As you get more proficient on a PC, pressing Ctrl+Z—the keyboard shortcut for Undo—eventually becomes an unconscious reflex. In fact, you can sometimes spot veteran Windows fans twitching their Ctrl+Z fingers even when they’re not near the computer—after knocking over a cup of coffee, locking the keys inside the car, or blurting out something inappropriate in a meeting.
Windows offers the mother of all Undo commands: System Restore. This feature alone can be worth hours of your time and hundreds of dollars in consultant fees.
The pattern of things going wrong in Windows usually works like this: The PC works fine for a while, and then suddenly—maybe for no apparent reason, but most often following an installation or configuration change—it goes on the fritz. At that point, wouldn’t it be pleasant to be able to tell the computer, “Go back to the way you were yesterday, please”?
System Restore does exactly that. It “rewinds” your copy of Windows back to the condition it was in before you, or something you tried to install, messed it up. Best of all, System Restore doesn’t change your files. Your email, pictures, music, documents, and other files are left up to date.
Tip
If your PC manages to catch a virus, System Restore can even rewind it to a time before the infection—if the virus hasn’t gotten into your documents in such a way that you reinfect yourself after the system restore. An up-to-date antivirus program is a much more effective security blanket.
In fact, if you don’t like your PC after restoring it, you can always restore it to the way it was before you restored it. Back to the future!
System Restore works by taking snapshots of your operating system. Your copy of Windows has been creating these memorized snapshots, called restore points, ever since you’ve been running it. When the worst comes to pass, and your PC starts acting up, you can use System Restore to rewind your machine to its configuration the last time you remember it working well.
Windows automatically creates landing points for your little PC time machine at the following times:
Once a day.
Every time you install a new program or a new device driver for a piece of hardware.
When you install a Windows Update.
Whenever you feel like it—for instance, just before you install a new component.
The central command center for the System Restore feature is the System Protection dialog box. Here are two good ways to open it:
Open the Start screen. Type restore and select Settings under the search box. In the search results, click “Create a restore point” (yes, even though you’re not creating one, you’re using one).
Right-click the lower-left corner of the screen; from the shortcut menu, choose System. In the resulting dialog box, click “System protection.”
Either way, you now see the dialog box shown in Figure 22-3.
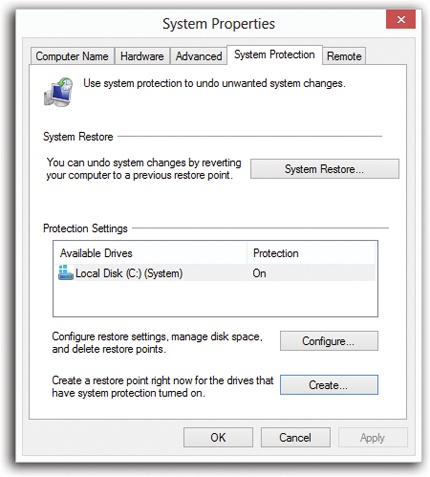
Figure 22-3. Here’s your command center for all System Restore functions. Its layout is, more or less, upside-down. For example, starting from the bottom of the box: Click the Create button to make a restore point right now, manually; click Configure to delete all restore points and limit disk space; click System Restore to perform the actual rewinding of your system. It probably goes without saying, but System Restore works only if the master System Protection switch is turned on. It’s hiding behind the Configure box shown here.
To create one of these checkpoints manually, open the System Protection tab on the System Properties dialog box (follow the steps above). At the bottom of that box, the Create button lets you create and name a new manual restore point. (Windows adds a date and time stamp automatically.)
Note
As you can imagine, storing all these copies of your Windows configuration consumes quite a bit of disk space. That’s why System Restore lets you limit how much of your drive is allowed to fill up with restore points. Click Configure in the System Protection tab of the System Properties dialog box (Figure 22-3); you get a slider that lets you cap the percentage of the drive that can be swallowed up with restore-point data. When your drive gets full, System Restore starts deleting the oldest restore points as necessary.
If something goes wrong with your PC, here’s how to roll it back to the happy, bygone days of late last week—or this morning:
1. Open the System Protection tab on the System Properties dialog box (Figure 22-3).
The steps are described on the previous pages.
2. Click System Restore. At the “Restore system files and settings” welcome screen, click Next.
The list of memorized restore points appears (Figure 22-4, top).
3. Look over the restore points; click the one you want to rewind to.
As you survey the restore points, try to remember when, exactly, your system went wonky. Double-click a restore point (or click “Scan for affected programs”) to help you figure out which apps and drivers will be affected if you go through with the restore (Figure 22-4, bottom).
3. Click Next.
You have one more chance to back out: Windows displays the date and time of the restore point, shows you which drives will be affected, gives you another chance to create a password-reset disk, and asks if you really want to go back in time.
4. Click Finish. In the confirmation box, click Yes.
Windows goes to town, reinstating your operating system to reflect its condition on the date you specified. Leave your PC alone while this occurs.
When the process is complete, the computer restarts automatically. When you log in again, you’re back to the past—and with any luck, your PC runs smoothly. (None of your emails or files are disturbed.)
If it didn’t work—if you only made things worse—then repeat step 1. At the top of the System Restore welcome screen, you’ll see an option called Undo System Restore. It lets you undo your undoing.
Or, of course, you can click “Choose a different restore point” if you think that maybe you didn’t rewind your PC far back enough and want to try again with a different restore point.
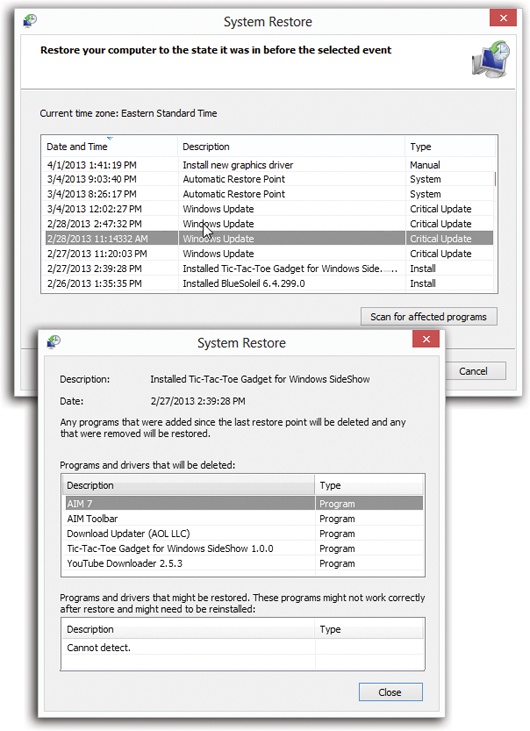
Figure 22-4. Top: You get to choose from a list of all the restore points Windows or you have made, anticipating just this moment. You’re shown the date and time of your most recent restore point, as well as why the restore point was created—for example, because you installed a new piece of software, or because you applied a Windows Update. That’s a clue as to which restore point you should use. Bottom: You can now see which programs will be affected by this system rewind.
You really shouldn’t turn off System Restore. It’s incredibly useful to hit rewind and get a smoothly running PC, even if you never do find out what the trouble was.
But if you’re an advanced power user with no hard drive space to spare—is there such a person?—open the System Protection tab of the System Properties box (shown in Figure 22-3). Click Configure, click “Disable system protection,” and click OK. (See the box on System Restore vs. Your Hard Drive for details.)
In the “Are you sure?” box, click Yes. That’s it. You’re flying without a net now, baby.