If you have high-speed Internet service, like a cable modem or DSL, you’re a very lucky individual. Not only do you get spectacular speed when surfing the Web or doing email, but you also have a full-time connection. You never have to manually connect or disconnect.
But you’d be nuts to confine that glorious connection to one PC. Share it! Make it available to the whole house!
Your broadband company probably supplied you with a router (probably both wireless and wired) that shares the Internet connection with more than one computer. If not, there are two ways to do it yourself.
As noted earlier, a router (a gateway in Microsoft lingo) is a little box, about $60, that connects directly to the cable modem or DSL box. It generally doubles as a hub, providing multiple Ethernet jacks to accommodate your wired PCs, plus WiFi antennas that broadcast to your wireless PCs. The Internet signal is automatically shared among all the PCs on your home network.
Internet Connection Sharing (ICS) is a built-in Windows feature that distributes a single Internet connection to every computer on the network. It’s like the way a smartphone’s tethering feature can distribute wireless Internet to nearby WiFi gadgets—but without the monthly fee. You just fire ICS up on the one PC that’s connected directly to your cable modem or DSL box—or, as networking geeks would say, the gateway or host PC.
But there’s a downside: If the gateway PC is turned off or goes into Sleep mode, nobody else in the house can go online.
Also, the gateway PC requires two network connections: one that goes to the cable modem or DSL box, and another that connects it to your network. Usually, that’s one Ethernet connection and one WiFi card. One connects to the Internet (for example, via a cable modem), and the other distributes the Internet signal to the other computers.
If you decide to use Internet Connection Sharing, start by making sure the gateway PC can already get onto the Internet on its own. Then:
Right-click the Network icon on your system tray; from the shortcut menu, choose Open Network and Sharing Center. Click the “Change adapter settings” link at the left side.
Now you see a window containing icons for every network connection. It’s probably one or two at most.
Right-click the icon of the connection you want to share; from the shortcut menu, choose Properties.
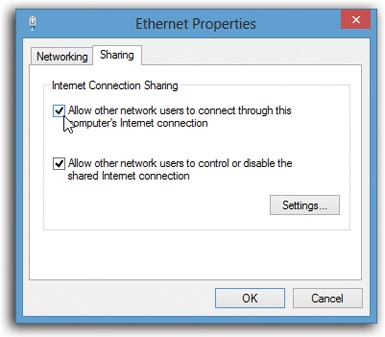
Authenticate if necessary. You wind up at the Properties dialog box shown in Figure 25-2.
Click the Sharing tab. Turn on “Allow other network users to connect through this computer’s Internet connection.”
If there’s no Sharing tab, it’s because you have only one kind of network connector (only WiFi, for example).
Now, the other computers on the network can share the gateway PC’s Internet connection, even if they’re running earlier versions of Windows, or even Mac OS X or Linux. In fact, they don’t need to be computers at all: You can use ICS to share your Internet connection with a video game console, a tablet, or a smartphone.
If the other computers can’t just hop onto the shared network as though it’s any other WiFi hotspot, you may have to adjust some of their settings, too. Follow these steps on the machines that will be using the shared connection (not the one you set up before):
Open the Start screen. Type options and select Settings under the search box. In the search results, select Internet Options.
The Internet Options dialog box opens.
Select the Connections tab. Select “Never dial a connection.” Click “LAN settings.”
Now the Local Area Settings dialog box appears.
Turn off all checkboxes and then hit OK. Restart all the computers.
And now the fine print:
Internet Connection Sharing doesn’t work with domain networks, DNS servers, gateways, or DHCP servers (you know who you are, network geeks).
The “receiving” PCs (the ones that will share the connection) can’t have static (fixed) IP addresses. (You’ll know if you have one, because you’re the one who set it up.)