Now suppose you’re not you. You’re your coworker, spouse, or employee. You’re using your laptop downstairs, and you want access to the stuff that’s in a shared folder on the Beefy Main Dell computer upstairs. Here’s what to do (the steps are the same whether the Public folder or any folder was shared):
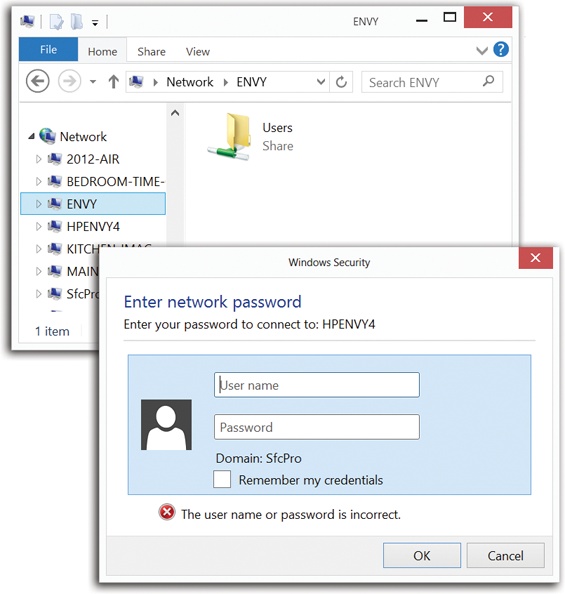
The navigation pane at left shows a Network heading. Click its flippy triangle, if necessary, to see icons for all the computers on the network (Figure 27-11, top). The same navigation pane is available in the Save and Open dialog boxes of your programs, too, making the entire network available to you for opening and saving files.
Figure 27-11. Top: The computers on your network are arrayed before you! Double-click the one you want to visit. Bottom: Supply your account name and password as it exists on the distant PC, the one you’re trying to access.
Tip
Alternatively, type network at the Start screen; press Enter to open the Network result in the results list.
If you don’t see a certain computer’s icon here, it might be turned off, or off the network. It also might have network discovery turned off; that’s the feature that lets a PC announce its presence to the network. (Its on/off switch is one of the buttons shown in Figure 27-7.)
And if you don’t see any computers at all in the Network window, then network discovery might be turned off on your computer.
Double-click the computer whose files you want to open.
FREQUENTLY ASKED QUESTION: Accessing Windows 8.1 from XP, Vista, Mac…
How do I access my Windows 8.1 PC from my non–Windows 8 machines?
Piece of cake. Turns out all versions of Windows use the same networking scheme, so you can share files freely among PCs using different Windows versions.
Once some files are shared (on any PC), here’s how to find them:
In Windows 7 or Windows Vista: Choose Start→Network.
In Windows XP or Windows Me: Choose Start→My Network Places.
In earlier versions: Double-click the desktop icon called Network Neighborhood or My Network Places.
On the Mac: Just look in the Sidebar of any Finder window in the Shared category. Open the Workgroup icon, if you see it, and then double-click the name of the computer you want. Enter your PC account’s name and password. (You’ll probably have trouble if your PC account doesn’t have a password.) The whole thing looks exactly like Figure 27-11.
Now you see icons that correspond to the computers on your network (including your own machine), much as shown in Figure 27-11. That should be all there is to it.
If you don’t see the Windows computers, it may because all the machines don’t have the same workgroup name. (A workgroup is a cluster of networked machines.) To change your Windows XP computer’s workgroup name to match, choose Start→Control Panel, click “Performance and Maintenance,” and then open System. Click the Computer Name tab, and then select Change.
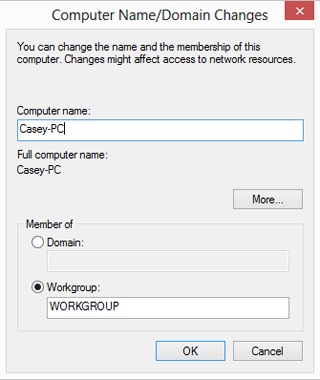
To change a Vista PC’s workgroup name, choose Start→Control Panel; click System and Maintenance; open System. Under the “Computer Name, Domain, and Workgroup Settings” heading, click Change Settings.
To change a Mac’s workgroup name, open
 →System Preferences→Network. Click
Advanced→WINS, and type right into the Workgroup box.
→System Preferences→Network. Click
Advanced→WINS, and type right into the Workgroup box.And to change your Windows 7/8 machine’s name, type rename into the Start screen or menu; click “Change workgroup name” under Settings. Click Change, and enjoy the box shown here.
If you’re on a corporate domain, you may first have to double-click your way through some other icons, representing the networks in other buildings or floors, before you get to the actual PC icons.
If you don’t have an account on the PC you’re invading—an account with the same name and password as you have on your own PC—then the Connect To box now appears (Figure 27-11, top).
Here, you have to fill the name and password of an account on the other computer. This, of course, is a real drag, especially if you access other people’s files frequently. Fortunately, you have two timesaving tricks available to you here.
First, if you turn on “Remember my credentials,” then you’ll never see this box again. The next time you want to visit the other PC, you’ll be able to double-click its icon for instant access.
Finally, if you’re trying to get to someone’s Public folder, and you don’t need to modify the files, but just read or copy them, you don’t need a password, ever. Just type guest into the “User name” box and click OK. You’ll have full read-only access. And here again, next time, you won’t be bothered for a name or password.
GEM IN THE ROUGH: Accessing Macs Across the Network
When it comes to networking, Macs are people, too.
Windows is perfectly capable of letting you rifle through a Mac’s contents from across the network. Here’s how to set that up (these instructions cover OS X 10.8, Mountain Lion.)
On the Mac, choose
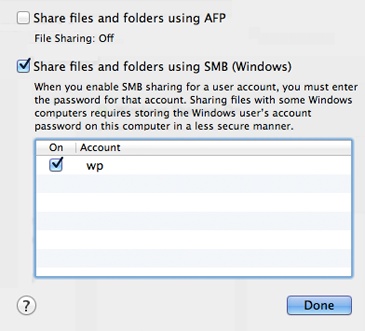
→System Preferences. Click Sharing, and then turn on File Sharing. Click Options.Now you see the dialog box shown here. Turn on “Share files and folders using SMB (Windows).” Then specify which Mac user accounts you want to be able to access; enter their passwords as necessary, and then click Done.
(Before you close System Preferences, you might notice that the line in the middle of the dialog box says: “Windows users can access your computer at smb://192.168.1.203.” Those numbers are the Mac’s IP address. You’d need it only if you decided to access the Mac by typing its UNC code [Extra Credit: Universal Naming Convention (UNC)] into your Windows address bar, like this: \\102.168.1.203.)
On the PC, proceed exactly as though you were trying to connect to another Windows PC. The Mac’s name shows up in the Network section of the navigation pane (left side of any Explorer window).
When you click the Mac’s name, you see the dialog box shown in Figure 27-11, bottom. Enter your Mac account name and password, and turn on “Remember my credentials” (so you won’t be bothered for a name or password the next time you perform this amazing act of détente). Click OK.
Now your Mac home folder opens on the screen before you. Feel free to work with those files exactly as though they were in a folder on your PC. Détente has never been so easy.
Tip
In the unlikely event that you want Windows to stop memorizing your password, open the Start screen. Type credential and select Settings under the Search box. In the search results, click Credential Manager. You see a list of every name/password Windows has memorized for you. You can use the options here to add a new memorized name/password, or expand one of the existing items in the list to remove it (“Remove from vault”) or edit it.
Click OK.
If all went well, the other computer’s window opens, presenting you with the icons of its shared folders and disks.
Tip
Working with the same shared folders often? Save yourself a lot of time and burrowing—make a desktop shortcut of it right now!
Once you’ve opened the window that contains the shared folder, grab your mouse. Right-click the shared item and drag it to the desktop. When you release the mouse, choose “Create shortcuts here” from the shortcut menu. From now on, you can double-click that shortcut to open the shared item directly.
Once you’ve brought a networked folder onto your screen, you can double-click icons to open them, drag them to the Recycle Bin, make copies of them, and otherwise manipulate them exactly as though they were icons on your own hard drive. (Of course, if you weren’t given permission to change the contents of the shared folder, you have less freedom.)
Tip
There’s one significant difference between working with “local” icons and working with those that sit elsewhere on the network. When you delete a file from another computer on the network (if you’re allowed to do so), either by pressing the Delete key or by dragging it to the Recycle Bin, it disappears instantly and permanently, without ever appearing in the Recycle Bin.
You can even use Windows’ Search feature to find files elsewhere on the network. This kind of searching can be very slow, however.
For hard-core nerds, that business of double-clicking icons in
the Network folder is for sissies. When they want to call up a
shared folder from the network, or even a particular document
in a shared folder, they just type a special
address into the address bar of any folder window, or even Internet
Explorer—and then press the Enter key. You can also type such
addresses into the Run dialog box (press  +R).
+R).
It might look like this: \\laptop\shared documents\salaries 2014.doc.
Tip
Actually, you don’t have to type nearly that much. The AutoComplete feature may propose the full expression as soon as you type just a few letters of it.
This path format (including the double-backslash before the PC name and a single backslash before a folder name) is called the Universal Naming Convention (UNC). It was devised to create a method of denoting the exact location of a particular file or folder on a network. It also lets network geeks open various folders and files on networked machines without having to use the Network window.
You can use this system in all kinds of interesting ways:
Open a particular folder like this: \\computer name\folder name.
You can also substitute the IP address for the computer instead of using its name, like this: \\192.168.1.44\my documents.
You can even substitute the name of a shared printer for the folder name.
As described later in this chapter, Windows can even access shared folders that sit elsewhere on the Internet (offline backup services, for example). You can call these items onto your screen (once you’re online) just by adding http: before the UNC code and using regular forward slashes instead of backward slashes, like this: http://Computer Name/Folder Name.