All over the world, frequent travelers connect to distant homes or offices using virtual private networking. VPN is a fancy way of saying, “Your remote computer can become part of your host network over the Internet.”
Note
To make VPN work, both computers require Internet connections; that much is obvious.
The one at home (or at the office) is probably all set. You should, however, put some thought into getting the laptop online. You’ll have to find wireless hotspots, for example, or, if you do this a lot, you can sign up for a cellular modem plan or even a dial-up account.
What corporations like most about VPN is that it’s extremely secure. The information traveling between the two connected computers is encoded (encrypted) using a technology called tunneling. Your connection is like a reinforced steel pipe wending its way through the Internet to connect the two computers.
To create a VPN connection, the host computer has two important requirements. If you’re VPNing into a corporation or a school, it’s probably all set already. Otherwise:
On the other hand, the remote computer—your laptop—doesn’t have any such requirements. It just needs an Internet connection.
Note
Several of the remote-connection methods described in this chapter require that your home-base PC have a fixed, public IP address. (An IP address is a unique number that identifies a particular computer on the Internet. It’s made up of four numbers separated by periods.)
If you’re not immediately nodding in understanding, murmuring, “Ahhhhh, right,” then download the bonus document available on this book’s “Missing CD” at www.missingmanuals.com. The free PDF supplement you’ll find there is called “Getting a Fixed, Public IP Address.”
In general, the big network bosses who expect you to connect from the road have already set up the VPN software at their end. They may even have set up your laptop for you, so that dialing in from the road requires only one quick click.
But if not—if you want to set up your remote PC yourself—here are the steps. §As usual, there are two ways in: from the Control Panel, or in TileWorld.
1. In the Charms bar, hit Settings, then “Change PC settings,” then Network, then “Add a VPN connection.”
If you prefer to work at the desktop, open the Control Panel. Type VPN into the Search box and choose “Set up a virtual private network (VPN) connection” from the results.
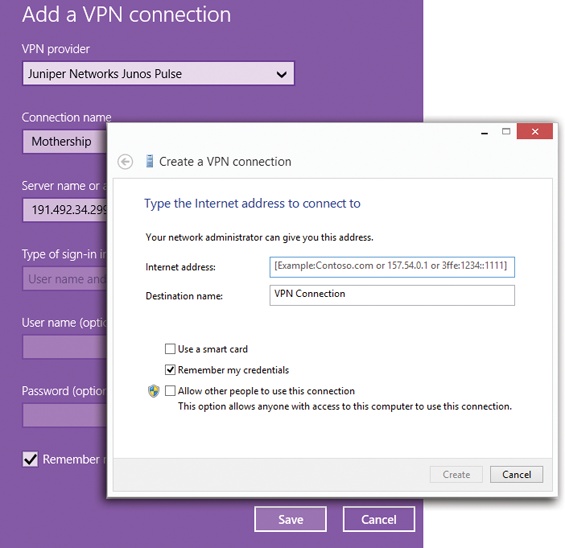
Either way, you wind up with one of the dialog boxes shown in Figure 28-7.
Figure 28-7. Here’s where you set up your VPN connection, whether you began your adventure in TileWorld (left) or the desktop (right). You get more options in the desktop version. For example, “Use a smart card” is relevant only if some network administrator has given you a security card to use every time you connect to the Corporation. “Allow other people to use this connection” means “other account holders on this machine.” All three of the checkboxes here are, in the end, security features.
2. Fill in the blanks.
You’ll need to know the host name or registered IP address of the VPN host—that is, the computer you’ll be tunneling into.
If you’re connecting to a server at work or school, your system administrator can tell you what to type here. If you’re connecting to a computer you set up yourself, specify its public IP address. (See the Note on Note.)
This is not the private IP address on your home network, and definitely not its computer name (despite the fact that the New Incoming Connection Wizard told you that you would need to use that name); neither of these work when you’re logged into another network.
It doesn’t matter what you type as the Destination or Connection name; this is just for your reference.
4. Click Save or Create.
You might have noticed, if you’re among the technically inclined, that you did not have to specify things like authentication protocols and tunneling setups. Windows 8 can figure that stuff out all by itself, saving you the technical bushwhacking.
Now, none of what you’ve achieved so far has actually gotten you online. All you’ve done is create a VPN connection—a stored, clickable icon for connecting to the mother ship. When the time comes that you want to make the actual connection, read on.
Open the Charms bar. Select Settings. Select the network icon (for example, the WiFi icon) at the bottom left.
You now see something like Figure 28-8.
Click your VPN’s name and then click Connect.
If you’ve done this before, and you turned on “Remember my credentials” when you created the VPN connection, you hop directly onto the distant network. You’re in!
If not, you’re asked to enter your name and password—take this final step:
Type your user name, password, and, if required by the network administrator, the domain name. Then click OK.
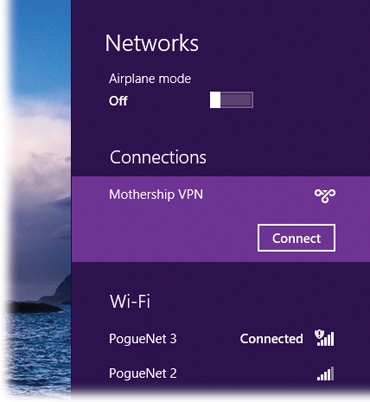
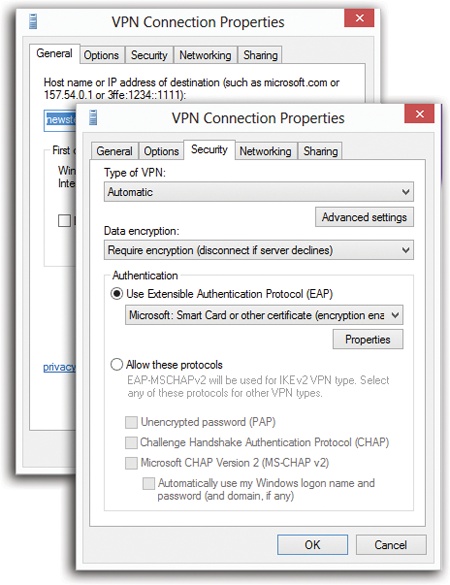
Figure 28-9. The VPN Connection Properties dialog box lets you tweak every VPN variable until you finally get the thing to work. By the way: These instructions describe Windows 8.1’s built-in VPN software. But more often than not, you’ll be given software from Cisco or your employer/school to use instead. In that case, pretend you never read these pages.
When you make the VPN connection, you’ve once again joined your home or office network. You should feel free to transfer files, make printouts, and even run programs on the distant PC.
When you want to disconnect, right-click the
 or
or  icon in your notification area, click the VPN
Connection from the list that pops up, and then choose
Disconnect.
icon in your notification area, click the VPN
Connection from the list that pops up, and then choose
Disconnect.
(You can also disconnect using the Network and Sharing Center.)
If the VPN connection doesn’t work the first time—it hardly ever does—you can make some adjustments. Figure 28-9 shows how to do it in the Control Panel; in TileWorld, just re-open the panel of PC Settings where you created the VPN connection in the first place, tap its name, and tap Edit. Keep your company’s highly trained network nerd nearby to help you.