Chapter 6
Commenting and Direct Messaging
IN THIS CHAPTER
 Thinking about what you should share on Instagram
 Using links to share posts
 Sending direct messages
 Getting, reviewing, and responding to comments
 Reporting inappropriate comments
This chapter tells you all about sharing your Instagram photos and videos. What’s more, you’ll find out how to encourage people to comment on your posts and how to send a direct message to a commenter.
You start by thinking about what you should and shouldn’t share. Next, you discover how to use a link to invite other Instagram users to comment on your posts as well as how to send a direct message to other users. And if you conclude that a comment is inappropriate, you can use Instagram’s built-in reporting tool to send feedback and information to the Instagram staff so they can investigate.
Before You Share, Stop and Think
Instagram provides guidelines that protect and nurture not only the larger Instagram community but also you and your business. Every social network, Instagram included, presumes that when you use its service you agree to its terms of use and any other guidelines that social network may set.
As with any social network, you need to be careful about what you post on Instagram because — as you’ve probably heard many times before — what’s posted on the Internet stays on the Internet … forever.
When you share photos and videos on Instagram, you strive to promote your business in the best possible light. However, you must also abide by Instagram's Community Guidelines.
If you run afoul of the Community Guidelines, you may be reported to Instagram. The company works hard to make sure that its users are posting photos and videos that meet its standards. If yours don’t, Instagram might delete your post, disable your account, or put in place what it ominously calls “other restrictions.”
 To read the latest version of the guidelines, visit the Community Guidelines page at
 https://help.instagram.com/477434105621119/.
Following are the most important points in the Community Guidelines:
- Share only photos and videos that you’ve taken. If you’re using someone else’s photo or video, be sure to get permission in writing, either online (such as in an email message) or on paper (such as in an Adobe Acrobat document.)
- Don’t use services that allow you to buy followers or run automated tasks to collect likes, followers, or shares. Instagram considers such tactics marketing spam and will shut down accounts to curb the problem.
- Post photos and videos that are appropriate for a general audience. Instagram doesn’t allow nudity except in specific cases. In addition, don’t post graphic photos or videos.
- Follow the law. This point should be self-evident. If it isn't, perhaps you should follow Obi-Wan Kenobi’s advice and go home to rethink your life.
Sharing on Other Social Media Sites
It’s easy to share photos and videos on Instagram as well as from Instagram to Facebook, Twitter, and Tumblr. We describe how do those tasks in Chapter 4.
Of course, many other social-networking sites are available. In this section, you learn how to create a link that you can embed into other social network posts or email messages.
Copying and pasting a link to another social network
Instagram’s capability to share directly with other social networks is limited to Facebook, Twitter, and Tumblr. But other networks, especially business networks such as LinkedIn, are also worthy of your Instagram posts.
Fortunately, Instagram makes it easy for you to get a web address (URL) link to your post that you can copy and paste to other social networks. Here’s how:
On the Instagram home screen, tap your profile icon, in the lower-right corner.
The Profile screen appears.
- Swipe up and down in your Profile screen, if necessary, to find the posted photo or video you want to link to.
Tap the photo thumbnail or video frame.
The Post screen appears. If you tapped a video frame, the video plays in the Post screen automatically.
Tap the menu icon (three dots), which appears at the top right.
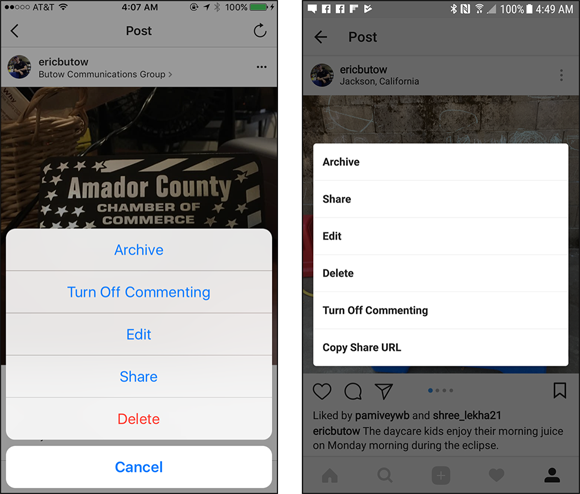
The menu shown in Figure 6-1 appears.
Tap Share (iPhone or iPad users) or Copy Share URL (Android users).
The Share Post (iPhone or iPad) or Share (Android) screen appears.
iPhone and iPad users, tap Copy Link.
A message appears for a few seconds, telling you that the link has been copied to the clipboard. Now you can paste the link into a post on another social-networking website or in an email message, as shown in the next section.
To view the post before you send it, click or tap the photo or video. On a smartphone or tablet, you see the original Instagram post. On a computer, you see the post on the Instagram website in a separate browser tab.
Embedding your photo or video on a web page
If you want to share photos or videos on a web page or in a blog post, you can embed them from the Instagram website on your computer.
When you embed a photo or video, you can click or tap the photo or video to open the original post in the Instagram app on your smartphone or tablet.
If you’re using a web browser on your computer, the original Instagram post will appear in a separate browser tab. (You may need to log into Instagram to view the post.) When you finish viewing the original post, close the tab to return to the web page you were viewing.
To embed a photo or video, do the following:
- On your computer, log into the Instagram website if you haven’t done so already.
Click the profile icon (silhouette of a person), in the upper-right corner.
The Profile screen appears.
Click the photo or video you want to share.
The screen displays your photo or video and caption, as well as any comments and likes.
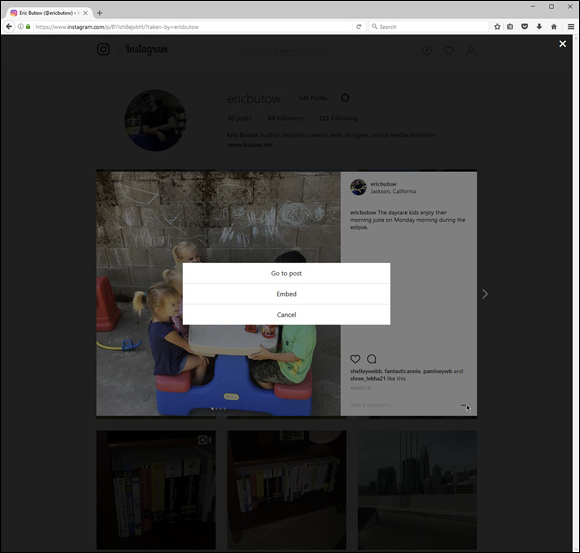
Click the menu icon (three dots), at the bottom right of the image, and then click Embed (see Figure 6-2).
If you decide that you don’t want to embed your code, close the window by clicking anywhere outside the pop-up window or by pressing the Esc key.
- If you don’t want a caption included with the photo or video, deselect (clear) the Include Caption check box.
- Click the Copy Embed Code button.
Now you can use your favorite website design program to paste the embedded code in a blog post or on a web page.
 When you embed one of your Instagram photos or videos on a website or in a blog post, anyone who has access to that website or blog post will be able to see your photo or video.
Sending Photos and Videos Privately
You’re not restricted to posting photos and videos to your profile. You can use the Instagram Direct service to send a private message to a single follower or a group of 2 to 15 followers.
You can send the following items in an Instagram Direct message:
- Photos or videos taken with your smartphone or tablet camera
- Photos or videos uploaded to your smartphone or tablet
- A plain old text message
- A hashtag, which your recipient can tap or click to view posts that contain that hashtag
- A location, which your recipient can tap or click to see posts that include that location
Excited? Even a little? In this section, you discover how to send an Instagram direct message on the iPhone and iPad, on your Android smartphone or tablet, or in the Windows app.
Replying to a direct message by sending a photo
If you’re already having a private message conversation in Instagram Direct, you can respond by sending a photo (sorry, no videos) to one or more of your followers. Here's how:
 Tap or click the Instagram Direct icon, which appears in the upper-right corner (and is shown in the margin).
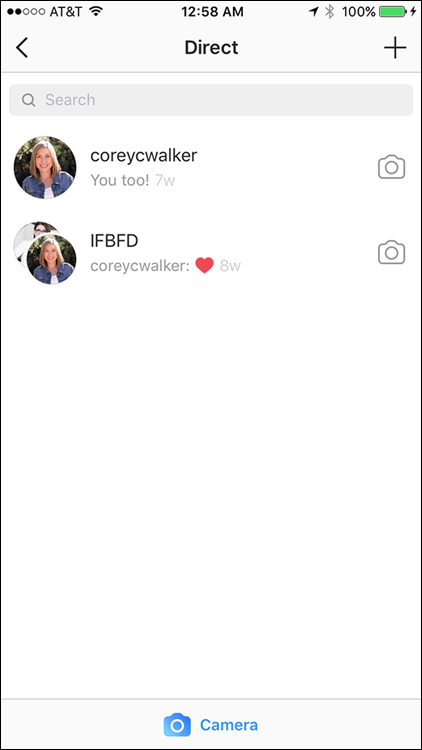
The Direct screen appears, as shown in Figure 6-3. The most recent direct message conversations appear in the list, with the most recent conversation at the top.
Tap or click the camera icon to the right of the user name in the list.
The Camera screen appears with the front camera active. In the Windows app, your webcam becomes active so you can take a photo of yourself. You may be prompted to enable access to your camera or microphone or both.
 Take a photo by tapping or clicking the white shutter button at the bottom of the screen or window.
You can switch between the front and back camera on your iPhone, iPad, Android smartphone, or Android tablet by tapping the switch icon (shown in the margin).
- Tap Send.
Starting a new conversation by sending a photo
When you want to start a new conversation, you don’t have to type a message. Instead, you can take a photo and send it to the other person. You can even type a brief caption that will appear on top of your photo.
In the Direct screen, tap or click Camera.
If you need to get to the Direct screen, first tap or click the Direct icon from the Instagram home screen or window.
Take a photo by tapping or clicking the white shutter button.
The switch cameras icon appears to the right of the white button so you can switch between the front and rear cameras, if necessary.
- If you want to add text in front of your photo, tap or click the text (Aa) icon. Type your message, and then tap Done.
Tap or click Next.
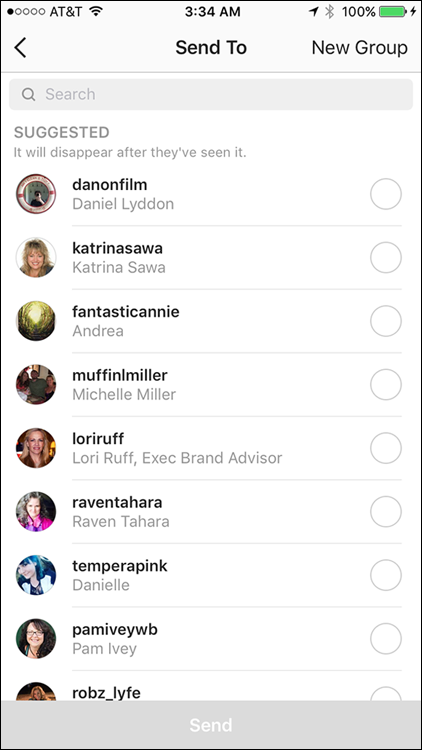
The Send To screen appears, as shown in Figure 6-4.
Select your recipients by swiping in the recipient list and then tapping or clicking one or more usernames.
After you tap or click a username, a blue circle with a check mark appears to the right and the username appears in the To box above the list.
 You can search for a recipient by tapping the Search box above the list and typing your search terms. As you type, the usernames that most closely match your terms appear in the results list. When you find the name of the recipients you’re looking for, tap or click their names in the list.
Tap or click Send.
The Direct screen appears and contains the message you sent to the recipient at the top of the conversation list.
Starting a new text conversation and adding a photo
If you prefer to start your conversation with a text message but also want to take a photo or upload a photo or video from your Camera Roll or Gallery, Instagram makes it easy for you to do that, too. Follow these steps:
- If the Direct screen isn’t open, tap or click the Instagram Direct icon in the upper-right corner.
Tap or click the add (+) icon.
The New Message screen appears.
Swipe or scroll in the list to find the recipients, and then tap or click their usernames.
A blue check mark appears to the right of each recipient name after you tap or click it. You can also search for one or more recipients as described in the preceding section.
- Tap or click Next.
- If you're an iPhone, an iPad, or a Windows user and have selected more than one recipient, do the following:
- If you want to name this group (so you can send future private messages to all followers in the group), tap the Name This Group box to open the keyboard. Type your name, and then tap the keyboard's Done key.
- If you don’t want to name the group, tap or click the X.
If you want to take a photo on your camera (or webcam if you’re using the Windows app), tap or click the camera icon in the lower-left corner of the screen (or window).
Follow the instructions for taking a photo in the preceding section.
iPhone, iPad, or Android users: If you want to upload a photo or video from your Camera Roll or Gallery:
- Tap the mountain range icon. The Camera Roll or Gallery window appears.
- Swipe in the Camera Roll or Gallery and then tap the thumbnail of the photo or video you want to add. Your selected photo or video appears in the window. If you selected a video, the video plays continuously.
- Upload the photo or video to your message by tapping the blue up arrow at the bottom of the screen.
If you change your mind, close the window by tapping the back icon (<).
To write a message, tap the Write a Message box, type your message, and then tap Send.
Your message appears in the Message screen.
Return to the Direct screen by tapping or clicking the < icon.
The message you just sent appears at the top of the list. Each message entry in the list shows you the recipients or group name, followed by a brief summary of the last message in the conversation and how long ago the last response was sent.
View your message on the screen by tapping the message entry. You can also send a follow-up photo to the recipient by tapping the camera icon to the right of the message or group recipient’s name and then taking a photo in the camera viewer screen.
- Return to the Instagram home screen by tapping or clicking the < icon.
 Direct messages are private, and Instagram means it — you can’t do several things with a direct message that you can do with a public message:
- You can’t share photos or videos sent with Instagram Direct to other social networking websites.
- Any hashtags or locations you add to your private message aren’t searchable in Instagram.
- Your messages won’t appear in the feed screen or in your profile.
Resuming a previous conversation
If you’ve had a previous conversation with one or more recipients, you can tap the individual or group name in the Direct screen to view your past conversation(s) and write a new message to start a new conversation. The Message screen appears and you see all the text, photos, and videos you sent previously to that recipient or that group.
Swipe or scroll to view your entire conversation. You can also type a new message, as described previously.
Garnering Comments
After you post a photo or video, any of your followers can comment on it. In this section, we describe two tried-and-true methods to encourage your followers to respond: Include a caption and mention your followers.
Including a caption
A caption adds context to your video and lets people know what they’re seeing. If you don’t add a caption, your viewers might be confused, and that reflects badly on your business. For example, if you show a photo of your new product but you don’t tell viewers what it is and why it’s helpful, they may think you don’t know what you’re doing and you’ll be left wondering why you’re not getting any attention.
After you create a post and edit your photo or video, you add the caption in the New Post (iPhone or iPad) or Followers (Android) screen.
Do you need more details? Bookmark this page and flip to the section on enriching photos in Chapter 4. The information about adding captions to photos applies also to videos.
Instagram truncates all captions after about three lines of text. If there’s more text to read, a More link appears at the end of the truncated text. To read the entire caption, you have to tap or click the link.
 How much text should be in your caption? It’s generally a good idea to communicate too much rather than too little, so consider writing one to three short paragraphs. Make sure that the first few lines are enticing enough that your viewer will want to tap or click the More link and read your entire caption.
Mentioning your followers
When one of your followers posts a photo or video, you can leave a like by tapping or clicking the heart icon to the right of the photo or video. To really get a follower’s attention, however, you need to write a comment that includes the person's username preceded by the @ symbol. For example, you might type this:
I really like your new business cards, @sideshowbob!
After you mention someone in a comment, that person will receive a notification in his or her feed. And perhaps the person you complimented will be more interested in both finding your latest posts and commenting on them. That, in turn, increases your profile’s visibility to other Instagram users when they search for new and interesting profiles.
Reviewing Your Comments
When you get a comment or a like, a notification appears in your feed. You can see how many comments and likes you have for a post by tapping the profile icon in the lower-right corner of the Instagram home screen, swiping until you see the thumbnail of the photo or video you posted, and then tapping the image.
Now you see
- The Photo screen if your post contains only one photo
- The Post screen if your post contains more than one photo
- The Video screen if your post contains a video
Likes and comments appear below the photo or video. Tap one of the comments or tap the comment icon (cartoon bubble) below the photo or video to open the Comments screen shown in Figure 6-5.
If you want to like the comment without replying to it, tap the like icon (white heart) to the right of the comment. After you tap the icon, the heart turns red and one more like appears for the comment. Return to the Photo, Post, or Video screen by tapping the back icon (<) in the upper-left corner.
 If you want to view all your notifications, tap the heart icon at the bottom of the Post, Photo, or Video screen. Then tap the You tab at the top of the Notifications screen if the tab isn’t already active. You’ll see as many as 100 of your most recent notifications as you swipe in the list. You can view a user’s profile by tapping the username in a notification (the username is in bold).
Deciding to respond or delete
You can reply to a comment in two ways, depending on whether you’re using the iPhone or iPad, an Android smartphone or tablet, or a computer running Windows.
 You can’t delete or respond to comments on the Instagram website, though you can add another comment preceded by @name, where name is the username of the person you’re replying to.
iPhone, iPad, and Windows users
If you're using an iPhone, an iPad, or a Windows PC, you can reply to a comment by tapping (or clicking) Reply below the comment.
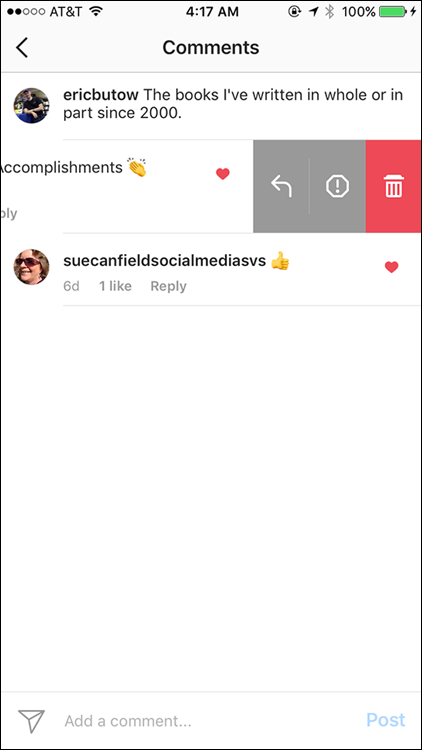
A second way to reply is to use the comment options. iPhone and iPad users tap and hold down on the comment and then swipe left to display the options shown in Figure 6-6. Windows users should click and hold down on the comment and then move the mouse pointer to the left.
There are three options, from left to right:
- Left arrow: Reply to the commenter.
- Exclamation mark: Report the commenter to Instagram. (You find out more about reporting commenters later in this chapter.) If you delete your own comment, the exclamation mark doesn’t appear in the menu. You can report only one commenter at a time.
Trash can: Delete the comment.
 After you delete a comment, a red bar appears at the top of the Comments screen so you can undo the deletion. If you don’t tap the bar within five seconds, the comment is deleted permanently.
If you want to close the comment menu without making any changes, tap and hold down on the comment to the left of the menu and swipe to the right. Windows users should click and hold down on the comment and then move the pointer to the right.
When you reply to the commenter using either method (tapping Reply or tapping the left arrow in the comment options), a comment area appears, with the username of the commenter entered automatically. Now you can type your reply and then tap (or click) Post to the right of the comment area.
Have you changed your mind about writing a reply? Tap (or click) the back icon (<) in the upper-left corner of the screen and you’ll return to the Photo screen.
Android smartphone and tablet users
Android smartphone and tablet users can reply to a comment by tapping Reply below the comment. The comment area appears with the commenter’s username entered automatically. After you type your comment, tap the blue check mark button to the right of the comment area or tap the Send key on the keyboard.
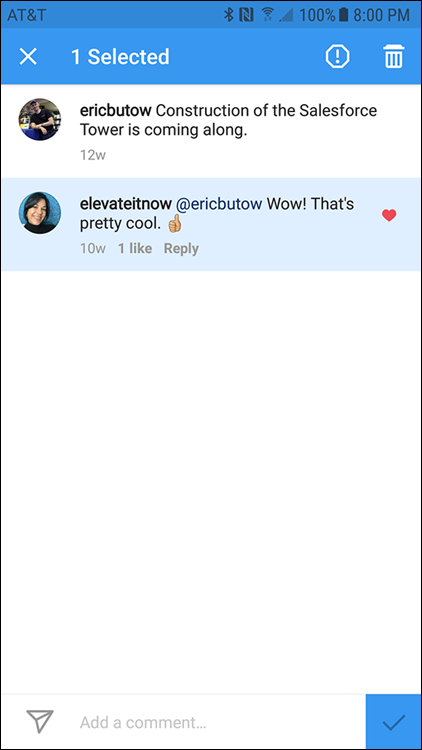
If you want to one or more comments — either your comments or someone else's comments — tap the comment(s). A blue menu bar appears at the top of the screen (see Figure 6-7) that contains the following icons you can tap:
- X: Close the menu bar without making any changes.
- Exclamation point: Report the commenter. (You learn more about reporting commenters later in this chapter.) If you tap more than one comment or you delete your own comment, the exclamation mark doesn’t appear in the menu. You can report only one commenter at a time.
Trash can: Delete the comment(s).
 After you delete a comment, a red bar appears at the top of the Comments screen so you can undo the deletion. If you don’t tap the bar within five seconds, the comment is deleted permanently.
You can close the menu bar by tapping all the selected comments to deselect them.
Mac and website users
Mac users can use only the Instagram website. If you’re using a Mac, another computer, or another device to access the website, you can delete only comments written by someone else — not your own comments.
Here’s how to delete a comment:
- Click or tap on the profile icon in the upper-right corner of the web page.
- Scroll or swipe until you see the thumbnail of the photo or video that contains the comments.
Click or tap the thumbnail.
The list of comments appears.
Click or tap the X to the right of the comment, and then tap Delete Comment.
The comment disappears from the list.
Reporting Commenters When All Else Fails
Instagram asks that you resolve disputes between you and another person who posts a photo, video, or comment that you think may violate Instagram’s Community Guidelines. For example, if someone's comment contains inaccurate information about you, you can post a comment or send a private Instagram Direct message and ask the commenter to remove the comment.
If the commenter won’t cooperate or the comment is clearly a violation of the Community Guidelines (such as a threat of violence), Instagram strongly recommends that you don’t escalate the situation yourself. Instead, report the user to Instagram and have Instagram staffers review the situation.
 If you refuse to heed Instagram’s warning and decide to attack the commenter with nasty comments of your own, you may find yourself in trouble if the commenter reports you for harassment.
Reporting a commenter
Before you report a commenter, review the latest Community Guidelines at https://help.instagram.com/477434105621119/?helpref=hc_fnav. If you still believe the commenter must be reported to Instagram for further action, you can use Instagram’s built-in reporting tools.
 You can report a user only from your iPhone, iPad, Android smartphone or tablet, or the Windows app. You can’t report a user from the Instagram website.
Reporting from an iPhone, an iPad, or the Windows app
If you’re reading comments on your iPhone, iPad, or in the Windows app and you come across a comment that violates the Community Guidelines, tap (or click) and hold down on the comment in the list and then swipe (or drag) to the left.
The gray report button appears to the right of the comment. Tap (or click) the button to open the menu at the bottom of the screen, and then select the Spam or Scam option or the Abusive Content option.
If you select Spam or Scam, the menu closes and the comment disappears from the Comments screen so you can continue to read comments. When you tap (or click) Abusive Content, the Report Comment screen opens. You can decide how to report the comment and take any additional steps or get more information. For example, if you choose I Don’t Like the Comment, the Blocking People page appears so you can learn how to block commenters.
Reporting from an Android smartphone or tablet
When you see a comment on your Android smartphone or tablet that you think violates the Community Guidelines, tap and hold down on the comment in the list.
The comment gets a light blue background, and a blue bar at the top of the screen tells you that the comment is selected. Tap the exclamation point to open the menu, and then tap one of the reporting options: Spam or Scam, or Abusive Content.
When you tap Spam or Scam, the menu closes and the comment disappears. Now you can get back to reading other comments. When you tap Abusive Content, the Report Comment screen opens so you can decide how to report the comment and take any additional steps or get more information. For example, if you tap This Comment Shouldn’t Be on Instagram, you see a list of reasons that you can choose from, such as nudity or pornography.
Blocking a commenter
If a commenter is obnoxious, that alone isn’t a reason to report the commenter to Instagram but you can block the commenter. Then you no longer have to read anything from that user again. As on other networking sites such as Facebook and LinkedIn, Instagram doesn’t tell users that they’ve been blocked.
 You can block a user only in the Instagram app on your smartphone or tablet. You can’t block a user on the Instagram website.
Here’s how to block a user:
In the comments below the photo or from the Comments screen, tap the username of the commenter.
The username is the first text you see in the comment and is in bold text.
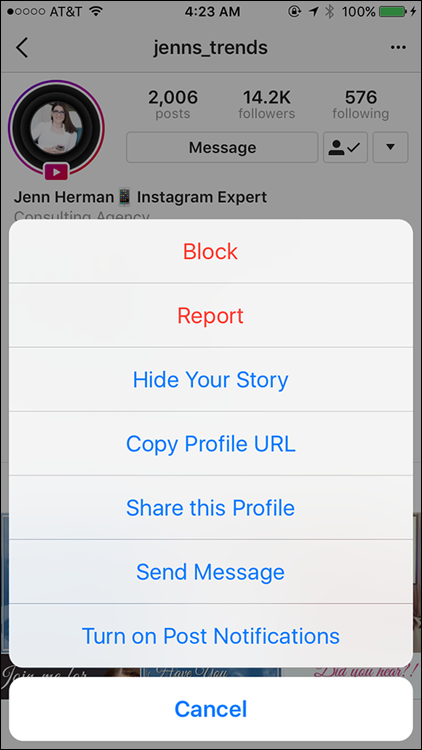
In the commenter’s profile page, tap the three dots in the upper-right corner of the screen.
The menu shown in Figure 6-8 appears.
- Tap Block.
Tap or click the < icon to return to the Comments screen. The blocked user's comments no longer appear on the screen. To unblock someone, follow the same steps, except tap Unblock in Step 3.
 Thinking about what you should share on Instagram
 Using links to share posts
 Sending direct messages
 Getting, reviewing, and responding to comments
 Reporting inappropriate comments
 To read the latest version of the guidelines, visit the Community Guidelines page at
 Tap or click the Instagram Direct icon, which appears in the upper-right corner (and is shown in the margin).
 Take a photo by tapping or clicking the white shutter button at the bottom of the screen or window.
 You can search for a recipient by tapping the Search box above the list and typing your search terms. As you type, the usernames that most closely match your terms appear in the results list. When you find the name of the recipients you’re looking for, tap or click their names in the list.
 Direct messages are private, and Instagram means it — you can’t do several things with a direct message that you can do with a public message:
