Chapter 4
Taking and Posting Great Photos
IN THIS CHAPTER
 Taking a photo
Using the photo-editing tools
Adding descriptions and more
Creating a post with multiple photos
Now that you have all your Instagram ducks in a row, it’s time for those ducks to start walking around … and take some photos.
In this chapter, you find out how to take photos with Instagram, use editing tools to make your photos look their best, and then share photos stored on your iPhone, iPad, or Android smartphone or tablet with your followers and on other social networks.
 You can upload photos only in the Instagram app on your smartphone or tablet.
All figures in this chapter were taken using the iPhone app, because that’s Instagram’s native platform. Don’t worry, Android users — we note any differences between the iPhone and Android apps.
Taking Your Best Shot
Before you can post a photo on Instagram, you need to tell the app where to get the photo. In this section, we cover taking a photo. For details on selecting from your existing photos, see the “Uploading Photos from Your Camera Roll” section, later in the chapter.
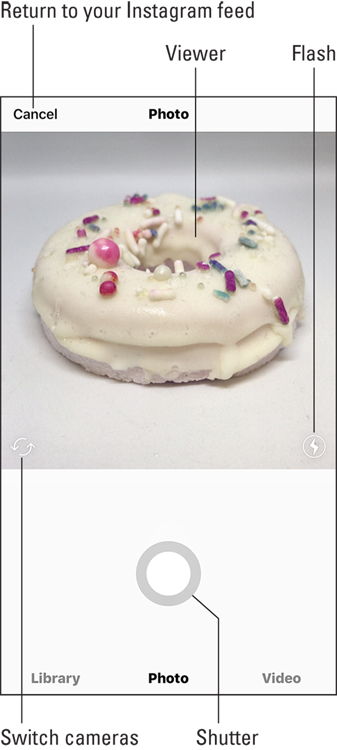
When you first log in to Instagram, you'll see your feed on the screen. Tap the + icon at the bottom of the screen. When prompted, allow Instagram access to your phone’s camera. Next, you'll see the Photo screen shown in Figure 4-1.
The good news is that you have to go through this process only once. The next time you open Instagram and tap the + icon, you won’t have to enable camera access.
Note the following elements in the Photo screen:
- The viewer appears in the top part of the screen.
- The switch cameras icon (two circular arrows) is in the bottom-left corner of the viewer. Tap the icon to switch between your smartphone’s front and back cameras.
- The flash icon (lightning bolt in a circle) appears in the bottom-right corner of the viewer. Tap the flash icon to toggle the following flash modes:
- Off: This mode is the default. The icon circle appears hollow.
- On: The circle is white and the lightning bolt appears hollow.
- Auto-detect: The circle is white with an A inside.
- The shutter button is the large gray circle in the bottom half of the screen.
- The Cancel button, in the upper-left corner, returns to your Instagram feed.
When you’re ready to take a photo, tap the shutter button. Your phone makes a camera shutter sound, as it does when you use the phone’s Camera app.
Improving Your Best Shot
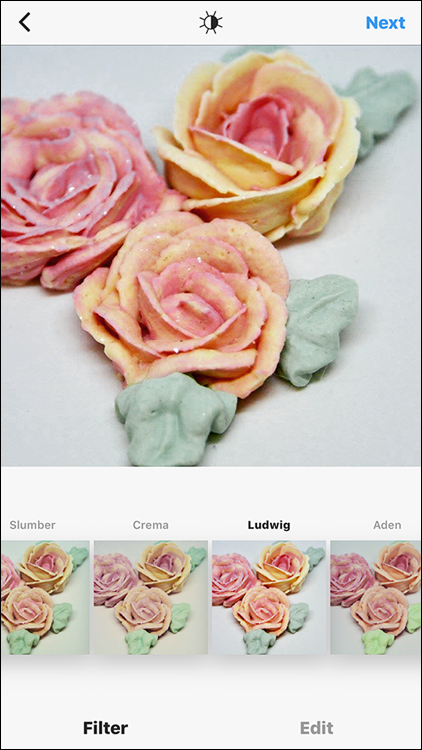
The photo you’ve just taken appears in the viewer of the Filter screen, as shown in Figure 4-2. The screen contains the following four sections, from top to bottom:
- The top menu bar, with a < (back) icon on the left, the Lux icon in the center (which you learn about later in this chapter), and the Next link on the right
- The viewer, which displays your photo
- A row of filter thumbnail images so you can see what your photo will look like with a filter applied
- The bottom menu bar, with a Filter menu option (selected by default) and the Edit option
 Not interested in editing your photo? Simply tap the back icon in the upper-left corner to save your photo and take a new one, if you want.
Applying a filter
Below your photo in the viewer is a row of filters. Each filter includes a thumbnail image so you can see the filter's effect on your photo.
Swipe from right to left in the row of thumbnail images to view all 23 filters, from Clarendon to Nashville. (Normal is the default image, without a filter.) Tap a filter thumbnail image, and the photo in the viewer changes to show you the photo with that filter applied.
To return to the original photo, tap the Normal thumbnail (refer to Figure 4-2). To continue processing the photo with a filter, either tap Edit at the bottom-right corner of the screen to edit your photo further, or tap Next in the upper-right corner of the screen to add a description to your photo. (You learn how to add a description in the “Enriching Your Photo” section, later in this chapter.)
What happens when a filter is not quite to your liking and you'd like to tweak it? You can change the intensity of any filter (except Normal) by tapping the filter thumbnail image again. A slider appears; move it to the left and right to change the intensity. The photo in the viewer changes to reflect the selected intensity. The default intensity for each filter is 100. (And yes, we checked each one.) When you've set the intensity to just the right amount, tap Done. If you're still not satisfied and want to return the photo to its original intensity, tap Cancel.
Keep in mind that any filter settings will revert to the default after you leave this screen.
If you want to see how the photo with a filter compares to the original photo, tap and hold down on the viewer to view the original photo. Release your finger to see the photo with the applied filter.
Changing the order of filters
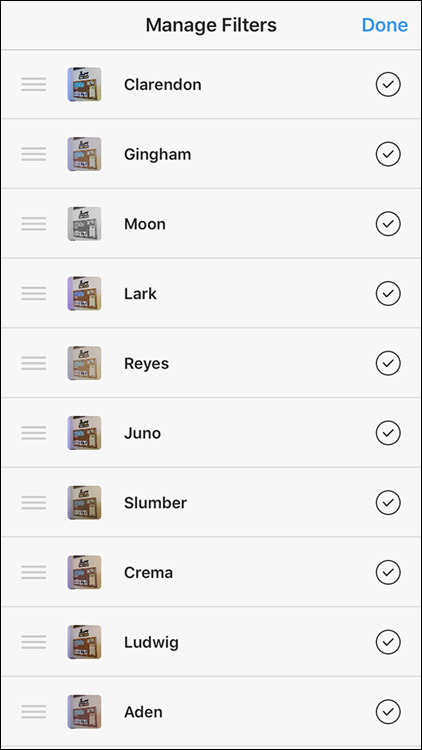
Too many filters or your favorite ones are too far down in the list? No problem. Swipe to the end of the filter list, and you’ll see a Manage icon. Tap the icon to open the Manage Filters screen, shown in Figure 4-3, where you can perform three tasks: change the order of filters in the row, add filters, and disable filters.
The filters on the Manage Filters screen appear in the same order as they do in the Filter screen. You can change the order of filters as follows:
Tap and hold down on a filter name in the list.
The filter name gets larger after you hold down on the name for about a second.
Move the name in the list.
As you move the filter name, other filter names helpfully move out of the way so you can see where your selected filter will appear in the list.
When the filter is where you want it, release your finger.
The filter name appears in your desired location in the list.
That's all there is to it! To return to the Filter screen, tap Done.
Adding a filter
When you swipe up and down in the list of filters on the Manage Filters screen, you’ll see several filter names that appear dimmed. These filters are disabled, but it’s easy to add any of them to the Filter screen.
Simply tap a dimmed filter name. The name turns black, which means the filter is active, and you see a check mark to the right of your newly activated filter name. Tap Done, and you return to the Filter screen, where you see your new filter in the row of filters.
Disabling a filter
If you decide that you don’t want to include one or more filters in the Filter screen, you can disable it by tapping the filter name in the list on the Manage Filters screen. The check mark to the right of the name disappears and the filter name is gray. (To add it back, just tap the disabled filter name again.)
When you're finished, tap Done.
Tweaking with the editing tools
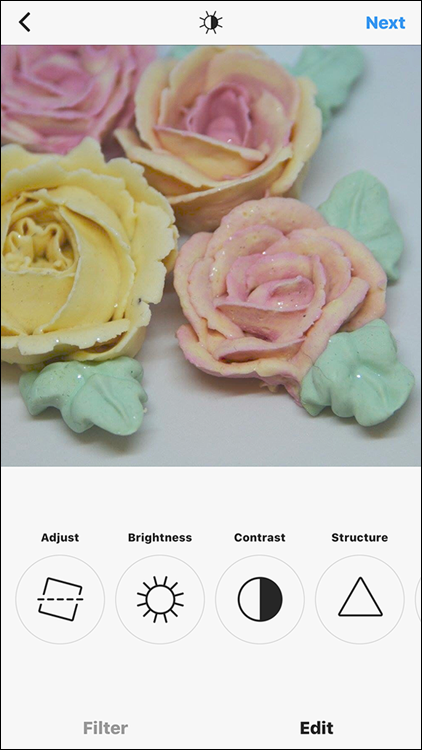
When you’ve finished experimenting with filters, view Instagram's editing tools by tapping Edit at the bottom of the screen. A row of editing tools appears below the viewer, as shown in Figure 4-4.
Swipe from right to left in the row of editing tools to see all 13 tools. Tap a tool to open it below the viewer.
What you see below the viewer depends on the tool you tapped. For example, when you tap the Brightness tool, a slider appears so you can increase or decrease the photo’s brightness. No matter what tool you use, the photo in the viewer reflects the changes you make.
Here’s what you can do with each tool:
- Adjust: You can adjust your photo in several ways by using the Adjust tool. A row of three icons and an associated slider bar appear below the photo, as shown in Figure 4-5, so you can make the following changes:
- Change the vertical or horizontal perspective of the photo by tapping the left or right icon, respectively, below the photo. After you tap the icon, it’s highlighted in black. The slider bar is a series of vertical lines. Swipe left and right in the slider bar to see the change reflected in the photo. As you slide, the highlighted icon above the slider bar is replaced with a box that shows you the change amount measured in degrees.
- If the object in your photo appears tilted, tap the straighten icon in the middle of the icon row. Then swipe left and right in the slider bar to tilt the photo so that the object appears straight. As you swipe in the slider bar, a box appears in place of the straighten icon and shows you the number of degrees you’re tilting the photo.
- Rotate the photo 90 degrees counterclockwise by tapping the rotate icon in the upper-right corner of the screen. Keep tapping the rotate icon to continue to rotate the photo in the viewer.
- Crop the photo to a specific area by first zooming in (touch the photo and spread your thumb and index finger apart) in the viewer. Then hold down on the photo and drag it in the viewer until you see the part of the photo you want to post on your Instagram feed. If you decide you don’t want to crop the photo, zoom back out to the photo’s original size by pinching your thumb and index finger together in the viewer.
- Brightness: In the slider bar below the viewer, slide the dot to the left to darken the photo or to the right to make the photo brighter. As you move the slider bar, the photo in the viewer darkens or brightens accordingly.
- Contrast: In the slider bar, make the light areas of your photo even lighter by sliding the dot to the left. Make the dark areas even darker so the focus is on the lighter areas of your photo by sliding the dot to the right.
Lux tool: At the top center of the Filter and Edit screens is an icon that looks like a half-light, half-dark sun. Tap it to open the Lux tool, which you can use to quickly change the exposure level and brightness instead of using the separate Brightness and Contrast editing tools. Move the slider to change the exposure level and brightness. When you’re finished, tap Done to save your changes, or tap Cancel to discard them.
If you want to undo any edits you’ve made, tap the Lux icon and then move the slider to its default location, 50. (The default setting for the Brightness and Contrast editing tools, however, is 0.) When you’re done, tap Done. If you’ve undone any edits in tools other than Lux, you won’t see the gray dot below the tool button.
- Structure: This tool enhances the details in the photo, such as adding color in an area that appears washed out in the original. In the slider bar, slide the dot to the right to see how the tool increases the details of the photo in the viewer. If you think the photo is too detailed, slide to the left to make the photo fuzzier.
- Warmth: In the slider bar below the viewer, slide the dot to the right to make the colors warmer by adding orange tones or to the left to make the colors cooler by adding blue tones.
- Saturation: In the slider bar, slide the dot to the right or left to increase or decrease, respectively, the intensity of all colors in your photo.
- Color: You can change the color of your photo's shadows or highlights or both, as well as change the intensity of the tint. Eight colors are available: yellow, orange, red, pink, purple, blue, cyan, or green, as you see in Figure 4-6.
- To change the color of shadows in your photo: Tap Shadows, if necessary (it's the default), and then tap one of the color dots.
- To change the highlight color: Tap Highlights, and then tap one of the eight color dots, which are the same colors as those used for shadows.
- To change the tint intensity for the shadow or highlight color: Tap the color dot twice. In the slider bar that appears below the viewer, slide the dot to the left or right to decrease or increase the intensity, respectively. When the intensity looks good to you, release your finger from the dot and then tap Done to return to the Color page.
- Fade: Do you want your photo to look like it’s been sitting in a shoebox for years … or decades? In the slider bar, slide the dot to the right to fade the color from your photo or to the left to add color.
- Highlights: In the slider bar, slide the dot to the right to increase the brightness in bright areas of the photo. Slide to the left to darken the bright areas in the photo.
- Shadows: In the slider bar, slide the dot to the right to lighten the dark areas in your photo. Slide to the left to darken the dark areas.
- Vignette: This tool allows you to darken the edges of the photo so people will focus on the center of the photo. In the slider bar, slide the dot to the right to darken the photo edges.
Tilt Shift: You can blur the outer edges of your photo and keep the center in clear focus so people will automatically look at the focused area. Tap Radial below the viewer to blur all four edges of the photo and keep the center focused. Tap Linear to blur just the top and bottom edges of the photo.
You can change the size of the “unblurred” area of the picture by tapping the center of the photo with your thumb and forefinger. Then spread them apart to make the area larger or together to make the area smaller. Tap Off if you don’t like the changes and want to keep your entire photo in focus.
- Sharpen: This tool sharpens features that aren’t visible in the original photo, such as the texture on a wall. In the slider bar, slide the dot to the right and left to make the photo less and more fuzzy, respectively.
After you finish making changes to your photo, apply your effect by tapping Done. Or discard the effect by tapping Cancel.
After you apply an effect, a gray dot appears below the effect's icon as a reminder that your photo now sports that effect.
Saving your changes (or not)
When you've finished using the editing tools and filters, you can do one of three things:
- Discard your changes and return to the Photo screen by tapping the left arrow icon in the upper-left corner and then tapping Discard in the pop-up menu.
- Save your changes and continue editing by tapping the left arrow icon and then tapping Save Draft in the pop-up menu.
- Add a description to the photo by tapping Next in the upper-right corner. The New Post screen appears, where you can add a caption and location, tag friends, and decide if you want to share the photo on other social networks. (See the next section.)
To follow along with the example in this chapter, tap Next.
Enriching Your Photo
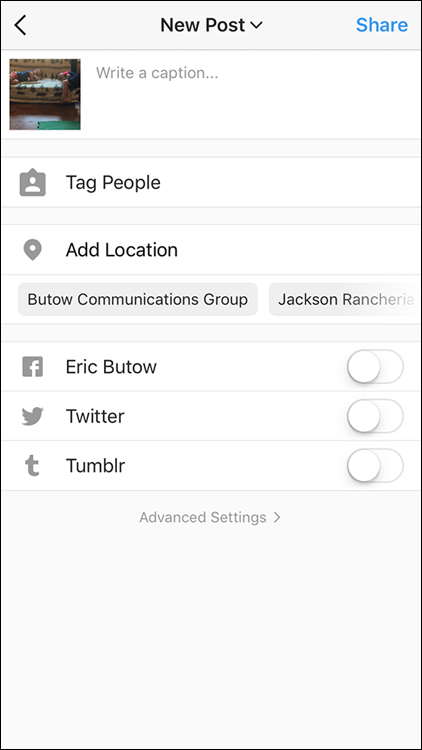
After you tap Next in the Edit screen, the New Post screen appears, as shown in Figure 4-7. (This screen is called Followers on an Android smartphone.) In this screen, you can add a caption to your photo, tag people who appear in the photo, include the photo's location, share the photo on other social media networks, and turn commenting on and off.
Describing your photo
To add a description to your photo, tap in the top section where it says Write a caption. A keyboard appears at the bottom of the screen.
Captions can't exceed 2,200 characters. You’ll know you’ve reached the limit when you keep typing and no characters appear in the caption box.
To add a blank line between paragraphs, tap the Return key after the last character of text. If you tap Return after a blank space after the last character, Instagram won’t format your paragraph correctly when you post your photo. You can read more about formatting your caption (and the pitfalls) for the iPhone and Android smartphones at www.jennstrends.com/how-to-format-instagram-captions/.
When you’ve finished writing, tap OK in the upper-right corner of the screen. The text of your caption appears in the caption box.
To edit the caption, tap in the caption box and make your changes. When you’re finished, tap OK.
It’s good to have options
Below the caption box are five options to identify people in your photo, add a location to your photo, share your photo on other social networks, and turn commenting on and off (under the Advanced Settings link at the bottom).
Tagging people
When you tag people, you add their Instagram usernames to your photo so they know that you posted a photo with them in it. Instagram enables you to tag up to 20 people in a single photo. To tag a person in your photo, do the following:
On the New Post (or Followers) screen, tap Tag People.
The Tag People screen appears.
Tap the photo to tag.
The Search screen appears.
In the Search for a Name box, type the name of the person you want to tag, and then tap the Search key in the keyboard.
A list of people appears below the box.
Swipe up and down in the list until you find the person you want to tag, and then tap the person’s name.
You can tag only people who appear in the list.
- Repeat this process to tag more people.
- When you've finished tagging people, tap Done in the upper-right corner of the screen.
 Be sure that you tag only people who are in the photo. If you tag someone who isn’t in the photo, the tagged person may report you to Instagram, and then you may be subject to “deleted content, disabled accounts, or other restrictions” per Instagram’s Community Guidelines. However, if the photo contains a logo or product, you can tag the brand or company associated with the product or logo.
Adding your location
You can include your current location in the photo's description. Tap Add Location. Your smartphone or tablet asks if the Instagram app can use your location if it’s the first time you are adding a location. Tap Allow in the pop-up window to continue.
In the Locations screen that appears, swipe up and down in the list of nearby locations. If you don’t find your location, tap the Search box at the top of the screen and start typing. As you type, results that most closely match your search term(s) appear in the list. When you find the location in the list, tap the location name.
If you want to delete the location, tap the delete icon (X) to the right of the location. After you delete the location, you see Add Location again on the screen.
After you allow the Instagram app to use your location, the next time you open the New Post (or Followers) window, you’ll see a row of potential locations below Add Location. Swipe up in the row to view more locations. Tap the location name to select it as your location. You can still add a location by tapping Add Location and either selecting a location from the list or by typing the location in the Search box and then selecting the location in the list.
Facebook
Tap the dot to toggle the Facebook switch from left to right to log into Facebook and post your photo to your Facebook newsfeed as well as to Instagram. If this is the first time you're posting to Facebook, you'll be asked to allow Facebook to access your Instagram account.
If your shared post links to your personal account, the post is shared only with your Facebook friends. When your shared post links to your business account, the post is shared with the people who follow your Facebook business profile.
Twitter
If you want to tweet the same Instagram photo you’re preparing, tap the dot to toggle the Twitter switch from left to right to log into your Twitter account. After you log in, you can share your photo and caption in a tweet. Remember that Twitter will cut off any caption that exceeds 280 characters. If this is the first time you are posting to Twitter from Instagram, you will have to allow Twitter access to your account.
Tumblr
You can post your photo to your Tumblr account as well by tapping the Tumblr dot to toggle from left to right. Tumblr opens so you can log into your account, and then you return to Instagram. When you share your photo and related information in Instagram, you’ll share it to your Tumblr feed as well.
You have to tap the toggle dot every time you want to share on Facebook, Twitter, and Tumblr.
Turning commenting on and off
Before you share your photo, you may not want to take the time to read or respond to comments. You can block your followers from leaving comments about your photo. Begin by tapping the Advanced Settings option at the bottom of the New Post screen (refer to Figure 4-7). In the Advanced Settings screen, tap the Turn Off Commenting dot to toggle from left to right. To return to the New Post screen, tap the left arrow in the upper-left corner.
Posting Your Photos: Ta Da!
Your photo or photos are now ready to share with the Instagram world, so all you have to do is tap Share in the upper-right corner of the New Post screen.
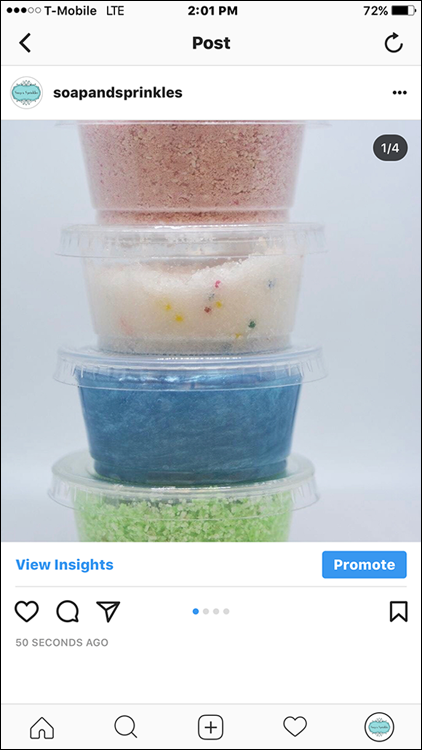
After you post a photo, the home screen appears with your photo at the top, as shown in Figure 4-8. If you’ve posted several photos in one post, you’ll be able to swipe in your post to view them all. Slicker than a box of rocks.
 Instagram automatically uploads your photo in the best resolution possible. When you take a photo with a smartphone or tablet that runs iOS or Android, resolution isn’t an issue. However, if you upload a photo from your Camera Roll (on the iPhone) or Gallery (on an Android smartphone), check your image settings in a photo-editing app such as Image Size (iPhone and iPad) or Photo & Picture Resizer (Android smartphones and tablets). In the app, see that the photo has a width between 320 and 1,080 pixels with an aspect ratio between 1.91:1 and 4:5. For example, if the photo width is 1,080 pixels, the height can be between 566 pixels (1.91:1 ratio) and 1,350 pixels (4:5 ratio). If your photo height is too low or high, Instagram will automatically crop it to fit the aspect ratio. The moral of this story is to check and crop your photos before Instagram does it for you (probably to your annoyance).
Uploading Photos from Your Camera Roll
Do you have some photos you've already shot that you'd like to share with your followers? It’s easy to select one or more photos and then share them on your Instagram feed. Here’s how to upload photos from your camera:.
Tap the + icon at the bottom of the home screen.
The Photo screen appears.
Tap Library.
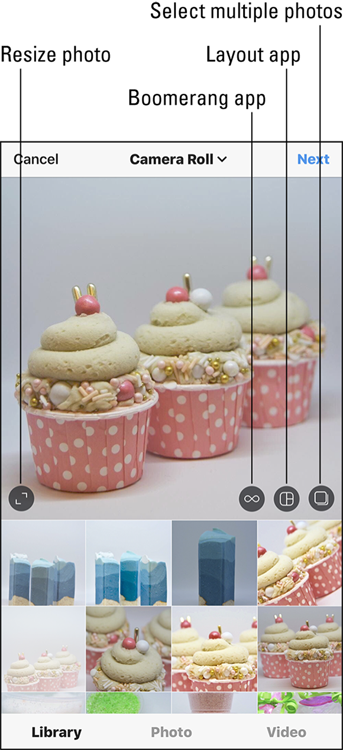
The Camera Roll screen appears, as shown in Figure 4-9. (Android users see the Gallery screen.) The most recent photo you saved to your smartphone appears in the viewer. Thumbnail-sized photos appear below the viewer.
Swipe in the thumbnail photos to view other photos. When you find one you like, tap it.
The selected photo appears in the viewer. Instagram automatically crops your photo to the size of the viewer.
- (Optional) View the photo in its original size by tapping the resize icon (labeled in Figure 4-9).
- Tap Next.
- (Optional) Apply filters and edit your photo as described earlier.
Tap Next.
The New Post (or Followers) screen appears.
(Optional) Write a caption, tag people, add a location, change advanced settings and recipients, and share your photo on other social networks.
For details, bookmark this page and read the earlier section, “Enriching Your Photo.”
- When you’re ready to share your photos, tap Share.
If you have an Apple Mac desktop or laptop and you use the Safari web browser, there’s a trick you can use to upload one or more photos from your Mac to your Instagram profile. Bookmark this page and go back to Chapter 1 to learn all about it. (Windows users, you’re out of luck.)
Did you notice in Figure 4-9 the icons for the Boomerang and Layout apps? You use the Boomerang app to create and post mini-videos on your feed. Your camera takes a burst of photos, and Boomerang stitches them together, creating a quick video clip that plays backward and forward — like a Boomerang flies … get it? (See Chapter 10 for details on using Boomerang.)
You can use the Layout app to combine multiple photos into one photo and post the combined photo on your feed without having to swipe back and forth between photos.
Uploading Multiple Photos to One Post
You don’t need to have one post for each photo. Instead, you can add as many as ten photos in your Camera Roll (or Gallery if you use an Android smartphone) to a single post.
Selecting multiple photos
To choose more than one photo to add to a post, do the following:
- In the main Instagram feed screen, tap the + icon.
Tap Library, in the lower-left corner of the screen.
The most recent photo in your Camera Roll (or Gallery) appears in the viewer.
- Swipe in the thumbnail photos, and then tap the first photo you want to add.
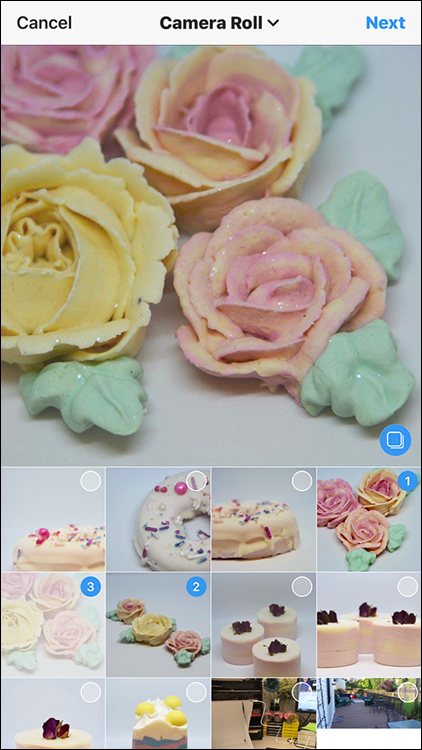
Tap the select multiple icon (labeled in Figure 4-9).
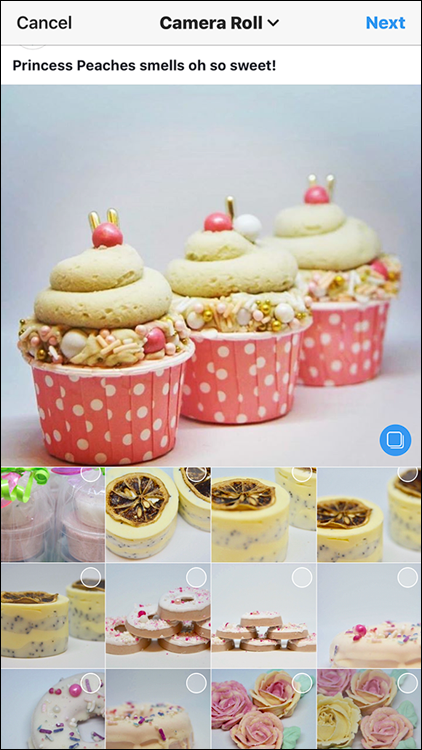
The selected thumbnail appears dimmed, with a blue number 1, as shown in Figure 4-10.
Tap another thumbnail.
The photo appears in the viewer, and a number 2 appears next to the thumbnail. That number shows you the order in which your followers will see the photos in your post.
If you select a photo but then decide that you don’t want to include it, just tap the thumbnail photo. The order of your photos will change if you selected more than two photos. To deselect all photos, tap the blue select multiple icon in the lower-right corner of the viewer.
Continue tapping thumbnails as needed.
In Figure 4-11, we’ve chosen three photos. The numbers reflect the order in which we selected each photo.
When you have finished selecting photos, tap Next.
The Edit screen appears.
Edit the photos by tapping Next in the upper-right corner of the screen.
To reorder the photos, you have to deselect them and then reselect them in the correct order. (Yes, this is something Instagram needs to work on.) For example, suppose you select five photos and want to move photos 3 and 4 to positions 4 and 5, respectively. First deselect photos 3 and 4. At this point, the former photo 5 becomes photo 3. Then select the former photo 3, which becomes photo 4, and then select the former photo 4, which becomes photo 5.
Applying filters and adding photos
After you have selected your photos and tapped Next, the Edit screen appears, as shown in Figure 4-12. The top of the screen displays the photo you’re editing.
A row of filter types appears below the photo. Swipe from right to left in the row to view all the filters. To apply a filter to all photos in the group, tap the thumbnail image under the filter name.
At the right side of the screen, you see part of the next photo in your photo group. To see the other photos, swipe left. To add another photo to your post, swipe to the end of the row, tap the + icon, and then select the photo from the Camera Roll screen, as described in the “Uploading Photos from Your Camera Roll” section earlier in this chapter.
Editing photos individually
To edit a photo, tap it in the row of photos. The selected photo appears in the center of your screen. Now you can do the following:
- Add a filter: Swipe right to left in the filter row, and then tap the filter thumbnail image. Get all the details in the “Adding a filter” section.
- Change the exposure and brightness levels at once: Tap the Lux icon (half-light, half-dark sun) at the top of the screen. Learn more about using the Lux tool in the “Tweaking with the editing tools” section.
- Perform other editing tasks: Tap Edit, and then follow the instructions in the “Tweaking with the editing tools” section.
Tap Done in the upper-right corner when you're finished.
Adding information and sharing your photos
When your photos are the way you want them, tap Next in the upper-right corner of the Edit screen.
In the New Post screen, you can write a caption, tag people, add a location, share your photo on other social networks, and turn commenting on and off as described earlier in the “Enriching Your Photo” section.
You can't write a caption for each photo when you have multiple photos in your post. So when you write your description, the caption should describe all your photos, not just one.
When you've finished editing your photos, it's time to share them. Tap Share in the upper-right corner of the New Post screen.