Chapter 10
Making Your Story More Fun
IN THIS CHAPTER
 Designing graphics for your Stories
 Using text, stickers, hashtags, links and face filters
 Sharing with Instagram LIVE
In Chapter 9, we show you how to create and share a basic Instagram Story. There is so much more you can add to your Stories to make them come alive and get seen by more people!
Instagram Stories has rolled out a number of additions to enhance the Stories you create. In this chapter, we discuss how to create your own graphics; add text, username tags, stickers, hashtags, geolocation tags, and website links; and use Boomerang and face filters.
In addition, you find out how to use Instagram LIVE, including how to prepare for, promote, save, and repurpose your broadcast.
Creating Graphics for Stories
If you enjoy posting graphics versus photos, you'll be happy to hear that you can use graphics in Instagram Stories. Create your graphic in Illustrator or Photoshop, making sure the graphic is 1,080 pixels wide x 1,920 pixels high. Export the graphic as a .jpg, and email it to yourself.
Next, open the email on your phone, and download it to your camera roll. Then upload the graphic to Instagram Stories in the same way you upload a photo. (For details on uploading to Stories, see Chapter 9.)
If you don't have Illustrator or Photoshop, we recommend using Adobe Spark (https://spark.adobe.com/) to create your graphics. It's much simpler for someone without design experience to use. Adobe Spark is available on your phone (which saves the step of emailing the graphic) and includes Instagram Stories templates, which you can alter. You can also create your own design.
To create an Instagram Story graphic on your phone using Adobe Spark, follow these instructions:
Download the Adobe Spark app from the App Store and create a username and password.
You can also log in through Facebook or Google. The app is free to use, but some photos and illustrations cost $1 each, and are clearly marked in the app.
- Choose a design:
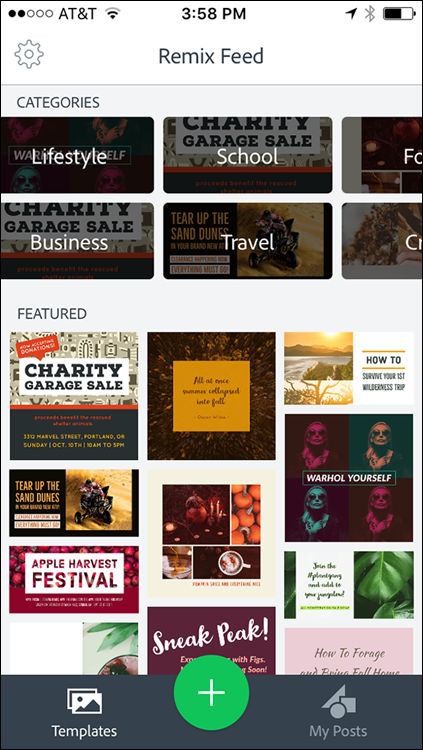
- Tap a category at the top of the screen, such as Lifestyle, Business, School, or Travel, as shown in Figure 10-1. Make a selection in the list of designs in that category that appear.
- Tap a design in the Featured section.
Tap Remix.
The screen shown in Figure 10-2 appears.
- Change the design by tapping the options below the image:
- Add: Add text or a new photo by tapping on your choice. Then either type new text and tap Done, or select photo library to access your photos, access the camera roll to take a photo, or search free photos to use a stock photo. Tap the photo you would like to use and it will be added to your design.
- Design: Change the look and feel of your post by tapping Design, and then choosing one of the other suggested designs. Your photo or background will remain the same, but the font and filter will change. Tap Done after you find a design you like. Premium paid customers can also add their own fonts and filters in the Brand section, and add those to a design.
- Palette: In the Palette section, you can change the color scheme of your image and text. Several color palettes are available. To change the color palette, simply tap a new palette. Tap Done to save the palette to your design.
- Resize: Resize your design according to its use. You can choose correct sizing for a Facebook ad, Instagram, Instagram Stories, YouTube, and more. Tap the size you want, and then tap Done.
- Layout: Alter the layout of your image by changing the grid. (This change will typically prompt you to upload more photos, depending on the layout you select.) Tap the grid you like, and then tap Done. To add more photos, tap Add and following the instructions detailed earlier in this section about adding photos.
- Effects: Change filters by selecting one of the filters at the bottom of the screen, or choose Animation and select how you would like to animate your images. After you select a filter or an animation, tap Done.
When you're satisfied with your graphic, tap Share. Then choose Save Post as either Video or Image (no animation) to save the graphic to your camera roll.
 On the next screen, do not tap the Instagram icon. Selecting that will send the graphic to your main Instagram newsfeed, not to Instagram Stories.
Upload the graphic just as you would upload a photo to Instagram Stories.
For details on uploading a photo to Stories, see Chapter 9.
 When you create an image in Adobe Spark, it saves the image in My Posts. For future images, it may be easier to use My Posts to alter one of your own designs if you normally stick to similar colors, styles, and fonts for your brand. The editing features and sharing process are the same as using one of Adobe Spark’s templates.
Canva (www.canva.com) is another popular app that allows you to create graphics based on its templates. However, it doesn’t have a template sized exactly for Instagram Stories.
Adding Text and Username Tags
Adding text to your photo or video can add context (and often humor) to your Story. You can also tag another user using text. Follow these steps to add text or username tags:
- Take a photo or video in Instagram Stories, or upload a photo or video there.
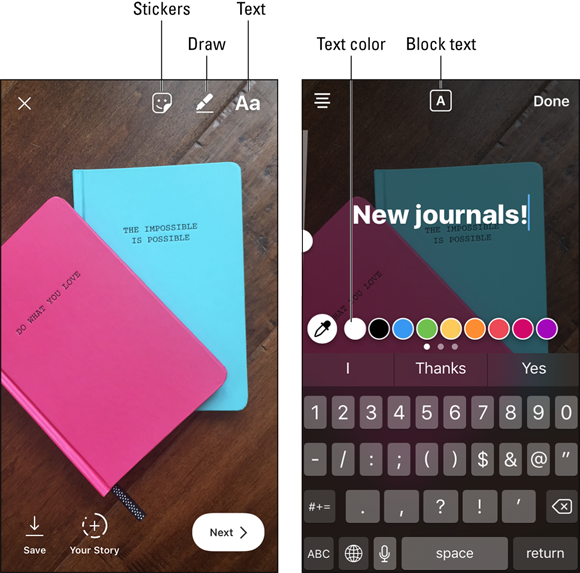
Tap Aa at the top right of your screen, as shown in Figure 10-3, left.
A new screen with a keyboard appears.
Type your word or phrase (emojis work here too), as shown in Figure 10-3, right.
You can change the text color and size:
- To change the text color from white, the default, tap a colored circle. Scroll left or right to reveal more color choices or tap and hold down on a color circle to reveal another color selection palette.
- To change the type size, find the slider on the left side of the page and move it up or down.
If you want to tag someone, type @username and select the person from the suggested profiles.
The person will be notified that you tagged him or her in your Story.
- Tap Done.
- (Optional) Make further changes:
- Move the text by tapping and holding down on the text and then sliding it to its new position.
- Change the type size by placing two fingers on the text and sliding your fingers apart or together.
- Change the angle of the text by placing two fingers on the text and twisting left or right.
- Share the Story by tapping Your Story; save it by tapping Save; or send it as a DM by tapping Next, selecting the recipients, and tapping Send.
 To create block text (white text that has a color boxed behind it), tap the A at the top of the keyboard screen (labeled in Figure 10-3, right). Tapping the A again makes the background transparent, and tapping again removes the transparency.
Drawing on Your Story
Another popular feature of Instagram Stories is the drawing tool. You can use your finger to draw arrows, to circle something, to write words, or to draw anything else you’d like!
Follow these steps to draw on a Story:
- Take a photo or video in Instagram Stories, or upload a photo or video there.
- Tap the pen icon at the top right of the screen (refer to Figure 10-3, left).
Tap a drawing tool, at the top of the screen.
From left to right, the tools are as follows:
- Magic marker: Draws like a fat magic marker.
- Highlighter: Draws like a highlighter and is slightly transparent.
- Neon: Draws like a neon light with an outline of the color you select.
- Eraser: Erases anything you draw. Use your finger to rub across the drawing to erase. Erasing will not affect your photo or video.
- Heart: Draws like a piece of chalk.
Start drawing! You can use your finger or a stylus.
See what each drawing tool’s line looks like in Figure 10-4. You can change the color or line width as follows:
- To change the color of any drawing tool (except the eraser), tap a colored circle (at the bottom of the screen).
- To change the line width, tap the circle to the left of the other colored circles, and move the slider up or down.
When you have finished drawing, tap Done at the top right of the screen.
You can still go back and erase or add to your drawing by tapping the pen tool again.
- Share the Story by tapping Your Story; save it by tapping Save; or send it as a DM by tapping Next, selecting the recipients, and tapping Send.
 When you have text that is hard to read over a busy photo or video, make the text stand out by scribbling behind it. Or, if you’d like to create a solid color background that covers the entire screen, take a photo of anything, tap the drawing tool, select a color, and then tap and hold down anywhere on the screen.
Stickers and Tags
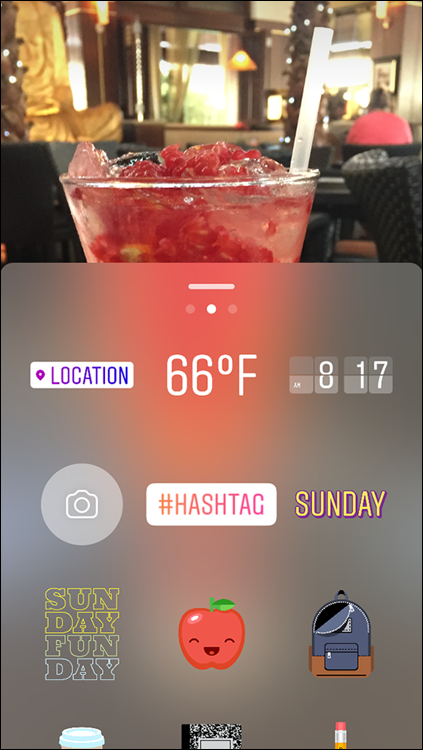
The sticker page is available after you take or upload a photo or video. Simply tap the square smiley face at the top of the screen (refer to Figure 10-3). Stickers are an easy way to add color and fun to your photos or videos. Instagram changes its stickers based on the day or holiday. For instance, on Sundays, you’ll see SundayFunday stickers, as shown in Figure 10-5. Leading up to Halloween, you’ll see pumpkins, witches, and goblins.
The sticker page is also where you can find location geotags, the temperature and time for your location, hashtags, and photo stickers.
To add a sticker, simply follow these steps:
- Take a photo or video in Instagram Stories, or upload a photo or video there.
Tap the icon for stickers (labeled in 10-3, left.)
A screen with stickers appears. Three screens are available, as indicated by the dots near the top of the screen. Tap the left dot to access recently used stickers. The middle dot displays the main screen with the latest and most popular stickers, as well as geotags, hashtags, selfie photos, temperature, and time. The right dot displays a page of stickers of hats and glasses. Swipe up on any sticker page to see more.
- Tap the sticker you want to add.
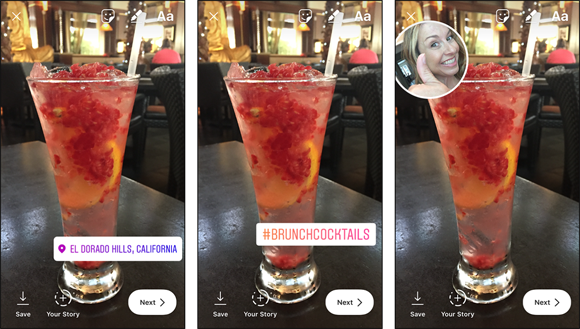
If you tapped the Location sticker: Tap one of the locations that are presented to you.
That location is added as a geotag to your Story, and your Story is added to all other Stories currently using that geotag. This is a great way to get your Story seen by local people who don’t necessarily follow you. See Figure 10-6 (left).
If you tapped the #Hashtag sticker: Type your hashtag using the keyboard that appears. Then tap Done.
As you type, Instagram offers suggestions for your tag; you can select one if you want. Your Story is added to all other Stories currently using that hashtag. Now anyone who searches that hashtag can see your Story. See Figure 10-6 (middle).
- If you tapped the camera icon: Tap and hold down on the gray blob that appears, and then move it to the desired location. Hold your phone up to your face; your face appears inside the gray blob. If you want a white circle around your face, tap the gray blob. When ready, tap the white circle below the gray blob or the large white circle to add a selfie photo sticker to your photo or video. See 10-6 (right).
- Adjust the position, size, or angle of the sticker as desired:
- Move the sticker by tapping and holding down on the sticker and then sliding it.
- Change the size by placing two fingers on the sticker and then sliding your fingers apart or together.
- Change the angle of the sticker by placing two fingers on the sticker and then twisting left or right.
- Share the Story by tapping Your Story; save it by tapping Save; or send it as a DM by tapping Next, selecting the recipients, and tapping Send.
Adding a Link to Your Website
A popular feature that is available only to business profiles with 10,000 or more followers is adding a link to your website. This is an important addition because it offers a direct way for businesses to send people to their website to get more information, register for events, or make a purchase. To add a website link:
- Take a photo or video in Instagram Stories, or upload a photo or video there.
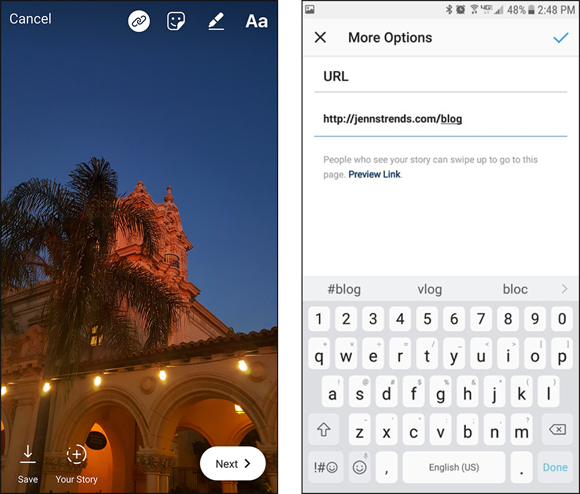
Tap the chain link icon (see Figure 10-7, left) at the top of your Story.
A new page appears.
- Type your website destination (see Figure 10-7, right.)
- Tap Done (iOS) or the green check mark (Android).
Your followers will see a See More link at the bottom of your Story, indicating a website link. Make sure you add a call to action either verbally during your video or by adding Swipe Up to See More overlay text to a still image.
 Instagram doesn't track links on Stories. To capture the analytics on your website clicks, use a URL shortener such as Bitly (
https://bitly.com) or Rebrandly (www.rebrandly.com), and then access metrics via its dashboard.
Using Boomerang to Keep Fans Coming Back
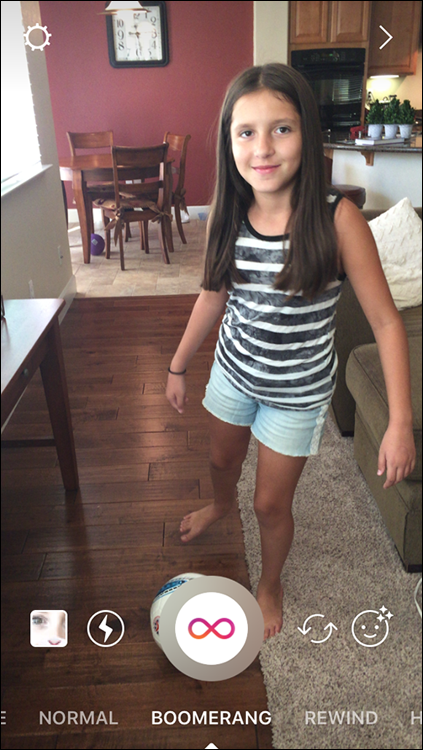
Boomerang is an app that takes a burst of photos and creates a looping backward and forward video clip from them. An action such as twirling a pencil or blowing a bubble becomes more exciting when played in a loop!
Boomerang is not installed automatically on your phone. Go to the App Store and type Boomerang for Instagram in the Search bar to find it (it’s free). After you download the app, follow these steps to use it:
- Open Instagram Stories by swiping right or using the camera icon at the top of the newsfeed.
- Slide the Normal setting to the left, changing it to Boomerang, as shown in Figure 10-8.
 To switch from forward-facing video mode to selfie video mode and back, tap the arrows to the right of the white circle (and shown in the margin).
You can also use Boomerang with one of the face filters, as described in the next section.
Tap the white circle with the Boomerang logo (infinity symbol).
You don’t need to hold down the white button as you would for video. The app is actually taking several pictures in a rapid burst.
- If you're not satisfied with your Boomerang and want to try again, tap X at the top left and repeat, starting Step 3.
- Share the Boomerang Story by tapping Your Story; save it by tapping Save; or send it as a DM by tapping Next, selecting the recipients, and tapping Send.
 Boomerang works best when recording movement. To try it out, film someone doing a cartwheel, making funny faces in the camera, or dancing!
Making Funny Faces with Face Filters
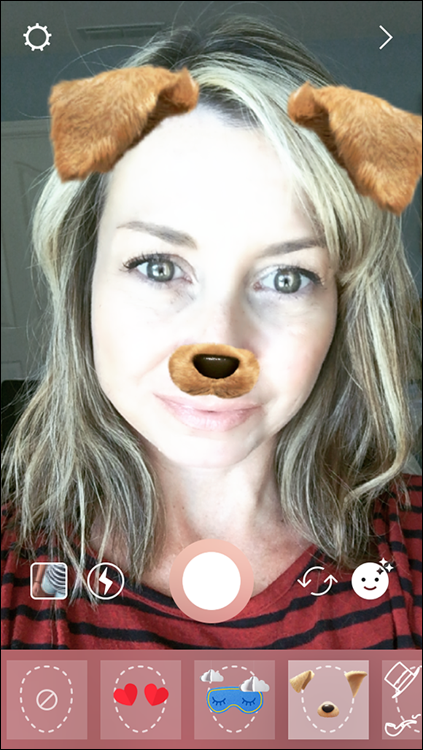
A face filter is an app that applies a filter over your face using the camera, making you look, for example, like a dog, an alien, or a rock star. Instagram Stories didn’t offer face filters when it first launched, so a lot of people continued using Snapchat for that feature, or created Snaps with filters and then loaded them to Instagram Stories. Now, Instagram users can rejoice at the fact that their favorite feature of Snapchat is available on Instagram!
Here’s how it works:
- Open Instagram Stories by swiping right or using the camera icon at the top of the newsfeed.
 Put the camera in selfie mode by tapping the arrows to the right of the white circle (and shown in the margin).
Tap the smiling face to the right of the selfie mode arrows.
Filters appear at the bottom of the screen. Scroll to the left to see all available filters.
To apply a filter to your face, as shown in Figure 10-9, tap the filter.
To change filters, simply tap a different one.
Take a photo by tapping the white button, or record a video by holding down the white button.
 You can use filters in any camera setting: Live, Boomerang, Rewind, or Hands-Free.
- To try again, tap the X at the top left of the page and go back to Step 4.
- Share your Story by tapping Your Story; save it by tapping Save; or send it as a DM by tapping Next, selecting the recipients, and tapping Send.
Using Instagram LIVE
Quickly after it launched, Instagram Stories dramatically changed the way people used Instagram. Some users even abandoned the newsfeed and went all in on Instagram Stories. With the popularity of Stories and the growth of Facebook LIVE, including a live video option in Instagram Stories seemed like a natural next step.
In this section, you learn all about how to go live, and get tips for making your LIVE broadcast more successful before, during, and after filming.
Getting started with LIVE
So, you’re ready to go LIVE, but how do you even get to it? Its location is not exactly obvious. Follow these steps:
- Open Instagram Stories by swiping right or using the camera icon at the top of the newsfeed.
At the bottom of the screen, swipe Normal to the right so you are on LIVE.
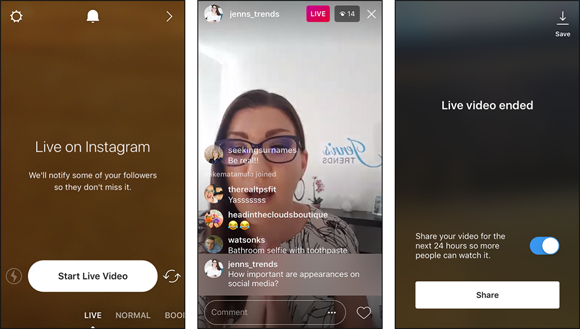
Figure 10-10, left, shows the LIVE screen.
If you want only certain people to view your LIVE broadcast, tap the gear icon (Settings) at the top left. Tap Hide Story From, and select the followers you want to omit.
You can also turn off notifications by tapping the bell icon at the top of the screen. However, we recommend leaving notifications on so your followers can be alerted that you're starting.
When you’re ready to start, tap Start Live Video.
Instagram checks your connection, and then the timer counts down 3, 2, 1 and you’re on! You’ll begin seeing “Username has joined” and the number of people who have joined.
- Wait a minute or two before diving into your topic so that people have time to join. Greet as many people as possible.
- Now that you're LIVE, you can do the following:
- Turn off comments by tapping the three dots at the bottom right of the screen, as shown in Figure 10-10, middle. However, we recommend that you keep them turned on for more interaction.
- Enter the name of your LIVE broadcast by typing it in a comment and tapping Send. Then tap the comment and choose Pin Comment from the options menu. This pins the name to the top of the comment feed, where it acts like a title.
- To keep track of your time, tap the pink LIVE button in the upper right. A timer appears.
- To see the names of the people who have joined, tap the number to the right of the pink LIVE button. To kick people out of your LIVE broadcast, place an X by their name.
- When you’re finished, tap End, and then tap End Live Video.
Save the LIVE video by tapping Save at the top left.
Your video is saved to your camera roll so you can use it elsewhere online, as shown in Figure 10-10, right.
 You must save your LIVE broadcast immediately after recording (before you agree to share it). After it's shared, there is no option to go back and save it.
- To share the LIVE video with your Instagram followers for 24 hours, go to the bottom of your screen and make sure the sharing tab is pushed to the right showing blue, then tap Share.
 Instagram LIVE has a 60-minute time limit. You'll see a 15-second timer countdown when your time is almost up, and then the LIVE broadcast will shut down at the 60-minute mark. Plan your content accordingly!
Developing a game plan
Now that you know how to physically tap all the buttons to record a LIVE broadcast, it’s time to talk strategy. We recommend going on Instagram LIVE with forethought about what you’ll be doing. Here are a few tips to help you execute the best Instagram LIVE possible:
- Think of a topic that will interest your audience. Some ideas to consider: Announce a new product, discuss industry news, teach a class, or offer a Q&A session.
- Jot down several talking points, but don't memorize or look overly rehearsed. LIVE broadcasts are supposed to be a bit off the cuff.
- Think about some common questions you might get asked, and prepare your answers. You can also ask people to submit questions beforehand.
- Do a test video on your regular camera app where you plan to do the LIVE broadcast, and at the same time of day. Check the lighting and the background. Make sure that you can get a decent signal in that location.
- Promote your LIVE broadcast ahead of time via Instagram, your blog, your email list, and other social networks.
- Be as interactive as possible with your followers during the broadcast.
- Save your broadcast so you can repurpose it to other online media, and then publish your broadcast so it’s available for 24 hours.
 It’s often helpful to have a tripod to hold your camera steady and in place while filming LIVE. Arkon Mounts (
www.arkon.com/) has several tripods available for under $50.
Alerting your fans
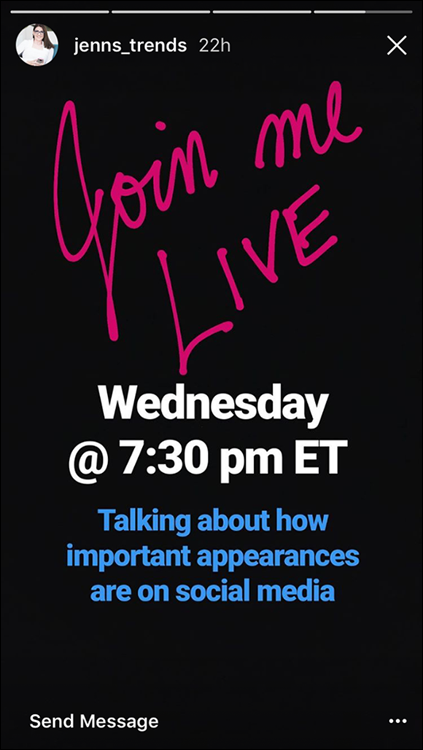
To help get more viewers to your LIVE video, promote it. You can do this in a variety of ways, but the most obvious route is through Instagram itself. Post a graphic or a video in your Instagram newsfeed and Stories stating the topic, date, and time, as shown in Figure 10-11. If you have an email newsletter or blog, you’ll want to promote it there too. Finally, reach out to your other social media networks, and post information about the LIVE video there, making sure to include your Instagram handle.
Instagram sends a notification to your followers (unless they have turned off this feature) to let them know you are LIVE. Your profile pic will be labeled LIVE in the bar at the top of the newsfeed so people can jump in from there too.
Acknowledging LIVE followers
While you're waiting for more people to view your LIVE video, acknowledge with excitement the people who are joining you. Use their name and thank them for participating. After a few minutes, you can start speaking about the topic.
People will likely comment while you're talking. It’s nice to answer questions and comments as they arise, but sometimes it’s not practical if you're trying to explain something. In this case, let them know that you are happy to take comments and questions, and will address them at the end.
Saving and repurposing LIVE broadcasts
After you’ve completed your LIVE broadcast, don’t forget to save it! After you’ve tapped End Live Video, tap Save in the screen that appears (refer to Figure 10-10, right). The broadcast is saved to your camera.
When you save your Instagram LIVE broadcast, it becomes a regular video that you can use any way you’d like. Here are some places to reuse it:
- On your website
- In a blog post
- In your email newsletter as a free replay, or as a teaser for your next LIVE broadcast
- On your YouTube channel, then share the link to it on LinkedIn and Twitter
- On your Facebook business page
You can also edit the video to create 1-minute or less sound bites, and upload them directly to Instagram, Facebook, LinkedIn, and Twitter. Or create a graphic about the video for Instagram, and then link to the video (on YouTube or your website) via the link in the bio on your Instagram profile page.
You can reuse LIVE content in so many creative ways — don’t let it go to waste!
 Designing graphics for your Stories
 Using text, stickers, hashtags, links and face filters
 Sharing with Instagram LIVE
 On the next screen, do not tap the Instagram icon. Selecting that will send the graphic to your main Instagram newsfeed, not to Instagram Stories.

 When you create an image in Adobe Spark, it saves the image in My Posts. For future images, it may be easier to use My Posts to alter one of your own designs if you normally stick to similar colors, styles, and fonts for your brand. The editing features and sharing process are the same as using one of Adobe Spark’s templates.

 To switch from forward-facing video mode to selfie video mode and back, tap the arrows to the right of the white circle (and shown in the margin).
 You can use filters in any camera setting: Live, Boomerang, Rewind, or Hands-Free.