There are many advantages to observing with binoculars instead of a telescope, and these include cost and portability. If you’re just starting to observe the night sky, I highly recommend you start with binoculars.
Binoculars are rated using two numbers separated by an “×”. The first is the magnification and the second is the aperture—the size of the front lenses—in millimeters. For example, 10×50 binoculars magnify 10 times and have front lenses 50 millimeters across.
7×35 binoculars are very common and suitable for astronomy. They have a wide field of view and enough aperture to reveal thousands of faint stars invisible to the naked eye. A view of the moon through these is wonderful, and bright objects such as the Orion Nebula and the Andromeda Galaxy are easily within reach.
More powerful binoculars can reveal more, but they come with trade-offs. For example, 15×70 binoculars, often advertised as “giant” binoculars, can show more detail in nebulae and star clusters, but they are heavy and difficult to hold steady. You will need a large tripod mount suitable for these giant binoculars.
If price is no object, consider buying image-stabilized binoculars. These electronic binoculars use a moving lens element to compensate for motion and vibrations.
Choosing a telescope can be a daunting experience for beginners. There are so many models available, each with varying features and specs, that it’s hard to know how to compare them. I often advise people to visit star parties, where they can look through different kinds of telescopes before buying their own.
Moreover, the best telescope for you depends on the kinds of objects you’re interested in viewing. I would recommend one telescope for planets and a different one for galaxies and nebulae. In this section I’ll describe the criteria you should pay attention to, and then follow up with a description of the most common kinds of telescopes.
MAGNIFICATION All telescopes magnify the image—that is, the view through a telescope appears larger than what the naked eye sees. 100x magnification means the image is 100 times larger.
Low magnification, generally from 7x to about 25x, is best for large, faint objects, like galaxies and nebulae. Though the object will appear smaller, all of its light will be concentrated in a small area, which will make it easier to see. High magnification, generally above 75x, is best for small, bright objects, like planets, globular clusters, and double stars. Remember, though, that high magnification requires calm, steady skies.
You can change the magnification of a telescope by using a different eyepiece. Larger eyepieces (25mm and above) provide lower magnification, while small eyepieces (10mm and below) provide higher magnification.
APERTURE, FOCAL LENGTH, AND FOCAL RATIO The most important spec is the aperture of the telescope. The aperture, expressed in either millimeters (for small scopes) or inches (for large scopes), measures the diameter of the primary objective—the main lens or mirror that gathers the faint light from all those distant objects.
All things being equal, a telescope with double the aperture has four times the light-gathering power. Stars in an 8-inch telescope will appear four times brighter than in a 4-inch telescope.
The focal length of a telescope, almost always expressed in millimeters, measures the distance between the primary objective and the focal point, generally where the eyepiece sits. The longer the distance, the greater the magnification. A telescope with twice the focal length magnifies twice as much, given the same eyepiece.
You might think higher magnification is better, but that’s not always true. First of all, atmospheric distortion puts a limit on magnification. Unless the skies are pristine, magnifying more than 200-300× is a waste—the view will just get blurrier and blurrier. More importantly, when it comes to extended objects such as galaxies and nebulae, greater magnification makes the objects fainter.
It’s easy to understand why. Your telescope has gathered a finite number of photons from some distant object, through the front of the telescope tube. Magnifying the image does not magically increase the number of photons—it just spreads them out over a larger area. The result is that each square millimeter of your eye gets fewer photons, and thus the image will seem fainter (though larger).
If larger apertures make things brighter and longer focal lengths make things fainter, then you need to consider both in order to determine how bright a nebula or galaxy will appear. Indeed it is the ratio of the two that determines the perceived brightness.
The focal ratio is the focal length divided by the aperture (in the same units). A 200-millimeter-diameter telescope (8 inches) with a 2,000-millimeter focal length has a focal ratio of 10, usually expressed as “f/10”.
When considering galaxies and nebulae, smaller (“faster”) focal ratios are better. An f/4 system is four times brighter than an f/8 system. Of course, this assumes the same eyepiece. You can increase brightness in a “slow” focal ratio telescope by using an eyepiece with less magnification.
For objects other than galaxies and nebulae, longer focal lengths are sometimes better. For example, planets and planetary nebulae are generally small and relatively bright. They are better viewed at higher magnifications, even if that dims the image somewhat. Similarly, stars are point-sources (not extended objects) and are not affected by magnification. They don’t get much dimmer under magnification because they don’t get bigger—they are too far away. Globular and open clusters are entirely composed of stars, and therefore benefit from magnification without much loss of brightness.
TELESCOPE MOUNTS After optics, the most important component of a telescope is the mount. A good, heavy mount keeps the image steady, even when the wind blows or when you accidentally brush against it. The worst mounts are those that shake for a long time at the slightest touch. No matter how good the optics, viewing under those conditions can be frustrating.
Telescope mounts often have clock drives to track the motion of the stars (actually, the Earth) so you don’t have to constantly adjust the aim. The greater the magnification, the faster the object will move out of your field of view without a clock drive.
There are several different kinds of mounts. For the casual amateur, an inexpensive alt-azimuth mount is sufficient. For those interested in astrophotography, however, the more expensive equatorial mounts are a requirement.
Many telescope mounts have a built-in computer for pointing at specific objects in the sky. These “go-to” mounts can be very helpful for beginners, but only if properly aligned. Make sure the alignment procedure is easy and relatively accurate.
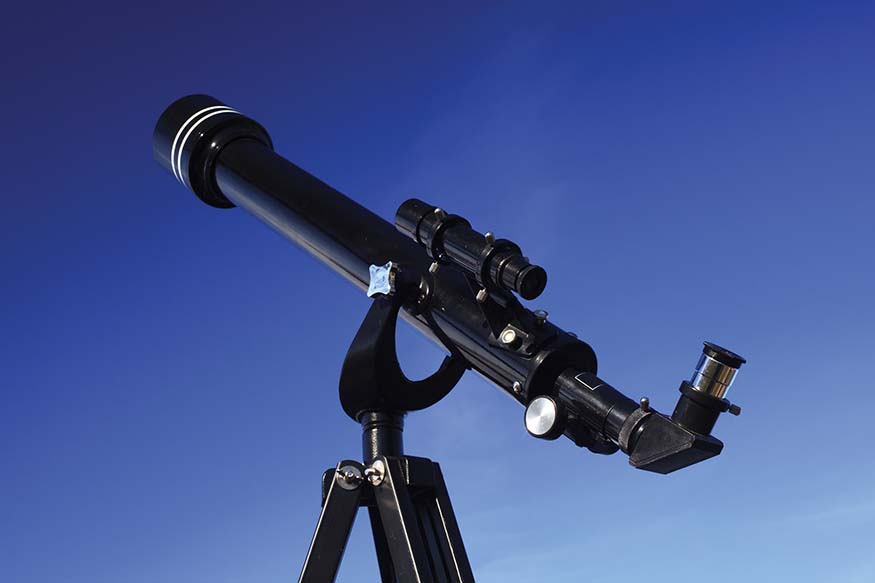
REFRACTOR TELESCOPES The first telescopes were all refractors. They are amazingly simple: a large lens at the front gathers the light and focuses it onto an eyepiece. Views through a refractor are sharp and high-contrast. Many people prefer them for viewing the planets.
A REFRACTOR TELESCOPE
Unfortunately, they have one major drawback: they are very expensive. For the price of a 3-inch refractor you could buy an 8-inch reflector of equivalent quality.
Most refractors are 70 to 120mm in aperture and f/6 to f/12. The faster ones are great for wide-field views of nebulae and large star clusters, while the slower ones are best for planets and small clusters.
I would not recommend a refractor as a beginner scope. The inexpensive ones are of low quality and seldom worth the price. But if you have experience, and are willing to pay the price, a good refractor can be an amazing instrument.
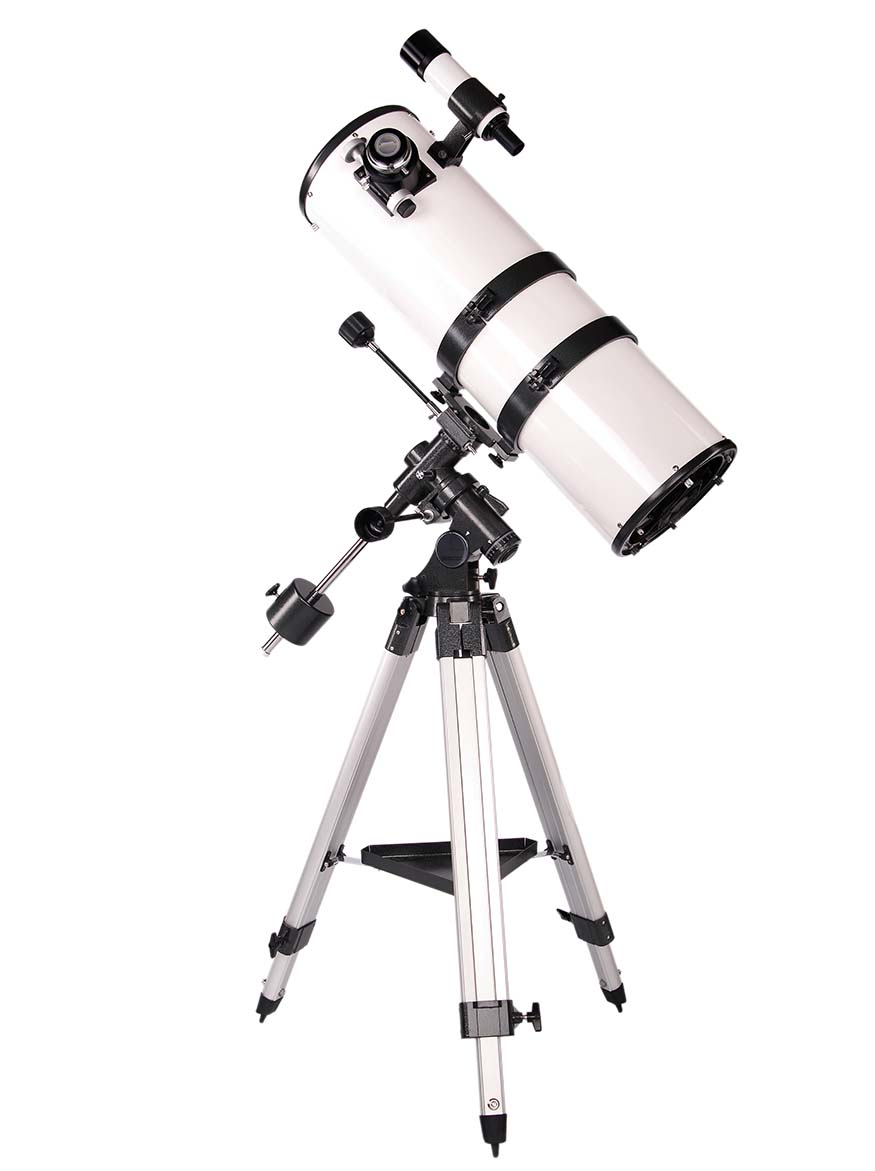
NEWTONIAN AND DOBSONIAN TELESCOPES Sir Isaac Newton invented the reflecting telescope, which uses a curved mirror to focus light instead of a lens. The price advantage is immediately obvious: only one surface needs to be polished instead of two.
A NEWTONIAN TELESCOPE
A second advantage is more subtle. Lenses suffer from chromatic aberration—different colors are focused at different points—causing bright images to have color fringes. Correcting these distortions require more lenses—and more money. Reflecting telescopes don’t suffer from chromatic aberration, and can thus be simpler.
But reflecting telescopes also have a drawback. The primary mirror reflects light and focuses it in front of it. You can’t put your eye at the focal point because your head would block the telescope! Instead, a smaller secondary mirror bounces the light to the side where it can be focused by an eyepiece. But the secondary mirror blocks some of the light and causes a loss of contrast.
Nevertheless, the price advantages of a reflector are worth the trade-offs. All modern observatories, including the Hubble Space Telescope, use reflecting mirrors instead of lenses.
Newtonian telescopes come in all sizes, from tiny 4-inch aperture reflectors (like my old Astroscan) to monster 16-inch telescopes.
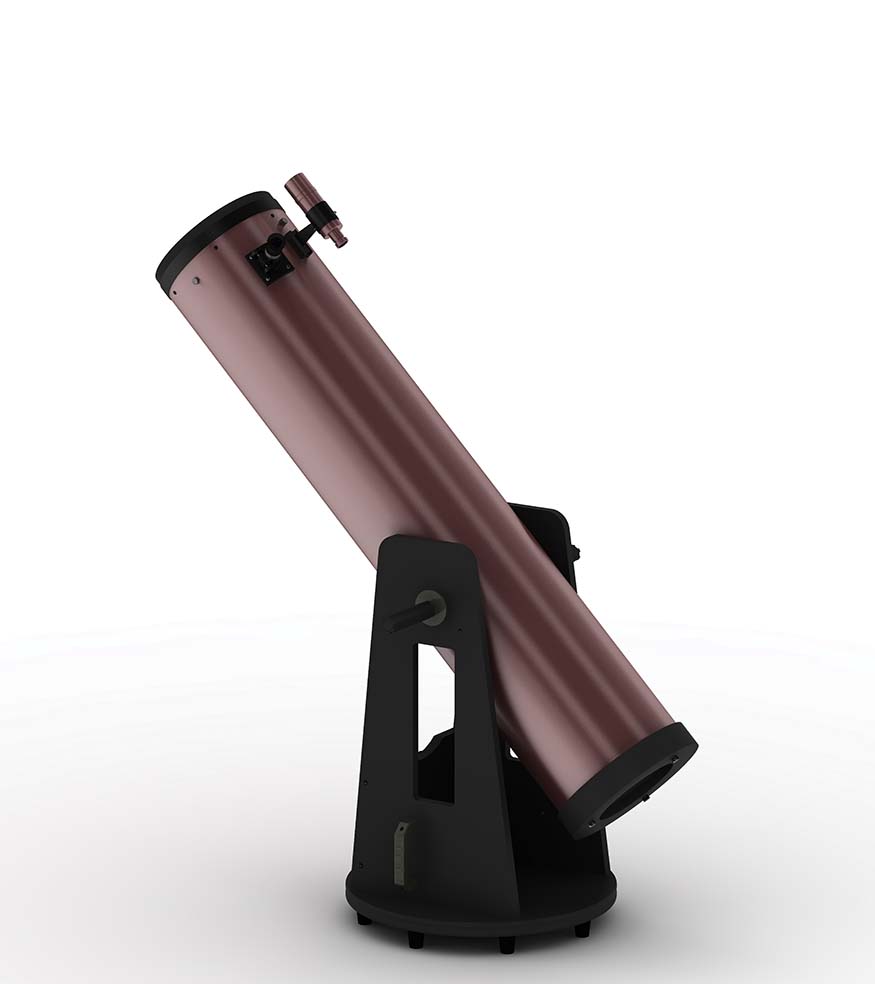
Larger telescopes are heavier and require a heavier (and more expensive) tripod mount. An alternative is the Dobsonian mount, popularized by John Dobson, which does away with the tripod and places the bottom of the telescope on a rotating “cannon mount”.
Dobsonian telescopes are very capable and probably the best option for apertures above a certain size. Their only drawback is that they cannot be used for long-exposure astrophotography.
A DOBSONIAN TELESCOPE
Newtonian telescopes often have short focal-ratios—f/4 to f/6—and are ideal for faint nebulae and galaxies.
Bigger is often better, but remember that the best telescope is the one you actually use. If it’s too hard to take your heavy telescope to a dark site, you will not use it as much. You might be better off with a smaller, more portable model.
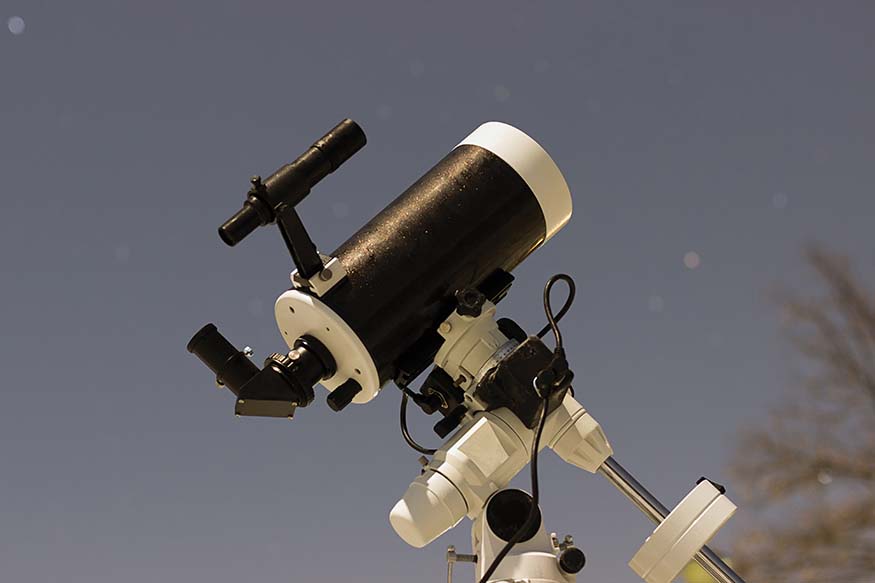
SCHMIDT-CASSEGRAIN AND MAKSUTOV-CASSEGRAIN TELESCOPES An 8-inch aperture Newtonian telescope with an f/6 focal ratio is at least 48 inches long! A 16-inch one is at least 8 feet long—probably too large to fit in your car. Is there a better option?
The popular Schmidt- and Maksutov-Cassegrain telescopes were designed to have long focal lengths in a compact body. Light from the primary mirror bounces off the secondary, but instead of bending it to one side, it sends it back through a hole in the primary mirror. The result is a longer focal length in a smaller body.
Most Schmidt-Cassegrains are between 8 and 12 inches in aperture and have f/10 focal ratios. These specs make them good for planets, planetary nebulae, and small clusters. Faint nebulae and galaxies are not as bright as through a rich-field Newtonian, but still reasonable.
Maksutov-Cassegrains are usually smaller, around 4 inches in aperture, and have higher focal ratios: from f/12 to f/14. These are great for views of planets, lunar craters, and other small but bright objects.
A MAKSUTOV CASSEGRAIN TELESCOPE
HOW TO CHOOSE As with any other decision, experience makes things easier. The more time you spend looking through a telescope, the easier it will be for you to decide what you want. Star parties and local astronomy clubs (or just friends in the area) are your best bet for gaining experience without spending a lot of money.
With a little bit of familiarity, the choice will be easier.
Astrophotography is the hardest kind of photography. It takes a lot of equipment and a lot of practice to get even mediocre results. Lots of beginners quit because they expect to take an amazing photo on their first night.
You can take some pictures without a telescope. If you have DSLR with a good zoom lens you can start taking pictures of the night sky. You’ll still need good image stacking software and you may want a tracking mount.
Unfortunately, the set of objects you can capture this way is small. Eventually you’ll want more. Follow these steps if you want to try for more:
STEP 1: GET A TELESCOPE In astrophotography, the focal ratio is critically important. In visual astronomy, you can use an eyepiece to change the magnification. But in astrophotography, there is no eyepiece. The camera is at prime focus, so the focal length of the telescope determines the magnification, and the focal ratio determines the brightness of the image.
If you want to take pictures of planets (which are small and bright), then you should get a high focal-ratio telescope (f/10 or higher). But if you want to take pictures of nebulae (which are large and dim), you need a “fast” ratio; f/4 is good if you can get it.
If necessary, you can use a focal reducer to decrease the focal ratio of a telescope. Or you can use a Barlow lens to increase the focal ratio.
STEP 2: GET A TRACKING MOUNT You need excellent optics, of course, but even more important is an accurate and steady mount. When you take pictures (particularly of faint galaxies) you’ll need to expose a frame for up to an hour. That means your telescope has to exactly match the rotation of the Earth, or else your target will move in the frame and smudge the image. The more accurate the telescope mount, the easier this is.
Look for a tracking equatorial mount. Dobsonians are out, since they can’t usually track. You should also avoid alt-azimuth mounts, which can track but cause image rotation. If at all possible, stick with a German Equatorial Mount or a fork mount with an equatorial wedge.
I recommend you spend at least 50 percent of your budget on a mount. Get a smaller telescope, if necessary; the mount will be worth it.
STEP 3: GET A CAMERA If you have a telescope and a tracking mount, you can point it at the moon and just take pictures with your phone camera! Even planets like Jupiter and Saturn can be captured by just pointing your phone camera at the eyepiece. As long as the object is bright enough, a quick exposure is enough. For fainter objects, though, you will need a camera directly connected to your telescope.
DSLR: You can do decent astrophotography with an off-the-shelf DSLR. All you need is the proper adapter to connect the camera to the telescope (T-adapter). These adapters are relatively cheap and all major cameras have them available.
The advantage of this path is that you might already have a DSLR, in which case you don’t need to spend more money. I would definitely start here if that’s the case.
The disadvantage is that DSLRs are not well-suited to astrophotography. For one thing, they all have an infrared filter over their sensor (because we don’t want to see infrared in our pictures). For astronomy, unfortunately, that means we lose a good fraction of light.
Planetary Camera: If you’re taking pictures of planets, then you need a fast, high-resolution camera. Planets are small and bright, so you don’t have to worry about capturing a lot of light. Instead you need to worry about atmospheric distortion.
Planetary cameras take several shots per seconds, hoping to get one where the atmosphere is briefly steady. You end up with thousands of frames, from which you pick the best ones.
Fortunately, these kinds of cameras are cheap (˜$200), so if you’re interested in planetary photography, this is the way to go.
Monochrome Camera: Another disadvantage with DSLRs is that they take color pictures. Camera sensors just detect light intensity (not color), so DSLRs have color filters in a special pixel pattern (Bayer filter). The result is that some pixels are dedicated to red, some to green, and some to blue. When combined, we generate a full-color image. But one downside is that the resolution is reduced.
A different way to take color pictures is to take three complete images: one with a red filter, one with green, and one with blue. You can then combine the three channels to make a full-color image.
Another advantage is that you are not limited to color filters. You can use special narrowband filters, which focus on a very specific wavelength. This highlights the detail in nebulae. Most Hubble Space Telescope images, for example, are taken with narrowband filters. But if you get this far, you’re definitely an advanced astrophotographer!
STEP 4: GET PROCESSING SOFTWARE Believe it or not, most of the time I spent on astrophotography was not on a telescope but in front of a computer.
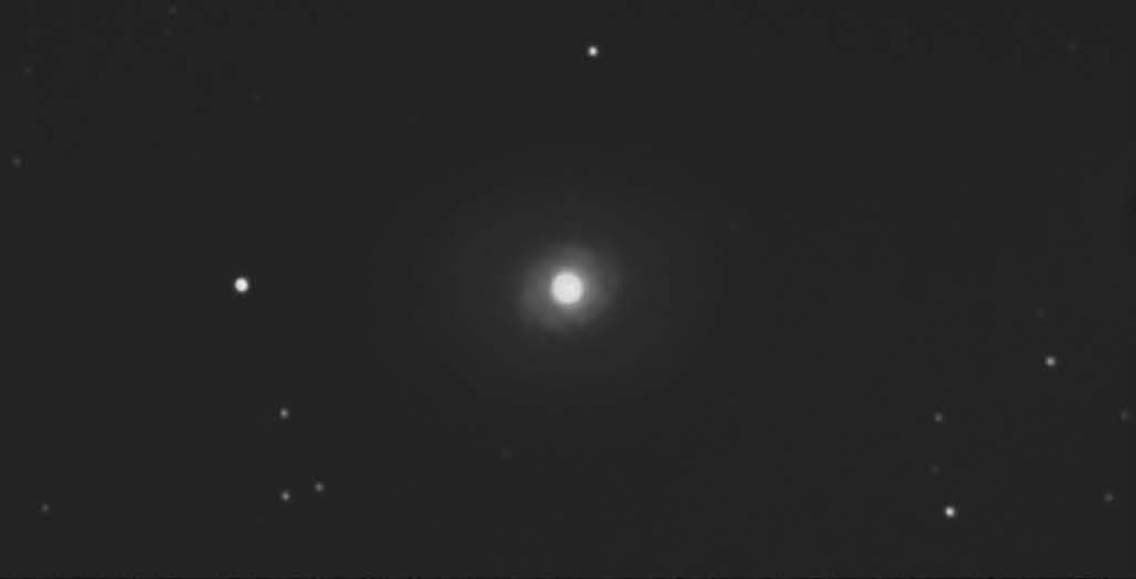
The top frame is a single one-minute exposure of the galaxy M94. Note that a minute is actually a long time. In one minute the galaxy (actually, the Earth) has moved maybe a half of its diameter. If I didn’t have a good mount you’d see a blurry streak.
The galaxy is very faint, just a little bit brighter than the surrounding background. We can enhance it by brightening the entire image—this is equivalent to the Levels or Curve command in Adobe Photoshop.
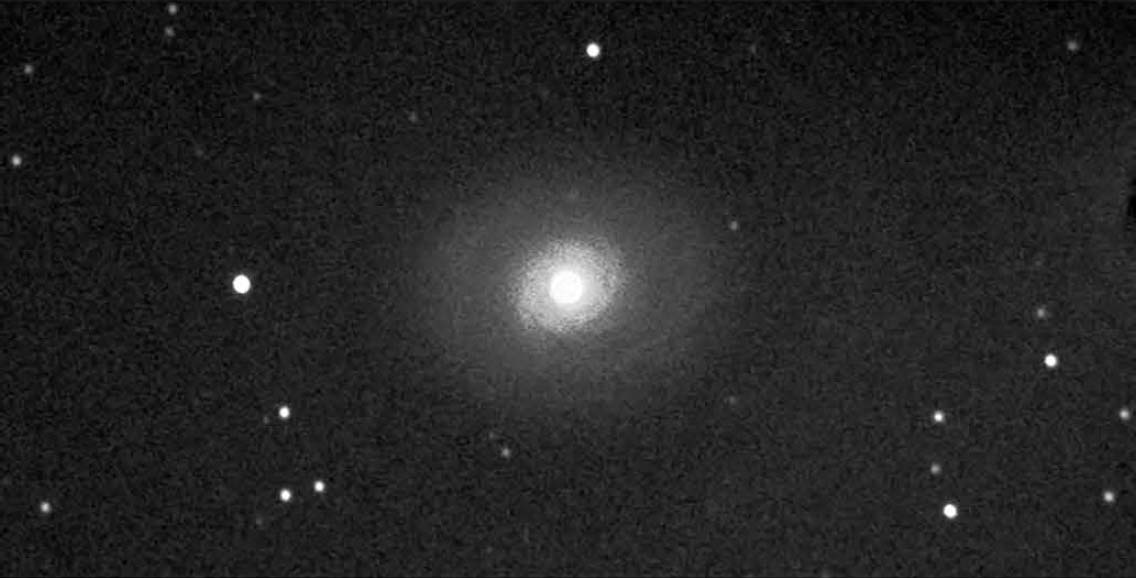
The second frame has enhanced the single exposure. Notice how noisy it is? This is just like taking a picture in very low light. We can’t control the light of the galaxy, but we can expose for longer to reduce noise.
Unfortunately, you can’t expose for too long. First, the more you expose, the greater the chance that your tracking will have errors, which will ruin the image. Second, if you expose too much, eventually the sky background will be so bright that the sensor gets saturated. Then you just have a solid white picture.
The answer is to take lots of shorter exposures and stack them together. Essentially, you mathematically add the two exposures to get a single exposure. The randomly distributed noise will cancel out, but the signal will get stronger! It sounds like magic, but it’s quite common.
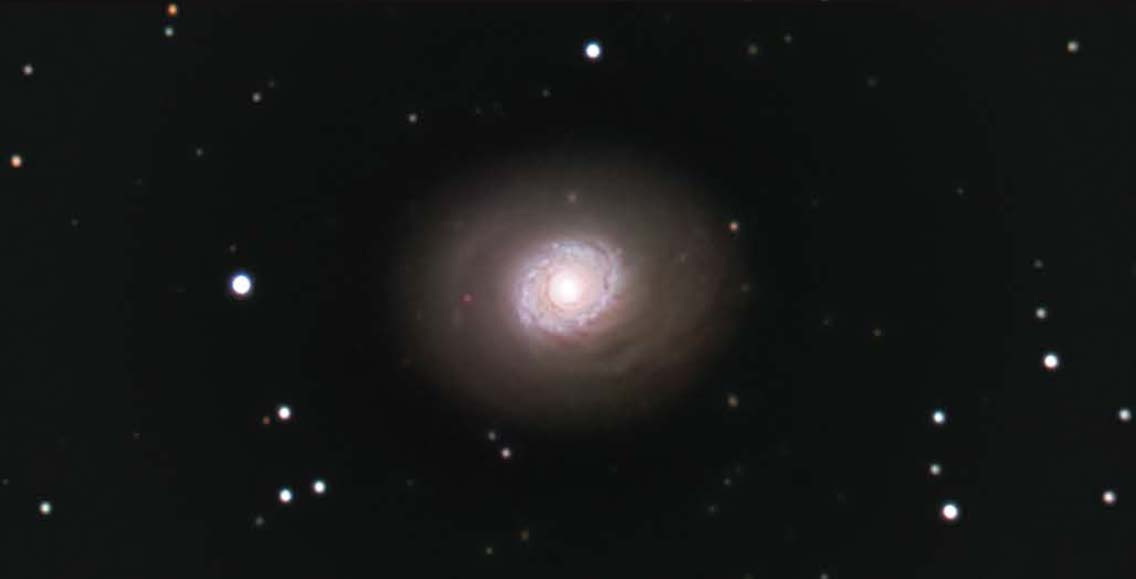
The third frame above is a composite of 220 individual exposures. Yes—you need that many to get a decent quality. Considering that I had to throw out many individual exposures due to tracking errors, the above required more than four hours of telescope time. And that’s just for the monochrome version. Add more time to get the red, green, and blue images.
There is lots of stacking and processing software out there. If you buy a dedicated astrophotography camera, it usually comes with some software. Otherwise, I recommend something like Stark Lab’s Nebulosity.
The final image combines the color stack and cleans up some of the background. For these kinds of tasks I use Adobe Photoshop, but any good image processing software will work.
STEP 5: GET A GUIDE CAMERA This step is optional. If you’ve gotten to step #4, then you’re all set. You can take amazing images of a wide range of targets. But, eventually, you’ll want to get a guide camera.
Remember that one of the biggest problems is accurate tracking. Even the best (i.e., most expensive) mounts have some amount of error. Gears and motors have tiny flaws.
To compensate, you need a second camera taking pictures of a single star, automatically communicating with the mount to adjust. When the guide camera sees the star move to the left, it tells the mount to slew to the right.
In order for this to work, you need a computerized mount that can receive commands in some way. You also need a way to mount the second camera so that it can see a guide start without getting in the way of your primary camera.
Astrophotography can be daunting, expensive, and frustrating, but the results are worth it. Give it a try!