 |
STANCE HABITS TO CHANGE |
If I asked you, “How much do you weigh?” you’d hop onto a scale and tell me the number that it gives you. But that number is really how much all of you weighs when you’re standing on the scale. If you had a tiny scale in each knee, you could get them to give different numbers just by putting more of “your weight” over one foot. How you stand matters when it comes to loads in the body.
Right now you have a way of standing that is based on your movement history, including the kind of shoes you have worn. Just because you take your shoes off doesn’t mean you’ll automatically stand differently. Well, you will stand differently right away, but it might not be differently enough—especially if you’re motivated by musculoskeletal pain.
The following are general guidelines on how to balance your weight evenly over and between your feet, as well as how to position your feet relative to your knees and hips, and how to carry your weight relative to the ground, to allow more of your body to participate in standing and moving. In the long term, a new stance can lead to more stability of your body parts, which can lead to improved health.
Because you’re likely to be using your body outside of “doing your exercises” and because your body is adapting to inputs one hundred percent of the time, adjusting your habitual stance can have an even greater impact than just doing exercise. When you adjust your posture you’re essentially doing the same thing as an exercise—creating a new load and asking your body to adapt. For best results put your exercises on a calendar and stick to them, and keep these stance modifications in the front of your mind, ensuring constant adjustments all day long.
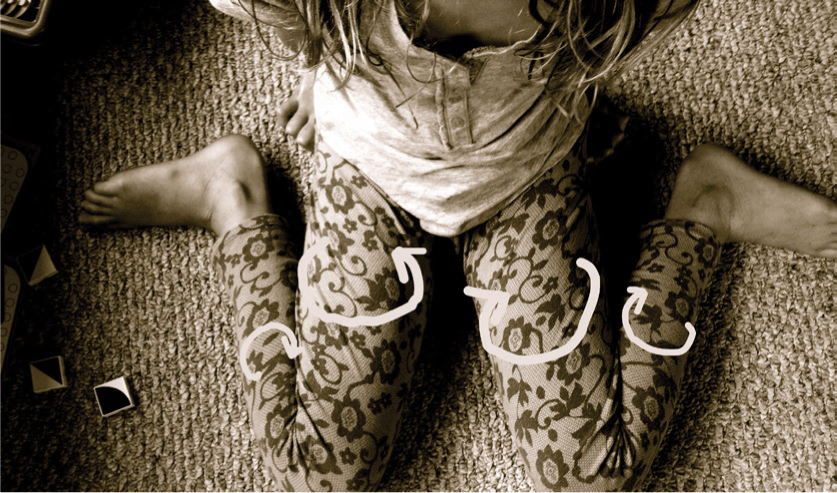
If you’re standing around—and you’re often going to be standing around—constantly cycle through this list of adjustments to balance out your loads:
While we all have different movement backgrounds, a shared cultural theme (flat ground, shoes, sitting the bulk of the day starting as five- or six-year-olds) seems to have resulted in a similar adaptation: most of us tend to stand, walk, and run with our feet splayed outward to varying degrees.
Because the position of the foot sets the stage for the way the joint axes and muscles line up from the toes to the hip, the feet need to be brought around (forward).
To measure how your feet line up, try to stand with your feet completely straight, lining up these two points along the outside edges.

No, it’s not necessary to force your body all the way straight right off the bat; there are many tissues that need to adapt to this new position. However, your exercises should all use this baseline as much as possible. And when you’re walking, you can attempt to correct to whatever degree suits you.
And I’m compelled to say that keeping your feet straight is really much more complicated than I’m making it seem here, but I want you to have an idea of where we’re headed. For a more nuanced and complex look at how to keep your feet straight, see the Un-Duck Your Feet section on page 87.
As I mentioned at the beginning of this section, the weight (weight isn’t the ultimately correct term here, but I think it’s the easiest to understand and therefore I’m using it, mmkay?) that gets placed on the joints depends on how the bones and muscles line up. For many of us, the way the foot-knee-hip line stacks up results in a higher-than-normal load on the medial (towards the midline) side of the knee, which is a risk factor for ACL (anterior cruciate ligament) and medial meniscus tears.
To reduce medial loads when standing or walking, try this:
Standing in front of a mirror, line up the middle of the front of your ankles with the bony prominences at the front of your pelvis.

This better distributes the weight of the body over the entirety of both knees. This arrangement is easier to do when standing than while walking, but even widening your ankles slightly makes a difference. If, for example, you tend to walk with your ankles very close together—similar to walking on a tightrope—open them just a bit, bringing the ankles closer to pelvis-width apart.
Another way to check this “line up” is to go up and down stairs. After planting your foot on the stair, does your knee end up dropping inwards as you transfer your weight onto it?
All of these scenarios—close-footed walking, inward knee dropping, and standing with your ankles too far apart or too close together—make for wonky knee loads. And the wider the pelvis, the greater the medial knee loads with narrow foot placement. This is likely one of the reasons women struggle more with ACL issues and knee osteoarthritis.
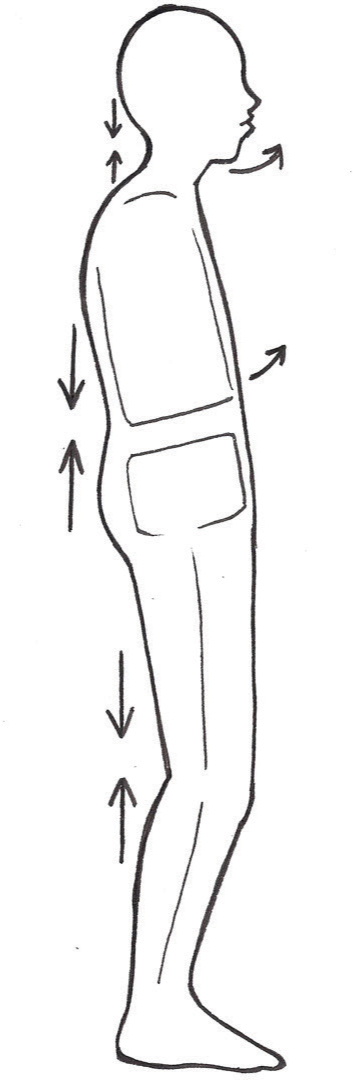
If you stand sideways to a mirror and hang a plumb line down from the center of your hip joint, you’ll probably find that the other end is dangling over the front of your foot.
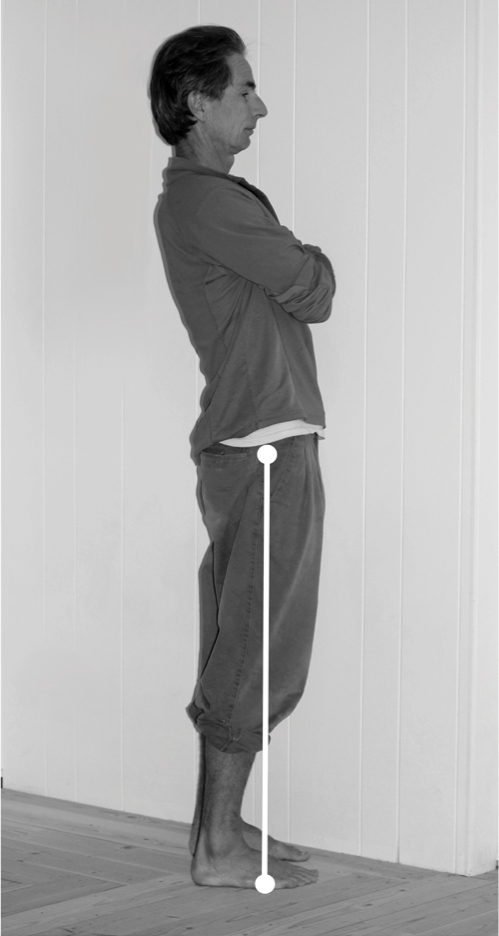
The loads created by standing this way are problematic for many reasons, but setting aside things like increased psoas tension, lower-back compression, and reduced weight-bearing status of the hips, it’s also a big problem for your feet.
If you find that you do tend to stand with your pelvis out in front of you—a totally normal adaptation to wearing heeled shoes for your entire life—then the bulk of your weight is being carried over the small bones of your feet, instead of being distributed throughout larger, stronger bones in the shins, ankles, and heels. Pelvic thrust also makes it difficult to rotate your thighs (the next stop on the alignment train) because your quads have to tighten to keep your whole body from pitching forward.
To correct pelvic thrust, move your hips back so that they’re directly over the knees and ankles—so that the plumb line picks up the midpoint of the knee and the quarter-sized ankle bone over the heel.

 |
My husband loves wearing minimal running shoes. He’s active-duty army, eighteen years now, and they’re the only style of shoes that he enjoys wearing. He runs an average of ten miles a day in them. VALERIE RHYMER |
|
I have been a ballet teacher for over thirty years. Because of the demands of my job and the extreme repetitive use, I began experiencing pain in my feet, specifically my great toe joint. I have been doing barefoot restorative work for a year now and have found it extremely beneficial, restoring full articulation and relief. My wife and I walk our dog twice daily, go barefoot, and make a concerted effort to walk on a variety of surfaces. People at the dog park think we’re crazy! STELIO CALAGIAS |
Now your large heel bone is bearing the weight of your body above it, reducing the pressure on the front of the feet (and any nerves, neuromas, or hypermobile toe joints that are in there). This allows your feet the freedom they need to be dexterous, and helps release the quads so the thigh bones are free to move.
Remember when we were talking about the problem of ankle schmear, which happens in large part because of our chronically internally rotated femurs? Well, now it’s time to unschmear. Rotating your femurs—while keeping your feet pointing straight ahead, at pelvis-width apart, and with your hips backed up—until your knee pits are pointing straight behind you will undo your schmear while you’re standing. (It will also create an immediate arch, even in people who are otherwise flat-footed, which I find amazing.)
Lining up your knee pits usually requires external rotation (looking at your knees, the knee caps will move away from each other). Standing with a mirror (or a close friend) behind you, turn your thigh bones away from each other until the four lines down the back of both knees line up like this:

Note that the degree to which you need to rotate your femurs will depend on how much they’ve been rotated, and will probably vary between your two legs. Also important to note: you do NOT need to keep the instep of the foot down as you rotate your thighs to neutral. To do so can create a high torsional load to the knee, so let the inner edges of the feet lift away from the ground! Eventually they’ll be able to stay on the ground when your knee is in “neutral,” but that will take lots of the intrinsic foot muscle mobilization exercises in the next section.
All habits can be difficult to change, either mentally or physically. As far as overcoming the mental hump, strive to keep the stance points in mind as you move through your day.
As far as physical difficulty goes, the following is a list of corrective exercises designed to mobilize the typically underused parts of your body and restore lost ranges of motion and muscle so you can move better. You should find that the exercises done in conjunction with the all-day alignment awareness reinforce each other. Meaning, it will become easier to “get into position” when necessary, and by doing so with regularity, the need for the correctives will decrease. Your body will become mobile simply from the way you use it in day-to-day life.
|
STRETCHING THE INTRINSIC TISSUES OF THE FOOT |
Intrinsic foot muscles are those that both start and end within the foot, and in this section I’m including all “musculoskeletal” tissues—bone, ligament, tendon, and fascia—that reside within the foot alone. Because your foot has been contained in a shoe for the bulk of your life, chances are you haven’t been walking on surfaces that would naturally be pushing the tiny bones in your feet around—which is unfortunate, as it is that passive deformation that results in the muscles responding and adapting to these movements.
The flexible, thin sole of minimal footwear will let a lot of this motion in now, but your feet have essentially been casted for decades. In the same way I wouldn’t recommend ripping off an arm cast and doing a hundred pushups, I don’t recommend throwing your ill-prepared feet into nature.
With a lack of muscle use comes less circulation (read: nourishment) to all the tissues of the feet—including bone. Research into minimally shod running has shown an increase in bone marrow edema—the precursor for bone fractures. Why? Who knows. Form, level of impact, hardness of ground, distances traveled, and health of the foot tissue to begin with are all players in the equation that is Your Foot Injury. What I do know is that most people I know have spent decades not loading their intrinsic foot tissues, and most people coming to me with foot injuries have difficulty recruiting the fine motor skills that should be inherent to feet. So let’s start there.
Separating—also known as abducting—your toes mobilizes the bones, muscles, and connective tissues in your feet so you can start achieving better intrinsic muscle strength, circulation, and nerve health. Eventually you will be doing this with the muscles within the feet, but first you’ll start by using the muscles of your hands.
Start by sitting with one ankle crossed over the opposite knee. With your hands, gently spread your toes apart, stretching the toes away from each other. Ideally you’ll hold the toes apart for a minute at a time, but start with smaller distances and shorter intervals—maybe fifteen seconds—and progress to greater distances and longer holds as you feel comfortable.
Eventually you can interlace your fingers and toes together—the same way you would with your hands, but with one hand and one foot instead. I like to hang out like this when I’m reading or watching movies. Bonus: you’ll end up doing some hip stretching as well because WHO PUT MY FEET SO FAR AWAY?

If you’ve read my other books/blog posts, you know I’m all about time management and getting movement done while you’re doing other things. You might have four hours to spend pulling your toes apart (which sounds like a lot, but I’d bet you’ve never balked once at your shoes pressing them together ten hours a day, every day for the last thirty years), but then again probably you don’t. Easy solution: get some toe-alignment products like toe-spreading socks and toe-spacers. This makes a passive stretch even more passive—you don’t even need your hands. Yes, I said it. Hands-free foot health is available, if you want it.
Wear your spacers/socks overnight or while you watch TV so that you’ll be working your foot kinks out while getting something else done. Like sleeping. (For what it’s worth, I woke up three hours into the first night sleeping with my alignment socks on. My feet were screaming—they had had enough exercise for one night. Listen to your body!)

So you’ve got your thighs in neutral but the ball of your foot is miles from the ground. Why? In general, the thirty-three joints of the foot have lost all their mobility—they’ve clumped together as a response to negative input (the surfaces and shoes you have walked upon didn’t require that these joints stay mobile) and now your “foot” motion comes only from the ankle. Want evenly mobile feet? Start introducing low and controlled loads to the feet that will mobilize the muscles and joints within them.
Start standing with a tennis or similarly sized squishy ball under the arch of one foot. Slowly load your weight onto the ball, moving your foot forward and back and side to side to apply pressure to individual joints within the foot.

I told you that there were thirty-three joints in each foot already, yes? Well, I’m telling you again. Think of your foot as a floor you must vacuum. When it’s your turn to vacuum, you don’t just go around the edges, do you? Vacuum along a single line down the arch of the floor? Nope, you vacuum all of it. Apply this diligence to your foot massage. Move tiny distances at a time. Leave no foot joint unstimulated. (Note: Again, if you live in a vacuum, this does not pertain to you, as why would you ever be vacuuming?)
Work the sole of the foot with the ball, applying more or less pressure as needed. Eventually try different ball sizes and firmnesses. Each will mobilize the joints differently.
This stretch is great for undoing chronic “gripping” tension in the toes and the front of the ankle. Refer back to the “what your feet do in flip-flops” graphic to see how this stretch undoes the specific motions necessary to keep on an unattached shoe. If you’re a chronic flip-flop wearer, then this exercise is especially pertinent to your feet.
Holding on to something if necessary, stand on your right foot and reach your left foot back behind you, tucking the toes of your left foot under and placing them on the floor.
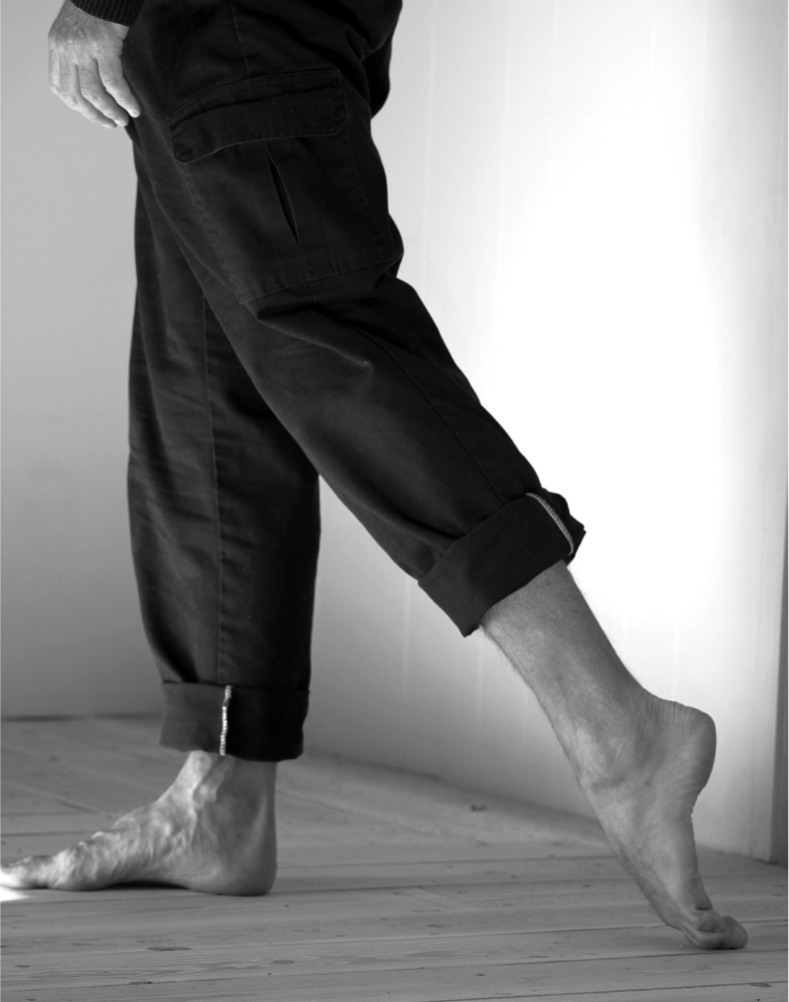
The tendency here is to lean the entire body forward to reduce the load to the feet. If your body is really leaning forward, then shorten the distance you’ve reached the leg back or sit down in a chair to lessen the load.

Once you’re used to the load, try bringing your pelvis over your standing (not your stretching) ankle, and try to bring the upper body over the hips. Once here you can decrease the stretch by bringing your left foot forward, closer to your right foot, or increase it by moving it farther back.
The goal is to work up to holding this stretch for a minute, but it’s very common to experience cramping. If you do, just come out of the stretch, wait till the cramp passes, then try again. And then, of course, switch feet.
This is a super portable stretch that you can do any time you’re standing. Do it a few times every day until your feet regain their intended dexterity and/or until you’ve eliminated any cramping.
The Top of the Foot Stretch targets not only intrinsic foot muscles, but extrinsic ones as well, which makes it the perfect segue into…
|
STRETCHING THE EXTRINSIC TISSUES OF THE FOOT |
Extrinsic foot muscles are those that have one attachment in the foot and one outside of it. Basically anything that passes over the ankle, moving the foot relative to the shin or thigh, counts as an extrinsic foot tissue, and as you work on these, you’ll see how footwear really does create whole-body alignment problems.
I often say that if I could make everyone do just one stretch, it would be this one. There are a few reasons for this. The first is that our calf muscles are chronically shortened in this culture due to heeled shoes (which create forced plantarflexion, a.k.a. toe-pointing) and sitting (forced calf shortening via knee flexion). If you’ve worn shoes and sat throughout your life, you’re missing an essential distribution of mass. Second, your calf muscles have some of the greatest responsibilities when it comes to keeping you upright and mobile. Critical for the endurance of standing and controlled walking (which is the opposite of “walking is falling”), you need your calves to be in tip-top shape. And thirdly (but not finally; I could go on and on, but I won’t, this one time), the tension in your lower body while walking has a whip-like effect on the top. Meaning your upper spine and head can be unduly accelerated by tension IN YOUR CALVES.
Have you ever seen a wave break? Well, here’s how it works. A section of water comes to shore at the same speed. But as a wave approaches shallow water, the inclined sea bed slows the bottom of the wave down, causing the upper part of the wave to accelerate right on over. And so, it breaks.
Now picture a gait pattern where the lower part of the leg is slowed down due to tension between the foot and the shin. What happens? The shin is slowed down relative to the whole body, accelerating the upper body over the slowed bottom half. No biggie, since you can compensate by simultaneously firing opposing muscles to keep that forward motion from happening (i.e. you can prevent a net forward motion), but what you end up with is a walking pattern that tenses your upper back and neck with every step. This way of firing your muscles can result in chronically tensed muscles down the back of the neck, shoulders, and upper spine—muscles that have adapted to the tension in your leg.
Why is this important, you ask? If you’re working on neck and shoulder issues, wondering why they’re not getting better, consider that these parts need to stay tense to cope with the forces created by HOW YOU WALK.
And now, the Calf Stretch.
Place the ball of your left foot on the apex of a half-foam roller (I use a 6 × 3 × 12-inch one) or a rolled-up folded towel, drop the heel all the way to the ground, and straighten that knee. Hang out here for a bit, then try to step forward with your right foot.
You should be able to bring your right foot all the way forward, but most people can’t do this immediately. Instead, take a smaller step—your right foot might remain behind your left, or be at the same level, or only a little bit forward. Keep your weight stacked vertically over the heel of whichever foot is farther back.

You can make this stretch easier by bringing the front leg back a little bit, or by sliding the foot on the roller back a little bit to keep the toes lower. If you’re really struggling—say you’re having trouble standing upright, or you have to tense your whole body to keep the tension in your lower leg from launching your body off the dome—ditch the foam roller. Start with a folded-then-rolled towel or the front of a phone book, which both tend to be shorter than the dome. You can move back to the dome after you’ve mobilized some of the tissues in your lower leg.
Stretch the calf muscles in both legs as many times in a day as you can, for up to a minute at a time. I like to leave a half-foam roller in a few different rooms of the house so I can stretch my calves while I’m on the phone, brushing my teeth, or making supper.
This stretch targets the gastrocnemius muscle.
This stretch is a companion to the above Calf Stretch, targeting the soleus (which is the deeper muscle of the calf) and the Achilles tendon, both of which are shorter than necessary in most of us.
Place the ball of your right foot on top of the dome or rolled towel again, and lower your heel to the floor. Step forward until your left foot is roughly level with the right, and then bend your right knee without lifting your heel (your other knee can bend too). Hold this for thirty to sixty seconds, and repeat on the left side.

|
My feet grew a full size after starting to walk more barefoot and in minimal shoes. I can not fit in my first pair of Vibram Five Fingers from six years ago anymore. I can also do more pistol squats on one leg. I used to be able to do three or four, now I can do fifteen at a time. In the single-leg pistol squat, foot stability and proprioception are super important. GALINA IVANOVA DENZEL |
The soleus is often neglected in a calf-stretching regimen because it requires a different joint configuration than what’s necessary for targeting the other calf muscles in the group. How much do you need this one? As much as all the others, so make sure to do this stretch as often as you do the other Calf Stretch.
This stretch continues the work of the Calf Stretch, but also targets the hamstrings and connective tissues (fasciae) that wrap around the series of joints that make up the feet and leg. I know that the hamstrings may seem super far (seventeen inches) from your feet, but, like, everything’s connected, man. Tight hamstrings keep the knees slightly buckled, which in turn keeps the calves and Achilles tendons short—OR IS IT THE OTHER WAY AROUND? One can’t really say. Either way, this stretch helps you recognize the adaptations that come about from sitting and standing, and slowly nudges these tissues into a different state.
Stand in front of a chair, facing the seat. With your feet pelvis-width apart, knees straight, and feet pointing forward, tip the pelvis forward until your palms rest on the chair.
Can’t reach the chair without really bending the knees or rounding the back?

Stop! and make your seat height higher or move to a counter or desk top.
Once your arms are down, see if you can allow your spine to drop down toward the floor, and your tailbone to lift toward the ceiling. Don’t force your ribs to the floor or arch your back—just consciously relax the spine to the ground as much as you can.
If you noticed your back was curved upward like an angry cat, it means that the tension down the back of the leg is there, all the time, working on your spine, knees, or both. If you can pepper your day with this stretch (makes for a great break from sitting), you’ll notice an improvement.
Other pointers on this one include:
Keep your weight back in your heels, far enough back that you can wiggle your toes. Relax the back of your neck. Really. Try lowering the top of your head toward the ground, which moves the load into the fascial wrapping extending down your entire backside.
Once you can hold this for sixty seconds comfortably, add your half-foam roller or rolled towel in front of the chair, and repeat the stretch with the balls of the feet on the apex of the roller.

This ups the ante quite a bit. Add it when you feel ready.
This stretch focuses on connecting, for the exerciser, the relationship between tension in the calf and coping mechanisms like bending the knees and pointing the toes.
Lie on your back and loop a strap (or a belt) across the toe-box of your right foot. Straighten your right leg above you and extend your left leg until your left hamstring is touching the floor. If you have to bring your right leg lower for the left hamstring to touch, do so, keeping both legs straight. Allow your arms to hold the weight of your right leg—relax it completely.
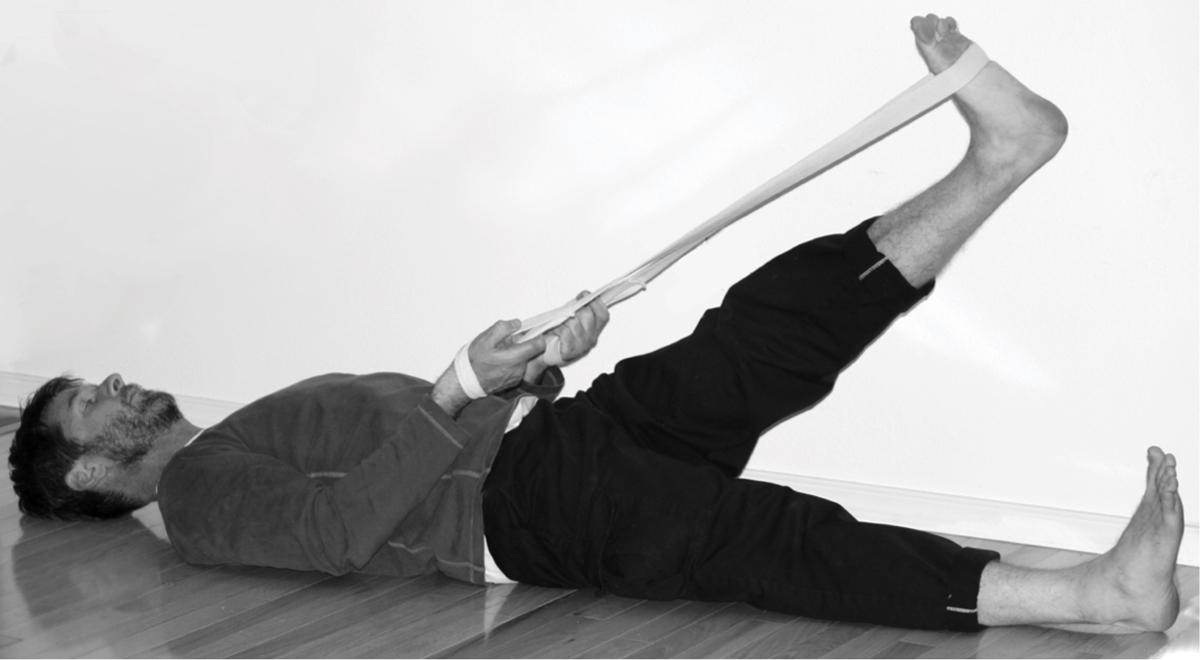
Now, pull your foot toward you—with the strap, not with the muscles down the front of the shin. Keeping your ankle in place, pull your right leg higher in small increments, without allowing the left hamstring to come up off the floor. You might notice that, in order to reduce the stretch to these areas, you’ll want to point the toes slightly or bend the knee. This is a normal reaction, but it’s also what allows the tension down the back of the leg—and the resulting gait patterns from this tension—to persist. The goal is not a huge, uncomfortable stretch, but a gentle stretching load to muscles that very much want to avoid it.
After you have held this for a while, bring your right leg across the body and hold the stretch there (which introduces new loads to the hip muscles that help you walk with a wider stance).
Do this one a lot. Bonus: You have to get down on the floor and back up again so it’s got other necessary movement “nutrients” in it as well. Strap Stretch is floortified with movement nutrition. Get it?
Before you do this next exercise, I’d like you to put yourself in an imaginary outfit—one that wraps your body head-to-toe and is skintight. Are you wearing it in your mind? Great. Are you wearing it in real life? Quick, go get your camera and send me a picture immediately, thanks.
Now that you’re in your imaginary suit, imagine how that suit would wrinkle or gather as your body changed the orientation of parts from neutral to sitting in a chair or wearing heeled shoes. You see, when the pelvis thrusts, or the chest lifts, the ankles plantarflex, the knees bend, etc., it doesn’t only require the rearrangement of bones. These motions require the rearrangement of the tissue wrappings over the bones and muscles as well.
In general, the way most people’s imaginary catsuits have adjusted to the backward “fixing” of the forward projection created by heeled shoes is by shortening areas of the suit on the backside and lengthening the suit on the front.
Again, this phenomenon is not local to the ankles, but includes “suit wrinkles” all the way up to the back of the neck. The neck! From what’s on your feet!
So you can see why foot issues are really whole-body issues. Which is why this next stretch targets both the muscles and the connective tissues all along the back line of the body.
Sit on the floor with your feet pressed flat against a wall and your legs straight.
If this is difficult for you because your hamstrings are too tight—if your pelvis is being forced to tuck backwards, straining your lower back—feel free to sit your bottom up on as many pillows as you need to be comfortable.

Fold your body forward, tipping your pelvis towards the wall as you drop your chest towards your legs. Don’t force it, just drop to wherever you can get to using gravity alone. Now, completely relax your neck, letting your head hang. Feel how the motion of your head creates an additional pull down the back of your legs? Maybe you can feel how your tendency to jut your chin up and toward the computer all day is “connected” to your lower back?

This exercise is one of my favorites because it helps people experience how, indeed, everything can be connected: your head position to the position of your sacrum, your shoe choices to your chronic headaches.
|
STRENGTHENING THE INTRINSIC TISSUES OF THE FOOT |
The term abduct as used in anatomy means “to take away from the midline.” This is a very simple way to both test and improve the health of your foot musculature.
Stand with your feet pelvis-width apart and pointing straight ahead, and your weight back in your heels. Now try to spread your toes apart as far as you can, just like you can spread your fingers. Try to make space between each toe, keeping all the toes flat on the ground.

Not surprising, but many chronically shod folks have lost their ability to abduct their toes—a lifetime of shoes that push your toes together has rendered your toes almost unresponsive to your brain’s signals…at first. The good news is that the more you try to do this exercise in conjunction with the manual/passive toe-spreading, the better your toes will respond to the signals you’re sending.
Repeat this exercise throughout the day, with or without shoes (and you’ll know whether your shoes are too tight in the toe-box if you can’t do this exercise in them).
This is one of the first exercises I give not only to those interested in transitioning to minimal shoes, but also to those wanting better balance, foot-nerve health, and better functioning knees and hips.
Once you’ve tested your ability to spread or splay your toes, how about seeing if you can lift them…one at a time? I know, I know. Toes seem so small and light. But in this exercise they can feel heavy.
Try to lift just your big toes while in the same stance as the last exercise. Try the right foot, then the left. Most of us can lift all our toes at once, but find it difficult to use the muscles separately.

The muscle group working to lift your big toe (the extensor hallucis group) is one of the strongest muscles in the foot. Getting these muscles working can go a long way toward restoring strength and motor control in your feet, crucial for stabilized motions at the ankle, knee, and hip. (Again, IT’S ALL CONNECTED.) Work to lift each big toe straight upward, rather than letting it veer sideways (toward the pinkie toe).
After you’ve mastered lifting your big toes try lifting first them and then the second toe of each foot, making sure to keep the balls of your feet on the floor. Then lift the third, fourth, and fifth toes. Once all the toes are lifted, put them back down one by one. Then try this again, but one foot at a time.
When you’re finished, stretch your toes with the Top of the Foot Stretch—it’s common to feel cramping in the arch during this exercise, since these muscles have rarely if ever been used before.
|
STRENGTHENING THE EXTRINSIC MUSCLES OF THE FOOT |
The following exercises target the muscles between the foot and the rest of the body, specifically how these muscles are moving during the functional task of being upright and walking around safely. Walking—as boring as it sounds—can quickly become something you cannot do. Whether this is due to foot pain, knee injury, osteoarthritis, or just a lack of strength, losing the ability to walk is a profound weight on the mind. You’re probably a great walker, but take it from me—taking it from thousands of others I’ve been in direct contact with: Keep your walking skills up, because you’ll surely miss them when they go.

Balance is one of those things rarely thought about until after a fall. And I think many people operate under the assumption that they have pretty good balance, even though they’ve hardly tested their skills. In reality, most of us might have had great balance at one time, but since we aren’t regularly exposed to balance challenges, we’re comfortable in our abilities until we end up on the ground, wondering what knocked us over.
Test yourself. Barefoot, and standing on a flat surface, stand on the left leg with the knee straight (but not hyperextended) and bend the right knee to lift the right foot slightly off the floor. What’s your ankle doing? Your arms? Shoulders? How about your face? Was that grimace there before you got started? Now, check the position of your standing foot. Did it turn out, pointing slightly to the right or left? What about your standing knee? Did it automatically bend to lower your center of mass, reducing the work to the hip?
|
I had flat feet my whole life. All my ballet shoes from when I was a kid had solid grey soles. I was jealous of the other little kids who had “footprint-shaped” wear on the bottom of their ballet shoes. Then in my late thirties I transitioned to minimal footwear per your suggestions, diligently doing the exercises and going through different types of successively more minimal shoes up to the most minimal type I could find, every day. Now, in my forties, for the first time in my life I don’t have flat feet anymore. When I pad back into the house barefoot with wet feet, I leave “footprint-shaped” footprints and I smile like a lunatic. SARAH DE VRIES |
Whatever you did, take note of how your body structurally rearranges itself to deal with balance. Then, consider that every walking step requires a period of balance and that what you do to cope—bend the knees, turn out the feet, reach your arms out to the sides—is slowly creeping into your gait pattern until, eventually, your ability to walk with balance is all the way gone and you’ve become a shuffler.
Try this exercise again, this time keeping your ankle still, your arms down by your sides, and your foot pointing straight ahead (with knee pits facing back, once you’re more advanced). This ensures you’re training your leg as it is best used in a level-ground gait, and assists in targeting more use of the lateral hip muscles responsible for correcting schmear. Hold this for up to a minute on each side, three times each.
It’s normal to think that one day you get old and, surprise! your ability to do stuff is gone. But in most cases, you’ve stopped doing a movement for a long time, the muscles and programming necessary to do it have atrophied, and when you call on the move, it’s gone. Continue to keep up your balance work—you’ll be glad you did!
This exercise takes the previous one up a notch and is a necessary step to prepare the body for walking on more varied terrain—the instability of the towel will deepen the work in the foot, ankle, thigh, and hip muscles.
Fold a towel over several times and repeat the single-leg balance while standing on top of the towel, balancing for up to one minute before switching legs. To make this even more challenging, turn your head from side to side to mix up your visual field. Want to really up the ante? Try it with your eyes closed.
This exercise might seem very similar to the previous two, but the List demands isolated work from your lateral hip muscles and is perhaps the best schmear-buster of all, when done with a neutral knee-pit (which is an advanced move, so give yourself time).

Standing in neutral—feet straight, ankles pelvis-width apart, weight on the rear of the foot—place your right hand on your right hip and pull the right side of the pelvis down toward the floor. Bringing the right half of the pelvis down lifts the left half up and will result in your left foot clearing the ground. Neither knee bends during this exercise, and you’ll want to make sure you’re not using the muscles in your lower back to hike the left hip up—a common “cheat.”
If you feel your standing ankle wobble, touch your left foot down by pointing your toes or hold on to a chair or wall. If you feel the need to move your weight forward over the front of your right foot again or notice your knees are bending, these are signs that you don’t regularly use your lateral hip muscles when walking. And you probably have some significant schmear going on. Try working on holding this for up to a minute, three times on each side.
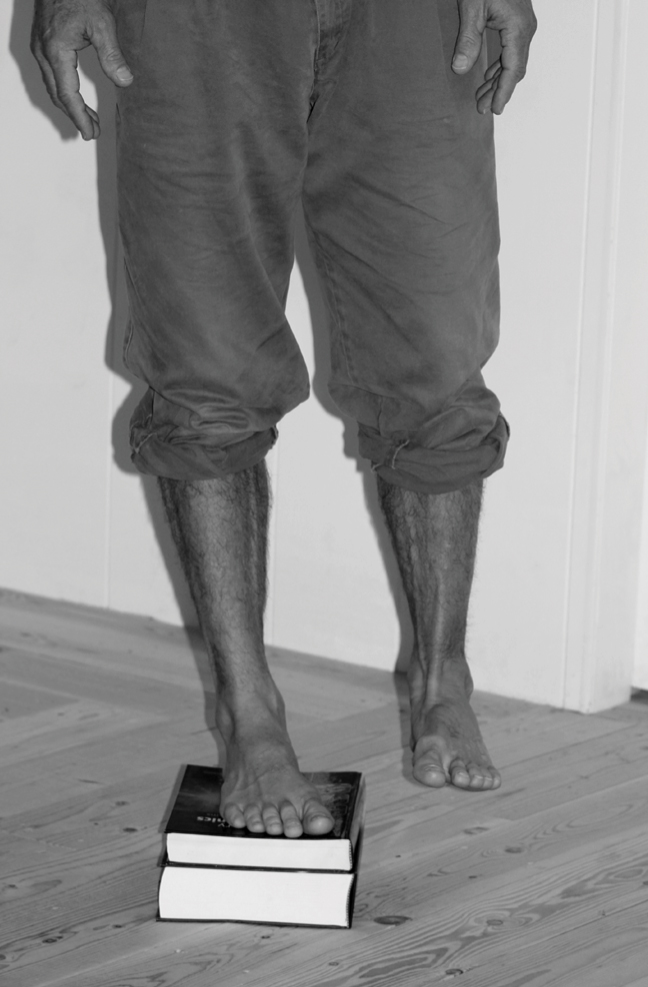
Once you’ve incorporated the Pelvic List and other exercises and habits into your daily routine, try advancing the List while standing on a phone book or yoga block with the other leg floating above the ground. You’ll follow the same listing procedure, but in addition to the pelvis hiking up, you can lower the floating half of the pelvis down, increasing the lateral hip muscle’s working range of motion. Controlled motion over a greater range of motion will better prepare these muscles—and you—for going up and down hills, which you’re going to be doing a lot once you’re done with this book, right?
If you’ve been trying to list with a neutral knee pit, you’ve probably noticed how challenging it is. Mostly because by the time you rotate your thighs to neutral, the entire instep of the foot is off the ground. How can you stand on the outside of your foot and list at the same time? The answer is, you can’t. But here’s a trick: stand on an inverted half-foam roller (flat side up, round side down).

By doing so, you’ll bring the “floor” (that is, the flat side of the dome) over to match the angle of your foot. By taking your foot’s limitations out of the equation, you’ll be using all of your listing muscles!
|
I no longer have to warm my (formerly) cold feet on my husband at night! LIBBY BATTY |
|
STRENGTHENING YOUR WALK |
I know this might seem like a strange subheading, but it’s not just the little parts of you that need to be challenged—the very way you’ve been walking needs to be “strengthened” as well. The following are walking drills to assist your transition not only to better footwear, but to natural surfaces. If you’re wearing minimal shoes for your health, then you must consider the spectrum of walking nutrients necessary for humans and not overdose on Vitamin Flat and Level. Varying up your walking experience is key to ensuring you’re not creating a repetitive environment for your newly awakened muscles. Therefore it is my suggestion that to keep feet functioning well, you expose them to other nutrients.
Unlike your toes’ muscles and joints, which can be stimulated by toe-lifting exercises, the joints of the foot “work” when deformed by what’s underfoot.
In the natural world, your feet would be made supple through the organic relationship of lots of walking and lots of varied terrain—two elements that are missing from the modern world. If you really want to use more of your feet—more of your whole body, even—you have to walk on natural surfaces.
Sand, rocky paths, dirt paths, and root-filled forest floors are all nutritional input that mobilize the feet in unique ways. But while you need this input, your feet have significantly atrophied—which means you need to progress smartly.
To do so, you’ll need texture. You can buy cobblestone mats, or find a playground with loose pebble fill, or even buy a bag of river rocks at your hardware store and put them either outside or on a mat inside. Before you walk, I suggest you stand on these surfaces. Instead of starting barefoot, take to new surfaces in your minimal shoes first, then socks, then barefoot. This way your joints will be buffered from the full impact of the joint deformation, which is another way of transitioning gradually. Listen to your feet and don’t overdo it. The next stage would be walking on these same surfaces, which increases the loads to the feet quite a bit. While you create g-force acceleration of 1G (a load equal to your body weight) when standing, it’s easy to create up to 1.75Gs while walking—a weight equal to 1.75 times your body weight—and 2–3Gs when running. This is why “barefoot training” should start with your shoes on.
KIDS, TEXTURE, AND TOE WALKING
In many cases, pediatric toe walking is idiopathic—meaning scientists and healthcare practitioners don’t know why this particular gait pattern occurs. However, recent insights were made during a trial experiment that consisted of having toe-walking kids walk barefoot over different surfaces: gravel, carpet, and a laboratory floor. (Check out Fanchiang, H. and M. D. Geil, 2014, in the references, to read the whole fascinating study.) When walking over gravel, the heel height of the toe walkers decreased, leading the researchers to believe that exposing feet to texture could be a novel treatment for idiopathic toe walking.
On one hand I am glad for the potential of a non-invasive, inexpensive, and easily accessible therapy for toe-walking patients. On the other, I find myself asking, have researchers discovered a new therapy for toe walking, or have they discovered that toe walking is a sign of a missing “movement nutrient”?
In the 1700s, James Lind discovered that lemons or oranges could cure scurvy in sailors. But as you know, the big “takeaway science lesson” from that experiment wasn’t that citrus fruits are a therapy for those with scurvy. The lesson was that foods containing Vitamin C (later discovered by chemist Albert Szent-Györgyi in the 1930s) are essential for human function. Scurvy was simply the extreme manifestation of Vitamin C deficiency that prompted the inquiry.
So, should we think of texture walking as a therapy for toe walkers, or does it make sense—considering the design of the foot, our understanding of how nerves and the balance systems of the body function, and evolutionary biology—that texture walking could be a requirement for optimal gait development?
You probably don’t have scurvy, yet you know that you still require regular doses of Vitamin C. Without it, you will begin to develop signs of deficiency. And while you might not toe walk, you might be showing signs of a texture deficiency in the form of more subtle (perhaps non-gait-related) symptoms. This most recent investigation of toe walkers strengthens the already biologically plausible argument that your body requires regular doses of Vitamin Texture.
I like to keep a cobblestone mat in a hallway I walk down many times a day or at my standing desk area. This way I don’t have to take any extra time out of my day to innervate all my intrinsic muscles.
Though it can feel like torture at first, if you expose your feet to these varied surfaces enough, you might even start to crave the sensation.
Just as your feet have been missing a wide range of stimulation (read: muscles’ work and resulting adaptations) by walking on well-groomed ground, your ankles have been chronically overfed flat-and-level, and underfed all the other degrees of deformation necessary for varying slope, squatting, climbing trees, etc. Specific to walking, modern ankles are missing all the ways they would have been deformed had you been walking up and down hills, along sideways-sloping terrain, and over larger items like logs and rocks—which means when we do encounter the occasional hole or crack in our super flat world, we’re totally unable to deal with it without injury.
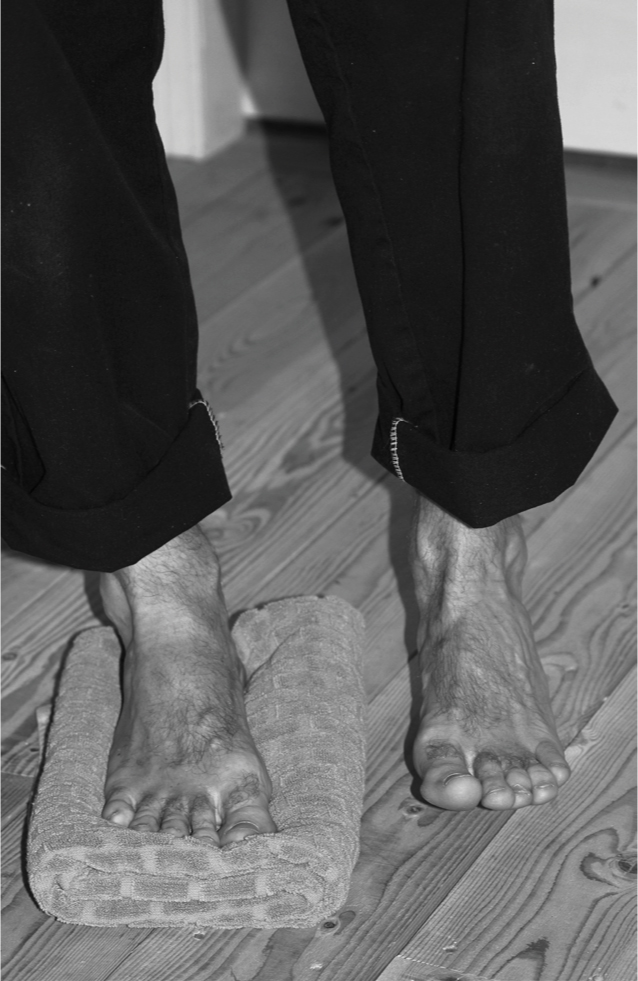
Pillow-walking is a great exercise to gently and safely introduce the muscles of your feet and ankles to uneven and unstable terrain.
Make a short “train” of different pillows and cushions on your floor—throw pillows, couch cushions, a yoga bolster, and even folded-up towels will work for this. Walk back and forth across the pillows and feel your feet and ankles waking up. Bonus: If you have kids, they’ll love this too—perfect for a rainy day when you’re trapped inside.

The calf muscles are the elevators of the body. Lifting and lowering the body to and from the ground, the calf muscles really come into play with varied terrain. Unfortunately, void of a well-rounded environment, our calves have lost the ability to work in their best plane of action—straight up and down. Instead, what most people tend to do when they rise up on their toes is a sort of rotation and sideways motion. Go ahead and try it.

When you come up onto your toes do your ankles move away from each other? Kind of roll onto the outside of the foot? Maybe your heels come closer together?
This type of “calf raise” isn’t really the plantarflexion/dorsiflexion action necessary for the calf muscles. I don’t know about you, but when I take an elevator I want it to go straight up or down, not sideways, or in a circle. And the wonkier your calves are in a calf raise, the more your feet and shins move this way while you walk.
This exercise is a great way to isolate those calf and foot muscles that aren’t working and help develop a better-supported multi-terrain gait pattern.

Standing in front of a mirror, line up your feet so they point forward, ankles pelvis-width apart. Pressing the front of your foot into the ground, slowly lift your heels away from the ground without shoving your pelvis forward. (P.S. Shoving your pelvis forward is a great way to use momentum to get up instead of using your calf muscles.) While going up and down, keep your ankles straight—imagine a pin going through both ankles, keeping them fixed both relative to the ground and relative to each other. Keep the instep of the foot reaching down towards the floor, keep the ball of the foot on the floor, and make sure you’re not on your toes. Your toes should be lift-able throughout the entire exercise.
|
I always had such dainty little feet; they were the wonder of my family. I was ridiculously proud of them, too. I also had sore, sore feet, and would have given up pretty much anything you could name (sex, chocolate…) for a foot massage. When I read Every Woman’s Guide to Foot Pain Relief, I bought a pair of super flat shoes and some small balls, massaged out some knots with the balls, and started wearing these…slippers. And my toes unfurled. Over a few months, my toes became these long, straight finger-like appendages, where curled little things used to be. And far more importantly, my feet grew strong, and I could stand long durations with neither pain nor wobbling! And now I can stride with a firm push from the big toe propelling me forward, and it is powerful and wonderful. My feet are now nearly the same size as my sister’s, my mother’s, and grand-mother’s. I’ve thrown out huge numbers of gorgeous little shoes, and instead have a respectable collection of barefoot brands. Some of them are even cute. I’d still love a foot massage though. If anyone is offering. JUSTINE ARNOT |
Initially you can do this holding on to something, but eventually you should do elevator (straight up and down) calf raises without holding on to anything. You don’t have a wall or chair there when you’re hiking, so it’s best to not train yourself to require balancing items while walking.
Eventually (once you can “elevator” with both ankles stable), try it one leg at a time. Moving uphill requires that you be able to stabilize the ankle while propelling your body upward—one step at a time. To neglect to train each ankle to hold your entire body weight is to be half-prepared for the “athletic pursuit” of walking uphill.
The best way to get a zillion joint angles in your feet, ankles, knees, and hips is to walk over natural, varied terrain. Think hilly forest trails littered with twigs, roots, and stones; a sloping meadow dotted with animal holes and thick clumps of plants; a rocky beach. Move your body through natural places and your feet will start experiencing the world the way our ancestors’ feet did. You might not be able to take a long natural-terrain hike immediately, but you can start by leaving the main path for five or ten minutes at a time, and eventually you’ll be able to go for hours.
Can’t find long stretches of natural terrain? Don’t feel limited by your urban jungle; when you’re in the city, you can often find more varied alternatives to a flat and level sidewalk. If there’s a grassy or dirt-patch verge between the sidewalk and the road, go ahead and walk on it. Is it flat, flat, flat for days? Take your hike to a skate park. Seriously! I know this stuff can sound like small potatoes, but slight movement variations—even the quick muscle responses to the most manicured of grassy surfaces—can be a big deal to an under-moved body.
|
UN-DUCK YOUR FEET |
I’ve been writing about foot turnout for years and noting that there’s an alignment to the leg as a walking structure (foot to hip) that’s best served by pointing the foot forward. Only, this process is not always as simple as turning your feet in, as not all turnouts are created the same way.
In general there are three ways of making a turnout, but also keep in mind that your turnout is likely a combination of the three. (Also, I’m numbering for clarity; the numbers have no clinical significance.)
Turnout One comes from the hips. In this case, your thigh-bones are turned outward and away from each other, as are the shin and foot. Looking at the legs from behind, the feet turn away from the midline, as do the knees. The upper leg and lower leg are “neutral” relative to each other. When the knees bend, the thigh moves in the direction of the outward-pointing foot. My brother, who fancies himself a cowboy, has this particular leg arrangement. When he walks his legs don’t swing straight forward, but come out on a slight diagonal.
Turnout Two comes from the lower half of the knee. In this case, the shanks (lower legs) rotate away from the midline but the thighs still flex and extend in the sagittal plane (straight forward and back). This upper/lower leg relationship is a “medial moment” maker of the knee, which means when you bend your knee (in walking, going up and down stairs, and landing jumps), your thighbone moves along a different plane than your shin and foot. Not so fun for the medial structures (meniscus and anterior cruciate ligaments of the knee).
When you bend your knees in this position, the thigh bone moves in a plane that brings the knees together when they bend. Or, if you look at this arrangement from the back, you’ll see that the knee pits look straight when the feet are pointing out. This is a classic “knock-kneed” orientation, although some feet are so turned out the knees are kept from touching.
Turnout Three looks practically identical to Turnout Two, but instead, the lower leg “turnout” is created by a turn in the bone itself. This is the most “permanent” turnout, but it is still helpful to understand bone robusticity—that is, how the shape of bone is affected by how you use it.
|
After wearing minimalist shoes for four weeks and working intensely with Restorative Exercise™, I showed up to perform a concert. I did my usual switch from flat shoes into short heels shortly before the concert and realized within seconds that my feet hurt, that I couldn’t balance my upper half over my lower half, and that there was a noticeable difference in my flute sound. So, I took the heels off, performed in the flats, and will never wear the heels again for a performance! KELLY MOLLNOW WILSON |
While we all have a basic bone shape that’s consistent across the animal kingdom (if you can recognize a human femur then you’re likely to be able to recognize the femur of a bird as well as a tiger), the nuance of bone is created by how a bone is used over a lifetime. In Move Your DNA I used professional baseball pitchers as my example (although the same phenomenon is found in volleyball and swimming athletes as well). In the case of professional pitchers, CT scans have shown that the throwing arm bones of a pitcher are slightly twisted in the direction of their wind-up.
Imagine the windup necessary to throw a pitch. What a pitcher is doing is creating a series of “twists”—some large, at the hips and shoulder, some smaller, at the elbow and wrist—that he will unwind all at once, putting all that untwisting energy into the ball as it leaves the hand. Only, the ball isn’t the only thing being thrown around. The cells in the pitcher’s arm, too, are thrown around during the windup, and via a process called mechanotransduction, the bone takes a slightly new shape based on this mechanical input. So why am I putting pitchers and arm bones into this book about feet? Your cells are constantly being thrown about by how you move, and when it comes to gait (how you walk), you’ve taken a hundred million steps towards the bone shape you have now.
Bodywork is very helpful in accessing all the nooks and crannies of our muscles and helping to innervate them. You can get extra-deep work from massage, and you can also work on your body at home with this excerpt from Jill Miller’s incredible book The Roll Model (yes, you should read it).
Stack any size Yoga Tune Up® balls on either side of your calf to bring slide & glide to this dense myofascial zone. (See images for “Stack” options…the doggie is optional). The balls will simultaneously nuzzle into the anterior tibialis (on top) and the peroneal group at the bottom of the stack. Point, flex, and circle your ankle & foot, then re-stack the balls higher or lower along your lower leg. Alternatively, balance one ball underneath your lower leg and slide your shin so that the ball combs through the full length of the peroneals. Spend 5-10 minutes per leg.


—Jill Miller, author of The Roll Model: A Step by Step Guide to Erase Pain, Improve Mobility and Live Better in Your Body
Torsion is defined as the twisting of an object along its own axis, where one end is moving relative to the opposite end; rotation is the turning of an entire unit about an axis.
While slight torsion is a natural phenomenon, populations with different movement behaviors, like those found in India and Japan, are known to have significantly less tibial torsion than those of European descent. This difference in bone shape is believed to be the result of loads to the bones created by squatting and floor sitting, which Europeans have largely missed out on. In fact, pediatric orthopedists and physios recommend children sit in different ways (swapping “W”-sitting for “criss-cross applesauce” or cross-legged sitting) because the loads in W-sitting can torque bones, potentially increasing both femur (thigh bone) and lower leg torsions. The takeaway? Loads (read: whole-body, whole-life movement) matter when it comes to the end-shape of your bones.
W-SITTING: YOU ARE HOW YOU MOVE
This is a picture of my niece W-sitting. Anatomically speaking, a W-sit is created by a significant (some say excessive) internal rotation of the thigh bone coupled with a significant/excessive external rotation of the lower leg bones.
While she’s clearly not pitching any baseballs in this image, she is pitching her cells in directions that can promote an end-distribution of mass that is a combination of Turnout Two and Turnout Three (discussed on page 88).
While there’s a general consensus in the allopathic community regarding loads created via this position to be “bad,” there is also a side to the debate that goes something like “all human positions are natural, so lay off the W-sitters.”
Like the minimal footwear movement debate, I concur with both sides. In the end I would say that debating the issue requires that we broaden the discussion to include all movements over a lifetime. Modern humans sit and are shod at unnatural levels; the resulting “natural” preferences can be adaptations to the unnaturalness of our bodies. If one were W-sitting in the context of walking miles a day and doing all sorts of other leg motions, the twist-in-the-bone loads would be insignificant and the adaptation would be to a broader load profile. In the end, I’ll just recommend that you take a look at the shape and functions of your body, see how they’re working for you, and choose future movements based on your own “body of evidence.”
But let’s say there is no end shape, and what you’ve got right now is your shape, and you want to change it. Great. The point of this section is, while we need to un-duck, this process is different for everyone and any progress is good progress, even if it’s shifting the loads to your bones in teeny tiny steps.
On page 45 we direct you to straighten your foot during exercises, and this will become easier through doing all the exercises we’ve listed, but in the case of lower leg rotation and tibial torsion, there are some habit modifications and bodywork that can facilitate the process.
There are other things that we do that promote this lower leg turn-out and if you want to make progress, you have to consider how you’re pushing your cells around all the time. Here are some of the behaviors I stopped doing when I realized they were impeding my own personal progress; you might realize you’re doing slight variations of these once you start paying attention to how you move your feet and legs throughout the day.
1. I uncrossed my ankles. It’s totally natural to default to our comfort poses—crossing your arms in front, holding your wrists behind you, shifting your weight onto one leg, and slouching—because they’re comfortable and save the body energy in the short term. One habit I’m super-diligent about catching (when I’m being super-diligent) is uncrossing my ankles. After years of working on my left shin I noticed, after an hour of foot and ankle work, that I was reading a book with my ankles crossed, putting my shin in the exact position I had just labored to get it out of. Now I uncross every time I catch myself.
2. I stopped throwing my shins under the bus. Quick, go sit cross-legged on the floor. Use a few pillows if necessary. Now, look at your lower leg. Did you point your toes and roll onto the outside of the foot? Did you notice that you had to turn your lower leg out as well? When we take our unnaturally shaped bodies to a natural behavior like floor sitting, it’s important to remember that the way we accomplish that natural movement is affected. So, in addition to bolstering tight hips, one might also think of bolstering the ankles as well, to not allow an exercise for the hips to take the lower leg. (And along the way you might realize that your leg as a whole isn’t as mobile as you thought it was!)
3. I stopped driving my feet wonky. It’s not only shoes that have us on our toes; check out your feet next time you’re driving your car and you’re likely to find that you’re spending quite a bit of time in plantarflexion. Make over your drive by making sure you’re not pushing the pedals with a clenching foot or toes and instead create a smoother push.
Remember there’s nothing actually wrong per se with gripping your toes on the gas, crossing the ankles, or sickling (the ballet term for pointing and rolling the foot to the outside); it’s only that when you frequent those positions, they reinforce the old version of your body.