
Light


LIGHT HAS A VARIETY of characteristics or personalities. Depending on time of day, direction, and intensity, the quality and color of light can change dramatically. Sometimes, the color can influence the camera in the wrong way and cause an image to look tinted and unattractive. One way to balance and correct such results is to use the white-balance setting. In this chapter, you’ll learn how to use this feature to your advantage. And, we’ll take a look at the various colors of light, as well as the way direction and time of day can influence light and, therefore, affect your photos.

Most people think that to make great photos, the weather needs to be beautiful and sunny. This is a myth. You can often create great images in poor or marginal weather. The key is to have great flexibility. If, for example, you go out photographing a particular subject that only looks good in a certain light, and you don’t find that light, you may need to shift gears and photograph an entirely different subject.
That’s what happened to me one overcast afternoon when I was driving around looking for pockets of sunshine. No sooner had I finally found some sunshine and opened up my camera bag than it began to rain. Still, I made several exposures, protecting my gear as best as I could, and this rainbow image was my favorite result. I like the way the composition utilizes the line of the road to lead the eye to the house and rainbow.
1/250 SEC. AT f/8, ISO 100, 100–400MM LENS AT 100MM
LIGHT REVEALS IT SELF with infinite characteristics and subtleties. Natural light (light that’s not from flash) can change from a cool blue to a warm pink in a matter of seconds. In portraits, light that provides a soft, even glow can hide wrinkles, while light that’s dramatic and directional (coming from the side, for example) can intensify a subject’s weathered features. I often find myself thinking more about light than the subject itself.
The main thing to keep in mind with natural, or “available,” light is that it can change fast! For this reason, the ideal situation is to be at the scene and ready to go before the good light arrives. It also pays off to stick around, when the light is not good, and wait for it to improve. So, two qualities that greatly help the photographer are preparedness and patience—getting to the scene ahead of time and being able to wait, if necessary, for the ideal moment.

When it comes to working with light, one great trick is to simply turn around. Whenever you find yourself admiring a particular scene, turn 180 degrees around and see how the light looks. Often, when the light catches your eye while facing one direction, it will be equally or even more interesting when you face another direction. This is exactly what happened here. The morning sun was behind me as I prepared to photograph a black bear in the gorgeous morning light. Noticing the way my vehicle had kicked up a great deal of dust, I wondered how the light would look filtering through it. So, I turned around and captured both a vertical and a horizontal version of this scene.
1/90 SEC. AT f/5.6, ISO 100, 28–105MM LENS AT 45MM
1/180 SEC. AT f/10, ISO 100, 28–105MM LENS AT 28MM

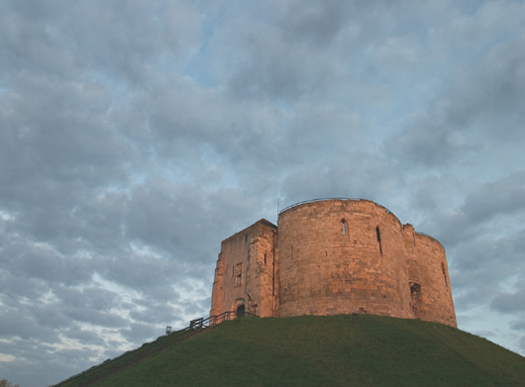
After making several exposures of this statue in England when a cloud was blocking the sun, I finally gave up, climbed down, and started shooting something else. As I turned around to head back to my car, I saw the light breaking through the clouds and climbed up again for this second shot. You can see the effect different light has on the subject. (I also used a different, super wide-angle lens for this second image. This allowed me to include the castle in the background. We’ll talk more about lenses and composition in chapter 6.)
1/250 SEC. AT f/8, ISO 100, 16–35MM LENS AT 16MM
Light takes on many different hues, each having a very different effect on the subject. The more technical among us describe the various colors of light as different temperatures. For example, candlelight can be expressed as 1900 degrees Kelvin (1900K) and noontime daylight might be around 5500K. Light is also referred to as cool or warm, depending on its temperature or color cast.
It doesn’t matter how you describe light, as long as you get into the habit of noticing the various colors that light can offer. When you do, you’ll see the quality of your pictures immediately begin to improve. With each photographic outing, you’ll become more and more aware of the effect that the light has on your subjects. You’ll see how subtle changes in these hues can completely transform your photos.
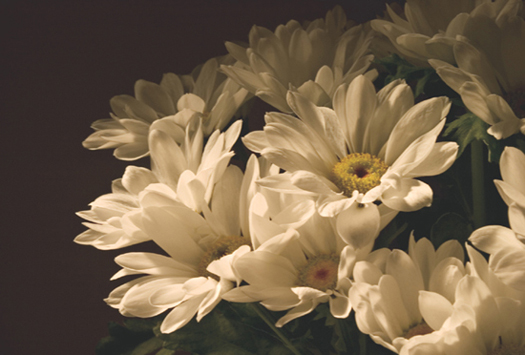
Every so often, I would catch myself thinking in church, Wow, the light coming in through those stained glass windows sure would make a wonderful photo. So, one Sunday morning before church, I brought my camera with me and began making photographs. A friend who was with me asked me about depth of field, so I demonstrated the concept with these flowers. I enjoy the way this image uses both deep depth of field and the glowing light from the window to give the subject a warm, yet sharp look. Let there be light—amen to that!
1/45 SEC. AT f/22, ISO 100, 28–105MM LENS AT 72MM
1/60 SEC. AT f/4.5, ISO 100, 28–105MM LENS AT 28MM
This pair of images shows how fast you sometimes have to be when taking pictures. I could see that the light was changing quickly. The beautiful warm glow of the early morning was transforming into a dull, unattractive gray right before my eyes. I quickly made an exposure with the lens that was on my camera, without fiddling with the settings or making sure that I had all the knobs and buttons in their perfect positions. After I took this “safety shot,” I changed the lens. Even though I was moving quickly—with the lens change only taking nine seconds (according to my EXIF data)—I was too late. The sun had already moved into low clouds on the horizon, and the warm light was gone. The show was over but, fortunately, I got the shot that I wanted by acting quickly when taking the first picture.
1/125 SEC. AT f/4.5, ISO 100, 16–35MM LENS AT 16MM
It’s also essential to consider the direction and angle of the light. When the light source (usually the sun) is behind you and hits the front of your subject, this is called frontlight. When the sun is in front of you and hits your face and the back of your subject, this is called backlight. Backlighting is much trickier to work with than frontlighting, but it can often result in interesting, creative images.
Light that comes directly from above, as when the sun is high in the sky, is generally considered less than ideal for taking pictures. This overhead light is usually too bright and harsh. Objects appear flat and lifeless, without texture. Harsh overhead lighting can also cause unflattering shadows in portraits, such as the “raccoon eyes” effect when the eye sockets get filled with shadows. It can also cause your subjects to squint, which always looks worse in the final photo than it did in the viewfinder.
Light that comes from the side, or sidelight, accentuates the three-dimensionality and depth of a scene, and the picture looks more interesting. In sidelit scenes, even slight shadows add drama and give viewers something more enjoyable to look at.
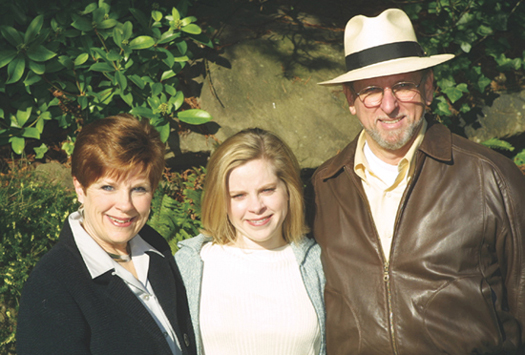
This series shows the variety you can get with the same subject in different light. In the photo above, the family was in direct sunlight on a bright day. Even though the flash fired when I took this picture, you wouldn’t know it. The sunlight is far too bright and harsh. When making portraits, pay attention to your subjects; if they’re squinting, see if you can find another location in nearby shade.
1/200 SEC. AT f/10, ISO 100, 28–105MM LENS AT 105MM
1/60 SEC. AT f/5.6, ISO 100, 28–80MM LENS AT 80MM
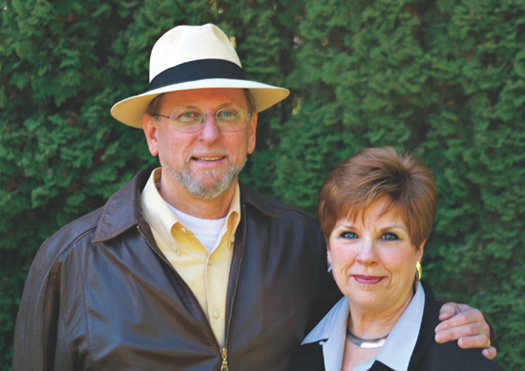
We did just that at left, trying another location in open shade; however I forgot that I still had the camera set for flash. Even though the flash did fill in the shadows, it also produced light that had a cool, flat quality. I noticed this when viewing the image in the LCD monitor and decided to try again. The result was my favorite shot above, which utilized the available light without resorting to the boring, flat light of the flash.
1/60 SEC. AT f/4, ISO 100, 28–80MM LENS AT 60MM
HAVE YOU HEARD photographers talk about the “golden hours”? These are the brief periods of time around dawn and dusk. During these times, the light is often amazingly warm and directional. Compared to the rest of the day, the light you encounter during these fringe times is pure magic. Experienced photographers know that the way to get stunning, breathtaking images is to take full advantage of these brief windows of opportunity. You’ll find these photographers out in the field in the early morning, even before sunrise, and there in the late evening, when everyone else has gone to dinner. If you want to get great photos, be ready and waiting for the photo op to occur at the beginning and ending of each day.
If you think about it, waking up before first light increases your chances of getting great pictures by about 150 percent. If you can get ten good pictures in one evening, you can get twenty-five if you shoot both morning and evening. Why 150 instead of 100? In the morning, there are fewer people around, less traffic, and calmer winds and waters. Photograph a lake in the early morning, and you’re more likely to capture the perfect glasslike reflections you’re after.
If you find it practically impossible to get out early, it may help to analyze the reason. Photographers don’t procrastinate because they’re lazy; they fail to get out early because they haven’t realized what they could be capturing. If you continually fail to get out of bed before sunrise, fine-tune your understanding of what you’re trying to accomplish. Do you want to be a famous artist? Do you want to make your first photography sale? Do you want to make so many sales that you can actually quit your day job?
MORNING = WARM, COLOR, DRAMATIC SHADOWS

MIDDAY = BOLD COLORS, HARSH LIGHT, LACK OF SHADOWS

EVENING = WARM COLOR, DRAMATIC SHADOWS
Also, don’t be afraid to use whatever tricks you have at your disposal—tricks that help you get going. You may discover that you need to be on a trip, traveling in an exotic location, to feel the sense of urgency to get out there creating images. Without any of the daily business to distract you, you might find it easier to dedicate a full morning to photography. When I’m traveling, I find it easier to appreciate that today is the day, that in the blink of an eye I will be in a totally new place. This kind of carpe diem! attitude has helped me time and time again.

SKIP A MEAL
Skip breakfast if you have to—just bring a snack instead. You can always get breakfast in the late morning, once the sunlight becomes less interesting.
One fear people have of rising early is that, after they go through all the work to get out there early, the golden sunlight will fail to appear. It’s true, this can happen. Some mornings turn out to be overcast and dull. If this is the case, you have three choices:
 As long as the light is still bright (which is often the case even on overcast days), you can photograph things like animals or people. These subjects actually benefit from the soft, nondirectional light of an overcast sky.
 You can photograph in a garage or kitchen studio (whether makeshift or professional).
 You can go back to bed.
Although the morning and evening are the best times lightwise, there are still great ways to make the most of midday light. If this is the only time you can shoot, you can:
Move in closer and focus on the details.
 Take advantage of a passing cloud, shooting in its shadow.
 Work in the shade, forcing your flash to fire so that it will even out any extremes in contrast.
 Look for the ways that certain subjects, such as leaves in a tree, might be photographed while backlit by the bright sun.
 Take advantage of the light for photographing scenes in deep canyons or underwater (only if you have a waterproof camera, of course). Such environments, brightest during the midday hours, are often easier to shoot at this time.
 Focus on bold colors that will pop out even more when lit by bright, direct sunlight.
Keep these options in mind and the pictures you take in between 10 a.m. and 2 p.m. can still be beautiful.
During the late afternoon and early evening, the light becomes especially warm. With the business of daytime activity subsiding, this may be an even better time to photograph people than the early morning hours. More people are bound to be out—whether they’re just getting home from work, taking a walk, or mowing the lawn—and the late afternoon light casts a glow much like that of morning light.
If a sunset catches your attention, by all means, take a few pictures of it. Once you’re done, though, remember to turn around and look at the things the sunset light hits; use this warm light to illuminate a composition. Photographing a person, animal, or any other scene bathed in this light will likely result in a great picture.
1/45 SEC. AT f/3.5, ISO 100, 16–35MM LENS AT 16MM
This pair of images illustrates how dramatically a scene can change when it’s viewed in different light. Within a couple of hours, the scene was entirely transformed.
1/90 SEC. AT f/16, ISO 100, 28–105MM LENS AT 28MM
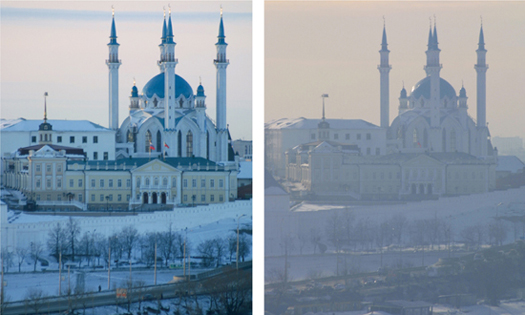
LEFT: 1/90 SEC. AT f/5.6, ISO 100, 100–300MM LENS AT 300MM; RIGHT: 1/500 SEC. AT f/8, ISO 100, 100–300MM LENS AT 270MM
LATE AFTERNOON LATER AFTERNOON
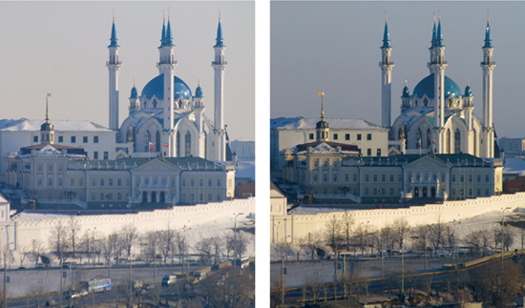
LEFT: 1/500 SEC. AT f/8, ISO 100, 100–300MM LENS AT 300MM; RIGHT: 1/500 SEC. AT f/8, ISO 200, 100–300MM LENS AT 290MM
EARLY EVENING NIGHT

I shot these six images on a recent trip to Russia. The nature of the trip caused me to be waiting in my hotel room for long periods of time. I decided to make the most of it. I shot images of the same subject, the kremlin in Kazan, at various times of the day. I found the subject fascinating but even further enjoyed comparing the quality, color, and direction of light as it changed over the course of the day.
LEFT: 15 SEC. AT f/38, ISO 100, 100–300MM LENS AT 300MM; RIGHT: 6 SEC. AT f/19, ISO 100, 100–300MM LENS AT 300MM
Probably the most overlooked, and often most rewarding, time of the day for photography is long after the sun goes down. With a tripod and a remote shutter release or self-timer (to minimize camera shake), you can get fascinating new views of normal, everyday scenes. Just be sure to use either a remote release or a self-timer. You need one of these because you need to take the picture without actually touching the camera—the slightest movement can cause the photo to come out blurry. As long as you can make a long exposure in this way, you can create beautiful photographs of night subjects, such as light reflecting on water, buildings lit in dramatic ways, and cityscapes dotted with twinkling lights.
After the sun had set in Bath, England, I noticed this romantic scene and used a long 30-second exposure.
30 SEC. AT f/19, ISO 100, 100MM MACRO LENS
Since this subject was so much more brightly illuminated than the river scene on the previous page, and since I required less depth of field, the shutter speed for this image was much faster.
2/3 SEC. AT f/5.6, ISO 100, 16–35MM LENS AT 16MM
On Queen Anne Hill in Seattle there’s a park famous for its view of the Space Needle. Every evening, photographers gather to attempt to capture its beauty. The trick is to photograph the scene just after sunset as the city lights begin to twinkle on. For this 8-second exposure, I placed my camera securely on a tripod, attached my remote shutter release, and fired away. I used Photoshop after the fact, to pump up the purple in the sky.
8 SEC. AT f/4.5, ISO 100, 28–105MM LENS AT 105MM
WE LIVE IN a rainbow of colors. You may not notice this rainbow, but all the same, it’s there. Every scene features objects illuminated by light that’s slightly blue, green, pink, orange, yellow, or another color. Contrary to what we seem to see, light is rarely crystal clear and colorless. We only think the light is colorless because, when we view such scenes, our eyes naturally compensate for the various colors of light, without even thinking about it.
Our cameras, on the other hand, don’t have it so easy. They don’t necessarily know how to automatically compensate. When presented with an overall yellow light, for example, cameras will simply render the scene with a yellow cast. When the light is slightly blue, cameras will render the final image slightly blue—unless we set the camera to do something to change this.
The process of compensating for color tone in light is referred to as balancing the light or, simply, white balance. A bit of blue added to overall yellow light will balance things out; a dash of yellow added to blue light, will result in clear, balanced light. All the colors in that image will look natural and realistic. Similarly, adding red to a photo with a blue cast and red to a photo with a green cast will produce images with clear, realistic colors.
In order to balance the color of light, the camera has to first find what is called the white point. This is the point at which a white object within a photo would be rendered as pure white. When there’s no white object, a best guesstimate has to be made. While most digital cameras will gladly try to do this guesswork for you, automatically determining white balance by scanning the image for a white point, it’s not wise to rely on these automatic white balance modes all the time. Just as with exposure, there will be times when the camera’s automatic functions lead you astray. At these times, you’ll want to know enough about white balance to manually adjust the settings until you get natural, clean, and realistic colors.
This is especially true if you photograph scenes that are bathed in a particular color. For example, if you’re photographing a mountain peak radiating pink in the aspen glow of a summer evening or a person’s face bathed in the beautiful light of the sunrise, the automatic white balance will often defeat the purpose. Wrongly identifying these warm tones as an unwanted color cast, the white balance will likely compensate enough to cause this interesting light to disappear. The idea is that you want to balance the whites in your image; you want your image to be not too pink, not too blue, not too green … but rather “just right.”

All You Really Need to Know about Color Temperature

If you find color temperature numbers confusing, just keep this in mind when learning about white balance:
Use higher color temperature numbers to warm things up (removing blue cast)
Use lower color temperature numbers to cool things down (removing reddish/yellow cast)
So, when you’re presented with lighting conditions that are very blue (like open shade for example), you’d shoot with a higher color number, such as the Shade white balance setting with a color temperature of approximately 7000K. When presented with lighting conditions that are overly yellow light (such as household lamps), you’d match this up with a white balance setting like Tungsten (incandescent) at approximately 3200K.
Knowing this general principle will help you when you’re trying to figure out if you’re dealing with a warm or a cool image. This is all you really need to know about color temperatures.

The ability to control white balance while shooting is another thing that gives digital photographers an advantage over film photographers. Like the ability to switch ISO on the fly, the ability to adjust white balance from photo to photo adds a tremendous convenience to digital photography. Additionally, if you shoot in the raw file format, you can choose white balance after the fact, when you are processing your images on the computer. This gives you even more flexibility when it comes to dealing with color casts. In fact, most photographers who shoot raw don’t even think about white balance while shooting, because they know they can adjust it later.

THINK OF WHITE BALANCE AS A FILTER
If you’re an ex-film photographer, you might find it easier to think of white balance in the same way you’d think of filters. When shooting an indoor scene lit by tungsten light, slide-film photographers must use special film or special corrective filters. If not, the images will come back from the photo lab with a color cast. With print-negative film, there’s generally less concern about this because the lab will balance the colors for you. Most labs fix color casts when developing negative film or printing pictures. But with slide or digital photography, you need to either use a filter or set your white balance to capture the balance accurately in the first place.
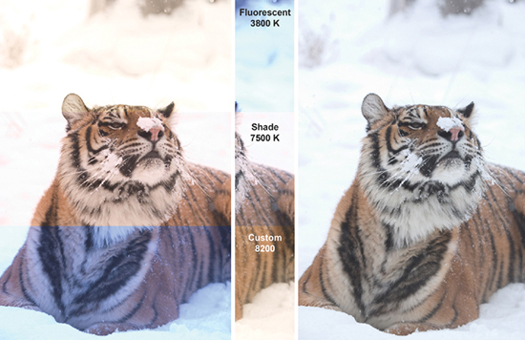
These photos illustrate the process of using white balance. The upper left corner shows an overly warm interpretation. Balancing this warm light with a cold fluorescent white balance setting results in the natural whites on the right side. Balancing the increasingly colder lights with increasingly warmer white balance filters achieves the same, balanced results.
FINAL IMAGE: 1/250 SEC. AT f/5.6, ISO 200, 100–400MM LENS AT 180MM
UNDERSTANDING the white balance options requires simplification and experimentation. First, let’s look at the various white balance settings found on most digital cameras. In my experience, the most important are Daylight, Shade, and Tungsten. These three will get you by in most lighting conditions.
AUTO This is when the camera does its best to select the correct white balance for a given exposure.
DAYLIGHT This is the setting appropriate for most outdoor situations. It balances the colors using the temperature of sunlight as its standard.
SHADE This setting acts much like a warming filter, adding a bit of red to a scene. As open shade is notorious for imparting a blue cast, the Shade setting will help you bring images made in shaded lighting conditions back to a more natural, daylight look.
TUNGSTEN. The Tungsten setting takes care of the overly yellow/orange casts that often occur in images made indoors without a flash. This is good when the scene is illuminated by tungsten, incandescent, or halogen lights—the kinds of bulbs found in most household lamps.
CLOUDY The Cloudy setting adds a little bit of warmth to an image made on an overcast day. Some photographers shoot with the Cloudy setting all the time, to give every photo an extra bit of warmth. Be careful about doing this. It is much better if you actually think about it first and only use this setting when the light appears to be too cold.
FLUORESCENT. This setting may come in handy if you shoot in stores and other commercial locations where this kind of light is used. Most of the time, the indoor lighting you encounter around the home will be tungsten. But if your images look greenish, or you notice a lot of neon-type bulbs about, try the Fluorescent setting.
FLASH. This is a very nice setting for when you’re forced to use flash as your light source indoors. The Flash setting warms up your subject, effectively eliminating the bluish cast that often occurs with this light source. One exception to using the Flash white balance setting with flash is when you’re shooting outdoors and using fill-flash to brighten up shadows and create catchlights in your subject’s eyes. In such situations, I recommend using the Daylight setting. But don’t just take my word for it. Try out both the Flash and the Daylight settings. You might find that you like the extra bit of warmth offered by the Flash setting.
CUSTOM. Custom and direct color temperature controls may be useful for those doing professional product, portrait, and other studio work. When shooting a series of products or people against a white background, it’s important that they all have the same color cast. This becomes even more crucial if all the images are going into the same printed catalog or Web gallery. Custom white balance allows you to measure the white point from a white sheet of paper and then use this white as your standard, setting the camera to use this temperature for a series of images. If your camera offers this feature and you do a lot of studio photography, the Custom white balance feature can come in handy. If used properly, all subsequent images will be consistent in color.

AN EASY WAY TO AVOID THIS WHOLE WHITE BALANCE QUESTION
If you’are an ex-film photographer, there’s one easy thing you can do to avoid this whole white balance mess: Simply rely on the Daylight setting. This will be just like shooting with daylight-balanced film. You can treat light as you always have, using your regular filters to control color casts. And best of all, you won’t get unexpected, surprising results like you often might from the Auto white balance setting.

When It’s Crucial to Set White Balance in Your Camera

If you’re using either the JPEG or TIFF format, setting the white balance becomes very important. Unlike photographing in the raw format, which lets you easily adjust white balance when importing the image into your software, shooting JPEGs and TIFFs requires that you set the white balance correctly at the time of shooting. White balance is much more difficult to change with JPEGs and TIFFs.

The color temperature of incandescent light is basically 3000K. This puts it so close to tungsten that the Tungsten setting works just as well. Your camera might have an Incandescent setting. If it does, you can use it for tungsten and halogen light sources, as well. So, when you’re shooting indoors, odds are very good that you’ll need to use this Tungsten (incandescent/halogen) setting.
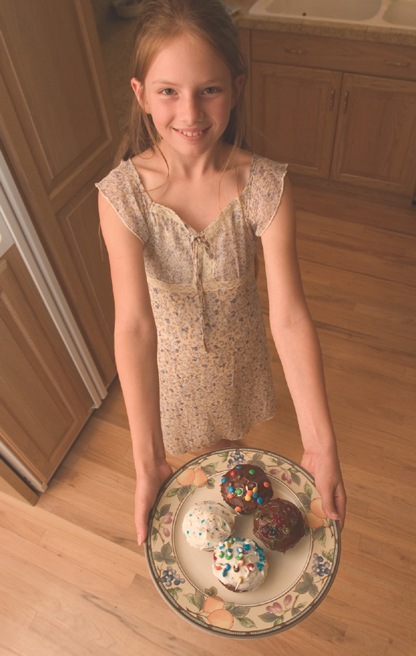
Taken indoors in my kitchen, this image is nice and warm, illuminated by a mixture of incandescent light and daylight. To get this shot, I used a super-wide-angle focal length and stood on a step stool so that I could look down at my subject from a high point of view. (More on focal lengths in chapter 6.)
1/60 SEC. AT f/6.7, ISO 100, 16–35MM LENS AT 16MM

1/250 SEC. AT f/9.5, ISO 100, 28–105MM LENS AT 28MM
CLOUDY
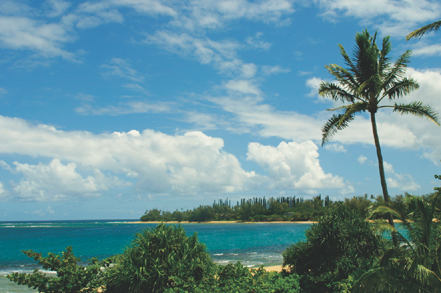
FLASH
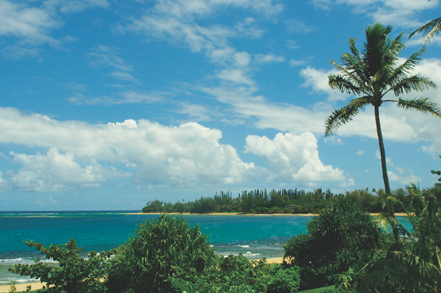
Compare these images taken with different white balance settings. Notice how the Daylight, Cloudy, and Flash settings are similar, with the Cloudy and Flash versions being a bit warmer than the Daylight version. This is because they’re all using a white balance setting close to 5200K. In this situation, either of these three settings would be fine. Whether you go with the warmer Cloudy or Flash settings vs. the cooler Daylight setting is largely a matter of personal preference.
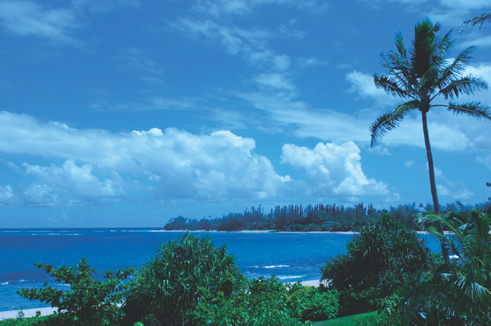
FLUORESCENT
You would certainly want to avoid the Tungsten and Fluorescent settings, unless you were purposely trying to make a creative, artistic effect. The most important point is that you want to get a knowledge of white balance so that you can keep the color shifts under your control, instead of leaving it up to the camera.
1/350 SEC. AT f/9.5, ISO 100, 28–105MM LENS AT 28MM

REMEMBER TO SHOOT SOMETHING WHITE AT NIGHT
In order to see the effects of the various white balance options while you’re photographing at night, be sure to select a subject that has white in it. If you only shoot a nighttime sky, for example, it will be very hard to see the different effects the various white balance options have on the scene.
WHITE BALANCE can get your head spinning in circles, but it really doesn’t have to be that way. My suggestion (along with shooting in raw format) is to experiment for a bit, and then select one white balance to use as your “everyday” setting—the one you’ll use 99 percent of the time. This lets you keep things simple, allowing you to concentrate on the things that matter even more—i.e., moving in close, composing carefully, and metering the best exposure.
One last thing: It might help if you ask yourself if you ever shoot in a studio environment with controlled lighting. If you rarely shoot in such conditions, you’ll likely be able to get by without a Ph.D. in white balance. Use the tips in this chapter to come up with a simple game-plan for handling most of your shooting. Then, when you get into studio photography, you can return to the subject to master the nuances, such as setting custom white balance settings. The bottom line is, learn just enough about white balance to keep you going strong. Don’t let it keep you from shooting often and with a sense of enjoyment.

The Exception to the Daylight Rule

I’ve mentioned how I prefer to shoot with the Daylight white balance setting most of the time. So, it might be a good candidate to be my “everyday” white balance. But let’s look at an exception—a time when I would definitely want to shift gears and use a different white balance setting.
The Daylight white balance setting doesn’t work for this scene, lit as it is by tungsten lamps. In the end, the Tungsten white balance setting does the best job of balancing the light. This most closely approximates how the scene looked to the human eye. Daylight causes the subject to look too yellow.
DAYLIGHT SETTING
TUNGSTEN SETTING


IF YOU’VE DECIDED to shoot in the raw file format, you don’t need to worry about white balance while you’re shooting—you can easily adjust it when you open up the raw files on your computer. You’ll still want to understand the various color temperatures, though, and how each white balance setting relates to the others.
JPEG images captured with the wrong white balance settings are fairly difficult to correct. The raw format offers much more flexibility and latitude when it comes to correcting white balance in a software program. While many corrective measures can be taken at the postprocessing stage with Photoshop, or equivalent software, setting things up for correct white balance will save you time in the long run, even in the raw format—and especially if you shoot in the JPEG file format.
Inaccurate white balance can make postshooting Photoshop work difficult. When dealing with major color casts or trying to correct tricky things like skin tones, you’ll find it much more time efficient if you shoot in the right setting first, rather than correct the colors later. So, the two best options are to either shoot in raw or do your best to capture accurate white balance at the time of shooting.

TAKE NOTES
If you look for the EXIF data in the File Browser of the most recent version of Photoshop, you may not see which white balance settings you selected. Sometimes this data is not displayed. This is a good reason, when you are still learning about white balance, to write down what you do when shooting; your notes will allow you to easily sort it out later, when you’re sitting at your computer.
Another option is to download EXIF-reading software that provides information relating to the white balance settings.

 Shoot the Same Scene throughout the Day
As I did with my six Kazan kremlin photos, shoot the same scene at various times of day. Get up early, shoot a few images, and then shoot again and again throughout the day. Keep your camera set on a tripod in the same place, and return to it whenever you get a chance. Photograph the same subject at least three times—morning, midday, and evening. If you can, also photograph it at other times of day. The more sessions you do, the more images you’ll have to compare.
For this assignment, keep the white balance setting fixed to Daylight. This will prevent the white balance setting from influencing your results. If you shoot in camera raw, you can change this white balance setting later; all the same, it will help if you keep your white balance at a constant of Daylight while shooting. Then, have fun shooting and learning to appreciate the light.
