YEAST BREADS
There’s something magical about mixing flour and yeast with liquid and witnessing the transformation of the ingredients into a tempting loaf. Whether you enjoy the ritual of hands-on kneading or prefer the convenience of using a bread machine, it’s always satisfying to make bread at home. In this chapter, you’ll find sweet buns for breakfast, firm loaves to slice for sandwiches or toast, rolls for serving alongside main courses, and pizzas that will make a meal.
TYPES OF YEAST
Yeast is the organism that makes bread rise. It reacts with the natural sugars in flour to create carbon dioxide gas, which is trapped in the dough and forces it to expand.
Dry yeast comes in ¼-ounce packages, jars, and in bulk. One ¼-ounce package of dry yeast equals 2¼ teaspoons of fresh yeast.

Fresh yeast is available in foil-wrapped 1-ounce cakes. It is very perishable; refrigerate and use within two weeks. Fresh and dry yeast become activated when mixed with warm water (105° to 115°F). Let the water-yeast mixture stand for about five minutes. It should look creamy, which indicates that the yeast is alive.
Quick-rise yeast cuts the rising time of traditional yeast doughs by about 50 percent. This yeast requires very hot tap water (120° to 130°F) to be activated.
KNOW YOUR FLOURS
A variety of flours can be used for bread making. Different flours contain varying amounts of gluten, which is what gives dough its strength and elasticity. Wheat flours milled from hard winter wheat are high in gluten and great for bread making.
Bread flour is made entirely from hard wheat and makes delicious, chewy, crusty loaves.
All-purpose flour is a blend of hard and soft wheats and yields a more tender bread. All-purpose flour is available unbleached and bleached. Bleaching somewhat reduces the amount of gluten. You can use either bread or unbleached all-purpose flour for bread, but you will need more all-purpose flour as it absorbs less liquid.
Whole-wheat flour and rye flour are usually combined with bread or all-purpose flour in yeast doughs.
MIXING THE DOUGH
When mixing bread dough, use a large glass or ceramic bowl and a sturdy wooden spoon. You can also use a heavy-duty electric mixer; attach the paddle to make a soft dough, then switch to the dough hook to knead.
Flour and yeast are the basic ingredients in bread making, but other ingredients play a role. Salt slows the rising and enhances the flavor of bread. Fat (butter, oil, or eggs) adds richness, moistness, and softness to the crumb. Milk gives bread a tender, sweet crumb, and sugar promotes tenderness and a golden crust.
Because yeast works best in a warm environment, have all the ingredients at room temperature. The amount of flour needed to make a dough will vary according to the type of flour and the amount of humidity in the air (on a humid day, a dough will require more flour).
KNEADING THE DOUGH
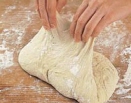
Kneading activates the gluten in flour, which strengthens the dough. Knead in just enough flour to prevent the dough from sticking to the work surface. Doughs that are sweet and rich or contain whole-grain flours should be somewhat sticky. If kneading in a heavy-duty mixer, take care not to overknead; six to eight minutes is usually sufficient.
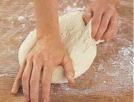
Place the dough on a lightly floured surface. To knead, fold one-fourth of the dough back onto itself, then push it down and away from you with the heel of your hand. Give the dough a quarter turn and repeat until the dough is smooth and elastic and tiny blisters appear on the surface, which will usually take from eight to ten minutes.


RISING AND SHAPING THE DOUGH
• Choose a bowl large enough to allow the dough to rise until doubled in volume. Grease the bowl lightly with butter, margarine, or oil. Gather the dough into a ball and place in the bowl; turn to coat the top. Cover the bowl with plastic wrap and place in a warm, draft-free spot.
• If you like, you can let the dough rise in the refrigerator for up to twelve hours. Before shaping the dough, let it stand at room temperature for about two hours, or until it loses its chill.

• The dough should rise until doubled. To test, press two fingers about ½ inch deep into the center of the dough. If the indentation stays, the dough has risen sufficiently.
• To punch the dough down, gently push your fist into the center to deflate it.
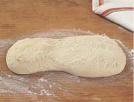
• The bread is now ready to be shaped. Place the dough on a lightly floured work surface, cover with plastic wrap, and let rest for 15 minutes.
• Grease the pans as directed in the recipe, add the bread, and loosely cover with plastic wrap. Let stand in a warm place until doubled in volume.
BAKING THE BREAD
Position a rack in the center of the oven and preheat for at least ten minutes. If baking two loaves at once, allow at least two inches between the pans.
To prevent bread from bursting during baking, most loaves are slashed with a serrated knife or single-edge razor blade before baking. The tops of loaves can be brushed with beaten whole egg for a golden crust, egg yolk for a dark brown crust, or egg white for a shiny crust. Bread is done when it pulls away from the sides of the pan and is nicely browned. If tapped on the bottom with your knuckles, the bread will sound hollow, and the sides of the loaf should feel crisp and firm.
COOLING AND STORING
Remove the bread from the pan and place, right side up, on a wire rack, away from drafts. If you must have warm bread, let it rest for at least 20 minutes before slicing; hot rolls, however, can be served immediately.
Be sure bread is completely cool before wrapping or freezing. Store soft breads in plastic bags and crusty breads in paper bags at room temperature for up to five days. Most breads freeze well for up to three months.
Place in a heavy-duty zip-tight plastic bag or tightly wrap in heavy-duty foil. To thaw, let stand at room temperature for about one hour, or wrap the frozen bread in foil (with an opening at the top so steam can escape) and heat in a 300°F oven for about 20 minutes.