Enamel canning pots
HERE WE DEAL WITH EQUIPMENT used in boiling the wort. Obviously, you need a kettle to hold the wort and a burner for a heat source — and well talk about those — but you may also want to consider spoons or other stirrers, lids, and a hopback.
The boil, which should be vigorous and last for at least 60 minutes, serves several functions: It reduces the volume of water in an all-grain wort, thereby increasing the gravity; it extracts the bitterness from hops and changes their character in a process called “isomerization”; it sterilizes the wort, killing any bacteria as well as denaturing any enzymes remaining after the mash; and it drives off unwanted volatile flavor components.
Get a big kettle. Bigger than you think you need. If you are doing 5-gallon batches, a 20-quart pot will be too small. You’ll want at least a 7-gallon pot (8 gallons would be even better). Keep in mind that in all-grain batches you will be reducing gravity during the boil, so you’ll be starting off with about 40 percent more volume than the batch size you want. You also need to add a little extra room to account for vigorous boils that kick off a lot of foam. If you don’t have a lot of room, you’re going to have a lot of boil-overs and you’ll spend a lot of time doing cleanup.
Besides the size of the pot, some other considerations in selecting a good brew kettle include:
Durability. You want a well-made pot that will withstand the rigors of brewing. Ideally it should have sturdy handles because 5 gallons of wort weighs about 45 pounds.
Ease of cleaning. You want a surface that can be cleaned and scrubbed. Sugars and other solids in the wort scorch surfaces, often needing to be scrubbed off. Keep in mind that some materials, such as stainless steel, may react with some of the sanitizers commonly used by homebrewers (e.g., chlorine).
Cost. Trade-offs everywhere. Some of the best pots are the most expensive.
There are a lot of kettles on the market that you can use for a brewpot. The three most commonly used by homebrewers are:
Enamel canning pots
Stainless-steel kettles
Modified kegs
Enamel canning, or crab, pots work fine for most homebrewers, but the enamel sometimes chips and the pots are not exceptionally durable. If you’re planning to be a homebrewer for years to come, a stainless-steel kettle or a modified keg will serve you better and prove more cost-effective over the long run.
Stainless-steel kettles are probably the best choice from a strictly quality perspective. They’re built for cooking, are easy to clean, and will last a lifetime if cared for properly; but you should never fill one with a chlorine solution to soak other equipment. Good-quality stainless-steel kettles are available from kitchen and restaurant supply houses. A good source of kettles is Rapids. Expect to pay well over $100 for a good 32-quart kettle.
Brewing kettles in sizes up to 25 gallons are also available from East Coast Brewing Supply. These are good-quality kettles for serious homebrewers, and although they are expensive, they are actually a good value. Expect to pay $100 to $700 for the kettle (depending on size) plus the cost of add-ons, such as sight glasses or thermometers.
If you are into spending a lot of money, Cumberland General Store sells hand-hammered copper pots, which are excellent for beer-making as well as candy-making. Just be prepared for sticker shock. Stainless-steel pots may be pricey, but copper ones can be double that! It’s interesting to note, however, that a 40-gallon copper pot doesn’t cost much more than a 40-gallon stainless-steel pot. So if you are building a 40-gallon brewery, copper is a viable option. The only problem is that copper pots must be cleaned often, so from this standpoint, stainless steel is easier to live with.
Modifying a beer keg to use as a brew kettle is a good way to get a stainless-steel vessel that’s large enough to accommodate 10-gallon batches. Kegs are durable, easily cleaned, and the perfect size for brewing. The best kegs are the ones with straight sides. The older Hoff-Stevens models that have curved walls and a bunghole in the side are difficult to work with and are a poor choice.
You need to cut the top off the keg and then file down any burrs or rough edges. Instead of cutting the top off from the side of the keg, do it the way most homebrewers (and SABCO Industries) do it: Cut a circular hole in the top, inside the rim, leaving the handles intact. This way you can carry the keg and move it easily. Use a reciprocating saw or sabre saw to cut off the top of the keg, and then use a sanding wheel on a drill to remove the rough burs. For a detailed discussion of modifying a keg, see “Modified Keg with False Bottom” on pages 71 to 76. Again, get your keg legally — don’t steal it from a brewery.
You will probably also want to install a ball valve near the bottom of the keg to make it easy to drain. If you put in a valve, you’ll want to run a siphon tube from the valve over to the bottom of the pot because the bottom of a keg is domed and a valve in the side is not going to drain all of the liquid. Having a perforated screen at the bottom of the plate helps to remove hops and other matter such as coagulated protein (trub).
5½-gallon keg with lid cut out
⅜" ball valve with ⅜" FPT
⅜" O.D. (outside diameter) stainless-steel or copper tube
Perforated steel plate
⅜" MPT nipple
⅜"compression nut and ferrule
⅜" MPT x ⅜" compression adapter
⅜" FPT coupling
⅜" MPT nipple
1. First, drill a hole for the coupling in the side of the keg just above the bottom weld.
2. You’ll then need to find a welder to weld the coupling to the keg. Omit Washer Option.
One ½" I.D. (inside diameter) stainless-steel washer
Two ½" I.D. (inside diameter) nylon washers
⅜" MPT x ⅜" compression adapter
1. Drill a ½" hole above the bottom weld. Place the stainless-steel washer, followed by a nylon washer, over the pipe threads of the ⅜" MPT x ⅜" compression adapter. Place the adapter inside the keg and through the hole. Place a nylon washer over the pipe threads on the outside of the keg. Wrap Teflon tape around the threads. Thread on the ball valve and tighten.
2. Next cut an 8"-diameter circle from the perforated steel. Drill out the center hole to ⅜". Set the screen in the bottom of the kettle. You’ll need to cut the tube to an appropriate length, with one end going through the hole to the bottom of the dome, a 90-degree bend, and then running to the coupling. Attach the tube with the compression nut and ferrule.
COPPER
Because copper serves as a source of yeast nutrients, you might want to keep a small piece of copper around to drop into the brew kettle. A small sawed-off piece of copper tubing will work well.
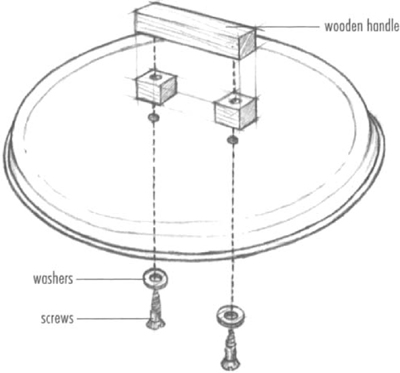
If you’d like a lid for the kettle, look around for a pizza pan. The larger pans are just about the right size. For each handle, cut two small wooden blocks, about 1 inch high, for the braces and cut one piece of wood (about 4 inches long) for the handle itself. Drill a hole through the braces as shown in the illustration on page 91. Drill a hole in the handle to match up with the braces, and drill a similar hole in the pan. Pass a bolt through the handle, brace, and pan and attach with a washer and nut. A cover may not really be necessary because you shouldn’t cover a boiling brew kettle anyway.
A pizza pan, with an easy-to-make wooden handle, makes a great lid for the modified keg brewpot.
Most beginning homebrewers use their kitchen stoves to boil wort. Many never get beyond that stage. The stove is easy to use and you already have it, so why worry about burners? Well, stoves are not that well suited to homebrewing. It’s difficult to get many stoves (electric stoves in particular) to bring water to a vigorous boil, especially when you’re dealing with batches of 7 (or 10, or 15) gallons. In addition, a large 32-quart kettle does not fit well on a stovetop, and brewing often makes a mess with boil-overs and scorched tops around the burner where the heat reflects off the pot bottom. If you’re using an indoor electric stove, you’ll probably find that the largest heating element is insufficient for brewing anything other than an extract batch, and that if you do a lot of batches, you’ll quickly burn out the element.
One solution is to replace the heating element with a larger, higher-output element called a “canning element,” which sits above the stove surface. These are available from appliance part stores for about $25. Follow the instructions that come with the burner. If your stove does not have removable electric elements, you will probably have to go with an outdoor cooker, which we discuss next.
These burners generate a lot of carbon monoxide. Always use them outdoors, or at least in a well-ventilated area. We also recommend having a carbon monoxide detector if you’re using the burner in any enclosed area.
The ideal burner for many homebrewers — especially those who are doing 10- or 15-gallon batches — is a large, outdoor propane burner.
These are inexpensive (often $30 to $50), use readily available propane, and generate enormous amounts of heat that can quickly bring large amounts of liquid to a rolling boil. The burners come with a regulator and a hose for the gas, but you’ll need to buy a propane tank. If you don’t already have one on your gas grill, it’ll cost you about $20 to buy a new one. Many gas stations will fill the tank for you. Alternatively, you may need to ask around or look in the phone book. These burners are available from many sources such as department stores, sporting goods dealers, and hardware stores. Some homebrew supply shops also carry the burners. Brew City Beer Gear will sell you one by mail order for about $40.
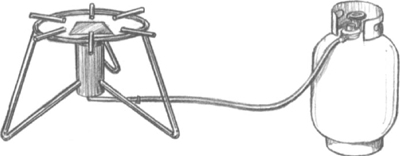
A large, outdoor propane burner is ideal for homebrewing. It is inexpensive, and it heats like crazy. (Remember to check for leaks.)
THE PROBLEM OF SOOT
Outdoor cookers tend to create a lot of carbon soot that covers the bottom of the kettle with a plush black carpet. This can be easily removed at the end of the brewing day if you remember an old Boy Scout trick: Apply some liquid dishwashing detergent to the bottom of the pot before putting it on the heater. Excessive soot can also mean that your air-fuel mixture is not set well. A simple adjustment can often reduce soot buildup.
When using a propane cooker, you likely will notice the flame coming up around the bottom of the kettle, especially when you are just starting to heat water and the burner is set at full throttle. Indeed, there is a fair amount of heat going up along the sides of the kettle that helps the heating. If you are cooking outdoors, in an unprotected area, the wind can blow heat away from the kettle, and it will take longer to heat. A simple way to prevent this is to surround the kettle with a heat shroud. Essentially this is a piece of thin metal wrapped around the outside of the kettle, allowing the hot gas to pass between it and the kettle undisturbed.
To make our own shroud, we shaped a piece of 18-inch-wide aluminum roof flashing into a tapered cylinder and riveted the ends together. The trick is to have the bottom of the shroud come down past, and be at least 2 inches away from, the bottom of the kettle. The flames should not touch the shroud, so you will need to know how far out the flame extends from the bottom of the kettle when the burner is set at full throttle. As long as the flame does not come in direct contact with the aluminum, there will be enough air flow to prevent it from melting. (The top of the shroud should be ½ to 1 inch away from the sides of the kettle.) You can pop-rivet standoffs to the shroud to maintain the spacing. And since you’re working with aluminum, it will be easy to also make a cutout for the valve.
You will be surprised how much more rapidly the kettle heats with a shroud. With a copper brewpot and a shroud, boiling actually will begin at the sides of the kettle instead of at the bottom. In our test case, boil was achieved 5 minutes earlier, and we used a much smaller flame (than without the shroud) to maintain a rolling boil.
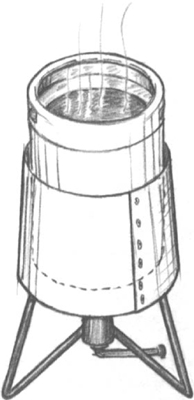
A simple beat shroud, which you can make from sheet aluminum, will keep the wind out and the heat in, greatly increasing the efficiency of your burner.
Several burners on the market today serve homebrewers well. Many offer more precise control over the flame and are cleaner to use than the outdoor cookers. Even though these burners often have lower BTU ratings than outdoor cookers, they are perfectly capable of bringing large brew kettles to a rolling boil, precisely because they offer better control and efficiency. These burners are available — or can be adapted — for either propane or natural gas. East Coast Brewing Supply sells such a burner for $83. Superb Gas Products is also a good source for these.
Several years ago, Bill Owens published a small book entitled How to Build a Small Brewery: Draft Beer in Ten Days. In the first edition he advocated getting an old gas water heater, removing the heating element, and using that as a burner. In his more recent version he dropped the section on modifying a water heater in favor of recommending the inexpensive propane burners that we described previously. Bill is making the right call, but we know there are still some homebrewers who will appreciate learning that an old water-heater burner can be adapted for homebrewing. After all, gadgeteering is a hobby of many homebrewers.
In Chapter 5 we mentioned the plastic buckets with electric immersion-heating elements. These buckets can be used not only as mashing vessels but also as boilers. Bucket systems such as the Bruheat, a 220-volt model available from BrewCo, should bring 6 gallons of wort to a boil in about 40 to 50 minutes. Buckets with immersion heaters are a nice idea, but it can sometimes be difficult to get and maintain a good rolling boil.
A spoon or paddle for stirring the boiling water is handy. Any good-quality spoon will do, either wood or stainless steel. Wood does not introduce the sanitation problem that it’s sometimes made out to because it’s used in the boil, where microorganisms are killed by the heat. If you’re using a slotted spoon for stirring your mash, you may want to keep a regular spoon handy for skimming the protein scum off the top of the boiling wort. Restaurant supply shops and kitchen stores are good places to find spoons.
If you’d like to make your own wood paddle just for brewing, you can make an inexpensive one (which can also be used for stirring the mash) simply by cutting a 3-foot length of 2-inch by 6-inch hardwood lumber into a paddle, as shown in the illustration below. Use a hardwood such as oak or maple. Never use white or, especially, yellow pine, unless you like the taste of pine sap in your beer! (As we noted earlier, some homebrewers use small canoe paddles to stir large mashes.)
After cutting out the rough shape, run a sander with 80-grit sandpaper down the corners of the handle to round them over. If you’ve got a router and roundover bit, by all means use it! If you want to go a step further, use a belt sander to taper the thickness of the blade, but this isn’t necessary. Drill a ¼-inch-diameter hole in the top of the handle so you can hang it up when you are not using the paddle.
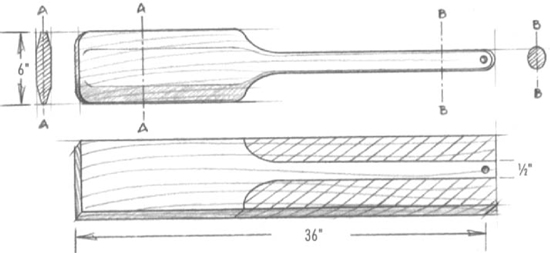
It is easy to make a paddle from hardwood stock (oak or maple) for stirring the mash or boiling wort.
The hopback is a chamber in the middle of the siphon line — between the brew kettle and the chiller — that contains fresh hops and through which you run the hot wort. This allows you to capture the fresh aromas of hops in your beer without adding them to the boil. The setup is simple: The siphon hose goes from the brew kettle to the hopback, where a second hose takes the wort to the chiller. A third hose goes from the chiller to the fermenter. Some commercial breweries, such as the Peter Austin brewhouses, use an in-line hopback like this, although they call it the “hop percolator.” It’s essentially the same idea. Hot wort goes into the hopback, where it is filtered through cones of fresh hops and is then pumped through the chiller and into the fermenter.
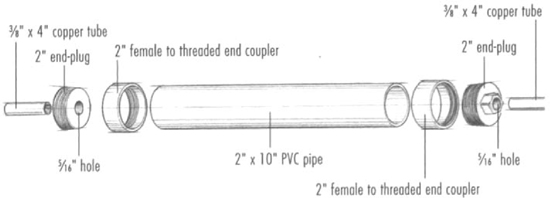
In the fall 1994 issue of Zymurgy, Charlie Stackhouse described how to make a simple hopback with a 10-inch length of 2-inch-diameter PVC pipe and a 2-inch-diameter stainless-steel tea ball as a filter. (A copper scrubber or stainless-steel screen also would work fine as filter material.) Begin by attaching a female-threaded end-coupler to each end of the PVC pipe. Next, insert a piece of ⅜-inch-diameter copper tube to each of two male-threaded end-cap plugs. Then jam a copper scrub pad (or fit a tea ball) into the exit (lower) end of the hopback and attach the end-plug. Finally, fill the pipe with fresh hops, attach the other end, and siphon the hot wort through. Although Stackhouse’s article says to use PVC, we recommend using CPVC because PVC isn’t always approved for use with food or drinking water.
One length of 2"-diameter PVC pipe 10" long
Two 2"-diameter end-plugs
Two 2"-diameter female-threaded end-couplers
Two lengths of ⅜"-diameter copper tubing 4" long
Filter material: stainless-steel tea ball, stainless-steel screen, or copper scrubber
Teflon tape
PVC cement
1. Drill a  "-diameter hole in each end-plug.
2. Push a piece of copper tubing into each end-plug. It’s going to be a tight fit, but push just enough of the tubing to clear the inside plastic by ½".
3. Run the PVC cement applicator around one end of the 2"-diameter PVC pipe. Do the same for the smooth inside surface of one of the couplers. Push the coupler onto the tube. Do the same for the other end and allow time for the glue to harden.
4. If you’re using a tea ball as your strainer, disassemble it and insert it into one of the end-plugs. You may need to file the edges of the strainer to get it to fit.
5. Wrap Teflon tape around the threads of the end-plug and install it in one of the couplers.
6. If you are using filter material, push it in from the open end until it is fully seated at the bottom of the pipe.
7. Wrap Teflon tape around the other end-plug, but wait until you are ready to use it before installing it into the open coupler.
Note: An optional hanger can be made from coat-hanger wire and a 3/4"-wide piece of 2"-diameter PVC pipe. Cut a lengthwise slit in the 3/4"-diameter pipe to make it into a split ring, which can be slipped over the pipe, wire hanger attached, and hung from the side of the brewpot. You could simply duct-tape the hanger to the tube, but this setup’s not aesthetically pleasing. If you have a spigot on your brewpot, just attach it there.
A simple hopback, placed in the siphon line between the brew kettle and the chiller, allows you to capture the aromas you want in your beer.
To use the hopback, stuff the filled hop bag into the PVC pipe, thread on the end-cap, and tighten it. Hang it on the pot. Attach the top copper tube to your racking cane with a piece of hose. Attach the bottom copper tube to your counterflow chiller (see “chillers,” pages 114 to 119), and siphon the hot wort through the entire setup as usual. A siphon may not have sufficient pressure to adequately run through a hopback such as this. You may need to use a pump or other filtering technique.
Many homebrewers use a dedicated copper tube to siphon the hot wort out of the kettle and into the fermenter, and you can easily make your own. Simply obtain a length of ⅜"-outside diameter copper pipe and attach a copper pot scrubber. The scrubber can be attached by drilling a small hole near the end of the siphon tube and then running a piece of wire through the hole and tying the scrubber into place. We first heard about this idea five years ago from Kinney Baughman of BrewCo. The copper scrubber (the Chore Boy brand is most commonly available) works well for filtering out hops and settled proteins. The best way to do this is to vigorously stir the wort before siphoning so that the settled material gathers toward the center of the pot; and then insert the siphon tube with the copper scrubber attached and start the siphon.
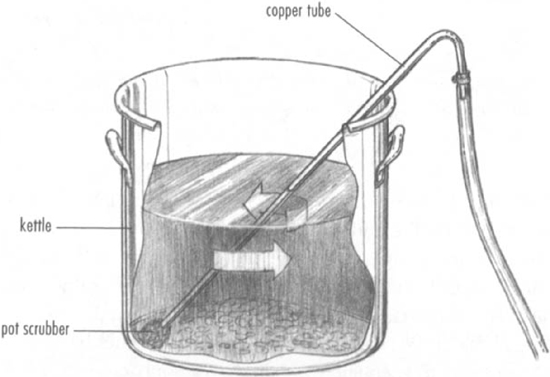
A copper tube can be used to siphon hot wort from the brewkettle to the fermenter. A copper pot scrubber attached to the end of the tube works great for filtering out hops and sediment.