Hunters of the North American continent sport a practical, yet fun hat called the deerstalker. Whether serious or whimsical, this close-fitting cap with fur-lined brim and ear- and neck flaps is headwear’s finest for blocking the wind and cold.
I have designed three options for my knitted hat. The adult size is knitted with bulky yarn and felted a little or a lot for a firm fit, or felted not at all for a soft flexible fit. The child’s size is made with worsted-weight yarn and follows the numbers for the adult version. When the child’s size is felted, it reduces to a nice compact felt texture. The yarns I have chosen come in a wide range of colors, so feel free to personalize your fashion statement. Here we come, Elmer Fudd!
The wool outer hat is worked back and forth in rows, starting with a half-circle at one ear. Stitches are picked up along the curved edge of the half-circle, then worked in reverse stockinette stitch to the top of the head. Another piece is made to match and the two pieces are joined along the center top. The brim and earflap sections are knitted downward from the cap. The fur linings are worked separately, then sewn in place.
Finished Size: Adult Version A and B: 23" (58.5 cm) circumference and 6½" (16.5 cm) tall. Child’s Version C: About 20" (51 cm) circumference and 5½" (14 cm) tall.
Adult
Child
Yarn: Versions A and B: 256 yd (234 m) of chunky (Bulky #5) yarn and 85 yd (78 m) of novelty chunky (Bulky #5) yarn. Version C: 220 yd (201 m) of worsted-weight (Medium #4) yarn and 85 yd (78 m) of novelty chunky (Bulky #5) yarn.
We used: Felted Adult Version A: Cascade 128 Tweed (90% Peruvian wool, 10% Donegal tweed; 128 yd [117 m]/100 g): #7602 dark olive, 256 yd (234 m). Crystal Palace Splash (100% polyester; 85 yd [78 m]/100 g) #7181 jaguar, 85 yd (78 m).
Unfelted Adult Version B: Cascade 128 Tweed (90% Peruvian wool, 10% Donegal tweed; 128 yd [117 m]/100 g): #7619 dark charcoal, 256 yd (234 m).
Crystal Palace Splash (100% polyester, 85 yd [78 m]/100 g): #7185 sable, 85 yd (78 m).
Child’s Version C: Cascade 220 Tweed (100% wool; 220 yd [201 m]/100 g): #7608 bright pink, 220 yd (201 m). Crystal Palace Splash (100% polyester, 85 yd [78 m]/100 g): #7234 carnival, 85 yd (78 m).
Needles: Version A—Size 10 (6 mm): 16" (40-cm) circular (cir). Version B—Size 9 (5.5 mm): 16" (40-cm) cir. Version C—Size 10½ (6.5 mm): 16" (40-cm) cir. All Versions—Spare 16" (40-cm) cir needle smaller than size 9 (5.5 mm). Trim—Size 10½ (6.5 mm): 16" (40-cm) cir. Adjust needle size if necessary to obtain the correct gauge.
Notions: Tapestry needle; size G/6 (4.25 mm) crochet hook; long sewing pins with colored heads; sharp-point sewing needle and matching thread; beeswax to strengthen sewing thread; two ½" (1.3-cm) snaps (available at fabric store).
Gauge: Version A: 14 sts and 18 rows = 4" (10 cm) in St st with 128 Tweed on size 10 (6 mm) needles; Version B: 15 sts and 22 rows = 4" (10 cm) in St st with 128 Tweed on size 9 (5.5 mm) needles, before felting; Version C: 14 sts and 18 rows = 4" (10 cm) with 220 Tweed on size 10½ (6.5-mm) needles, before felting.
Half-circle: With needles for gauge and using the long-tail method (see Glossary, page 131), CO 25 sts. Purl 1 (WS) row. Next row: (RS) K12, p1, k12. Next row: (WS) Purl. Rep the last 2 rows 5 more times—13 rows total.
Dec as foll:
Row 1: (RS) K1, ssk, k9, p1, k9, k2tog, k1—23 sts rem.
Row 2: (WS) Purl.
Row 3: K1, ssk, k8, p1, k8, k2tog, k1—21 sts rem.
Row 4: P1, p2tog, p15, ssp (see Glossary, page 133), p1—19 sts rem.
Row 5: K1, ssk, k6, p1, k6, k2tog, k1—17 sts rem.
Row 6: P1, p2tog, p11, ssp, p1—15 sts rem.
Row 7: Sl 1, ssk, psso, BO to last 3 sts, k2tog, BO to end.
Top: With RS facing and beg at lower right corner of half-circle, pick up and knit 42 sts evenly spaced along curved edge, working one-half st in from edge, turn. Cont in rev St st (purl on RS, knit on WS) as foll: Knit 1 row.
Inc row 1: P15, [p1f&b (see Glossary, page 135), p4] 2 times, p1f&b, purl to end—45 sts.
Knit 1 row, purl 1 row, knit 1 row.
Inc row 2: P16, [p1f&b, p5] 2 times, p1f&b, purl to end—48 sts.
Cont even in rev St st until piece measures 2½" (6.5 cm) from pick-up row, ending with a WS (knit) row. Place sts on spare cir needle and set aside.
Work as for left side, but leave sts on needle.
Holding 2 halves of hat tog with WS facing each other, use the three-needle method (see Glossary, page 129) to BO sts tog so that seam is on the RS of the hat. Do not cut yarn. Bring entire ball of yarn through last loop to secure. Beg at center back and using the attached working yarn and crochet hook, work 1 row of single crochet (sc; see Glossary, page 131) around lower edge of hat, easing in any fullness—about 84 sc sts. Fasten off. Weave in loose ends.
Measure 3½" (9 cm) out from each side of center front seam (7" [18 cm] total) and mark for brim placement. With RS facing, pick up and knit 25 sts between markers, working in back loops of sc edge. Turn. Cont as foll:
Row 1: (WS) K3, p19, k3.
Row 2: (RS) Knit.
Rep Rows 1 and 2 until piece measures 2½" (6.5 cm) from pick-up, ending with a WS row. Change to garter st (knit every row) and cont as foll: Dec row: (RS) K2, ssk, knit to last 4 sts, k2tog, k2—2 sts dec’d. Knit 1 row even. Rep the last 2 rows once more. Rep dec row once more—19 sts rem. With WS facing, BO all sts.
With RS facing, beg at brim left edge, and working in back loops of sts, pick up and knit 60 sts around lower edge of hat, ending at brim right edge, turn. Cont as foll:
Row 1: (WS) K3, purl to last 3 sts, k3.
Row 2: (RS) Knit.
Rep Rows 1 and 2 until piece measures 2½" (6.5 cm) from pick-up, ending with Row 2 (RS).
Next row: (WS) K3, p9, k36, p9, k3.
Next row: (RS) Knit.
Rep the last 2 rows once more (4 rows total).
Next row: (WS) K3, p9, k6, BO 24 sts (1 st on right needle), k5 (6 sts on right needle), p9, k3—18 sts each side.
Left earflap: Work 18 sts on left side as foll:
Rows 1, 3, 5, and 7: (RS) Knit.
Row 2: (WS) Sl 1 with yarn in front (wyf), bring yarn to back, k1, psso, k4, p9, k3—17 sts rem.
Row 4: Sl 1 wyf, bring yarn to back, k1, psso, k3, p9, k3—16 sts rem.
Row 6: Sl 1 wyf, bring yarn to back, k1, psso, k2, p9, k3—15 sts rem.
Row 8: K3, p9, k3.
*Rep Rows 7 and 8 until flap measures 7" (18 cm) from pick-up row, ending with Row 8 (WS).
Dec row: (RS) K2, ssk, knit to last 4 sts, k2tog, k2—2 sts dec’d.
Next row: (WS) Knit.
Rep the last 2 rows once more. Rep dec row once more—9 sts rem. With WS facing, BO all sts.*
Right earflap: With RS facing, join yarn to right-hand side of rem 18 sts and cont as foll:
Row 1: (RS) Sl 1 wyf, bring yarn to back, k1, psso, knit to end—17 sts rem.
Rows 2, 4, and 6: (WS) K3, p9, knit to end.
Row 3: Sl 1 wyf, bring yarn to back, k1, psso, knit to end—16 sts rem.
Row 5: Sl 1 wyf, bring yarn to back, k1, psso, knit to end—15 sts rem.
Row 7: Knit.
Row 8: K3, p9, k3.
Rep from * to * as described for left earflap.
Button loop on right earflap: With RS facing, insert crochet hook into fourth st of BO edge and draw up loop, ch 5, insert hook into next st and work 1 slip st. Cut yarn, draw tail through last loop to secure, and fasten off. Weave in loose ends.
Felted Adult Version A: Felt according to the instructions on page 134 just enough to fuse the fibers together without reducing the size significantly. As you felt, stop often to check the progress to prevent over felting. Use bath towels to blot out excess water. Invert a mixing bowl of the appropriate circumference over a tall vase to form a blocking stand. (Using a tall vase, or some other tall object as a blocking stand will allow the earflaps to hang free and avoid creases.) Place wet hat over inverted bowl and allow to air-dry.
Unfelted Adult Version B: Lightly steam-block earflaps and brim flat.
Child’s Version C: Significantly felt hat until sts are nicely compacted. Personalize size by adjusting felting time. Block as for felted adult version.

Fur brim: With size 10½ (6.5 mm) needle, CO 18 sts. Work rev St st (purl on RS, knit on WS) until piece measures 3½" (9 cm) from CO, ending with a WS (knit) row. Next row: (RS) P2tog, purl to last 2 sts, p2tog—16 sts rem. With WS facing, BO all sts.
Fur Neck and Earflaps: With size 10½ (6.5 mm) needle, CO 44 sts. Work rev St st until piece measures 3½" (9 cm) from CO, ending with a RS (purl) row. Next row: (WS) K12, BO 20 sts, knit to end—12 sts rem for each earflap.
Right earflap: (RS) P10, p2tog—11 sts rem. Cont even in rev St st until piece measures 6½" (16.5 cm) from CO, ending with a purl row. Next row: K2tog, knit to last 2 sts, k2tog—9 sts rem. BO all sts.
Left earflap: With RS facing, join yarn to right-hand side of rem 12 sts, p2tog, purl to end—11 sts rem. Cont even in rev St st until piece measures 6½" (16.5 cm) from CO, ending with a RS (purl) row. Next row: K2tog, knit to last 2 sts, k2tog—9 sts rem. BO all sts. Weave in loose ends.
Fur Brim: With size 10½ (6.5 mm) needle, CO 13 sts. Work rev St st (purl on RS, knit on WS) until piece measures 2½" (6.5 cm) from CO, ending with a WS (knit) row. Next row: (RS) P2tog, purl to last 2 sts, p2tog—11 sts rem. With WS facing, BO all sts.
Fur Neck and Earflaps: With size 10½ (6.5 mm) needle, CO 36 sts. Work rev St st until piece measures 2½" (6.5 cm) from CO, ending with a RS (purl) row. Next row: (WS) K10, BO 16 sts, knit to end—10 sts rem for each earflap.
Right earflap: (RS) P8, p2tog—9 sts rem. Cont even in rev St st until piece measures 5¼" (13.5 cm) from CO, ending with a purl row. Next row: K2tog, knit to last 2 sts, k2tog—7 sts rem. BO all sts.
Left earflap: With RS facing, join yarn to right-hand side next to neck flap, p2tog, purl to end—9 sts rem. Cont even in rev St st until piece measures 5¼" (13.5 cm) from CO, ending with a RS row. Next row: K2tog, knit to last 2 sts, k2tog—7 sts rem. BO all sts. Weave in loose ends.
Fold brim up against crown and mark placement of snaps, one close to each corner of brim. Cut a length of sewing thread and draw through a disk of beeswax to coat. “Press” the thread by quickly pulling thread under hot iron. With waxed sewing thread and sharp-point needle, sew snaps on crown and knit side of brim. Pin knit side of fur brim to purl side of hat brim, covering seam between crown and brim. With waxed sewing thread and sharp-point needle, use a whipstitch (see Glossary, page 139) to sew in place along the edges. Pin WS of fur flap to purl side of hat, matching center point of fur flap to center of hat flap. Match flap upper corners and ease straight edge of fur along seam line, covering it as before. Pin earflaps for placement, pulling fur slightly around the edges so fur will be seen on RS of hat. Sew button centered onto lower curved edge of left earflap on the wool side. Hat may be worn buttoned with all fur showing on outside, or with flaps hanging down to cover the ears.


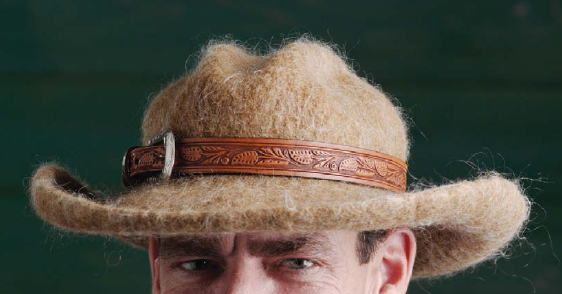
There’s an old saying about this quintessential icon of the American West: “It’s the last thing you take off and the first thing that is noticed.” A rugged cowboy with the brim tipped just so against the glare of the setting sun is an indelible popular image.
The son of a Philadelphia master hatter, John B. Stetson designed and created the first cowboy hat in 1865. He created a smooth piece of felt by kneading the under-fur collected from a cow hide, dipping it in boiling water, then kneading it and dipping it again. From this piece of felt he made his first hat, and the rest is history, including the name Stetson, which has come to represent a mark of quality, durability, innovation, and beauty.
Although not a Stetson, my felted design honors the American cowboy. There are countless ways to crease the crown and shape the brim, each as individual as the person who wears the hat. Here, I offer two variations for shaping the same knitted pattern. And of course, you will want to care for your hat so it retains its shape. The best place is on your head, next best is in a hatbox that will keep the brim from getting crushed.
This hat is worked in the round from the brim to the top, then felted and shaped.
Finished Size: About 22 to 23" (56 to 58.5 cm) head circumference. Final measurement is flexible, according to the amount of felting.


Yarn: About 250 yd (229 m) of bulky (Bulky #5) yarn.
We used: Brown Sheep Lamb’s Pride Bulky (85% wool, 15% mohair; 125 yd [114 m]/4 oz): 250 yd (229 m). Shown in #M08 wild oak and #M77 blue magic.
Needles: Size 13 (9 mm): 24" (60-cm) and 16" (40-cm) circular (cir) and set of 5 double-pointed (dpn). Adjust needle size if necessary to obtain the correct gauge.
Notions: Marker (m); open-ring marker; tapestry needle; ¾ yd (61 cm) grosgrain ribbon; sharp-point sewing needle and thread to match ribbon; beeswax to strengthen sewing thread; leather belt for hatband.
Gauge: 10½ sts and 14 rnds = 4" (10 cm) in St st worked in the rnd, before felting (see Glossary, page 134, for working gauge swatches in the rnd).
With longer cir needle, CO 150 sts. Place marker (pm) and join for working in the rnd, being careful not to twist sts. Knit 4 rnds—piece should measure 1" (2.5 cm) from CO edge. Shape brim as foll:
Dec rnd 1: *K3, k2tog; rep from *—120 sts rem.
Knit even until piece measures 3½" (9 cm) from CO.
Dec rnd 2: *K4, k2tog; rep from *—100 sts rem.
Knit even until piece measures 6" (15 cm) from CO.
Dec rnd 3: *K3, k2tog; rep from *—80 sts rem.
Place open marker to indicate last rnd of brim.
Knit every rnd until piece measures 7" (18 cm) from brim marker. Shape top as foll, changing to shorter cir and dpn when necessary:
Rnd 1: *K6, k2tog; rep from *—70 sts rem.
Rnd 2 and all even-numbered rnds: Knit.
Rnd 3: *K5, k2tog; rep from *—60 sts rem.
Cont in this manner, dec 10 sts every other rnd and working 1 st fewer between decs until 20 sts rem.
Next rnd: *K2tog; rep from *—10 sts rem. Cut yarn, thread tail on a tapestry needle, draw through rem sts, and pull tight to secure. Weave in loose ends.
Felting: Felt according to the instructions on page 134.
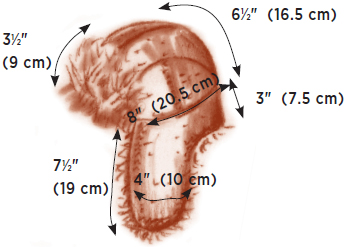
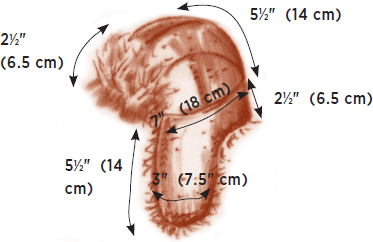
Shaping: Firmly pull hat lengthwise from top of crown to brim, being careful not to stretch edge of brim. Place the hat on your head or a rounded bowl of correct circumference. Shape crown to a smooth roundedness. Place hat on flat surface (a countertop or table) and use your palm to hold the base of the crown while pulling the brim away from the crown at a 90-degree angle, defining crown to brim transition, and smoothing brim as you do so. Be careful not to stretch very edge of brim. Brim edges may now be curved up in back and around sides, leaving front of brim flatter, or turned slightly down. Exaggerate the “potato chip” shape of the brim for a distinct western style. Crown indentations may be formed using edge of rigid palm on outside of crown and cupping other hand on the inside of crown to define shape. The tan hat was shaped first with a front-to-back groove in the top of the crown, then indented along the sides. The blue hat was shaped first with the center groove toward the front of the crown, then the side indentations were also squeezed toward the front for an Old West look. Place hat over a tall vase or wide-mouth bottle to keep brim off the countertop or table while it dries.
Attach ribbon: Measure head circumference where you want to wear the hat and cut ribbon 2" (5 cm) longer. Fold one end of ribbon back on itself 1" (2.5 cm). Mark other end of ribbon 1" (2.5 cm) from cut end. Cut a length of sewing thread and draw through a disk of beeswax to coat. “Press” the thread by quickly pulling it under a hot iron. With sewing needle and waxed thread, sew folded end along this mark to form a ring. Pin ribbon ring to inside of hat so that lower edge of ribbon aligns with lower edge of crown. Try on hat for fit and adjust ribbon if necessary. With sewing needle and waxed thread, use a whipstitch (see Glossary, page 139) to sew lower edge of ribbon to hat.
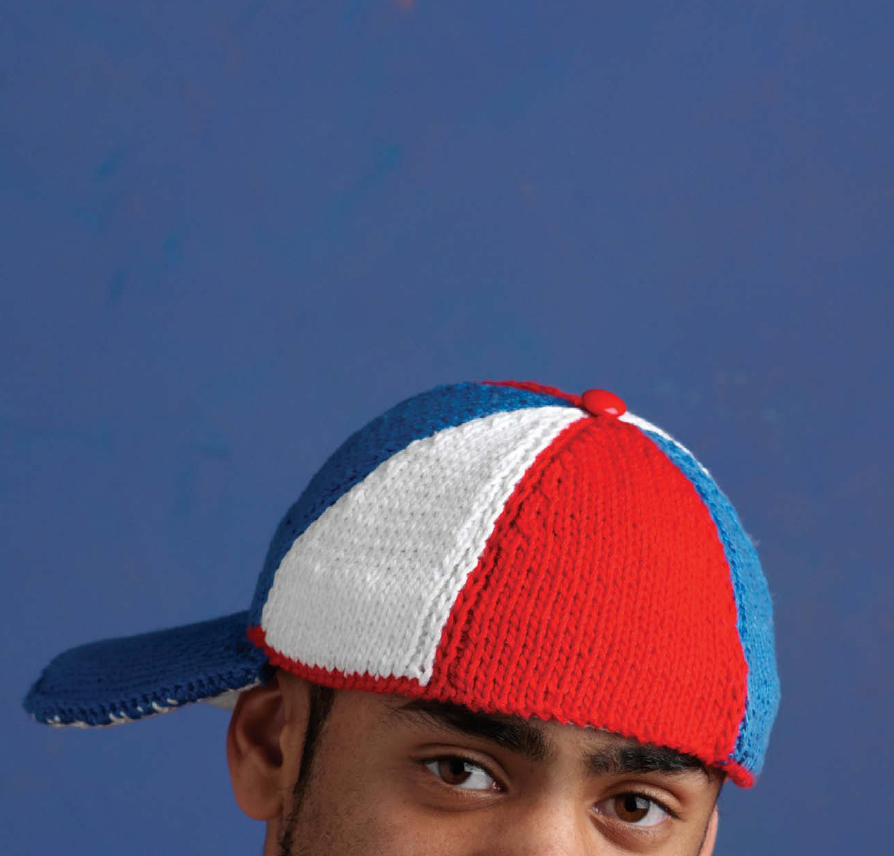
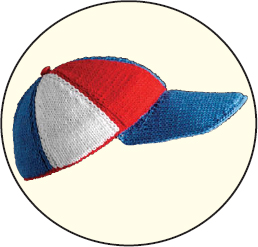
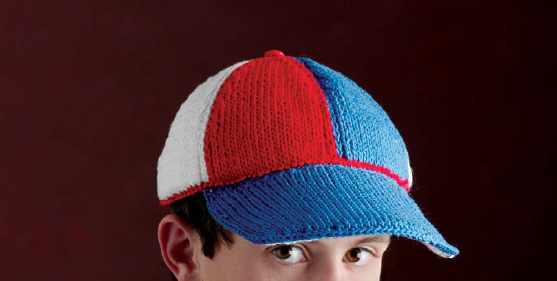
Baseball has been declared America’s pastime, and the baseball cap is by far the most popular accessory in American culture. You can find baseball caps atop almost any sports team in America, and they come in every color combination imaginable. No sports team? No problem. Pick pink for girls, blue for boys, red for everyone, camouflage for hunters—you get the idea.
I offer mine in red, white, and blue, the colors of my country. The cotton yarn and thin layer of vinyl-faced foam in the brim make this hat washable, always a key feature when you consider the abuse these hats can take. Wear it brim to the front, brim to the back, brim to the side—there are no rules for sporting this hat!
This hat is worked from crown to top. The crown facing is worked in the round, then stitches are worked back and forth in rows, using the intarsia technique (see Glossary, page 137) for the color work. The crown is sewn together along the center back. The brim and its facing are knitted separately, sewn together, then sewn to the lower edge of the crown.
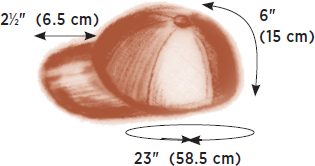
Finished Size: About 23" (58.5 cm) circumference and 6" (15 cm) tall.
Yarn: About 185 yd (169 m) each of three colors of light worsted-weight (Light #3) yarn.
We used: Reynolds Saucy (100% mercerized cotton; 185 yd [169 m]/100 g): #800 white, #361 red, and #251 blue, 185 yd (169 m) each.
Needles: Size 6 (4 mm): 16" (40-cm) circular (cir) and set of 4 double-pointed (dpn). Size 5 (3.75 mm): 16" (40-cm) cir. Adjust needle size if necessary to obtain the correct gauge.
Notions: Marker (m); tapestry needle; ¾ yd (68.5 cm) of 1" (2.5-cm)-wide non-roll elastic; sharp-point sewing needle and white sewing thread; long, straight pins with colored heads; ¼ yd (23 cm) vinyl-faced foam about ⅛" (3 mm) thick for brim (available at fabric stores); ⅝" (1.5 cm) smooth, rounded-face shank button for top of crown.
Gauge: 20 sts and 26 rows = 4" (10 cm) in St st on larger needle.
With white and larger needle, CO 118 sts, leaving a 24" (61-cm) tail for hemming later. Place marker (pm) and join for working in the rnd, being careful not to twist sts. Rnd begins at center back. Work St st (knit every rnd) until piece measures 1¼" (3.2 cm) from CO edge. Change to red and smaller cir needle. Knit 1 rnd, purl 1 rnd (turning ridge). Change to larger cir needle.
Foundation rnd: (RS) With red, k1 (selvedge st), *k20 red, k18 white, k20 blue; rep from * once, end k1 blue. Turn work to WS and begin knitting back and forth in rows as foll:
Foundation row: (WS) Keeping colors as established throughout remainder of crown and crossing yarns at color changes to prevent holes, k1 (center back), *p1, k1, purl to last 2 sts of color, k1, p1; rep from * for each color, end k1 in last color.
Row 1: (RS) With red, p1, *sl 1, p1, k16, p1, sl 1; with white, sl 1, p1, k14, p1, sl 1; with blue, sl 1, p1, k16, p1, sl 1; beg with red, rep from * once, end p1 blue. Turn work.
Row 2: (WS) Rep Foundation row.
Rep Rows 1 and 2 until piece measures 2½" (6.5 cm) from turning ridge, ending with a WS row. Dec for top as foll:
Dec row 1: (RS) Matching colors as established, p1 (center back), *sl 1, p1, k2tog, knit to 2 sts before next purl st, ssk, p1, sl 1; rep from * for each color, end p1 blue—12 sts dec’d; 106 sts rem.
Rows 2 and 4: (WS) Work sts as they appear: knit the knit sts; purl the purl sts; purl the slipped sts.
Row 3: (RS) P1 (center back), *sl 1, p1, knit to next purl st, p1, sl 1; rep from * for each color, end p1 blue.
Rep Rows 1–4 two more times—82 sts rem.
Rep Rows 1 and 2 (dec every other row) a total of 3 times—46 sts rem; 6 sts in each white section; 8 sts in each red and blue section, plus 1 selvedge st at each end of row.
Next row: (RS) With red, p1 (center back), *sl 1, p1, k2tog, ssk, p1, sl 1; with white, sl 1, k2tog, ssk, sl 1; with blue, sl 1, p1, k2tog, ssk, p1, sl 1; rep from * for each color, end p1 blue—34 sts rem.
Next row: (WS) Work sts as they appear: knit the knit sts; purl the purl sts; purl the slipped sts.
Next row: (RS) With red, p1, *[ssk] 2 times, k2tog; with white, ssk, k2tog; with blue, [ssk] 2 times, k2tog; rep from * for each color, end p1 blue—18 sts rem.
Cut yarn. Thread blue tail on a tapestry needle, draw through rem sts, and pull tight to secure.
Left brim point: With blue, CO 3 sts.
Row 1: (WS) Purl.
Row 2: K1f&b (see Glossary, page 135), knit to end—4 sts.
Row 3: Purl.
Rep Rows 2 and 3 two more times—6 sts. Next row: (RS) Using the cable method (see Glossary, page 130), CO 2 sts, knit to end—8 sts. Purl 1 row. Use the cable method to CO 3 sts at beg of next row, knit to end—11 sts. Purl 1 row. Use cable method to CO 4 sts at beg of next row, knit to end—15 sts. Purl 1 row. Use cable method to CO 5 sts, but do not knit the sts in this row. Instead, place all 20 sts on holder, and cut yarn leaving a 6" (15-cm) tail to weave in later.
Right brim point: With blue, CO 3 sts.
Row 1: (WS) Purl.
Row 2: Knit to last st, k1f&b—4 sts.
Row 3: Purl.
Rep Rows 2 and 3 two more times—6 sts. Knit 1 row. Next row: (WS) Use the cable method to CO 2 sts, purl to end of row—8 sts. Knit 1 row. Use the cable method to CO 3 sts at beg of next row, purl to end of row—11 sts. Knit 1 row. Use the cable method to CO 4 sts at beg of next row, purl to end of row—15 sts.
Join right and left brim points: With RS facing, k15 sts of right brim point, beg at the edge with the 6" (15-cm) yarn tail attached, k20 held left brim point sts—35 sts total. Beg with WS row, work even in St st until piece measures 2¼" (5.5 cm) from last CO row, ending with a WS row. With RS facing and using the sloped method (see Glossary, page 129), BO as foll: BO 2 sts at beg of next 2 rows, then BO 3 sts at beg of next 2 rows, then BO 4 sts at beg of next 2 rows—17 sts rem. BO all sts. With white, work another brim for facing.
With yarn threaded on a tapestry needle, RS facing, and using invisible weaving for reverse stockinette stitch (see Glossary, page 138), sew center back seam.
Blocking: With crown turned WS out, wad up a hand towel for roundness and place inside crown. Lightly steam-block to set sts. Steam-block brim and brim facing flat. Let dry.
Elastic band: Cut elastic to 1" (2.5 cm) longer than head circumference. Form into a ring, overlapping 1" (2.5 cm), and with sewing needle and thread, sew ends tog securely. Place elastic ring inside cap with lower edge of elastic aligned with WS of turning ridge. Fold facing toward WS of cap to enclose elastic. Pin facing in place at color “seams.” Thread tapestry needle with long tail left from CO, sew facing to WS of cap, being careful not to pull seaming yarn too tight and cause puckers.
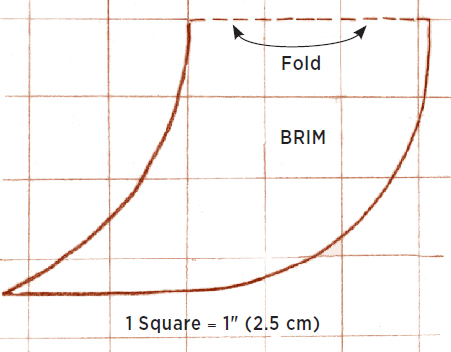
Brim: With WS together, pin brim pieces together around outside edges, leaving inner curved edge open so foam stiffening can be inserted later. With blue, crochet hook, RS facing, and beg at right brim point, work 1 row of single crochet (sc; see Glossary, page 131) around outside curved brim edge. Do not cut yarn. Make a photocopy of brim schematic below and enlarge it so that each square = 1" (2.5 cm) for brim template. Cut vinyl-faced foam to match template. Roll foam, with vinyl facing to outside, lightly around a bottle or a can to encourage curved shape. Slip the foam brim with vinyl toward top into knitted brim from the open edge of the inside curve. Pin these edges together, and work sc around inner curve of brim working 2 sc in each point, completely enclosing the foam brim. With RS tog (this will be blue brim top and cap center front colors red and blue), pin brim to crown, matching center of brim to center front of cap. With blue, use a whipstitch (see Glossary, page 139) to join brim to turning ridge of crown, using every st on turning ridge, and easing sts on inner curve of brim. Lightly steam-block seam from inside of cap to set sts. Sew button onto top of crown.