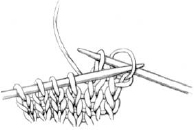
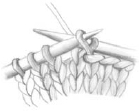
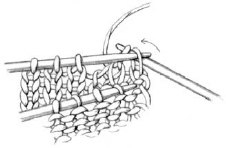
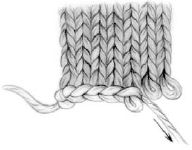
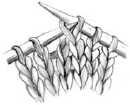
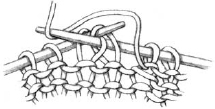
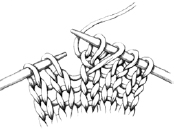
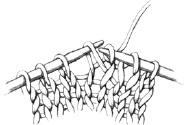
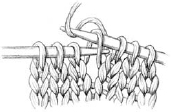
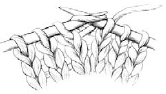
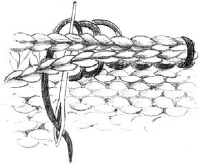
Knit two stitches, *insert left needle tip into first stitch on right needle (Figure 1) and lift this stitch up and over the second stitch and off the needle (Figure 2). Repeat from * for the desired number of stitches.

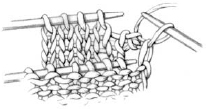
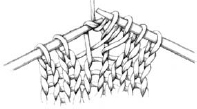
On the row preceding the bind-off row, do not work the last stitch. Turn work—there will be one stitch on the right needle. Place working yarn in back, slip the first stitch on left needle purlwise (Figure 1), use left needle tip to lift the unworked stitch over the slipped stitch and off the needle (Figure 2) to bind off one stitch. Knit the next stitch and continue binding off as for the basic bind-off method.

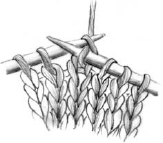
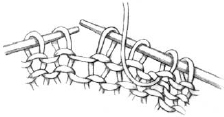
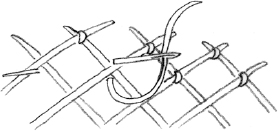
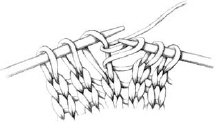
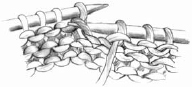
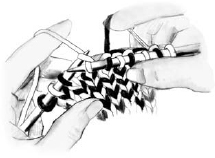
Place the stitches to be joined onto two separate needles and hold the needles parallel so that the right sides of knitting face together. *Insert a third needle into the first stitch on each of two needles (Figure 1) and knit them together as one stitch (Figure 2), knit the next stitch on each needle the same way, then use the left needle tip to lift the first stitch over the second and off the needle (Figure 3). Repeat from * until one stitch remains on third needle. Cut yarn and pull tail through last stitch to secure.

Blocking is the process of wetting or steaming knitted pieces to even out the lines of stitches and the yarn fibers. There are a number of ways to do this.
Hold an iron set on the steam setting ½” (1.3 cm) above the hat and direct the steam over the entire surface, except the ribbing (if there is any). You can get similar results by placing wet cheesecloth on top of the hat and repeatedly touching a dry iron lightly to the wet cheesecloth—do not move the iron across the cheesecloth. Let the hat dry completely before moving it.
Spray hat with water, pat it into shape, and let it dry.
Run a large bath or beach towel through the rinse/spin cycle of a washing machine to thoroughly moisten it. Roll the hat in the damp towel, place the roll in a plastic bag, and leave it to set overnight. The hat will be uniformly damp and ready to shape the next morning.
*Loop working yarn counterclockwise and place this loop on the needle so that it doesn’t unwind. Repeat from * for desired number of stitches.

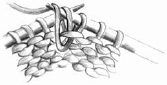
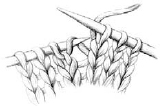
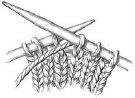
*Insert right needle between first two stitches on left needle (Figure 1), wrap yarn around needle as if to knit, draw yarn through (Figure 2) and place new loop on tip of left needle (Figure 3) so that new loop forms first stitch on needle. Repeat from * for desired number of stitches, always working between the first two stitches on the left needle.
With a crochet hook and waste yarn, make a crochet chain (see page 131) 4 stitches longer than the number of stitches you want to cast on. With knitting needle and working yarn, pick up and knit one stitch through the back loop of each chain stitch (Figure 1) for every stitch to be cast on. When you’re ready to work in the opposite direction, pull out the crochet chain and carefully place live stitches on a needle.

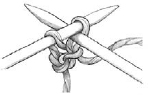
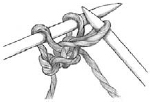
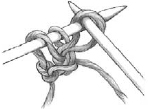
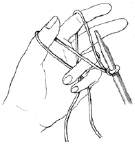
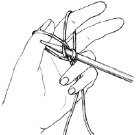
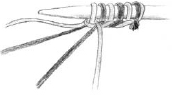
Leaving a long tail (about 1/2" to 1" [1.3 to 2.5 cm] for each stitch to be cast on), make a slipknot and place on right needle. Place thumb and index finger of left hand between yarn ends so that working yarn is around your index finger and tail end is around your thumb. Secure ends with your other fingers and hold palm upwards, making a V of yarn (Figure 1). Bring needle up through loop on thumb (Figure 2), grab first strand around index finger with needle, and go back down through loop on thumb (Figure 3). Drop loop off thumb and, placing thumb back in V configuration, tighten resulting stitch on needle (Figure 4).


Holding two colors of yarn together (color A and color B), make slipknot and place on right needle as for regular long-tail method (the slipknot will be worked as a single stitch in the next row). Hold the two strands of A as for the regular long-tail method, with the tail over your thumb and the working yarn over your index finger, and cast on 1 stitch. Drop both strands of A so that each strand is on the outside edge of color B. *Pick up both strands of B through the center (as illustrated) and cast on 1 stitch. Drop both strands of B to the outside, pick up A through the center, and cast on 1 stitch. Repeat from * for one less than the desired number of stitches (the slipknot counts as the final stitch). Note: The yarns will twist around each other and you may need to stop periodically and untwist them.
Make a slipknot and place on crochet hook. *Yarn over hook and draw the loop through the slipknot. Repeat from * for desired number of stitches. To fasten off, cut yarn and draw end through last loop formed.

*Insert crochet hook into an edge stitch, yarn over hook and draw a loop through the stitch, yarn over hook (Figure 1), and draw loop through both loops on hook (Figure 2). Repeat from * for desired number of stitches.
Insert hook into stitch, yarn over hook, and draw loop through stitch and loop on needle (Figure 1).

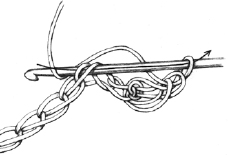
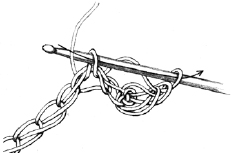
Yarn over hook, insert hook into a stitch, yarn over hook and draw a loop through (three loops on hook), yarn over hook (Figure 1) and draw it through two loops, yarn over hook and draw it through the remaining two loops (Figure 2).
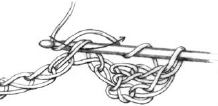

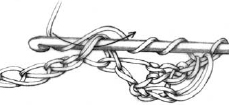
Wrap yarn around hook two times, insert hook into a stitch, yarn over hook and draw a loop through (four loops on hook; Figure 1), yarn over hook and draw it through two loops (Figure 2), yarn over hook and draw it through the next two loops, yarn over hook and draw it through the remaining two loops (Figure 3).


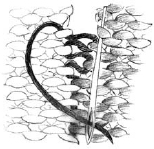
Slip one stitch knitwise, knit the next stitch, then use the left needle tip to lift the slipped stitch (Figure 1) over the knitted stitch and off the needle (Figure 2).
Slip one stitch knitwise, knit the next two stitches together, then use the left needle tip to lift the slipped stitch over the stitch formed after knitting two stitches together (see above).
Slip two stitches individually knitwise (Figure 1), then insert left needle tip into front of these two slipped stitches, and use the right needle to knit them together through their back loops (Figure 2).
Holding yarn in front, slip two stitches individually knitwise (Figure 1), then slip these two stitches back onto left needle purlwise (they will appear twisted), and purl them together through their back loops (Figure 2).
Slip two stitches together knitwise to right needle (Figure 1), knit the next stitch (Figure 2), then use the left needle tip to lift the two slipped stitches over the knitted stitch and off the needle. The decreases will form a raised line of stitches (Figure 3).

With yarn threaded on a tapestry needle, make a series of long straight stitches parallel to each other and about ½" (1.3 cm) apart. Work another series of straight stitches on top of and at right angles to the previous ones. Use small stitches to couch the intersections of the two lines of parallel stitches.
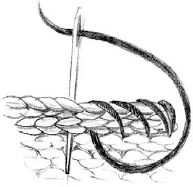
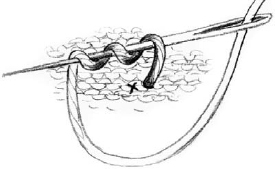
Bring threaded needle through fabric from back to front, wrap yarn around needle three times, then insert needle back into fabric very close to where it emerged (designated by an x in illustration below), and use your thumb to hold the wraps in place as you pull the needle through to the wrong side of the fabric.
Bring threaded needle in and out of fabric to form a dashed line of stitches.
(Also called outline stitch) Keeping the working yarn above the needle, bring threaded needle through fabric from back to front, then insert it a short distance to the right, and bring it out again close to the first stitch.
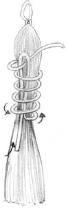
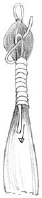
Cut a strand of yarn about 36" (91.5 cm) long. Lay one cut end of the yarn parallel to the tassel strands. Fold the cut yarn back on itself to create a loop beyond where you want the wrap to end (this will secure the end of the yarn), and beginning at the cut end, wrap the yarn snuggly around the tassel, placing the wraps right next to each other so that none of the tassel shows through (Figure 1). When desired length of wrap is reached, pull the second cut end through the foundation loop until it lies smoothly, finishing the wrap. Pull on first cut end to pull foundation loop to center of wrap (Figure 2). Trim ends of wrapping yarn.
Put knitted hat in washing machine with a pair of blue jeans and a tennis shoe or a few tennis balls to increase agitation. Let the washer go through a hot wash/cold rinse cycle. Wash twice for extra body.
Fill a basin with very warm but not scalding water. Add soap to the hot water, mix, than add the knitted hat. Scrub, twist, and agitate the hat for several minutes to get the fibers to mat together. Rinse in cold water. Repeat, adding hot water to soapy basin, and rinse in a fresh basin of cold water until hat is desired size. Roll hat in dry bath towel to remove excess water. Shape and let dry according to pattern instructions.
There are several ways you can work a gauge swatch for a project that is worked in the round. The key is that the right side of the work is facing outward in projects worked in the round, so for some stitch patterns—such as stockinette stitch—purl stitches are never worked. Many knitters have different tensions on knit and purl stitches, and this difference can make a difference in the final gauge between a piece worked back and forth in rows and a piece worked in the round. Use the method below that gives you the best approximation of what your knitting looks likes when you work in the round. Option 1: Using an 11" (28 cm) or 12" (30.5-cm) circular needle, cast on enough stitches to fill the entire needle circumference. For example, if the gauge requires 20 stitches for 4" (10 cm), cast on three times that amount (60 stitches) to accommodate the 12" (30.5-cm) needle, adding stitches if necessary to accommodate full repeats of the stitch pattern you’re working. Join, and work in the round, just as you will for the project, until the piece measures at least 4" (10 cm) long. This method produces a large swatch that you may want to keep for future reference.
Option 2: Using a set of 4 or 5 double-pointed needles, cast on the number of stitches required for 4" (10 cm), adding stitches if necessary to accommodate full repeats of the stitch pattern you’re working. Join, and work in the round until the piece measures at least 4" (10 cm) long.
Option 3: Using circular needle, cast on 10 more stitches than required for 4" (10 cm), adding stitches if necessary to accommodate full repeats of the stitch pattern you’re working. Do not join for working in the round. Beginning with Row 1, work in pattern across all of the stitches on the needle. Without turning the work, slide all of the stitches to the opposite end of the needle and loosely loop the yarn across the back of the work. Work across all of the stitches on the needle again, this time following Row 2 of the pattern. Continue in this manner, always working with the right-side of the work facing you, always slipping the stitches to the opposite needle tip at the end of the row, and always looping the working yarn across the back of the work. The edge stitches will loosen due to the stranded yarn across the back of the work, so be sure to measure gauge in the middle of the work. This gauge swatch is usually raveled and the yarn is reused.
Knit a stitch but leave it on the left needle (Figure 1), then knit through the back loop of the same stitch (Figure 2) to make two stitches from one (Figure 3).

Purl a stitch but leave it on the left needle (Figure 1), then purl through the back loop of the same stitch (Figure 2) to make two stitches from one. Note: You may find it easier to work through the back loop first, then work through the front loop.


Knit into the back (the “purl bump”) of the stitch directly below the stitch on the needle (Figure 1), then knit into the stitch on the needle (Figure 2), and slip both stitches off the needle.

Insert right needle from top into the purl bump of the stitch below the stitch on the needle (Figure 1), purl this stitch, then purl the stitch on the needle (Figure 2).
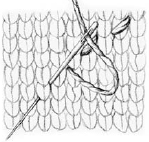
Insert left needle tip into back (the “purl bump”) of the stitch directly below the stitch just knitted (Figure 1), and knit this stitch (Figure 2).

Note: When working lifted increases with bulky yarn, it helps to create a neater increase if the left needle is inserted into the stitch below from the back, then knitting this lifted stitch through the back loop.
If no direction is specified, work the left-slant increase.
Left-Slant (M1L): With left needle tip, lift the strand between last knitted stitch and first stitch on left needle, from front to back (Figure 1), then knit the lifted loop through the back (Figure 2).

Right-Slant (MIR): With left needle tip, lift the strand between last knitted stitch and first stitch on left needle, from back to front (Figure 1), then knit the lifted loop through the front (Figure 2).
Work to turn point, slip next stitch purlwise to right needle. Bring yarn to front (Figure 1). Slip same stitch back to left needle (Figure 2). Turn work and bring yarn in position for next stitch, wrapping the stitch with the working yarn as you do so. When you come to wrapped stitch on a subsequent row, hide the wrap by working it together with the wrapped stitch as follows: Insert right needle tip under the wrap (from the front if wrapped stitch is a knit stitch; from the back if wrapped stitch is a purl stitch), then into the stitch, and work the two together.
Fair Isle, or color stranding, is a technique of multicolored knitting in which yarns that are not in use are carried across the back of the work. In traditional Fair Isle, just two colors are used in a row, the colors are changed frequently, and diagonal pattern lines dominate over vertical lines to evenly distribute the tension over the knitted fabric. To work Fair Isle patterns, simply work the designated number of stitches with one color, drop that color, pick up the next color and work the designated number of stitches with that color, drop that color, and so on. This type of knitting is most efficient if the two yarns are held simultaneously; one in the left hand and worked in the Continental method, the other in the right hand and worked in the English method.
The key to Fair Isle knitting is stranding the unused yarn loosely across the back of the work—the stitches will pucker if the strands are pulled too tightly across the back, ruining the appearance. To prevent this, spread the stitches on the right-hand needle to their approximate gauge each time you change colors rather than allowing them to scrunch up near the tip of the needle.
Intarsia, or jacquard, is a method of knitting that uses isolated blocks of color. These blocks may have vertical, horizontal, diagonal, or curved boundaries. Because the colors are used in limited areas, this type of knitting is most commonly worked back and forth in rows (knit one row, purl one row), not circularly. A separate ball or butterfly of yarn is used for each color block. Tangles are inevitable and you’ll need to stop periodically to separate the individual balls or butterflies.
At each color change, twist the yarns around each other to prevent holes in the knitting. Always pick up the new color from beneath the one you’ve just finished. To change colors along a vertical line, twist the yarns around one another on every row. To change colors along a diagonal line, twist the yarns around one another on every other row.

With double-pointed needle, cast on the desired number of stitches (usually 3 or 4). *Without turning the needle, slide the stitches to the other needle point, pull the yarn around the back of the work, and knit the stitches as usual. Repeat from * until cord measures desired length.
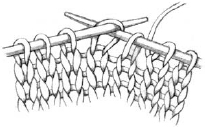
Tip: To prevent the first stitch of each row from being too loose, knit the first stitch, place your right index finger on this stitch to stabilize it, then insert the needle into its largest diameter into the second stitch before knitting it.

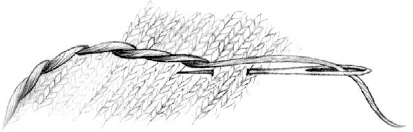
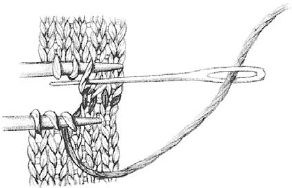
With right sides facing together, pin knitted fabric together with edges even. Thread yarn on a tapestry needle and whipstitch edge stitch to secure. *Insert threaded needle through both layers two stitches to the left, then one stitch back. Repeat from *, working right to left in a circular motion.
Place pieces to be seamed side by side, with the right sides facing upward. *Use a threaded tapestry needle to catch the bottom loop of the edge stitch of a knit ridge on one piece, then the top loop of the corresponding knit ridge on the other piece. Repeat from *, alternating from one piece to the other.
Place pieces to be seamed side by side, with right sides facing upward. Note that along the selvedge edges a loose stitch alternates every other row with a tight stitch, and that there is a horizontal bar at the base of the V of the small, tight stitch. *Insert a threaded tapestry needle under this bar on one piece, then under the corresponding bar on the other piece, and pull the seaming yarn snuggly to bring the two pieces together. Repeat from *, alternating from one piece to the other.
Place pieces to be seamed side by side, with right sides facing upward. Begin at lower edge and work upward, row by row as follows: Insert a threaded tapestry needle under the bottom loop of a purl stitch on one side of the seam, then under the top loop of the corresponding purl stitch on the other side of the seam, and pull the seaming yarn snuggly to bring the two pieces together. Repeat from *, alternating from one side to the other. When the seam in completed, turn the work over and whipstitch once over the seam allowance to secure the seam.

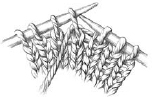
Place stitches to be joined onto two separate needles. Hold the needles parallel to each other, with the points facing to the right and so that wrong sides of the knitting face each other. With a threaded tapestry needle, work back and forth between the stitches on the two needles as follows:
Step 1: Bring threaded needle through front stitch as if to purl and leave stitch on needle.
Step 2: Bring threaded needle through back stitch as if to knit and leave stitch on needle.
Step 3: Bring threaded needle through the same front stitch as if to knit and slip this stitch off needle. Bring threaded needle through next front stitch as if to purl and leave stitch on needle.
Step 4: Bring threaded needle through first back stitch as if to purl (as illustrated), slip that stitch off, bring needle through next back stitch as if to knit, leave this stitch on needle.
Repeat Steps 3 and 4 until all stitches have been worked.
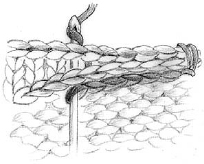
Make a slipknot and place it on a crochet hook. *Insert hook through both pieces of knitted fabric one stitch in from edge, yarn over hook, and draw loop through fabric and through loop already on hook. Repeat from * for the length of the seam.
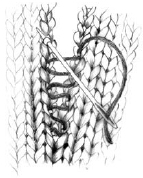
Insert threaded tapestry needle at right angle through a stitch on one piece of the work, then through a corresponding stitch on the piece to be attached. Pull stitches together, closing both pieces firmly, but not too tightly.