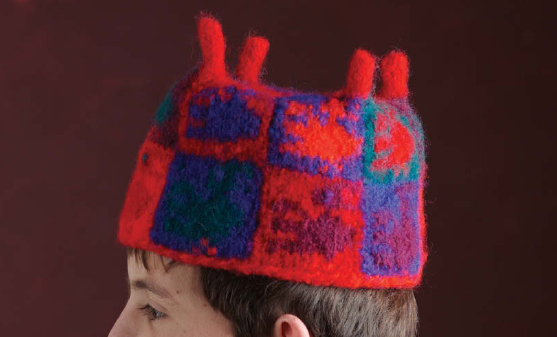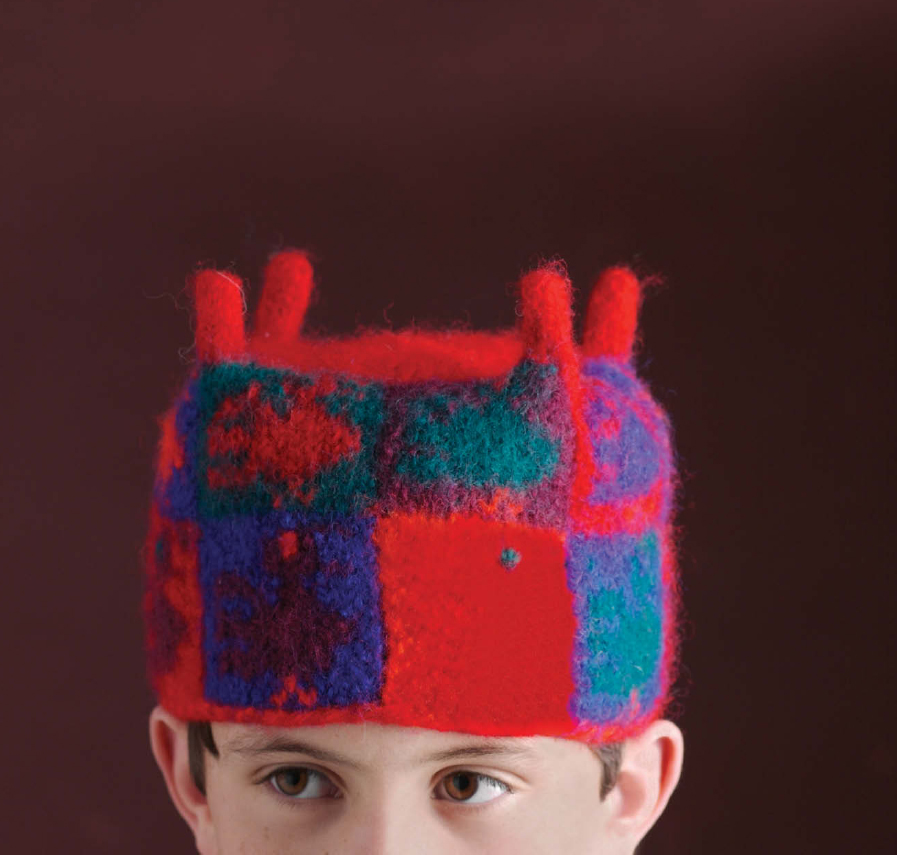

Ancient Andean fiber artists invented many unusual techniques, among which is cut pile, which they used to display colorfully dyed checkerboard and banded patterns of animals, faces, and geometric motifs that are common to all South American knitting designs. I offer a repeat design of a bird in many bright colors for my hut hat, so-called for the four “chimneys” on top. This hat is felted slightly for stability and visual texture. To wear it as Peruvians would, perch it high and forward on your head, but feel free to pull it down like a cloche.
The hat base is worked back and forth in rows in an ingenious South American knitting technique for working intarsia color patterns that, at the same time, joins every other row into a round, thereby eliminating the need for a seam. The top is worked circularly in rounds.
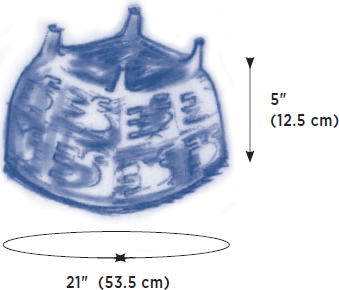
Finished Size: About 21" (53.5 cm) circumference and 5" (12.5 cm) tall, excluding “chimneys.”
Yarn: About 310 yd (284 m) each of five colors of chunky (Bulky #5) yarn.
We used: Baabajoes Wool Pak 14-Ply (100% New Zealand wool; 310 yd [284 m]/250 g): #06 red, #15 blaze, #34 royal blue, #35 aubergine, and #37 royal green, 310 yd (284 m) each (this is enough yarn to make several hats).
Needles: Size 8 (5 mm): 16" (40-cm) circular (cir) and set of 5 double-pointed (dpn). Adjust needle size if necessary to obtain the correct gauge.
Notions: Marker (m); stitch holders or waste yarn; tapestry needle.
Gauge: 16 sts and 20 rows = 4" (10 cm) in St st, before felting.


With red and blaze held tog, cir needle, and using the 2-color long-tail method (see Glossary, page 131), CO 88 sts. Do not join into a rnd. Working back and forth in rows, work Rows 1–30 of Hut Hat chart, working color patt in the intarsia method (see Glossary, page 137) joining the seam on knit (RS) rows in the traditional South American technique as foll:
Knit (RS) rows: Knit to the last st in a knit row, slip the last st kwise, use right needle to lift the st in the row below the first st on left needle and place this st on the left needle, then slip the new st to the right needle and work these two sts together as ssk (see Glossary, page 132).
Purl (WS) rows: Keeping in patt, purl all sts.
With RS facing and red, begin working in rnds. Do not turn work. Knit 1 rnd. Next rnd: K3, place marker (pm) to indicate new beg of rnd, place last 6 sts worked onto holder or waste yarn, *k16, place next 6 sts on holder; rep from * 2 more times, k16—64 sts rem. Change to dpn, placing 16 sts from each section onto a separate needle. Dec as foll:
Rnd 1: *Ssk, k12, k2tog; rep from * 3 more times—56 sts rem.
Rnds 2, 4, and 6: Knit.
Rnd 3: *Ssk, k10, k2tog; rep from * 3 more times—48 sts rem.
Rnd 5: *Ssk, k8, k2tog; rep from * 3 more times—40 sts rem.
Rnd 7: *Ssk, k6, k2tog; rep from * 3 more times—32 sts rem.
Beg dec every rnd, working 2 sts fewer between ssk and k2tog, until 8 sts rem (2 sts per needle). Cut yarn, thread tail on a tapestry needle, draw through rem sts, and pull tight to secure.
Chimneys: *Place 6 held sts evenly distributed on 3 dpn. Knit 5 rnds even. BO all sts. Cut yarn, thread tail on tapestry needle, and weave in tail on WS of hat. Rep from * for rem 3 chimneys.
Weave in loose ends.
Felting: Follow felting instructions for hand or machine as described on page 134. Felt hat just enough to fuse stitch fibers together, but not so much to shrink circumference more than about 5 percent. Check size often, by trying hat on (it’s best to do this on a “bad-hair” day so you won’t care that your hair gets wet each time you try the hat on!).
Shaping: Turn hat upside down on a flat surface and press the top with your hands to flatten it. Turn hat right side up and pinch chimneys to stand straight. Roll a bath towel into a cylinder the appropriate size for hat form. Place hat over towel cylinder and let air dry.

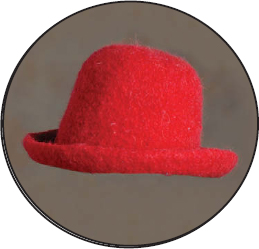
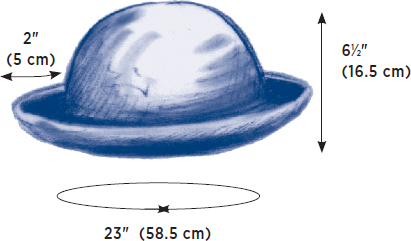
The bowler derby commemorates its originator William Bowler, and was popularized by the Earl of Derby. The style found its way to South America, where in Bolivia, Chola women wear this remnant of European influence as part of their daily uniform, and a group of many Chola women working together creates a stunning visual portrait of the culture.
I honor the importance of the llama in South American culture by using a llama-blend yarn, which happens to felt to a beautiful texture. One caution: You must decide how you will wear your hat before you felt it. The length of time felted has determined the fit of each hat shown. The black hat was felted the longest for the most authentic fit, high and forward on the head.
This hat is knitted from side to side with short-row shaping, then felted.
Finished Size: About 23" (58.5 cm) circumference and 6½" (16.5 cm) tall; brim is about 2" (5 cm) wide and curves upward.

Yarn: About 254 yd (232 m) of chunky (Bulky #5) yarn.
We used: Classic Elite Montera (50% llama, 50% wool; 127 yd [116 m]/100 g): 254 yd (232 m). Shown in #3813 black, #3893 ch’ulla blue, and #3858 cintachi red.
Needles: Size 10.75 (7 mm): straight or 16" (40-cm) circular (cir). Spare needle of same size or 1 or 2 sizes smaller. Adjust needle size if necessary to obtain the correct gauge.
Notions: Open-ring markers (m); tapestry needle; a few yards (meters) smooth cotton waste yarn for provisional CO; size K/10½ (6.5 mm) crochet hook.
Gauge: 12 sts and 18 rows = 4" (10 cm) in St st, before felting.
Using the crochet chain provisional method (see Glossary, page 130), CO 38 sts. Change to working yarn. Purl 1 row. Knit 1 row. *Purl 1 row. Work short-rows (see Glossary, page 136) as foll:
Short-row 1: (RS) K37, wrap next st, turn.
Short-row 2: (WS) P37.
Short-row 3: K36, wrap next st, turn.
Short-rows 4, 6, 8, 10, 12, and 14: Sl 1, purl to end.
Short-row 5: K34, wrap next st, turn.
Short-row 7: K33, wrap next st, turn.
Short-row 9: K30, wrap next st, turn.
Short-row 11: K13, wrap next st, turn.
Short-row 13: K11, wrap next st, turn.
Short-row 15: K9, wrap next st, turn.
Short-row 16: P9.
Next row: (RS) K38, hiding wraps as you go. Place an open-ring marker at the end of the row to mark end of short-row section.
Rep from * 9 more times—10 short-row sections; working yarn is at center crown. Cut yarn, leaving a 40" (101.5-cm) tail for grafting.
Remove waste yarn from provisional CO and carefully place live sts on spare needle. Thread 40" (101.5-cm) tail on a tapestry needle and use Kitchener st (see Glossary, page 139) to graft live sts tog. Thread a 12" (30.5-cm) length of yarn on tapestry needle and work a running st (see Glossary, page 133) around center crown, weaving in and out of the edge stitches, pull yarn snug to close top of crown hole but not so tight as to prevent felting, and secure.
Felting: Felt according to instructions on page 134 to desired fit—from a gently felted hat that will fit around the head like a cloche to a very firmly felted derby that will sit perched atop the head, or anywhere in between!
Shaping: To shape, you will need a rounded form such as your own head, a bowl of appropriate size, or a purchased hat form. Pull the wet hat firmly down over the form, cuffing the brim in your fingers so as not to stretch the brim edge, and rotate and pull while firmly smoothing the palm of your hand over the surface of the crown. Remove hat from form, and with one hand on the outside of the crown and one on the inside, smooth out any irregularities of shape (you may want to do this over an inverted rounded bowl). Set hat on flat surface and work brim if necessary to encourage a tight upward curve. Let air-dry completely.

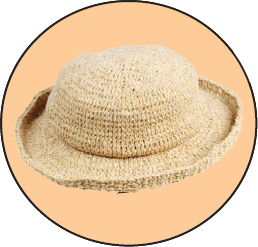
The hat we call a panama is actually made by artisans in Ecuador! Their exquisite workmanship acquired its name in the 1800s when Panama became a center for hat export. Panamas are not worn by the natives, but are a favorite of travelers.
These hats are light and durable, yet soft enough to be rolled into a tube for travel or storage. In Ecuador, fan-shaped palm leaves are gathered, dipped in boiling water, dried, shredded, and bleached with sulphur. The resulting straw is woven into light hats that are perfect sunshields for the face. A bit softer than a traditional panama, my version is still light and comfortable, and it employs a basketweave pattern stitch to emulate woven straw.
The crown of this hat is worked in the round from the outer crown to the center. The brim is worked separately in the round from crown edge to outer brim edge, then the two pieces are joined with single crochet.
Finished Size: About 22" (56 cm) circumference and 6" (15 cm) tall; brim is about 3" (7.5 cm) wide.

Yarn: About 240 yd (220 m) of worsted-weight (Medium #4) yarn.
We used: Crystal Palace Deco-Ribbon (70% acrylic, 30% nylon; 80 yd [73 m]/50 g): #119 tan, 240 yd (220 m).
Needles: Size 7 (4.5 mm): 16" and 24" (40- and 60-cm) circular (cir) and set of 4 double-pointed (dpn). Adjust needle size if necessary to obtain the correct gauge.
Notions: Marker (m); size F/5 (3.75 mm) crochet hook; tapestry needle.
Gauge: 20 sts and 22 rnds = 4" (10 cm) in basketweave st worked in the rnd (see Glossary, page 134, for working gauge swatches in the rnd).
Rnd 1: Knit.
Rnd 2: Knit into back loop of each st.
Repeat Rnds 1 and 2 for pattern.
Lifted Increase: With right needle tip, lift st below the first st on left needle and place this st on left needle, then knit this lifted st, then knit st on left needle (see Glossary, page 136).
Lifted Increase Through Back Loop: With right needle tip, lift st below the first st on left needle and place this st on left needle, then knit this lifted st, then knit into the back of the st on the needle to twist it.
With shorter cir needle, CO 112 sts. Place marker (pm) and join for working in the rnd, being careful not to twist sts. Work basketweave st (see Stitch Guide) until piece measures 3¾" (9.5 cm) from beg, ending with Rnd 1 of patt, and dec 2 sts evenly spaced in last row—110 sts rem. Dec as foll (all sts on dec rnds are worked through back loops; all sts on plain rnds are worked as usual), changing to dpn when necessary:
Rnd 1: *K8 through back loops (tbl), k2tog tbl; rep from * 10 more times—99 sts rem.
Rnds 2, 4, 6, 8, 10, 12, and 14: Knit.
Rnd 3: K3 tbl, *k2tog tbl, k7 tbl; rep from * to last 6 sts, k2tog tbl, k4 tbl—88 sts rem.
Rnd 5: K5 tbl, *k2tog tbl, k6 tbl; rep from * to last 3 sts, k2tog tbl, k1 tbl—77 sts rem.
Rnd 7: *K2tog tbl, k5 tbl; rep from * to end of rnd—66 sts rem.
Rnd 9: K2 tbl, *k2tog tbl, k4 tbl; rep from * to last 4 sts, k2tog tbl, k2 tbl—55 sts rem.
Rnd 11: *K3 tbl, k2tog tbl; rep from * to end of rnd—44 sts rem.
Rnd 13: *K2tog tbl, k2 tbl; rep from * to end of rnd—33 sts rem.
Rnd 15: *K1 tbl, k2tog tbl; rep from * to end of rnd—22 sts rem.
Rnd 16: *K1 tbl; rep from * to end of rnd.
Rnd 17: Knit.
Rnd 18: *K2tog tbl; rep from * to end of rnd—11 sts rem.
Cut yarn, thread tail on a tapestry needle, draw through rem sts, and pull tight to secure.
With smaller cir needle, CO 112 sts. Place marker and join for working in the rnd, being careful not to twist sts. Work basketweave st in the rnd for 4 rnds. Inc as foll:
Rnd 1: *K4, work lifted inc (see Stitch Guide) in next st, k5, work lifted inc in next st; rep from * to last 2 sts, k2—132 sts.
Rnds 2 and 4: *K1 tbl; rep from * to end of rnd.
Rnds 3 and 5: Knit.
Change to longer cir needle. Note: The spacing between increases at the end of the next rnd changes slightly to maintain a smooth appearance.
Rnd 6: K1 tbl, work lifted inc tbl (see Stitch Guide) in next st, *k4 tbl, work lifted inc tbl in next st, k5 tbl, work lifted inc tbl in next st; rep from * to last 9 sts, k2 tbl, work lifted inc tbl in next st, k6 tbl—156 sts.
Rnd 7: Knit.
Rnd 8: *K1 tbl; rep from * to end of rnd.
Rnd 9: *K4, work lifted inc in next st; rep from * to last 6 sts, k6—186 sts.
Rnds 10 and 12: *K1 tbl; rep from * to end of rnd.
Rnds 11 and 13: Knit, working jogless join on last st of last plain rnd as foll: knit to last st, sl last st kwise, use right needle to lift st in row below st on left needle onto left needle, then slip it to the right needle, and work these 2 sts as ssk (see Glossary, page 132).
Rnd 14: *K1 tbl, p1; rep from * to end of rnd.
Rnd 15: *P1, k1 tbl; rep from * to end of rnd.
BO all sts loosely while working k1 tbl, p1 rib.
Align CO edges of both pieces with RS tog. With crochet hook, work slip-stitch crochet (see Glossary, page 132), working stitch for stitch to join crown to brim. Weave in loose ends.
Blocking: Spray inside and outside of hat with water. Use the palm of your hand to press and smooth the surface texture of crown and brim. Place hat on a flat surface, such as a countertop, with crown over a biscuit tin of appropriate circumference and height. It will help shape the crown somewhat squarish, but keep the transition soft from hat sides to hat top. Hand-press brim against countertop to define its round shape, and turn outer ½" (1.3 cm) of brim upward. Let air-dry completely.