
Just as all knitting is made up of two basic stitches (knit and purl), all hats are made up of two basic styles—those with a brim and those without. Beyond that, hat shapes vary widely, but share basic terms to describe similar parts.
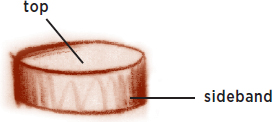
The Crown is the portion of a hat that covers the head—the crown top sits at the top of the head; the base of the crown is the part that fits around the head. Crowns may be rounded or structured with defined straight hat sides, also called crown sides or sideband, and a flat top (sometimes called a tip). The brim is the part of the hat that extends away from the crown at the base, and may be found in a wide variety of width and curve options.
BOWLER

BERET

CORDOBES
PILLBOX
Throughout history, there have been hundreds of hat shapes, and each has been given a specific identifying name. Working to create innovative head coverings, my design collection is a sampling of some common, and many uncommon, types.


A cloche has a rounded crown and a very small curved brim (or no brim at all); it is worn down to the eyebrows in front and covers the neck in back.
A pillbox has a structured crown, straight hat sides that are perpendicular to a flat top, and no brim; it sits on top of the head.
A beret is a relatively unstructured brimless hat with a narrow band that is worn around the circumference of the head. The band merges into the soft sides, then into the flat top.
A Spanish Cordobes is a structured shape consisting of straight crown sides, a flat top, and a wide straight brim.
A fedora is a higher crowned hat that features a lengthwise crease along the crown, with front “pinch” indentations, and a brim that curves up in the back and slightly down in the front.
A cowboy hat has a rounded crown that may be creased in a variety of ways and a brim that slopes away from the base of the crown in a gentle to exaggerated curve. A variety of other silhouettes are included in this book, among them: a deerstalker with earflaps, a close-fitting French hood, and a Cossack with a high-profile crown. Descriptive text and a drawing accompany each pattern.
To make a hat that fits perfectly, you’ll want to measure the head that will wear it. For hats that are to be worn down around the full part of the head (such as a stocking hat, cloche, or skullcap), wrap a cloth tape measure around the fullest part of the head about one inch above the ear (Figure 1).

For hats that are to be worn perched snugly above the full part of the head (such as a Cordobes, cowboy hat, or fedora), wrap the tape measure around the head about two inches above the ear, toward the top of the forehead and slightly above the full part of the back of the head (Figure 2); this measurement ensures that the wearer will have a clear line of sight below the slight dip of the brim.

To measure the crown height for a stocking hat, cloche, or skullcap, pin a ribbon around the head where the hat will be worn, then measure from the bottom edge of the ribbon on one side of the head, up over the top of the head to the bottom edge of the ribbon on the other side (Figure 3). Take a similar measurement from front to back, then average the two measurements to determine the crown height to be knitted.

To determine the crown height on a structured hat (such as a pillbox or fedora), measure straight up (not curved over the head) from the bottom edge of the ribbon to the desired height (Figure 4). Crown heights can vary and are largely determined by personal choice—Dr. Suess’s Cat in the Hat likes his crown quite a bit taller than the average three-inch height of a pillbox!

I shaped the more structured hats in this book by hand, sometimes with the help of some household items. However, they may be blocked over hat forms to achieve their characteristic shapes. Commercial hat forms are available online, but you can also make your own. The instructions here are for an inexpensive form that works well for the Gondolier’s Boater (page 55), or any hat with a similar crown. Feel free to experiment with this method and sculpt the crown in other rounded contours for a completely custom profile. Let your inner artist guide you.
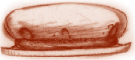
Purchase four pieces of one-inch-thick Styrofoam circles (available at craft stores) seven inches in diameter. Glue the four circles together, layering one on top of the other (Figure 1), and let them dry. Use a hacksaw or old serrated knife to shave off about half an inch from each side to form an oval block (Figure 2) that is the desired circumference (about 22" for an adult). Shave off the upper edges to round off the top of the block (Figure 3). Use a wood file or coarse sandpaper to smooth the transition from the hat sides to the top. Wrap the finished block with plastic to prevent the Styrofoam from shedding onto the hat and to facilitate slipping the hat on and off the block.


