
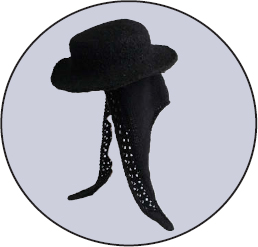
From Cordova in the Andalusian region of southern Spain, come the famous wide, flat-crowned, straight-brimmed Cordobes hats. Sometimes called boleros after the Spanish dance, the hats are popular with all Andalusian men and women, and they’re almost always black or red. In a country profuse with lavish and dramatic clothing, from the extravagant tiered colorful dresses of the women to the tightly fitted waist-length jackets, ruffled shirts, and full-length trousers of the men, the Cordobes emerges as the most recognizable symbol of mannered elegance that is wholly Spanish.
The llama/wool yarn I have chosen felts to a beautiful, supple surface texture with enough stability to maintain its shape. I have embellished this unique silhouette with a stylish attached scarf so you can wrap yourself in my interpretation of this Spanish tradition.
This hat is worked in the round from brim to top, then felted and shaped. The scarf is worked separately and sewn to the base of the crown.
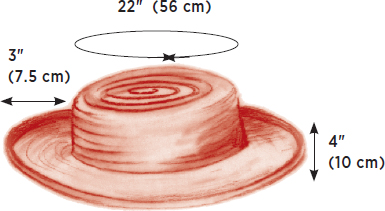
Finished Size: About 22" (56 cm) circumference and 2½ to 3" (6.5 to 7.5 cm) tall; brim is about 2½" (6.5 cm) wide.


Yarn: Hat: About 254 yd (232 m) of bulky (Bulky #5) yarn. Scarf: About 246 yd (225 m) of worsted-weight (Medium #4) yarn.
We used: Hat: Classic Elite Montera (50% llama, 50%wool; 127 yd [116 m]/100 g): #3813 black, 254 yd (232 m).
Scarf: Classic Elite Lush (50% angora, 50% wool; 123 yd [112 m]/50 g): #4413 black, 246 yd (225 m).
Needles: Hat—Size 10½" (6.5 mm): 24" (60-cm) circular (cir) and set of 4 or 5 double-pointed (dpn). Scarf—Size 9 (5.5 mm): 24" (60-cm) cir. Adjust needle size if necessary to obtain the correct gauge.
Notions: Markers (m); tapestry needle; long sewing pins; sewing thread; beeswax for strengthening thread; sharp-point sewing needle; safety or coilless pin.
Gauge: 20 sts and 24 rnds = 5¾" (14.5 cm) with Montera worked in St st on larger needles, before felting; 15 sts and 18 rows = 4" (10 cm) in Lush worked in St st on smaller needles.
With Montera and larger needles, CO 171 sts. Place marker (pm), and join for working in the rnd, being careful not to twist sts. Knit 2 rnds. Cont as foll:
Rnd 1: [K17, k2tog] 9 times—162 sts rem.
Rnd 2 and all even-numbered rnds: Knit.
Rnd 3: [K16, k2tog] 9 times—153 sts rem.
Rnd 5: [K15, ssk] 9 times—144 sts rem.
Rnd 7: [K14, k2tog] 9 times—135 sts rem.
Rnd 9: [K13, ssk] 9 times—126 sts rem.
Rnd 11: [K12, k2tog] 9 times—117 sts rem.
Rnd 13: [K11, ssk] 9 times—108 sts rem.
Rnd 15: [K10, k2tog] 9 times—99 sts rem.
Knit even until piece measures about 4¼" (11 cm) from last dec.
Rnd 1: [K9, k2tog] 9 times—90 sts rem.
Rnd 2 and all even-numbered rnds: Knit.
Rnd 3: [K8, k2tog] 9 times—81 sts rem.
Rnd 5: [K7, k2tog] 9 times—72 sts rem.
Cont to dec in this manner, working 1 st fewer between decs until 18 sts rem (last rnd will be [k1, k2tog]). Next rnd: [K2tog] 9 times—9 sts rem. Cut yarn, draw tail through rem sts, and pull tight to secure. Fasten off. Weave in all ends.
Felting: Felt according to instructions on page 134 until when folded flat, hat measures 11" (28 cm) at base of crown. Rinse thoroughly and blot out excess water with bath towels.
Shaping: Hold top of crown and pull brim downward to smooth lengthwise grain of knitting, working around entire brim. Shape hat over a form (I used a lidded biscuit tin that measures 7" [18 cm] in diameter and 2¾" [7 cm] tall). Place tin or form on countertop or other flat surface. Place crown of hat on form and, with palm of hand, smooth top of hat flat. Make a sharp crease at top-to-side “corner,” and smooth hat sides to base of crown where bottom of form meets countertop. Firmly press brim flat onto countertop, pulling slightly on brim where needed to shape evenly round. Let air-dry completely.
With Lush and smaller needles, CO 57 sts. (Note: To provide contrast with the St st background, the lace insert patt is worked with purl sts on the RS of the work, and the knit sts on the WS.)
Row 1: (WS) *K1, p1, yo, sl 1, k1, psso, k1, sl 1, k1, psso, yo, p1, k1*, place marker (pm), purl to last 9 sts, pm, rep from * to * once.
Row 2: (RS) *K2, p5, k2*, slip m (sl m), knit to last 9 sts, sl m, rep from * to * once.
Row 3: *K1, p1, k1, yo, sl 1, k2tog, psso, yo, k1, p1, k1*, sl m, purl to last 9 sts, sl m, rep from * to * once.
Mark the center st with a safety or coilless pin before starting next row. Move pin upward every 4th row to identify marked center st.
Row 4: K2, p5, k2, sl m, knit to center st, yo, k1 (center st), yo, knit to marker before last 9 sts, sl m, k2, p5, k2—59 sts.
Rep these 4 rows 5 more times. Then work Rows 1–3 once more—69 sts. Place m each side of center 11 sts. Next row: (Row 4 of patt) Work 29 sts in patt to marked 11 sts, place these 29 sts on holder, BO next 11 sts, work in patt to end—29 sts each side. Remove m each side of 11 BO sts and remove pin from center st; retain m in place at each side edge lace inserts. Note: To produce a smooth bind-off edge, use the sloped method (see Glossary, page 129) for subsequent bind-offs.
Right tie (as hat is worn): Work as foll:
Row 1: (WS) K1, p1, yo, sl 1, k1, psso, k1, sl 1, k1, psso, yo, p1, k1, sl m, purl to last st (1 st unworked on left needle), turn work to RS—29 sts.
Row 2: (RS) Beg at center back, sl 1 from left to right needle (2 sts on right needle), BO 1 st, k1, BO 1, k1, BO 1, knit to m, k2, p5, k2—26 sts rem.
Row 3: K1, p1, k1, yo, sl 1, k2tog, psso, yo, k1, p1, k1, sl m, purl to last st (1 st on left needle), turn work to RS.
Row 4: Sl 1 from left to right needle, BO 1 st, k1, BO 1, knit to m, k2, p5, k2—24 sts rem.
Row 5: Rep Row 1.
Rows 6 and 8: Rep Row 4—20 sts rem after Row 8.
Row 7: Rep Row 3.
Row 9: K1, p1, yo, sl 1, k1, psso, k1, sl 1, k1, psso, yo, p1, k1, sl m, purl to end of row.
Row 10: Ssk, knit to m, k2, p5, k2—19 sts rem.
Row 11: K1, p1, k1, yo, sl 1, k2tog, psso, yo, k1, p1, k1, sl m, purl to end of row.
Row 12: Knit to m, k2, p5, k2.
Row 13: K1, p1, yo, sl 1, k1, psso, k1, sl 1, k1, psso, yo, p1, k1, sl m, purl to end of row.
Rep Rows 10–13 until 2 sts rem. When there are too few to complete the 9-st lace patt at the beg of WS and end of RS rows, work these sts in garter st, while maintaining the first 2 sts on RS rows and last 2 sts on WS rows in patt. BO all sts. Cut yarn, leaving 4" (10-cm) tail and pull tail through rem st to secure.
Left tie: With WS facing, join yarn at center back. Work as foll:
Row 1: (WS) Beg at center back, sl 1, p1, BO 1 st purlwise, p1, BO 1 purlwise, p1, BO 1 purlwise, purl to m, k1, p1, yo, sl 1, k1, psso, k1, sl 1, k1, psso, yo, p1, k1—26 sts rem.
Rows 2, 4, and 6: (RS) K2, p5, k2, sl m, knit to last st (1 st unworked), turn work to WS.
Rows 3 and 7: (1 st on right needle from previous row) Sl 1 from left needle, BO 1 purlwise, p1, BO 1 purlwise, purl to m, k1, p1, k1, yo, sl 1, k2tog, psso, yo, k1, p1, k1—2 sts dec’d.
Row 5: (1 st on right needle from previous row) Sl 1, BO 1 purlwise, p1, BO 1 purlwise, purl to m, k1, p1, yo, sl 1, k1, psso, k1, sl 1, k1, psso, yo, p1, k1—22 sts rem.
Row 8: K2, p5, k2, sl m, knit to end of row.
Row 9: Ssp (see Glossary, page 133), purl to m, k1, p1, yo, sl 1, k1, psso, k1, sl 1, k1, psso, yo, p1, k1—19 sts rem.
Row 10: K2, p5, k2, knit to end of row.
Row 11: Purl to m, k1, p1, k1, yo, sl 1, k2tog, psso, yo, k1, p1, k1.
Row 12: K2, p5, k2, knit to end of row.
Rep Rows 9–12 until 2 sts rem. Change to garter st when there are too few sts to work lace patt, while maintaining first 2 sts of RS rows and last 2 sts of WS rows in patt. BO and finish as for right tie.
Edging: With Lush and RS facing, pick up and knit about 140 sts evenly spaced along St st curved edge of scarf. With WS facing, BO all sts kwise.
Weave in loose ends. Steam or wet-block scarf. Pin straight edge of scarf to back half of hat at base of crown on inside, matching center back RS (knit side) of scarf to center back WS of hat. Cut a length of sewing thread and draw through a disk of beeswax to coat. “Press” the thread by quickly pulling it under a hot iron. With sewing needle and waxed thread, whipstitch (see Glossary, page 139) scarf to hat.


As an enduring symbol of the romance of Venice, gondoliers stand second to none. It used to be that gondoliers had to be Venetian by birth, and the job passed down from father to son. A special course and exam covering everything from the history of architecture to singing were required before the gondolier had the right to wear his identifying straw hat.
My choice of linen softens the straw hat’s look. After making a gazillion inches (this is a distinct exaggeration) of knitted cord, you shape the hat by coiling the cord over a hat form and sewing the concentric ovals together. You work from the top of the crown down and define the shape of the brim and keep it firm with the final knitted cord oval. To look like a real Venetian gondolier, tie a ribbon around the base of the crown.
This hat is constructed from a long strip of knitted cord (I-cord) that is coiled around itself from the center of the crown downward to the brim, and sewn in place.
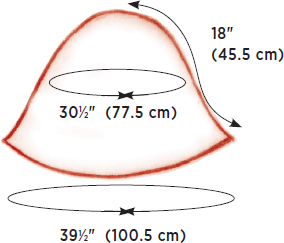
Finished Size: About 22" (56 cm) circumference and 4" (10 cm) tall; brim is about 3" (7.5 cm) wide.
Yarn: About 600 yd (549 m) of worsted-weight (Medium #4) yarn.
We used: Euroflax Heathers Chunky (100% linen; 150 yd [137 m]/100 g): #16.2872 chamomile, 600 yd (549 m).
Needles: Size 7 (4.5 mm): set of 2 double-pointed (dpn). Adjust needle size if necessary to obtain the correct gauge.
Notions: Tapestry needle; long sewing pins with colored heads; safety or coilless pin; hat form (see page 11 for making a hat form).
Gauge: 16 rows of 3-st knitted cord measures about ⅜" (1 cm) wide and 4" (10 cm) long.
CO 3 sts. Work 3-st knitted cord (see Glossary, page 137) until piece measures about 50 feet (15.25 meters). Place sts on safety or coilless pin (so you can adjust the final length during assembly).

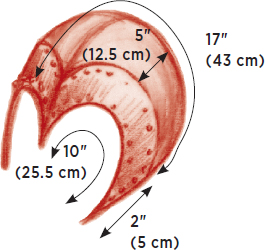
Crown: Measure 2" (5 cm) from CO edge of knitted cord and fold back to lay parallel to next 2" (5 cm) of cord. Lay on flat surface and coil cord around itself to create an oval, being careful to keep the cord untwisted. *Work 3 or 4 concentric rings, then insert pins from the outer edge toward the center to hold the rings in place. Thread about 24" (61 cm) of yarn on a tapestry needle, and with WS facing and working from the outer edge toward the center, insert threaded needle into the cord from the outer edge of the oval toward the center, then back to the outer edge as shown at right. Rep from * until piece measures about 6" (15 cm) wide and 7" (18 cm) long, rethreading needle as necessary. Steam-press lightly to flatten. Lay piece on top of hat form and continue to coil cord around itself, rounding the crown shape and working down to the inner edge of brim, and sewing 3 to 4 concentric rings at a time, until entire hat form is covered.
Brim: Continue to coil cord against flat surface, sewing 3 to 4 concentric rings at a time until brim measures 3" (7.5 cm), but do not sew the last row. Add or subtract a few rows of cord, if necessary. Place hat (still on hat form) on ironing board and steam press brim, keeping last coil length free. Let air-dry. Add one more coil on top of previous coil to make a rim on the brim, working this coil a bit tighter so that brim will turn up slightly and maintain its shape. On last row of cord, work sl 1, k2tog, psso—1 st rem. Cut yarn, leaving a 4" (10-cm) tail, and draw tail through last st. Thread tapestry needle with rem tail and weave into center of cord to secure. For the authentic look of a Gondolier, tie a black ribbon around the base of the crown.
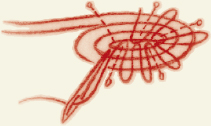
Sew knitted cord into a spiral by inserting sewing needle from outer edge towards center and back out to outer edge.


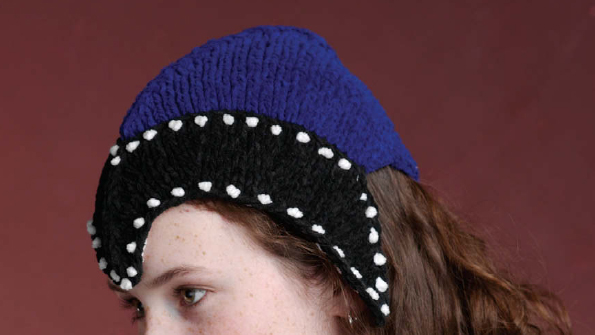
When she went to France to marry Henry II in the sixteenth century, Catherine de Medici wore a version of the French hood, popular at the time all over Europe. The French hood was a stiff open cap shaped like a “C” that was worn with the points curving around the chin. When Catherine became a widow, she added a dip over the forehead, the source of the term “widow’s peak,” and the headdress became known as a frontière. In the 1500s, frontières were made of black velvet or a rich satin or taffeta brocade with decorative jeweled and pearled edges.
My close-fitting cap of cotton chenille offers a surface texture similar to cut velvet. The French knots are a knitter’s version of the pearled edges. All in white, the frontière would be fit for a bride.
This hat is worked in rows from the black border at the front, across the top of the head, then to the lower back, and is shaped with increases and decreases along the way.
Finished Size: About 22" (56 cm) circumference (will stretch to 24" [61 cm]).
Yarn: About 98 yd (90 m) each of three colors of sport-weight (Fine #2) yarn (used doubled).
We used: Crystal Palace Cotton Chenille (100% cotton; 98 yd [90 m]/50 g): #9598 black, #6246 blue, and #1058 white, 98 yd (90 m) each (used doubled).
Needles: Size 9 (5.5 mm): 16" (40-cm) circular (cir). Adjust needle size if necessary to obtain the correct gauge.
Notions: Open-ring marker; tapestry needle; black sewing thread; beeswax to strengthen thread; sharp-point sewing needle; one ½" (1.3 cm) pearl drop (available at fabric or craft stores).
Gauge: 12 sts and 16 rows = 4" (10 cm) with yarn doubled.
(See Glossary for illustrations of all of these techniques.)
Purl Lifted Increase: Insert right needle from top into purl st below needle, purl this st, then purl the st on needle.
Left Lifted Increase: Knit st on needle, with left needle, insert tip into back of the loop of st in row below st just knitted, knit this st.
Right Lifted Increase: Insert right needle into the back of the loop of the st in row below next st, knit this st, knit st on needle.
Vertical Double Decrease: Sl 2 sts tog knitwise, k1, psso.
With 2 strands of black held tog and using the long-tail method (see Glossary, page 131), CO 59 sts.
Row 1: (WS) P2tog, purl to last 2 sts, ssp (see Glossary, page 133)—57 sts rem.
Row 2: Ssk, k24, sl 3 sts tog kwise, k2tog, p3sso (pass the sts over one at a time to make this easier), k24, k2tog—51 sts rem.
Rows 3, 5, and 7: P2tog, [p4, purl lifted inc (see Stitch Guide) in next st] 4 times, p2, **sl 2 sts individually kwise, pass these 2 sts back to left needle, with yarn in front, insert right needle into these 2 sts from the back (as if to ssp), return the sts to the left needle (twisting them), p3tog (2 twisted sts plus next st)**, p2, [purl lifted inc in next st, p4] 4 times, ssp—55 sts.
Rows 4, 6, and 8: Ssk, k24, work vertical double dec (see Stitch Guide), k24, k2tog—51 sts rem.
Row 9: P2tog, p22, rep from ** to ** in Row 3, purl to last 2 sts, ssp—47 sts rem.
Row 10: Ssk, k20, work vertical double dec, k20, k2tog—43 sts rem.
Loosely BO all sts pwise.
With 2 strands of blue held tog and RS facing, pick up and knit 1 st in back loop of each BO sts of border—43 sts. Sl 1, purl to end. Place open-ring marker in center st (22nd st from each edge). Cont as foll, working short rows (see Glossary, page 136) as specified:
Row 1: (RS) Sl 1, right lifted inc in next st, k18, work vertical double dec, k18, left lifted inc in next st, k1—43 sts.
Rows 2 and 4: Sl 1, purl to end.
Row 3: Sl 1, k19 (1 st before marked center st), vertical double dec, knit to end—41 sts.
Row 5: Sl 1, right lifted inc, knit to 1 st before marked center st, vertical double dec, knit to last 2 sts, left lifted inc, k1.
Row 6: (short row) Sl 1, purl to last 3 sts, wrap next st, turn work, k16 (1 st before marked center st), vertical double dec, k16 to last 3 sts, wrap next st, turn work, purl to end, hiding wraps as you go—39 sts rem.
Row 7: Sl 1, knit to 1 st before marked center st, vertical double dec, knit to end, hiding wraps as you go—37 sts rem.
Row 8: (short row) Sl 1, purl to last 3 sts, wrap next st, turn work, k14 (1 st before marked center st), vertical double dec, k14 to last 3 sts, wrap next st, turn work, purl to end, hiding wraps as you go—35 sts rem.
Row 9: Sl 1, right lifted inc, knit to 1 st before marked center st, vertical double dec, knit to last 2 sts, hiding wraps as you go, left lifted inc, k1.
Row 10: (short row) Sl 1, purl to last 7 sts, wrap next st, turn work, k9 (1 st before marked center st), vertical double dec, knit to last 7 sts, wrap next st, turn work, purl to last 9 sts, wrap next st, turn work, k6 (1 st before marked center st), vertical double dec, knit 6 sts to last 9 sts, wrap next st, turn work, purl to end, hiding wraps as you go—31 sts rem.
Row 11: Sl 1, knit to 1 st before marked center st, vertical double dec, knit to end, hiding wraps row as you go—29 sts rem.
Row 12: (short row) Sl 1, purl to last 9 sts, wrap next st, turn, k4 (1 st before marked center st), vertical double dec, knit to last 9 sts, wrap next st, turn, purl to end, hiding wraps as you go—27 sts rem.
Row 13: (short row) Sl 1, right lifted inc, k5, wrap next st, turn, purl to end.
Row 14: (short row) Sl 1, k5, wrap next st, turn, purl to end.
Row 15: Sl 1, right lifted inc, k11 (hiding wraps as you go) to 1 st before marked center st, vertical double dec, knit to last 2 sts, left lifted inc, k1—28 sts.
Row 16: (short row) Sl 1, p7, wrap next st, turn, knit to last 2 sts, left lifted inc, k1—29 sts.
Row 17: (short row) Sl 1, p6, wrap next st, turn, knit to end.
Row 18: Sl 1, purl to end, hiding wraps as you go.
Using the three-needle method (see Glossary, page 129), BO rem sts tog as foll: Sl 1, knit to center marked st, place previous 14 sts onto one dpn, place center st on open-ring marker to hold, rotate dpn counterclockwise so that WS of sts face tog (the seam will be on the RS of work, creating a ridge). Remove marker from center st, and place st on an empty dpn. Hold the dpn with center st in right hand, and the other 2 needles each holding 14 sts in the left hand, slip the first 2 sts (1 from each needle) together to right needle (3 sts on right needle), pass the center st over both slipped sts (2 sts on right needle); knit first st from each left needle together (3 sts on right needle), pass the 2 slipped sts over the new st to BO. Use the standard three-needle technique to BO rem sts tog. Cut yarn, draw tail through rem loop, and pull tight to secure. Weave in loose ends. With 2 strands of white threaded on a tapestry needle, make French knots (see Glossary, page 133) spaced about ½" (1.3 cm) apart around edge of black border. Cut a length of sewing thread and draw through a disk of beeswax to coat. “Press” the thread by quickly pulling it under a hot iron. With sewing needle and waxed thread, sew pearl drop onto center back point at nape of cap.


The beret is a millinery fashion classic. First worn by the ancient Greeks some 2,500 years ago, the fashion migrated all over Europe, with early Greek and Roman traders taking the beret into the Basque country, which became its permanent home. With its round flat crown and usually made of wool, the Basque beret is well known. In adaptations, it has been slashed, jeweled, feathered, worn at angles with and without plumes, and made in all colors.
Completing one’s costume with a beret was popularized in the Renaissance, especially by Rembrandt van Rijn. As an artist, I wonder, “If I dressed like him, could I also paint like him?” Probably not, but I can have an elegant beret knitted in rayon chenille, shaped full with the gathers draping softly, and worn to the side. A very real fashion statement or for make-believe . . . you decide!
This hat is worked in the round from the brim (or band) to the top, then slightly felted to improve the drape. A ribbon band is sewn to the inside of the hatband to add stability.
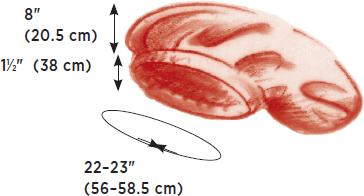
Finished Size: About 22 to 23" (56 to 58.5 cm) circumference.
Yarn: About 244 yd (223 m) of worsted-weight (Medium #4) yarn.
We used: Muench Touch Me (72% viscose/microfiber, 28% wool; 61 yd [55 m]/50 g): #3633 dark green, 244 yd (223 m).
Needles: Size 6 (4 mm): 16" (40-cm) circular (cir) and set of 4 or 5 double-pointed (dpn). Size 8 (5 mm) for casting on. Adjust needle size if necessary to obtain the correct gauge.
Notions: Markers (m); open-ring markers; tapestry needle; ¾ yd (68.5 cm) of 1" (2.5-cm)-wide velvet ribbon for hatband; sharp-point sewing needle; beeswax for strengthening sewing thread.
Gauge: 15 sts and 20 rnds = 4" (10 cm) in St st worked in the rnd on size 6 (4 mm) needles (see Glossary, page 134, for working gauge swatches in the rnd).
With larger needle, CO 86 sts. Change to smaller cir needle, place marker (pm), and join for working in the rnd, being careful not to twist sts.
Next rnd: *K1, p1; rep from * to end of rnd.
Work even in St st (knit every rnd) until piece measures 1½" (3.8 cm) from CO.
Inc rnd: *K1f&b (See Glossary, page 135); rep from * to end of rnd—172 sts. Knit even until piece measures 5" (12.5 cm) from inc rnd, or 6½" (16.5 cm) from CO, dec 2 sts evenly spaced on last rnd—170 sts rem.
Work as foll:
Dec rnd 1: *K15, k2tog, pm; rep from * to end of rnd—160 sts rem.
Place open-ring marker in work to indicate dec rnd. Work even in St st until piece measures 1" (2.5 cm) from dec rnd, or 7½" (19 cm) from CO. Cont as foll:
Dec rnd 2: *K14, k2tog, slip marker (sl m); rep from *—150 sts rem.
Place second open-ring marker to indicate dec rnd. Knit 2 rnds even.
Dec rnd 3: *K13, k2tog; rep from * to end of rnd—140 sts rem.
Place third open-ring marker to indicate dec rnd. Knit 2 rnds even. Cont to dec every rnd as foll, changing to dpn when necessary.
Dec rnd 4: *K5, k2tog; rep from * to end of rnd—120 sts rem.
Dec rnd 5: *K4, k2tog; rep from * to end of rnd—100 sts rem.
Dec rnd 6: *K3, k2tog; rep from * to end of rnd—80 sts rem.
Dec rnd 7: *K2, k2tog; rep from * to end of rnd—60 sts rem.
Dec rnd 8: *K1, k2tog; rep from * to end of rnd—40 sts rem.
Dec rnd 9: *K2tog; rep from * to end of rnd—20 sts rem.
Remove all markers. Cut yarn, thread tail on tapestry needle, draw tail through rem loops, and pull tight to secure.
Weave in loose ends.
Felting: Felt according to the instructions on page 134, to keep rayon chenille stable and prevent worming. (Note: shrinkage is only about 5 percent and will not affect the size.)
Ribbon band: Cut velvet ribbon to head circumference plus 2" (5 cm). Allowing for a 1" (2.5-cm) seam allowance at each end of ribbon, sew ribbon into a ring that matches head circumference. Pin WS of ribbon ring to WS of hat, aligning lower edge of ribbon with lower edge of hat. Cut a length of sewing thread and draw through a disk of beeswax to coat. “Press” the thread by quickly pulling it under a hot iron. With waxed sewing thread and sharp-point needle, use a whipstitch (see Glossary, page 139) to sew both edges of ribbon ring to inside brim.

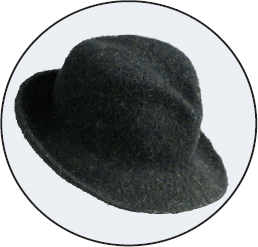
The fedora is said to have been named after Fedora, a popular nineteenth-century play by the French playwright Victorien Sardou. A felt fedora tops off the traditional dress—short leather trousers, knee stockings, heavy hobnail shoes, decorated shirts, embroidered suspenders, and jacket—of Bavarian mountaineers.
The wool and flax yarn I have chosen felts beautifully in this hat to a heathered finish. I tend to like this hat without a hatband, but you can opt for some leather with a feather! Look out, Indiana Jones!
This hat is worked in the round from the brim to the top, then felted and shaped.
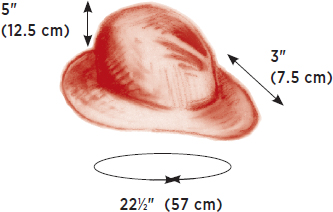
Finished Size: About 22½" (57 cm) circumference and 5" (12.5 cm) tall; brim is about 3" (7.5 cm) wide.
Yarn: About 490 yd (448 m) of worsted-weight (Medium #4) yarn.
We used: Harrisville Flax & Wool (20% flax, 80% wool; 245 yd [224 m]/100 g): #221 moss, 490 yd (448 m).
Needles: Size 10½ (6.5 mm): 24" (60-cm) circular (cir) and set of 4 or 5 double-pointed (dpn). Adjust needle size if necessary to obtain the correct gauge.
Notions: Markers (m); 2 coilless safety pins; tapestry needle.
Gauge: 20 sts and 24 rnds = 6" (15 cm) in St st worked in the rnd, before felting (see Glossary, page 134, for working gauge swatches in the rnd).
With cir needle, CO 132 sts. Place marker (pm) to denote center back and join for working in the rnd, being careful not to twist sts. Next rnd: K33, pm, k66, pm, k33. Slip markers every rnd. Knit 3 rnds even. Dec as foll:
Dec rnd 1: K36, [k2tog, k4] 10 times, k36—122 sts rem.
Knit 7 rnds even.
Dec rnd 2: [K2tog, k4] 5 times, k6 to m, [k2tog, k3] 10 times, k6, [k2tog, k4] 5 times—102 sts rem.
Knit 7 rnds even.
Dec rnd 3: [K2tog, k8] 10 times, k2—92 sts rem. Place a coilless pin to mark this rnd.
Knit even until piece measures 9½" (24 cm) from coilless pin. Remove coilless pin.
Dec for crown as foll, changing to dpn when necessary:
Rnd 1: [K7, k2tog] 10 times, k2tog—81 sts rem.
Rnds 2, 4, 6, 8, 10, and 12: Knit.
Rnd 3: [K6, k2tog] 10 times, k1—71 sts rem.
Rnd 5: [K5, k2tog] 10 times, k1—61 sts rem.
Rnd 7: [K4, k2tog] 10 times, k1—51 sts rem.
Rnd 9: [K3, k2tog] 10 times, k1—41 sts rem.
Rnd 11: [K2, k2tog] 10 times, k1—31 sts rem.
Rnd 13: [K1, k2tog] 9 times, [k2tog] 2 times—20 sts rem.
Place 10 sts each on 2 dpn. With yarn threaded on a tapestry needle and using the Kitchener st (see Glossary, page 139), graft sts tog. Weave in loose ends.
Place coilless safety pin at center back to enable you to shape the felted piece accurately.
Felting: Felt according to the instructions on page 134 (I felted this one by machine) until hat folded flat measures 11" (28 cm) to 11½" (29 cm) at base of crown. Rinse out soap and blot out excess water with bath towels.
Shaping: Holding top of crown, pull brim downward to smooth lengthwise grain of knitting around entire brim. Fold hat at marked center back and make a crease to define the center front of hat. Place a coilless pin at base of crown at center front. Shape round dome of crown on your head, a hat form, or a bowl that is the perfect size. When roundness is achieved, lay hat on flat surface and shape brim by rolling up hatback and sides slightly, without stretching the edge of the brim, and taper roll to nothing at the center front. With the side of your flattened palm, make an indentation on the top of the crown along the back/front axis. If necessary, lift up the hat and restore the crown curve at the back of the indentation. Pinch hat sides on both sides of center front to create a sharper tripartite definition at the front of the crown.


