2. Techniques for Selecting Artwork
Lesson overview
In this lesson, you’ll learn how to do the following:
Differentiate between the various selection tools and use selection techniques.
Recognize Smart Guides.
Save selections for future use.
Hide, lock, and unlock items.
Use tools and commands to align shapes and points to each other and the artboard.
Group and ungroup items.
Work in Isolation mode.
Arrange objects.

This lesson will take about 45 minutes to complete. To get the lesson files used in this chapter, download them from the web page for this book at www.adobepress.com/IllustratorCIB2021. For more information, see “Accessing the lesson files and Web Edition” in the Getting Started section at the beginning of this book.

Selecting content in Adobe Illustrator is one of the more essential things you’ll do. In this lesson, you’ll learn how to locate and select objects using selection tools; protect other objects by grouping, hiding, and locking them; align objects to each other and the artboard; and much more.
Starting the lesson
Creating, selecting, and editing are the cornerstones of working with artwork in Adobe Illustrator. In this lesson, you’ll learn the fundamentals of selecting, aligning, and grouping artwork using different methods. You’ll begin by resetting the preferences in Illustrator and opening the lesson file.
To ensure that the tools function and the defaults are set exactly as described in this lesson, delete or deactivate (by renaming) the Adobe Illustrator preferences file. See “Restoring default preferences” in the “Getting Started” section at the beginning of the book.
 Note
NoteIf you have not already downloaded the project files for this lesson to your computer from your Account page, make sure to do so now. See the “Getting Started” section at the beginning of the book.
Start Adobe Illustrator.
Choose File > Open. Locate the file named L2_end.ai, which is in the Lessons > Lesson02 folder that you copied onto your hard disk, and click Open.
This file contains the finished illustration that you’ll create in this lesson.
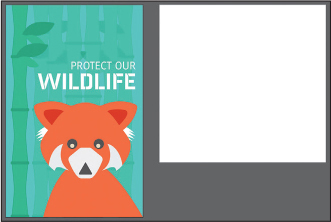
Choose File > Open to open the L2_start.ai file in the Lessons > Lesson02 folder on your hard disk.
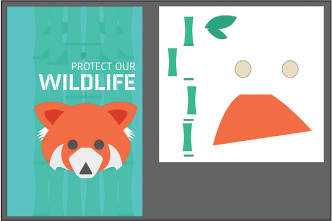
Choose File > Save As.
When saving in Illustrator, you can choose to save either to the Adobe cloud as a cloud document or to your computer. To learn more about saving as a cloud document, visit the sidebar, “Working with cloud documents” in Lesson 1.
For this lesson, you’ll save the lesson file to your computer.

Click Save On Your Computer, circled in the previous figure, to show the Save As dialog box. In the Save As dialog box, name the file WildlifePoster.ai, and save it in the Lessons > Lesson02 folder.
Leave Adobe Illustrator (ai) chosen from the Format menu (macOS) or Adobe Illustrator (*.AI) chosen from the Save As Type menu (Windows), and click Save.
In the Illustrator Options dialog box, leave the Illustrator options at their default settings, and click OK.
To see all the artwork, choose View > Fit All In Window.
Choose Window > Workspace > Essentials, make sure it’s selected, and then choose Window > Workspace > Reset Essentials to reset the workspace.
Selecting objects
Whether you’re creating artwork from scratch or editing existing artwork in Illustrator, you’ll need to become familiar with selecting objects. It will help you to better understand what vector artwork is all about. There are many methods and tools for selecting and editing, and in this section, you’ll explore the most widely used, which are the Selection ( ) and Direct Selection (
 ) tools.
Using the Selection tool
The Selection tool ( ) lets you select, move, rotate, and resize objects. In this section, you’ll become familiar with it.
Choose 2 Pieces from the Artboard Navigation menu below the Document window.

This should fit the artboard on the right into the Document window. If the artboard doesn’t fit in the window, you can choose View > Fit Artboard In Window.
Select the Selection tool (
 ) in the toolbar on the left. Move the pointer over the different artwork on the artboards, but don’t click.
The icon that appears next to the pointer as it passes over objects (
 ) indicates that there is artwork under the pointer that can be selected. When you hover over an object, that object is also outlined in a color, like blue in this instance.
Select the Zoom tool (
 ) in the toolbar, and click a few times on the beige ellipses to zoom in.
Select the Selection tool (
 ) in the toolbar again and move the pointer over the edge of the beige ellipse on the left.
A word such as “path” or “anchor” may appear because Smart Guides are turned on by default (View > Smart Guides). Smart Guides are temporary snap-to guides that help you align, edit, and transform objects or artboards. You’ll learn more about Smart Guides in Lesson 3.
Click anywhere inside the ellipse on the left to select it. A bounding box with eight handles appears around the selected ellipse.

 Note
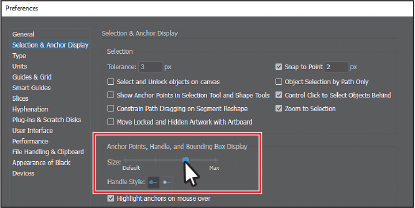
NoteI’ve intentionally enlarged the bounding and anchor points in this lesson to make them easier to see. To learn how you can do that, see the sidebar “Changing the size of anchor points, handles, and the bounding box display.”
The bounding box can be used to make changes to content, such as resizing or rotating. The bounding box also indicates that an item is selected and ready to be modified. The color of the bounding box indicates which layer the object is on. Layers are discussed more in Lesson 10.
Using the Selection tool, click in the ellipse on the right. Notice that the ellipse on the left is now deselected and only the ellipse on the right is selected.
Pressing the Shift key, click in the ellipse on the left to add it to the selection, and then release the key. Both ellipses are now selected, and a larger bounding box surrounds them.

Move the ellipses a short distance by dragging from inside either selected ellipse (in the beige color). Because both ellipses are selected, they move together.
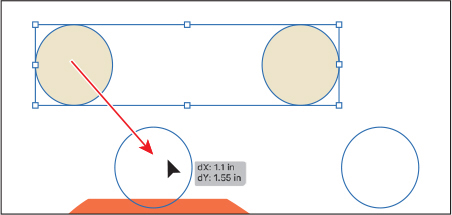
As you drag, you may notice that magenta lines appear. These are called alignment guides. They are visible because Smart Guides are turned on (View > Smart Guides). As you drag, the objects align to other objects in the document. Also notice the measurement label (gray box) next to the pointer that shows the object’s distance from its original position. Measurement labels also appear because Smart Guides are turned on.
Revert to the last saved version of the document by choosing File > Revert. In the dialog box that appears, click Revert.
Selecting and editing with the Direct Selection tool

As you draw, you create vector paths that are made up of anchor points and paths. Anchor points are used to control the shape of a path and work like pins holding a wire in place. A shape you create, like a simple square, is composed of at least four anchor points on the corners with paths connecting the anchor points.
One way to change the shape of a path or shape is by dragging its anchor points. The Direct Selection tool ( ) lets you select anchor points or paths within an object so they can be reshaped. Next, you’ll become familiar with selecting anchor points using the Direct Selection tool to reshape a path.
Choose 2 from the Artboard menu in the Properties panel on the right.
Choose View > Fit Artboard In Window to make sure you see the whole artboard.
Select the Direct Selection tool (
 ) in the toolbar on the left. Click inside one of the larger green bamboo shapes to see the anchor points.
Notice that the anchor points are all filled with a blue color, which means they are all selected. For this section, you may want to zoom in to the selected shape.
Move the pointer directly over the upper-right anchor point.
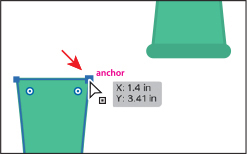
With the Direct Selection tool selected, when the pointer is right over an anchor point, the word “anchor” appears. Also notice the little white box next to the pointer (
 ). The small dot that appears in the center of the white box indicates that the cursor is positioned over an anchor point.
Click to select that anchor point, and then move the pointer away from it.
Notice that only the anchor point you clicked is now filled with blue, indicating that it’s selected. The other anchor points in the shape are now hollow (filled with white), indicating that they are not selected.
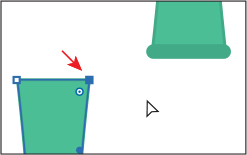
With the Direct Selection tool still selected, move the pointer over the selected anchor point and then drag it to edit the shape.
 Note
NoteThe gray measurement label that appears as you drag the anchor point has the values dX and dY. dX indicates the distance that the pointer has moved along the x-axis (horizontally), and dY indicates the distance that the pointer has moved along the y-axis (vertically).

Try clicking another point on the shape. Notice that when you select the new point, the previous point is deselected.

Revert to the last saved version of the file by choosing File > Revert. In the dialog box that appears, click Revert.
Selecting with a marquee
Another way to select content is by dragging across what you want to select (called a marquee selection), which is what you’ll do next.
Select the Zoom tool (
 ) in the toolbar, and click the beige ellipses several times to zoom in closely.
Select the Selection tool (
 ) in the toolbar on the left. Move the pointer above and to the left of the leftmost beige ellipse and then drag across both ellipses to create a marquee that overlaps at least part of them. Release the mouse button.
When dragging with the Selection tool (
 ), you need to encompass only a small part of an object to select it.
Choose Select > Deselect, or click where there are no objects.
Now you’ll use the Direct Selection tool to select multiple anchor points in the ellipses by dragging a marquee around anchor points.
Select the Direct Selection tool (
 ) in the toolbar. Starting off the top left of the leftmost ellipse (see the first part of the following figure), drag across just the top edges of the two ellipses and then release the mouse button.
Only the top anchor points become selected. With the anchor points selected, you’ll see little handles coming from the anchor points. Those are called direction handles, and they can be used to control the curve of the path.
In the next step, you’ll drag one of the anchor points. Make sure you drag the square anchor point and not the round end of one of the handles.
Move the pointer over one of the selected anchor points at the top of an ellipse. When you see the word “anchor,” drag it to see how they move together.
You can use this method when selecting points so that you don’t have to click exactly on the anchor point that you want to select.

Revert to the last saved version of the file by choosing File > Revert. In the dialog box that appears, click Revert.
Hiding and locking objects
Selecting artwork may be more difficult when there are objects stacked one on another or when there are multiple objects in a small area. In this section, you’ll learn a common way to make selecting objects easier by locking and hiding content. Next, you’ll attempt to drag across artwork to select it.
Choose 1 Final Artwork from the artboard navigation menu in the lower left.
Choose View > Fit Artboard In Window.
With the Selection tool (
 ) selected in the toolbar, move the pointer into the solid blue-green area to the left of the animal artwork and then drag across part of the head of the animal to select it. Release the mouse button.
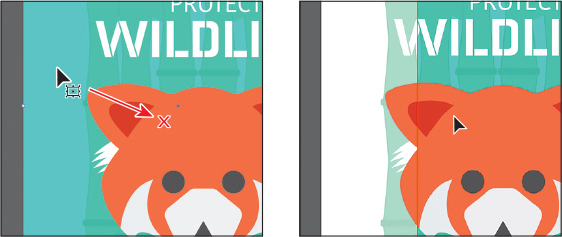
Notice that you dragged the large blue-green shape, rather than selecting the animal shapes.
Choose Edit > Undo Move.
With the large blue-green background shape still selected, choose Object > Lock > Selection, or press Command+2 (macOS) or Ctrl+2 (Windows).
Locking objects prevents you from selecting and editing them.
Click the PROTECT OUR WILDLIFE text and lock it as well by choosing Object > Lock > Selection.
Move the pointer into the solid blue-green area to the left of the animal artwork again and drag across all of the parts of the animal, this time selecting the whole thing.

Next, you’ll hide all of the shapes that make up the head of the animal, except for the eyes. You’ll deselect the eyes and then hide the selected artwork.
Press the Shift key and click each eye shape, one at a time, to remove the eyes from the selection.

Choose Object > Hide > Selection, or press Command+3 (macOS) or Ctrl+3 (Windows).
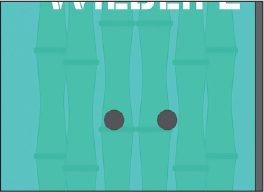
The selected shapes are temporarily hidden so that you can more easily select other objects.
Unlocking objects you’ve locked
After you lock an object or objects, later you may need to unlock them to select them—maybe to make a change. You can either unlock all locked objects in the document at once or unlock individual objects in the document. Next, you’ll unlock the background green shape, but first you need to turn on an option in the program preferences.
Choose Illustrator > Preferences > Selection & Anchor Display (macOS) or Edit > Preferences > Selection & Anchor Display (Windows). Select the Select And Unlock Objects On Canvas option, if it isn’t already selected. Click OK.

With the Select And Unlock Objects On Canvas option turned on, you can now unlock individual objects right on the canvas.
Click in the PROTECT OUR WILDLIFE text to show a small lock icon on the left edge of the selected content.
Click the lock icon to unlock the text.
 Tip
TipIf you right-click on locked content, you can also choose any objects under the pointer from the Unlock menu to unlock it. If you select arrtwork, you can also unlock any selected items in the same right-click menu.
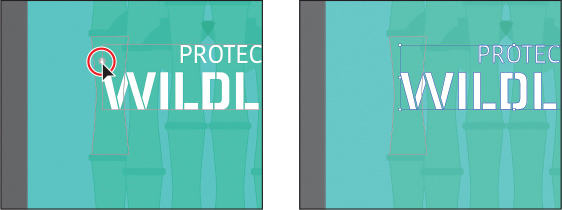
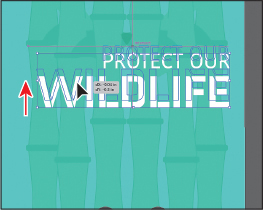
Drag the text up a little to reposition it.
Selecting similar objects
You can also select artwork based on similar fill color, stroke color, stroke weight, and more, using the Select > Same command. The stroke of an object is the outline (border), and the stroke weight is the width of the stroke. Next, you’ll select several objects with the same fill and stroke applied.
Choose View > Fit All In Window to see all the artwork at once.
With the Selection tool (
 ), click to select one of the larger green “bamboo” shapes on the right.
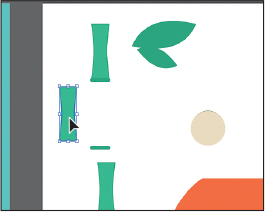
Choose Select > Same > Stroke Color to select all objects on any artboard with the same stroke (border) color as the selected object.
 Tip
TipIn Lesson 14, you’ll learn about another method for selecting similar artwork using Global Edit.
All the shapes with the same stroke (border) color are now selected. If you know that you may need to reselect a series of objects again, like the shapes you just selected, you can save that selection. Saved selections are a great way to easily make a selection later, and they are saved only with that document. You’ll save the current selection next.
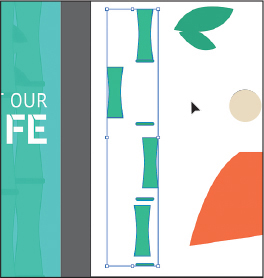
With the shapes still selected, choose Select > Save Selection. Name the selection Bamboo in the Save Selection dialog box, and click OK.
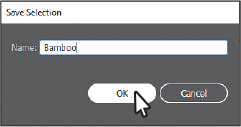
Now that you’ve saved it, you’ll be able to choose this selection quickly and easily from the bottom of the Select menu when you need it.
Choose Select > Deselect.
Selecting in Outline mode
By default, Adobe Illustrator displays all artwork with its paint attributes, like fill and stroke (border), showing. However, you can view artwork in Outline mode to display artwork so that the appearance is removed and only outlines (or paths) are visible. Outline mode can be useful if you want to more easily select objects within a series of stacked objects.
Choose Object > Show All so you can see the artwork you previously hid.
Choose Select > Deselect so nothing is selected.
Choose View > Outline to view artwork as outlines.
With the Selection tool (
 ), back on artboard 1, click within one of the eye shapes on the animal head to select it.
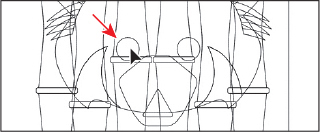
You can’t select the object by clicking the fill using this method. To select in Outline mode, you can click the edge of the object or drag a marquee across the shape to select it. In Outline mode, you may see a small X in the center of some of the shapes. If you click that X, you can select the shape.
With the Selection tool selected, drag across both eye shapes to select them. Notice that the artwork behind the eyes (the bamboo) is not selected. That’s because it was locked at some point. Press the Up Arrow key several times to move both shapes up a little bit.
 Tip
TipYou could have also clicked the edge of one of the shapes and then pressed the Shift key and clicked the edge of the other to select both.

Choose View > Preview (or GPU Preview) to see the painted artwork.
Aligning objects
Illustrator makes it easy to align or distribute multiple objects relative to each other, the artboard, or a key object. In this section, you’ll explore the different options for aligning objects.
Aligning objects to each other
One type of alignment is aligning objects to each other. This can be useful if, for instance, you want to align the top edges of a series of selected shapes to each other. Next you’ll align the green bamboo shapes to each other.
Choose Select > Bamboo to reselect the green shapes on the right artboard.
Click the Next Artboard button (
 ) in the lower-left corner of the Document window to fit the artboard with the selected green shapes in the window.
Click the Horizontal Align Center button (
 ) in the Properties panel on the right.
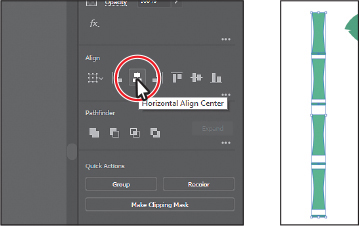
Notice that all of the selected objects move to align to the horizontal center of the shapes.
Choose Edit > Undo Align to return the objects to their original positions. Leave the objects selected for the next section.
Aligning to a key object
A key object is an object that you want other objects to align to. This can be useful when you want to align a series of objects and one of them is already in the perfect position. You specify a key object by selecting all the objects you want to align, including the key object, and then clicking the key object again. Next, you’ll align the green shapes using a key object.
With the shapes still selected, click the leftmost shape with the Selection tool (
 ). See the first part of the following figure.
 Note
NoteThe key object outline color is determined by the layer color that the object is on. You’ll learn about layers in Lesson 10.
That object is now the key object. When selected, the key object has a thick outline indicating that other objects will align to it.
Click the Horizontal Align Center button (
 ) in the Properties panel again. Leave the shapes selected for the next section.
Notice that all of the selected shapes moved to align to the horizontal center of the key object.
 Note
NoteIf you accidentally deselect some or all of the shapes, to reselect them choose Select > Deselect and then choose Select > Bamboo.
Click the key object (an arrow is pointing to it in the last part of the previous figure) to remove the blue outline, and leave all of the green shapes selected. The next time you align the selected content it won’t align to the key object.
Distributing objects
Distributing objects using the Align panel enables you to select multiple objects and distribute the spacing between the centers or edges of those objects equally. Next, you will make the spacing between the green shapes even.
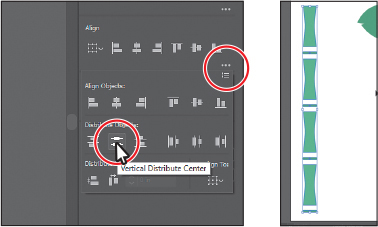
With the green shapes still selected, click More Options (
 ) in the Align section of the Properties panel (circled in the figure). Click the Vertical Distribute Center button (
 ) in the panel that appears.
 Note
NoteYou’ll need to hide the panel to continue. To do that, press the Escape key. I won’t always tell you to hide these panels, so it’s a good habit to get into.
Distributing moves all of the selected shapes so that their centers are spaced an equal distance apart.
Choose Edit > Undo Align.
With the shapes still selected, click the topmost shape of the selected shapes to make it the key object.
Click More Options (
 ) in the Align section of the Properties panel (circled in the following figure). Ensure that the Distribute Spacing value is 0 (zero) and then click the Vertical Distribute Space button (
 ).
).
Distribute Spacing distributes the spacing between selected objects, whereas the Distribute Objects alignments distribute the spacing between the center points of selected objects. The value you can set is a great way to set a specific distance between objects.
Choose Select > Deselect and then choose File > Save.
Aligning anchor points
Next you’ll align two anchor points to each other using the Align options. As with setting a key object in the previous section, you can also set a key anchor point that other anchor points will align to.
Select the Direct Selection tool (
 ), and click in the orange shape at the bottom of the current artboard to see all of the anchor points.
Click the lower-right corner point of the shape (see the first part of the following figure). Press the Shift key and click to select the lower-left point of the same shape to select both anchor points (second part of the following figure).

The last selected anchor point is the key anchor point. Other points will align to this point.
Click the Vertical Align Top button (
 ) in the Properties panel to the right of the document.
The first anchor point selected aligns to the second anchor point selected.
Choose Select > Deselect.
Aligning to the artboard
You can also align content to the active artboard (page) rather than to a selection or a key object. Aligning to the artboard aligns each selected object separately to the edges of the artboard. Next, you’ll align the orange shape to the artboard that contains the final artwork.
Select the Selection tool (
 ) and click the orange shape at the bottom of the right-hand artboard to select it.
Choose Edit > Cut to copy to the clipboard and remove it from the artboard.
Click the Previous artboard button (
 ) in the lower-left corner of the Document window to navigate to the first (left) artboard in the document, which contains the final artwork.
Choose Edit > Paste to paste the shape in the center of the Document window.
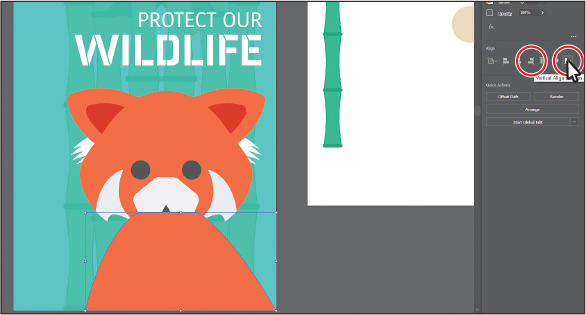
Click the Align To button (
 ) in the Align section of the Properties panel, and make sure that Align To Artboard is chosen in the menu that appears. Any content you align will now align to the artboard.
Click the Horizontal Align Right button (
 ) and then click the Vertical Align Bottom button (
 ) in the Align section of the Properties panel to align the orange shape to the horizontal right and vertical bottom of the artboard.
Choose Select > Deselect.
The orange shape will be on top of the other artwork. Later, you will put it behind the other animal artwork.
Working with groups
You can combine objects into a group so that the objects are treated as a single unit. That way, you can move or transform a number of objects without affecting their individual attributes or positions relative to each other. It can also make selecting artwork easier.
Grouping items
Next you’ll select multiple objects and create a group from them.
Choose View > Fit All In Window to see both artboards.
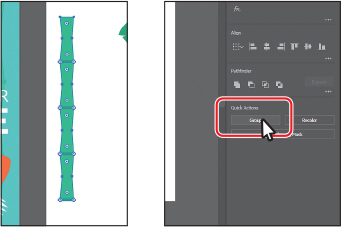
Choose Select > Bamboo to select the green shapes on the right artboard.
Click the Group button in the Quick Actions section of the Properties panel on the right to group the selected artwork together.
 Tip
TipYou can also choose Object > Group to group content.
Choose Select > Deselect.
With the Selection tool (
 ) selected, click one of the shapes in the new group. Because they are grouped together, all are now selected.
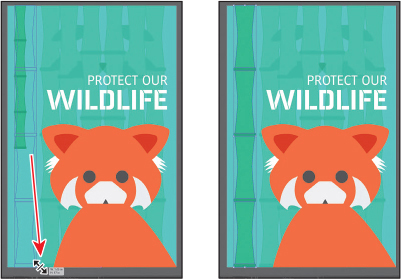
Drag the group of bamboo shapes close to the top of the artboard on the left.
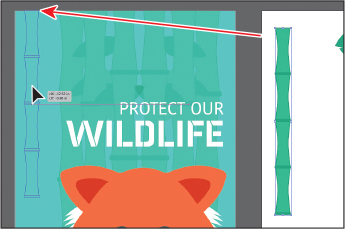
Next you’ll align the bamboo group to the top of the artboard.
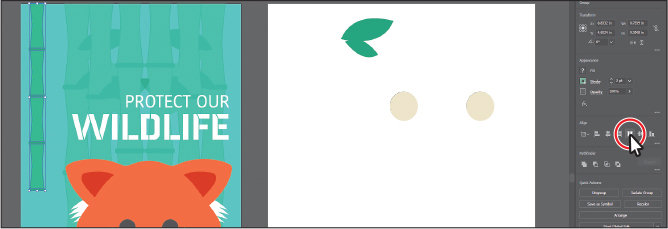
With the group still selected and Align To Artboard (
 ) chosen from the Align To menu in the Properties panel on the right, click the Vertical Align Top button (
 ).
).
With the Selection tool selected, press the Shift key and then drag the lower-right corner of the bounding box down to the bottom of the artboard to make the bamboo shapes larger. When the pointer reaches the bottom of the artboard, release the mouse button and then the key.
Choose Select > Deselect and then choose File > Save.
Editing a group in Isolation mode
Isolation mode lets you isolate groups so that you can easily select and edit specific objects or parts of objects without having to ungroup the objects. When in isolation mode, all objects outside the isolated group are locked and dimmed so that they aren’t affected by the edits you make. Next, you will edit a group using Isolation mode.
With the Selection tool (
 ), drag across the two green leaves on the right artboard to select them. Click the Group button at the bottom of the Properties panel to group them together.
Double-click one of the leaves to enter Isolation mode.
 Note
NoteYou’ll learn more about layers in Lesson 10.

Notice that the rest of the content in the document appears dimmed (you can’t select it). At the top of the Document window, a gray bar appears with the words “Layer 1” and “<Group>.” This indicates that you have isolated a group of objects that is on Layer 1, and they are now temporarily ungrouped.
Click to select the smaller leaf shape. Click the Fill color box in the Properties panel on the right, and making sure the Swatches option (
 ) is selected in the panel that appears, click to select a different green color.
When you enter Isolation mode, groups are temporarily ungrouped. This enables you to edit objects in the group or to add new content without having to ungroup.
Double-click outside the shapes within the group to exit Isolation mode.
You can also click the gray arrow in the upper-left corner of the Document window, press the Escape key when in Isolation mode, or double-click a blank area of the Document window.
Click to select the leaf group, and leave it selected for the next section.
The leaves are once again grouped, and you can also now select other objects.
Creating a nested group
Groups can also be nested—grouped within other objects or grouped to form larger groups. Nesting is a common technique and a great way to keep associated content together. In this section, you’ll explore how to create a nested group.
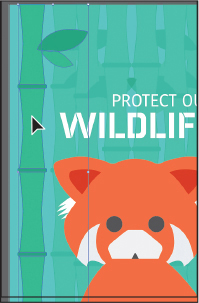
Drag the group of leaves onto the bamboo on the left artboard, and leave them selected. Shift-click the bamboo group to select it as well.
 Note
NoteIf the bamboo leaves are behind the bamboo group, you can select the leaves and choose Object > Arrange > Bring To Front.
Click the Group button in the Properties panel.
You have created a nested group—a group that is combined with other objects or groups to form a larger group.
Choose Select > Deselect.
With the Selection tool, click the leaves to select the nested group.
Double-click the leaves to enter Isolation mode. Click to select the leaves again, and notice that the leaf shapes are still grouped. This is a nested group.
 Tip
TipInstead of either ungrouping a group or entering Isolation mode to select the content within, you can select with the Group Selection tool (
 ). Nested within the Direct Selection tool (
 ) in the toolbar, the Group Selection tool lets you select an object within a group, a single group within multiple groups, or a set of groups within the artwork.
Choose Edit > Copy and then Edit > Paste to paste a new group of leaves.
Drag them lower onto the bamboo.

Press the Escape key to exit Isolation mode; then click a blank area of an artboard to deselect the objects.
Exploring object arrangement

As you create objects, Illustrator stacks them in order on the artboards, beginning with the first object created. This ordering of objects, called stacking order, determines how they display when they overlap. You can change the stacking order of objects in your artwork at any time, using either the Layers panel or the Arrange commands.
Arranging objects
Next you’ll work with the Arrange commands to change how objects are stacked.
With the Selection tool (
 ) selected, click the orange shape at the bottom of the artboard.
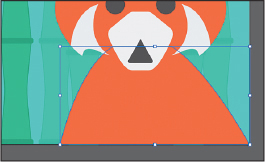
Click the Arrange button in the Properties panel. Choose Send To Back to send the shape behind all of the other shapes.

Click the Arrange button again, and choose Bring Forward as many times as necessary to bring the orange shape on top of the large blue-green background shape and the bamboo shapes. I chose it three times.
Selecting objects behind
When you stack objects on top of each other, sometimes it becomes difficult to select objects that are underneath. Next, you’ll learn how to select an object that’s part of a stack of objects.
Drag across both beige ellipses on the artboard on the right to select them.
Pressing the Shift key, drag a corner to make them smaller. When the measurement label shows a width of approximately 1.3 inches, release the mouse button and then the key.

Click away from the ellipses to deselect them, and then drag either of them on top of one of the dark eye shapes on the animal. Release the mouse button.
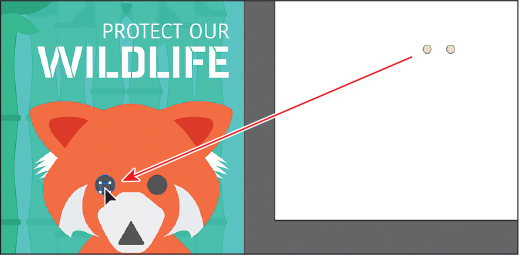
The ellipse disappears but is still selected. It went behind the dark circle (the eye) because it was created before the eye shape, which means it is lower in the stacking order.
With the ellipse still selected, click the Arrange button in the Properties panel, and choose Bring To Front. This brings the smaller ellipse to the front of the stack, making it the topmost object.
With the Selection tool (
 ), select the other beige ellipse on the right artboard and then drag it onto the other eye shape on the left artboard.
This ellipse disappears like the other, but this time, you will deselect the ellipse and then reselect it using another method.
Choose View > Zoom In a few times.
Choose Select > Deselect.
Because it is behind the larger eye shape, you can no longer see the smaller beige ellipse.
 Note
NoteTo select the hidden beige ellipse, make sure that you click where the ellipse and the eye overlap. Otherwise, you won’t be able to select the beige ellipse.
With the pointer over the location of the beige ellipse you just deselected, the one behind the eye shape, hold down the Command (macOS) or Ctrl (Windows) key and click until the smaller ellipse is selected again (this may take several clicks).

 Tip
TipTo see where the beige ellipse is, you can choose View > Outline. When you see it, you can choose View > Preview (or GPU Preview) and attempt to make the selection.
Click the Arrange button in the Properties panel, and choose Bring To Front to bring the ellipse on top of the eye.

Choose View > Fit Artboard In Window.
Choose File > Save and then File > Close.
Review questions
1. How can you select an object that has no fill?
2. Explain how you can select an item in a group without ungrouping.
3. Of the two selection tools (Selection [ ] and Direct Selection [
 ]), which allows you to edit the individual anchor points of an object?
4. What should you do after creating a selection that you are going to use repeatedly?
5. To align objects to the artboard, what do you first need to change in the Properties panel or Align panel before you choose an alignment option?
6. Sometimes you are unable to select an object because it is underneath another object. Explain two ways to get around this issue.
Review answers
1. You can select an object that has no fill by clicking the stroke or by dragging a marquee across any part of the object.
2. You can double-click the group with the Selection tool selected to enter Isolation mode, edit the shapes as needed, and then exit Isolation mode by pressing the Escape key or by double-clicking outside of the group. Read Lesson 10 to see how you can use layers to make complex selections. Also, using the Group Selection tool ( ), you can click once to select an individual item within a group (not discussed in the lesson). Click again to add the next grouped items to the selection.
3. Using the Direct Selection tool ( ), you can select one or more individual anchor points to change the shape of an object.
4. For any selection that you anticipate using again, choose Select > Save Selection. Name the selection so that you can reselect it at any time from the Select menu.
5. To align objects to an artboard, first choose the Align To Artboard option.
6. If your access to an object is blocked, you can choose Object > Hide > Selection to hide the blocking object. The object is not deleted. It is just hidden in the same position until you choose Object > Show All. You can also use the Selection tool ( ) to select an object that’s behind other objects by pressing the Command (macOS) or Ctrl (Windows) key and then clicking the overlapping objects until the object you want to select is selected.
