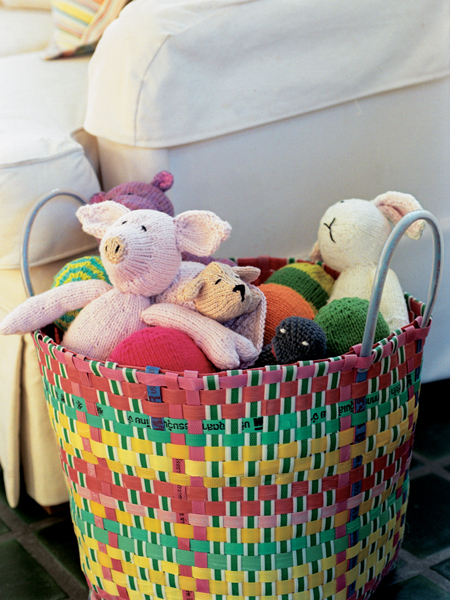
Knitting toys uses most of the same skills used in knitting a baby hat, a garment, or any other type of accessory. Sometimes the pieces are smaller and three-dimensional, which can make it feel like a new experience. Toy knitting uses the same skills in a different and interesting way. The following chapter provides instructions and tips on skills used throughout the book. If you are a new knitter, you’ll need to get some basics down first, then move right on to your first project in chapter 2, referencing techniques as needed. I’ve included the methods that I use when knitting toys. However, there are no steadfast rules in knitting; do what feels right and comfortable for you. If you achieve the same result while going about the techniques in a different way, that is fine.
Now take a deep breath, jump right in, and have some fun!
There are certain skills that I think of when it comes to the basics of knitting. Knitters can easily access all of this information online or in books and be able to quickly gather and master the necessary skills. I extensively covered the basics of knitting in my last two books, Itty-Bitty Hats and Itty-Bitty Nursery, and on my blog through written and video tutorials at www.susanbanderson.blogspot.com and at SusanBAnderson on www.youtube.com. The following skills are covered in my previous books and on my blog: casting on, the knit stitch, the purl stitch, binding off, gauge, seaming, increases, and decreases.
A couple of longstanding and excellent teaching Web sites include:
All the other techniques used for the projects in Itty-Bitty Toys are included on the following pages. Here’s where you will find techniques that go beyond the basics. Every special technique you need to make the projects in this book is included on the following pages. If you are new to knitting, take your time and give it a go. You will have things figured out in no time.
knitting in the round on circular needles • Circular needles are two needles that are joined by a cable. They are used for both knitting in the round and knitting back and forth. The length of the needles, measured from tip to tip, is determined by the cable length. Even though the needles are attached, consider them separate needles, holding one needle in your right hand and the other in your left hand. The following steps will start you on your way.
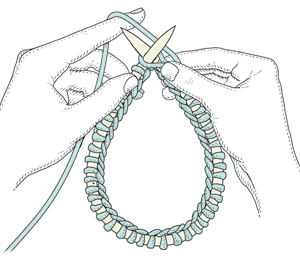
1. Cast on just as you would if you were knitting back and forth.
2. After you have completed casting on, spread the stitches all the way around the needles and the cable so the first and last stitches come together at the points of the needles.
3. Most important, make sure the stitches are not twisted before you begin knitting. Look to see if the cast-on row is at the inside of the circle as you hold the needles up. If the stitches are twisted, then untwist them at this time. There is no way to untwist stitches once you’ve started knitting. The only way to fix this is to start over.
4. Place a stitch marker (see page 16) on the right needle before you begin knitting, to mark the beginning of the round. Do this by sliding a stitch marker onto the point of your right needle.
5. Hold the left needle in your left hand and the right needle in your right hand. Be sure the yarn is coming from the needle in your right hand.
6. Begin working in the round by knitting the first stitch on the left needle as you usually would (again, making sure the yarn is coming from your right needle). Now you have joined the circle.
7. Continue knitting as your pattern directs until you reach your desired length, slipping the stitch marker from the left to the right needle as you begin each new round. Slide the stitches along the cable as you knit.
• The easy part of knitting in the round is that you are knitting in a continuous circle, there is no turning back and forth, and there are no seams to sew at the end. Many people prefer knitting in the round over any other kind of knitting due to this continuity.
knitting in the round on double-pointed needles • When you are knitting in the round on a number of stitches too small to fit comfortably around a circular needle, you must use double-pointed needles. Double-pointed needles come in different lengths. Certain lengths of needles are better suited for certain projects. You’ll have to experiment to find a length that feels good to you.
Some projects call for double-pointed needles right away, on the cast-on row, and other projects transfer onto double-pointed needles as the stitches decrease in number. I will describe both types of situations. For this book, most often you will use four double-pointed needles, with the stitches being divided on three needles and the fourth needle being used to knit onto. Sometimes a pattern calls for five double-pointed needles to be used.
transferring stitches from circular needles to double-pointed needles • Following are the steps for transferring from a circular needle to double-pointed needles when it becomes too tight.
1. With the left circular needle in your left hand, begin knitting onto the first double-pointed needle. Knit as many stitches onto the first needle as directed in the pattern. Switch to the second double-pointed needle, which is empty, and begin knitting the required number of stitches onto this needle, being sure to pull the yarn snugly when transferring to this new needle. Do the same for the third needle. The three double-pointed needles form a triangle with the first and last stitches meeting at the beginning of the round.
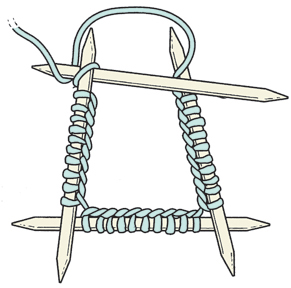
TIP • Some patterns will tell you how many stitches to put on each needle. Others will tell you to divide the stitches evenly onto three or four needles.
2. Be sure to keep track of the beginning of your round by placing a detachable stitch marker on the first stitch.
3. Begin knitting in the round just as you would with circular needles. Hold the first needle in your left hand, ready to knit. Hold the empty fourth needle in your right hand. This fourth needle is your working needle. Concentrate only on the needle you are knitting from and the working needle, basically ignoring the other needles. Insert the right needle into the first stitch on the left needle and knit as usual. Knit all the stitches on the first needle. When this needle is empty, it becomes your working needle.
4. Hold the second needle in your left hand with the stitches ready to knit. Begin knitting the stitches onto the empty needle in your right hand. Knit all of the stitches on the second needle onto the working needle in your right hand. Make sure you pull the yarn snugly when starting a new needle so you don’t create gaps along the way.
5. Knit across the stitches on the third and final needle to complete one round.
• Continue knitting in the round this way and decrease stitches as the pattern directs.
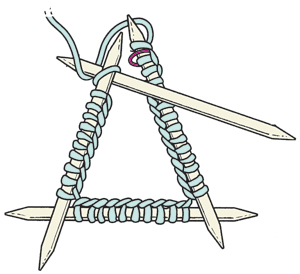
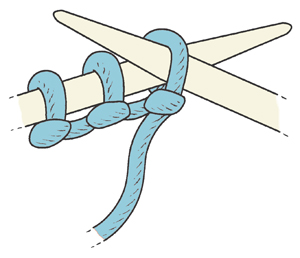
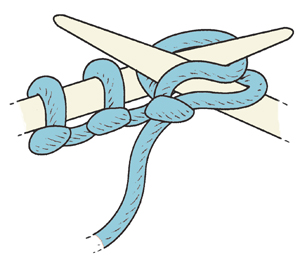
knitting in the round on double-pointed needles from the cast-on row • This type of knitting with double-pointed needles is used often, especially when knitting smaller tubes or spherical shapes.
1. Cast on all required stitches onto one double-pointed needle.
2. Knit the first round onto the double-pointed needles, dividing the stitches evenly onto three needles.
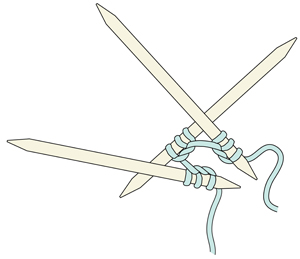
3. Hold the three needles so they form a triangle, with the first and last stitches meeting at the beginning of the round and the working yarn coming from the right needle.
4. Most important, check to make sure the cast-on stitches are not twisted around any of the needles before you begin knitting.
5. With the empty fourth needle held in your right hand, insert the point into the first stitch on the first needle, which is held in your left hand. Focus only on the two working needles, ignoring the other needles. Knit as usual until all stitches are knit from the first needle. Now empty, it becomes your working needle.
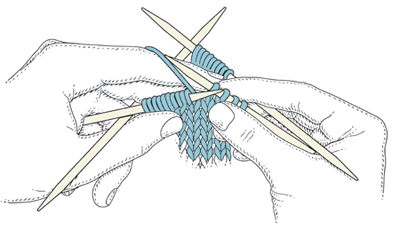
6. Work the same way across the other two needles, being sure to pull the yarn snugly when transferring from one needle to the next.
7. After completing one round, place a stitch marker to show the beginning of the round on the first stitch.
• Continue knitting in the round as your pattern directs.
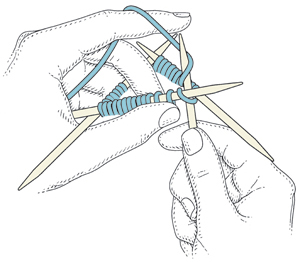
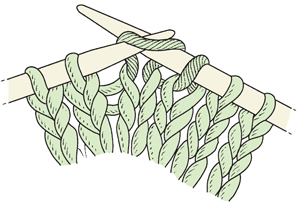
casting a small number of stitches onto double-pointed needles • There are a couple of different ways to do this. The first is to cast all of the stitches onto one double-pointed needle and then transfer the stitches onto the appropriate needles. The other is to cast the stitches onto the three double-pointed needles from the start. Let’s say, for example, you are going to cast 9 stitches onto three double-pointed needles. You can cast on 3 stitches on each of 3 double-pointed needles. As you are casting on, make sure to pull the yarn so it is snug between the needles.
Next you will start the first round. Join to work in the round by starting to knit on the first stitch of the first needle. Place a stitch marker on the first stitch of the first needle, and make sure that the row of cast-on stitches is not spiraled around the needle. There should be no twists in the row. When you are starting to knit with a small number of stitches, the needles can feel kind of floppy and awkward. Don’t worry about this; just start working, and before you start each needle for the first round, double check that the stitches on it aren’t twisted around the needle. Once you work a few rounds, it becomes much easier. In toy patterns, you will often increase your stitches over the first several rounds.
Increases are used when you want to make your knitted piece wider. You do this by adding stitches as you go.
knit into the front and back of the same stitch, or kfb
1. Knit the first stitch and leave it on the left needle.
2. Insert the tip of the right needle into the back of the same stitch and knit again.
3. Slip the stitch off the left needle. Two stitches have been made from 1 stitch and are now on the right needle.
purl into the front and back of the same stitch, or pfb
1. Purl the first stitch and leave it on the left needle.
2. Insert the tip of the right needle through the back of the same stitch from left to right and bring the point to the front. Purl again.
3. Slip the stitch off the left needle. Two stitches have been made from 1 stitch and are now on the right needle.
make one, or m1 • Look at the bar between the stitches on the needles.
1. Insert the left needle under the top bar from front to back, bringing the bar onto the left needle.
2. Knit the bar on the left needle through the back loop.
Decreases are used when you want to make your piece narrower at a certain point, as at the end of a duck’s beak. You do this by making fewer stitches as you go.
knit 2 stitches together, or k2tog • This makes a right-slanting decrease.
1. With the right needle, and the yarn in back, put the point through the first 2 stitches on the left needle at the same time as if to knit.
2. Knit these 2 stitches together to make 1 stitch on the right needle.
purl 2 stitches together, or p2tog • This makes a right-slanting decrease.
1. With the right needle, and the yarn in front, put the point through the first 2 stitches on the left needle at the same time as if to purl.
2. Purl these 2 stitches together to make 1 stitch on the right needle.
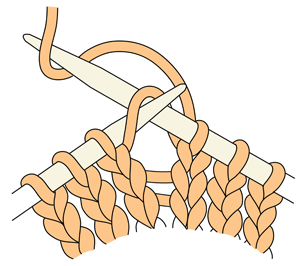
slip stitch, slip stitch, knit 2 stitches together through the back loops, or ssk (slip, slip, knit) • This makes a left-slanting decrease.
1. With the right needle and the yarn in back of the work, slip the first 2 stitches onto the right needle as if to knit.
2. With the left needle, put the point through the front of the 2 slipped stitches on the right needle.

3. Knit the 2 slipped stitches together by wrapping the yarn around the right needle and pulling a loop through onto the right needle, making 1 stitch on the right needle.
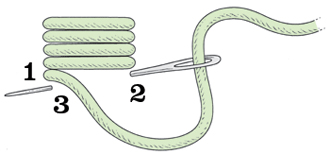
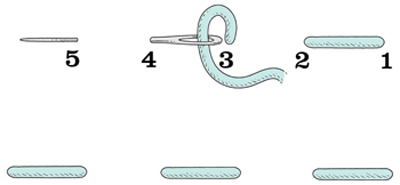
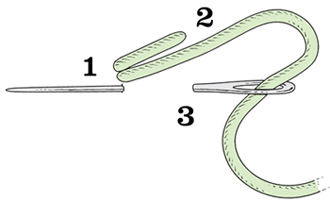
i-cord • I-cord is a tried and true embellishment that has endless uses. For this collection, it is used for loops, arms and legs, and much more. The versatility of this knitted cord makes it a must for every knitter to learn. Here are the steps for making I-cord:
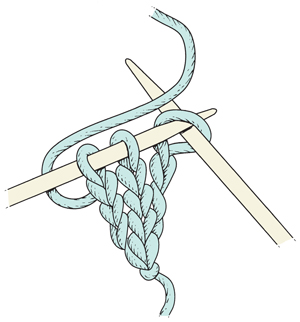
1. Using a double-pointed needle, cast on 2, 3, or 4 stitches, depending on how thick you want your cord. Knit these stitches using another double-pointed needle and do not turn the work.
2. Slide the stitches to the other end of the double-pointed needle. The yarn will now be on the opposite side of the work.
3. Bring the yarn very firmly around the back of the work and knit the stitches firmly to create a tube. Do not turn.
• Repeat rows 2 and 3 until the cord reaches the desired length. Bind off. Cut the yarn and pull it through the last stitch.
TIP • When knitting I-cord, gently pull down on the cord as it forms. This helps the stitches to fall in place to better form the cord.
sewing on an appliqué • Sewing on appliqués is not difficult and allows for some extra creativity. Knitted fabric is so pliable that you can create different shapes by stretching and molding the appliqué as you sew. When knitting the appliqués in this book, remember to leave a longer tail that can later be used for sewing the appliqué onto the toy.
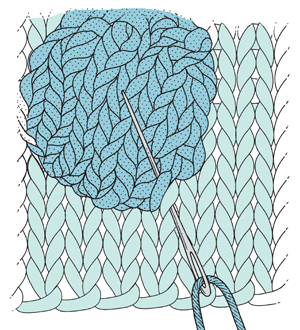
1. Arrange the appliqués and pin them to the toy. Thread a tail end or piece of matching yarn on a yarn needle.
2. Work around the outer edge of the appliqué, turning your work as you go. Pick up a stitch on the toy, sew through the outermost edge of the appliqué, and pull the yarn through. Repeat all the way around the appliqué.
3. Pull the end through to the inside.
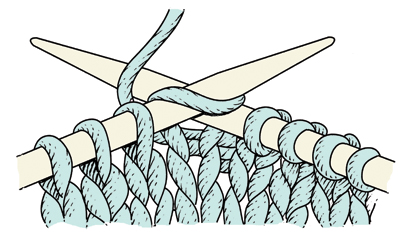
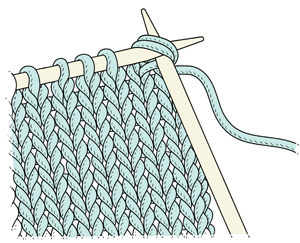
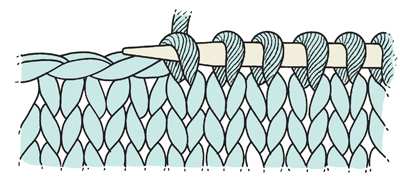
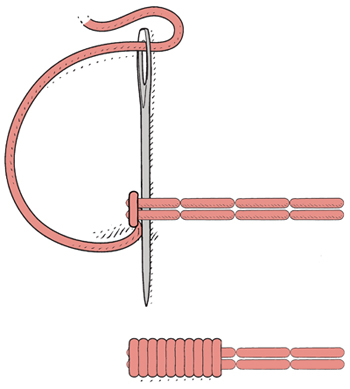
pick up stitches • To pick up and knit stitches is a skill that every knitter needs to master. It is used in knitting toys and is an easy way to continue knitting onto another piece of knitted fabric.
Pick up stitches means that you will be picking up stitches along an edge or another place on the fabric as if you are going to knit them. You will insert the needle into your knitted fabric, wrap the yarn as if you were knitting, and draw a stitch through the knitted fabric. Put each new stitch on your right needle. Be careful not to create holes as you work by making sure you insert the needle into the correct point on the knitted piece. The pattern will tell you how many stitches to pick up.
1. With the yarn held to the back of your piece and the right side of your work facing you, take one needle in your right hand and insert the needle from front to back (right through the fabric), into each stitch just beneath the cast-on edge, bind-off edge, or one stitch in on a side edge.
2. Wrap the yarn as if to knit and pull the loop through the fabric, leaving the new stitch on the right needle.
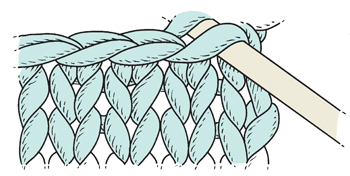
Pick up and knit from a bound-off edge.
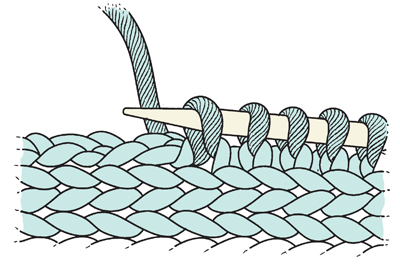
Pick up and knit from a side edge.
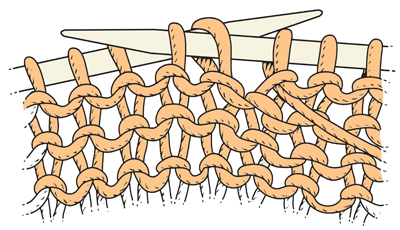
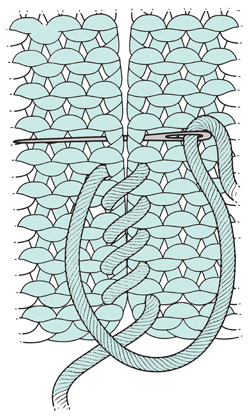
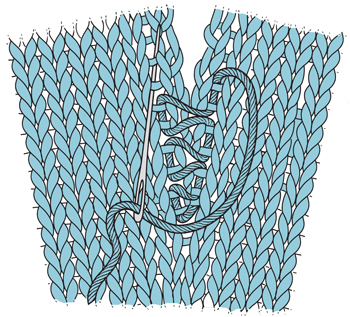
kitchener stitch • Kitchener stitch is used to graft live stitches together. This means that the two sets of stitches are joined in a way that is continuous, without any seam.
1. Place the stitches to be grafted so they are evenly divided on two needles with the points of the needles facing to the right, and the needles parallel so one needle is in front and the other is in back. The wrong sides of the fabric are facing each other.
2. With a length of matching yarn threaded into a yarn needle, insert the yarn needle through the first stitch on the front needle as if to knit, and drop it off of the needle.
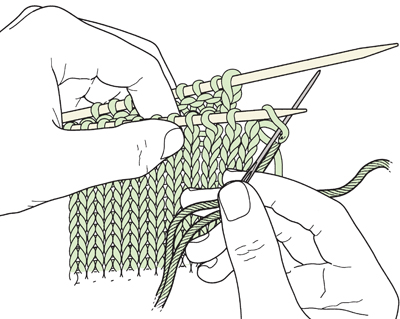
3. Insert the yarn needle through the second stitch on the front needle as if to purl. Do not drop that stitch off of the needle; pull the yarn through.
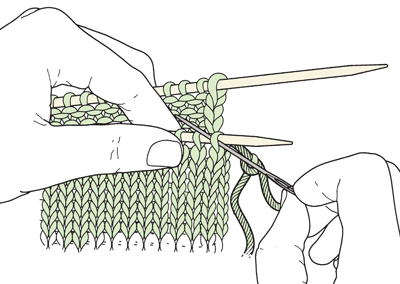
4. On the back needle, insert the yarn needle through the first stitch as if to purl and drop it off of the needle.
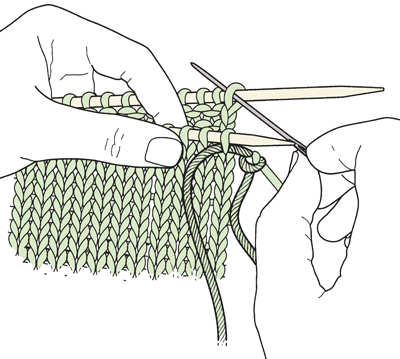
5. Insert the needle through the second stitch on the back needle as if to knit. Do not drop that stitch off of the needle; pull the yarn through.
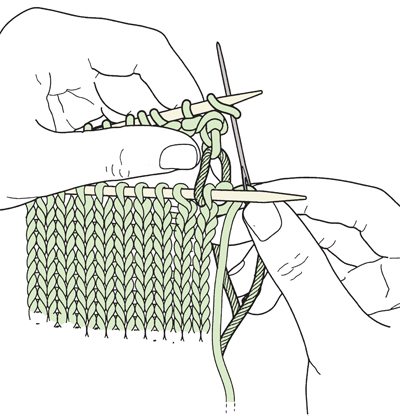
• Repeat steps 2 through 5 until the stitches are all off of the needles. Weave in the end on the wrong side.
Sewing garter stitch edges together is simple and, best of all—due to the bumpy nature of the fabric—it is forgiving. This basic seaming technique is perfect for sewing together squares for the Nesting Boxes or the sides of the Penguin.
garter stitch seam • With the edges you wish to join lined up next to each other and right sides facing you, cut a length of yarn and thread it on a yarn needle so you are working with a single thickness of yarn. Do not knot the end of the yarn. Starting at the left edge, insert the needle into the top loop (a purl stitch bump) and draw the yarn through the loop nearly to the end. Leave a 3-inch tail. On the corresponding stitch on the right edge, insert the needle into the bottom loop (a knit stitch). Do not draw the stitches up too tightly—try to match the tightness of the knitting, but do not leave gaps in the seam. Continue alternating the sides with a top loop and a bottom loop. When the seam is completed, weave in both ends of the seaming yarn and trim close to the knitted piece.

GARTER STITCH SEAM
Insert the yarn needle into the top bump on one side, then the bottom loop of the corresponding stitch on the other side. Continue to alternate in this way.
whipstitch seam • With the edges you wish to join lined up next to each other and right sides facing you, cut a length of yarn and thread it on a yarn needle. Starting on the right side, insert the needle into the stitch at the edge. On the corresponding stitch on the left edge, insert the needle. Gently pull the yarn through, keeping an even tension. The whipstitch seam can be used on any type of knitted piece.
WHIPSTITCH SEAM
mattress stitch • This is a great technique for making an invisible seam.
1. Lay the pieces flat with the right sides facing up. Pin the pieces together with safety pins if necessary. Thread a tail end or new piece of yarn through a yarn needle, and begin sewing at the bottom of the seam.
2. Working upward, find the bars, or horizontal strands, between the first stitch and second stitch up the sides of the pieces. You can do this by gently pulling apart the two stitches.
3. Put the needle under the first two bars on one side and draw the yarn through. Then place it under the two bars directly opposite on the other piece and draw the yarn through. Repeat back and forth this way, working up the seam two bars at a time on each side. As you go, be sure to insert the needle into the last “hole” you came out of on each side.
• Complete by weaving in the end along the seam on the inside of the piece and trim.
NOTE • You can whipstitch two edges or two parts of a toy together. It can be used as a decorative stitch on the right side of the fabric, or it can be used as an invisible seam on the wrong side of the fabric. Basically, you are wrapping the yarn around the outer edge or across two surfaces of the fabric.
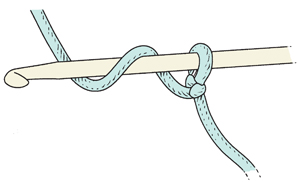
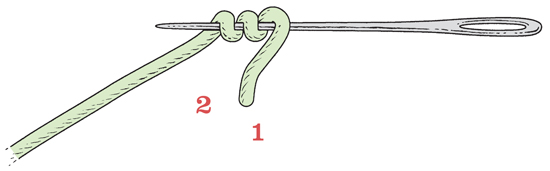
slipknot • The slipknot is the very first step to begin crochet.
1. Measure out about 4 inches from the tail end of the ball of yarn. You will make a slip knot at this point on the yarn.
2. Make a loop, overlapping the yarn at the bottom of the loop.
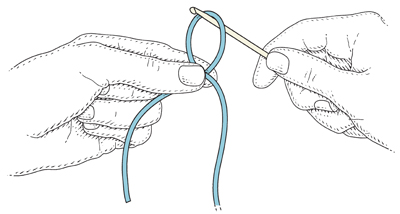
3. Bring the yarn that is on top of the overlap behind and then through the loop, making another loop. Pull up.

4. Put the new loop on the hook and tighten it to fit.
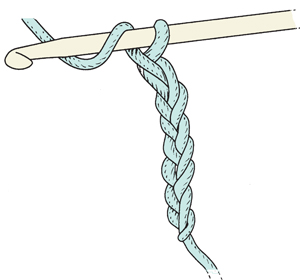
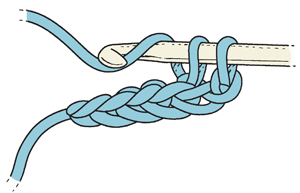
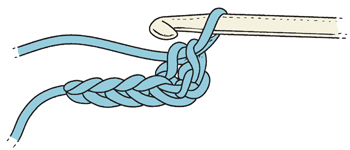
chain stitch • The chain stitch is the place to start when learning to crochet. With a slipknot on the hook, and the hook in your right hand, and with your left hand holding the working yarn as you would for continental knitting (reversed if you’re left-handed), continue as follows:
1. Wrap the yarn over the hook from back to front (counterclockwise).

2. Catching the yarn with your hook, pull it through the loop on the hook. (You may need to hold the slipknot with the thumb and middle finger of your left hand to keep it steady.)
3. Repeat steps 1 and 2 until desired number of chain stitches are made.
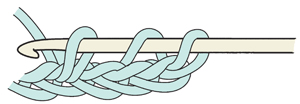
slip stitch • The slip stitch is often used to join rounds when crocheting in a circle or when making a picot edging.
1. Insert the hook into the two upper strands of the appropriate stitch as directed in the pattern.
2. Wrap the yarn over the hook from back to front (counterclockwise) and pull it through the stitch.
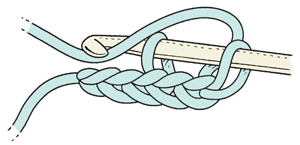
3. With two loops on the hook, pull the second loop through the first loop.
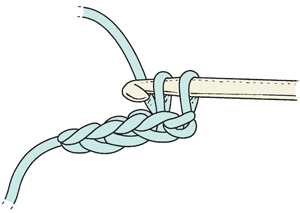
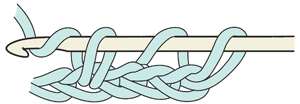
single crochet • The single crochet is one of the first stitches you’ll need to learn. It is the most basic stitch, but it can be used to create almost anything.
1. Insert the hook into the two upper strands of the appropriate stitch as directed in the pattern.
2. Wrap the yarn over the hook from back to front (counterclockwise) and pull it through the stitch.
3. Wrap the yarn over the hook once more and pull it through both loops.
• Repeat as directed.
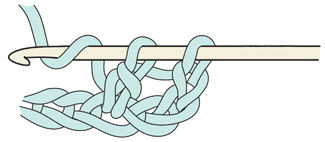
double crochet • Double crochet makes a higher stitch than single crochet.
1. Wrap the yarn over the hook and insert the hook under the two upper strands of the stitch.
2. Wrap the yarn over the hook and pull it through. (3 loops on hook)
3. Wrap the yarn over the hook and pull it through. (2 loops on hook)
4. Wrap the yarn over the hook and pull it through the remaining 2 loops (1 loop on hook)
spiderweb • This embroidery technique is one of my favorites for making dots on knitted fabric. It is simple, quick, and fun.
1. Begin by making 5 straight stitches radiating out from a center point. These stitches form spokes and are the foundation for the spiderweb.
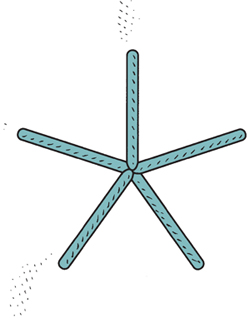
5 straight stitches
2. Next, stitching up from the center, begin weaving the needle over and under the spokes until they are completely covered.
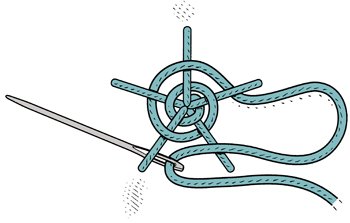
Stitch over and under the spokes until the straight stitches are covered
3. Pull the yarn through to the wrong side of the fabric and secure by taking a few small stitches. Trim the end close to the fabric.
backstitch • The backstitch is used to make lines that are straight or curved. Make the stitches small and as even as possible.
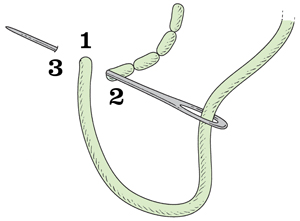
1. Cut a length of yarn and thread it on a yarn needle. Pull the yarn through several loops on the wrong side of the fabric, leaving a. ½-inch tail. With the needle, pull the yarn through to the right side at your starting point (1).
2. Moving backward from your starting point, insert your needle at 2 and have the point of the needle come out at 3. This should be one motion.
3. Pull the yarn through. This is your new starting point (1). Insert the needle into the new 2, and have the point of the needle come out at the new 3.
• Keep working in this way, moving backward and forward, until you have completed the length of stitching desired. At the last stitch, pull the yarn through to the back and weave in the end on the wrong side of the knitted fabric.
satin stitch • The satin stitch is used to fill in spaces and to create shapes. It is worked in one motion and moves quickly.
1. Cut a length of yarn and thread it on a yarn needle. Pull the yarn through several loops on the wrong side of the fabric. Pull the needle through to the right side, at the starting point (1).
2. Insert the needle at 2 and have the point of the needle come out at 3. Pull the yarn through. This is your new starting point (1).
• Repeat step 2 until the space is filled. On the last stitch, pull the yarn through to the wrong side of the knitted fabric and weave in the end.
1. Cut a length of yarn and thread it on a yarn needle. Pull the yarn through several loops on the wrong side of the fabric. Pull the yarn through to the right side. This is your starting point (1).
2. Insert the needle at 2 and bring it up at 3, pulling the yarn through in one motion.
3. Insert the needle at 4 and bring it up at 5, pulling the yarn through in one motion.
• Repeat to the end for the desired length. Pull the yarn through to the wrong side of the knitted fabric. Weave in the end.
1. Cut a length of yarn and thread it on a yarn needle. Pull the yarn through several loops on the wrong side of the fabric. Pull the needle through to the open middle of the knitted hole. This is the starting point (1).
2. Insert the needle at 2 and bring the needle back through the open middle. Pull the yarn through.
3. Insert the needle at 3 and bring the needle back through the open middle. Pull the yarn through.
• Continue in this way until you have filled in around the border of the hole. You may have to overlap the stitches somewhat to get a solid look. Don’t worry if all of the stitches are not the exact same length; this adds more character. Mine aren’t and probably never will be.
wrapping stitch • This is my variation on both the overcast stitch and a couching embroidery technique, but it is slightly different because it isn’t exactly like either of these stitches of old. I use this technique a lot for the eyes of the toys.
1. Using a straight stitch as the foundation for the shape or line you intend to wrap, thread a 12- to 18-inch piece of yarn on a yarn needle. Secure the yarn on the wrong side of the fabric by taking a couple of small stitches through the straight stitches. Bring the needle and the yarn to the right side of the fabric, at the starting point.
2. Next make tiny satin stitches around the straight stitches. The pattern will tell you how many wraps to make.
3. After the last stitch is completed, pull the yarn through to the inside of the toy, and cut the end close to the fabric.
french knots • I use French knots a couple of times in this book (for the Zebra puppet and the Santa doll). It’s a great decorative stitch. However, my French knots, even when done exactly according to others’ instructions, never turn out quite right. So here is my own twist on this technique.
1. Cut a length of yarn and thread it on a yarn needle. Pull the yarn through several loops on the wrong side of the fabric. Pull the yarn through to the right side of the fabric. This will place the French knot.
2. Wrap the yarn around the needle three times while holding the needle close to the fabric. Hold the yarn wraps taut by pinching the yarn between your left thumb and index finger. Insert the needle nearby and pull it gently through to the wrong side of the fabric.
3. Insert the needle right next to the wraps and pull the yarn through to the right side of the fabric.
4. Insert the needle into the center of the knot just created and pull it through to the wrong side of the fabric. This extra stitch makes the French knot much more secure and gives it a finished look.

• If you are making one knot, cut the yarn and weave in the end. If you are making many knots, carry the yarn over the back of your work to different spots, but only if you can’t see the carried yarn through the fabric. If you can see it from the right side, you’ll have to cut your yarn and tie it off for each French knot, then reattach the yarn at the new spots as you go.
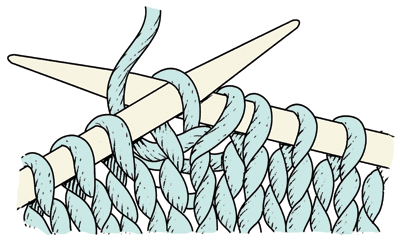
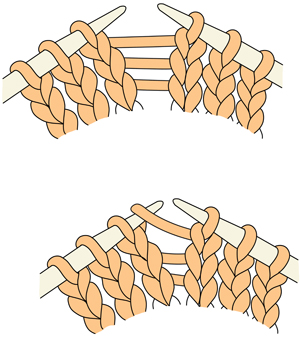
KNITTING IN THE ROUND is the best way to construct most knitted toys. I have made many toys that are knit in flat pieces that then needed to be seamed up the sides and sewn together at the end. That’s a lot of sewing, which gets tedious. When you create the parts of the toy in their actual round shape, it eliminates nearly all of the seaming; then you only need stitch the parts together to finish your fabulous toy. Easy!
STITCH TOGETHER AS YOU GO is my mantra while making toys. Remember in home economics when your teacher told you to put away your ingredients as you go so you won’t have so much clean up at the end? That’s exactly my philosophy when you are making the parts of a toy. By sewing the parts together as you finish them, you won’t be overwhelmed at the end by having to sew the entire toy together. What makes this even better is that you can see your toy come to life bit by bit as you work, and that can be very motivating. When you knit your last part and attach it, your toy will be pretty much finished.
DOUBLE-POINTED NEEDLES are not to be feared. I think they often don’t get a fair shake with some knitters. Using double-pointed needles is not any more difficult than knitting in the round with circulars. They are wonderful tools for taking control of your knitting. You can easily manipulate the shape and form of a knitted item when using them, so they are my favorite needles for toy knitting and for creating other small knitted objects. I strongly suggest that you take the time to feel comfortable with them. The more you practice, the easier it will become.
STITCH MARKERS are important for marking the beginning of a round and for keeping track of specific rounds in the pattern. I suggest that you use the detachable plastic stitch markers that look similar to an oversize safety pin. That way, you can remove and place markers without having them locked in anywhere on your knitting or on your needles.
STITCH TO SECURE AND WEAVING IN ENDS on a closed toy that is worked in the round is different because you can’t get to the wrong side of the fabric. After threading the tail on a yarn needle, pull the tail through the remaining stitches and gather them tight to close the hole. Run the needle through the remaining stitches a couple more times. Pull the end to the inside and then poke the needle back through the right side of the fabric to draw the end to the outside again. Pull the end slightly taut and trim close to the knitted fabric. The end should then pop back inside of the toy and stay this way. I do this for all of the toy parts and for the embroidery on the faces.
FACES are sometimes the most difficult and always the most important part of a toy. Usually I don’t have to try things more than once with my knitting, but when embroidering the faces, sometimes I do. It can be difficult to get the eyes even or the nose in the center, or to achieve a certain expression. If your stitches don’t look correct the first time, pull them right back out and keep trying until you are satisfied.
POLY PELLETS are little plastic beads that are found in craft stores in the doll-making aisle. These are fantastic for partially filling your knitted toys, because they give a nice heft or substance to them. However, if your fabric is not tightly knit, the pellets may push through and actually pop out. Most of my toys are tightly knit on smaller than usual needles so the pellets won’t fall through; however, it does still raise a concern if you are knitting for babies and young children. The pellets are considered a choking hazard for babies and toddlers and even young children. If you are concerned about creating a choking hazard, do not use the poly pellets for filling or stuffing your toys. Only use the polyester fiberfill. Your toy will be lighter in weight, but you won’t have to worry about anyone choking. A muslin bag can be used to hold the poly pellets and remedy the choking hazard for babies and young children. You could sew up or purchase a simple muslin or other cotton fabric bag (drawstring sachet bags work perfectly) to fill with poly pellets and then place it inside the base of your toy. Then stuff the rest of the toy with polyester fiberfill. This way the pellets are contained and can’t sneak out through the knitted fabric.
SMALLER NEEDLES than what is suggested on the corresponding yarn labels are used for knitting the projects in this collection. There are a few reasons for this. First, when knitting toys you want to achieve a dense, tight fabric so the toy has form and shape. If you knit too loosely, even at the suggested gauge for a yarn, your toy will become a shapeless lump before long. The second reason is that you don’t ever want to see the stuffing showing through the surface of your toy; that’s a major no-no. The last reason is that a dense fabric subjected to wear and tear will stand the test of time much better.
THE AMOUNT OF POLYESTER FIBERFILL to purchase will vary depending on your plans. If you are going to make one, two, or even three of the smaller-size toys, one small bag of fiberfill will be plenty. If you are planning on making many or all of the toys in the book, one large bag will most likely be enough. I always grab a couple of large bags to keep at home so I never run out.
LIVING AN ORGANIC LIFESTYLE has become increasingly popular recently, and the knitting community has responded accordingly by making more and more organic yarns available. When knitting for children and babies, we need to be especially concerned with the fiber content of the yarns we select and the environmental impact the materials we use may have. That is why so many of the projects in this book are made using organic yarns: all of the reversible projects, the Baby Doll Set, Mama Duck and Ducklings, the Lamb, the Matryoshka dolls, the Penguin, the Pig, the Bunny, the Wrap-Me-Up Puppies, the Squishies, and the Koala Mama and Baby. Some of the yarns are dyed, and some represent the gorgeous variety of natural shades of wool and cotton, but all were chosen to make their project absolutely shine.