There is nothing better than a simple project that also looks great. Beginners appreciate easy projects, of course, but all levels of knitters love projects that can be completed with ease and style.
The four projects in this chapter take you through the skills necessary to complete those in the rest of the book.
As you start with a couple of garter-stitch-square projects and move into creating a simple ball shape on double-pointed needles, you’ll build confidence and pick up some new skills. Jump right in and don’t be intimidated by new techniques—embrace them!
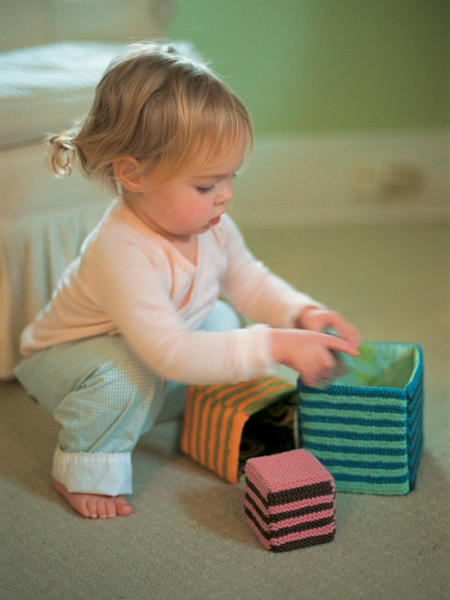
I learned everything about babies from my mom, who always knew exactly how to make a baby laugh. With all of the grandkids, she would stack plastic nesting boxes or cups and then let the child knock them down. Babies get so much fun out of this, and of course they’ll do it over and over again.
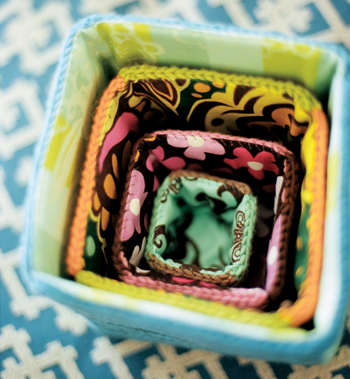
When a baby knocks the stack of my knitted nesting boxes down, it won’t be quite so loud. I used plastic mesh and fabric to finish off the inside of this simple project and to make the boxes sturdier. Garter stitch looks great from both sides, so you can leave them unlined if you choose. An added bonus is that the boxes are beautiful and can be used for storage in your knitting studio or around the house, not just for baby entertainment.
finished measurements
• Large Box: 5 × 5 × 5 inches
• Medium Box: 3¾ × 3¾ × 3¾ inches
• Small Box: 2½ 2 × 2½ × 2½ inches
• Extra-Small Box: 1¼ × 1¼ × 1¼ inches
yarn
• Rowan Handknit Cotton (100% cotton; 93 yards/50 grams), 1 skein each in Thunder #335, Ice Water #239, Turkish Plum #277, Tangerine Dream #337, Gooseberry #219, Rose #332, Double Chocolate #315, Bermuda #324, and Tope #253
tools
• U.S. size 4 needles, 24-inch circular or straight needles, or size needed to obtain gauge
• Tape measure or ruler
• Yarn needle
• Scissors
• Cotton fabric to line the inside of the boxes (optional), small amounts to cover finished measurements (see above) plus ¼ inch on all sides
• Sewing needle and matching thread (optional)
• 3 sheets of 12 × 18 inch plastic mesh (optional)
gauge
• 5½ stitches per inch in garter stitch
sides 1 and 2
With Thunder, cast on 27 stitches. Work in garter stitch (knit every row) throughout.
stripe pattern
Rows 1–4: Thunder
Rows 5–8: Ice Water
Repeat rows 1–8 until the side measures 5 inches from the cast-on edge, ending with either row 4 or row 8. Bind off. Cut the yarn, leaving an 8-inch-long tail, and pull through the remaining stitch.
sides 3 and 4
With Thunder, cast on 27 stitches.
stripe pattern
Rows 1–4: Thunder
Rows 5–8: Turkish Plum
Complete as for sides 1 and 2.
bottom
With Thunder, cast on 27 stitches and begin working in garter stitch. Continue until the bottom measures 5 inches from the cast-on edge. Bind off. Cut the yarn, leaving an 8-inch-long tail, and pull through the remaining stitch.
finishing option 1
Holding together the side edges of two pieces having alternating stripe patterns, thread one bound-off tail on a yarn needle and whipstitch together. Whipstitch the remaining two unattached side pieces to either side of the two joined pieces, then whipstitch the unattached edges together to form a box. Whipstitch the bottom to one end of the box, using a bound-off tail. Weave all ends to the inside and trim.
For each side piece and the bottom, cut a piece of the plastic mesh, trimming the mesh ¼ inch smaller on all sides than the knitted piece. With the thread and sewing needle, tack down each corner of the plastic mesh to the knitted piece with a few stitches.
Attach the four side pieces as in Finishing Option 1, but do not yet join the final edges to form a box. Lay the attached side pieces flat on a table on top of the lining fabric. Pin the knitted piece to the fabric and cut out the lining, leaving a ¼-inch seam allowance on all sides.
Fold ¼ inch of the fabric toward the wrong side on all edges, to match the size of the knitted piece. Pin the folded fabric to the knitted piece, wrong side of the fabric facing the plastic mesh. With the sewing needle and matching thread, whipstitch the fabric to the knitted sides.
Repeat for the bottom piece.
Join the final unattached sides of the piece to form a box.
Whipstitch the bottom piece to the sides with a bound-off tail threaded on a yarn needle.
sides 1 and 2
With Tangerine Dream, cast on 21 stitches. Work in garter stitch (knit every row) throughout.
stripe pattern
Rows 1–4: Tangerine Dream
Rows 5–8: Gooseberry
Repeat rows 1–8 until the side measures 3¾ inches from the cast-on edge, ending with either row 4 or row 8. Bind off. Cut the yarn, leaving an 8-inch tail, and pull through the remaining stitch.
sides 3 and 4
With Gooseberry, cast on 21 stitches.
stripe pattern
Rows 1–4: Gooseberry
Rows 5–8: Tangerine Dream
Complete as for sides 1 and 2.
bottom
With Gooseberry, cast on 21 stitches and begin working in garter stitch. Continue until the bottom measures 3¾ inches from the cast-on edge. Bind off. Cut the yarn, leaving an 8-inch-long tail, and pull through the remaining stitch.
Finish using Option 1 or Option 2 as for the Large Box.
sides 1 and 2
With Rose, cast on 15 stitches. Work in garter stitch (knit every row) throughout.
stripe pattern
Rows 1–4: Rose
Rows 5–8: Double Chocolate
Repeat rows 1–8 until the side measures 3¾ inches from the cast-on edge, ending with either row 4 or row 8. Bind off. Cut the yarn, leaving a 6-inch tail, and pull through the remaining stitch.
sides 3 and 4
With Double Chocolate, cast on 15 stitches.
stripe pattern
Rows 1–4: Double Chocolate
Rows 5–8: Rose
Complete as for sides 1 and 2.
bottom
With Rose, cast on 15 stitches and begin working in garter stitch. Continue until the bottom measures 3¾ inches from the cast-on edge. Bind off. Cut the yarn, leaving a 6-inch-long tail, and pull through the remaining stitch.
Finish using either Option 1 or Option 2 as for the Large Box.
sides 1 and 2
With Bermuda, cast on 9 stitches. Work in garter stitch (knit every row) throughout.
color pattern
Rows 1 and 2:
Switch to Tope and continue in garter stitch until the side measures 3¾ inches from the cast-on edge. Bind off. Cut the yarn, leaving a 6-inch tail, and pull through the remaining stitch.
sides 3 and 4
With Tope, cast on 9 stitches. Work in garter stitch (knit every row) throughout.
color pattern
Rows 1 and 2: Tope
Switch to Bermuda and continue in garter stitch until the side measures 1¼ inches from the cast-on edge. Bind off. Cut the yarn, leaving a 6-inch tail, and pull through the remaining stitch.
bottom
With Tope, cast on 9 stitches and begin working in garter stitch. Continue until the bottom measures 1¼ inches from the cast-on edge. Bind off. Cut the yarn, leaving a 6-inch-long tail, and pull through the remaining stitch.
Finish using either Option 1 or Option 2 as for the Large Box.
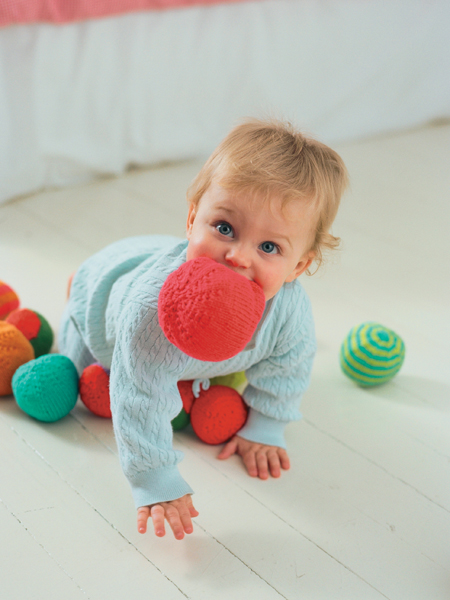
Nothing is better than a squishy knitted ball. Throw them, roll them, chew them (babies only, please), display them in a big bowl … the sky is the limit.
Squishies are also the perfect skill-building project. Without a doubt, double-pointed needles are my favorite tools, and getting familiar with them will open every door in the knitting world. This small, quick-to-finish project packs in important techniques that are used throughout Itty-Bitty Toys.
Be patient, take your time, and you’ll reap the benefits as soon as you finish your first one. I promise you’ll want to make a dozen more right away.
finished measurements
• Large: 4 inches tall
• Medium: 3 inches tall
• Small: 2 inches tall
yarn
• Blue Sky Dyed Cotton (100% cotton: 150 yards/100 grams); 1 skein makes many Squishies
• Large: Poppy #601, Flamingo #627, Lemongrass #607, and Pickle #633
• Medium: Lemongrass #607 and Caribbean #630
• Small: Orchid #618, Ladybug #629, Flamingo #627, and Pickle #633
tools
• U.S. size 6 set of four double-pointed needles, or size needed to obtain gauge
• Stitch marker
• Yarn needle
• Scissors
• Polyester fiberfill, 1 small bag
• Tape measure or ruler
gauge
• 6 stitches per inch in stockinette stitch
TIP • If this is your first project in the round, cast all of the stitches onto one double-pointed needle and then distribute the stitches onto the three needles as noted (see p. 4). Also, I suggest starting with one color to simplify.
Using three double-pointed needles and the selected yarn, cast on 9 stitches, placing 3 stitches on each needle. Join to knit in the round, being careful not to twist the stitches. Place a stitch marker on the first stitch.
Increase rounds
Round 1 and every odd round: knit
Round 2: kfb in each stitch (6 sts per needle, 18 sts total)
Round 4: repeat (k1, kfb) across round (9 sts per needle, 27 sts total)
Round 6: repeat (k2, kfb) across round (12 sts per needle, 36 sts total)
Round 8: repeat (k3, kfb) across round (15 sts per needle, 45 sts total)
Round 10: repeat (k4, kfb) across round (18 sts per needle, 54 sts total)
Round 12: repeat (k5, kfb) across round (21 sts per needle, 63 sts total)
Place a stitch marker on round 12 and leave it there. Knit every round until the ball measures 2½ inches from the marker.
Decrease rounds
Round 1: repeat (k5, k2tog) across round (18 sts per needle, 54 sts total remain)
Round 2 and every even round: knit
Round 3: repeat (k4, k2tog) across round (15 sts per needle, 45 sts total remain)
Thread the tail on a yarn needle and pass it through the stitches of the cast-on edge. Close up the hole at the bottom of the ball by gathering the stitches. Pull tight and stitch to secure (see p. 16).
After round 4, stuff the ball.
Round 5: repeat (k3, k2tog) across round (12 sts per needle, 36 sts total remain)
Round 7: repeat (k2, k2tog) across round (9 sts per needle, 27 sts total remain)
Round 9: repeat (k1, k2tog) across round (6 sts per needle, 18 sts total remain)
After round 10: finish stuffing the ball so it is firm.
Round 11: repeat (k2tog) across round (3 sts per needle, 9 sts total remain)
Cut the yarn, leaving a 6-inch-long tail, and thread it on a yarn needle. Pull the tail through the remaining stitches, weave to the inside of the ball, and trim.
The samples were worked in the following colors and patterns:
Solid: 1 in Poppy and 1 in Flamingo
stripe pattern
Rounds 1–4: Poppy
Rounds 5–8: Flamingo
Repeat rounds 1–8 to the end. You can end on any round.
single stripe pattern
Rounds 1–18: Lemongrass
Rounds 19–26: Pickle
Rounds 27–32: Lemongrass
Finish the decrease rounds in Lemongrass.
Rounds 1–10: same as for the large ball (18 sts per needle, 54 sts total)
Place a stitch marker on round 10 and leave it there. Knit every round until the ball measures 2 inches from the marker.
Decrease rounds
Rounds 3–12: from the large ball (3 sts per needle, 9 sts total)
Finish the same as for the large ball. The samples were worked in the following stripe patterns and colors:
Solid: 1 in Lemongrass, 1 in Caribbean
stripe pattern
Rounds 1 and 2: Caribbean
Rounds 3 and 4: Lemongrass
Repeat to the end. You can end on any round.
Rounds 1–8: same as for the large ball (15 sts per needle, 45 sts total)
Place a stitch marker on round 8 and leave it there. Knit every round until the ball measures 1½ inches from the marker.
Decrease rounds
Rounds 5–12: from the large ball (3 sts per needle, 9 sts total).
Finish the same as for the large ball.
The samples were worked in the following colors and stripe patterns:
Solid: 1 in Orchid, 1 in Ladybug
stripe pattern
Rounds 1–8: Flamingo
Round 9: Orchid
Round 10: Flamingo
Repeat rounds 9 and 10 four times more (10 rounds total).
Finish decrease rounds in Orchid.
single stripe pattern
Rounds 1–8: Ladybug
Rounds 9–11: Orchid
Rounds 12–14: Ladybug
Finish decrease rounds in Ladybug.
Begin the small Squishie pattern in Pickle. Work to 2 inches above the stitch marker and finish the decrease rounds in Ladybug.
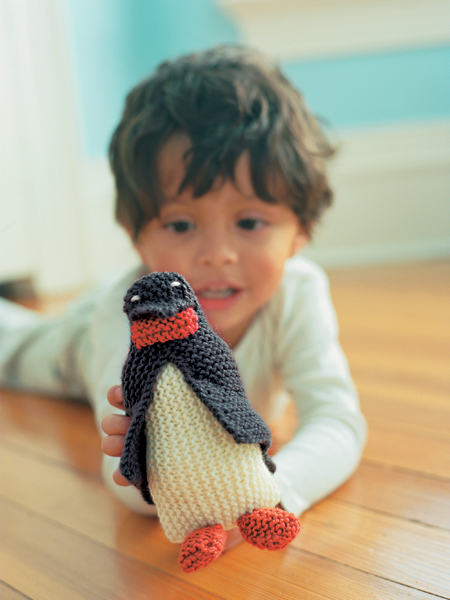
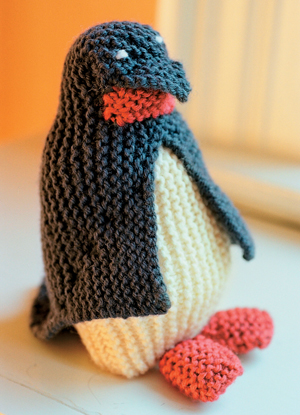
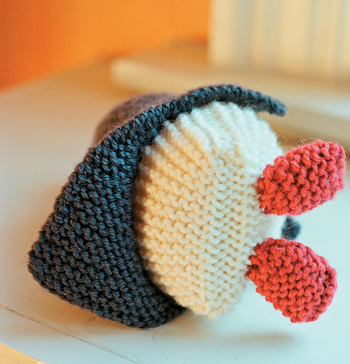
My kids are especially fond of penguins because they’re the team mascot for their summer swim team. Even a brand-new knitter can make this adorable cold-climate friend, because it’s made completely out of garter stitch squares. With a fold and a pull and a stitch or two, you’ll make your own penguin in a jiffy. Dive right in and give it a try.
finished measurements
• 6 inches tall, 3 inches wide
yarn
• Rowan Pure Wool DK (100% wool; 136 yards/50 grams), 1 skein each #013 Enamel (natural), #003 Anthracite (dark gray), and #035 Quarry (orange)
tools
• U.S. size 5 needles or size needed to obtain gauge
• Polyester fiberfill, 1 small bag
• Poly pellets (optional), 32-ounce bag
• Yarn needle
• Scissors
• Tape measure or ruler
• Pins
gauge
• 6 stitches per inch in stockinette stitch
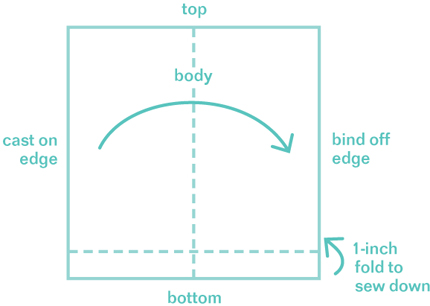
With Enamel, cast on 36 stitches. Work in garter stitch (knit every row) until the piece measures 6 inches from the cast-on edge.
Bind off. Cut the yarn, leaving an 8-inch-long tail, and pull the tail through the remaining stitch. Lay the piece on a table in front of you with the cast-on edge at the left, and the bound-off edge at the right. Fold over 1 inch of the bottom edge and pin down. Whipstitch the fold down. This edge will become the bottom of the penguin.
Fold the cast-on edge to meet the bound-off edge. Whipstitch this edge and the bottom folded edge together, leaving the top open. Fill the body half full with poly pellets and the rest with fiberfill, or fill only with fiberfill. Stuff until firm. Whipstitch the top seam closed.
outer piece
With Anthracite, make another piece as you did for the body.
With Quarry, cast on 12 stitches. Knit every row until the foot measures 1 inch from the cast-on edge.
Cut the yarn, leaving a 6-inch-long tail, and thread the tail on a yarn needle. Pull the tail through the 12 stitches and gather tightly. Secure with a knot. Fold the piece in half and whipstitch the edges together. Stuff the foot lightly with fiberfill before closing the last edge. Weave the end to the inside and trim.
With Quarry, cast on 10 stitches.
Rows 1–4: knit
Bind off. Cut the yarn and pull through the remaining stitch.
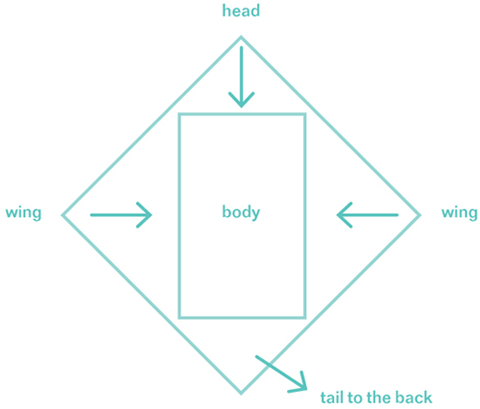
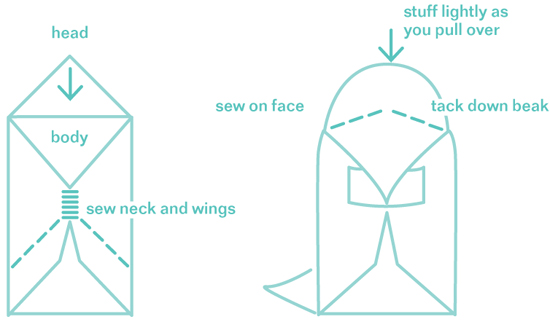
Place the Anthracite square on a table in front of you so one of the corners is facing you as if the piece were diamond-shaped. Place the body in the center of the Anthracite square.
Pull the wings inward and sew them together at the neck for about 1 inch. Tack down the wings to the body using a running stitch (see p. 14) and leaving the corners unattached. The bottom corner folds to the back to make the tail. Tack down the tail to the body using a running stitch.
Pull the top corner over to the front. Stuff the top corner lightly with fiberfill to form the head. Tack down the sides of the beak to the body with a few stitches. The beak remains unattached.
Whipstitch the neckband under the beak and over the front seam. Whipstitch the feet to the bottom front of the body.
eyes
With Enamel and a yarn needle, take 2 small straight stitches (see p. 14) to create the eyes, using the photograph as a guide.
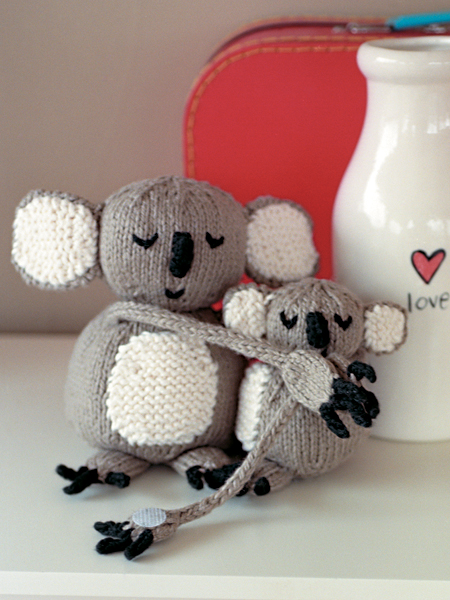
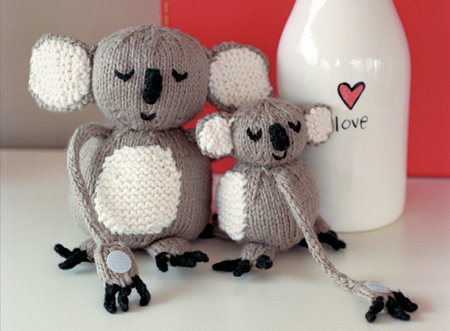
My sister collected koala bear toys when she was little. Her stuffed koalas always had a baby hanging on, and the memory of the mama and baby koalas inspired this project.
The koala is a perfect next stepping-stone after the Squishies. The bodies and heads use the same simple pattern as that project, and then you add on to your skills by making the ears and arms. For the long arms, you’ll use I-cord, an important skill to master for toy knitting.
This project involves more parts and more stitching together, but it’s actually fairly easy to pull together a surefire hit like this.
finished measurements
• Mama: 6 inches tall, 5 inches wide
• Baby: 4 inches tall, 3 inches wide
yarn
• Blue Sky Dyed Cotton (100% organically grown cotton; 150 yards/100 grams), 1 skein each in Stone #626 and Ink #613
• Blue Sky Organic Cotton (100% organic cotton; 150 yards/100 grams), 1 skein in Bone #80
tools
• U.S. size 5 set of four double-pointed needles or size needed to obtain gauge
• Yarn needle
• Polyester fiberfill, 1 small bag
• Scissors
• Tape measure or ruler
• Stitch markers
• Two pairs of Velcro dots
• Sewing needle and thread to match Stone
gauge
• 5½ inches per inch in stockinette stitch
body
With Stone, complete as for the large Squishie (see p. 25).
head
With Stone, complete as for the medium Squishie (see p. 26). Whipstitch the head to the body with a length of Stone threaded on a yarn needle. The cast-on end of the head is sewn to the body. Weave the end to the inside and trim.
ears
outer ear (make 2)
With Stone and two double-pointed needles used as straight needles, cast on 7 stitches.
Row 1: knit
Row 2: k1, kfb, k to last 2 sts, kfb, k1 (9 sts)
Rows 3–6: knit
Row 7: repeat row 2 (11 sts)
Continue knitting every row until the ear measures 2 inches from the cast-on edge.
Decrease row: k1, k2tog, k to the last 3 sts, k2tog, k1 (9 sts remain)
Next row: repeat the decrease row (7 sts remain)
Bind off. Cut the yarn and pull the end through the remaining stitch.
inner ear (make 2)
With Bone and two double-pointed needles used as straight needles, cast on 5 stitches.
Row 1: knit
Row 2: k1, kfb, k to last 2 sts, kfb, k1 (7 sts)
Rows 3–6: knit
Row 7: repeat row 2 (9 sts)
Continue knitting every row until the inner ear measures 1¾ inches from the cast-on edge.
Decrease row: k1, k2tog, k to last 3 sts, k2tog, k1 (7 sts remain)
Next row: repeat the decrease row (5 sts remain)
Bind off. Cut the yarn and pull the end through the remaining stitch.
finishing
Place each inner ear piece on an outer ear piece, aligning the edges, and whipstitch together using the Bone tail from the bound-off edge threaded on a yarn needle. Whipstitch the ears to the sides of the head, using the Stone tail. Weave the end to the inside and trim.
tummy patch
With Bone, use the outer ear pattern to make the tummy patch. Whipstitch to the body using the Bone tail threaded on a yarn needle and the photograph as a guide. Weave the end to the inside and trim.
arms and hands (make 2)
With Stone and two double-pointed needles used as straight needles, cast on 4 stitches. Work in I-cord (see p. 7) until the arm measures 5½ inches from the cast-on edge.
Continue on to create the hands:
Row 1: kfb, k2, kfb (6 sts)
Row 2: kfb in each stitch, and change to working in the round by transferring 4 stitches onto each of three double-pointed needles (4 sts per needle, 12 sts total)
Place a stitch marker on the first stitch and begin working in the round. Knit every round until the hand measures 1 inch from the first round.
Next round: (k2, k2tog), repeat to end of round (3 sts per needle, 9 sts total remain)
Cut the yarn, leaving a short tail, and thread on a yarn needle. Pull through the remaining stitches and pull up tight to close the hole. Weave the end to the inside, stitch to secure, and trim.
Using the tail from the cast-on stitches and a yarn needle, whipstitch the arms to the sides of the body.
With a sewing needle and matching thread, sew Velcro dots to the palms of the hands, attaching one hook dot to one palm and one loop dot to the other.
feet (make 2)
With Stone, cast on 12 stitches, placing 4 stitches on each of three double-pointed needles. Join to work in the round, being careful not to twist the stitches. Place a stitch marker on the first stitch.
Knit every round until the foot measures 1 inch from the cast-on edge.
Next round: (k2, k2tog), repeat to end of round (3 sts per needle, 9 sts total remain)
Thread the tail from the cast-on stitches on a yarn needle, gather the stitches to close the hole, and stitch to secure. Weave the end to the inside and trim. Stuff the foot lightly with fiberfill.
Cut the yarn, leaving a 6-inch-long tail, and thread on a yarn needle. Pull through the remaining stitches and pull up tight to close the hole. Whipstitch the feet to the bottom of the body with a yarn needle.
fingers and toes, optional (make 12 total)
With Ink and two double-pointed needles used as straight needles, cast on 2 stitches. Work in I-cord until the cord measures ½ inch from the cast-on edge.
Next row: k2tog (1 st remains)
Cut the yarn and pull through the last stitch. Attach 3 fingers and 3 toes on each hand and foot with a yarn needle and a few stitches. Weave ends to the inside and trim.
nose
With Ink and two double-pointed needles used as straight needles, cast on 3 stitches. Work in I-cord until the nose measures ½ inch from the cast-on edge. Bind off. Cut the yarn and pull through the remaining stitch. Whipstitch the nose to the center of the face using the bound-off tail threaded on a yarn needle.
With a yarn needle and a length of Ink, embroider the face using straight stitches (see p. 14) and the photograph as a guide.
body
With Stone, complete as for the small Squishie (see p. 26).
head
With Stone, follow the large Squishie pattern (see p. 25) as follows:
Increase rounds
Complete rounds 1–6 (12 sts per needle, 36 sts total).
Place a stitch marker on round 6 and leave it there. Knit every round until the head measures 1 inch from the stitch marker.
Decrease rounds
Complete rounds 7–11.
Whipstitch the cast-on end of the head to the body with a yarn needle. Weave the end to the inside and trim. The baby’s face should look to the side.
ears
outer ear (make 2)
With Stone and two double-pointed needles used as straight needles, cast on 7 stitches. Knit every row until the ear measures 1 inch from the cast-on edge.
Next row: k1, k2tog, k1, k2tog, k1 (5 sts remain)
Bind off. Cut the yarn and pull through the remaining stitch.
inner ear (make 2)
With Bone and two double-pointed needles used as straight needles, cast on 5 stitches. Knit every row until the ear measures ¾ inch from the cast-on edge.
Next row: k2tog, k1, k2tog (3 sts remain)
Bind off. Cut the yarn and pull through the remaining stitch.
inner ear (make 2)
With Bone and two double-pointed needles used as straight needles, cast on 5 stitches. Knit every row until the patch measures ¾ inches from the cast-on edge.
Next row: k1, k2tog, k1, k2tog, k1 (5 sts remain)
Bind off. Cut the yarn and pull through the remaining stitch.
finishing
Place each inner ear piece on an outer ear piece, aligning the edges, and whipstitch together using the Bone tail from the bind off threaded on a yarn needle. Whipstitch the ears to the sides of the head with the Stone tail. Weave the end to the inside and trim.
tummy patch
With Bone and two double-pointed needles used as straight needles, cast on 5 stitches.
Row 1: knit
Row 2: k1, kfb, k1, kfb, k1 (7 sts)
Knit every row until the patch measures 1½ inches from the cast-on edge.
Next row: k1, k2tog, k1, k2tog, k1 (5 sts remain)
Bind off. Cut the yarn and pull through the remaining stitch.
Whipstitch the tummy patch to the body using a yarn needle.
arms and hands (make 2)
With Stone and two double-pointed needles used as straight needles, cast on 3 stitches. Work in I-cord until the arm measures 4½ inches from the cast-on edge.
Next row: kfb in each stitch (6 sts)
Place 2 stitches on each of three double-pointed needles. Begin working in the round. Place a stitch marker on the first stitch.
Next round: (k1, kfb), repeat on each needle (3 sts per needle, 9 sts total)
Knit every round until the hand measures ¾ inch from the first round.
Next round: (k1, k2tog), repeat on each needle (2 sts per needle, 6 sts total)
Cut the yarn, leaving a 6-inch-long tail, and thread on a yarn needle. Pull through the remaining stitches, gather up tight to close the hole, and stitch to secure. Weave the end to the inside and trim. Whipstitch the arms to the body with the tail from the cast-on stitches threaded on a yarn needle.
With a sewing needle and matching thread, sew Velcro dots to the palms of the hands, attaching one hook dot to one palm and one loop dot to the other.
feet (make 2)
With Stone, cast on 9 stitches, placing 3 stitches on each of three double-pointed needles. Join to knit in the round, being careful not to twist the stitches. Place a stitch marker on the first stitch. Knit every round until the foot measures 1 inch from the cast-on stitches.
Next round: (k1, k2tog) on each needle (2 sts per needle, 6 sts total)
Thread the tail from the cast-on stitches on a yarn needle and stitch through the cast-on stitches, gathering them up to close the hole. Stuff the foot lightly with fiberfill. Cut the yarn, leaving a 6-inch-long tail, and thread on a yarn needle. Pull the tail through the remaining stitches and gather up tight to close the hole. With a yarn needle and the tails from the cast-on stitches, whipstitch the feet to the bottom of the body.
fingers and toes, optional (make 12 total)
With Ink and two double-pointed needles used as straight needles, cast on 2 stitches. Work in I-cord for 2 rows.
Next row: k2tog
Cut the yarn and pull through the remaining stitch. Sew 3 toes and fingers to each foot and hand using the yarn needle and the tails from the cast-on edges. Weave ends to the inside and trim.
nose
With Ink and two double-pointed needles used as straight needles, cast on 3 sts. Work in I-cord until the nose measures ¼ inch from the cast-on edge.
Bind off. Cut the yarn and pull through the remaining stitch. Using a yarn needle and a length of Ink, whipstitch the nose to the center of the face, using the photograph as a guide.
eyes and mouth
With a length of Ink and a yarn needle, embroider the eyes and mouth using straight stitches and the photograph as a guide.