I often get nostalgic for the good old days, when there were only three channels on the television, there was no such thing as a video game, and your imagination was your best friend. Those of you who grew up in that kind of environment know how much toys can mean to a child.
For the Classic Toy collection, I drew upon my memory of classic toys and classic characters, all of which you will recognize. Each has a place in history and they are all popular in our current cultures in one way or another.
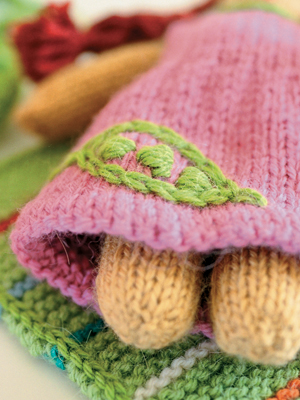
I’ve included matryoshka dolls (they’ve been a classic in Russia for generations, and have become very popular in North America in recent years), a Christmas set to play with and cherish year after year, a baby doll with clothes and a matching child’s hat (I had to sneak at least one in), and in tribute to my favorite fairy tale, a princess and a pea. All of these toys are keepers and will be adored for years to come. I bet you can’t wait to get started.
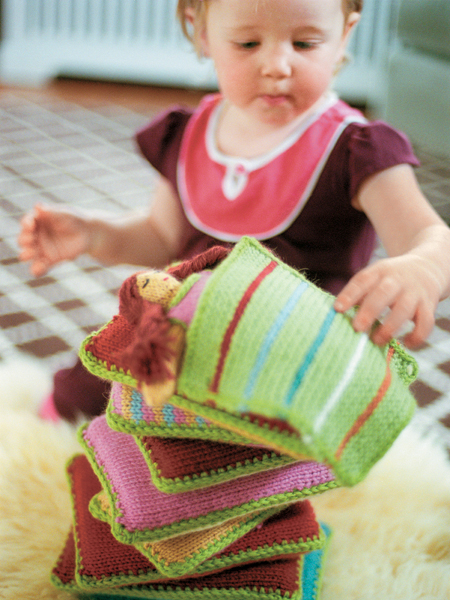
I started knitting this set on a long car trip with my family. The kids were all very interested in my progress as we drove east on our summer vacation. I started by knitting five mattresses, which I thought was enough. But my kids were disappointed there weren’t more. I agreed with them that there should be lots to stack, so I continued making mattresses until I reached eleven—then everyone was happy.
Nevertheless, you could make one, two, or three mattresses and your set will still be fun. Little ones will love stacking them up extra-high and putting the princess to bed. And I’ve included a nightie and blanket to help with the bedtime ritual.
The princess is a simple little doll, and she is beautiful on her own if you are looking for a quick, easy project. Her legs, body, and head are made in one piece and the arms are added on. I stuffed the princess with natural wool roving to give her substance.
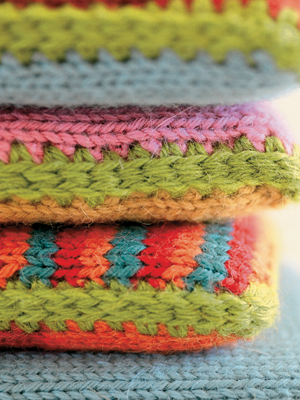
The entire set is made in a beautiful worsted-weight wool blend yarn that gives it a rustic feel. The pea pod is storybook-like itself and adds the final touch to the set. This project is a dream come true for me, something I have longed to design for many years.
finished measurements
• Large mattresses: 5 × 7 inches
• Small mattresses: 3½ × 6 inches
• Princess: 7½ inches tall
• Blanket: 6 × 6 inches
• Pea pod: 4½ inches long
yarn
• Nashua Handknits Julia (50% wool, 25% alpaca, 25% kid mohair; 93 yards/50grams), 1 skein each in Aqua Fog #4013, Blue Thyme #4936, Geranium #6085, Persimmon #0121, Natural #0010, Rose #1715, and Celery #5293; 2 skeins each in Golden Honey #2163, Rock Henna #2230, and Spring Green #5185
tools
• Mattresses: U.S. size 6 needles, or size needed to obtain gauge
• Princess: U.S. size 5 set of four double-pointed needles, or size needed to obtain gauge
• Blanket and nightgown: U.S. size 7 set of four double-pointed needles and either 24-inch circular needle or straight needles, or size needed to obtain gauge
• U.S. size G crochet hook (optional)
• 2 sheets of 15- × 17-inch 1-inch-thick foam
• Stitch holder
• Stitch markers
• Yarn needle
• Scissors
• Tape measure or ruler
• Natural wool roving for stuffing
• 1 cm green wool felt balls for peas (optional)
• 1 green pipe cleaner
• Black and red embroidery floss
• Sewing needle and green thread
gauge
• 5½ stitches per inch in stockinette stitch for the mattresses
• 6 stitches per inch in stockinette stitch for the princess
• 5 stitches per inch in stockinette stitch for the blanket and the nightgown
The large mattress samples were worked in the following color combinations:
Mattress 1 |
side 1: Aqua Fog; side 2: Blue Thyme |
Mattress 2 |
side 1: Geranium; side 2: Golden Honey |
Mattress 3 |
side 1: Blue Thyme; side 2: Persimmon |
Mattress 4 |
side 1: Persimmon; side 2: Geranium |
Mattress 5 |
side 1: Rock Henna; side 2: Aqua Fog |
Mattress 6 |
side 1: Natural; side 2: Rose |
With size 6 needles, or the size needed to obtain gauge, and the selected color, cast on 30 stitches. Work in stockinette stitch (knit 1 row, purl 1 row) until the mattress measures 7¼ inches from the cast-on edge, ending with a purl row. Bind off. Cut the yarn and pull through the remaining stitch. Steam the sides and let dry.
Cut six 4¾ × 7 inch pieces of foam.
crocheted edging (optional)
With the crochet hook and Spring Green, single crochet (see p. 12) in every stitch around the edge of the mattress, working 3 single crochet stitches in each of the four corners.
Hold the two selected sides together with the purl sides facing, and slip stitch (see p. 12) the edges together, leaving one short end open. Slide a foam rectangle into the mattress piece. Continue closing the final edge with slip stitch. Cut the yarn, pull through the last stitch, and weave the yarn to the inside. Trim.
alternate mattress assembly
Hold the two selected sides with the purl sides together, and with an end threaded on a yarn needle, use mattress stitch (see p. 10) to seam the edges together, leaving one short end open. Place the cut foam inside and close the final edge with mattress stitch. Cut the yarn, weave the end to the inside, and stitch to secure. Trim.
The small mattress samples were made in the following color combinations:
Mattress 1 |
side 1: Golden Honey; side 2: Rose |
Mattress 2 |
side 1: Natural; side 2: Rock Henna |
Mattress 3 |
side 1: Stripe pattern in Rock Henna, Golden Honey, and Persimmon; side 2: color block pattern in Natural, Rock Henna, and Natural. |
Mattress 4 |
side 1: stripe pattern in Rose, Golden Honey, and Aqua Fog; side 2: color block pattern in Rose, Golden Honey, and Aqua Fog |
Mattress 5 |
side 1: stripe pattern in Persimmon, Blue Thyme, and Geranium; side 2: color block pattern in Persimmon, Geranium, and Blue Thyme |
stripe pattern
Rows 1 and 2: color A
Rows 3 and 4: color B
Rows 5 and 6: color C
Repeat rows 1–6 to the end.
color block pattern
Work 2 inches in each color listed; with the last color, work 2 additional rows before the bind off.
For all small mattresses, with color to start selected pattern and size 6 needles (or size needed to obtain gauge), cast on 22 stitches. Work in stockinette stitch until the side measures 6¼ inches from the cast-on edge. Bind off. Cut the yarn and pull through the remaining stitch. Steam the sides and let dry.
Cut five 6 × 3½ inch rectangles of foam.
Assemble the small mattresses as for the large mattresses.
legs (make 2)
With Golden Honey, cast on 9 stitches, placing 3 stitches on each of three double-pointed needles. Join to work in the round, being careful not to twist the stitches. Place a stitch marker on the first stitch.
Round 2: (k1, m1, k1, m1, k1), repeat on each needle (5 sts per needle, 15 sts total)
Knit every round until the leg measures 3 inches from the cast-on edge. Cut the yarn and place the stitches on a stitch holder. Set aside.
For the second leg, do not cut the working yarn at the end.
Continue on to create the body:
Distribute the stitches from the 2 legs as follows:
Needle 1: 10 stitches from leg 1
Needle 2: 5 stitches from leg 1 and 5 stitches from leg 2
Needle 3: 10 stitches from leg 2
10 stitches per needle, 30 sts total.
Place a stitch marker on the first stitch on the first needle. Begin to work in the round.
Round 1: knit
Round 2: (k5, m1), repeat to end of round (12 sts per needle, 36 sts total)
Knit every round until the body measures 2 inches from the legs. With a length of yarn threaded on a yarn needle, whipstitch the hole between the legs closed. Weave the ends to the inside and trim. Stuff the legs and body with wool roving, and continue stuffing as you finish the body and head.
Decrease rounds
Round 1: (k4, k2tog), repeat to end of round (10 sts per needle, 30 sts total remain)
Round 2: knit
Round 3: (k3, k2tog), repeat to end of round (8 sts per needle, 24 sts total remain)
Round 4: knit
Round 5: (k2, k2tog), repeat to end of round (6 sts per needle, 18 sts total remain)
Round 6: knit
Round 7: (k1, k2tog), repeat to end of round (4 sts per needle, 12 sts total remain)
Rounds 8 and 9: knit
Continue on to create the head:
Round 1: (k1, m1, k2, m1, k1), repeat on each needle (6 sts per needle, 18 sts total)
Round 2: knit
Round 3: (k1, m1, k4, m1, k1), repeat on each needle (8 sts per needle, 24 sts total)
Rounds 4–9: knit
Round 10: (k2, k2tog), repeat to end of round (6 sts per needle, 18 sts total remain)
Round 11: (k1, k2tog), repeat to end of round (4 sts per needle, 12 sts total remain)
Finish stuffing the princess.
Round 12: (k2tog), repeat to end of round (2 sts per needle, 6 sts total remain)
Cut the yarn and thread on a yarn needle. Pull through the remaining stitches, gather up tight to close the hole, and stitch to secure. Weave the end to the inside and trim.
arms (make 2)
With Golden Honey, cast on 12 stitches, placing 4 stitches on each of three double-pointed needles. Join to work in the round, being careful not to twist the stitches. Place a stitch marker on the first stitch.
Knit every round until the arm measures 2½ inches from the cast-on edge.
Next round: (k2, k2tog), repeat to end of round (3 sts per needle, 9 sts total remain)
Next round: (k1, k2tog), repeat to end of round (2 sts per needle, 6 sts total remain)
Cut the yarn and thread on a yarn needle. Pull through the remaining stitches, gather up tight to close the hole, and stitch to secure. Weave the end to the inside and trim.
Stuff the arms. Thread the ends from the cast-on edges on a yarn needle and whipstitch the top of each arm closed. Whipstitch the arms to the sides of the body, using the photograph as a guide. Weave the ends to the inside and trim.
hair
With Rock Henna, cut the desired number of 12-inch lengths. Thread two lengths at a time on a yarn needle and begin pulling the lengths through individual stitches on the head of the princess. Pull through halfway until the ends meet and tie a half knot to secure. Make the hair part in the middle, then continue the part down the back of the head. Continue adding hair until you have enough pieces to make two braids. Braid the hair and tie the ends with a length of Rose. Trim the ends even.
face
With a length of black embroidery floss threaded on a yarn needle, create each eye with one long horizontal straight stitch (see p. 14), using the photograph as a guide. Catch the straight stitch with a tiny straight stitch perpendicular to the long stitch to pull it downward a bit and make the eyes look sleepy. Weave the ends through to the inside and trim. With red embroidery floss and a yarn needle, make two small straight stitches to create a mouth.
With Rose and the larger double-pointed needles, cast on 51 stitches, leaving a long tail and arranging the stitches on the needles as follows:
Needles 1 and 2: 15 sts
Needle 3: 21 sts
Join to work in the round, being careful not to twist the stitches. Place a stitch marker on the first stitch.
Rounds 1 and 2: knit
Round 3: purl (this is the turning round)
Continue to knit every round until the nightgown measures 3 inches from the cast-on edge.
Next round: (k1, k2tog), repeat to end of round
Needles 1 and 2: 10 sts
Needle 3: 14 sts
34 stitches total remain
Next round:
Needles 1 and 2: knit
Needle 3: k2tog four times, k6 (10 sts remain)
10 sts per needle, 30 sts total remain
Continue to knit every round until the nightgown measures 4½ inches from the cast-on edge. Divide the stitches, placing 15 stitches on needle 1 and needle 3.
front
On needle 1 only, work back and forth as follows:
Row 1: knit
Row 2: purl
Row 3: k5, bind off 5 sts, k5
Turn and work on the last 5 stitches only.
Row 4: purl
Row 5: k1, ssk, k2 (4 sts remain)
Row 6: purl
Row 7: k1, ssk, k1 (3 sts remain)
Bind off. Cut the yarn and pull the end through the remaining stitch.
Reattach the yarn at the center and work on the remaining 5 stitches.
Row 1: purl
Row 2: k2, k2tog, k1 (4 sts remain)
Row 3: purl
Row 4: k1, k2tog, k1 (3 sts remain)
Bind off. Cut the yarn and pull through the remaining stitch.
back
Reattach the yarn so that you begin with a knit row. Work in stockinette stitch until the back matches the front to the shoulders, ending with a purl row. Bind off. Cut the yarn and pull through the remaining stitch.
With mattress stitch, sew the shoulders together.
crocheted edging (optional)
With Spring Green and the crochet hook, slip stitch around the neckline. Single crochet around the neckline. Slip stitch only around the armholes.
hem
Turn up the hem at the purl round and thread the tail from the cast-on stitches on a yarn needle. Whipstitch the hem to the inside. Steam the nightgown to set the hem.
embroidery
With Spring Green and a yarn needle, embroider a pea pod using straight stitches (see p. 14) and three peas using satin stitch (see p. 14) to the front of the gown. Use the photograph as a guide.
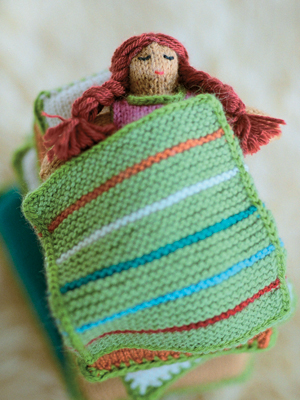
With larger needles and Celery, cast on 30 stitches. Using garter stitch, work the following stripes, carrying the Celery along the side of the blanket as you work, and cutting and weaving in the ends for the other colors.
Rows 1–8: Celery
Rows 9 and 10: Geranium
Rows 11–18: Celery
Rows 19 and 20: Aqua Fog
Rows 21–28: Celery
Rows 29 and 30: Blue Thyme
Rows 31–38: Celery
Rows 39 and 40: Natural
Rows 41–48: Celery
Rows 49 and 50: Persimmon
Rows 51–58: Celery
Bind off. Cut the yarn and pull through the remaining stitch. Weave in the ends.
crocheted edging (optional)
With Spring Green and the crochet hook, slip stitch around the edge of the blanket, working 3 stitches in each corner. Cut the yarn and pull through the remaining stitch. Weave in the end.

pod
With Spring Green and two of the smaller double-pointed needles used as straight needles, cast on 1 stitch loosely.
Row 1: kfb until 5 stitches are on the right needle (5 sts)
Row 2: knit
Row 3: purl
Row 4: (k1, m1) four times, k1 (9 sts)
Row 5: purl
Row 6: k1, m1, k7, m1, k1 (11 sts)
Continue working in stockinette stitch until the pod measures 4 inches from the cast-on edge, ending with a purl row.
Decrease rows
Row 1: k1, ssk, k5, k2tog, k1 (7 sts remain)
Row 2: purl
Row 3: k2tog three times, k1 (4 sts remain)
Row 4: k2tog two times, do not turn, pass the first stitch over the second stitch and off of the needle (1 st remains)
vines
*With the 1 stitch remaining on the needle, use the backward-loop method to cast on 19 stitches more (20 sts).
Bind off (1 st remains).
Repeat from * two times more until there are three vines.
Repeat one more time, but cast on 29 stitches (30 sts total).
Bind off. Cut the yarn and pull the end through the remaining stitch. Weave in the ends. With a sewing needle and thread, sew one pea (see below) to the end of the longest vine.
felted wool peas (optional)
If you choose to use the felted wool balls, whipstitch nine of them to the inside of the pod, using the sewing needle and thread. Cut two pieces of the green pipe cleaner about 3½ inches long to fit inside of the pod, running along each side of the row of peas. Secure by whipstitching the sides of the pod to the balls.
alternative to felted balls
bobbles for peas (make 9)
With the remaining Spring Green yarn, make bobbles using two smaller double-pointed needles as straight needles.
Cast on 1 stitch loosely.
Row 1: kfb until there are 5 stitches on the right needle (5 sts)
Row 2: knit
Row 3: purl
Row 4: knit, do not turn, pass the second, third, and fourth stitches over the first stitch and off the needle
Cut the yarn and pull through the remaining stitch.
Thread the tail on a yarn needle and gather up the edges with a few stitches to create a ball. Finish as for the felted wool balls.
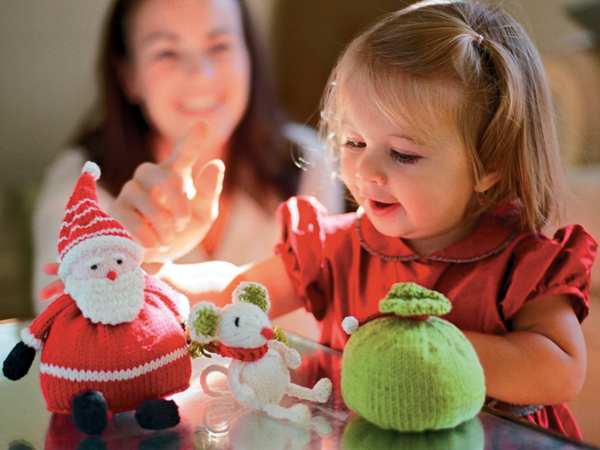
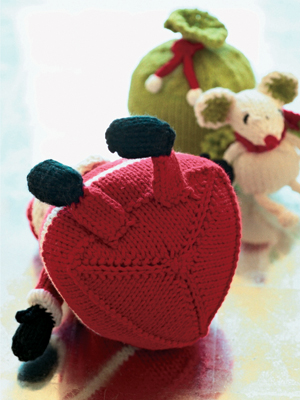
I wanted to include one holiday toy in the collection, and this Santa set is it. Knitters love creating special pieces for Christmas and many do it all year round. Cast on for this in time to have it done by December, then watch the smiles when you bring it out!
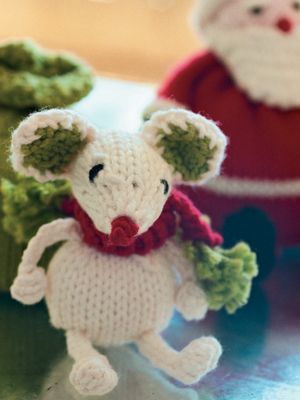
This Santa is beautifully crafted, with wonderful detail, and the kids can play with him all they want; he can’t break. The gift bag is a cute addition, ideal for tossing around or for imagining what might be inside. The tiny Christmas mouse is the tag-along seasonal friend, the perfect stocking stuffer. If you add a loop on top, he can even be an ornament for the tree.
You can’t go wrong investing in this sweet set that will be cherished and enjoyed for many years to come. Ho, ho, ho!
finished measurements
• Santa: 8 inches tall, including the hat; 5 inches wide
• Bag: 4 inches tall, 4 inches wide
• Christmas mouse: 3 inches tall, 2 inches wide
yarn
• Rowan Handknit Cotton (100% cotton; 93 yards/50 grams), 1 skein each in Rosso #215, Black #252, Gooseberry #219, Shell #310, and Bleached #263
tools
• U.S. size 3 set of four double-pointed needles, or size needed to obtain gauge
• Tape measure or ruler
• Scissors
• Yarn needle
• Stitch markers
• Polyester fiberfill, 1 small bag
• Poly pellets (optional), 32-ounce bag
gauge
• 6 stitches per inch in stockinette stitch
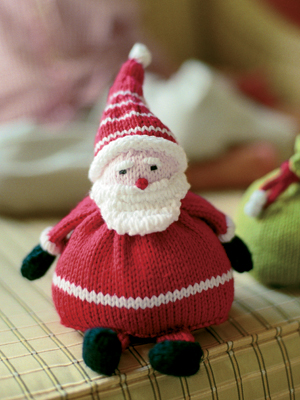
body
Starting at the bottom, with Rosso, cast on 9 stitches, placing 3 stitches on each of three double-pointed needles. Join to work in the round, being careful not to twist the stitches. Place a stitch marker on the first stitch.
Increase round: (kfb, k to last stitch, kfb), repeat on each needle (5 sts per needle, 15 sts total)
Repeat the increase round until there are 25 stitches on each needle, 75 stitches total.
Next round: purl
Knit every round until the body measures ¾ inch from the purl row.
Switch to Bleached.
Knit 2 rounds.
Switch to Rosso.
Knit every round until the body measures 3 inches from the purl round.
Decrease rounds
Round 1: (k3, k2tog), repeat to end of round (20 sts per needle, 60 sts total remain)
Round 2: (k2, k2tog), repeat to end of round (15 sts per needle, 45 sts total remain)
Round 3: (k1, k2tog), repeat to end of round (10 sts per needle, 30 sts total remain)
Thread the tail from the cast-on stitches on a yarn needle. Stitch through all of the cast-on stitches, gather up to close the hole at the bottom, and stitch to secure. Weave the end to the inside and trim. Fill the body half full with poly pellets and the rest with fiberfill, or stuff with fiberfill only.
Round 4: k2tog, repeat to end of round (5 sts per needle, 15 sts total remain)
Round 5: (k2tog, k1, k2tog), repeat on each needle (3 sts per needle, 9 sts total remain)
Finish stuffing.
Cut the yarn and thread the end on a yarn needle. Pull the end through the remaining stitches, gather up tight to close the hole, and stitch to secure. Weave the end to the inside and trim.
head
Starting at the bottom of the head with Shell, cast on 9 stitches, placing 3 stitches on each of three double-pointed needles. Join to work in the round, being careful not to twist the stitches. Place a stitch marker on the first stitch.
Round 1: kfb in every stitch (6 sts per needle, 18 sts total)
Round 2: (k1, kfb), repeat to end of round (9 sts per needle, 27 sts total)
Round 3: (k2, kfb), repeat to end of round (12 sts per needle, 36 sts total)
Rounds 4–15: knit
Decrease rounds
Round 16: (k2, k2tog), repeat to end of round (9 sts per needle, 27 sts total remain)
Thread the tail from the cast-on stitches on a yarn needle. Stitch through all the cast-on stitches, gather tightly to close the hole, and stitch to secure. Stuff the head with fiberfill.
Round 17: (k1, k2tog), repeat to end of round (6 sts per needle, 18 sts total remain)
Round 18: k2tog, repeat to end of round (3 sts per needle, 9 sts total remain)
Finish stuffing.
Cut the yarn and thread the tail on a yarn needle. Pull through the remaining stitches, gather up tight to close the hole, and stitch to secure. Use this tail and the yarn needle to whipstitch the head to the body. Weave the end to the inside and trim.
hat
With Bleached, cast on 36 stitches, placing 12 stitches on each of three double-pointed needles. Join to work in the round, being careful not to twist the stitches. Place a stitch marker on the first stitch.
Rounds 1–3: knit
Switch to Rosso.
Rounds 4–6: knit
Switch to Bleached.
Round 7: knit
Repeat rounds 4 through 7 until the hat measures 1½ inches from the cast-on edge.
Decrease rounds
Continue in Rosso only.
Round 1: (k2, k2tog), repeat to end of round (9 sts per needle, 27 sts total remain)
Rounds 2–4: knit
Round 5: (k1, k2tog), repeat to end of round (6 sts per needle, 18 sts total remain)
Rounds 6–11: knit
Round 12: (k2tog), repeat to end of round (3 sts per needle, 9 sts total remain)
Rounds 13–17: knit
Cut the yarn and thread the tail on a yarn needle. Pull the end through the remaining stitches, gather up tight to close the hole, and stitch to secure. Weave the end to the inside and trim.
Make one bobble with Bleached as follows:
Using two double-pointed needles as straight needles, cast on 1 stitch loosely.
Row 1: kfb until there are 3 stitches on the right needle (3 sts)
Row 2: knit
Row 3: purl
Row 4: knit, do not turn, pass the first, second, and third stitches over the first stitch and off the needle
Cut the yarn and thread the tail on a yarn needle. Take a few stitches around the edge of the bobble, and gather the stitches to create a ball. Attach the bobble on the top of the hat with a few stitches. Weave the end to the inside and trim. Thread the tail from the cast-on edge on a yarn needle. Place the hat on the head and whipstitch to attach. Weave the end to the inside and trim.
beard
With Bleached and two double-pointed needles used as straight needles, cast on 3 stitches.
Row 1: kfb, k1, kfb (5 sts)
Row 2: purl
Row 3: kfb, k3, kfb (7 sts)
Row 4: purl
Row 5: kfb, k5, kfb (9 sts)
Row 6: purl
Row 7: knit
Row 8: purl
Row 9: knit to end, cast on 8 stitches (17 sts)
Row 10: purl to end, cast on 8 stitches (25 sts)
Row 11: knit
Row 12: purl
Bind off. Cut the yarn and pull through the remaining stitch. Cut an 18-inch length of Bleached and thread on a yarn needle. Starting at the top of the beard, complete four rows of satin stitch (see p. 14). Whipstitch the top edge of the beard to the face.
face
Using the photograph as a guide, with a length of Rosso threaded on a yarn needle make one French knot (see p. 15) for the nose. With Black and a yarn needle, take 2 straight stitches (see p. 14) for the eyes. With Bleached, take 2 straight stitches and wrap the yarn (see p. 15) 4 times over the straight stitches for the eyebrows. For the mustache, take 2 straight stitches under the nose and above the beard, and wrap 4 times on each set of 2 straight stitches.
arms (make 2)
With Rosso, cast on 12 stitches, placing 4 stitches on each of three double-pointed needles. Join to work in the round, being careful not to twist the stitches. Place a stitch marker on the first stitch.
Knit every round until the arm measures 1½ inches from the cast-on edge.
Switch to Bleached.
Knit 3 rounds.
Bind off. Cut the yarn, leaving a long tail, and thread on a yarn needle. Pull through the remaining stitch. Using the yarn needle, whipstitch decoratively around the White rounds at the bottom of the arm. Weave in the end and trim.
hands (make 2)
With Black, cast on 9 stitches, placing 3 stitches on each of three double-pointed needles. Join to work in the round, being careful not to twist the stitches. Place a stitch marker on the first stitch.
Round 1: knit
Round 2: (kfb, k2), repeat on each needle (4 sts per needle, 12 sts total)
Rounds 3–8: knit
Bind off. Cut the yarn and pull the end through the remaining stitch. Thread the tail from the cast-on edge on a yarn needle, stitch through all of the cast-on stitches, gather up tight to close the hole, and stitch to secure. Fill the hand with poly pellets or fiberfill. Thread the end from the bound-off stitches on a yarn needle and whipstitch the top of the hand closed. Whipstitch the hand to the cuff of the arm.
With Black and 2 double-pointed needles used as straight needles, cast on 2 stitches. Work in I-cord (see p. 7) for 4 rows.
Next row: k2tog (1 st remains)
Cut the yarn and pull through the remaining stitch. With a couple of whipstitches, attach the thumb to the side of the hand, thumb facing forward.
legs (make 2)
With Rosso, cast on 9 stitches, placing 3 stitches on each of three double-pointed needles. Join to work in the round, being careful not to twist the stitches. Place a stitch marker on the first stitch.
Knit every round until the leg measures 1 inch from the cast-on edge.
Bind off. Cut the yarn and pull through the remaining stitch. Thread the end on a yarn needle and whipstitch along the cast-on stitches so that one half of the stitches lies flat against the other. Repeat for the bound-off end.
feet (make 2)
With Black, cast on 9 stitches, placing 3 stitches on each of three double-pointed needles. Join to work in the round, being careful not to twist the stitches. Place a stitch marker on the first stitch.
Round 1: knit
Round 2: (kfb, k2), repeat on each needle (4 sts per needle, 12 sts total)
Rounds 3–10: knit
Round 11: (ssk, k2), repeat on each needle (3 sts per needle, 9 sts total remain)
Thread the tail from the cast-on edge on a yarn needle, stitch through all of the cast-on stitches, and gather up tight close the hole. Stitch to secure. Weave the end to the inside and trim.
Fill the feet with poly pellets or stuff with fiberfill. Cut the yarn and thread the tail on a yarn needle. Pull through the remaining stitches and gather up to close the hole. Whipstitch the top of the feet to the legs. With a length of Rosso threaded on a yarn needle, whipstitch the legs to the bottom side of the body, setting the legs back a couple of rows from the purl row. Weave the ends to the inside and trim.
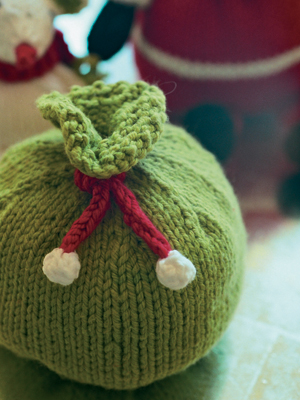
With Gooseberry, cast on 9 stitches, placing 3 stitches on each of three double-pointed needles. Join to work in the round, being careful not to twist the stitches. Place a stitch marker on the first stitch.
Round 1: knit
Round 2: kfb in every stitch (6 stitches per needle, 18 stitches total)
Round 3: (k1, kfb), repeat to end of round (9 sts per needle, 27 sts total)
Round 4: (k2, kfb), repeat to end of round (12 sts per needle, 36 sts total)
Round 5: (k3, kfb), repeat to end of round (15 sts per needle, 45 sts total)
Round 6: (k4, kfb), repeat to end of round (18 sts per needle, 54 sts total)
Round 7: (k5, kfb), repeat to end of round (21 sts per needle, 63 sts total)
Place a stitch marker on round 7 and leave it there.
Knit every round until bag measures 3 inches from the stitch marker.
Decrease rounds
Round 1: (k5, k2tog), repeat to end of round (18 sts per needle, 54 sts total remain)
Round 2: (k4, k2tog), repeat to end of round (15 sts per needle, 45 sts total remain)
Rounds 3–4: knit
Round 5: (k3, k2tog), repeat to end of round (12 sts per needle, 36 sts total remain)
Round 6: knit
Round 7: (k2, k2tog), repeat to end of round (9 sts per needle, 27 sts total remain)
Round 8: knit
Thread the tail from the cast-on edge on a yarn needle, stitch through all of the cast-on stitches, and gather up to close the hole at the bottom. Stitch to secure. Fill the bag one-third full with poly pellets and the rest with fiberfill, or stuff with fiberfill only.
Round 9: (k1, k2tog), repeat to end of round (6 sts per needle, 18 sts total remain)
Rounds 10–15: knit
Round 16: kfb in every stitch (12 sts per needle, 36 sts total remain)
Rounds 17 and 18: knit
Bind off in k1, p1 rib. Cut the yarn and pull through the remaining stitch. Weave the end into the inside of the bag and trim so end stays inside.
tie
With Rosso and two double-pointed needles used as straight needles, cast on 2 stitches. Work in I-cord until the tie measures 8 inches from the cast-on edge.
Next row: k2tog (1 st remains)
Cut the yarn and pull through the remaining stitch. Weave the ends to the inside.
Make 2 bobbles with Bleached as for the top of the hat. Whipstitch one bobble to each end of the tie, weave in ends, and trim.
body
With Bleached, cast on 9 stitches, placing 3 stitches on each of three double-pointed needles. Join to work in the round, being careful not to twist the stitches. Place a stitch marker on the first stitch.
Round 1: knit
Round 2: (kfb, k1, kfb), repeat on each needle (5 sts per needle, 15 stitches total)
Round 3: knit
Round 4: (kfb, k3, kfb), repeat on each needle (7 sts per needle, 21 sts total)
Round 5: (kfb, k5, kfb), repeat on each needle (9 sts per needle, 27 sts total)
Rounds 6–12: knit
Decrease rounds
Round 13: (ssk, k5, k2tog), repeat on each needle (7 sts per needle, 21 sts total remain)
Round 14: (ssk, k3, k2tog), repeat on each needle (5 sts per needle, 15 sts total remain)
Thread the tail from the cast-on edge on a yarn needle. Stitch through all of the cast-on stitches, gather tight to close the hole at the bottom, and stitch to secure. Stuff the body with fiberfill.
Round 15: (ssk, k1, k2tog), repeat on each needle (3 sts per needle, 9 sts total remain)
Cut the yarn and thread the tail on a yarn needle. Pull through the remaining stitches, gather up tight to close the hole, and stitch to secure. Weave the end to the inside and trim.
head
Complete the same as for the body through round 4 (7 sts per needle, 21 stitches total).
Rounds 5–9: knit
Decrease rounds for nose
Round 10: (ssk, k3, k2tog), repeat on each needle (5 sts per needle, 15 stitches total remain)
Rounds 11 and 12: knit
Round 13: (ssk, k1, k2tog), repeat on each needle (3 sts per needle, 9 stitches total remain)
Rounds 14 and 15: knit
Thread the tail from the cast-on edge on a yarn needle. Stitch through all of the cast-on stitches, pull up tight to close the hole, and stitch to secure. Weave the end to the inside and trim. Stuff with fiberfill. Cut the yarn, and thread on a yarn needle. Pull the end through the remaining stitches, gather tight to close the hole, and stitch to secure. Weave the end to the inside and trim.
outer ears (make 2)
With Bleached and two double-pointed needles used as straight needles, cast on 5 stitches.
Row 1: knit
Row 2: pfb, p3, pfb (7 sts)
Row 3: knit
Row 4: purl
Row 5: knit
Row 6: purl
Row 7: ssk, k3, k2tog (5 sts remain)
Row 8: p2tog, p1, p2tog (3 sts remain)
Bind off. Cut the yarn and pull through the remaining stitch.
inner ears (make 2)
With Gooseberry and 2 double-pointed needles used as straight needles, cast on 3 stitches.
Row 1: knit
Row 2: pfb, p1, pfb (5 sts)
Row 3: knit
Row 4: purl
Row 5: ssk, k1, k2tog (3 sts remain)
Bind off. Cut the yarn and pull through the remaining stitch. Place one inner ear piece on each outer ear piece, purl sides facing, and with the tail from the outer ear threaded on a yarn needle, whipstitch around the edges of each ear. With a length of Bleached threaded on a yarn needle, whipstitch the ears to the head, using the photograph as a guide. Whipstitch the head to the body, weave the ends to the inside, and trim.
nose
With Rosso and two double-pointed needles used as straight needles, cast on 1 stitch loosely.
Row 1: kfb (2 stitches)
Row 2: knit
Do not turn. Pull the first stitch over the second stitch and off the needle. Cut the yarn and pull through the remaining stitch. Thread the end on a yarn needle, stitch around the edge of the piece, and gather the stitches to form a ball. Whipstitch the nose to the tip of the snout.
tail
With Bleached and two double-pointed needles used as straight needles, cast on 2 stitches. Work in I-cord until the piece measures 3 inches from the cast-on edge.
Next row: k2tog (1 st remains)
Cut the yarn and pull through the remaining stitch. Thread the end on a yarn needle, weave it into the tail, and trim. Thread the tail from the cast-on stitches on a yarn needle and whipstitch to the lower back center of the body, using the photograph as a guide. Weave the end to the inside and trim.
legs and arms (make 4 total)
With Bleached and two double-pointed needles used as straight needles, cast on 3 stitches. Work in I-cord until the piece measures 1 inch, and bind off.
Cut the yarn and thread the tail on a yarn needle. Whipstitch the arms to the sides of the body and the legs to the lower front of the body. Weave in the remaining ends.
feet and hands (make 4 total)
With Bleached and two double-pointed needles used as straight needles, cast on 1 stitch loosely.
Row 1: kfb until there are 3 stitches on the right needle
Row 2: knit
Row 3: purl
Row 4: knit, do not turn, pass the first, second, and third stitches over the first stitch and off the needle (1 stitch remains)
Cut the yarn, thread on a yarn needle, and stitch around the edge of the piece. Gather the stitches to form a ball, and whipstitch one bobble to the end of each arm and leg. Weave all ends to the inside and trim.
scarf
With Rosso and two double-pointed needles used as straight needles, cast on 3 stitches. Knit every row until the scarf measures 7 inches.
Bind off. Cut the yarn and pull through the remaining stitch.
With Gooseberry, make two 1-inch pom-poms with 10 wraps each. With a yarn needle and the ends, attach one pom-pom to each end of the scarf. Tie the scarf around the mouse’s neck.
If you look around the crafting world, you will see Russian nesting dolls everywhere you turn. The cute characters, often wrapped up in babushkas, are printed on fabric, crocheted, felted, and painted. I even have a set of matryoshka salt and pepper shakers. The only kind of set I’d never seen was a functional knitted one that you could actually play with. I knew what I had to do, and set out to come up with the features of the design.
I kept my knitted set of dolls small so that the repetitive format remains interesting, and kept them all one color to keep things simple. The doll set takes a small amount of worsted-weight yarn, less than one skein, and is the perfect stash buster. With a little simple embroidery for the faces, you are all set to nest.
These dolls are a bit addictive; you may have to make more than one set!
finished measurements
• Large doll: 4½ inches tall
• Medium doll: 4 inches tall
• Small doll: 3½ inches tall
• Tiny doll: 1½ inches tall
yarn
• Blue Sky Dyed Cotton (100% organically grown cotton; 150 yards/100 grams), 1 skein in Aloe #604
• Blue Sky Skinny Organic (100% organic cotton; 150 yards/65 grams), 1 skein in Birch #30
tools
• U.S. size 3 set of four double-pointed needles, or size needed to obtain gauge
• Stitch marker
• Tape measure
• Scissors
• Yarn needle
• Embroidery floss in yellow, pink, red, and black
• Embroidery needle
• Small amount of fiberfill
gauge
• 6 stitches per inch in stockinette stitch
bottom
With Aloe, cast on 9 stitches, placing 3 stitches on each of three double-pointed needles. Join to work in the round, being careful not to twist the stitches. Place a stitch marker on the first stitch of the round.
Round 1: knit
Round 2: kfb in each stitch (6 sts on each needle, 9 sts total)
Rounds 3–5: knit
Round 6: kfb in each stitch (12 sts on each needle, 36 sts total)
Round 7: knit
Round 8: purl
Rounds 9 and 10: knit
Round 11: (k2, kfb in the next stitch), repeat across the round (16 sts per needle, 48 sts total)
Continue, knitting every round until the bottom measures 1½ inches from the purl round.
Purl 2 rounds.
Knit 3 rounds.
Bind off.
Cut the yarn, leaving a 6-inch-long tail. Turn the bottom inside out so the purl side is facing out. Using the two consecutive purl rounds as the turning rows, fold the hem to the purl side of the bottom. Using a yarn needle and a length of Aloe, whipstitch the bound-off edge to the purl side of the bottom. Turn the bottom right side out so the knit side is facing out. Stitch up the hole in the cast-on edge and weave the ends to the inside.
top
With Aloe, cast on 48 stitches, placing 16 stitches on each of three double-pointed needles. Join to work in the round, being careful not to twist the stitches. Place a stitch marker on the first stitch of the round.
Knit 3 rounds.
Purl 2 rounds.
Continue, knitting every round until the top measures 1¼ inches from the purl rounds.
Next round: (k2, k2tog), repeat across the round (12 sts per needle, 36 sts total remain)
Next round: (k1, ssk, k6, k2tog, k1), repeat on each needle (10 sts per needle, 30 sts total remain)
Place a stitch marker on this round.
Knit straight until the top measures 1¼ inches from the marker.
Decrease rounds
Round 1: (k3, k2tog), repeat across the round (8 sts per needle, 24 sts total remain)
Round 2: (k2, k2tog), repeat across the round (6 sts per needle, 18 sts total remain)
Round 3: (k1, k2tog), repeat across the round (4 sts per needle, 12 sts total remain)
Round 4: (k2tog), repeat across the round (2 sts per needle, 6 sts total remain)
Cut the yarn, leaving a 4-inch-long tail. Pull the tail through the remaining stitches, gather up tight to close the hole, and stitch to secure. Weave the tail to the inside and trim. Using the purl rows as the turning row, fold the hem under to the inside. Using the cast-on tail threaded on a yarn needle, whipstitch the hem to the purl side of the top. (It is easier to sew down if the top is turned inside out while sewing.) Weave in all ends.
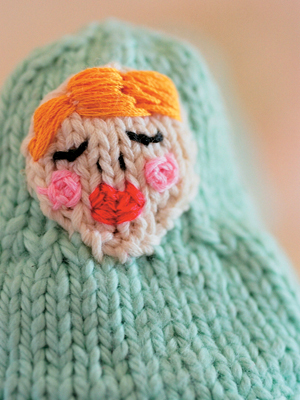
face
With Birch and two double-pointed needles used as straight needles, cast on 3 stitches.
Row 1: kfb, k1, kfb (5 sts)
Row 2: pfb, p3, pfb (7 sts)
Row 3: kfb, k5, kfb (9 sts)
Rows 4–8: start with a purl row and begin to work in stockinette stitch (knit 1 row, purl 1 row)
Row 9: ssk, k5, k2tog (7 sts remain)
Row 10: p2tog, p3, p2tog (5 sts remain)
Row 11: ssk, k1, k2tog (3 sts remain)
Bind off in purl.
Cut the yarn, leaving a 6-inch-long tail, and pull through the last stitch.
Embroider the face with the embroidery needle and floss, using the photograph as a guide. The cheeks are made with spiderweb circles (see p. 13). The mouth and hair are made with satin stitches. The nose and eyes are straight stitches.
Thread the tail from the bind-off edge of the face on the yarn needle. Whipstitch the embroidered face piece to the front top of the doll.
bottom
With Aloe, cast on 9 stitches, placing 3 stitches on each of three double-pointed needles. Join to work in the round, being careful not to twist the stitches. Place a stitch marker on the first stitch.
Round 1: knit
Round 2: kfb in each stitch (6 sts per needle, 18 sts total)
Rounds 3 and 4: knit
Round 5: (k1, kfb) across the round (9 sts per needle, 27 sts total)
Round 6: purl
Rounds 7 and 8: knit
Round 9: (k2, kfb) across the round (12 sts per needle, 36 sts total)
Continue, knitting every round until the bottom measures 1 inch from the purl round.
Purl 2 rounds.
Knit 3 rounds.
Bind off. Finish as for the large bottom.
top
With Aloe, cast on 36 stitches, placing 12 stitches on each of three double-pointed needles. Join to work in the round, being careful not to twist the stitches. Place a marker on the first stitch of the round.
Purl 2 rounds.
Knit every round until the top measures 1 inch from the purl rounds.
Next round: (k2, k2tog), repeat across the round (9 sts per needle, 27 sts total remain)
Next round: (k1, ssk, k3, k2tog, k1), repeat on each needle (7 sts per needle, 21 sts total)
Place a stitch marker on this round.
Knit every round until the top measures ¾ inch from the stitch marker.
Decrease rounds
Round 1: (k5, k2tog), repeat across the round (6 sts per needle, 18 sts total remain)
Round 2: (k4, k2tog), repeat across the round (5 sts per needle, 15 sts total remain)
Round 3: (k3, k2tog), repeat across the round (4 sts per needle, 12 sts total remain)
Round 4: (k2, k2tog), repeat across the round (3 sts per needle, 9 sts total remain)
Round 5: (k1, k2tog), repeat across the round (2 sts per needle, 6 sts total remain)
Cut the yarn, leaving a 4-inch-long tail, and thread on the yarn needle. Pull through the remaining stitches, gather up tight, and stitch to secure. Weave the end to the inside.
face
With Birch and two double-pointed needles used as straight needles, cast on 3 stitches.
Row 1: kfb, k1, kfb (5 sts)
Row 2: pfb, p3, pfb (7 sts)
Rows 3–7: start with a knit row and continue working in stockinette stitch
Row 8: ssk, k3, k2tog (5 sts remain)
Row 9: p2tog, p1, p2tog (3 sts)
Bind off. Cut the yarn, leaving a 6-inch-long tail, and pull through the remaining stitch.
Embroider the face with the embroidery needle and floss, using the photograph as a guide, same as the large doll.
Thread the tail from the bind-off edge of the face on a yarn needle and whipstitch the face to the top. Weave the ends to the inside.
bottom
With Aloe, cast on 9 stitches, placing 3 stitches on each of three double-pointed needles. Join to work in the round, being careful not to twist the stitches. Place a marker on the first stitch.
Round 1: knit
Round 2: kfb in each stitch (6 sts per needle, 18 stitches total)
Round 3: knit
Round 4: purl
Round 5: knit
Round 6: (k1, kfb), repeat across the round (9 sts per needle, 27 sts total remain)
Continue knitting every round until the bottom measures ¾ inch from the purl round.
Purl 2 rounds.
Knit 3 rounds.
Bind off. Finish as for the large bottom.
top
With Aloe, cast on 27 stitches, placing 9 stitches on each of three double-pointed needles. Join to work in the round, being careful not to twist the stitches. Place a stitch marker on the first stitch of the round.
Knit 3 rounds.
Purl 2 rounds.
Continue, knitting every round until the top measures ¾ inch from the purl rounds.
Decrease rounds
Round 1: (ssk, k5, k2 tog), repeat across the round (7 sts per needle, 21 sts total remain)
Round 2: (ssk, k3, k2tog), repeat across the round (5 sts per needle, 15 sts total remain)
Place a stitch marker on this round. Knit every round until the top measures ½ inch from the purl rounds.
Next round: (ssk, k1, k2tog), repeat across the round (3 sts per needle, 9 sts total)
Cut the yarn and thread the tail on a yarn needle. Pull through the remaining stitches, pull up tight to close the hole, and stitch to secure. Weave the end to the inside and trim.
face
With Birch and two double-pointed needles used as straight needles, cast on 3 stitches.
Row 1: kfb, k1, kfb (5 sts)
Row 2: purl
Row 3: knit
Row 4: purl
Row 5: ssk, k1, k2tog (3 sts remain)
Bind off. Cut the yarn, leaving a 4-inch-long tail.
Embroider the face with the embroidery needle and floss, using the photograph as a guide. For the small face, use straight stitches for the cheeks. The rest is the same as for the large face.
Thread the tail from the bind-off edge of the face on a yarn needle and whipstitch the face to the top. Weave the ends to the inside.
With Aloe, cast on 9 stitches, placing 3 stitches on each of three double-pointed needles.
Round 1: knit
Round 2: purl
Rounds 3 and 4: knit
Round 5: (k1, kfb, k1), repeat across the round (4 sts per needle, 12 sts total)
Continue, knitting every round until doll measures ½ inch from the purl round.
Next round: (k1, k2tog, k1), repeat across the round (3 sts per needle, 9 sts total remain)
Knit 2 rounds. Stuff the doll with fiberfill.
Next round: (k1, k2tog), repeat across the round (2 sts per needle, 6 sts total remain)
Cut the yarn and thread on a yarn needle. Pull through the remaining stitches, pull up tight, and stitch to secure. Weave the end to the inside and trim.
face
With Birch and two double-pointed needles used as straight needles, cast on 1 stitch.
Row 1: knit into the front, back, then front again (3 sts)
Row 2: purl
Row 3: knit
Row 4: purl
Row 5: knit, do not turn, pass the second and third stitches over the first stitch and off the needle (1 st remains)
Cut the yarn, leaving a 4-inch-long tail, and pull it through the remaining stitch.
Embroider the face with the embroidery needle and floss, using tiny straight stitches for hair, eyes, mouth, and cheeks.
Thread the tail from the bind-off edge of the face on a yarn needle and whipstitch the face to the top. Weave the ends to the inside.

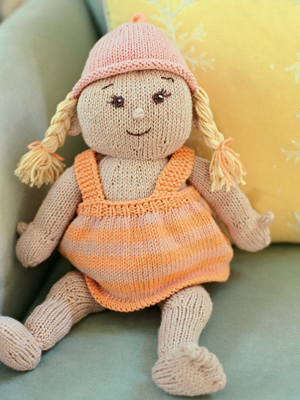
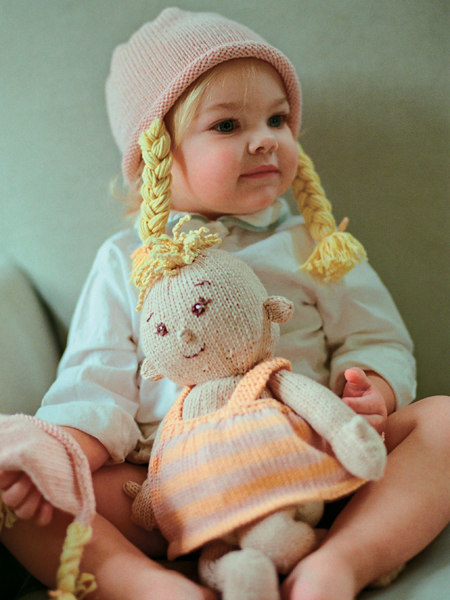
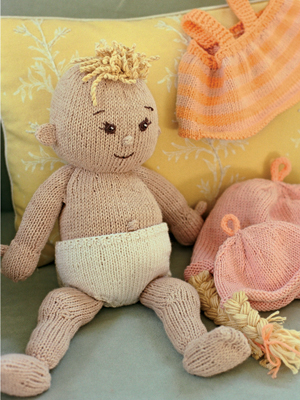
My younger daughter is a baby doll aficionado. She enjoys a good play session with her collection, which contains every sort of doll imaginable, each with its own personality and purpose. She inspired me to knit up the perfect baby doll set—and helped me with the design.
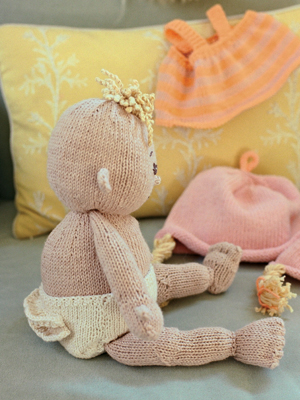
The size is perfect for cuddling, as the doll fits right in the crook of a child’s arm; it’s not too big or too small. Her hair is no-fuss and fun to make. Plus she can either sit or lie down.
I used the most fantastic organic cotton yarn to keep the doll extra special. The construction is simple, with minimal seaming at the end. The legs have a knee bend worked in, which is fun to knit. My daughter insisted on the sundress, ruffle pants, and hat. She also requested the matching hat for the baby’s mom, too!
finished measurements
• Baby doll: 9 inches tall seated, 5 inches wide
• Child’s hat: To fit 2 years and older, head circumference of 18–20 inches
yarn
• Baby doll: Rowan Purelife Organic Cotton (100% naturally dyed organic cotton; 131 yards/50 grams), 2 skeins in Quebracho Bark #987
• Sundress, baby doll’s hat with braids, and baby doll’s hair: 1 skein each in Madder #980, Lipstick Tree #985, and Yellowwood #984
• Ruffle pants: 1 skein in Natural #986
• Child’s hat: 1 skein in Madder #980, small amount of Lipstick Tree #985 for loop, and small amount of Yellowwood #984 for braids
tools
• U.S. size 4 set of four double-pointed needles and 24-inch circular or straight needles (used for baby doll and ruffle pants), or size needed to obtain gauge
• U.S. size 5 set of four double-pointed needles, 12-inch circular needle (used for baby doll’s hat), and 16-inch circular needle (used for sundress and child’s hat), or size needed to obtain gauge
• U.S. size G crochet hook (optional)
• Tape measure or ruler
• Scissors
• Stitch markers
• Yarn needle
• Polyester fiberfill, 1 small bag
• Poly pellets (optional), 32-ounce bag
• Brown and white embroidery floss
• Embroidery needle
gauge
• 6 stitches per inch in stockinette stitch for baby doll
• 5½ stitches per inch in stockinette stitch for baby doll’s hat, girl’s hat, and sundress
body
With Quebracho Bark, cast on 9 stitches, placing 3 stitches on each of three of the smaller double-pointed needles. Join to work in the round, being careful not to twist the stitches. Place a stitch marker on the first stitch.
Increase rounds
Round 1: knit
Round 2: kfb in every stitch (6 sts per needle, 18 sts total)
Rounds 3–5: knit
Round 6: kfb in every stitch (12 sts per needle, 36 sts total)
Round 10: (k2, kfb), repeat to end of round (16 sts per needle, 48 sts total)
Round 11: knit
Round 12: (k3, kfb), repeat to end of round (20 sts per needle, 60 sts total)
Rounds 13–15: knit
Round 16: (k4, kfb), repeat to end of round (24 sts per needle, 72 sts total)
Place a stitch marker on round 16 and leave it there. Knit every round until the body measures 3 inches from the stitch marker.
Decrease rounds
Round 1: (k4, k2tog), repeat to end of round (20 sts per needle, 60 sts total remain)
Rounds 2–5: knit
Thread the tail from the cast-on stitches on a yarn needle. Stitch through all of the stitches in the cast-on edge, gather to close the hole at the bottom, and stitch to secure (see p. 16). Weave the end to the inside and trim.
Fill the body one-third full with poly pellets and the rest with fiberfill, or fill with fiberfill only. Continue to add stuffing as you work on the body.
Round 6: (k3, k2tog), repeat to end of round (16 sts per needle, 48 sts total remain)
Rounds 7–9: knit
Round 10: (k2, k2tog), repeat to end of round (12 sts per needle, 36 sts total remain)
Rounds 11–13: knit
Round 14: (k1, k2tog), repeat to end of round (8 sts per needle, 24 sts total remain)
Round 15: knit
Round 16: (k2, k2tog) repeat to end of round (4 sts per needle, 12 sts total remain)
Round 17: knit
Round 18: (k1, k2tog, k1), repeat to end of round (3 sts per needle, 9 sts total remain)
Finish stuffing. Cut the yarn and thread the end on a yarn needle. Pull through the remaining stitches, gather up tight to close the hole, and stitch to secure. Weave the end to the inside and trim.
head
Starting at the bottom of the head, work the same as for the body through round 16 of the increase rounds (24 sts per needle, 72 sts total).
Place a stitch marker on round 16 and leave it there. Knit every round until the head measures 3½ inches from the stitch marker.
Decrease rounds (for the top of the head)
Round 1: (k4, k2tog), repeat to end of round (20 sts per needle, 60 sts total remain)
Round 2: knit
Round 3: (k3, k2tog), repeat to end of round (16 sts per needle, 48 sts total remain)
Rounds 4 and 5: knit
Round 6: (k2, k2tog), repeat to end of round (12 sts per needle, 36 sts total remain)
Round 7: knit
Round 8: (k1, k2tog), repeat to end of round (8 sts per needle, 24 sts total remain)
Round 9: knit
Thread the tail from the cast-on stitches on a yarn needle. Stitch through all of the stitches in the cast-on edge, gather to close the hole at the bottom, and stitch to secure. Weave the end to the inside and trim. Stuff the head with fiberfill. Continue to stuff as you work.
Round 10: k2tog, repeat to end of round (4 sts per needle, 12 sts total remain)
Round 11: (k1, k2tog, k1), repeat to end of round (3 sts per needle, 9 sts total remain)
Finish stuffing. Cut the yarn, leaving a 6-inch-long tail, and thread on a yarn needle. Pull the end through the remaining stitches, pull up tight to close the hole, and stitch to secure. Use the remainder of the tail to whipstitch the head to the body.
ears (make 2)
With Quebracho Bark, cast on 12 stitches, leaving an 8-inch-long tail, and placing 4 stitches on each of three double-pointed needles. Join to work in the round, being careful not to twist the stitches. Place a stitch marker on the first stitch.
Rounds 1 and 2: knit
Round 3: (k2, k2tog), repeat to end of round (3 sts per needle, 9 sts total remain)
Cut the yarn and thread the end on a yarn needle. Pull the end through the remaining stitches, up tight to close the hole, and stitch to secure. Weave the end to the inside and trim. Lay the ear flat and whipstitch the cast-on edge closed, using the tail threaded on a yarn needle. With the remainder of the cast-on tail, whipstitch the ears to the side of the head, using the photograph as a guide.
hair (make 3 pieces)
With Yellowwood and two double-pointed needles used as straight needles, cast on 6 stitches.
Row 1: work twisted loop stitch in every stitch as follows:
Knit the stitch and leave it on the left needle.
Pull the loop that is on the right needle out about 3 inches. Transfer the loop onto your right index finger. Twist the loop in one direction until it folds back on itself.
Place the loop back on the left needle.
Knit the two stitches together.
Row 2: knit
Row 3: repeat row 1
Bind off. Cut the yarn and pull through the remaining stitch. Arrange the hair pieces on the top of the head in a cluster. Using the tails threaded on a yarn needle, whipstitch the hair down. Weave the ends to the inside and trim.
arms (make 2)
Starting at the shoulder, with Quebracho Bark and two double-pointed needles used as straight needles, cast on 5 stitches, leaving an 8-inch-long tail.
Row 1: kfb, k to last stitch, kfb (7 sts)
Row 2: purl
Repeat rows 1 and 2 until there are 15 stitches, ending with a purl row.
Next row: kfb, k6, kfb, k6, kfb (18 sts)
Place 6 stitches on each of three double-pointed needles. Continue working in the round. Place a stitch marker on the first stitch and leave it there. Knit every round until the arm measures 2¼ inches from the stitch marker.
Continue on to create the wrist and hand:
Round 1: (k4, k2tog), repeat to end of round (5 sts per needle, 15 sts total remain)
Round 2: knit
Round 3: (kfb, k3, kfb), on each needle (7 sts per needle, 21 sts total)
Rounds 4–10: knit
Round 11: k to last 2 sts, k2tog (20 sts total remain)
Rearrange the stitches, placing 10 stitches on each of two double-pointed needles.
Continue working in the round as follows:
Round 12: (ssk, k6, k2tog), on each needle (8 sts per needle, 16 sts total remain)
Round 13: knit
Round 14: (ssk, k4, k2tog), on each needle (6 sts per needle, 12 sts total remain)
Cut the yarn, leaving an 8-inch-long tail. Thread the end on a yarn needle.
Use kitchener stitch (see p. 9) to graft the tip of the hand.
Fill the hand with poly pellets and stuff the arm lightly with fiberfill, or stuff both with fiberfill only. Pinch the shoulder end of the arm flat and whipstitch the edges shut, using the tail from the cast-on edge. With the remaining length of the cast-on tail, whipstitch the arms to the body. The slanting shoulder should follow the curve of the body.
thumbs (make 2)
With Quebracho Bark, cast on 6 stitches, placing 2 stitches on each of three double-pointed needles. Join to work in the round, being careful not to twist the stitches. Place a stitch marker on the first stitch.
Knit 3 rounds.
Cut the yarn and thread the end on a yarn needle. Pull through the stitches, pull up tight to close, and stitch to secure. Stuff lightly with fiberfill. Thread the tail from the cast-on edge on a yarn needle and whipstitch the thumb to the side of the hand, facing upward. Weave the end to the inside and trim.
With Quebracho Bark, cast on 24 stitches, placing 8 stitches on each of three double-pointed needles. Join to work in the round, being careful not to twist the stitches. Place a stitch marker on the first stitch.
Knit every round until the leg measures 2 inches from the cast-on edge.
Rearrange the stitches to work the knee bend as follows:
Needle 1: 18 sts
Needle 2: 3 sts
Needle 3: 3 sts
Switch to working back and forth on needle 1 only as follows:
Row 1: k11, k2tog, k1, turn
Row 2: sl1, p5, p2tog, p1, turn
Row 3: sl1, k6, k2tog, k1, turn
Row 4: sl1, p7, p2tog, p1, turn
Row 5: sl1, k8, k2tog, k1, turn
Row 6: sl1, p9, p2tog, p1, turn
Row 7: knit across the 12 sts
With the free needle, pick up (see p. 8) 2 stitches down the side and knit across the 3 stitches from needle 2.
With the resulting free needle, knit 3 stitches from needle 3 and pick up 2 more stitches from the other side:
Needle 1: 12 sts
Needle 2: 5 sts
Needle 3: 5 sts
Rearrange the stitches as follows:
Needles 1 and 2: 7 sts
Needle 3: 8 sts
Change back to working in the round:
Next round: knit to last 2 sts, k2tog (7 sts per needle, 21 stitches total)
Place a stitch marker on the last round and leave it there.
Knit every round until the leg measures 1¾ inches from the stitch marker.
Next round: (k5, k2tog), repeat on each needle (6 sts per needle, 18 sts total remain)
Bind off, leaving tails free.
feet (make 2)
With Quebracho Bark, cast on 9 stitches, placing 3 stitches on each of three double-pointed needles. Join to work in the round, being careful not to twist the stitches. Place a stitch marker on the first stitch.
Rounds 1 and 2: knit
Round 3: kfb in each stitch (6 sts per needle, 18 sts total)
Knit every round until the foot measures 1 inch from the cast-on stitches.
Next round: (k2, kfb), repeat to end of round (8 sts per needle, 24 sts total)
Knit every round until the foot measures 2½ inches from the cast-on stitches.
Rearrange the stitches, placing 12 stitches on each of two double-pointed needles.
Next round: (ssk, k to last 2 sts, k2tog) on each needle (10 sts per needle, 20 sts total remain)
Thread the tail from the cast-on edge on a yarn needle, stitch through all of the cast-on stitches, and gather to close the hole. Stitch to secure. Weave the end to the inside and trim. Fill the feet with poly pellets or fiberfill.
Cut the yarn, leaving a 12-inch-long end. Thread on a yarn needle and use kitchener stitch to graft the foot.
With the remaining tail, take 4 stitches about ¼ inch in from the tip of the foot to create toes.
Whipstitch the feet to the bottom of the legs using a yarn needle and the bound-off tails from the legs. Stuff the legs with fiberfill. Whipstitch the top of the legs closed using the cast-on tail, then whipstitch the legs to the body, using the photograph as a guide. When attached to the body, the legs should bow out and the feet should bend inward.
nose and belly button (make 1 each)
With Quebracho Bark and two double-pointed needles used as straight needles, cast on 1 stitch loosely.
Row 1: kfb and then in the front again (3 sts)
Row 2: knit
Row 3: purl
Row 4: knit, do not turn, pass the second and third stitches over the first stitch and off the needle. Cut the yarn and pull through the remaining stitch. Thread the tail on a yarn needle, stitch around the edge of the piece, and gather the stitches to create a tiny ball. Whipstitch the nose to the center of the face and whipstitch the belly button to the stomach, about 2 inches up from the bottom of the seated body.
eyes and mouth
With an embroidery needle and brown embroidery floss, make two spiderweb circles (see p. 13) for the eyes. Add three eyelashes to the outer sides with straight stitches (see p. 14). With the white embroidery floss take a tiny straight stitch in each eye.
Take 2 straight stitches with brown embroidery floss for the eyebrows. Take 4 straight stitches in a curved line for the mouth.

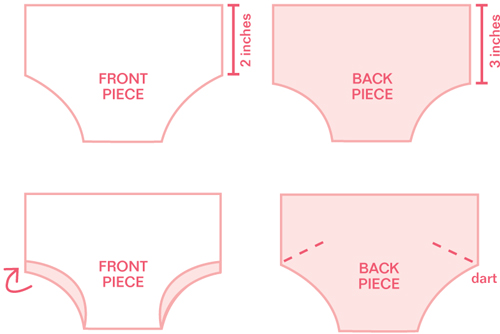
ruffle pants
front
With Natural and the 24-inch circular needle or straight needles, cast on 38 stitches.
Rows 1 and 2: (k1, p1), repeat to end of row Change to working in stockinette stitch (knit 1 row, purl 1 row), and continue until the front measures 2 inches from the cast-on edge, ending with a purl row.
Decrease rows
Bind off 2 stitches at the beginning of the next 4 rows (30 sts remain).
Bind off 3 stitches at the beginning of the next 8 rows (6 sts remain).
Cut the yarn, leaving the remaining stitches on the needle, and set aside.
back
Work the same as for the front, but work in stockinette stitch until the back measures 3 inches from the cast-on edge.
Decrease the same as for the front (6 sts remain).
Cut the yarn, leaving an 8-inch-long tail, and thread on a yarn needle.
Place the front and back pieces together, purl sides facing, and use mattress stitch (see p. 10) to sew the side seams.
On the back of the pants, measure down the side seam 2 inches from the waistband. Bring back corner up to meet front corner to create a dart on the back. Whipstitch the dart with a length of Natural threaded on a yarn needle. Tack down the fold on the inside with a couple of stitches to secure.
leg edging (2 options)
With the crochet hook and a length of Natural, single crochet in every other stitch around the leg opening. Cut the yarn and pull through the remaining stitch. Weave the ends to the inside.
With the smaller double-pointed needles, pick up stitches in every other stitch around the leg opening. As you are picking up stitches, work them evenly onto three double-pointed needles. Knit 1 round. Bind off. Cut the yarn and pull through the remaining stitch. Weave the ends to the inside and trim.
With Natural and a 24-inch circular needle or straight needles, cast on 21 stitches.
Row 1: kfb in each stitch (42 sts)
Row 2: purl
Row 3: knit
Row 4: purl
Row 5:: (k1, p1) repeat to end of row
Bind off. Cut the yarn, leaving an 8-inch-long tail. Thread the tail on a yarn needle and whipstitch the first ruffle to the back of the pants under the ribbing. Attach the second ruffle under the first in the same way.
hat
With the 12-inch circular needle and Madder, cast on 64 stitches. Join to work in the round, being careful not to twist the stitches. Place a stitch marker on the first stitch.
Knit every round until the hat measures 2½ inches from the cast-on edge.
Decrease rounds
Knit the first round onto three double-pointed needles.
Round 1:
Needles 1 and 2: (k6, k2tog), repeat 3 times on each needle (21 sts per needle remain)
Needle 3: (k6, k2tog), repeat 2 times (14 sts remain)
56 stitches total remain.
Round 2: (k5, k2tog), repeat to end of round (18 sts on needles 1 and 2, 12 sts on needle 3; 48 sts total remain)
Rounds 3 and 4: knit
Round 5: (k4, k2tog), repeat to end of round (15 sts on needles 1 and 2, 10 sts on needle 3; 40 sts total remain)
Round 6: knit
Round 7: (k3, k2tog), repeat to end of round (12 sts on needles 1 and 2, 8 sts on needle 3; 32 sts total remain)
Round 8: knit
Round 9: (k2, k2tog), repeat to end of round (9 sts on needles 1 and 2, 6 sts on needle 3; 24 sts total remain)
Round 10: (k1, k2tog), repeat to end of round (6 sts on needles 1 and 2, 4 sts on needle 3; 16 sts total remain)
Round 11: k2tog, repeat to end of round (3 sts on needles 1 and 2, 2 sts on needle 3; 8 sts total remain)
Knit the next round onto one double-pointed needle.
Round 12: k2tog, repeat to end of round (4 sts remain)
Switch to Lipstick Tree and on the remaining 4 stitches begin to work in I-cord (see p. 7) as follows:
Row 1: k1, k2tog, k1 (3 sts remain)
Continue working in I-cord until the piece measures 1 inch from the beginning. Bind off. Cut the yarn and pull through the remaining stitch. Thread the tail on a yarn needle and tack down the end with a couple of stitches to form a loop. Weave the end to the inside of the hat and trim. Weave the rest of the ends to the inside and trim.
braids (make 2)
Cut 21 8-inch-long strands of Yellowwood. Place the hat on the Baby Doll’s head and mark the placement of the braids with a pin or stitch marker. The braids should fall just in front of the ears.
Threading 3 strands at a time on a yarn needle, pull through a purl loop at the marker and where the hat naturally rolls up at the brim. Pull the strands halfway through.
Divide the hair into three 7-strand segments and braid. With a length of yarn, tie the ends of the braids with a knot and then a double-tied bow. Trim the ends of the braids to the desired length.
sundress
With Lipstick Tree and the 16-inch circular needle, cast on 120 stitches. Join to work in the round, being careful not to twist the stitches. Place a stitch marker on the first stitch.
Rounds 1–3: knit
Round 4: purl
Rounds 5–8: knit
Switch to Lipstick Tree.
Rounds 9–12: knit
NOTE • Carry the colors along the inside as you work, and be sure not to pull too tightly as you knit.
Repeat rounds 9–12 three more times and then rounds 5–8 one more time.
Next round: k2tog, repeat to end of round, and at the same time work onto three double-pointed needles (20 sts per needle, 60 sts total remain)
Next 3 rounds: Work in 1 × 1 rib: (k1, p1), repeat to end of round
Bind off loosely in rib. Cut the yarn and pull through the remaining stitch.
straps (make 2)
With Lipstick Tree and two double-pointed needles used as straight needles, cast on 5 stitches. Work in garter stitch (knit every row) until the strap measures 4½ inches from the cast-on edge. Bind off. With a yarn needle and the strap tails, whipstitch the straps ½ inch down from the top edge of the dress and about 1½ inches in from the sides.
With Madder and the 16-inch circular needle, cast on 99 stitches. Join to work in the round, being careful not to twist the stitches. Place a stitch marker on the first stitch.
Knit every round until the hat measures 6½ inches from the cast-on edge.
Decrease rounds
Round 1: (k7, k2tog), repeat to end of round (88 sts remain)
Round 2: (k6, k2tog), repeat to end of round (77 sts remain)
Round 3: (k5, k2tog), repeat to end of round (66 sts remain)
Round 4: knit
For the next round, work onto three double-pointed needles as follows:
Round 5: (k4, k2tog), repeat to end of round (20 sts on needles 1 and 2, 15 sts on needle 3; 55 sts remain)
Round 6: knit
Round 7: (k3, k2tog), repeat to end of round (16 sts on needles 1 and 2, 12 sts on needle 3; 44 sts remain)
Round 8: (k2, k2tog), repeat to end of round (12 sts on needles 1 and 2, 9 sts on needle 3; 33 sts remain)
Round 9: knit
Round 10: (k1, k2tog), repeat to end of round (8 sts on needles 1 and 2, 6 sts on needle 3; 22 sts remain)
Round 11: knit
Round 12: k2tog, repeat to end of round (4 sts on needles 1 and 2, 3 sts on needle 3; 11 sts remain)
Round 13:
Needles 1 and 2: (k1, k2tog, k1), repeat on each needle (3 sts per needle remain)
Needle 3: knit (3 sts)
Round 14: (k1, k2tog), repeat on each needle (2 sts per needle remain)
Switch to Lipstick Tree and place all 6 remaining stitches on one double-pointed needle. Begin to work in I-cord.
Row 1: k2tog, k2, k2tog (4 sts remain)
Continue working in I-cord until the cord measures 3 inches from the beginning. Bind off. Cut the yarn and pull through the remaining stitch. Thread the bound-off tail on a yarn needle and whipstitch the end to the top center of the hat. Bring the other end of the cord around to meet the first, and tack down with a few more stitches to form a loop. Weave the tail to the inside of the hat and trim. Weave in all other remaining tails and trim.
braids
Complete the same as for the Baby Doll’s hat, but use 30 6-inch strands. Divide into groups of 10 for braiding. Trim to desired length.