 Projects from the
Square Knot
 Projects from the
The overhand knot is the easiest knot to tie, tied in a single strand. The square knot tied in two strands.
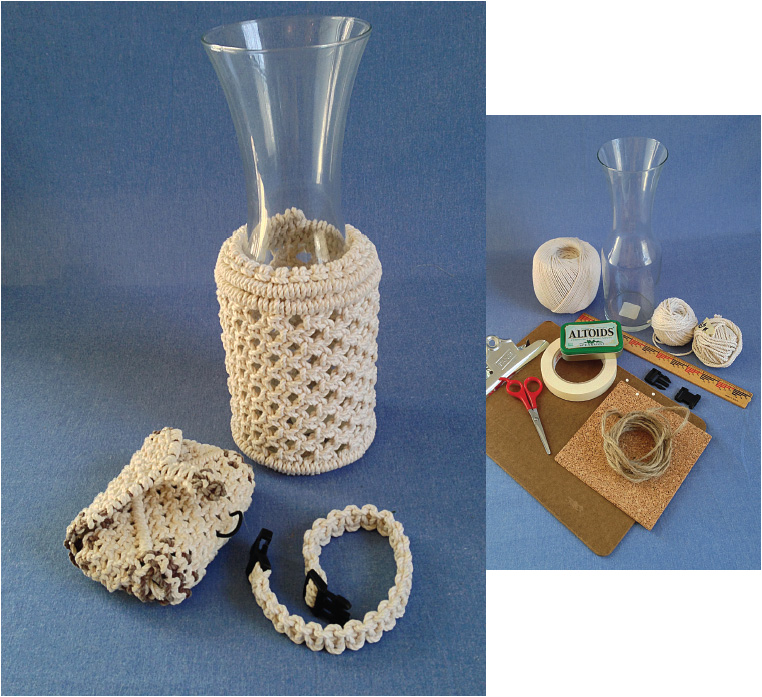
The square knot projects take minimal materials yet yield marvelous results.
A square knot.
The square knot morphed from a humble working knot into an art form in the court of Queen Anne of England. The ladies of her court would tie intricate patterns of square knots in the fringe of woven material. The knot enjoyed popularity in France under the name that many know today: macramé. The craft found its way onto ships during the whaling era and once again underwent a name change at the hands of the whalers, who dubbed it a square knot.
To tie a square knot, follow these steps:
1  Lay two pieces of twine parallel to each other.
2  Thread the bottom piece of twine over, under, and over the top piece of twine, forming a half-knot.
3  Pick up the two pieces of twine that are now at the top of your work area and cross them over, under, and over each other in the same pattern as the bottom pieces.
4  A square knot is formed. Pull the left and right ends of the twine to tighten the knot.
With a square knot, the pieces of twine on either side of the completed knot are parallel to each other, lying either above or below the loop of twine. If they are not parallel (for example, on the left side of the knot one piece of twine lies above the loop and the other lies beneath it), then you can wind up with a knot called a granny knot.
about 12 feet (see Note) of #48 cotton seine twine
dog collar clip
corkboard or like material with T pins, or clipboard
scissors or sharp knife
superglue
ruler
Note: This collar is  inch wide by 10 to 12 inches long. To ensure that the collar will fit your dog, you will want to determine the shrinkage of the cotton material you are using. Different cordage by different manufacturers will shrink differently. In order to discover this factor for your material, cut a 12-inch piece, dip it in very hot water, and let it dry. Measure once more to determine the amount of shrinkage, and factor this into the length of the collar.
This project fits a medium-sized dog, such as a cocker spaniel, border collie, or larger terrier.
To attach the twine to either end of the clip, follow these steps:
1  Middle (fold in half) the 12-foot piece of #48 cotton seine twine.
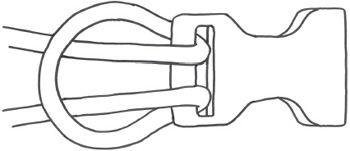
2  Attach the middled twine to one end of the plastic clip with a lark’s head knot/cow hitch. Take an extra turn around the bar with both of the strands to make the knot thicker (see drawing on page 16 for guidance on how to make the knot).
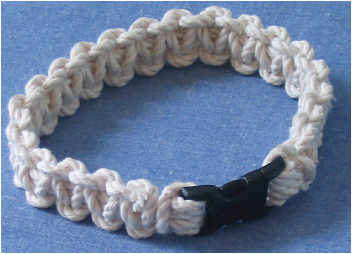
A dog collar is a fast and fun project—one to build your confidence.
Attaching the twine to each of the collar clips.
3  Bring the two strands down to the other end of the clip. After making sure the length is right for your dog’s neck, take two turns around the bar of the clip with each strand, as shown below.
This is now the core of your dog collar.
4  Arrange the two halves of the clips facing away from each other. Take the two loose ends and tie a chain of square knots that encompass the two core strands. Continue until you reach the clip at the other end.
5  Cut the ends off close to your work and glue them with superglue.
Twine attached to dog collar clip with a lark’s head knot (also known as a cow hitch).
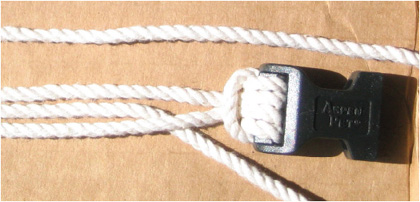
Extra turn added to lark’s head knot to thicken the knot.
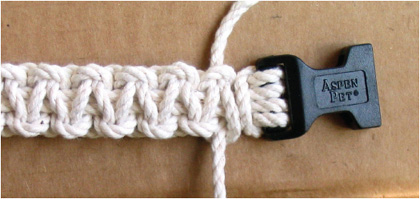
Square knots on dog collar almost complete.
standard glass carafe
150 feet of #48 cotton seine twine
sharp knife or scissors
ruler
masking tape
This project uses lark’s head knots, square knots, and clove hitches to decorate a glass carafe.
Follow these steps to start the project:
1  Cut a 6-foot length of #48 cotton seine twine. This will be your base cord.
2  Cut 24 pieces of #48 cotton seine twine that are each 72 inches long.
3  Middle (fold in half) each of the 72-inch strands. Then attach each strand to the base cord using a lark’s head knot (also known as a cow hitch).
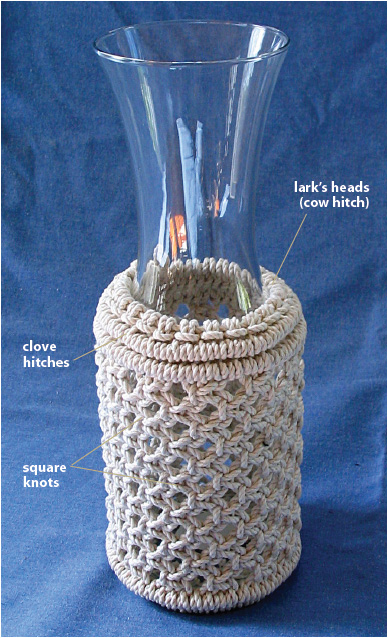
A completed glass carafe.
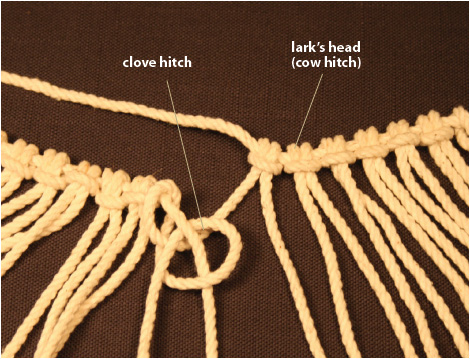
On the right: adding lark’s head knots to the base cord.
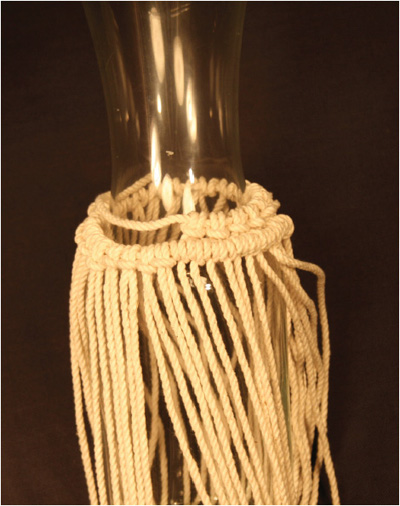
Carafe with base cord wrapped around its neck.
Clove hitch knot.
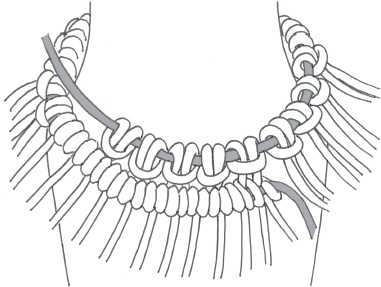
Start the clove hitches on the second row.
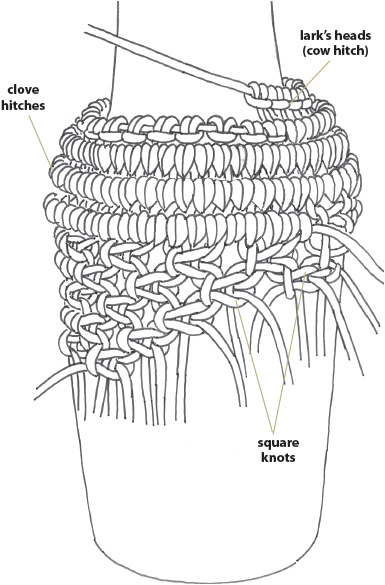
Square knots tied on the strands all the way to the bottom of the carafe.
Next, add clove hitches to the project by following these steps:
1  Pick up your “hula skirt” of strands (you will have 48 strands—the 24 lark’s head strands tied to the base cord—hanging from the base cord) and wrap it around the neck of the carafe. Tape the short end of the base cord to the glass.
2  If the wine carafe is larger or smaller, you will have to add or subtract the knotted-on strands from it so that they encircle the neck of the carafe. To execute the pattern, though, the number of strands hanging from the base cord must be divisible by four.
3  Pick up the first strand attached to the base cord and tie a clove hitch with it (the knot is illustrated above). Pull all the slack out of this first hitch and repeat with the following 47 strands.
4  Continue hitching until you’ve completed three rows of clove hitches.
5  Tuck the base cord up and out of the way. You’ll be using it again at the end of the project.
Now you need to change to square knotting. Tie square knots in the strands down to the bottom of the bottle, following the pattern described in the Altoids tin cover instructions later in this chapter.
The last part of the project is finishing the bottom of the carafe. This serves two purposes: to prevent the covering from slipping up the glass, and to add a nice pattern that repeats the hitching on the top of the carafe. Follow these steps:
1  Pick up the base cord that you had tucked aside and weave it down to the bottom of the square knotting.
2  Use the base cord to encircle the bottom of the carafe, and then tie off the base cord.
3  Use the strands to tie one last row of clove hitches to the base cord.
13 feet of #30 dark-color cotton seine twine (optional)
60 feet of #30 natural-color cotton seine twine
corkboard or like material with T pins
scissors or sharp knife
ruler
This is a useful and pretty project. The empty tin will hold many small items, such as a travel sewing kit, small bits of hardware for your boat (such as cotter pins), or a miniature first-aid kit. (Note: Although the materials list calls for cotton seine twine, you will notice that many of the photos show the project constructed with synthetic parachute cord. If you tie this with one more row, using 18 feet of parachute cord for accent and 80 feet of main color, you can make a neat cover for your smart phone.)
We start the tin knotted cover at the tongue (also known as the catch or latch).
Follow these steps to start the project:
1  Cut two pieces of the dark #30 cotton seine, each 6½ feet long, and middle (fold in half) each piece to create four strands.
2  Pin the four strands beside one another on the board.
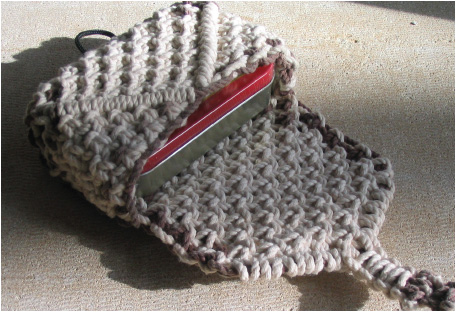
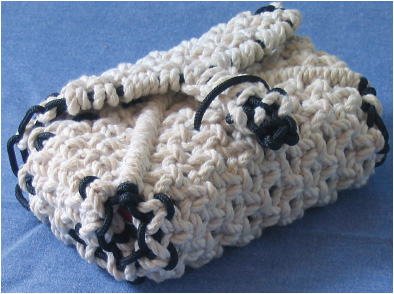
The completed tin cover made out of natural fibers (top); the cover in the lower photo uses black, synthetic braided core.
3  Just below where the strands are middled, use the two outside strands to tie a square knot around the two inside strands. Use the illustration and photo as a guide.
4  To get the tongue to the necessary width, we’ll add two pieces of the #30 natural-color cotton seine twine. Cut two pieces of the natural-color twine, each 7½ feet long. Middle each one and pin them just below the knot in the dark-color twine. There are now eight strands hanging down, half of them dark and half natural color.
5  Working with the four strands on the left, use the two outside strands to tie a square knot around the two inside strands.
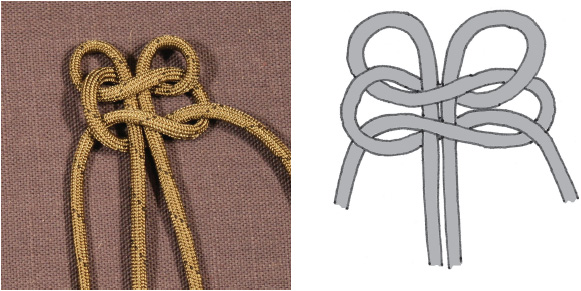
A square knot tied over the two middle strands.
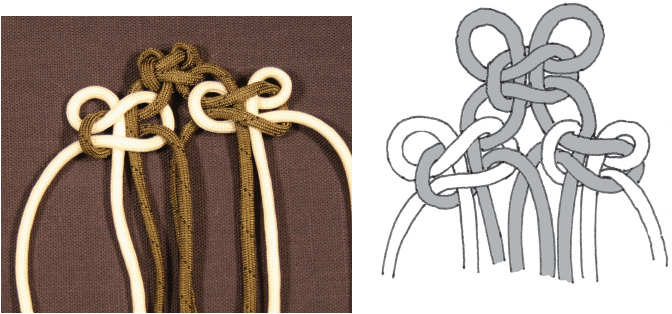
Two more square knots added to the tongue using natural-color cord.
Adding square knots to lengthen the tongue.
6  Then, working with the four strands on the right, use the two outside strands to tie a square knot around the two inside strands. Use the illustration and photo as a guide.
7  Make sure all the slack is out of the knots. To complete the catch, use the left and right natural-color strands to tie two more square knots over the six inside strands.
With the tongue done, follow these steps to work on the main body of the project:
1  Pull the dark-color strands off to the left and right. Then hitch each of the four natural-color strands to a pair of dark strands using a clove hitch.
2  Tie a square knot with the four natural-color strands right under the tongue (use the two outer strands to enclose the two inner strands).
3  Take ten lengths of 5 feet each of #30 natural cotton seine twine and middle them. Use lark’s head knots to attach five lengths to the left dark-color strands and five lengths to the right dark-color strands. See the pictures for guidance.
4  Tie a single knot at the center. To create the angled “bar” or “ridge,” tie a single row of clove hitches left and right. (See the photo at left and middle of previous page.)
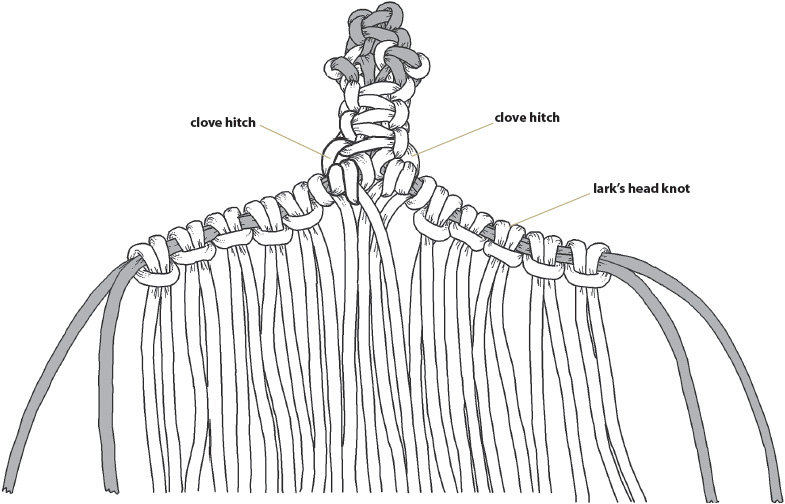
Natural-color strands added to the project using lark’s head knots.
Tying the rows of hitches on the left and right at the bottom of the project.
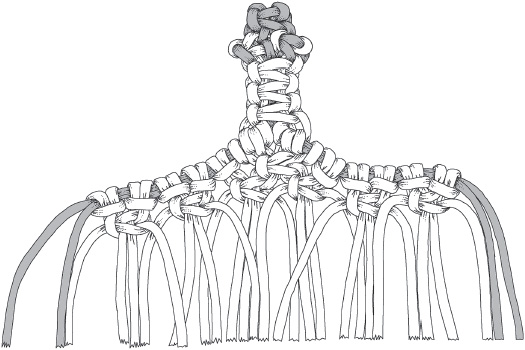
The beginning of the process of adding square knots to create the long side of the tin cover.
Tying rows of square knots after the hitches.
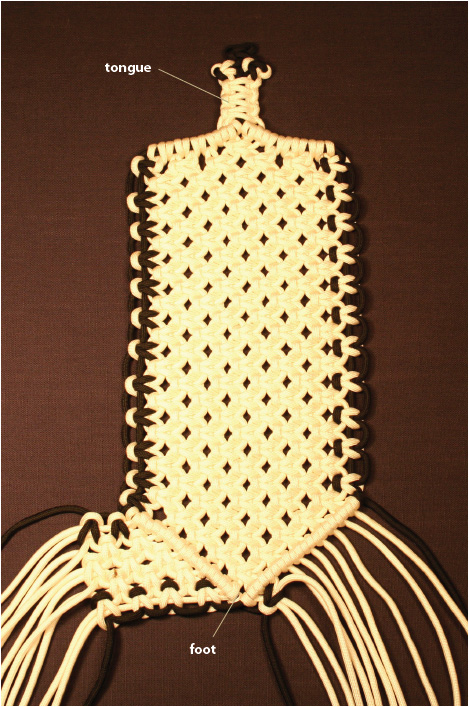
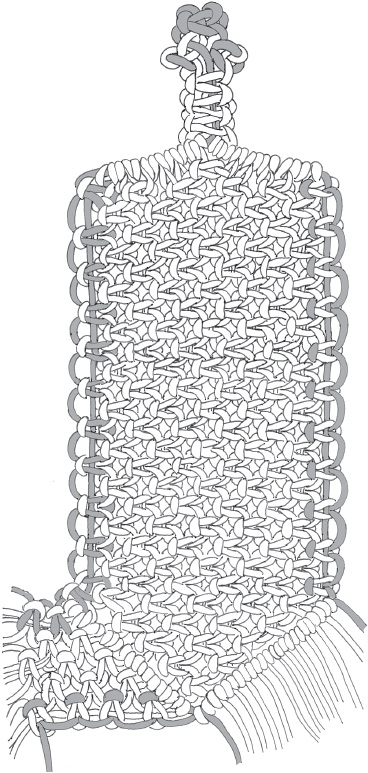
The almost completed project showing the tongue and the foot.
5  For the next rows of knots, you’ll need to continue tying alternating square knots for thirteen rows—that includes the single square knot at the peak (just below the tongue) and the single square knot at the foot.
6  To bring the project to completion, we’ll need to change the direction of the strands. They need to make a 90-degree turn. By tying the row of hitches right and left, we’ll gain 45 degrees.
7  To complete the turn, after the row of hitches, tie the three rows of square knots. Do this on the left and right sides of the foot.
8  Now that the strands are pointing in the right direction, what’s left is to simply tie up the sides to form the case. Do this step with the case inside out. To do this, note you have seven pairs—take one strand from each pair and thread it through the corresponding loop. (Refer back to the photos at the beginning of the project to see how the final project looks.)
9  Pull up and tie a square knot. Put a dab of glue on the knot. (Or this can be done without the glue; I don’t use glue on the cotton, but it is useful on parachute cord.) Don’t cut it off too close to the knot—this is the inside of the cover, not the outside that will be in view.
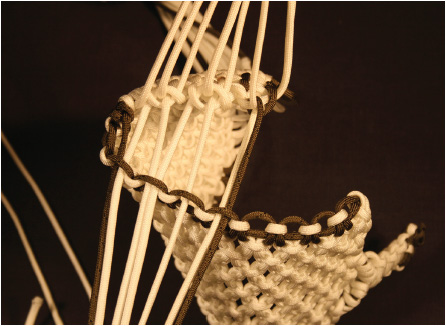
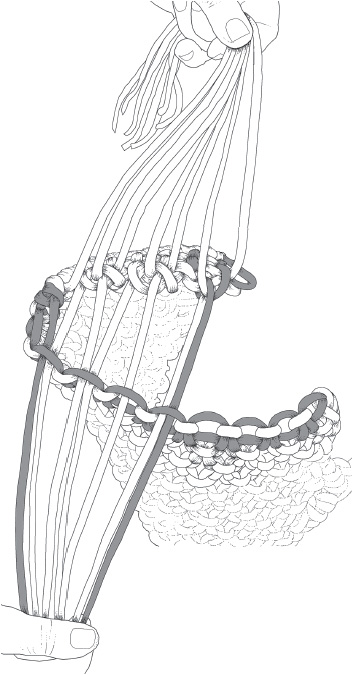
Tying off the strands to bring the cover to a folded shape that will go around the tin.