This final chapter discusses the topic of API extensibility. By this, I mean the ability of your clients to modify the behavior of your interface without requiring you to evolve the API for their specific needs. This can be a critical factor in your ability to maintain a clean and focused interface while also delivering a flexible system that lets your users solve problems that you had never anticipated. This concept is expressed by the Open/Closed Principle, which was discussed in Chapter 4, that an API should be open for extension but closed for modification (Meyer, 1997).
To offer a real-world example, the Marionette animation system at Pixar supported key-frame animation with a range of possible interpolation schemes between animation keys, such as Bézier, Catmull-Rom, linear, and step interpolation. However, during development of The Incredibles and Cars it became necessary to allow our production users to devise and iterate on more sophisticated interpolation routines. Instead of continually updating the core animation system every time our users needed to change their custom interpolation algorithm, I devised a plugin system that allowed production users to create dynamic libraries that could be discovered at run time and would then be added to the set of built-in interpolation routines. This proved to be a very effective way to resolve production-specific needs while still maintaining a generic filmmaking system.
This chapter is dedicated to various techniques that allow you to achieve the same level of flexibility in your own APIs. I will spend most of the chapter detailing how to create industrial-strength, cross-platform plugin architectures for your C and C++ APIs, but I will also cover other extensibility techniques using inheritance and templates.
12.1 Extending Via Plugins
In the most common scenario, a plugin is a dynamic library that is discovered and loaded at run time as opposed to a dynamic library that an application is linked against at build time. Plugins can therefore be written by your users, using a well-defined plugin API that you provide. This allows them to extend the functionality of your API in designated ways. Figure 12.1 illustrates this concept, where the white boxes represent artifacts that your users produce.
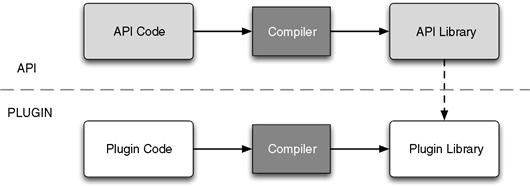
Figure 12.1 A plugin library is a dynamic library that can be compiled separately from a Core API and explicitly loaded by the API on demand.
It should be noted, however, that static library plugins are also possible, such as for embedded systems where all plugins are statically linked into the application at compile time. This is useful to ensure that a plugin can be found at run time and that it has been built under the same environment as the main executable. However, I will focus on the dynamic library model in this chapter, as this poses the most design challenges and gives users the ability to add new plugins to the system at run time.
12.1.1 Plugin Model Overview
Many examples of commercial software packages allow their core functionality to be extended through the use of C/C++ plugins. For example, the Apache Web server supports C-based “modules,” Adobe Photoshop supports a range of plugin types to manipulate images, and Web browsers such as Firefly, Chrome, and Opera support the Netscape Plugin API (NPAPI) for the creation of browser plugins such as the Adobe Flash or PDF Reader plugins. The Qt toolkit can also be extended via the QPluginLoader class. (A server-based plugin API such as Apache’s module interface is sometimes referred to as a Server API, or SAPI.)
Some of the benefits of adopting a plugin model in your API are as follows.
• Greater versatility. Your API can be used to solve a greater range of problems, without requiring you to implement solutions for all of those problems.
• Community catalyst. By giving your users the ability to solve their own problems within the framework of your API, you can spark a community of user-contributed additions to your base design.
• Smaller updates. Functionality that exists as a plugin can be updated easily independently of the application by simply dropping in a new version of the plugin. This can often be a much smaller update than distributing a new version of the entire application.
• Future proofing. Your API may reach a level of stability where you feel that no further updates are necessary. However, further evolution of the functionality of your API can continue through the development of plugins, allowing the API to maintain its usefulness and relevance for a greater period of time. For example, the NPAPI has changed little in recent years, but it is still a popular method to write plugins for many Web browsers.
• Isolating risk. Plugins can be beneficial for in-house development too by letting engineers change functionality without destabilizing the core of your system.
As was just hinted, a plugin system doesn’t have to be used only by your clients. You can develop parts of your Core API implementation as plugins too. In fact, this is actually a good practice because it ensures that you fully exercise your plugin architecture and that you live in the same world as your users (“eat your own dog food”). For example, the GNU Image Manipulation Program (GIMP) ships many of its built-in image processing functions as plugins using its GIMP Plugin API.
Netscape Plugins
The Netscape Plugin API (NPAPI) provides a cross-platform plugin API to embed custom functionality inside of various Web browsers. The interface grew out of work from Adobe Systems to integrate a PDF viewer into early versions of the Netscape browser. This plain C plugin API is still used today to embed native code extensions inside of Web browsers, such as Mozilla Firefox, Apple Safari, and Google Chrome. For example, Shockwave Flash, Apple QuickTime, and Microsoft Silverlight are implemented as browser plugins (try typing “about:plugins” into Firefox to see a list of installed plugins).
The NPAPI gives native code the following capabilities inside a Web browser:
• Draw into a region of the browser window.
• Receive mouse and keyboard events.
• Send and receive data over HTTP.
While I was at SRI International in the 1990s, we developed a Web-based 3D terrain visualization system called TerraVision (Leclerc and Lau, 1994). This started life as a desktop application that required a four-processor SGI Onyx RealityEngine2. However, as commodity graphics hardware advanced, we were eventually able to make it run as a plugin inside of Netscape Navigator and Microsoft Explorer on a standard PC.

Because TerraVision was a complex multithreaded application, to make this work in a non-thread-safe browser environment we had to run it in a separate process. That is, our Netscape plugin would create a new process for TerraVision to run in and pass it a window handle to draw into. All communication between the plugin and the TerraVision processes happened via pipe I/O.
12.1.2 Plugin System Design Issues
There are many different ways to design a plugin system. The best solution for your current project may not be the best choice for your next project. I will therefore start by trying to tease out some of the high-level issues that you should be aware of when devising a plugin system.
At the same time, there are also a number of general concepts applicable to all plugin systems. For example, when supporting dynamic library plugins, you will always need a mechanism to load a dynamic library and access symbols in that file. In general, when creating any plugin system, there are two major features that you must design (see Figure 12.2).
1. The Plugin API: This is the API that your users must compile and link against in order to create a plugin. I differentiate this from your Core API, which is the larger code base into which you are adding the plugin system.
2. The Plugin Manager: This is an object (often a singleton) in the Core API code that manages the life cycle of all plugins, that is, loading, registration, and unloading. This object can also be called the Plugin Registry.
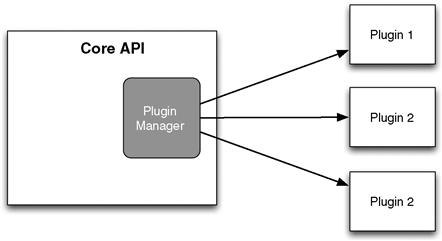
Figure 12.2 The Plugin Manager lives in the Core API. It discovers and loads plugins that have been built against the Plugin API.
With these general concepts in hand, let’s take a look at some of the design decisions that will affect the precise plugin architecture that you should build for your API.
• C versus C++. As discussed earlier in the versioning chapter, the C++ specification does not define a specific ABI. Therefore, different compilers, and even different versions of the same compiler, can produce code that is binary incompatible. The implication for a plugin system is that plugins developed by clients using a compiler with a different ABI may not be loadable. In contrast, the ABI for plain C code is well defined and will work across platforms and compilers.
• Versioning. You will want some way to know whether a plugin was built with an incompatible version of your API. Because determining what constitutes an incompatible API can be difficult to surmise automatically, it is often left to the plugin writer to specify. For example, Firefox’s Extensions API lets you specify a minimum and maximum version range that the extension is known to work with (with a system to easily update an extension’s max version for occasions when an incompatible API is released). It’s also useful to know which version of the API a plugin was compiled against. This could be embedded in the plugin automatically or again it could be left to the plugin writer to specify. For example, Google’s Android API lets you specify an android:targetSdkVersion in addition to android:minSdkVersion and android:maxSdkVersion.
• Internal versus external metadata. Metadata, such as a human-readable name and version information, can either be defined within the plugin code itself or can also be specified in a simple external file format. The benefit of using an external metadata file is that you don’t actually have to load all plugins in order to know the set of all available objects. For example, you may want to present a list of all plugins to the user and then only load the plugins they chose to use. The downside, however, is that you cannot simply drop a new plugin into a directory and have it be loaded automatically. You must also include a per-plugin metadata file, or update a global metadata file for all plugins, depending on the particular approach you adopt.
• Generic versus specialized Plugin Manager. One approach to implementing the Plugin Manager is to make it very low level and generic, that is, it simply loads plugins and accesses symbols in those plugins. However, doing so can mean that the Plugin Manager does not know about the existence of concrete types in your API. As a result, it will probably have to return objects as void* pointers and you must cast those to concrete types before using them. Alternatively, a Plugin Manager that can, at a minimum, forward declare the types for any objects in a plugin can produce a more type safe solution, although as a result it cannot be implemented independently of your API. A middle ground is to introduce a dynamic run-time typing system into your API, where the Plugin Manager can return references in terms of a generic type that can be registered later by your API.
• Security. You must decide how much you will trust user plugins. Plugins are arbitrarily compiled code that you allow to run in your process. A plugin could therefore potentially do anything, from accessing data that it should not, to deleting files on the end-user’s hard drive, to crashing the entire application. If you need to protect against such malicious plugins, then you may consider creating a socket-based solution, where plugins run in a separate process and communicate with the Core API through an IPC channel. Alternatively, you could implement bindings for a language that supports sandboxing of user scripts, such as JavaScript or .NET/Mono, and require all plugins to be written in that scripting language.
• Static versus dynamic libraries. As already mentioned, it is possible to define plugins as static libraries, meaning that they must be compiled into the application program. The more common solution for consumer applications is to use dynamic libraries so that users can write their own plugins and extend the application at run time. A constraint for writing static plugins is that you must ensure that no two plugins define the same symbols, that is, the initialization function for each plugin must be named uniquely, such as <PluginName>_PluginInit(). In the case of dynamic library plugins, you can use the same initialization function name for every plugin, such as PluginInit().
12.1.3 Implementing Plugins in C++
I’ve identified that supporting C++ plugins can be difficult due to cross-platform and cross-compiler ABI problems. However, because this is a book about C++ API design, let’s take a few more moments to present some solutions that let you use C++ plugins more robustly.
First off, if you are happy requiring that plugin developers use the same version of the same compiler that you use for building your API, then you should have nothing to worry about.
If that’s not the case, one solution is to use a binding technology for your plugins, for example, an IPC solution such as COM on Windows, or creating script bindings for your API and letting users write extensions using a cross-platform scripting language such as Python or Ruby (as covered in the previous chapter).
If you absolutely need to use C++ plugins for maximum performance or you feel that creating a COM or script binding is too heavyweight for your needs, there are still ways that you can use C++ more safely in plugins. The following list offers several best practices, many of which are implemented by the open source DynObj library available on http://www.codeproject.com/.
• Use abstract base classes. Implementing virtual methods of an abstract base class can insulate a plugin from ABI problems because a virtual method call is usually represented as an index into a class’s vtable. Theoretically, the vtable format can differ between compilers, but in practice this tends not to happen. (Note, however, that different compilers may order overloaded virtual methods differently so it’s best to avoid these.) All of the methods in the interface need to be pure virtual, although inlined methods can be used safely too as the code will get embedded directly into the plugin.
• Use C linkage for free functions. All global functions in your Plugin API should use C linkage to avoid C++ ABI issues, that is, they should be declared with extern "C". Similarly, function callbacks that a plugin passes to the Core API should also use C linkage for maximum portability.
• Avoid STL and exceptions. Different implementations of STL classes such as std::string and std::vector may not be ABI compatible. It is therefore best to avoid these containers in any function calls between the Core API and Plugin API. Similarly, because the ABI for exceptions tends to be unstable across compilers, these should be avoided in your Plugin API.
• Don’t mix allocators. It’s possible for plugins to be linked against a different memory allocator than your API. For example, on Windows it’s common for debug builds to use a different allocator than release builds. The implication for the design of our plugin system is that either the plugin must allocate and free all of its objects or the plugin should pass control to the Core API to create and destroy all objects. However, your Core API should never free objects that were allocated by a plugin, and vice versa.
Putting all of this information together, I will now develop a flexible and robust cross-platform C++ plugin system. The plugin system will allow new C++ classes to be registered with the Core API by providing one or more factory methods. I will continue our extensible factory example from Chapter 3 and augment it to allow new IRenderer classes to be registered from plugins, where these plugins are loaded dynamically at run time rather than being compiled into the Core API. Furthermore, the plugin architecture will support different approaches to storing plugin metadata, either within an accompanying external file or within the plugins themselves.
12.1.4 The Plugin API
The Plugin API is the interface that you provide to your users to create plugins. I’ll call it pluginapi.h in our example here. This header file will contain functionality that allows plugins to communicate with the Core API.
When the Core API loads a plugin, it needs to know which functions to call or symbols to access in order to let the plugin do its work. This means that you should define specifically named entry points in the plugin that your users must provide. There are several different ways that you can do this. For example, when writing a GIMP plugin, you must define a variable called PLUG_IN_INFO that lists the various callbacks defined in the plugin.
NULL, /* called when GIMP starts */
NULL, /* called when GIMP exits */
query, /* procedure registration and arguments definition */
Netscape Plugins use a similar, although slightly more flexible, technique. In this case, plugin writers define an NP_GetEntryPoints() function and fill in the appropriate fields of the NPPluginFuncs structure that the browser passes in during plugin registration. The NPPluginFuncs structure includes size and version fields to handle future expansion.
Another solution is to have specifically named functions that the Core API can call, if they are exported by the plugin. I will adopt this approach for our example because it is simple and scalable; for example, it doesn’t rely on a fixed size array or structure.
The two most basic callbacks that a plugin should provide are an initialization function and a cleanup function. As noted earlier, these functions should be declared with C linkage to avoid name mangling differences between compilers. If you want to develop a cross-platform plugin system, you will also have to deal with correctly using __declspec(dllexport) and __declspec(dllimport) decorators on Windows. Instead of requiring our plugin developers to know all of these details, I will provide some macros to simplify everything. (As stated earlier, you should avoid preprocessor macros for declaring things such as API constants; however, they are perfectly valid to affect compile-time configuration like this.)
Also, I’ve decided that our plugin should be allowed to register new IRenderer derived classes so I’ll provide a Plugin API call to let plugins do just this. Here’s a first draft of our Plugin API:
#define CORE_FUNC extern "C" CORE_API
#define PLUGIN_FUNC extern "C" PLUGIN_API
#define PLUGIN_INIT() PLUGIN_FUNC int PluginInit()
#define PLUGIN_FREE() PLUGIN_FUNC int PluginFree()
typedef IRenderer *(*RendererInitFunc)();
typedef void (*RendererFreeFunc)(IRenderer *);
This header provides macros to define the initialization and cleanup functions for a plugin: PLUGIN_INIT() and PLUGIN_FREE(), respectively. I also provide the PLUGIN_FUNC macro to let plugins export functions for the Core API to call, as well as the CORE_FUNC macro that exports Core API functions for plugins to call. Finally I provide a function, RegisterRenderer(), which allows plugins to register new IRenderer classes with the Core API. Note that a plugin must provide both an init function and a free function for their new IRenderer classes to ensure that allocations and frees happen within the plugin (to address the point that you should not mix memory allocators).
You may also note use of the CORE_API and PLUGIN_API defines. These let us specify the correct DLL export/import decorators under Windows. CORE_API is used to decorate functions that are part of the Core API, and PLUGIN_API is used for functions that will be defined in plugins. The definition of these macros is contained in the defines.h header and looks like:
#define CORE_API __declspec(dllexport)
#define PLUGIN_API __declspec(dllimport)
#define CORE_API __declspec(dllimport)
Note that you must build your Core API with the BUILDING_CORE define set for these macros to work correctly, for example, add /DBUILDING_CORE to the compile line on Windows. This define is not needed when compiling plugins.
Finally, for completeness, here are the contents of the renderer.h file, which is also included by pluginapi.h.
virtual bool LoadScene(const char *filename) = 0;
virtual void SetViewportSize(int w, int h) = 0;
virtual void SetCameraPosition(double x, double y, double z) = 0;
This is essentially the same definition presented in Chapter 3, except that I have changed the LoadScene() method to accept a const char * parameter instead of a std::string (to address our concerns about binary compatibility of STL classes between compilers).
12.1.5 An Example Plugin
Now that I have developed a rudimentary Plugin API, let’s examine what a plugin built against this API might look like. The basic parts that you need to include are:
2. Callbacks to create and destroy this class.
3. A Plugin initialization routine that registers our create/destroy callbacks with the Core API.
Here is the code for such a plugin. This plugin defines and registers a new renderer called “opengl.” This is defined in a new OpenGLRenderer class that derives from our IRenderer abstract base class.
class OpenGLRenderer : public IRenderer
bool LoadScene(const char *filename) { return true; }
void SetViewportSize(int w, int h) {}
void SetCameraPosition(double x, double y, double z) {}
void SetLookAt(double x, double y, double z) {}
void Render() { std::cout << "OpenGL Render" << std::endl; }
PLUGIN_FUNC IRenderer *CreateRenderer()
PLUGIN_FUNC void DestroyRenderer(IRenderer *r)
RegisterRenderer("opengl", CreateRenderer, DestroyRenderer);
In this example, I have defined a PLUGIN_INIT() function, which will get run whenever the plugin is loaded. This registers our OpenGLRenderer factory function, CreateRenderer(), and the associated destruction function, DestroyRenderer(). These are both defined using PLUGIN_FUNC to ensure that they are exported correctly with C linkage.
The RegisterRenderer() function essentially just calls the RendererFactory::RegisterRenderer() method presented in Chapter 3 (with the addition of also being able to pass a destruction callback as well as the CreateCallback). There are a couple of reasons why I added an explicit registration function to the Plugin API rather than letting plugins register themselves directly with the RendererFactory. One reason is simply to give us a layer of abstraction so that you could change RendererFactory in the future without breaking existing plugins. Another reason is to avoid plugins calling methods that use STL strings: note that RegisterRenderer uses a const char * to specify the renderer name.
12.1.6 The Plugin Manager
Now that you have a Plugin API and you can build plugins against this API, you need to be able to load and register those plugins into the Core API. This is the role of the Plugin Manager. Specifically, the Plugin Manager needs to handle the following tasks.
• Load metadata for all plugins. These metadata can either be stored in a separate file (such as an XML file) or be embedded within the plugins themselves. In the latter case, the Plugin Manager will need to load all available plugins to collate metadata for all plugins. These metadata let you present the user with a list of available plugins for them to choose between.
• Load a dynamic library into memory, provide access to the symbols in that library, and unload the library if necessary. This involves using dlopen(), dlclose(), and dlsym() on UNIX platforms (including Mac OS X) and LoadLibrary(), FreeLibrary(), and GetProcAddress() on Windows. I provide details about these calls in Appendix A.
• Call the plugin’s initialization routine when the plugin is loaded, and call the cleanup routine when the plugin is unloaded. These functions are defined by PLUGIN_INIT() and PLUGIN_FREE() within the plugin.
Because the Plugin Manager provides a single point of access to all of the plugins in the system, it is often implemented as a singleton. In terms of design, the Plugin Manager can be thought of as a collection of Plugin Instances, where each Plugin Instance represents a single plugin and offers functionality to load and unload that plugin. Here is an example implementation for a Plugin Manager:
explicit PluginInstance(const std::string &name);
std::string GetFileName() const;
std::string GetDisplayName() const;
PluginInstance(const PluginInstance &);
const PluginInstance &operator =(const PluginInstance &);
static PluginManager &GetInstance();
bool Load(const std::string &name);
bool Unload(const std::string &name);
std::vector<PluginInstance *> GetAllPlugins();
PluginManager(const PluginManager &);
const PluginManager &operator =(const PluginManager &);
This design decouples the ability to access metadata for all plugins from the need to load those plugins. That is, if metadata such as the plugin’s display name are stored in an external file, you can call PluginManager::GetAllPlugins() without loading the actual plugins. However, if metadata are stored in the plugins, then GetAllPlugins() can simply call LoadAll() first. The following example presents a sample external metadata file based on an XML syntax:
Irrespective of the approach to store plugin metadata within an external file or embedded within each plugin, the following code outputs the display name for all available plugins:
std::vector<PluginInstance *> plugins =
PluginManager::GetInstance().GetAllPlugins();
std::vector<PluginInstance *>::iterator it;
for (it = plugins.begin(); it != plugins.end(); ++it)
std::cout << "Plugin: " << pi->GetDisplayName() << std::endl;
A related issue is that of plugin discovery. The aforementioned API does not restrict the ability for the implementation of PluginManager::Load() to search multiple directories to discover all plugins. The name passed to this Load() method can be a base plugin name without any path or file extension, for example, “glplugin.” The Load() method can then search various directories and look for files with extensions that may be platform specific, for example, libglplugin.dylib on Mac OS X or glplugin.dll on Windows. Of course, you can always introduce your own plugin filename extension. For example, Adobe Illustrator uses the .aip extension for its plugins, and Microsoft Excel uses the .xll extension.
The following Core API initialization code registers a single built-in renderer and then loads all plugins, allowing additional renderers to be added to the system at run time:
class MesaRenderer : public IRenderer
bool LoadScene(const char *filename) { return true; }
void SetViewportSize(int w, int h) {}
void SetCameraPosition(double x, double y, double z) {}
void SetLookAt(double x, double y, double z) {}
void Render() { std::cout << "Mesa Render" << std::endl; }
static IRenderer *Create() { return new MesaRenderer(); }
// create a built-in software renderer
RendererFactory::RegisterRenderer("mesa", MesaRenderer::Create);
12.1.7 Plugin Versioning
As a final note, I will expand on the topic of plugin versioning. As with API versioning, you will want to make sure that the release of your first plugin system includes a versioning system. You could either co-opt the version number of your Core API or introduce a specific Plugin API version number. I suggest the latter because the Plugin API is actually a separate interface from the Core API and the two may change at a different rate. For example, Google’s Android API uses the notion of API Level (Table 12.1). This is a single integer that increases monotonically with each new version of the Android API.
Table 12.1
Android API level for each version of the Android platform
| Platform Version | API Level |
| Android 2.1 | 7 |
| Android 2.0.1 | 6 |
| Android 2.0 | 5 |
| Android 1.6 | 4 |
| Android 1.5 | 3 |
| Android 1.1 | 2 |
| Android 1.0 | 1 |
One of the most important pieces of information you will want to access is the Plugin API version that a given plugin was built against. This can let you determine if a plugin is incompatible with the current release and therefore should not be registered, for example, if the plugin was built with a later version of the API or an incompatible older API. Given the importance of this information, it is advisable to embed this information automatically in every plugin. This ensures that the correct version is always compiled into the plugin every time that it is rebuilt successfully. Given the Plugin API already proposed, you could include this information in the PLUGIN_INIT() macro because users must call this in order for the plugin to do anything. For example,
In addition, users can optionally specify a minimum and maximum version of the API that the plugin will work with. The minimum version number will be more commonly specified. For example, if the plugin uses a new feature that was added to the API in a specific release, that release should be specified as the minimum version. Specifying a maximum version number is only useful after a new version of the API has been released and the plugin writer finds that it breaks their plugin. Normally, the maximum version will be unset because plugin writers should assume that future API releases will be backward compatible.
This min/max version number could either be specified in an external metadata format, such as
Alternatively, you can extend the Plugin API with additional calls to let plugins specify this information in code.
12.2 Extending Via Inheritance
The focus of this chapter thus far has been supporting API extensibility at run time via plugins. However, there are other ways that your clients can extend the functionality of your API for their own purposes. The primary object-oriented mechanism for extending a class is inheritance. This can be used to let your users define new classes that build upon and modify the functionality of existing classes in your API.
12.2.1 Adding Functionality
Jonathan Wood has a video on Microsoft’s Visual C++ Developer Center where he demonstrates extending MFC’s CString class via inheritance in order to create a CPathString class that adds some path manipulation functions to the basic string class. The resulting class looks something like
This is a simple example of extending an existing class where only new methods are added to the base class.
An important point to reiterate here is that this can only be done safely if the base class was designed to be inherited from. The primary indicator for this is whether the class has a virtual destructor. In the CPathString example, MFC’s CString class does not have a virtual destructor. This means that there are cases when the destructor for CPathString will not be called, such as
In this particular case, this is not an issue because all of the new CPathString methods are stateless, that is, they do not allocate any memory that must be freed by the CPathString destructor. However, this does highlight the issue that if you expect your users to inherit from any of your classes, you should declare the destructor for those classes to be virtual.
12.2.2 Modifying Functionality
In addition to adding new member functions to a class, we know that C++ allows you to define functions in a derived class that override existing functions in a base class if they have been marked as virtual in the base class. [Note that C++ lets you redefine, i.e., hide, a non-virtual base class method in a derived class, but you should never do this (Meyers, 2005).] This can provide even more avenues for your users to customize the behavior of a class, if you give them the hooks to do so.
For example, all UI widgets in the Qt library provide the following virtual methods:
This allows users of the Qt library to create derived classes of these widgets and change their appearance. To illustrate this, the following class inherits from the standard Qt button widget and overrides the sizeHint() method to specify the preferred size of the button. The result of this can be seen in Figure 12.3.

Figure 12.3 A standard Qt QPushButton widget (left), and a derived class of QPushButton that overrides the sizeHint() virtual method (right).
This code works because sizeHint() is a known method of every widget and is called by the layout classes to determine the widget’s preferred size. That is, the creators of the Qt library explicitly designed this point of customization into the toolkit and allowed users to modify it in their own derived classes by deliberately declaring the method to be virtual. APIs that allow users to selectively override or specialize their default behavior in this way are called “frameworks,” which is why Qt is often referred to as an application or UI framework. This is also an example of the Template Method design pattern, where a generic algorithm allows one or more of its steps to be overridden to support different behaviors.
It’s important to note that simply changing the size of the widget by calling the resize() method in the MySquareButton constructor is not the same thing. The effect of this would be to forcibly set the size of the button. However, the point of sizeHint() is to provide an indication of the preferred size to the UI layout engine, that is, to other classes in the API, so that it can override this size when necessary to satisfy other widget size constraints.
This could be implemented without a virtual sizeHint() method. For example, non-virtual setSizeHint() and getSizeHint() methods could be added to the widget base class. However, this would require the base class to store the hint information as a data member in the object, and hence increase the size of every object that inherits from it. In contrast, the use of the sizeHint() virtual method supports the ability for a class to simply calculate the preferred size on each invocation, without the need to store the size within the object instance.
In the chapter on performance, I cautioned you to only add virtual methods to a class when you need them. That advice is still valid. In the aforementioned example, designers of the Qt API added these virtual methods to their API carefully and consciously to produce a flexible way for their users to extend the base functionality of their classes.
12.2.3 Inheritance and the STL
Programmers who are new to C++ and the Standard Template Library often try to subclass STL containers, such as
However, as already noted, you should only attempt to derive from a class that defines a virtual destructor. STL container classes do not provide virtual destructors; in fact, they have no virtual methods for you to override at all. This is a clear indication that these classes were not meant to be inherited from. Attempting to do so could introduce subtle and difficult-to-debug resource leaks into your code, and your clients’ code. The general rule is therefore that you should never inherit from STL container classes.
As an alternative, you could use composition to add functionality to an STL container in a safe manner. That is, use an std::string as a private data member and provide accessor methods that thinly wrap the underlying std::string methods. Then you can add your own methods to this class. For example,
explicit MyString(const char *str) : mStr(str) {}
bool empty() const { return mStr.empty(); }
void clear() { mStr.clear(); }
However, the STL does provide a few classes that were designed for inheritance. One of the most obvious of these is std::exception. This is the base class for all STL exceptions, including bad_alloc, bad_cast, bad_exception, bad_typeid, lock_error, logic_error, and runtime_error. You can define your own exceptions that derive from std::exception quite simply:
Another part of the STL that supports extension through inheritance is the iostream library. This is actually a very powerful, well-designed, and extensible API that provides various stream abstractions. A stream can be thought of simply as a sequence of bytes waiting to be processed, such as the standard cin input stream and cout output stream. You can write custom stream classes by deriving either from a particular stream class or from the streambuf base class. For example, you could create custom stream classes to send and receive HTTP data to/from a Web server.
There is also the Boost Iostreams library, which makes it easier to work with STL streams and stream buffers and also provides a framework for defining filters on streams and buffers. The library comes with a collection of handy filters, including regular expression filtering and data compression schemes such as zlib, gzip, and bzip2.
12.2.4 Inheritance and Enums
There are times when your users may want to extend an enum that you define in one of your base classes, for example, to add further enumerators for new features that they have added in their derived classes. This can be done quite easily in C++ as follows.
Here is an example that demonstrates the use of this extended enum:
std::cout << "CIRCLE=" << Derived::CIRCLE << std::endl;
std::cout << "SQUARE=" << Derived::SQUARE << std::endl;
std::cout << "TRIANGLE=" << Derived::TRIANGLE << std::endl;
std::cout << "OVAL=" << Derived::OVAL << std::endl;
std::cout << "RECTANGLE=" << Derived::RECTANGLE << std::endl;
The important part that makes this work in a robust way is the fact that the Base class defined SHAPE_END so that the Derived class could add new values after the last value defined by Base::SHAPE. This is therefore a good practice for you to adopt when defining enums in classes that you expect to be subclassed by your clients. Without this, your clients could pick an arbitrarily large integer to start numbering their enumerators, for example, OVAL=100, although this is a less elegant solution.
12.2.5 The Visitor Pattern
Various generic design patterns were presented back in Chapter 3. However, I deferred discussion of the Visitor design pattern until now as it is specifically targeted at API extensibility. The core goal of the Visitor pattern is to allow clients to traverse all objects in a data structure and perform a given operation on each of those objects. This pattern is essentially a way to simulate the addition of new virtual methods to an existing class. It therefore provides a useful pattern for your clients to extend the functionality of your API. For example, a Visitor pattern could be used to let clients provide a set of methods that operate on every node in a scene graph hierarchy or to traverse the derivation tree of a programming language parser and output a human-readable form of the program.
Let’s develop a visitor example to illustrate how this pattern works. I’ll use the example of a scene graph hierarchy that describes a 3D scene, such as that used by Open Inventor, OpenSceneGraph, or the Virtual Reality Modeling Language. To keep the example simple, our scene graph will contain only three different node types: Shape, Transform, and Light. Figure 12.4 shows an example hierarchy using these node types.
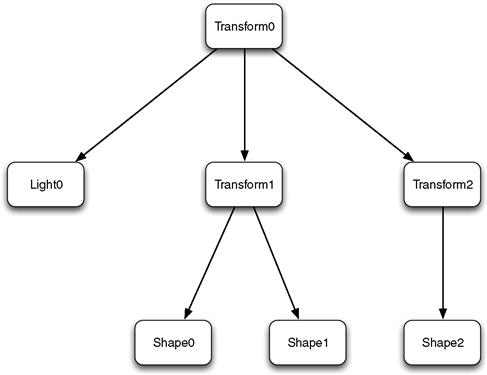
Figure 12.4 Example scene graph hierarchy showing nodes of different types.
I’ll begin by defining our abstract visitor interface. Clients can create concrete subclasses of this interface in order to add custom operations to the scene graph. It essentially declares a Visit() method for each node type in the scene graph.
virtual void Visit(ShapeNode &node) = 0;
virtual void Visit(TransformNode &node) = 0;
Now let’s take a look at our scene graph API. This provides the declarations for each of our node types, as well as a skeleton SceneGraph class. Each node type derives from a base node type, called BaseNode.
explicit BaseNode(const std::string &name);
virtual void Accept(INodeVisitor &visitor) = 0;
class ShapeNode : public BaseNode
explicit ShapeNode(const std::string &name);
void Accept(INodeVisitor &visitor);
class TransformNode : public BaseNode
explicit TransformNode(const std::string &name);
void Accept(INodeVisitor &visitor);
class LightNode : public BaseNode
explicit LightNode(const std::string &name);
void Accept(INodeVisitor &visitor);
void Traverse(INodeVisitor &visitor);
SceneGraph(const SceneGraph &);
Note that each of the node types declares an Accept() method, taking a visitor object as its parameter. This method is used to call the appropriate Visit() method in the visitor class. This can be thought of as a way to have a single virtual method in each node that can then call any user-supplied virtual method. See Figure 12.5 for a UML diagram that shows this Visitor pattern.
void ShapeNode::Accept(INodeVisitor &visitor)
void TransformNode::Accept(INodeVisitor &visitor)
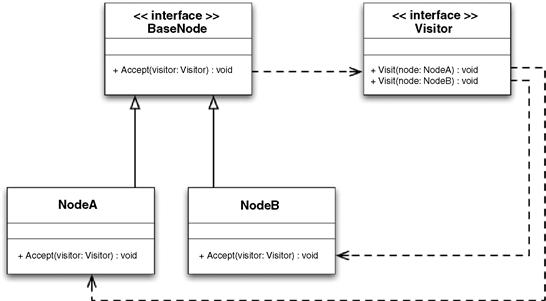
Figure 12.5 UML diagram of the Visitor design pattern.
Building upon this infrastructure, the SceneGraph::Traverse() method can be implemented by navigating the scene graph hierarchy and then calling the Accept() method for every node in the graph. Your clients can then define custom visitor classes to perform arbitrary operations on the scene graph. This is done without exposing any details about how the scene graph is implemented. For example, the following code demonstrates how a client could write a visitor to count the number of each node type in the scene graph and also sum the polygon count for all shape nodes in the scene graph:
class MyVisitor : public INodeVisitor
mNumPolygons += node.GetPolygonCount();
void Visit(TransformNode &node)
std::cout << "Shapes: " << visitor.mNumShapes << std::endl;
std::cout << "Polygons: " << visitor.mNumPolygons << std::endl;
std::cout << "Transforms:" << visitor.mNumTransforms << std::endl;
This example demonstrates many of the benefits of the Visitor pattern, with the most relevant benefit to the topic of extensibility being that clients can effectively plug their own methods into your class hierarchy. However, other benefits include the colocation of all code that performs a single coherent operation. For example, all of the code that implements the node counting functionality in this example is contained with the single MyVisitor class rather than being distributed across all of the individual node classes. A further benefit is that the state required to count the various nodes and the number of polygons (mNumShapes, mNumPolygons, mNumTransforms, and mNumLights) is isolated in the MyVisitor class rather than being stored directly in, and hence increasing the size of, the SceneGraph object.
However, there are some significant downsides to the Visitor pattern too. The flexibility of being able to add new methods to a related set of classes comes at the cost of making it more difficult to add new related classes. Note, in visitor.h, that the visitor interface must know about every class that can be visited, that is, all of our node types. Therefore, adding a new node type to our scene graph will require the visitor interface to also be updated. As a result, the Visitor pattern is used most appropriately in cases where the class hierarchy is stable (Alexandrescu, 2001).
To address this problem, let’s consider adding a new node type, called CameraNode, to our scene graph. The naive way to do this would be to add another Visit() pure virtual method to the INodeVisitor interface that accepts a CameraNode reference. However, we know that adding a pure virtual method to an interface is a bad thing to do in terms of API backward compatibility because it will break all existing client code. Instead, there are a couple of alternative ways to solve this problem.
1. Thinking ahead, you could release the first version of INodeVisitor with a Visit() pure virtual method for BaseNode. This will effectively become a catch-all method that will be called if a node type is encountered for which there is not an explicit Visit() method (BaseNode::Accept() will also have to be modified so that it is no longer a pure virtual method). The inelegant consequence of this is that users must use a sequence of dynamic_cast calls inside of this catch-all method to work out which node type has been passed in. Adopting this solution would change the visitor interface as follows:
virtual void Visit(ShapeNode &node) = 0;
virtual void Visit(TransformNode &node) = 0;
virtual void Visit(LightNode &node) = 0;
virtual void Visit(BaseNode &node) = 0; // catch-all
2. A better solution is to add a new Visit() virtual method for the new node type instead of a pure virtual method. That is, you provide an empty implementation for the new method so that existing code will continue to compile, while still allowing users to implement a type-safe Visit() method for the new node type where appropriate. This would change the INodeVisitor interface as follows:
virtual void Visit(ShapeNode &node) = 0;
virtual void Visit(TransformNode &node) = 0;
virtual void Visit(LightNode &node) = 0;
12.2.6 Prohibiting Subclassing
As a final note on extending via inheritance, I will address the situation where you want to prohibit users from inheriting derived classes from the classes you provide to them. In Java, you can declare a class to be final to prevent others from inheriting from it, but C++ does not have a similar concept.
As already noted, if you declare a class with a non-virtual destructor, this should be a signal to a good programmer that they should think twice about inheriting from the class. However, if you want a physical mechanism to prevent users from subclassing one of your classes, the easiest way to do this is to make all of its constructors private. Any attempt to derive from this class will produce a compile error because the derived class’s constructor cannot call your class’s constructor. You can then provide a factory method to let users create instances of the object.
The downside of this approach is that instances of NonBase cannot be created on the stack. Your clients must instead always allocate instances of NonBase using the NonBase::Create() static function. If this is undesirable, there is another solution. You can instead rely on virtual inheritance to ensure that no concrete class can inherit from NonBase, as follows (Cline et al., 1998).
12.3 Extending Via Templates
C++ is often referred to as a multiparadigm language because it supports different styles of programming, such as procedural, object oriented, and generic. Inheritance is the primary way to extend classes using object-oriented concepts. However, when programming with templates, the default way to extend an interface is to specialize a template with concrete types.
For example, the STL provides various container classes, such as std::vector and std::set. You can use these container classes to create data structures that contain arbitrary data types, such as std::vector<MyCustomClass *>, which the creators of the STL had no way of knowing about when they designed the library.
Similarly, C++11 provides the ability to create reference-counted pointers that can hold any pointer type without having to resort to using void*. This provides a powerful and generic facility that can be customized by clients to create type-safe shared pointers to any object, such as std::shared_ptr<MyCustomClass>.
Templates therefore offer an excellent way for you to write extensible code that can be applied to many different types, including types that your clients define in their own code. The next couple of sections present the concept of policy-based templates to help you maximize the flexibility of your class templates, and I will also investigate a curiously common template pattern that provides static polymorphism as an alternative to the dynamic polymorphism of object-oriented programming.
12.3.1 Policy-Based Templates
Andrei Alexandrescu popularized the use of policy-based templates in his book (Alexandrescu, 2001). The term refers to the approach of building complex behaviors out of smaller classes, called policy classes, where each of these define the interface for a single aspect of the overall component. This concept is implemented using class templates that accept several template parameters (often template template parameters), instantiated with classes that conform to the interface for each policy. By plugging in different policy classes, you can produce an exponentially large number of concrete classes.
For example, Alexandrescu presents the following design for a smart pointer class template that accepts several policy classes to customize its behavior (Alexandrescu, 2001):
template <class> class OwnershipPolicy = RefCounted,
class ConversionPolicy = DisallowConversion,
template <class> class CheckingPolicy = AssertCheck,
The type that SmartPtr points toward is represented by the template parameter T. The remaining parameters specify various policies, or behaviors, for the smart pointer. These can be instantiated with classes that conform to a defined interface for each parameter and provide alternative implementations for the smart pointer. Here’s an overview of each parameter’s purpose.
• OwnershipPolicy: Specifies the ownership model for the smart pointer. Predefined policy classes include RefCounted, DeepCopy, and NoCopy.
• ConversionPolicy: Determines whether implicit conversion to the type of the object being pointed to is allowed. The two available classes are AllowConversion and DisallowConversion.
• CheckingPolicy: Specifies the error checking strategy. The predefined policy classes for this parameter include AssertCheck, RejectNull, and NoCheck.
• StoragePolicy: Defines how the object being pointed to is stored and accessed, including DefaultSPStorage, ArrayStorage, and HeapStorage.
Policy-based design recognizes the fact that there is a multiplicity of solutions for every problem in computer science. Use of these generic components means that clients have a choice between literally thousands of solutions simply by supplying different combinations of policy classes at compile time.
The first step in creating your own policy-based templates is to decompose a class into orthogonal parts. Anything that can be done in multiple ways is a candidate for factoring out as a policy. Policies that depend on each other are also candidates for further decomposition or redesign. There is of course nothing new here. The essence of good software engineering is being able to recognize the more general and flexible abstraction that a specific problem can be implemented in terms of.
Taken to the extreme, a host class (as policy-based templates are often called) becomes a shell that simply assembles a collection of policies to produce aggregate behavior. However, Alexandrescu does state that you should try to keep the number of policy classes small for any given host class, noting that it becomes awkward to work with more than four to six template parameters. This correlates well with the cognitive limit of our working memory, which is believed to be seven plus or minus two (Miller, 1956).
It is also very useful to provide typedefs for specific combinations of policy classes that you use for a given task. For example, if your API passes around smart pointers that use non-default policies, it would be tedious to have to specify all those parameters all the time, and changing those policies in the future would require your clients to update all of their code accordingly. Instead, you can introduce a typedef for the specific pointer type, such as
12.3.2 The Curiously Recurring Template Pattern
In this final section on extensibility via templates, I present an interesting C++ idiom that was first observed by James Coplien in early template code (Coplien, 1995) and which may prove useful in your own API designs. The Curiously Recurring Template Pattern (CRTP) involves a template class that inherits from a base class using itself as a template parameter. Said differently (to perhaps make that last sentence more clear), it’s when a base class is templated on the type of its derived class. This provides the fascinating quality that the base class can access the namespace of its derived class. The general form of this pattern is as follows:
The CRTP is essentially just a way to provide compile-time polymorphism. That is, it allows you to inherit an interface from a base class, but to avoid the overhead of virtual method calls at run time. In this way, it can be thought of as a “mixin” class, that is, an interface class with implemented methods.
As a practical example of this pattern, the CRTP can be used to track statistics for each specialization of a template. For example, you can use it to track a count of all existing objects of a given type or the total amount of memory occupied by all existing objects of a given type. I will demonstrate the latter.
The following class provides the base class declaration for our memory tracker interface:
template <typename TrackedType>
// return memory used by existing objects:
MemoryTracker (MemoryTracker<TrackedType> const&);
For completeness, I also provide the associated definitions for this base class:
template <typename TrackedType>
size_t MemoryTracker<TrackedType>::BytesUsed() {
return MemoryTracker<TrackedType>::mBytes;
template <typename TrackedType>
MemoryTracker<TrackedType>::MemoryTracker() {
MemoryTracker<TrackedType>::mBytes += ObjectSize();
template <typename TrackedType>
MemoryTracker<TrackedType>::MemoryTracker (MemoryTracker<TrackedType>
MemoryTracker<TrackedType>::mBytes += ObjectSize();
template <typename TrackedType>
MemoryTracker<TrackedType>::~MemoryTracker() {
MemoryTracker<TrackedType>::mBytes -= ObjectSize();
template <typename TrackedType>
inline size_t MemoryTracker<TrackedType>::ObjectSize() {
// [*] access details of the derived class
return sizeof(*static_cast<TrackedType *>(this));
// initialize counter with zero
The clever part here is the line directly after the comment marked [*]. Here, the base class is accessing details of the derived class, in this case the size of the derived class. However, in a different example, it could just as easily call a method in the derived class.
Using the CRTP, now you can keep track of all memory currently consumed by a certain class derived from this MemoryTracker class. This can even be used to track memory usage of individual template specializations, as the following example shows. All of these derived classes will essentially inherit the BytesUsed() method from our base class described earlier, but, significantly, the method will be bound at compile time, not run time.
class MyClass1 : public MemoryTracker<MyClass1<T> > {
int mValue; // sizeof(MyClass1) == sizeof(int)
class MyClass2 : public MemoryTracker<MyClass2> {
int mValue; // sizeof(MyClass2) == sizeof(int)
std::cout << MyClass1<char>::BytesUsed() << std::endl;
This code will print out the values 8, 4, and 12, assuming a 32-bit system where sizeof(MyClass1) == sizeof(MyClass2) == 4 bytes. That is, there are two instances of MyClass1<char> (8 bytes), one instance of MyClass1<wchar_t> (4 bytes), and three instances of MyClass2 (12 bytes).