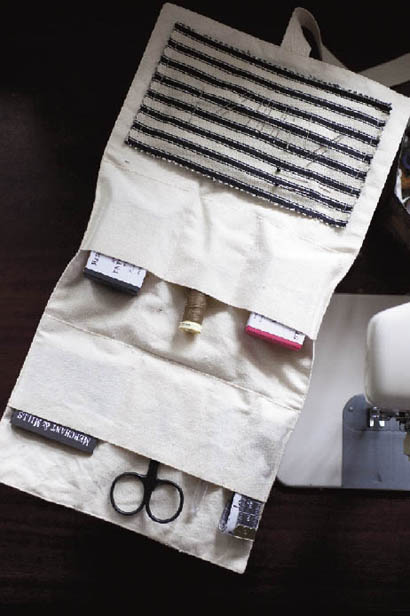
A hussif was once the soldier’s best friend, containing all he needed to keep his uniform in tip-top condition. Our version is made in heavyweight calico and can be neatly rolled up and secured with ties. It will safely hold two boxes of pins, a tape measure, a seam ripper, small scissors, a packet of needles and two reels of thread. This simple project also has a useful ticking needle cushion.

Fill the hussif to your heart’s content and roll up to take your sewing tools with you, wherever they are needed.
1. Mark out your calico following the measurements given in Fig 1. Cut out the pieces and clip the marked notches.
1. Start by zigzagging or overlocking the top and bottom edges of the two pockets (Fig 2).
Fig 2
2. Turn over a 5/8-in/1.5-cm seam allowance on both long edges on both pockets and press into place (Fig 3). Use a hot iron and steam if necessary.
Fig 3
3. Edge stitch along one long side of each pocket and then press (Fig 4). Take your time with this – see Inside Information, opposite.
Fig 4
4. Take the main body piece of the fabric for the inside of the roll and pin the pockets in place, aligning the bottoms of the pockets with the marked notches (Fig 5).
Fig 5
5. Edge stitch the pockets into place along the pinned long edges. Remove the pins and then press the work (Fig 6).
Fig 6
1. Turn the piece over and you will see two lines of stitching on the back (Fig 7). Lay out the tools you wish to put in your roll and measure the divides you need for each one. Remember to allow for a seam allowance of 3/8 in/1 cm on each side.
Fig 7
2. Measure along the pocket stitches and mark each of your divides using light pencil marks (Fig 8a). Measure out from these marks to the pocket edges (Fig 8b). See the next step for the measurements we used.
Fig 8a
Fig 8b
3• We divided the top pocket into sections 33/4 in/9.5 cm, 23/4 in/6.5 cm, 11/4 in/3.5 cm and 21/4 in/5.5 cm (see Fig 9). The bottom pocket was divided into sections 33/4 in/9.5 cm, 21/2 in/6 cm and 33/4 in/9.5 cm. Using your pencil marks as a guide, sew along the marked lines. Press the work.
Fig 9
1• Turn the work over to the inside of the roll and use the hand sewing needle to tack the piece of wadding into place 2 in/5 cm from the bottom edge and centered to the sides (Fig 10).
Fig 10
2• Take the piece of ticking fabric and use pinking shears to pink around the edges. Pin and then sew the ticking in place on top of the wadding 1 in/3 cm from the bottom (Fig 11). Remove the pins.
Fig 11
1• Fold the cotton webbing tape in half and pin to the center notch, with the ties facing inwards (Fig 12).
Fig 12
2• If you wish to use the graphic transfer, apply to the outside of the roll now – see Transfer Tip opposite. Take the outside main body piece, place it on top of the pocket/needle cushion piece right sides facing so that the graphic transfer is at the other end of the needle cushion; pin together. Sew all around using a 3/8-in/1-cm seam allowance and leaving a gap opposite the pinned ties for turning through (Fig 13). As you sew, the ties will be secured in the seam.
Fig 13
1• Trim all four corners, cutting as close to the stitching as you dare (Fig 14), and turn the roll out through the gap. Poke out all the corners with a point turner or pair of blunt scissors, using a chewing or stroking action rather than pushing hard.
Fig 14
2• Turn under the seam allowance neatly at the gap, press the opening and pin closed (Figs 15a and 15b). Before you press with an iron it is often easier to roll the seams with your fingers to get a neat edge.
Fig 15a (left), Fig 15b (right)
3• Edge stitch all the way around the roll and press to finish (Fig 16).
Fig 16