

Korean food is predominantly based on a handful of ingredients, the most common of which are the jang – products which have been made from fermented soybeans. The jang include what I think of as the ‘holy trinity’ of Korean cooking – gochujang, doenjang and ganjang. Most dishes will contain at least one of these three ingredients.
Gochujang [1]
Gochujang is Korean red chilli paste. Made from fermented soybean powder, sweet rice flour and dried Korean chillies, gochujang is sweet and spicy but has a real depth of flavour and an earthiness that’s very unique.
Doenjang [2]
Often described as Korean miso, doenjang is a fermented soybean paste. Unlike miso, the paste is quite coarse, often containing whole beans, and the flavour is much saltier and punchier.
Ganjang is soy sauce, and was originally a by-product of the
doenjang-making process. Korean soy sauce is often slightly sweeter and more caramel-like in flavour than other soy sauces. There are lots of different varieties of soy sauce, but the main two that we use in Korean cooking are
jin ganjang [3], a regular soy sauce used for braising dishes, dipping sauces and marinades and
guk ganjang [4], a much paler, saltier soy sauce used in soups and to lightly flavour dishes such as
muchims.
KEY CUPBOARD INGREDIENTS
The jangs aside, there are a few other essentials that you’ll need in your cupboard for Korean cooking. These include:
Gochugaru is often described as ‘Korean chilli powder’, ‘Korean red pepper powder’ or ‘Korean red pepper flakes’. Made from ground, dried Korean chillies, gochugaru comes in two types – fine or coarse. The fine gochugaru is used to make gochujang, whereas the coarse version is for everyday kitchen use. Whenever we mention gochugaru in this book, we’re referring to these coarser flakes. Gochugaru is spicy but the chillies have a subtle, smoky sweetness to them. It is usually used when more heat is needed in a dish, rather than adding more gochujang. This is because adding too much gochujang can make a dish taste too salty whereas gochugaru just brings a little bit more spice.

Koreans usually eat short-grain white rice (sushi rice), which has a high starch content that makes it sticky and shiny. Though most Korean dishes are based on sharing, everyone usually gets their own individual bowl of rice. Korean rice needs to be sticky, fluffy and glossy, which can only achieved with the perfect ratio of water to
rice.
It is really important to have a good-quality, roasted, 100 per cent pure (not blended) sesame oil as part of your Korean larder. The good ones are pricier but are much stronger in flavour, and a little goes a really long way. Buying a cheap, blended version is a false economy as you end up having to use a lot more. Roasted sesame oil is not usually used for frying, as it has a much lower burning point than cooking oils such as vegetable oil, and is instead used in dipping sauces and marinades or to finish dishes as it gives a creamy, nutty aroma.
Sesame seeds can be bought already roasted, or you can buy plain ones which you toast yourself in a dry pan at home. You can buy black or white sesame seeds, but we usually use the white ones. These give a nice nutty texture and also look great sprinkled over a dish as a garnish.
Apple Vinegar [9]
We really like using apple vinegar as it has a distinctively fresh apple-y flavour that is tart and a little sweet. If you can’t get hold of apple vinegar, rice or cider vinegar also work as substitutes in any of the recipes where apple vinegar is used in this book.
There are lots of different types of seaweed and, quite confusingly, the same varieties are often sold under different names. The three that we use in this book are:
Gim (also known as ‘nori’ or ‘sushi’ seaweed) [10] These are square sheets of seaweed, usually used for sushi. Sometimes these sheets come seasoned with oil and salt. The seasoned seaweed is great cut into squares and eaten simply with rice, or cut into matchstick-thin strips as a garnish.
Miyuk (also known as ‘wakame’) [11] These usually come dried in long, thin packets and are used for soup. A little goes a very long way – as you rehydrate this seaweed in water it’ll double in volume and go from crispy black strands to slippery green ribbons.
Dashima (also known as ‘kombu’ or ‘kelp’) [12] These are dried, tough sheets of seaweed, usually used for stock, which can be bought in long sheets or ready-cut. I usually use the ready cut-kind for ease. They often have a little bit of a white dusty coating on them – don’t wash this off, as this is where all the flavour is.
Noodles form an important part of the Korean diet, and come in a variety of different types, from thin vermicelli noodles made from flour, to springy buckwheat noodles, cellophane noodles made from sweet potato and last (but by no means least) the instant noodles, or
ramyun, loved by all. For a detailed breakdown of
noodle types.
OTHER COMMON INGREDIENTS
In this book, you’ll notice a few other ingredients that frequently pop up. These include:
As well as appearing as a side dish or
banchan with almost every Korean meal,
kimchi is often used for cooking. Cabbage
kimchi is the most frequently used
kimchi for cooking – it has to be matured for at least a few weeks so that the flavours have deepened and intensified and the
kimchi is tangy and strong.
Also known as glutinous rice flour,
chapssal garu, or more commonly
mochiko, sweet rice flour is used in the fermentation process of both
gochujang and
kimchi and is also commonly used as a thickener for sauces and in batters (such as for our
Korean Fried Chicken).
Usually found in the frozen section of Korean and Asian supermarkets, dried anchovies come in lots of different sizes. The two we’ve used in this book are the tiny anchovies (which are no bigger than a fingernail) for frying as a
banchan and the large dried anchovies, which form a key ingredient in our
stock recipe.
These teeny, tiny shrimp or saeujeot are preserved through salting and can be found in jars and in the frozen section of Korean and Asian supermarkets. A common ingredient in kimchi, they make a great seasoning. A word of warning – as they’re very salty, a little goes a long way!
Fish sauce is a key ingredient in kimchi. It smells very pungent and fishy if you’re not used to it, but this mellows as you cook with it (or in the case of kimchi, once the dish has fermented and matured).

Mandu skins are traditionally used to wrap a variety of savoury fillings and are then pan-fried, steamed, deep-fried or added to soups. While knowing how to make these dumpling wrappers is no means essential (they’re so easy to find at any Chinese supermarket), you will get far more satisfaction from making your own (see
here).
Though traditional Korean cooking would use Korean radishes, mooli are much easier to get hold of outside of Korea and taste quite similar. Mooli (also known as ‘white radish’ or ‘daikon’) are a long white vegetable that can be found in most Asian grocery stores. They are much milder in flavour than the peppery red English breakfast radishes and add a great crunch and texture to salads and slaws, but are also used in soups for body and for their clean, refreshing flavour.
Spring onions have been part of Korean cooking since long before the onion was introduced. They have a subtler flavour than normal onions and we often use the finely chopped green as a garnish.
Garlic and Ginger [20 and 21]
These two ingredients are as important as each other in Korean cooking, and are probably the ingredients that we’ve used the most in this book. Korean cooking is often quite punchy, so garlic and ginger are usually minced or very finely chopped for maximum flavour.
Unlike the European pears we’re used to seeing, Korean pears are large and round, with a thick papery golden skin. The skin is usually peeled and discarded, and the fruit inside is very crisp, sweet and juicy. My favourite way to eat these are straight from the fridge, so that they’re really cold and refreshing.
Yuja (more commonly known as Yuzu) is a tangy citrus fruit with a slightly bitter edge, a bit like a grapefruit. As a fresh fruit, it resembles a mandarin but it’s easier to get hold of as a concentrate (usually in small 70ml/2¼fl oz bottles). Yuja has a lovely fresh scent and makes a delicious alternative to lemons.
Also known as daechu in Korean, jujube are small, red dried dates which have a sweet, earthy flavour and can be used in either desserts or savoury dishes. In Korea, they’re known for their medicinal properties and are often sliced thinly to add to teas or used for cooking in dishes such as sam gye tang.
HOMEMADE STOCKS AND DIPPING SAUCES
There are a few base stock and dipping sauces recipes that you’ll need to have up your sleeve. As you make your way through this book, you’ll notice that you’re constantly referred back to this section as they provide the backbone of a lot of Korean recipes.
One of the most important basics stocks is
Myeulchi Gookmul, a mild, but deeply flavoured stock made from dried anchovies and kelp that provides the base for most Korean soups and stews. I do have a bit of a cheat’s confession though – there are times when I don’t always have dried anchovies at home, or I’m tired and don’t want to bother with boiling up a new batch of stock. In these instances I use a light chicken or vegetable stock instead.
For the dishes that need big, meatier flavours, we’ve also included a recipe for a rich brown chicken stock (
Dak Yuksu), which is the perfect way to use up any carcasses from a leftover roast chicken and is packed full of flavour.
There are a lot of overlaps when it comes to dipping sauces. Fried Korean dishes (of which there are many) can be quite heavy, so need something tangy such as our soy vinegar dipping sauce (
Cho Ganjang) to cut through the grease. Alternatively, some dishes just need a sauce so that everyone can season to their own taste, which is where our soy seasoning sauce (
Yangnyum Jang) comes in.

Cho Gochujang
TANGY CHILLI DIPPING SAUCE
Translating as ‘vinegared chilli paste’, cho gochujang is sweet and spicy with a tart edge. In Korea it is usually eaten as a dipping sauce for raw fish known as hwe and is also often used as an ingredient in banchan sharing dishes such as miyuk cho muchim.

3 tablespoons gochujang (Korean red chilli paste)
1 tablespoon lemon juice
2 tablespoons apple vinegar
1 tablespoon caster sugar
2 garlic cloves, minced
Mix all the ingredients together in a bowl until well combined, then serve in individual dipping bowls.

Supermarket Gochujang
Packed with salty, sweet umami flavour, gochujang brings both a unique heat and depth to anything you add it to, and is such an essential part of Korean cooking that other chilli sauces and pastes such as sriracha and tobanjan just don’t make very good substitutes. While we’re lucky to live close to a number of Korean supermarkets, when we started putting this book together it was really important for us to create an easy-to-make gochujang from ingredients that you could get hold of in a good ordinary supermarket, as we know that not everyone has this luxury. This really does taste similar to the real thing, so make a batch and leave it in your refrigerator so that you have it to hand!

8 tablespoons white miso paste
4 tablespoons corn syrup
4 tablespoons cayenne pepper
2 tablespoons mirin
1 tablespoon caster sugar
1 garlic clove, minced
Mix all the ingredients together in a bowl until well combined. Decant into a sterilized jar and store in the refrigerator. It should keep for at least a month.
TIP: This gochujang has a bit more of a fiery kick than the traditional variety, so if you’re using it for cooking, reduce the quantities of the sauce slightly from what we’ve suggested (unless you like it hot, that is).
Ssamjang
KOREAN BBQ DIPPING SAUCE
The ‘ssam’ in ssamjang refers to the lettuce wraps used for Korean BBQ, which is what this sauce is usually eaten with. It’s a mixture of gochujang and doenjang, so it’s quite earthy, a little salty and has a tiny bit of chilli to it, making it perfect with barbecued meats. Ssamjang is also often eaten in Korea as a dipping sauce for raw vegetables, as well as forming the base sauce for our Ssamjang Mayo.

1 tablespoon doenjang (Korean soybean paste)
1 tablespoon gochujang (Korean red chilli paste)
½ spring onion, trimmed and finely chopped
2 garlic cloves, minced
1 teaspoon sesame oil
1 teaspoon sesame seeds
Put all the ingredients in a bowl and mix together well, then serve in individual dipping bowls.

Yangnyum Jang
SOY SEASONING SAUCE
With its salty, slightly spicy kick, this sauce can be found in every noodle house in Korea.
6 tablespoons regular soy sauce
1 tablespoon fish sauce
2 spring onions, trimmed and finely chopped
2 bird’s eye chillies, trimmed and finely chopped
2 tablespoons gochugaru (Korean red chilli powder)
1 tablespoon water
1 teaspoon caster sugar
2 garlic cloves, minced
Mix all the ingredients together in a small serving bowl until well combined. Transfer to the middle of the table and serve with a bowl of
Kalguksu or some simply steamed tofu.
Cho Ganjang
SOY VINEGAR DIPPING SAUCE
Cho ganjang literally translates as ‘vinegared soy sauce’, with ‘cho’ referring to ‘vinegar’ and ‘ganjang’ the Korean word for ‘soy sauce’. It’s amazing how a little bit of vinegar can transform this sauce – it lightens it and gives it a really nice tanginess which works really well with fried dishes such as Haemul Pajeon or with simple dumplings such as Gogi Mandu.
4 tablespoons dark soy sauce
2 tablespoons apple vinegar
4 teaspoons gochugaru (Korean red chilli powder)
Put all the ingredients in a bowl and mix together well, then serve in individual dipping bowls.
Myeulchi Gookmul
ANCHOVY STOCK
Knowing how to prepare your own anchovy stock is a basic essential when it comes to Korean cooking, and it’s so easy to make. It doesn’t taste overly fishy as the anchovies are just dried and not salted, but it gives a really clean, deep savoury flavour to the many soups and stews in which it’s used.

375g (13oz) mooli, cut into 5-cm (2-inch) pieces
1 onion, roughly chopped
2 spring onions, trimmed and roughly chopped
4 whole garlic cloves
2 litres (3½ pints) water
15 large dried anchovies, halved and gutted
5 x 5-cm (2-inch) dashima (kombu) kelp squares
1_ Put the mooli, onion, spring onions, garlic cloves and 1 litre (1¾ pints) of the measurement water in a large saucepan or stockpot. Bring to the boil, then reduce the heat and continue to simmer for 20 minutes.
2_ Add the anchovies to the pot along with the kelp squares and the remaining water, return to the boil and cook for a further 20 minutes, skimming off and discarding any foam from the top of the stock with a slotted spoon as you go, until the liquid is a light brown. Remove from the heat and leave to cool.
3_ Once cool, strain the stock through a colander to remove the vegetables. Use straightaway or pour into a suitable container and refrigerate for up to two days, or freeze for longer.
Dak Yuksu
RICH BROWN CHICKEN STOCK
While most Korean soups and stews are traditionally made using the anchovy stock Myeulchi Gookmul as a base, I actually think this brown chicken stock works just as well as it’s so rich and full of flavour. If you’ve had a roast chicken dinner this is a great way to use the leftovers, while if you’re using a whole chicken, remove the breasts and set them aside for another day, as you won’t need the extra meat in this recipe.

1kg (2lb 4oz) chicken wings
1 x 1.2kg (2lb 12oz) chicken, breasts removed or the leftover carcass from a roasted chicken
3 tablespoons vegetable oil, plus extra for greasing
2 large onions, roughly sliced
pinch of salt
4 whole garlic cloves
200g mooli, cut into 5-cm (2-inch) pieces
1_ Preheat the oven to 220ºC (425ºF), Gas Mark 7.
2_ Use the heel of a large knife to carefully press down on the chicken wings, cracking the bones. Repeat with the spine of the carcass and the chicken legs.
3_ Place the bones on a large greased roasting tray, spoon over 2 tablespoons of the vegetable oil and coat evenly. Roast for 45 minutes. Remove from the oven, skim off any fat that may have rendered down with a spoon and set aside.
4_ Heat the remaining 1 tablespoon of oil in a large, heavy-based saucepan or stockpot. Add the onions and salt and cook gently over a low heat, stirring occasionally, for 15 minutes or until the onions are golden brown and sticky.
5_ Add the garlic, mooli and chicken bones to the pot along with any sticky bits left on the bottom of the tray (these will be packed full of flavour). Pour over enough water to cover everything by about 2.5cm (1 inch) and bring to the boil. Lower the heat and simmer gently for 2 hours, skimming away any foam or fat deposits that collect on the top with a slotted spoon and topping up with extra cold water if the liquid gets below the level of the ingredients.
6_ Strain the solids from the liquid using a fine-mesh strainer or muslin and leave the stock to cool for at least 20 minutes, then scrape away any fat that may have collected on the top. Use straightaway or freeze in a suitable container for later.
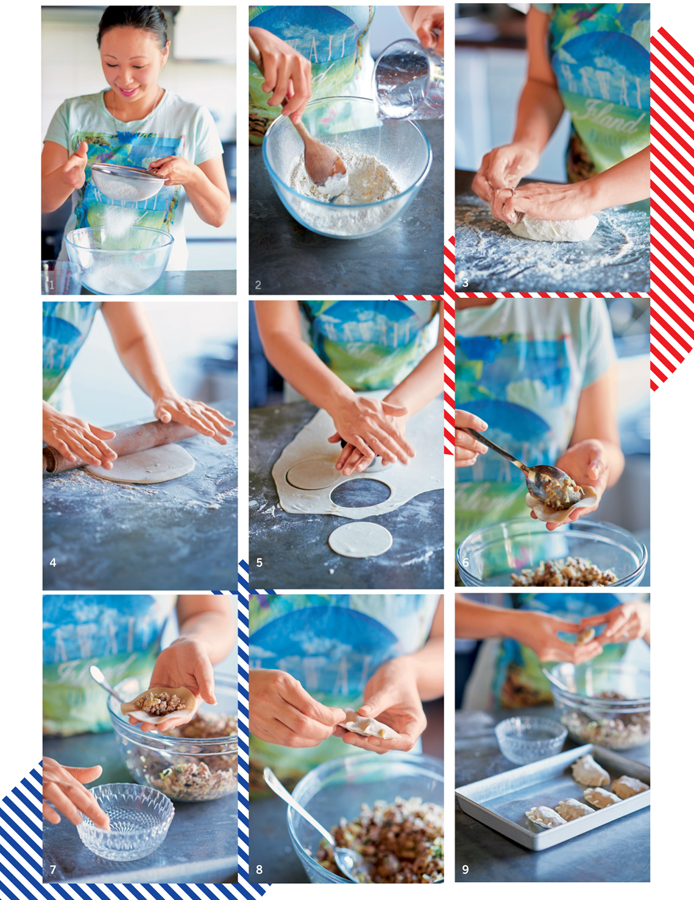
Homemade Mandu (Dumpling) Skins
Although dumpling skins are easy to get hold of at any Chinese supermarket – and if you can’t find them you can always use wonton or gyoza wrappers instead – it’s really simple and satisfying to make your own. Homemade skins are more pliable so you can fill them with more filling and because they aren’t so delicate, they’re also more suitable for clumsy hands.

120g (4oz) plain flour, plus extra for dusting
pinch of salt
60ml (2fl oz) warm water, plus extra if needed
1_ Sift the flour into a large bowl, add the salt and mix together. Stir in the warm water a little at a time, mixing with a wooden spoon, until the mixture starts to come together to form a dough (you may need to add an extra teaspoon or two of water).
2_ Turn the dough out onto a lightly floured surface and knead for 10 minutes, then wrap in clingfilm and leave to rest in the refrigerator for 20 minutes.
3_ Once it has rested, knead the dough for a further 10 minutes until smooth and elastic.
4_ Shape the dough into a ball, then roll it out to a 2mm (1/16-inch) thickness. Cut out a circle using an 8-cm (3¼-inch) cookie cutter and leave the excess to one side. Repeat with the remaining dough pieces, lightly dusting each dough circle with a pinch of flour and covering loosely with clingfilm as you go. Gather together the excess dough, shape into a ball and roll out to make more dumpling skins.
5_ Fill the dumpling skins with sweet or savoury fillings and cook as per your chosen recipe, or freeze them to use later (see Tip).
TIP: Mandu freeze really well and are great for making up in big batches; just be sure that you lay them spaced out on a baking tray lined with clingfilm for their initial freezing so that they don’t stick to each other. Once frozen they can be stacked.
Mandu don’t need to be defrosted before cooking – you just need to cook them for a little longer to make sure the filling is cooked through and the skins are browned.
How to Cook Rice the Korean Way
Cooking rice is actually a lot easier than most people think. This way of measuring the water vs. rice ratio will work for rice cookers, pressure cookers and saucepans. This is the way that most Koreans cook their rice, so here’s the secret:
1_ Put 80g (2¾oz) uncooked short-grain rice per person into a large saucepan, making sure the rice sufficiently covers the bottom of your saucepan (so this works better for a minimum of 2 people). Fill the pan with enough water until covered. Rub the rice between your fingers in the water to wash off the excess starch, then pour the water away. Repeat at least twice more until the water runs clear.
2_ Smooth out the rice so that the surface is even, then lay your hand flat on top of the rice.
3_ Leaving your hand flat against the rice, fill the pan with water, until the water level reaches your knuckle (this will be about 2cm or ¾ inch above the rice).
4_ Place the saucepan over a high heat, cover with a lid and cook for 8 minutes, then reduce the heat to low and cook for a further 2 minutes.
5_ Turn the heat off and leave the saucepan with the lid on for a further 10 minutes – try to resist sneaking a peak at this stage as you don’t want to release the steam from the pan.
6_ Once the rice has finished steaming, use a plastic rice spoon to separate the rice grains so that the rice is nice and fluffy.
TIP: If you have an electric hob, this method might need a little tweaking and playing around with as the hobs hold their heat. When you reach step 5, move the pan onto a cold hob so that the residual heat doesn’t scorch the bottom of the pan.
