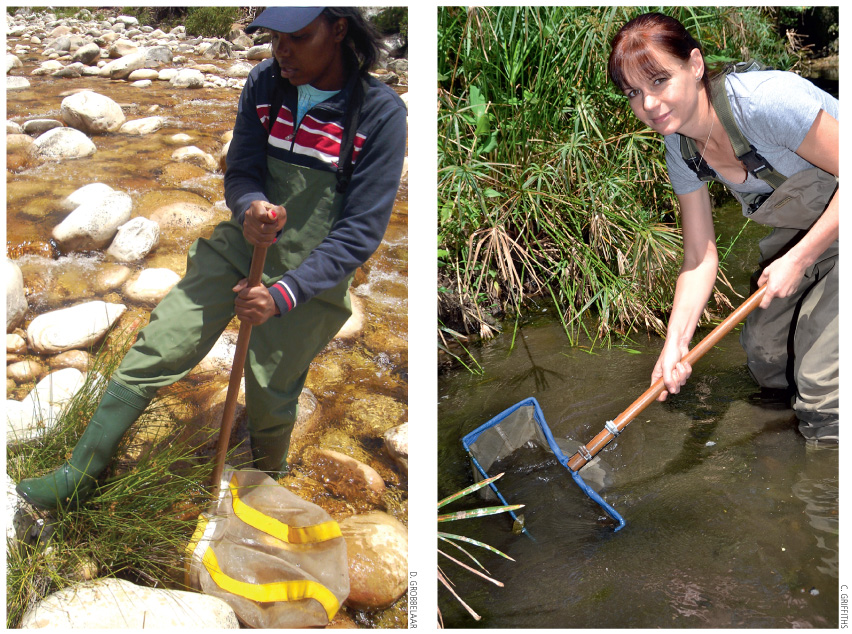
Bottom-dwelling invertebtates are best collected by disturbing or kicking the river bottom upstream of a net held across the current (left), while those along the banks can be sampled by sweeping a net though the marginal vegetation (right).
In this section we elaborate on how readers can engage more with freshwater activities, whether collecting, identifying and storing specimens for teaching or research purposes, assessing water quality in natural water bodies or building artificial wetlands or ponds in which freshwater organisms can be observed and enjoyed in a garden setting. We also give tips on how to minimise water use and how to photograph aquatic organisms successfully.

Bottom-dwelling invertebtates are best collected by disturbing or kicking the river bottom upstream of a net held across the current (left), while those along the banks can be sampled by sweeping a net though the marginal vegetation (right).
Larger aquatic invertebrates can be looked for under stones, on logs and twigs in riverbeds, along the margins of lakes or wetlands, or as they swim in the water. Individual specimens can be gently brushed off stones or hand-picked using a pair of fine tweezers, and then transferred into white plastic collecting trays (about 40×30cm is a useful size), where they can easily be observed and identified.
Alternatively, riverine invertebrates can be collected from the river bottom with a robust net or from marginal vegetation by dragging a net through the plants. The best mesh size for riverine samples is about 1mm. Nets can easily be made from rectangles or rings of 4–5mm-diameter mild steel wire attached to a broomstick, with fine mosquito netting sewn for the bag. It is useful to reinforce the rim of the bag with thin plastic hose, sliced open along its length to fit snugly onto the frame, or with canvas strapping.
Adults of many aquatic insects are fully terrestrial and often nocturnal; they can be caught by sweeping a net through land plants around the water’s edge, or attracted at night by shining an ultraviolet or near-ultraviolet light onto a vertically suspended white sheet.
Zooplanktonic organisms (such as copepods, ostracods, etc), some of which are very small, are best collected by sweeping a smaller net (fish-tank nets are useful) with fine mesh made from pantihose material.
Phytoplankton (such as monerans and some protists) can be collected from standing waters with a very fine-meshed plankton net (of the kind used in flour-milling factories; 0.05mm mesh is best). Other protists occur near, or on, any hard, damp or wetted substrate, including submerged vegetation. To get a good selection of material, scrub a small area of rock or wood with a toothbrush and collect the displaced material in a vial, together with submerged leaves, roots, stones and gravel, for later microscopic examination.
© C. GRIFFITHS
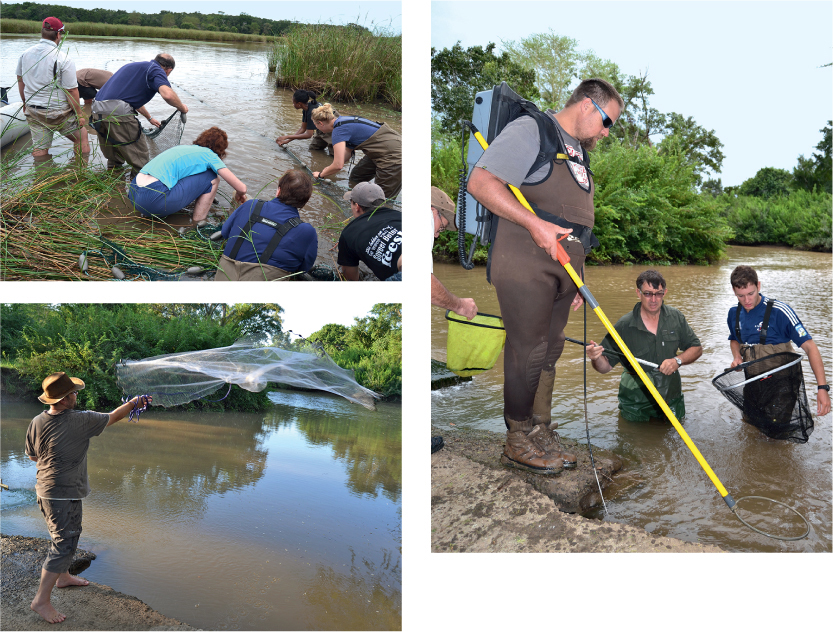
Fish-collecting methods include seine nets that encircle the fish and are then dragged to shore (above left), throw nets (left), and electrofishing equipment (above), which temporarily stuns the fish.
Fishes can be collected with a variety of gear, including seine or ‘trek’ nets, throw nets and traps. Specialised electrofishing apparatus can also be used to stun the fish (as well as tadpoles and aquatic frogs), allowing them to be easily netted. Catching fish for study is a specialist art, and a good manual should be referred to for the best equipment to use for particular purposes. Note that many species of fish in southern Africa, and particularly in the Cape Floristic Region, are highly endangered and may not be collected without a specific permit from the appropriate nature conservation authority. Such fish should not be disturbed and should never be caught. Fish and tadpoles caught in nets frequently die after release, so need to be handled with extreme care if they are to be returned live to their habitat. If fish are to be killed they should be immersed in a solution of MS222 at a concentration of 300–400mg/ℓ (see http://www.prefeiturarp.usp.br/pages/ceua/eutanasia/LA2.pdf for a discussion on ethical euthanasia of fishes and amphibians).
Frogs and tadpoles are normally collected by hand or with a small net. It is easiest to find them during the mating season and at night, when they can be located by their mating calls. Indeed, many frog surveys are conducted solely by listening to the unique calls of each species, with no need to collect specimens! CDs of frog calls accompany some current frog guides (see Further reading, p.353). Taking a photograph is almost always preferable to collecting specimens. If frogs or tadpoles are to be killed, they should first be anaesthetised by immersion in a solution of MS222 at a concentration of 300–400mg/ℓ.
Many animals and plants inhabiting our inland waters are easy to collect and identify in the field, without having to harm them. Accurate identification of some smaller invertebrates to genus and species level does, however, necessitate preserving a few specimens of each species, so that they can be examined microscopically. Reference specimens of unusual species of both plants and invertebrates should also be deposited in a reputable museum (for invertebrates) or herbarium (for plants).
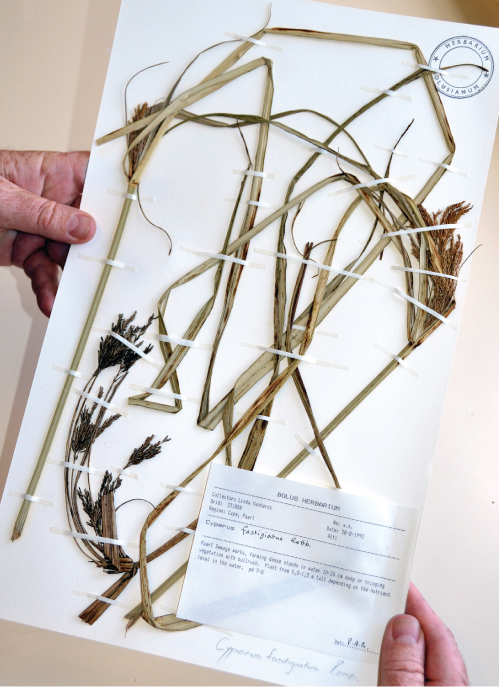
For identification of plants to species level it is important to collect an entire specimen, including flowers. For large plants, collect specimens that include roots, leaves, flowers and fruit if possible. Photographs of live material in the field greatly aid identification. Plant specimens need to be flattened and dried, which is done by pressing them between several sheets of newspaper or blotting paper in a press until they are completely dry. They should then be mounted on a card and properly labelled, as shown in the photo above.
© C. GRIFFITHS
Plant specimen mounted on herbarium sheet and correctly labelled
Invertebrates often have to be preserved for later study. The most humane way to kill them is by freezing for at least 10 minutes. Both large and small specimens should then be stored in 70% ethanol or in 1% Phenoxytol (ethylene glycol monophenyl ether). These preservatives do not fix the tissues, so to keep larger invertebrate specimens in good condition over the long term they should first be fixed. Fixatives include 4% formalin and various recipes that include formalin. Smaller specimens can be kept in good condition in 70% ethanol, in small airtight containers. Note, though, that ethanol often dissolves the pigments that give colour to the specimens.
Microscopic specimens should be examined live under a microscope, because preservation tends to distort them, making them difficult to identify, and because the ways protozoans move provide useful clues to their identity. Most protists can be seen satisfactorily only under a compound microscope at magnifications of 40–400×. Using a plastic dropper or Pasteur pipette, place a drop of water containing the specimens on a microscope slide, cover with a coverslip, and examine first under low magnification and then under progressively higher power. If protozoans and small animals are moving too fast for you to see details, leave the slide with its coverslip on for a few minutes, and they should slow down as they use up the oxygen in the water on the slide. Permanent slides require time, expertise, and suitable staining and mounting media. A useful website for preparing microscope slides is http://www.microscope-microscope.org/basic/preparing-microscope-slides.htm.
Precautions and permits
 Personal safety There are few dangerous animals in the temperate parts of the region, but when working in more tropical areas check for crocodiles, hippos and snakes before approaching the water’s edge. When working in bilharzia-prone areas (most parts of the summer-rainfall region), avoid exposing your skin to the water: wear waders while sampling and use disposable gloves to protect your hands while processing samples. Carry a small vial of methylated spirits when you sample in bilharzia-prone waters, and if you get water on your skin, wipe it off immediately with cotton wool dipped in the meths, which should kill infective larvae.
 Permits It is necessary in most provinces to have a permit for the collection of both plants and animals, as well as a separate licence for fishing. Contact your local provincial nature conservation authority for further information. Most research institutions also require collectors of animals to register their projects and apply for an in-house permit that details acceptable methods of collecting and killing vertebrates. Whether this is required or not, collectors should adhere to ethical practices when killing both vertebrates and invertebrates.
 Chemicals Formalin is a commonly used and effective fixative for long-term storage of specimens, but is a very dangerous substance and proven carcinogen. Avoid using it whenever possible, but if there is no alternative (e.g. when fixing large vertebrates, such as fish), handle it with extreme caution, using plastic gloves, a face mask and, if possible, a fume cupboard.
Vials of live material can be kept open on a windowsill for weeks – indeed, often different taxa breed and succeed one another over time. If it is necessary to preserve phytoplankton, add three drops of Lugol’s iodine solution (made by dissolving 1g of iodine crystals and 2g of potassium iodide in 300ml of water) per 100ml of sample.
Filamentous algae, stoneworts (e.g. Chara) and soft-bodied plants can be preserved in 70% ethanol, or dried and mounted as for vascular plants.
If specimens of fish, frogs and tadpoles need to be kept for research purposes, the body cavities are normally injected with 10–20% formalin; specimens are then stored in 10% formalin, 70% ethanol or 40–50% isopropyl alcohol.
© C. GRIFFITHS
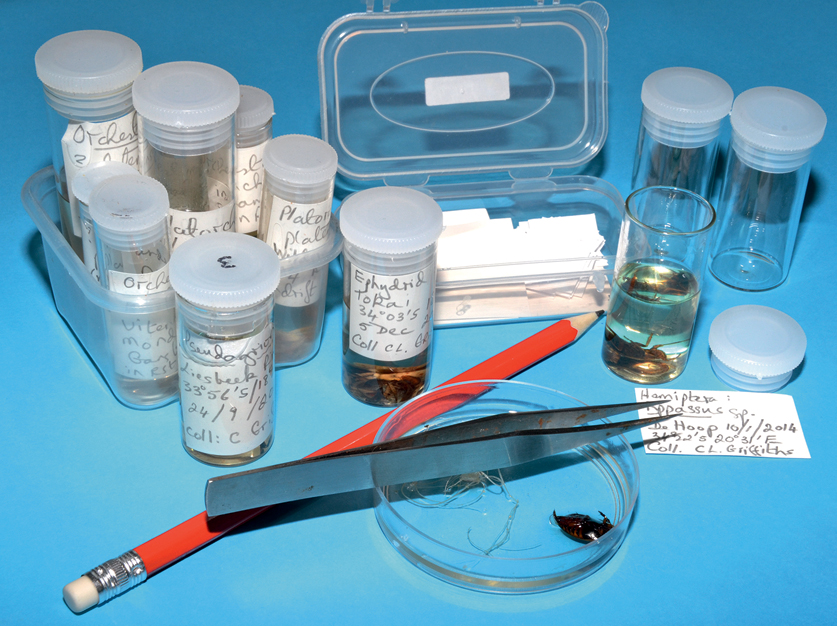
Correctly labelled and preserved invertebrate samples can be used for future study.
Correct documentation is crucial for the proper care of the specimens you have collected. Always label the samples immediately upon collection in the field, and always write the information in pencil on labels that are placed inside the specimen containers, or that are physically attached to large organisms, such as plants or fishes. Do not write the details on the lid, or the outside of a container, because lids can become mixed up, and lettering on the outside of containers can easily be rubbed off. Do not use ink, because most kinds dissolve in preservatives such as ethanol. Always make notes about your collections in a field notebook on the spot, together with relevant environmental and climatic information. Once specimens have been identified to species level, they should be stored in individual leak-proof vials, jars or bags – or on cards, in the case of plants. The label must include at least the following information:
Even after samples have been correctly labelled and preserved, long-term curation is essential to prevent the collection deteriorating. The level of preservative must be checked in all vials and storage jars every few months, because alcohol evaporates, even through airtight lids. Together with the collection, a written catalogue or database should list the contents of each vial, the Latin name, the name of the collector, the date of collection, the name of the person who identified it, details of the collecting site, the biotope it came from, the method of sampling and any other pertinent data that may assist future users of the collection. Good, well-curated collections may be accepted for curation by museums. The Albany Museum of Natural History in Grahamstown is the repository of most South African freshwater collections.
© C. GRIFFITHS
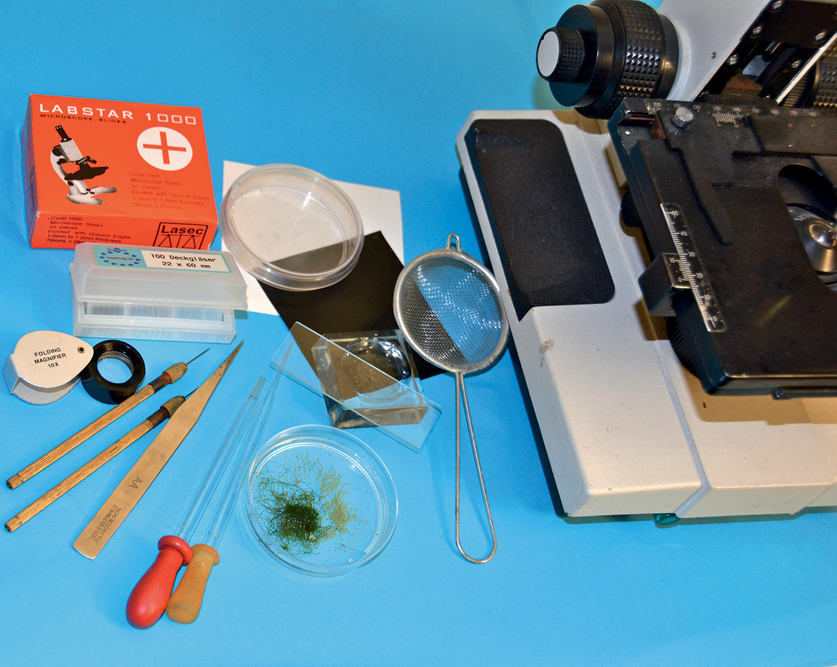
Basic tools useful for examination of smaller invertebrate specimens include forceps, pins mounted in pin vices and small glass and plastic dishes.
It has become much easier over the last few years to identify southern African aquatic organisms using a combination of published guides and Internet resources. Many useful identification guides are listed in the Further Reading section (p.353), while other excellent guides to identification can be found in the scientific literature. Bear in mind, too, that some southern African groups are very poorly known and specimens you find could belong to undescribed species.
It is always a good idea to keep a photographic record of the specimens you identify. This will be helpful when you are comparing specimens taken at different times in different places, or when asking for help with identification (see p.346 for tips on photography). Many taxonomists are very generous with their time, assisting in the identification of difficult taxa. It is unlikely that even an expert will be able to identify material based solely on photographs, however.
Many freshwater invertebrates are too small to examine without the use of a microscope. The smaller ones need to be viewed under a compound microscope, which can magnify to about 1,000×, and the larger ones under a stereo or dissecting microscope, most of which magnify satisfactorily up to about 50×. Both types of microscope are available with built-in cameras. A hand lens may be adequate for discerning some features of larger individuals. While larger adult insects, such as beetles and bugs, can be dried and pinned, most freshwater invertebrates, even in their adult form, are soft-bodied and need to be kept in liquid at all times. While they are being identified, they should be placed in water in a watch-glass or Petri dish small enough to fit on the stage of a dissecting microscope. Identification to species often requires dissection. Specialised tools are available, but very fine watchmakers’ forceps and dissecting needles are the basic tools for manipulating specimens. Dissecting needles can be manufactured by mounting insect pins into the ends of matchsticks or sticks of balsa wood, or into commercially available pin vices. It is often useful to dissect the specimen on a microscope slide in a drop of glycerine, which makes a good temporary mounting medium. A coverslip can then be dropped in place and the slide viewed under a compound microscope. Scanning electron microscopy (SEM) is a valuable tool, but this resource is generally only available at academic institutions.
© C. GRIFFITHS
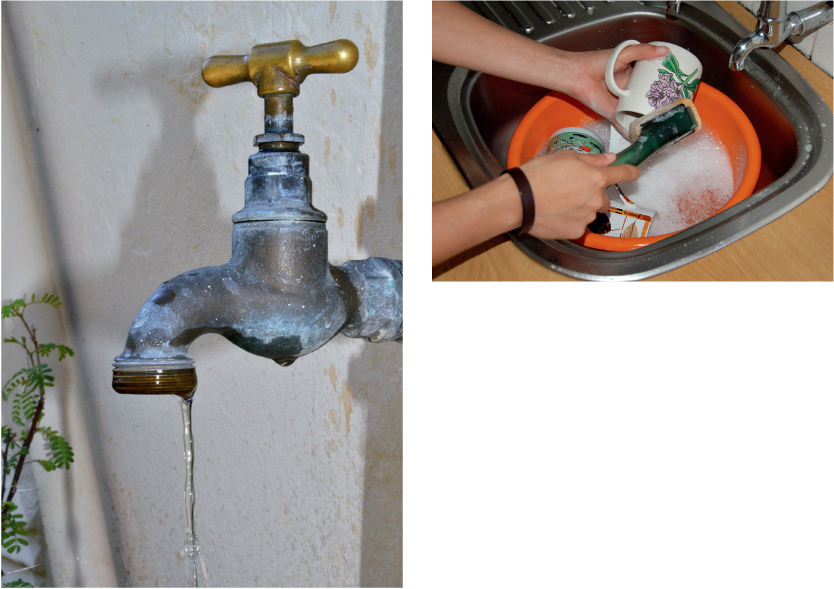
Simple ways of saving water in the home include repairing dripping taps (left) and washing up in a bowl placed in the sink (above).
Water is a scarce resource throughout much of southern Africa. It is therefore important not to waste water, and to treat the water that we do use with care, returning it to the system in the best possible condition for later re-use. This is true whether viewed in terms of our responsibility to the environment and to future generations, or for purely selfish and economic reasons.
Water is not cheap, and in South Africa householders are effectively charged twice for the water they consume: there is one charge for water that enters your property and then another charge for ‘sanitation’, which is based on a percentage of total water used, not on how many times you flush the toilet! Moreover, both of these costs are calculated on a sliding scale – the first few kilolitres per month are free, and from then on the price escalates rapidly with each additional amount used. The actual prices vary between municipalities and over time, but typically prices increase by a factor of four or more as total consumption rises. This means that reducing your water consumption by 10% can reduce your municipal bill by far more than that proportion, depending on the total quantity of water you use in that month.
Remember also that the amount municipalities charge for water is based both on the costs of supply – the dams, reservoirs and pipes that bring water to your home – and the costs of wastewater removal and treatment. You can’t do much to control the former, but you can reduce the environmental and economic costs of treatment, by ensuring that water leaving your care is in the best possible condition. Ultimately this will reduce the costs to municipalities and hence to consumers. Caring for water is important, whether it be storm water, which generally flows directly into the local river or to the sea without treatment, or water that goes down the drain or toilet to the local sewage plant, where everything you have added to the water needs to be removed again!
Here are some suggestions for reducing your water consumption and looking after the water that is in your care:
SAVING WATER IN THE HOME
SAVING WATER IN THE GARDEN
© C. GRIFFITHS
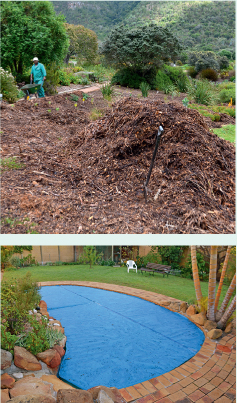
Mulching flowerbeds (top) and covering swimming pools with a pool blanket (above) can radically reduce evaporation and hence water use in the garden.
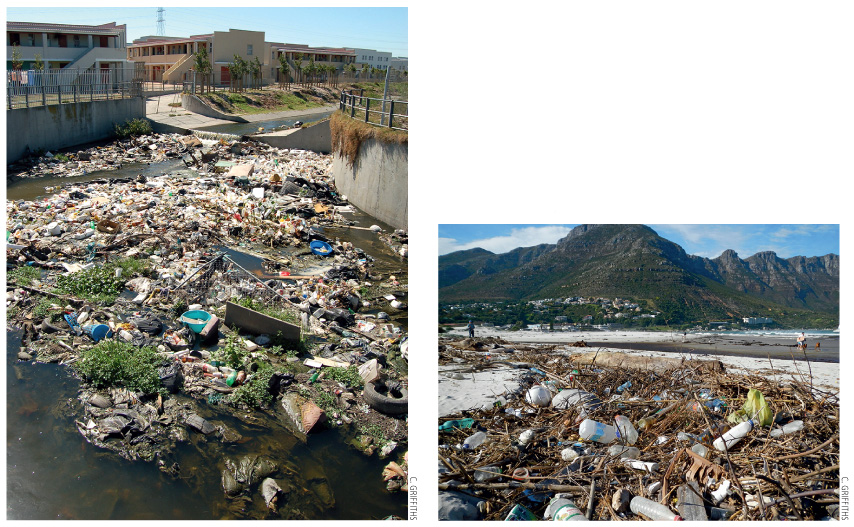
Rubbish allowed to enter the storm-water system simply ends up polluting local watercourses (left) or beaches (below).
As well as minimising water usage and utility bills, good citizens should make sure that the water leaving their property is a clean as possible:
Various biological measures can be used to assess the condition (or ‘health’) of an ecosystem. Some use plants or animals present in a particular area, while other use characteristics of individual animals, such as the concentrations of pollutants within their bodies.
Techniques that examine the communities of organisms present in a river are based on the assumption that if conditions are favourable, there will be more individuals and more species than if conditions are unfavourable. In addition, species vary in their tolerance for polluted conditions. A widely used system for assessing water quality in rivers in South Africa is the South African Scoring System (SASS).
SASS is well established and is used throughout South Africa for assessing the condition of rivers. Slightly modified versions are currently being developed, or are already being used in several other African countries, including Tanzania, Zambia, Zimbabwe and Swaziland. SASS itself is updated as new information becomes available. The current version is known as ‘SASS5’. SASS is based on two assumptions. The first is that some invertebrate taxa are much more sensitive to water quality than others. Nymphs of some families of mayfly, for instance, are found only in the purest waters in mountain streams, whereas others occur in the less pure waters of the lower reaches. Similar examples occur among the flies: the larvae of net-winged midges (Blephariceridae) occur only in mountain streams, while those of rat-tailed maggots (Syrphidae) are found even in the most polluted waters. The families of invertebrates present at a site in a river at any particular time may include some that are fairly sensitive to, and some that are fairly tolerant of pollution, but the more polluted the water, the fewer sensitive species will survive there.
The second premise is that the invertebrates living at any site, at any time, must have been able to survive the conditions that have been present at that site over their entire lives. This is particularly true for the more sedentary forms, since mobile ones might have moved away during a pollution event and later recolonised the site from further upstream. If the water quality of a system has been reduced by low-grade pollution over a long time, or if a transient ‘pollution event’ has passed by the site, members of the more sensitive families will have been killed. Aerial spraying of an insecticide onto crops may result in pollution of a nearby river, for example. The species that are sensitive to the insecticide will be killed, and their absence days or weeks later will indicate that such an event has occurred, even though we may have no chemical analyses of the water.
In summary, SASS uses the presence or absence of river invertebrates to estimate the degree of pollution of the water in a river. By implication it also reflects the general environmental condition of the river.
SASS is specifically designed for estimating impairment of water quality, but because it also measures the number of taxa it can be used for other purposes as well, among them:
There are, however, some limitations to the SASS system:
It is particularly important to note that SASS works for rivers but not for wetlands. There is currently no useful equivalent to SASS for lakes, reservoirs or wetlands.
People conducting an official SASS assessment have to be formally accredited by the River Health Programme of the South African National Department of Water and Sanitation. MiniSASS is a related, but much simpler, exercise that is useful for schools and ‘friends’ groups and is described in some detail overleaf.
MINISASS – A SIMPLIFIED RIVER-HEALTH PROJECT
MiniSASS is a simplified method of measuring the condition of rivers and is especially designed for families, ‘friends’ groups and school children. Using miniSASS you can explore a section of a stream or river in your area and, depending on the creatures that you find, work out the environmental condition of that section of river. If you upload your results to the miniSASS website (www.minisass.org), you will be joining people throughout the country who are monitoring the state of rivers around South Africa.
A successful miniSASS project entails the following five steps.
Preparation
Collecting samples
Animals favour different habitats, such as gravel, sand or mud; some prefer living under stones, while still others live on or among water plants. So try to choose a river reach with a variety of habitats, including rocky substrates if possible. Use your net to catch organisms from as many different habitats as you can. Sample the following places – it should take about five minutes to collect all the samples:
Identifying the animals in your sample
Half fill an old ice-cream tub or tray with water and tip the net’s contents into it. Check for small animals stuck inside the net. Use a teaspoon or tweezers to sort the animals into smaller dishes, and identify them using the downloaded field sheets. When you have finished, carefully return the animals to the river and wash your hands with soap and clean water.
Completing the score sheet
Using the downloaded score sheet:
Uploading your results to the miniSASS website
You can also join the miniSASS Facebook page or contribute to the miniSASS blog page.
© COMMON GROUND
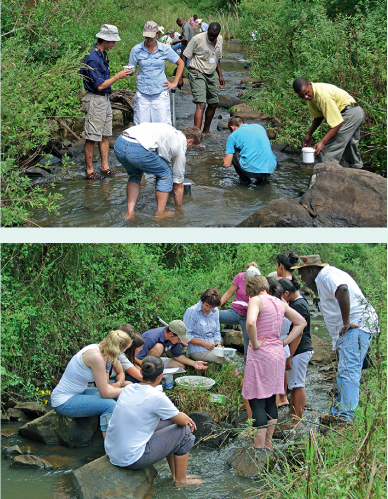
Collecting samples for a miniSASS survey (top); and processing a miniSASS sample (above)
© THIS SECTION ADAPTED WITH THANKS FROM ENVIROKIDS MAGAZINE.
© M. PICKER
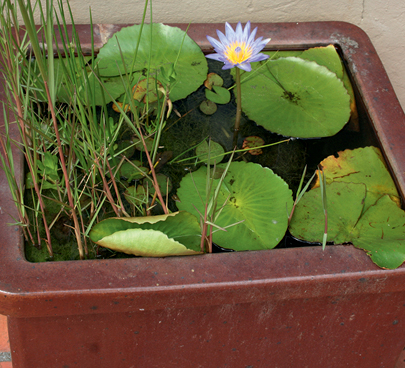
Raised water containers make attractive garden features.
A range of water bodies can be created in a small garden to attract and support freshwater life. These include still ponds, dams, wetlands and raised water containers whose smooth reflective surfaces may provide dramatic, attractive and soothing focal points in the garden, and will attract a variety of aquatic animals. One can also incorporate flowing streams, fountains and waterfalls with the use of small submersible water pumps (powerheads).
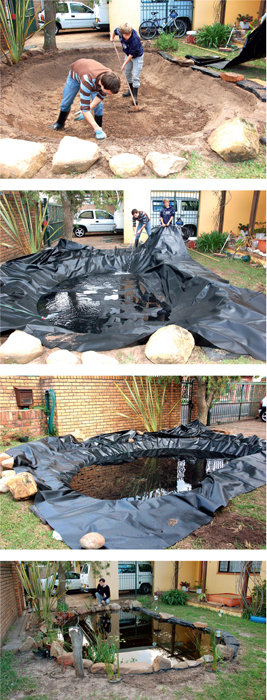
A temporary (seasonal) or shallow wetland (vlei) can be constructed by digging a shallow (<50cm deep) depression with sloping sides and lining it with heavy-duty plastic liner (at least 250µm), making sure that the edges are embedded under the soil or lawn. A thin layer of soil on the bottom of the depression will allow for a range of aquatic plants to be grown, and in a short while damselflies, dragonflies and other aquatic insects will establish themselves. The shallow water will also serve as a bathing and drinking area for terrestrial birds and mammals. Water depth should be no more than a few centimetres.
Building deeper, permanent ponds does not require complicated equipment and is a simple and relatively inexpensive procedure that can be completed over a weekend. Small ponds can be built using waterproofed concrete, plastic or fibreglass containers purchased from a nursery and either positioned in a sunny spot, or sunk flush with the ground. To allow water lilies and other submerged plants to reach the surface, ponds should be no deeper than about 1m, which is still sufficiently deep to support a variety of aquatic plants, invertebrates, tadpoles and fish. Fish commonly reduce the diversity of invertebrate life in the pond and, except for goldfish, are generally hard to see, but they can be useful as consumers of mosquito larvae. In the absence of fish, tadpoles, dragonflies, damselflies and water boatmen will thrive and provide their own appeal.
© C. GRIFFITHS
Steps in building a garden pond: digging, draping the liner, filling the pond, hiding the exposed plastic and adding indigenous plants.
Larger ponds and dams can be constructed as follows, bearing in mind that most aquatic plants and animals thrive best when the pond is situated in full sunlight.
Building more elaborate water features can require the installation of an electrical supply, pumps, filters, other equipment and sometimes very expensive fish! Many books, websites and companies provide advice and services concerning the construction and maintenance of such features, so we do not deal with this here.
The pond depicted to the left supports many vocal frogs, several species of dragonfly and damselfly, mayflies, water beetles, pond skaters, water boatmen, various other invertebrates and several species of flowering plant. It is also regularly visited by Hadeda ibis, herons and other birds – even a Giant kingfisher!
© C. GRIFFITHS
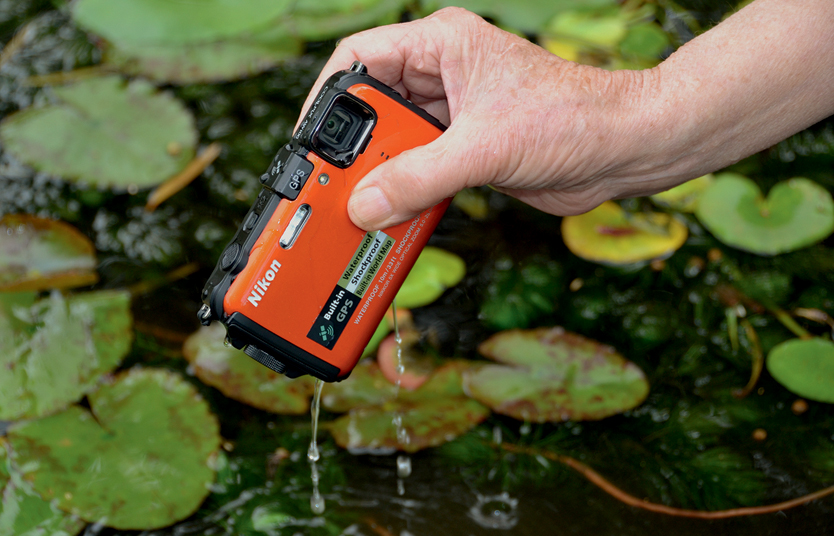
Submersible pocket cameras are convenient and sophisticated tools for taking underwater images, but for smaller creatures it is best to work under controlled conditions using an SLR camera fitted with a macro lens and off-the-camera flash.
Taking high-quality images of freshwater organisms can be challenging, as most subjects live under water and many are small and/or fast moving. Organisms that live around the perimeters of water bodies, or on the water surface, can be photographed using a conventional camera, but for smaller subjects, like insects, a single-lens reflex (SLR) camera fitted with a macro lens is optimal. Using a longer lens, with a focal length of 90–105mm, is best, as this allows one to fill the frame with skittish subjects, like dragonflies, without disturbing them. A small aperture is required to achieve a good depth of field and a fast shutter speed is usually necessary to freeze motion. To achieve both these objectives, set your camera at a relatively high ISO sensitivity rating (the digital equivalent of film speed) of at least 800, and take images in bright light, or use a flash to provide extra lighting. Many macro photographers leave their cameras set on an aperture of f-32 or smaller and routinely use one or more powerful flashes, even in bright sunlight. The very short duration of the flash (<1/1000 of a second) acts as an effective method of eliminating subject movement and camera shake, although to get pin-sharp images it is still best to use a tripod, or at least to steady the camera on a rock or bean bag.
To take underwater images of larger subjects, such as fish and crabs, the optimal equipment is an underwater camera equipped with one or more off-the-camera flashes on adjustable arms. Introducing light from the side is particularly important under water, as it eliminates backscatter from particles present in all but the clearest water. In clear water acceptable results can, however, be obtained using inexpensive waterproof pocket cameras, which have built-in flashes.
In the wild it is difficult to obtain good close-up images of small underwater subjects, such as insects, and it is usually preferable to remove them from the habitat, take the image under controlled conditions, and then return them to the exact site from which they were collected. Top-down images, taken though the water surface, are easiest. Create a background habitat in a shallow dish to resemble the natural environment from which the organism was collected, using washed and well-rinsed sand, flat rocks and aquatic plants. Submerge this in clean clear water. Any particles or bubbles in the water detract from the images, so it is often necessary to rinse items used in the background ‘scenery’ and/or change the water several times. Tap water is often better than that from nature, as it is usually clearer, and if refrigerated it has the additional advantage of harmlessly slowing down active subjects (carry iced water into the field in a thermos flask). Illuminate the subject with a flash held at a 45° angle to the water surface to eliminate surface reflections. If ambient reflections (of the camera, photographer, sky etc.) are problematic, try to eliminate external lighting by moving indoors, under the tail flap of a vehicle, or work under a black umbrella or cloth.
© C. GRIFFITHS
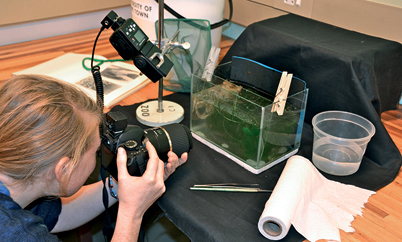
For side-on shots of small invertebrates, a small glass aquarium tank is needed. An additional sheet of glass, cut a few millimetres narrower than the front face of the tank and held in place by two clothes pegs, can be used to divide the tank into two sections – a narrow front section confining the subject where it can be clearly seen – and a deeper back section, which can be decorated with a suitable background ‘set’. Use an off-camera flash set at a 45° angle to the front glass for side lighting, or above the tank for top lighting. Reflections are your enemy and can be avoided by careful positioning of the flash and by minimising ambient light, especially coming from the camera’s direction. Working in a dimly lit room is best, but if in the field, work in a car or tent, at dusk or by night, or under a black umbrella. A small paintbrush is useful for removing bubbles or dirt from the glass, or for gently posing the subject.
Completed images can be submitted to virtual museums such as iSpot (www.ispot.org.za) or to subject-specific sites such as Frogmap and Odonatamap (www.vmus.adu.org.za), where your images will be identified by experts and may contribute to scientists’understanding of the distribution patterns and biodiversity of the region’s fauna and flora.