This chapter examines in detail two important JSF topics: data conversion and validation. Data conversion is handled by converters, while validation is handled by validators. The main point of conversion is to guarantee that the application’s business logic only deals with data that is of the expected type. By contrast, the main point of validation is to assure that the data has been validated against the application’s specific constraints. Systems that make such a guarantee allow for easier-to-develop business logic, since most of the tedious error checking and error handling is done outside of the model tier. You can think of validation and conversion as a protective layer around your business logic that doesn’t permit unchecked data to pass through. You saw an example of validation and conversion failures in the sample application in Chapter 2.
At some level, every computer program boils down to data transformation and processing. For example, traditional rich-client development frameworks such as Swing or Motif for the X Window System convert keyboard and mouse input into events delivered to the program’s event loop. Batch processing programs read data from files, possibly employing character set transformations, before processing the data. Web applications are no different; they need to convert the value entered by the user, such as “Jan 12, 2003” to a java.util.Date. Since the primary transfer protocol between a Web browser and the server is text-based HTTP, Web applications receive most of their data as ASCII text over a TCP socket. In the case of Faces applications, the Servlet API converts this data to the Java Unicode String type. While having a Java String is an improvement over raw ASCII, more needs to be done to bridge the gap between String and the domain model of the application, which deals in terms of objects, such as Integer, Float, and java.util.Date, or primitives, such as double, long, and char. This is the job of the Faces Converter system. Conversion is a two-way process by which data is converted from the String-based representation of the Servlet API to the Object-based representation demanded by the application business logic and back again. Conversion is completely customizable and language-specific, and takes into account the Locale in which your application is running.
Getting the data converted into the proper form expected by your application is one thing, but that’s still not enough to provide the previously mentioned correctness guarantee to the business logic. It is also necessary to ensure that the data has been validated against some application-specific constraints. This is the job of the Faces Validation system. While conversion is a two-way transformation process, validation doesn’t transform the data; it only asserts that the data is “correct” given some constraint. Validation is the process by which a piece of converted data has one or more correctness checks applied to it, yielding a Boolean result of whether the data is valid or not. Some basic examples of validation constraints are “this piece of data is required,” “this number must be between 1 and 10,” and “this credit card number must not be expired.”
Before describing the details associated with validation and conversion, it’s useful to examine some examples that illustrate how the major elements in the conversion and validation system interact with each other, and with the user.
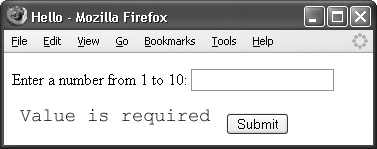
We begin with a simple example that uses a text field with a label and a button, shown next. Assume the data type of the number JavaBeans property referred to in the expression #{bean.number} is java.lang.Long.
<p>Enter a number from 1 to 10:
<h:inputText value="#{bean.number}" id="numberField" required="true">
  <f:validateLongRange minimum="1" maximum="10" />
</h:inputText></p>
<h:messages for="numberField" />

<h:commandButton value="Submit" />
This produces the following HTML output, which, of course, is rendered by the browser.
<p>Enter a number from 1 to 10:
<input type="submit" id="numberField"></input></p>

<input type="submit" value="Submit"></input>
If the user clicks Submit with no value entered, the page will be redisplayed with a message stating that a value must be provided, as shown at right.
This is an example of the “required” validation facility in action, described later in the chapter. If the user enters a non-number value, the page will be redisplayed with a message stating that the value must be a number, as shown next at right.

This is an example of the implicit conversion facility, described later in the chapter. Because the value entered by the user is stored in the value expression #{bean.number}, the system knows the expected type is java.lang.Long. Therefore, it is able to apply the LongConverter to the value before performing the validation. Implicit converters are available for all Java language primitives and their respective wrapper types, though the set of implicit converters may be extended as described in the section on custom converters.
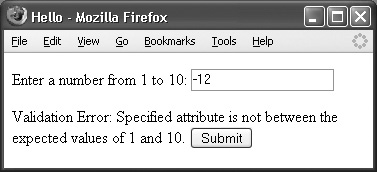
If the user enters a number that is not between 1 and 10, the page will be redisplayed with a message stating that the value must be between 1 and 10, as shown here.
This is an example of using one of the four standard validator tags provided by Faces. The standard validator tags are covered in the section “Using JSP to Associate a Validator with a UIComponent Instance” later in this chapter.
In all cases, the invalid data remains in the text field to aid the user in correcting the error. Also, note that both validation and conversion failures appear to the user in the same way: with a specific message stating what is wrong and how to fix it. While the user doesn’t know or care that conversion and validation are distinct processes, it is important for you to understand the distinction: conversion guarantees the data is in the expected type, and validation guarantees that it is valid given the application-specific constraints.
EXPERT GROUP INSIGHT Some frameworks, such as Tapestry, do not have a separate conversion facility. The Expert Group felt that the expressive power offered by having a separate conversion concept outweighed the complexity it introduced, especially since the implicit conversion facility substantially mitigated the complexity by hiding conversion in many cases.
The next example uses one of the three standard converter tags.
<p>Interest Rate: <h:outputText value="#{rates.prime}}">
  <f:convertNumber type="percentage"/>
</h:outputText>.</p>
The following HTML is rendered from this example:
<p>Interest Rate: 5.22%.<p>
Although all three standard converter tags are explained in detail in the section “Explicit Conversion via JSP Tags” later in the chapter, it is useful to note one point now: Converters can be associated with input or output components, but validators may only be associated with input components. This makes sense because it is impossible for invalid data to enter the system if the developer has properly used the validation system; therefore, there is no need to validate data on output.
The final example in this section shows a reasonably complex application of conversion and validation for an inventory tracking system. The user has to enter a valid Stock Keeping Unit, or SKU, that actually is in the inventory.
<h:outputText value="#{bundle.skuLabel}" />
<h:inputText value="#{product.sku}" required="true" id="sku"
  size="8">
    <f:validator validatorId="skuConverter" />
    <f:converter converterId="skuValidator" />
</h:inputText>
<h:message styleClass="errorMessage" for="sku" />
This example again shows the “required” facility and a custom validator that looks for the item in the inventory. It renders a simple label and text field. Notice that two validators and a converter are attached to the text field. The explicit skuConverter ensures that the user has entered something that can be considered an SKU. The required attribute simply states that a value is required, and the skuValidator ensures that the item is in the inventory. The <h:message> tag directs the system to place the error message, if any, at that point in the page. This example shows how you can extend the Faces framework by providing custom converters and validators that are specific to your business logic needs. Custom converters and validators are dealt with in turn later in the chapter.
Chapter 3 covered the Faces request processing lifecycle in considerable detail, but the portions of the lifecycle that deal with conversion and validation bear repeating here.
Converters are instances of javax.faces.convert.Converter, and validators are (usually) instances of javax.faces.validator.Validator. As shown in Figures 7-1 and 7-2, conversion (from String to Object) and validation normally happen during the Process Validations phase of the request processing lifecycle (unless the component has its immediate property set to true, in which case they happen during the Apply Request Values phase). Conversion (from Object to String) happens during the Render Response phase of the request processing lifecycle.
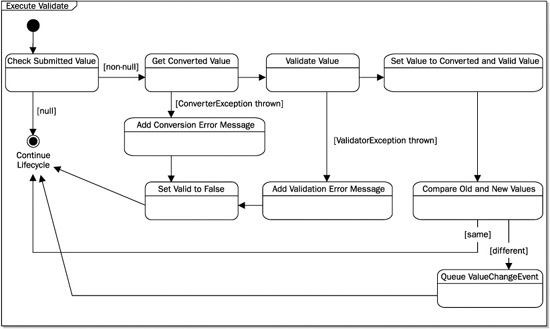
Conversion and validation can be said to have an outcome: success or failure. The outcome alters the flow through the lifecycle. When performing validation, the entire view is traversed by the system and each UIInput component is asked to validate itself, which includes performing data conversion. Figure 7-3 shows the components attached to the UI component for validation and conversion.
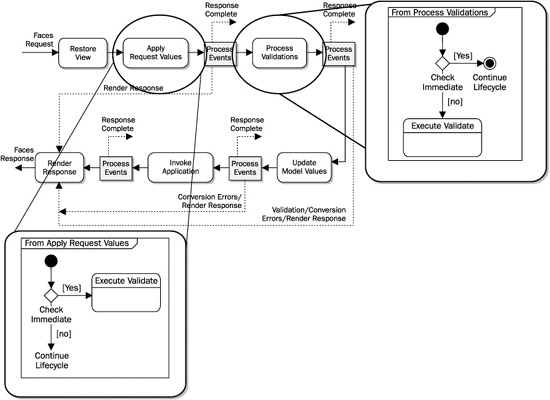
FIGURE 7-1 When conversion and validation happen during the request processing lifecycle
FIGURE 7-2 How conversion and validation are performed
The diagram in Figure 7-3 shows that a UIOutput component may have zero or one Converter instances associated with it, while a UIInput, which is a subclass of UIOutput, may have zero or more Validator instances associated with it. The means by which these instances are associated with each other may be direct via an instance variable, or indirect, by lookup, or through a ValueBinding.
JSF 1.2 TIP As mentioned in Chapter 4, in JSF 1.2, all occurrences of javax.faces.el. ValueBinding have been made obsolete, being replaced by javax.el.ValueExpression. Keep this in mind when you see occurrences of ValueBinding later in this and other chapters.
Following are the essential elements of the algorithm for doing conversion and validation. Throughout the course of this chapter, the various elements of this algorithm will be examined in detail. At this point, it is necessary to understand only in a general way how the various pieces fit together during the validation process. Keep in mind that this algorithm is performed on each EditableValueHolder node in the UI component hierarchy in the page, regardless of the outcome of performing the algorithm on previous nodes.
FIGURE 7-3 A UML diagram showing UIOutput (ValueHolder), with zero or one converters, and a subclass UIInput (EditableValueHolder), with zero or many validators attached
There is no way to abort validation processing midway through a view traversal, because the system needs to collect all of the error messages in one pass.
1. Obtain the value submitted by the user by calling getSubmittedValue( ) on the EditableValueHolder instance of this component. This value was originally retrieved from the incoming request during the Apply Request Values phase of the request processing lifecycle, which is discussed in detail in Chapter 3.
2. Obtain the Converter instance to use.
a. If this component has a Renderer, ask it to convert the value.
b. Otherwise, see if there is a Converter instance attached to this component. If so, use it.
c. Otherwise, if this component’s value is bound via a ValueBinding, use the type of the ValueBinding to create a Converter by type.
d. If none of the previous finds a Converter, assume the submitted value is already properly converted and return.
3. Convert the submitted value by calling the getAsObject( ) method on the Converter instance.
4. If a ConverterException occurs when trying to convert the value, queue the error message, mark the value as invalid, and abort the algorithm.
JSF 1.2 TIP The converterMessage property was added to UIInput to allow the page author to override the standard conversion message enclosed in the ConverterException. This feature, combined with either the f:loadBundle tag (described in Chapter 19) or the resource-bundle element in the faces-config.xml file (described in Chapter 18), allows the page author to provide fully internationalized conversion messages on a per-instance basis.
5. Otherwise, proceed to validate the value.
a. If the value has been marked as “required,” yet is empty, queue the required validator failed message, mark the component as invalid, and abort the algorithm. If the value is empty and not required, proceed to step 6.
JSF 1.2 TIP As mentioned earlier for ConverterException, a requiredMessage property was added to UIInput in JSF 1.2. This allows the page author to override the standard, and not very user-friendly, message shown in response to a failure in the required state of a value.
b. Otherwise, call the validate( ) method on each of the Validator instances attached to this component instance. If ValidatorException is thrown, queue the error message, mark the component as invalid, and abort the algorithm.
c. If there is a MethodBinding for a Validator on this instance, invoke it. If the invocation causes an EvaluationException, get the cause of the exception. If the cause is an instance of ValidatorException, queue the message from the exception, mark the component as invalid, and abort the algorithm.
JSF 1.2 TIP As mentioned earlier for ConverterException, a validatorMessage property was added to UIInput in JSF 1.2.
6. If the value is still valid at this point, compare the valid value with the previous value in the component. If the previous value is different from the new value, queue a ValueChangeEvent. (Event handling is discussed in Chapter 8.)
7. If the value is not valid, signal a skip to the Render Response phase by calling renderResponse( ) on the current FacesContext.
EXPERT GROUP INSIGHT The initial state of every UIInput instance is “valid,” and the conversion and validation algorithm simply seeks to mark the component as “invalid.”
There are many ways to attach a Converter instance, or one or more Validator instances, to a UIInput component. These are described in detail later in the chapter. Before moving on, it’s necessary to mention the final piece of the conversion and validation puzzle: the message system. This system allows the page author to control all aspects of the display of conversion and validation error messages in the page in a very flexible manner by using one or more <h:message> or <h:messages> tags. After explaining converters and validators in detail, we’ll conclude by exploring the message components.
At the core of the Faces converter system is the javax.faces.convert.Converter interface. This interface must be implemented by all objects that want to function as a converter. This section covers in detail the lifetime of converter instances, the standard converters that are available “out-of-the-box,” and how converters are associated with UIComponent instances. An example of how to write a custom converter is also presented.
javax.faces.convert.Converter defines the two methods shown next.
public Object getAsObject(FacesContext context,
UIComponent component,
String value)
public String getAsString(FacesContext context,
UIComponent component,
Object value)
The context parameter is the FacesContext instance for this request. The component parameter is the component whose value is being converted. It is useful for converters to have access to the component so they can query the component’s attribute set for any parameters necessary to perform the conversion. The value parameter is the value to be converted. Note that it is not the responsibility of the converter to modify the component with the converted value. It is advisable that converter implementations don’t modify the state of the component.
For all converters, the getAsString( ) method is called during rendering to get the String version of the data that is suitable for display in the current rendering technology. The getAsObject( ) method is called during the input processing to convert the value from String to the correct model type. If a ConverterException is thrown by this method, the component is marked as invalid and the message is extracted from the exception and added to the set of messages on the current FacesContext. Afterward, processing continues.
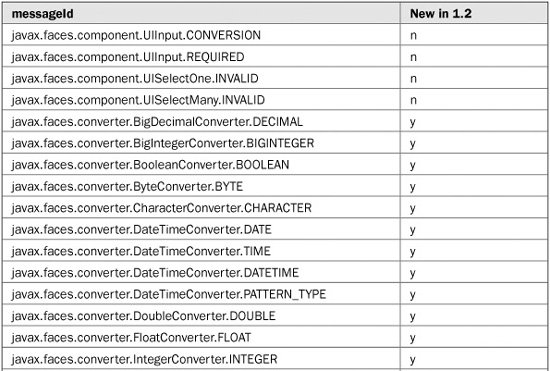
Faces provides the following implementations of Converter. A Converter instance is registered with the system according to the type of data it can convert, or by a converter ID, which is a logical name by which you can refer to the converter. Table 7-1 lists the standard converters, the class they can convert, and their converter ID.
All of the converters shown in Table 7-1 can be used from JSP via the <f:converter> tag, described later in the section “Associating a Converter with a UIComponent Instance.” The DateTimeConverter and NumberConverter have their own <f:convertDateTime> and <f: convertNumber> tags that allow complex configuration parameters to be expressed directly in JSP. These two converters are special in that they provide a gateway to the text formatting capabilities of the java.text package. The internal details of these converters as they apply to the calling of their getAsString( ) and getAsObject( ) methods are described in the following sections. These two converters have several JavaBeans properties that control the conversion process. When using Faces with JSP, the setters for these properties are called by the JSP tag that represents the converter in the page.
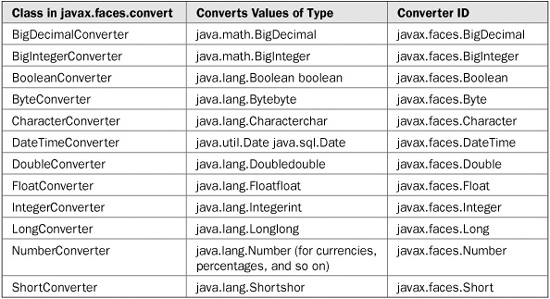
TABLE 7-1 The Standard Converters
The getAsObject( ) method parses a String into a java.util.Date using an algorithm similar to the following:
1. Examine the argument string. If null, return null; otherwise, call trim( ) on the argument. If the string ends up being zero length after trimming, return null.
2. Use the Locale JavaBeans property of this Converter instance, if non-null. Otherwise, if Locale is null, use the one from the UIViewRoot for this view. This Locale will inform the rest of the processing for this method call.
3. If a pattern JavaBeans property is specified on this converter instance (by virtue of the converter’s setPattern( ) method being called), it must conform to the rules of java.text.SimpleDateFormat. The pattern property takes precedence over the type, dateStyle, and timeStyle JavaBeans properties.
4. If pattern is not specified, parsing takes place based on the value of the type property, which must be date, time, or both.
EXPERT GROUP INSIGHT Parsing is non-lenient! The given string must conform exactly to the formatting parameters. Failure to conform causes a conversion error. The Expert Group decided that the original implementation of lenient parsing in the SimpleDateFormat class of the JDK was incorrect and inconsistently implemented across Java platform vendors. In addition, the so- called “leniency” isn’t really lenient in any useful way. Thus, the decision was made to disallow the use of lenient parsing in JSF.
The getAsString( ) method converts the model tier Object to a String for rendering using an algorithm very similar to the one described earlier, except that a null model tier value is converted to a zero length String.
The getAsObject( ) method parses a String into a java.lang.Number subclass using an algorithm that is the equivalent of the following:
1. Examine the argument string. If null, return null; otherwise, call trim( ) on the argument string. If the string ends up being zero length after trimming, return null.
2. Use the Locale property of this Converter instance, if non-null. Otherwise, if Locale is null, use the one from the UIViewRoot for this view. This Locale will inform the rest of the processing for this method call.
3. If a pattern JavaBeans property is specified (by virtue of the setPattern( ) being called), it must conform to the rules of java.text.DecimalFormat. The pattern property takes precedence over the type property.
4. If a pattern JavaBeans property is not specified, parsing takes place based on the value of the type property, which must be number, percentage, or currency.
5. If the integerOnly property is set to true, only the integer part of the String is parsed.
The getAsString( ) method converts the model tier Object to a String for rendering using an algorithm very similar to the one described earlier, except that a null model tier value is converted to a zero length string, and the groupingUsed, maxFractionDigits, maxIntegerDigits, currencyCode, and currencySymbol properties are applied before formatting.
As described in the previous section, each UIOutput instance in the view may have zero or one Converter associated with it. There are several ways to make that association, and we’ll cover each in this section. Since Faces was designed with ease of development in mind, most users will not need to manually associate a converter with a component instance due to the comprehensive list of standard converters that automatically are associated with the component depending on its current value. We call these “implicit converters.” In addition to the implicit converter association, there are a number of ways a converter can manually be associated with a component instance: by using one of the standard JSP converter tags, by using a custom converter tag, or programmatically in Java code by calling setConverter( ) on the component instance.
Table 7-2 lists the implicit converters by class. For each entry, there is a corresponding converter instance in the package javax.faces.convert. For example, the class java.lang.Double has an implicit converter with the fully qualified class name of javax.faces.convert.DoubleConverter.
EXPERT GROUP INSIGHT To help with the JSR goal of making JSF as useful as possible within tools, all of the standard converters adhere to JavaBeans naming conventions for properties. This allows tools to easily add converters to a palette and provide property inspectors for easy customization.
In order for implicit conversion to occur, the system must be able to discern the type of the value. As you learned in Chapter 3, each EditableValueHolder component instance has a “local value” property, as well as an optional “value binding.” The local value is not type-safe, and is always known to the system as being of type Object. It is only when a component instance has a value binding that its type is discoverable by the system, thanks to the getType( ) method of the Expression Language API. Components that don’t have a value binding cannot have implicit conversion. For example, the first of the two following text fields will have an implicit Integer converter associated with it, while the second will not.
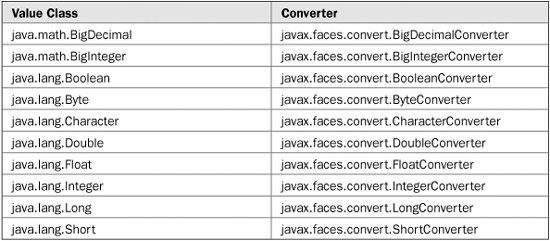
TABLE 7-2 The Implicit Converters
<h:inputText id="age" value="#{user.age}" />
<h:inputText id="weight" value="10"/>
Assuming the age JavaBeans property of the user managed bean is of type Integer, the system will automatically create and use a javax.faces.convert.IntegerConverter whenever conversion is required. Conveniently, as you will soon see, it is easy to install additional converters to extend or modify the set of types for which implicit conversion can be performed. Note the absence of an implicit converter for dates. This is because we have no way of knowing if the number should be a Date, a Time, or a Date and Time.
If you require greater control over conversion than that afforded by implicit conversion, three JSP tags are provided in the jsf_core tag library: <f:convertDateTime>, <f:convertNumber>, and <f:converter>. The general form of these tags is shown next. For brevity, some attributes have been omitted. Chapter 19 contains the complete reference. Most of the tag attributes in the following have corresponding JavaBeans properties on the converter instance that sits behind the tag. The setter methods of these properties are called as appropriate.
<f:convertDateTime dateStyle="dateStyle"
  locale="locale" pattern="formatPattern" timeZone="timeZone"
  type="type"
  binding="valueExpression"/>

<f:convertNumber currencyCode="code"
  currencySymbol="symbol"
  groupingUsed="boolean" locale="locale"
  pattern="formatPattern" type="type"
  binding="valueExpression" />

<f:converter converterId="converter-id"
  binding="valueExpression" />
For <f:convertDateTime>, the dateStyle attribute must be short, medium, long, full, or default. If not specified, default is assumed. If specified, locale must be a value binding expression that evaluates to an instance of java.util.Locale, or a literal string that is valid to pass as the first argument to the constructor for java.util.Locale(String language, String country). In this case, the empty string will be passed as the second argument. If locale is not specified, the return value of FacesContext.getCurrentInstance( ).getViewRoot( ).getLocale( ) will be used. If pattern is specified, its value must be a format pattern as used in java.text.SimpleDateFormat, or an expression that evaluates to the same. If timeZone is specified, its value must be a literal string that is a timezone ID as in the Javadocs for java.util.TimeZone.getTimeZone( ), or a value binding expression that evaluates to an instance of java.util.TimeZone. If not specified, the system timezone is used. If type is specified, its value must be date, time, or both. This tells the converter to format or parse the value as a date, a time, or a DateTime, respectively. If not specified, both is assumed. If binding is specified, its value must be a value binding expression that evaluates to an instance of javax.faces.convert.DateTimeConverter.
For <f:convertNumber>, the currencyCode, if specified, must be a literal string that is a valid ISO 4217 currency code (such as USD or EUR), or a value binding expression that evaluates to the same. If not specified, the system currency code is used. If specified, the currencySymbol is the actual currency symbol used, such as “$” or “є”, or an expression that evaluates to the same. If not specified, the system symbol is used. If specified, the groupingUsed must be either true or false. If not specified, true is assumed. If specified, pattern must be a literal string that is used as the pattern for the underlying java.text.DecimalFormat instance, or an expression that evaluates to the same. If not specified, no pattern is used. If specified, the type parameter must be number, currency, or percentage. If not specified, number is assumed. If specified, the binding attribute must be an expression that evaluates to a javax.faces.convert.NumberConverter instance.
For <f:converter>, the converterId attribute is the converter identifier as specified in the config file, such as faces-config.xml. In Faces 1.0 and 1.1, converterId was a required attribute, but in 1.2 either the binding or converterId attribute must be specified. If both are specified, converterId is used to create the converter, and the setValue( ) method of the binding is used to store the created converter.
The <f:convertDateTime> tag leverages the conversion facilities provided by java.text.SimpleDateFormat, the <f:convertNumber> tag leverages the conversion facilities provided by java.text.DecimalFormat, and <f:converter> provides a JSP gateway to look up a converter by its converter-id. These three tags are sufficient to cover the conversion needs for all possible datatypes. They are described in detail in Chapter 19, but the following discussion explains how they can be used to control conversion.
The usage pattern for all of the converter tags is to nest them inside the markup for the component to which they should be attached. For example:
<h:outputText id="date" value="#{transaction.date}">
  <f:convertDateTime dateStyle="short"/>
</h:inputText>
This example associates a DateTimeConverter instance with the HtmlOutputText instance with the ID date. The same pattern is true for the other converter tags.
JSF 1.2 TIP In JSF 1.2, all of these Converter tags provide a binding attribute that functions similar to the binding attribute on UIComponent instances (and the tags that expose them), as described in Chapter 6. Briefly, the binding attribute allows you to say that the actual Converter instance must come from the result of evaluating an EL expression. This feature enables programmatically configuring a converter instance directly from Java code, and then allows that converter instance to be referred to in many different places. This means you only have to configure the converter attributes once, and avoid the class of bugs that comes from duplicating information in multiple places. Also, the binding attribute makes it very easy to add custom converters and validators, as opposed to going through the hassle of adding them to a faces-config.xml file and the attendant JSP tags.
Before jumping into the tags themselves, let’s review the basics of date formatting using java.text.SimpleDateFormat. This class is a concrete implementation of java.text.DateFormat, which allows parsing dates or times in a language-independent manner. SimpleDateFormat applies user-specified parameters to convert a string into a java.util.Date instance and back again. These parameters are applied to the SimpleDateFormat instance by a variety of methods, as described next. The most basic element of SimpleDateFormat is style, which is inherited from the superclass, DateFormat. The style parameter is a symbolic constant passed to the static getDateInstance( ) or getTimeInstance( ) methods on DateFormat. This parameter provides a useful abstraction by saying the formatted value will be in SHORT, LONG, MEDIUM, or FULL style. The exact meaning of the style parameter depends on whether you are dealing with a date, a time, or a date and time. A SHORT styled date is 05/26/03, while a LONG styled time is 12:30:45 pm. When the maximum level of control is required, use the pattern parameter of SimpleDateFormat. The pattern is supplied to the instance by calling the applyPattern( ) method. This allows you to specify a format string to control how the date, time, or date and time are output. For example, the pattern string
"HH:mm:ss on EEEE ',' MMMM dd ',' yyyy"

will produce an output such as this:

13:24:21 on Tuesday, April 15, 1997
See the Java Platform API documentation for SimpleDateFormat for the complete specification of the pattern language. The timezone parameter of DateFormat allows you to state in which time zone this time should be treated. This is passed as an argument to the setTimeZone( ) method.
The <f:convertDateTime> tag exposes the power of the SimpleDateFormat class to the JSP Faces user. All of the tag attributes for this tag are value expression enabled. Briefly, the most useful tag attributes are type, style, and pattern. The type tag attribute allows you to choose to treat the value as a date, a time, or both. This is used to determine whether getDateInstance( ), getTimeInstance( ), or getDateTimeInstance( ) should be used to create the underlying DateFormat instance, respectively. The style parameter for the underlying SimpleDateFormat is specified by providing a dateStyle or timeStyle tag attribute with values of SHORT, MEDIUM, LONG, or FULL. The value of the pattern attribute is passed through directly to the underlying SimpleDateFormat instance. If you want to force conversion to be a specific Locale, the locale attribute is provided.
Let’s also review the use of java.text.DecimalFormat for formatting numbers, including currencies. This class is a concrete implementation of java.text.NumberFormat which allows parsing numbers in a language-independent manner. DecimalFormat applies user-specified parameters to convert a string into a java.lang.Number instance and back again. DecimalFormat has many elements, but the main ones of interest to conversion are pattern and groupingUsed (defined on superclass, NumberFormat). As in the SimpleDateFormat, the pattern parameter provides complete control over the appearance of the number and is applied to the underlying NumberFormat instance by calling its applyPattern( ) method. For example, the pattern “\u00A4 #.00” says this number should be output as a currency with any number of digits before the decimal separator, and exactly two after it. The currency symbol and decimal separator are, of course, locale-sensitive. The groupingUsed JavaBeans property specifies whether a locale-sensitive grouping delimiter should be used—for example, “3,147,295”.
The <f:convertNumber> tag exposes java.text.DecimalFormat to the JSP Faces user. As mentioned earlier, all tag attributes are value expression enabled. The most useful attributes are shown next:
• type
• pattern
• currencyCode
• currencySymbol
• groupingUsed
The type attribute can be number, currency, or percentage. The value of this attribute is used to determine if the underlying NumberFormat instance should be created using getNumberInstance( ), getCurrencyInstance( ), or getPercentInstance( ), respectively. The currencyCode attribute is an ISO 4217 currency code, such as “USD” for U.S. dollar, and “EUR” for European Union Euro. The currencySymbol can be used to directly specify the currency symbol, but in JDK 1.4 and beyond, the currencyCode takes precedence if specified. The groupingUsed attribute is a boolean that functions as mentioned in the previous paragraph.
The last of the three standard JSP tags for conversion is <f:converter>. This tag allows associating an arbitrary converter with a component using the converter ID lookup mechanism. Previously, we mentioned that converters can be registered and looked up by class. They can also be registered and looked up by converter-id, registered in the faces-config.xml file for the application. Table 7-1 lists the standard converters and their converter IDs. While it’s certainly possible to use the <f:converter> tag with the standard converters, it is really intended to provide a gateway to custom converters without requiring the creation of a custom converter tag. For example, the Virtual Trainer example uses a custom WeightConverter that consults the user’s preferences and displays weights in either metric or English units. For example:
<h:inputText id="targetWeight" value="#{user.targetWeight}">
  <f:converter converterId="weight"/>
</h:inputText>
The final way to associate a Converter with a UIComponent is programmatically. Nearly all of the JSP tags in Faces serve only to expose the underlying component model to the JSP page author. In the case of the converter tags, this can mean that the setConverter( ) method of a ValueHolder instance is called. The existence of a setConverter( ) method means that you can call it directly, if you are so inclined. When using this approach, you must be aware of when in the request processing lifecycle your code is executing. Also, this approach violates the separation of controller from view in the MVC paradigm because a-priori knowledge of the view is required to find the components on which to install the converters. With these cautions, we include this approach here for completeness.
As mentioned earlier, conversion happens twice during the lifecycle, once during the Apply Request Values or Process Validations phase, and again during the Render Response phase.
For JSF 1.2, if you want your Converter to be used during the whole lifecycle, try using a UIViewRoot PhaseListener registered for the beforePhase event of the Render Response phase. This will ensure that the Converter is installed before the first rendering and that it remains installed throughout the life of the view thanks to the state management APIs. Once you know when in the lifecycle your converter installing code will execute, it’s a matter of creating and installing it in the desired component.
The following example shows how to programmatically create and install a converter on two components in the view. One component uses by-type converter lookup and the other uses by-class converter lookup.
FacesContext context = FacesContext.getCurrentInstance();
Converter intConverter = null;
Converter floatConverter = null;
UIComponent component1 = null;
UIComponent component2 = null;
UIViewRoot root = context.getViewRoot();

// Find the components on which we'll install the Converters.
component1 = (ValueHolder) root.findComponent("form" +
                                NamingContainer.SEPARATOR_CHAR +
                                "intComponent");
component2 = (ValueHolder) root.findComponent("form" +
                                NamingContainer.SEPARATOR_CHAR +
                                "floatComponent");

// Create the Converters, one by type, the other by Class.
intConverter =
  context.getApplication().createConverter("javax.faces.Integer");

floatConverter =
  context.getApplication().createConverter(Float.class);

// Install the converters.


component1.setConverter(intConverter);
component2.setConverter(floatConverter);
The main point of this example is to show the two variants of createConverter( ) and the use of setConverter( ).
Even though the Java Platform provides automatic memory management in the form of garbage collection, it is still very important to be mindful of the memory implications of the design decisions that you make as you develop your application. This is particularly important when using a framework, where objects are frequently instantiated on the user’s behalf without the user’s knowledge. As described in the previous section, each UIComponent instance in the view may have zero or one Converter associated with it, and there are several ways to make that association. The lifetime implications of these different ways are the subject of this section.
Converters associated with implicit conversion are dynamically created each time they are needed. This might give the appearance of being an unnecessary performance penalty, but actually, implicit conversion is a good thing for performance. The cost of instantiating these kinds of converters is very small, and because they are not attached to the component, there is no state saving and restoring penalty.
All methods of explicit conversion boil down to calling setConverter( ) on the UIComponent instance, which makes the converter a part of the component’s state, thereby ensuring it will be saved and restored across requests by the state management system. With this approach, the lifetime of the converter is the same as the lifetime of the component instance itself, which is configurable by the application author by setting the server’s session timeout value.
Some validators also use converters to aid in performing validation. Depending on the implementation of the Validator, this may cause a Converter instance to be created.
The real power of the Faces conversion model is its extensibility. In this section, we will provide a complete converter for the Virtual Trainer example. This converter looks up the value of the weightUnits preference in the preferences object and uses it to convert the weight from the domain model unit, which is kilograms, to the user’s preference, which may be kilograms or pounds. We’ll start with the converter class and close with the configuration information necessary to hook up the converter to the system.
The converter class for Virtual Trainer is called WeightConverter. It implements the Converter interface and is shown next. This example is written using the JSF 1.2 API.
package com.jsfcompref.trainer.convert;

import javax.faces.convert.Converter;
import javax.faces.convert.ConverterException;
import javax.faces.context.FacesContext;
import javax.faces.application.Application;
import javax.faces.component.UIComponent;

import javax.el.ValueExpression;

import java.util.Locale;
import java.text.NumberFormat;
import java.text.ParseException;

public class WeightConverter implements Converter {


  public static final int UNIT_KILOGRAMS = 0;
  public static final int UNIT_POUNDS = 01;

  private Locale locale = null;

  private NumberFormat formatter = null;
  public WeightConverter() {
    formatter = null;
    locale = null;
  }

  private int getUnitFromUserPreferences(FacesContext context) {
    Integer result = null;
    int unit = –1;

    // Look up the user's preference.
    ValueExpression ve =
      context.getApplication().getExpressionFactory().
      createValueExpression("#{currentUser.prefs.weightUnits}");
    try {
      result = (Integer) ve.getValue(context.getELContext());
    }
    catch (Throwable e) {
      // log error
    }

    if(null != result) {
      unit = result.intValue();
    }

    return unit;
  }

  private getNumberFormat(FacesContext context) {
    if(null == formatter) {
      formatter = NumberFormat.getNumberInstance(getLocale(context));
    }
    return formatter;
  }

  private Locale getLocale(FacesContext context) {
    Locale locale = this.locale;
    if(locale == null) {
      locale = context.getViewRoot().getLocale();
    }
    return (locale);
  }


  public Locale getLocale() {
    return (this.locale);
  }

  public void setLocale(Locale locale) {
    this.locale = locale;
  }

  public Object getAsObject(FacesContext context,
                            UIComponent component, String value) {
    if(context == null || component == null) {
      throw new NullPointerException();
    }
    // This example doesn't use the component parameter but we will
    // use it later in the chapter when we explore conversion
    // messages.
    if(null == value || 0 == value.length()) {
      return null;
    }

    int units = getUnitFromUserPreferences(context);
    float floatValue;


    try {
      floatValue = getNumberFormat().parse(value);
    }
    catch (ParseException e) {
      throw new ConverterException(e.getMessage());
    }

    // If the user's preference is English, this String is in
    // pounds. Get the float value of the pounds
    if(UNIT_POUNDNS == units) {
      floatValue /= 2.2; // convert to kilograms
    }

    return new Float(floatValue);
  }

  public String getAsString(FacesContext context, UIComponent component,
                            Object value) {
    if(context == null || component == null) {
      throw new NullPointerException();
    }
    // This example doesn't use the component parameter but we will
    // use it later in the chapter when we explore conversion
    // messages.

    if(null == value || 0 == value.length()) {
      return null;
    }

    String result = null;

    int floatValue = ((Float)value).floatValue();
    int units = getUnitFromUserPreferences(context);

    if(UNIT_POUNDNS == units) {
      floatValue *= 2.2; // convert to pounds
    }

    try {
      result = getNumberFormat().parse(new Float(floatValue));
    }
    catch (ParseException e) {
      throw new ConverterException(e.getMessage());
    }
    if(UNIT_POUNDS == units) {
      result = result + " lbs.";
    }
    else {
      result = result + " kg.";
    }
    return result.trim();
  }
  // This converter has no user-configurable parameters, and thus
  // is stateless. If we did have user-configurable parameters, we
  // would need to implement the javax.faces.component.StateHolder
  // interface to save and restore the values of these parameters
  // between requests.
}
In WeightConverter, the getAsObject( ) method uses the number parsing provided by classes in the java.text package to perform the conversion from String to float. If the user has requested that weights be shown in pounds, the float value of pounds is converted to kilograms. The kilogram float value is then wrapped in an instance of java.lang.Float and returned.
The getAsString( ) method extracts the float primitive from the Float wrapper object. If the user has requested that weights be shown in pounds, the float value is converted to pounds and the number formatting classes from the java.text package are used to format the value into a string, with the units appended.
Helper methods are provided to get the NumberFormat and Locale instances to use. Pay special attention to the private getLocale( ) method. It takes a FacesContext as a parameter and extracts a Locale from the UIViewRoot for this view. This is important because the Faces internationalization system ensures that the UIViewRoot’s Locale is the correct one to use for all language-sensitive operations.
Before WeightConverter can be used, it must be hooked up to the system by placing the following in the proper element ordering in the faces-config.xml:
<converter>
  <description>
    Registers the weight converter using the converter id weight
  </description>
  <converter-id>com.jsfcompref.Weight</converter-id>
  <converter-class>
    com.jsfcompref.trainer.convert.WeightConverter
  </converter-class>
</converter>
The XML markup for WeightConverter simply identifies the converter by ID and a fully qualified Java class name. This enables the use of the <f:converter> tag to attach the converter to UIComponent instances in the view. Instead of registering the converter by ID, it is also possible to register the converter by the type of object it can convert. Converters registered in this way can be discovered for use in implicit conversion, which was explained earlier.
The WeightConverter can be used from JSP through the <f:converter> tag, as shown next:
<p>Current Weight <h:outputText value="#{user.currentWeight}">
  <f:converter id="com.jsfcompref.Weight" /> </h:outputText> </p>
Note that the binding attribute could also be used to good effect in the following:
<p>Current Weight <h:outputText value="#{user.currentWeight}">
  <f:converter binding="#{converters.weightConverter} /> </h:outputText> </p>
where the expression #{converters.weightConverter} points to an instance of our WeightConverter.
Now that you’ve learned about conversion, let’s examine validation, which happens immediately after conversion in the flow of the request processing lifecycle.
The javax.faces.validator.Validator interface is the foundation of the JSF validation system. As a general rule, this interface is implemented by objects that want to function as a Validator. (However, as explained later in this section, not all objects that function as a Validator must implement this interface.) This section covers in detail the lifetime of validator instances, the standard validators that are available “out-of-the-box,” how validators are associated with UIComponent instances, and an example of how to write a custom Validator.
The javax.faces.validator.Validator interface defines a single method called validate( ), which is shown next:
public void validate(FacesContext context,
UIComponent component,
Object value)
As with the converter methods, the context parameter is the FacesContext instance for this request, the component parameter is the component whose value is being validated, and the value parameter is the value on which to perform the validation.
This method is called during the Apply Request Values phase if the component has the immediate property set, or during the Process Validations phase otherwise. Before calling validate( ), the component is marked as invalid. The validate( ) method is then passed a value that has been successfully converted. This method must throw a ValidatorException if the validation fails. If no such exception is thrown, the system assumes validation has succeeded and marks the component as valid. If the exception is thrown, its message is extracted and added to the set of messages on the current FacesContext and processing continues. Standard Faces validators run on the server, though it’s possible to write a validator that executes entirely on the client. Even when using client-side validation, it is strongly advisable to perform server-side validation as a double-check against malicious code in the browser.
As with converters, Faces provides a small, but useful set of standard Validator implementations, listed in Table 7-3. Unlike converters, Validator instances are not registered by class, only by validator-id. This is because the concept of validation is not tied tightly to an object’s type. For example, it is possible for a number to be a valid credit card number, but still be expired. Expired credit cards are of no use to an e-commerce system!
In addition to the validators shown in Table 7-3, Faces also provides a facility to specify that a value is “required,” but since this feature is so commonly used, it has been implemented for maximum correctness and simplicity and does not use the regular validation system. Let’s examine the standard validators and the “required” facility in detail. The validation messages used in this section paraphrase the meaning of the message. The real messages will be dealt with later in this chapter in the section “Tie It All Together: Messages in a View.”
TABLE 7-3 The Standard Validators
LongRangeValidator.validate( ) verifies that the value of the component to which it is attached is within a specified range using an algorithm similar to the following:
1. The argument value has already been converted. This means that it is an instance of java.lang.Long. Therefore, the primitive long value is extracted.
2. If the user set a maximum parameter for this Validator instance, the value is checked against the configured maximum. If the value is greater than the maximum, one of two exceptions must be thrown. First, if the user configured a minimum parameter, then the value is not within the specified range. In this case, a ValidatorException with a “not in range” message is thrown. Second, if no minimum parameter is specified, then a ValidatorException with a “greater than the specified maximum” message is thrown.
3. If the user set a minimum parameter for this Validator instance, the value is checked against the configured minimum. If the value is less than the minimum, one of two exceptions must be thrown. First, if the user configured a maximum parameter, then the value is not in the specified range. In this case, a ValidatorException with a “not in range” message is thrown. Second, if no maximum parameter is specified, then a ValidatorException with a “less than the specified minimum” message is thrown.
4. If a NumberFormatException was thrown during processing, a ValidatorException with a “there was a type error during validation” message is thrown.
This class also implements the equals( ) method to allow comparing two instances. The equals( ) method returns true if the other Validator is configured with the same parameters values for maximum and minimum. The following example illustrates the use of the f: validateLongRange tag, which exposes the LongRangeValidator to the JSP page author.
<p>Enter a California Zip Code:
  <h:inputText value="#{user.address.zip}" id="zip">
    <f:validateLongRange minimum="90000" maximum="99999" />
  </h:inputText>
<h:message for="zip" /></p>
This example asks the user to enter a Zip code in California, which means they must enter a number from 90000 to 99999. A more robust example would also have a custom validator that checks that the Zip code entered is indeed a valid Zip code, since not all numbers between 90000 and 99999 are valid Zip codes in California.
The DoubleRangeValidator class behaves exactly like the LongRangeValidator, except that it operates on Double instances instead.
LengthValidator.validate( ) verifies that the string length of the data is within a specified range using an algorithm similar to the following:
1. The value has already been converted, which means that you can safely call toString( ) on it.
2. If the user has specified a maximum length parameter and the length of the value is greater than that maximum, throw a ValidatorException with the “string is too long” message.
3. If the user has specified a minimum length parameter and the length of the value is greater than that minimum, throw a ValidatorException with the “string is too short” message.
This class also implements the equals( ) method to allow two instances to be compared. The equals( ) method returns true if the other Validator is configured with the same parameters values for maximum and minimum.
The following example illustrates the use of the f:validateLength tag, which exposes the LengthValidator to the JSP page author.
<p>Credit Card Number:
  <h:inputText value="#{user.creditCard}" id="cc">
    <f:validateLength minimum="16" maximum="16" />
  </h:inputText>
</p>
In this example, we require that the user enter exactly 16 characters. Again, a more robust example would include a custom validator that handles things like interspersed dashes and/or spaces and validates the number against a credit card database.
The notion of a value being “required” for the user to enter is so common that it receives special treatment in Faces. Recall that any UIComponent in the view that can possibly have a user-entered value implements the EditableValueHolder interface. This interface has a boolean property called required whose default value is false. The validation processing in UIInput checks this property and if no value has been provided by the user, a “value is required” message is added to the set of messages for this FacesContext and the component is marked as invalid. If the field is not required, and no value has been provided, no further validation processing happens. This saves the cost of throwing and catching the ValidatorException for this common case, and ensures that validation doesn’t run on empty values, for the sake of algorithmic correctness.
EXPERT GROUP INSIGHT Early drafts of the specification included an actual Required validator instead of the simple required attribute, but this was removed for performance, convenience, and correctness.
As shown in the UML diagram in Figure 7-2, each EditableValueHolder instance in the view may have zero or many Validator instances associated with it. There are several ways to make that association, and each is described in this section. Unlike in the case of Converters, there is no implicit Validator association mechanism. This is because Validators don’t have the concept of type as a part of their external contract, though Validators may indeed need to be aware of the type of the data they are validating to function properly. Two methods are provided for explicitly associating a Validator with a UIComponent instance: via JSP tags or programmatically. Each EditableValueHolder instance maintains a list of Validator instances, as well as a special MethodBinding property that points to a method that acts like a Validator. These two data-stores for Validator instances provide lots of flexibility in how to validate your Web application.
There are two ways to associate a Validator with a UIComponent instance from JSP: using one of the tags from jsf_core or using a MethodBinding (or MethodExpression in Faces 1.2) as the value of the validator attribute on one of the component tags directly. This section covers each style in turn.
Faces provides a JSP tag in the jsf_core tag library for each of the standard validators. The <f:validateDoubleRange>, <f:validateLongRange>, and <f:validateLength> tags attach the DoubleRangeValidator, the LongRangeValidator, and the LengthValidator, respectively, to the component represented by the component tag in which they are nested. For example:
<h:inputText id="zipcode" value="#{user.zipCode}">
  <f:validateLength maximum="5" minimum="5" />
  <f:validateLongRange minimum="90000" maximum="99999" />
</h:inputText>
This attaches one LengthValidator and one LongRangeValidator to the HtmlInputText component associated with the <h:inputText> tag. The LengthValidator has been configured to ensure that the user enters exactly five characters in the text field. The LongRangeValidator has been configured to ensure the Zip code is between 90000 and 99999. If the zipcode property of the user bean is of type Integer, implicit conversion will take place as well.
As with converters, Faces also provides a generic <f:validator> tag that allows you to associate any Validator with the component in which it is nested by giving the validator-id. Also, similar to converters and UIComponent tags in general, the Validator tags offer a “binding” attribute to state that the actual Validator instance should come from evaluating an EL expression. (See Chapter 19 for full details on the Validator tags and all their attributes.)
Unlike conversion, validation is a one-way process, and it only happens once during a run through the request processing lifecycle. These constraints open up the possibility of using the Expression Language to point to a method on an arbitrary JavaBean that adheres to the contract and signature of Validator.validate( ). The MethodBinding class from the EL makes this possible. For example:
<h:inputText validator="#{user.validateAge}" value="#{user.age}" />
assuming the user bean has a method defined like:
public void validateAge(FacesContext context, UIComponent component,
                        Object value) {
  // Validation code here
}
During the Process Validations phase, when it comes time to validate this component, call the method validateAge( ) on the bean named user and assume that it will fulfill the contract of a Validator. This late-binding approach saves the instantiation of separate Validator instances and can greatly simplify application design by allowing you to put the business logic, and the method to validate it, in the same class.
All of the tags in the html_basic tag library that map to UIComponents which implement the interface javax.faces.component.EditableValueHolder honor the validator attribute. They are

Note that using this method of association allows only one Validator to be added to the component, but you can still attach multiple validators using the other methods of association.
As with converters, the JSP layer for validators is merely a façade around the component model. The JSP tags all result in a call to addValidator( ) on the underlying component instance, and the required attribute results in a call to setRequired(true) on the component. It is certainly possible to call these methods directly, but as with converters, you must be aware of when in the request processing lifecycle your code to add the validator or set the required attribute will execute.
JSF 1.2 TIP If you want your Validator to be used during the whole lifecycle, try using a UIView RootPhaseListener registered for the beforePhase event of the Render Response phase. This will ensure that the Validator is installed before the first rendering and that it remains installed throughout the life of the view thanks to the state management APIs.
Once you know when in the lifecycle your validator installing code will execute, it’s a matter of creating and adding it to the desired component. The following example shows how to programmatically create and add two different Validator instances on a component in the view.
FacesContext context = FacesContext.getCurrentInstance();
Validator progressValidator = null;
MethodBinding pointerToValidatorMethod = null;
EditableValueHolder component = null;
UIViewRoot root = context.getViewRoot();


// Find the component on which we'll add the Validator.
component = (EditableValueHolder) root.findComponent("form" +
NamingContainer.SEPARATOR_CHAR + "userComponent");


// Ensure that this component doesn't already have a
// progressValidator.
Validator [] validators = component.getValidators();
boolean found = false;
for(int i = 0; i < validators.length && !found; i++) {
  found = (validators[i] instanceof ProgressValidator);
}
if(found) {
  return;
}


// Create the progressValidator.
progressValidtor = context.getApplication().createValidator("progressValidator");


// Add it to the component.
component.addValidator(progressValidator);


// Ensure that this component doesn't already
// have a validator in its MethodBinding slot.
if(null != component.getValidator()) {
  return;
}


Class params = {FacesContext.class, UIComponent.class, Object.class};
pointerToValidatorMethod =
context.getApplication().createMethodBinding("#{user.validateAge}",
                                             params);
component.setValidator(pointerToValidatorMethod);
The main point of this example is to show the use of the createValidator( ), addValidator( ), and setValidator( ) methods. Note that we had to take extra care to check if the validator was already added. This is necessary because validators are additive, whereas converters are not.
Due to the lack of implicit validation, it’s easier to be aware of the lifetime implications because you always have to take some kind of action to add a validator. In all cases, once you take that action, the Validator instance persists for the lifetime of the UIComponent instance, which is generally limited by the lifetime of the session. If you’re worried about excessive object instantiation, a good approach is to use the MethodBindingValidator technique as shown in the section “Writing a validation( ) Method That Is Pointed to by a MethodBinding.” This places the lifetime constraints squarely into the realm of managed beans.
Creating custom Validator implementations is even more common than creating custom Converter instances, partly because the set of standard validators provided by Faces is relatively small, and partly because it is very easy to write a Validator. In this section, we’ll cover the two ways of implementing a Validator and discuss the pros and cons of each.
The first way that you can create a validator is to implement the Validator interface. With this approach, it is recommended to keep the validator in its own separate class since you must register it by validator-id. Also, instances of the Validator can be created automatically so it’s best to keep it lightweight. For the Virtual Trainer example, one can imagine a Validator that ensures that the client has met all the fitness requirements for participation in an event, according to the opinion of the virtual trainer.
The following class, called EventRequirementValidator, provides such an implementation, written using the JSF 1.2 API.
package com.jsfcompref.trainer.validator;

import javax.faces.validator.Validator;
import javax.faces.validator.ValidatorException;
import javax.faces.component.UIComponent;
import javax.faces.context.FacesContext;

import javax.el.ValueExpression;


public class EventRequirementValidator extends Object implements Validator {
  public void validate(FacesContext context,
                       UIComponent component,
                       Object value) throws ValidatorException {
  Boolean hasMetRequirements = null;

  ValueExpression ve =
    application.getExpressionFactory().
    createValueExpression("#{currentUser.status.qualified}");
    try {
      hasMetRequirements = (Boolean) ve.getValue(context.getELContext());
    }
    catch (Throwable e) {
      // log error
     }
    if(!hasMetRequirements.booleanValue()) {
      throw new ValidatorException("You still have more work to do!");
    }
  }
}
Before EventRequirementValidator can be used, it needs to be identified to the system by putting the following markup into the faces-config.xml file.
<validator>
  <description>
    Validates that the current user has met the requirements for the event
  </description>
  <validator-id>eventRequirements</validator-id>
  <validator-class>
    com.jsfcompref.validator.EventRequirementValidator
  </validator-class>
</validator>
Note that this EventRequirementValidator has no configuration parameters, and thus is essentially stateless. The validate( ) method simply looks up the qualified property in the user’s status bean and throws a ValidatorException if it is false. The markup for the validator allows the use of the <f:validator> tag to add this validator to any UIComponent instance in the view.
The second approach to validation allows any managed bean in your application to function as a Validator, without implementing the Validator interface or registering the Validator in the faces-config.xml file. This approach is very useful when you have existing code that you want to retrofit to JSF. You need add only one method and then any UIComponent can use that method to perform validation. An example of this approach was shown earlier in this chapter in the section “Using JSP and the validator Attribute to Associate a Validator with a UIComponent Instance.”
The previous sections covered the mechanics of conversion and validation, when they happen, their impacts on the request processing lifecycle, the ways to create converters and validators, and how to associate them with the components in your view, but all of that would be for naught were it not for giving user feedback. After all, the point of all this is to tell the user they’ve done something wrong, and hopefully how to fix it. The way this information flows from the source of the error (a conversion or validation error) to the user is through the javax.faces.application.FacesMessage class, the FacesContext, and the UIMessage or UIMessages components. This section covers messages in detail, including how they’re created, how to control their display, how to customize the standard messages, and how to add custom messages.
As explained in Chapter 3, the FacesContext instance is the per-request object that is the entry point to all of the Faces-specific context information relating to the current run through the request processing lifecycle. The two properties of particular import to conversion and validation are messages and the UIViewRoot. The page author doesn’t interact with these properties directly, but rather by using the <h:message> and <h:messages> tags from the html_basic tag library. In the interest of completeness, we cover the FacesContext message and UIViewRoot properties as they relate to conversion and validation.
The FacesMessage class encapsulates a single, localized, human-readable message, typically associated with a particular component in the view, and typically describing a problem in the process of conversion or validation. In addition to the message string itself, a FacesMessage has three properties of interest: severity, summary, and detail.
The severity property is defined as an inner class of FacesMessage with the following logical values: INFO, WARN, ERROR, and FATAL. The severity property provides additional information to the user about the error and has no effect on the lifecycle. The summary and detail properties are the actual localized human-readable messages.
The FacesContext instance maintains two logical collections of FacesMessage instances: a collection of messages that are associated with a component, and those that are not associated with a component. The former is usually the garden-variety conversion and validation message, and the latter may be a message that applies to the form as a whole. These two collections are accessed by the different variants of the getMessages( ) method on FacesContext. The variant that takes no arguments returns an Iterator of all messages, associated with a component or not. The variant that takes a clientId gets messages only associated with the component of that clientId, or, if the clientId is null, gets only messages that are not associated with a specific clientId. The FacesContext also provides a method to return the severity of the most severe message it currently has—getMaximumSeverity( ), and a method to return an Iterator of clientIds for which it has messages: getClientIdsWithMessages( ). Most JSP applications won’t need to call these methods directly, but an example to illustrate their use is in order. As you can imagine, the implementations of the renderers for the h:message and h:messages tags use the getMessages( ) method to get the message or messages to render. Let’s go a step further and show an example that directs the application to a special page if there are any messages with a severity of Severity.FATAL. To make this happen, we need to hook up an action method to a UICommand component. This is the standard way to do navigation in Faces, and is covered in detail in Chapter 5. First, let’s show the JSP fragment for the button that submits the form:
<h:commandButton action="#{bean.checkForFatalError}" />
As explained in Chapter 5, this will cause the public String checkForFatalError( ) method on the managed bean named bean to be called when the button is pressed. The return value from this method is fed into the navigation system to determine the next view to display. The implementation of the checkForFatalError( ) method follows.
public String checkForFatalError() {
  FacesContext context = FacesContext.getCurrentInstance()
  FacesMessage.Severity severity = context.getMaximumSeverity()
  String result = "next";

  if (null != severity) {
    if (severity == FacesMessage.Severity.SEVERITY_FATAL) {
      result = "fatalError";
    }
  }
  return result;
}
This method gets the FacesContext for this request, extracts its maximumSeverity JavaBeans property, and examines it. If the value is FacesMessage.Severity.SEVERITY_FATAL, it returns the value fatalError; otherwise, it returns the value next. These two values must be mentioned in a navigation-rule in the faces-config.xml file for this application, as shown next.
<navigation-rule>
  <from-view-id>/form1.jsp</from-view-id>
  <navigation-case>
    <description>Show a special page if any fatal errors are found
    </description>
    <from-outcome>fatalError</from-outcome>
    <to-view-id>/fatalError.jsp</to-view-id>
  </navigation-case>
  <navigation-case>
    <description>The normal page flow</description>
    <from-outcome>next</from-outcome>
    <to-view-id>/form2.jsp</to-view-id>
  </navigation-case>
</navigation-rule>
Here we see a single navigation-rule element with two navigation-case elements inside of it. The first deals with the fatalError case, and the second deals with the normal next case.
The FacesContext is the place where you obtain the UIViewRoot for the current view. This UIComponent subclass is the root node of the tree structure that is the view. All of the components in your page are arranged as a tree of children of this root node. This root node has several properties but its locale property is of special interest to conversion and validation. The locale property is an instance of java.util.Locale that is guaranteed to be the right locale for any language-specific processing in this view. Chapter 14 explains how the locale property is set by the user and/or by the system, but at this point you need to know only that it is the correct Locale to use.
Converters use the locale for many of their methods. For example, the DateTimeConverter couldn’t get very far unless it knew what separator it should use between numbers in a SHORT styled date, or where the year should go. For example, Europeans tend to use 14.05.1995 while Americans prefer 05/14/1995. Because messages are human-readable text, they are localized using the ResourceBundle mechanism of the Java platform.
There are exactly three times in the request processing lifecycle when the standard components will create a FacesMessage instance and add it to the FacesContext: when conversion fails, when validation fails, or when the converted and validated data cannot be pushed to the model during the Update Model Values phase. This last case is not likely due to user error, but the user needs to be informed nonetheless. Each case is examined in turn.
A Converter signals an error by throwing a ConverterException. When creating the exception, the converter has the option of giving a FacesMessage to the constructor directly, providing a simple string message, or no message at all. If no FacesMessage is provided to the ConverterException, a standard “conversion failed” FacesMessage is generated. If the ConverterException has a string message property, its value is used as the detail property of the FacesMessage. The severity of a Converter FacesMessage instance is always ERROR.
JSF 1.2 TIP In Faces 1.2, all of the standard converters have standard messages, but this was simply an omission in earlier revisions of the spec.
A Validator signals an error by throwing a ValidatorException. Unlike the ConverterException, the ValidatorException must take a FacesMessage in its constructor. The severity of a Validator FacesMessage instance is always ERROR.
Lastly, if an EL exception is thrown when trying to propagate the value to the model during the Update Model Values phase, the message of the exception is examined. If non-null, a new FacesMessage is created with the exception message as the summary. If null, a FacesMessage is created with a generic error message.
EXPERT GROUP INSIGHT In all of the preceding cases, we have glossed over how the content of the FacesMessage is localized for messages that are built in to the specification. The EG intentionally avoided providing a factory API for FacesMessage instances because a generic factory pattern may be included in a future release of the Java platform, and it would be preferable to use that when it is available. Instead of the factory, the EG specified the exact manner in which the Java platform’s ResourceBundle mechanism must be used to create and populate a FacesMessage instance with its localized message content. The following is the algorithm:
1. Call the getMessageBundle( ) method on the application. This returns the fully qualified name of the ResourceBundle to be used for this application, or null if no such bundle has been set. If null, use javax.faces.Messages as the name of the ResourceBundle.
2. Use the Java platform ResourceBundle lookup methods, and the Locale from the current UIViewRoot to obtain the ResourceBundle named from step 1.
3. Look in the ResourceBundle for a value under the key given by the value of the messageId for this FacesMessage. If none is found, there is no localized content for this message.
Otherwise, use the value as the summary property of the FacesMessage. Append the string “_detail” to the messageId and look in the ResourceBundle for a value under that key. If found, use the value as the detail of the FacesMessage.
4. Make sure to perform any parameter substitution required on the localized content—for example, if the returned ResourceBundle is “Validation Error: Specified attribute is not between the expected values of {0} and {1},” the proper values must be substituted for {0} and {1}, perhaps using java.text.MessageFormat.
At long last we have come to the place where the user enters the picture: showing them the errors in their input and how to correct them. In keeping with the JSF component model, there are two standard components that serve as placeholders in the view for messages to appear: UIMessage and UIMessages. Along with these components, there are renderers in the standard HTML render-kit: javax.faces.Message and javax.faces.Messages, respectively. Naturally, to show the valid combinations of these components and renderers, there are the <h:message> and <h:messages> tags in the html_basic tag library. As with all of the components in the standard HTML component set, the heavy lifting is done by the renderers, so we’ll briefly describe those in this section. We then list the standard message keys for converters and validators, and show how to customize messages and add new ones.
The <h:message> tag places into the view a UIMessage component associated with a javax.faces.Message Renderer. Whenever the user places a <h:message> tag in the page, they are required to provide a for attribute that gives the componentId of the component for which this tag will display messages. This gives the page author complete freedom to display the messages however they like in the page. The 1.2 version of the specification fixes a problem with earlier versions of JSF in which you couldn’t put the <h:message> tag in front of the component to which it refers unless both the tag and the component were in the same <h: form>. Also in 1.2, a dir attribute has been added that lets the page author give a cue to the Renderer about the direction of the text, either left to right (LTR) or right to left (RTL). This Renderer gets an Iterator of messages from the FacesContext by calling its getMessages( ) method, and passing the value of the for attribute. Only the first message in the Iterator is rendered. (See Chapter 19 for complete information on <h:message>.)
The <h:messages> tag places into the view a UIMessages component associated with a javax.faces.Messages Renderer. Whenever the user places a <h:messages> tag, all messages in the FacesContext are displayed, unless the globalOnly attribute is set, in which case only messages that are not associated with a given component are displayed. The layout attribute can be either table or list. If table, the messages are displayed in an HTML table; if list, they are displayed in an HTML unordered list. (Again, see Chapter 19 for complete information on <h:message>.)
Table 7-4 lists the standard message keys in JSF 1.2. The FacesMessage instances around which these messages are built are all generated during the Apply Request Values phase if the component has its immediate property set, and during the Process Validations phase otherwise. The severity of all these FacesMessage instances is Severity.ERROR.
The default content for the standard messages is pretty dry and may not be what you want in your application. For example, the standard message for javax.faces.validator.LengthValidator.MINIMUM is “Validation Error: Value is less than allowable maximum of ‘‘{0}’’”, which can be pretty cryptic to some. Because of the specification for how FacesMessage instances are produced, it is possible to provide your own ResourceBundle that is consulted before the standard one, thus allowing you to override any of the standard messages, as well as provide your own for any custom Converter or Validator implementations you may have. To do this, simply create an <application> element in your faces-config.xml file (if you don’t have one already) and add a <message-bundle> element inside of it. Note that DTD and Schema are very ordering-dependent so you must place the message-bundle element in the right order if you have other elements in your <application> element. Full details of the element ordering can be found in Chapter 18.
The following is the <application> element for the Virtual Trainer:
<application>
  <message-bundle>com.jsfcompref.Messages</message-bundle>
  <locale-config>
    <default-locale>en</default-locale>
    <supported-locale>de</supported-locale>
  </locale-config>
</application>

TABLE 7-4 The Standard Message Keys
This states that the application resource bundle should be com.jsfcompref.Messages and that the default locale for the application is English, but German is supported also. (See Chapter 12 for details on internationalizing JSF applications.) All that remains now is to author the Messages.properties and Messages_de.properties files. The following is a snippet from the Messages.properties file. Notice the use of the standard LengthValidator to ensure the user’s password is at least six characters long.
javax.faces.validator.LengthValidator.MINIMUM=\
  Not long enough. Make it longer!
JSF 1.2 TIP In Faces 1.2, a feature was added where the label of the component with which the message is associated is incorporated in the message string. If you want to support this feature when overriding a standard message, you must keep in mind that element {1} will be substituted with the label. Doing this doesn’t make sense for the preceding example, but it’s important to keep this in mind.
There are, of course, cases when you just want to override a standard message for one specific usage of one of the standard Validators in your application. This can easily be accomplished using the MethodBinding validator approach, as described earlier. In the method functioning as a Validator, you can manually call the appropriate standard Validator, catch the ValidatorException, create your own FacesMessage instance with your own message, and pass that to the constructor of a new ValidatorException, which you then throw.
JSF 1.2 T You can also override the message using the requiredMessage, converterMessage, or validatorMessage property of UIInput. This is exposed as a tag attribute on all of the tags that expose UIInput components to the page author.
Creating your own messages is as simple as adding a message key to your properties file, and then following the algorithm in the section “When and How FacesMessage Instances Are Created and Added to the FacesContext” earlier in this chapter to create the FacesMessage instance, and pass it to the constructor of your ConverterException or ValidatorException. In Chapter 9, you will see how to create a FacesMessageMaker class to encapsulate this process. Alternatively, your custom Validator could simply just pull the String off of a ResourceBundle manually in an application-specific manner.
Now that you’ve learned the details of conversion and validation, let’s examine in depth the Faces Event system in the next chapter.