Chapter 5. Separation of Concerns
Separation of concerns is the idea that each module or layer in an application should only be responsible for one thing and should not contain code that deals with other things. Separating concerns reduces code complexity by breaking a large application down into many smaller units of encapsulated functionality.
It’s easy to confuse separation of concerns with employing modules for the construction of your application, but separation of concerns also implies the layering of functionality in your application. For example, n-tier architecture and MVC architectures are the result of separating concerns across the entire application, rather than at the individual module level. The goal of MVC and related patterns is to separate data management from presentation.
Separation of concerns can be expressed as functions, modules, controls, widgets, layers, tiers, services, and so on. The various units of concern vary from one app to the next, and each different app may use a different combination. Functions and modules have already been discussed.
A control is a reusable GUI input that enables user interaction with your application. For example, combo boxes, calendar inputs, sliders, buttons, switches, and knobs are all controls.
A widget is a small application which is intended to be embedded in other applications. For example, WordPress allows developers to offer embeddable units of functionality to blog owners through its plug-in ecosystem. There are many widgets to manage calendars, comments, maps, and all sorts of services from third-party providers.
Tip
The word widget is historically used to mean the same thing as controls. To avoid confusion, this book will always refer to interactive form inputs as controls (or inputs), and widgets will always refer to embeddable mini applications.
Layers are logical groupings of functionality. For example, a data layer might encapsulate functionality related to data and state, while a presentation layer handles display concerns, such as rendering to the DOM and binding UI behaviors.
Tiers are the runtime environments that layers get deployed to. A runtime environment usually consists of at least one physical computer, an operating system, the runtime engine (e.g., Node, Java, or Ruby), and any configuration needed to express how the application should interact with its environment.
It’s possible to run multiple layers on the same tier, but tiers should be kept independent enough that they can easily be deployed to separate machines or even separate data centers. For large-scale applications, it’s usually also necessary that tiers can scale horizontally, meaning that as demand increases, you can add machines to a tier in order to improve its capacity to meet that demand.
Client-Side Concerns
There are several client-side concerns that almost every mature JavaScript application might deal with at some point:
Module management
Events
Presentation and DOM manipulation
Internationalization
Data management and IO (including Ajax)
Routing (translating URLs to script actions)
Logging
Analytics tracking
Authentication
Feature toggling (decouple code deployment and feature release)
Various libraries and frameworks exist that generally attempt to provide some combination of mechanisms to deal with these concerns. Libraries roughly fall into two categories: minimal and monolithic. Minimal libraries generally provide a handful of objects and methods which make it easier to build well organized applications. Perhaps the most famous example is Backbone.js, which provides views, models, collections, routers, and events.
That may sound like a lot, until you compare it to something like the Dojo framework, which is something like a library of libraries. It includes an impressive array of components that do everything from extending JavaScript with ideas from other programming languages, like aspects (aspect-oriented programming), to DOM widgets, such as a calendar. Dojo is interesting because it started out more monolithic, and now it’s actually a tiny module loader with a large library of components that you can use if you wish, without loading the entire Dojo framework.
Larger frameworks tend to be more heavy-handed (opinionated) about how your application architecture should function.
There is a growing trend in the JavaScript community moving in the direction of microlibraries, and microlibrary frameworks. Microjs.com has a list of interesting microlibraries. You should certainly explore the wealth of microlibraries available in the community and use the ones that solve your problems.
You might see microlibrary proponents discourage the use of jQuery, not least because it’s quite large compared to most microlibraries. However, there is some security in using a well-tested library like jQuery because it is used and improved by thousands of other smart developers. It’s usually safe to assume that jQuery will mostly behave as expected (of course, there are always exceptions).
Despite the claims of microlibary authors, most microlibraries have not undergone the same level of scrutiny as jQuery, and small libraries don’t equate to bug-free libraries. Everybody makes mistakes. Be prepared to debug them as you work with them. Please contribute fixes back to the author if you find and fix a bug.
It’s also likely that you’ll use most of jQuery’s core feature set in every application that you build. I see no good reason to reassemble that feature set from microlibraries every time you start a new project.
Also be aware that many microlibraries may need to reinvent the
wheel over and over again for commonly needed patterns, like copying
attributes from one object to another (as in jQuery or Underscore’s
.extend() method). It might seem like a good idea to use less
code, but there’s a chance you’ll end up using more, instead, unless you
go with a well-organized microlibrary framework with components designed
to be used together.
In order to decide which application frameworks or libraries might help you build your application, take a look at the TodoMVC project, which compares many commonly used libraries, such as Backbone.js, Angular.js, Dojo, and YUI, by showing you an example of what a simple Todo application looks like using each library.
Module Management
Module management is concerned with supplying a standard architecture that allows your modules to fit together easily and communicate with each other without being tightly coupled.
The module manager prescribes a standard module API that all other modules can implement and a sandbox of common library functionality that any module can use so that application modules can stay lightweight and focus exclusively on the service that they provide.
Module management typically supplies your application with:
Namespacing
Sandbox (a base layer of functionality that other modules can safely use)
Access to environment variables and bootstrapped data
Module lifecycle hooks (help with setup and teardown)
An event system for inter-module communication
Nicholas Zakas gave a related talk called Scalable JavaScript Application Architecture, and Addy Osmani (author of Aura) wrote about it in Patterns For Large-Scale JavaScript Application Architecture. Often, module-management implementations are part of a monolithic application library tightly coupled to a proprietary codebase, or both.
Aura is a good example of an open-source implementation with a fairly narrow focus on module management—with one clear difference: Aura has a strong focus on UI components, which are modules that have UI elements that need to be rendered to the screen. A generic module could perform any type of service and may or may not need a dedicated space to render. A component exists primarily for the purpose of supplying UI output or UI interaction.
For the sake of clarity and simplicity in the following examples, I wrote a simple module management solution called Tinyapp. It is an open source library. To get the source, clone it from GitHub:
$ git clone git://github.com/dilvie/tinyapp.gitGetting started
As of this writing, Tinyapp is rapidly evolving. Please see the Tinyapp website to learn how to download and install the latest version.
Simply require() it and initialize your app:
varapp=require('tinyapp');app.init({environment:environment,pageData:pageData,beforeRender:[promise1,promise2...]});
The environment object (optional) is
the primary means of passing application environment configuration
into your JavaScript application. Use it for passing in data that
usually has to come from server-side configuration, such as
environment domain names, application IDs for third-party services,
CDN URLs, etc.
There are a couple of ways you could source the environment from the server side: load it with Ajax or include it in the HTML with an inline script.
The pageData object is intended to register
bootstrapped data with the app at page-load time.
beforeRender is a list of promises that all must
finish before the render phase begins. For example, many apps will
need i18n translations to load before any module is allowed to render.
By adding an i18n promise to the application’s
beforeRender queue, you can postpone render until the
translations are loaded. Using beforeRender can prevent
tricky race condition bugs and provide a neat solution if you need a
guaranteed way to handle tasks before the modules render. See Registration, loading, and
rendering for more about application and
module timing hooks.
Warning
Be careful with the global beforeRender queue.
Each item you add to it compounds the possibility that something in
the queue will fail, which might significantly delay or block the
render of your application. If what you’re waiting for only impacts
a single module, keep the waiting logic isolated to that
module.
Here’s how you might build up a typical Tinyapp module:
Require Tinyapp:
varapp=require('tinyapp');Provide an API:
varapp=require('tinyapp'),hello=functionhello(){return'hello, world';},api={hello:hello};Export your module:
varapp=require('tinyapp'),hello=functionhello(){return'hello, world';},api={hello:hello};module.exports=api;
Tip
This contrived example should really be simplified even
further. Since it doesn’t actually use tinyapp, it
doesn’t need to require it, and since it’s only exporting a single
function (which is actually a pretty good idea for lots of modules),
it could just be module.exports = function hello() {
...
Any standard node-style module could be used as a Tinyapp module, but as you’ll see, Tinyapp provides some utility and benefit that you’ll use a lot.
Registration, loading, and rendering
If you need to fetch some data asynchronously before you render your module, Tinyapp helps speed things up by launching your asynchronous calls as early as possible.
Module initialization is broken into two phases: load and render. Imagine you want to asynchronously fetch some data while the page is still loading so that you can begin to render it as early as possible. This can speed up your perceived page-load times.
The solution is to kick off the asynchronous fetch at load time so that it begins the download as early as possible: before the DOM is ready, and before the page is done processing all the HTML, CSS, and JavaScript. Since the load is asynchronous, it will introduce only a few milliseconds of latency during the load phase, but it’ll do most of the work in the background while the browser continues processing the rest of the page in parallel with the load.
If you have data that is secondary to the main purpose of the page, and you can get away with waiting until after the DOM is ready, it’s a good idea to let your page load normally and fetch the data during the render step, instead of using the early load hook. This will reduce the number of page requests that must be handled at page-load time (eliminating the latency hit) and hopefully also improve the perceived performance of your app.
Tinyapp allows you to hook into those page-load phases individually so you can optimize page-load times and manage render dependencies without worrying about asynchronous timing issues.
You can specify load() and render()
callbacks by passing them into a registration method:
app.register({load:load,render:render});
The render() callback is called after:
Any promise returned by
load()is resolved. For example, if you return a jQuery Ajax promise from yourload()function, it will wait until the Ajax fetch is complete. All jQuery Ajax calls return compatible promises.All
beforeRendercallbacks have fired (see Getting started).The DOM is ready to be manipulated.
Registration is optional. If you don’t need any of the features it provides, you aren’t required to use it.
Time for an example. Imagine you have a widget that displays tour dates for bands. Here’s how it could work:
varapp=require('tinyapp'),view=require('./view'),data,load=functionload(){varurl='http://api.bandsintown.com/artists/'+'Skrillex.json?api_version=2.0&app_id=YOUR_APP_ID';whenLoaded=app.get(url);whenLoaded.done(function(response){data=response;});returnwhenLoaded.promise();},render=functionrender(){view.render(data);};app.register({load:load,render:render,});module.exports=api;
Warning
Try not to do anything blocking in your load()
function. For example, you might want to fetch the data that you
need to complete your page render, but if you’re loading a large
collection and you need to iterate over the collection and do some
data processing, save the data processing step for
render() time, when you’re not blocking the page render
process.
It’s not safe to manipulate the DOM at all in your
load() function.
Events
Events are a method of communicating between different application modules or components in order to achieve loose coupling, asynchronous communication, interprocess communication, or any combination of the above. For example, the browser environment is event driven. It presents DOM elements to users (buttons and form inputs, for example), and then responds to user input by firing events for the application to listen for and handle.
You’re probably already familiar with responding to existing browser DOM events. If you need a refresher, consult the Mozilla DOM Reference. This section covers defining and using your own custom events, independent of the DOM.
Tip
In order to keep modules decoupled from each other, it’s helpful to think of events as reports of what has happened, rather than commands for what should happen next. Other modules can listen for the events they care about and decide what to do next on their own.
Event emitters
Often we need to provide a method API that can handle a range of
asynchronous communication. A good solution to this problem is to
return an object that emits events. DOM elements are event emitters,
so that they can notify you of user input or other state changes. For
example, most elements emit a click event when the user
clicks them, and the HTML5 video API emits events for loading
progress, playback position changes, and a variety of other
information that isn’t immediately known.
It’s possible to create your own event emitter API that you can
mix into any JavaScript object. A minimal implementation might only
have three methods: .on(),
.trigger(), and .off().
Backbone.js is a client-side MV* library that provides event emitters for models, views, routers, and collections. If you’re using Backbone (which relies on Underscore), you can turn any object into an event emitter like this:
_.extend(myObject,Backbone.Events);myObject.on('my_event',functionhandle(data){console.log(data);});object.trigger('my_event','hi');// logs 'hi'
The downside to triggering events only on the object to which the events belong is that every listener must be given a reference to the object. In situations where there are potentially many objects listening, that strategy requires too much boilerplate code to be maintainable.
Another problem you might encounter is that listeners must be tightly coupled to emitters, which partially defeats the purpose of using events in the first place. To get around that, you can wire up emitters and receivers through an event mediator or connector.
In cases where you have nested views that need to communicate up to the top level, this pattern becomes problematic because at each level, the child and parent must register with each other to relay messages. In that situation, you create a lot of code overhead, and debugging event-passing bugs can become very painful.
Tip
If you have an object that needs to inform your application about asynchronous events such as incoming push notifications (chat notifications, new items added to collections, etc.), an event emitter might be the right solution.
Event aggregators
In contrast to event emitters, an event aggregator is a central object that collects events from multiple sources and delivers them to registered subscribers. This is essentially a type of publish/subscribe pattern. An aggregator eliminates the need for specialized mediators to keep an emitter and listener decoupled. Again, with Backbone and Underscore, that might look something like this:
// Set up an aggregator on your app object.varapp={bus:_.extend({},Backbone.Events)};// In your logger module, log all invites in the app.app.bus.on('invite',functionhandle(inviteData){console.log(inviteData);});// Trigger an event when a user invites a friend.app.bus.trigger('invite',{user:'userId',friend:'friend.email@example.com'});
Event aggregators can be enormously useful. Because neither
emitter nor subscriber need know about the other, aggregators enable
very loose coupling between modules. Each only needs a reference to
the aggregator. In this case, the emitter and the listener only need
to know about app.bus and the invite event
in order to communicate.
Queues and stacks
One disadvantage of the publish/subscribe pattern is that there is no guarantee that a message will be processed once it is broadcast.
A message queue is a type of event mediator that records every message it hears in a queue (or stack) for later processing. That log of messages can be permanently recorded, if needed, and the queue is actively managed, so it’s possible to enforce guarantees that some listener got the message.
There is often a need for separate modules or processes to collaborate in order to process input. For example, imagine that your application is a tool for photographers. It allows photographers to upload a photo, resize it, watermark it, and then send it to various social networks automatically.
When a photo is uploaded, it’s added to a processing queue. Later, a pool of photo-processing workers can independently pull jobs from the message queue as they are ready to process them, and message back when the photos are ready to be distributed across the Web. Other workers can then pick up the finished photo messages and handle the distribution step. With this architecture, the processing workers can scale independently of the distribution workers.
If you need a message queue, you might be in luck. It’s such a common pattern that there are several popular out-of-the-box solutions, such as Kestrel or Amazon Simple Queue Service (SQS).
Choosing the right event model
In reality, no single event model provides a complete solution to event management. It doesn’t make sense to examine a bunch of different event models and chose just one for your application. Most web-based applications eventually need more than one type. Here are some example use cases:
For reusable libraries that deal with asynchronous behaviors, consider an event emitter.
For communication between models, views, logging systems, analytics systems, and so on, where it’s advantageous to keep coupling to a minimum, go with an event aggregator.
For reliable communication between independently scalable and deployable application tiers, a message queue may be the right solution.
This guide has really only skimmed the surface of possible messaging patterns. I’ve intentionally focused only on the most common patterns that might be handy in almost every app that grows beyond a few thousand lines of code. For more ideas, take a look at Martin Fowler’s writing on Event Aggregator, Observer Synchronization, and Event Sourcing.
Events by example
To better understand how the most common messaging patterns fit together, it might be useful to revisit the guest-list app introduced in Chapter 4.
Of course, the whole idea here is to keep the presentation concerns separate from the data-management and domain-logic concerns. Backbone.js can give you a leg up with that by encapsulating common data-management tasks in models and collections, and encapsulating display and UI concerns in views.
All Backbone.Model instances are event emitters. When a model attribute changes, it
emits a change:<attribute> event, where
<attribute> is the name of the attribute that
changed. Since you want to communicate the change to the view without
tightly coupling the model to the view or vice versa, you’ll want to
have the model listen for its own change event and rebroadcast it at
the app level.
The view can listen for the app level changed event
and respond by updating the list item that changed.
Example 5-1 shows the new guest-list model.
You can listen to the Backbone.Model event emitter with
this.on('change:checkedIn', handler).
varModel=require('backbone-browserify').Model,app=require('./tinyapp'),// Set the checkedIn attribute on the model.toggleCheckedIn=functiontoggleCheckedIn(){this.set('checkedIn',!this.get('checkedIn'));},delegate=functiondelegate(){varsourceId=this.get('id');// Listen for toggled event, sent from the view.// sourceId is used to filter the event. The model// does not need to know where the event comes from,// only which item was clicked.app.on('toggled-checkedin',sourceId,toggleCheckedIn.bind(this));// Relay the change event so the view can listen for it// without knowing anything about the model.this.on('change:checkedIn',function(item){// Send a shallow copy of the list item as the// message payload. Make sure the new checkedIn// state is easy to access.varevent=app.extend({},item,{sourceId:this.id,checkedIn:item.get('checkedIn')});// Broadcast the message on the aggregator.app.trigger('changed.checkedIn',event);}.bind(this));},// The collection expects a Backbone.Model constructor.api=Model.extend({initialize:delegate,toggleCheckedIn:toggleCheckedIn});module.exports=api;
Note the line:
app.on('toggled-checkedin',sourceId,toggleCheckedIn.bind(this));
Tinyapp adds the concept of a sourceId to event listening.
The idea is that you augment your triggered event object with the ID
of the object you’re talking about. When you listen for the event
(like this example illustrates), you can pass in the object’s ID to
filter out any events that don’t have that sourceId on
the event object. This can be handled at the application framework or
event library level. For example, in Tinyapp, there’s a wrapper around
the events.on method that looks something like
this:
functionon(){varargs=[].slice.call(arguments),type=args[0],sourceId=args[1],callback=args[2];// If there's no sourceId, just pass this through// to the event emitter.if(args.length<=2){events.on.apply(events,arguments);}else{// Otherwise, filter out any events that don't match// the expected sourceId.events.on.call(events,type,function(event){if(event.sourceId===sourceId){callback(event);}});}}
Similar strategies include namespacing events and creating separate channels (aggregators) for separate concerns.
Warning
Regardless of which mechanism you prefer for event communication, be careful not to refer to other modules directly (including via channels and namespaces). If modules know how to communicate with each other directly, it defeats the purpose of loose coupling, and you might as well give them a direct handle on each other. A common pitfall that I have fallen into myself is to use the module’s namespace as the event namespace. Doing so gives every module that needs to listen knowledge of the emitting module by name.
Returning to the example app: the collection isn’t doing much
yet, but later you’ll use it to add and remove guests. For now, it
just gets a handle to the model constructor that it will use to
instantiate new list items. The create method is
just a thin wrapper around collection instantiation, as shown in Example 5-2.
varapp=require('./tinyapp'),Model=require('./guestmodel'),Collection=require('backbone-browserify').Collection.extend({model:Model}),create=functioncreate(models){models=models||app.pageData.guestList;returnnewCollection(models);},api={create:create};module.exports=api;
Similar to how the model relays its own events, the view listens
for DOM events and relays them on the app event aggregator so that
other modules can listen (such as models or click loggers). Pay
special attention to the delegate() and
relayClick() functions, as in Example 5-3.
varapp=require('./tinyapp'),// Assign Backbone.View to the View var.View=require('backbone-browserify').View,$=app.$,checkedinClass='icon-check',listClass='dropdown-menu',guestClass='guest',// Rebroadcast DOM click events on the app event// aggregator.relayClick=functionrelayClick(e){// Get the ID from the element and use it to// namespace the event.varsourceId=$(this).attr('id'),event=app.extend(e,{sourceId:$(this).attr('id')});app.trigger('toggled-checkedin',event);},delegate=functiondelegate(){// Delegate all click events to the parent element.this.$el.on('click','.'+guestClass,relayClick);// Listen for changed events from the model// and make sure the element reflects the current// state.app.on('changed.checkedIn',functionchangeHandler(event){varid=event.id;// Select the right list item by ID.this.$el.find('#'+id).toggleClass(checkedinClass,event.checkedIn);}.bind(this));},render=functionrender(guestlist){var$el=this.$el;$el.empty();// Loop over the passed-in guest models and render// them as li elements.guestlist.forEach(function(guestModel){var$guest;guest=guestModel.toJSON();$guest=$('<li class="'+guestClass+'" '+'id="'+guest.id+'">'+'<span class="name">'+guest.name+'</span></li>');$guest.appendTo($el);});returnthis;},// Define the backbone view.GuestlistView=View.extend({tagName:'ol',id:'guestlist-view',className:listClass,initialize:delegate,render:render}),// Expose a factory function.create=functioncreate(){returnnewGuestlistView();},api={create:create};module.exports=api;
Model View Controller/MV*
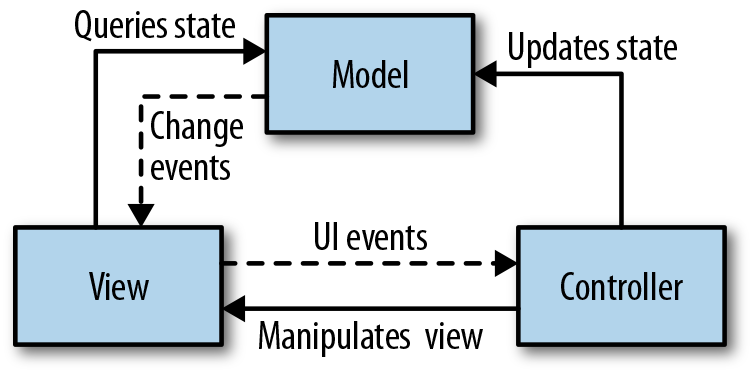
MVC (Model View Controller) is an architecture for managing separation of presentation logic from business domain logic in applications.
Model refers to application state, and methods for manipulating and retrieving state. Usually there is a mechanism to notify observing views when the model state changes. There can be more than one view listening to a single model.
View refers to the UI that gets drawn to the screen. It generally listens to the model so that it can update the UI when state changes, and sometimes to the controller so that it can handle presentation changes that do not impact the business domain (such as scrolling or showing/hiding UI).
Controller refers to the user interaction logic. It updates the model in response to user requests. In some MVC interpretations, it is responsible for instantiating both the model and the view, and wiring up event listeners between them. Most server-side web frameworks have controllers that route incoming requests to actions, which manipulate the model and serve updated views to the user. See Figure 5-1.
In the browser, where each element in the DOM also happens to be an event emitter with most of its own logic built in, it might seem natural to handle a bit more of the input directly in the view (rather than the controller, as is common with MVC). Several alternatives to MVC have sprung up that deviate slightly from the MVC architecture. The alternatives are commonly grouped together and referred to as MV*. Typically, there will be a notion of a model and a view (or something like them), while many of the responsibilities of a controller will be shuffled around to other components. UI logic typically moves mostly into the view, while domain logic gets shifted largely to models. Controllers in modern web applications often get whittled down to simple routers.
For example, Angular uses a system similar to MVC, except that the view takes on a lot of UI interaction tasks (called directives) that may have been handled by a traditional controller, and the controller handles domain logic and interactions with the models, which are bound to views via simple data structures called scopes. Angular’s controllers might remind you a lot of models from other MVC implementations, if you’re a follower of the “fat models, skinny controllers” approach. They typically supply or consume a collection of related services.
Riot.js is a Model View Presenter (MVP) library that represents the polar opposite of Angular. Riot’s model contains only business-domain logic: state and services to manipulate that state. The view is strictly HTML and CSS. The templates contain zero logic. There are no custom extensions to the HTML. The presenter listens to both the model and the view and responds to the events. This pattern is a branch of MVP known as passive view. The approach is extraordinarily simple, and it’s reflected in both the size and performance of Riot. It weighs in at less than 2 k minified and gzipped, and the template engine significantly outperforms popular competitors. The surface area of the API is so small, you could literally master it in a single sitting.
The most popular MV* library is Backbone. As with Angular, Backbone delegates most of what you would
find in a controller to the view and router. Instead of models, views,
and controllers, and an opinionated way of stitching them together,
Backbone defines View, Model,
Collection, and Router constructors. You are
expected to subclass those constructors using the .extend()
method available on each of the constructors.
Warning
Backbone’s .extend() method creates classical-style inheritance hierarchies, with
all the pitfalls that go along with them. I have seen a couple of
projects get into trouble by relying too much on Backbone’s
.extend() inheritance. Be careful about subclassing from
subclasses. Instead, try passing exemplar prototypes and
mixins into .extend() in order to facilitate code reuse.
See Classical Inheritance Is Obsolete and Prototypes.
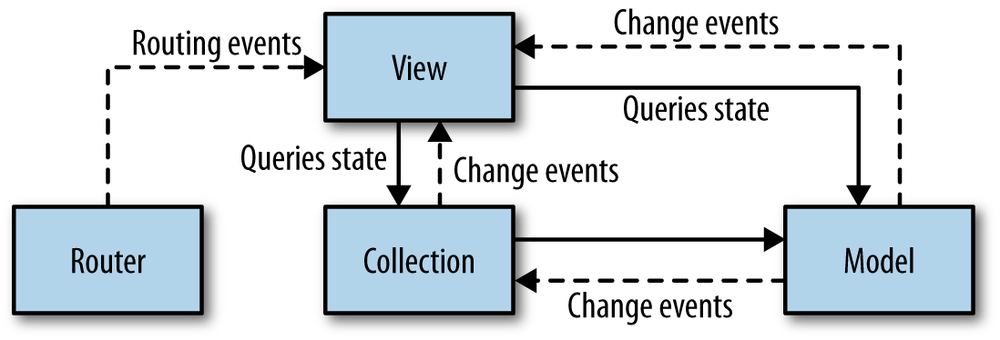
Backbone is not terribly opinionated about how you stitch the various pieces together, but most samples you’ll find in the wild give a lot of responsibility to the view, which typically instantiates and keeps a reference to collections, models, or both. A typical arrangement might look something like Figure 5-2.
Backbone.Router allows you to update the location bar when the user selects
different views, or create actions that get triggered in response to the
user navigating to a given URL. This is the primary responsibility of
controllers on the server side, because URLs are generally the only way
for the user to communicate with a server-side application. That’s not
the case in a client-side application.
Backbone.View is responsible for encapsulating view logic, such as how and
when to display information. Views typically listen for DOM events,
translate them into some intended action, and then emit events that the
model can subscribe to.
Warning
It’s common to see views directly update models, collections, and routers, but when they do, it is a slippery slope. Often, developers get confused and start to put too much business logic in the view, which breaks the separation of concerns and leads to code duplication and hard-to-find bugs across multiple views that need to share the same business rules. Instead, views should only manage the presentation concerns and trigger events that other modules can listen for.
Backbone.Model is responsible for encapsulating state and business logic.
When state changes, it emits events that views can subscribe to.
Backbone.Collection is an extremely useful abstraction that provides a managed way
of dealing with collections of models, complete with Underscore’s many
functional methods, which you can use to query, filter, and sort your
collections.
As you’ve already seen in the event examples, there are alternative ways to stitch Backbone’s tools together. For example, you can route most of the communication through an event aggregator to reduce coupling to a minimum, as shown in Figure 5-3.
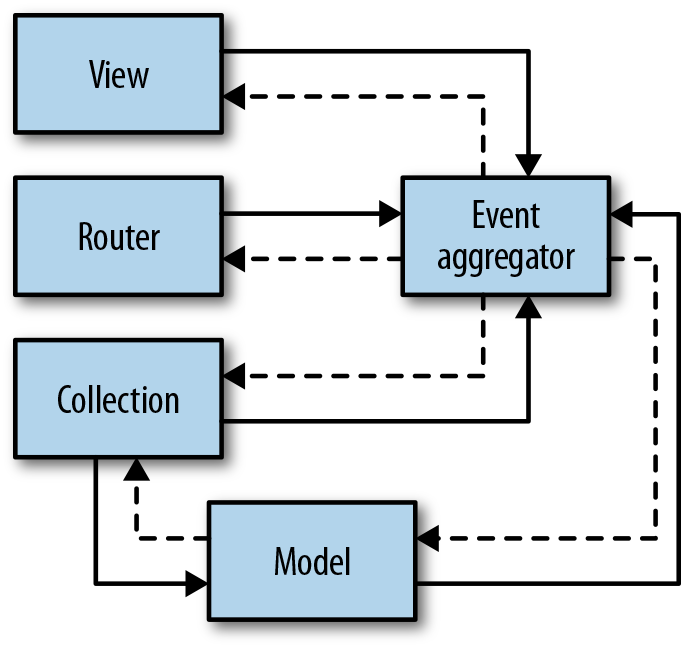
The solid lines represent direct references. Dashed lines represent event listeners. As you can see, with this setup, you don’t need a lot of direct references, which allows your modules to be a lot less coupled. Views listen for state changes and view selection events and emit user-action events. The router listens for user route selections, and emits route-change events. Collections listen for add and remove events and relay change events from the model. The model listens for UI input changes and emits change events.
This is the pattern you’ll see developing in the examples, but it’s certainly not the only way to handle separation of concerns in the browser.
There are many other MV* alternatives, including MVVM and RVP. I’ll leave it to you and Google to work out how they all differ. The important thing to understand is that all of them exist to allow the separation of presentation logic and business-domain logic. In short, your business logic should not be mixed in with your presentation logic and vice versa. You can explore various libraries frameworks at TodoMVC.com.
Presentation and DOM Manipulation
The primary purpose of a view in Backbone is to present the application’s interface to the
user and react to user input. As such, every Backbone view should be
associated with some DOM. Backbone handles that association with the
.el and .$el properties. The .el
property is a direct reference to the view’s root element, while
.$el is a cached jQuery or Zepto object for the view’s
element.
Consider Example 5-4 from guestlistview.js.
// Define the backbone view.GuestlistView=View.extend({tagName:'ol',id:'guestlist-view',className:listClass,initialize:delegate,render:render}),
If specified, Backbone.View will construct this.el
using the tagName, className, id,
and attributes parameters. If you don’t specify a
tagName, it will create a div. You can also
attach the view to an existing element by passing in a value for
.el.
View events
Backbone lets you pass in an events hash to declaratively specify event
handlers. The hash takes the form, { 'eventName selector':
'callback' }. If 'callback' is a string, it will
map to the method on the view object that matches the name. You can
also pass an inline function or function reference. Backbone uses
jQuery’s .on() method and delegates events
to the view’s root element (this.el) by default. If you
omit the selector, the root element will be the target element.
Warning
Leaving off the selector is probably a code smell. Could you be delegating events to a parent element instead?
Event delegation
Event delegation is the process of aggregating events from multiple sources to a single event-handling mechanism. It’s common to encounter large collections that share the same event handlers but attach different listeners for each item in the collection.
For example, it might have been tempting to implement the guest-list item as a separate view, and then rerender the guest template every time the status changed. That might look something like this:
render=functionrender(data){var$el=this.$el;// Prevent memory leaks in rerender cases.$el.off('click.'+this.className);$el.empty();processTemplate($el,data);// Reattach listener.$el.on('click.'+this.className,handleClick);returnthis;};
Note that this is essentially equivalent to passing an
events hash to Backbone in the hypothetical guests
View.extend():
events:{'click':handleClick}
Note that Backbone automatically delegates using jQuery’s .on() method. However, passing a
hash like this into an item-level view negates that capability.
Instead, it will wire up a separate click handler for each list
item.
This approach slows down the application in two ways: first, it takes longer to initialize because of the extra wiring that must be performed for each event handler, for each item. It also consumes more memory, particularly if you chose the inline method to specify the event handler. If you do that, there will actually be a separate copy of the event handler function for each item.
You should be aware that you can leak memory if you bind event
handlers to each item in a dynamic collection. For example, if you
have a collection that utilizes the infinite scroll technique,
you’ll need to remove elements from the DOM as they scroll out of
view to prevent browser performance issues or crashes. You must
remember to remove the event listeners when you remove the items
from the DOM. Backbone views have a .remove() method
that will remove both the DOM listeners and stop the view from
listening for events from other objects.
You’ve already seen event delegation employed in the
guestlistview.js delegate() function. Now
you’ll use the built in Backbone.View events hash to
handle it instead. Here’s what the delegation looked like
before:
// From the delegate() function:// Delegate all click events to the parent element.this.$el.on('click','.'+guestClass,relayClick);
You’ll pull that code out of the delegate() function and let Backbone handle it for you:
// Define the backbone view.GuestlistView=View.extend({tagName:'ol',id:'guestlist-view',className:listClass,initialize:delegate,render:render,// Add the handler to the view object:relayClick:relayClick,// Let Backbone handle the event delegation:events:{'click .guest':'relayClick'}}),
By delegating the click to the parent element
instead of to each list item, only one listener has to be attached
per behavior, rather than one per behavior for each item in the
list. What’s more, you don’t have to worry about removing the
listener and adding it again if you need to render a list item
again. In short, less code to write, and less risk of memory
leaks.
Bonus: when you expose your event handlers on the view object, it makes them easier to unit test because you don’t have to figure out how to simulate the events in order to invoke the handlers. Keep in mind that events are a part of the API surface area, and event handlers should be tested, just like public methods.
Warning
If you implement list items as subviews, you still need to
remember to call the item’s .remove() method as the
item scrolls away, because you still need to stop the view from
listening to Backbone events. If you wire up any other kind of
event listener (such as an app-level event aggregator), you should
remember to remove those listeners as well.
Templates
Templates help to separate display structure concerns from logic. Templates define the structure of your UI, along with some indication of where data should be injected. Templates can be reused with a variety of different data. A template processor combines data and templates to produce the DOM output that will be rendered to the screen.
Warning
It’s common for template languages to support limited logic, such as if/else statements. I recommend that you avoid the temptation to use any of them, because they defeat the purpose of separating DOM structure from logic concerns—instead, your logic just lives somewhere else. Even worse, your logic lives in two places, and it’s even harder to find the source of bugs.
There are many different options for template rendering. Some common choices include Jade, Mustache, Haml, EJS, Plates, and Pure. Plates (a Flatiron library) and Pure provide the ability to write templates in pure HTML, with no specialized DSL mixed in at all. Data gets associated via CSS-style selectors in the JavaScript view layer. Backbone relies on the Underscore library, which happens to include a simple template engine. For the sake of simplicity and familiarity, you’ll see it used in the examples.
Let’s revisit the guest-list view and replace the inline HTML with a template.
Before:
'<li class="'+guestClass+'" '+'id="'+guest.id+'">'+'<span class="name">'+guest.name+'</span></li>'
After:
<liclass="<%= guestClass %>"id="<%= id %>"><spanclass="name"><%= name %></span></li>
Even better, now that it isn’t expressed in a JavaScript string,
it’s obvious that it doesn’t belong in the JavaScript view layer at
all. For a template this small, it wouldn’t do any harm to simply
embed it in the HTML for the page. You can do that using a
<script> tag:
<scriptid="guest"type="text/template"><liclass="<%= guestClass %>"id="<%= id %>"><spanclass="name"><%=name%></span></li></script>
Tip
Unless they are tiny (a few lines), most templates should be in dedicated files. You may want to group them with corresponding views in the directory hierarchy. You can use a build step to pull templates into your HTML, or for templates that are only used rarely, fetch them as needed via Ajax.
If you’re using a module system that doesn’t pollute the global
namespace, you’ll need to explicitly require Underscore in order to
access the template utility. If you’re just including Backbone
standalone, you don’t need to do anything special to use Underscore’s
methods. Just use _.template() directly. In this case,
Browserify will not leak dependencies into the global namespace, so you’ll
need to require it. In guestlistview.js, you’ll
insert the require() line like this:
// Assign Backbone.View to the View var.View=require('backbone-browserify').View,// Grab the template utility from Underscore.template=require('underscore').template,
Of course, this isn’t going to work until we add Underscore to package.json:
"underscore": "*",
Save the file and run:
$ npm installNow that the dependency is there, it’s time to add the template
code. Underscore lets you compile your HTML templates into an
executable function in order to speed up template processing. You can
do that near the top of the render() function so that it
doesn’t need to be called for every guest that gets rendered, as in
Example 5-5.
render=functionrender(guestlist){var$el=this.$el,// Compile the guest template.guestTemplate=template($('#guestTemplate').html());$el.empty();// Loop over the passed-in guest models and render// them as li elements.guestlist.forEach(function(guestModel){varguest;// Build the data object to pass into the template.guest=guestModel.toJSON();// Add the guestClass to the data object.guest.guestClass=guestClass;// Process the template data and append the output to the// list element.$el.append(guestTemplate(guest));});returnthis;}
Remember to run grunt to rebuild the project files, or set up a grunt watch task
to build on file save. The tests should pass again. Having the lint
and unit test tasks set up makes it easy to refactor like this with
confidence, because you’ll catch any mistakes early.
Web Components
Web Components are a new standard way of creating reusable components and widgets with JavaScript, HTML, and CSS. The new standards currently lack widespread browser support but may soon transform the way we write reusable components for JavaScript applications.
Tip
Shadow DOM + custom elements = Web Components.
Web Components use a technology called Shadow DOM, which allows you to hide an entirely new document context, including HTML, CSS, and JavaScript. Shadow DOM is completely encapsulated from the main document. It gets its own document root (called shadow root), and possibly in the future, its own execution context for JavaScript. Shadow DOM is also minimally affected by the CSS on the parent page. The DOM encapsulation features should feel familiar to anyone who has used iframes for encapsulation purposes.
Your shadow DOM can be made up of many other HTML elements, but they won’t be visible in the DOM tree unless you specifically enable shadow DOM viewing in a debugger, such as Chrome Developer Tools.
Custom tags are an important aspect of
Web Components that allow you to simplify your DOM and write more
semantic HTML. For example, if you need to create a knob widget, you
can create a component called <x-knob>, which reads
a lot better than <div class="knob">. Custom tags
can use prototypal inheritance to inherit the properties of
other tags. You can simplify the creation of
<x-knob> by sharing the prototype from
<input> and setting some default properties (for
example, by selecting type="range"). Use the new DOM
method, document.register() to define the element.
Example 5-6 shows how you might define
<x-knob> using the document.register()
polyfill from Mozilla Web Components:
document.register('x-knob',{'prototype':Object.create((window.HTMLInputElement||window.HTMLSpanElement||window.HTMLElement).prototype),'lifecycle':{created:function(proto){this.type='range';console.log('x-knob created',this);},inserted:function(){console.log('x-knob inserted',this);},removed:function(){console.log('x-knob removed',this);},attributeChanged:function(attr,value){console.log('x-knob attributeChanged',this,attr,value);}}});
Now that you have a definition, you can instantiate it with:
varknob=document.createElement('x-knob');
Take a closer look at what happens in Example 5-7.
$(function(){test('document.register()',function(){equal(typeofdocument.register,'function','Should exist.');});test('document.createElement("x-knob")',function(){varknob=document.createElement('x-knob');ok(knob.getAttribute,'should produce a custom element.');});test('x-knob inheritance',function(){varknob=document.createElement('x-knob');ok(knob.checkValidity,'should inherit from input element.');});test('x-knob input type',function(){varknob=document.createElement('x-knob');equal(knob.type,'range','should have type="range".');});});
As exciting as all this is, it’s still bleeding edge. There is currently disagreement in the community about this mechanism, arguing that if we go down this road, we’ll lose a lot of the semantic meaning that the community has pushed so hard for. Ian Hickson argues along these lines:
Wouldn’t it be better to add a new attribute so that we can
preserve the semantics of existing elements? For example:
<input is="knob" type="range">. An obvious counter
argument is that popular tags will become part of the semantic
vernacular, and that agents will begin to recognize them, just as they
recognize the semantics of many metadata formats, and many semantic
extensions built on top of vanilla HTML. Another counter argument is
that many custom elements will not have meaningful base elements whose
semantics would be useful to build on.
As of this writing, none of these features are available for production use if you want solid cross-browser support. Mozilla has created a custom tag polyfill that you can experiment with today for nonproduction use.
More recently, Google has been hard at work on Polymer, which seems to be more actively maintained, more current, and more complete. Polymer Platform provides polyfills for custom elements, shadow DOM, HTML imports, pointer events (hardware-agnostic pointer inputs for mouse, pen, and touchscreen), and web animations. Polymer Core builds an API on top of Polymer Platform polyfills, providing sugar to make it easier to work with web components. Polymer Elements is a library of reusable custom elements built on top of the Polymer Platform and Polymer Core base layers. As of this writing, Polymer is still in alpha, meaning that it’s in an experimental state, and breaking changes might be introduced. However, it’s a very promising start and could be production ready soon. Refer to the Polymer website for the current status and documentation.
Server-Side Concerns
There was a time when the server side did a lot of work, but that time has come and gone in the world of JavaScript applications. Many current JavaScript applications defer most of the rendering and business logic to the client. For most apps, the server side will look something like this:
RESTful or REST-like API.
Static file server.
A single-page index route that pre-injects data for the initial page load. (This can be replaced by the static file server if you defer the page data to a subsequent Ajax request.)
There are many ways to accomplish these goals, but you should have little trouble finding alternatives via Google. In this section, you’ll learn how to get the job done with Node and Express.
Getting Started with Node and Express
Node is a server-side JavaScript environment with many attractive features:
A fast JavaScript engine (built on V8).
Asynchronous by default philosophy (nothing should block).
Event-loop design (much like the browser environment).
Networking as a first-class citizen (create production-capable servers with few lines of code).
A highly usable streams API.
A large, rapidly growing developer community.
A simple, CommonJS-based module solution that guarantees module encapsulation (your var declarations are limited to module scope). See Node-Style Modules.
A developer-friendly package management system with thousands of open-source packages to choose from.
Some of these features might take some getting used to if you are accustomed to server-side environments that allow features such as blocking IO and a single thread per connection (for convenient state management). However, you’ll find that the incredible performance boost achieved by nonblocking request/response cycles is well worth the learning effort.
Don’t underestimate the value of the asynchronous-by-default philosophy. That is the key to Node’s incredible performance in production environments.
Where other environments force users to wait in line while files load or network operations take place, Node fires off the request and keeps accepting new connections and executing other code paths while the asynchronous event does its work in the background.
Processes can spend an incredible amount of time waiting for file reads and network requests, especially if they encounter an error. Node just keeps cruising along. It’s like getting out of congested city streets with stop lights at every block and on to an open freeway.
Node isn’t fast simply because of the performance of the V8 JavaScript engine (though that does help). It’s fast because it doesn’t waste time waiting around for things to happen. There are other platforms that share some of JavaScript’s performance characteristics: Twisted Python and Tornado spring to mind. They’re fast for the same reason. However, even though they are more mature, they can’t compete with the active membership of the JavaScript developer community.
Node comes packaged with a module management solution called npm. It gives you access to a package registry stocked with thousands of open source packages and makes it very easy for you to contribute your own or use a private git repository for proprietary work. Of course, it’s easy to mix and match open source and proprietary packages in a single application.
Installing Node and Express
First, make sure you have Node installed. There are installers
available from the Node
homepage, but I like to use nvm so that I can easily switch between
different versions of Node. To install Node with nvm:
$ curl https://raw.github.com/creationix/nvm/master/install.sh | shFor more on nvm, check out
the docs on the GitHub
repository. With Node installed, you’ll need to create a new
directory for your project:
$mkdir my-first-project$cdmy-first project
Then initialize your project:
$ npm initExpress is currently the most popular application framework for Node. It’s easy to learn and use, and it has a vibrant developer community. If you’re going to build applications in Node, chances are you’ll eventually use Express. There’s no time like the present to get started. Install Express:
$ npm install --save expressThat’s it. You’re ready to get started!
If this is your first time using Node and Express, it might be helpful to see what some of the community believes are the current set of best practices. Node Bootstrap aims to show new users some common practices in the Node/Express community, using Twitter Bootstrap. Among other things, there’s an example of using the cluster module to manage multiple instances of the server (utilizing all available CPU cores).
Organizing files in Node
It’s a good idea to follow the emerging file organization trends in existing, popular Node repositories. That way, anybody familiar with Node should be able to find their way around your repository. Here are some common file locations:
Main ./index.js, ./server.js, or ./yourentryfile.js in the root
Supporting files in ./lib/
Static HTTP files in ./public/
Views or templates in ./views/
Command-line executables in ./bin/
Tests in ./test/ (or ./spec/ if you’re a Jasmine cool-aid drinker)
npm scripts in ./scripts/
Config in ./config/
Documentation in ./doc/
Examples in ./examples/
Performance analysis in ./benchmarks/
Native C/C++ source in ./source/
The npm repository serves as a good example.
Node libraries
These libraries will help you solve many common problems in Node:
- Mout
Like Underscore/Lo-Dash, stuff that should probably be included in JavaScript
- Express
Web-application framework
- Q
Promises
- Qconf
Application config
- Credential
Safe password hashing
- Hogan
Mustache for Express
- Superagent
Communicate with APIs
- Socket.io
Realtime communications (WebSocket)
- Async
Asynchronous functional utilities
- Bunyan
Logging
- Tape
Testing
- Cuid
Better than GUID/UUID for web applications
Configuration
Don’t include configuration data in your app repository (including secrets, paths to file locations, server hostnames, etc.). Instead, set up environment files with examples for sane defaults. Check in the examples, but don’t check in the actual configuration. Following this rule of thumb will make deployment/ops support for the app a lot easier. Check an example file into your app repo, s3.env.example:
S3_KEY=mykey
S3_SECRET=mysecret
Then copy it and fill in the real values when you install the app:
$ cp s3.env.example s3.envUse a package like qconf to
make the environment variables available in your app. Make
sure that the real environment files get added to .gitignore so that you don’t accidentally
check them into your repository.
Warning
One of the first stumbling blocks you might run into moving from browsers to Node is that you can’t rely on your closure state to be reserved for a single user. You have a single instance of the app, with a single pool of memory, and a potentially unbounded number of incoming connections.
State should be kept in a database, or passed as parameters through function calls. For example, each request in an Express application will have a corresponding request object. That may be a good place to store in-memory state for a single request/response cycle. Likewise, singletons are a good way to store state that will be shared for all requests, such as your application configuration, but otherwise, they’re usually an antipattern in Node applications.
Express
There are many application frameworks available for Node. One popular framework that I find particularly useful is Express. It’s basically an HTTP server built on top of Node’s HTTP module and middleware.
Create your app
To create an Express app instance, you’ll need to
require Express and call the function that gets
returned:
varexpress=require('express'),// Create app instance.app=express();
Routing
Express has a built-in app router. It’s pretty simple to use. First,
request method names correspond to the methods you call to set up your
route. GET is .get(), POST is .post(), and so on. To create a route that
will handle any request type, use .all(). Pass the route as the first
parameter and a function as the second parameter:
app.get('/',function(req,res){res.setHeader('Content-Type','text/plain');res.end('Hello, world!');});
Routes have easy parameter matching:
app.get('/:name',function(req,res){varname=req.params.name;res.send('Hello, '+name);});
A route can be a regular expression:
app.get(/(Hugh|Kevin)/,function(req,res,next){varname=req.params[0],// Whitelisted useroutput;// Write something to output...res.send('Hello, '+name);});
Middleware
Middleware is software that takes an incoming request, processes it, and passes it on to the next piece of middleware in the chain. Express middleware takes the form:
// Add some data to the request object that your other// middleware and routes can use.app.use(function(req,res,next){req.foo='bar';next();});
Here’s how it works in the context of an Express server:
'use strict';varexpress=require('express'),// Create app instance.app=express(),// Use the `PORT` environment variable, or port 44444port=process.env.PORT||44444;// The new middleware adds the property `foo` to the request// object and sets it to 'bar'.app.use(function(req,res,next){req.foo='bar';next();});app.get('/',function(req,res){res.setHeader('Content-Type','text/plain');// Send the value passed from the middleware, above.res.end(req.foo);});app.listen(port,function(){console.log('Listening on port '+port);});
Point a browser at the new server, or just use
curl:
$curl http://localhost:44444/bar
Handling errors is just as simple. Again, you’ll use middleware:
'use strict';varexpress=require('express'),// Create app instance.app=express(),// Use the `PORT` environment variable, or port 44444port=process.env.PORT||44444;// Some middleware that produces an error:app.use(function(request,response,next){varbar;try{// This will throw because `foo` is undefined.request.foo=foo.get('bar');}catch(error){// Pass the error to the next error handler in the// middleware chain. If you forget `return` here,// it will continue to process the rest of the// function, and probably throw an unhandled exception.returnnext(error);}// Do something with bar.});// Tell express to process routes before it gets to the error handler.app.use(app.router);// Error handlers take four parameters. The first is the error.// Generally, you'll want to add your error handler to the bottom of// your app.use() stack.app.use(function(error,request,response,next){// Log the error.console.log(error);// Send the user a friendly message:response.send(500,'Your request was not handled successfully. '+'Our smartest fix-it guy has already been alerted. '+'Contact us if you need help.');// Use setTimeout to give the app time to log and clean up,// but shut down ASAP to avoid unintended behavior.// Could also use setImmediate() in recent versions of Node.setTimeout(function(){process.exit(1);},0);});app.get('/',function(req,res){res.setHeader('Content-Type','text/plain');// Sadly, nobody will ever see this friendly greeting.res.end('Hello, world!');});app.listen(port,function(){console.log('Listening on port '+port);});
You can clean up after a lot of errors. In fact, sometimes an error is an expected probability. For example, there’s a chance that sometimes remote services won’t be available, and you can recover from that condition and try again later. However, sometimes you just won’t get the answer you’re looking for and there’s nothing you can do to recover. You don’t want to keep your server running with undefined state. In the case of errors that you can’t easily recover from, it’s important to shut down the process as quickly as possible.
Let it crash
Processes crash. Like all things, your server’s runtime will expire. Don’t sweat it. Log the error, shut down the server, and launch a new instance. You can use Node’s cluster module, forever (a Node module available on npm), or a wide range of other server monitor utilities to detect crashes and repair the service in order to keep things running smoothly, even in the face of unexpected exceptions.
Templates
Express comes with some built-in handling of templates, but it must be configured. You have to tell Express which view engine to use in order to process templates, and where to find the views. First, you’ll want to require your template engine. For Mustache templates, you can use Hogan:
varhulk=require('hulk-hogan');
Most of the settings for Express are specified with app.set(). You’ll need to use it to
configure Express to use the template engine of your choice. There are
four options that you should be aware of:
// Tell express where to find your templates.app.set('views',__dirname+'/views');// By default, Express will use a generic HTML wrapper (a layout)// to render all your pages. If you don't need that, turn it off.app.set('view options',{layout:false});// Tell express which engine to use.app.set('view engine','hulk-hogan');// Specify the extension you'll use for your views.app.engine('.html',hulk.__express);
Remember to define a route that uses your new view. Assuming
you’ve used your middleware to build a data object on the request
object called req.data (see Middleware):
app.all('/',function(req,res){res.render('index',req.data,functioncallback(err,html){// Handle error.});});
You can leave off the callback parameter and any errors will be
internally passed via next(err) for
your generic error handlers to catch. If you pass the callback, that
automatic error handling will not occur, and you should handle the
error explicitly.
Next steps
Of course, you want to do a lot more with your app than return a hard-coded message to your users. The good news is that there are drivers for just about any database you can dream of. You can use a variety of template libraries, and of course, serve static files. I encourage you to dive into the Node module playground and take a look around. For starters, here’s a simple static file server example using the built-in static middleware:
varexpress=require('express'),app=express(),// Create the express app.// Try pulling the port from the environment. Or// default to 5555 if no environment variable is set.port=+process.env.PORT||5555;// .bodyParser() parses the request body and creates the// req.body object.app.use(express.bodyParser());// .methodOverride() lets you simulate DELETE and PUT// methods with POST methods. Common boilerplate.app.use(express.methodOverride());// .static() creates a static file server, which looks for// assets in the /public directory, in this case.app.use(express.static(__dirname+'/public'));// app.router handles path routing for express apps.app.use(app.router);// Express comes with a default error handler that is// intended for development use. You'll want to implement// your own for production systems.app.use(express.errorHandler());app.listen(port,function(){console.log('Server listening on port '+port);});
Have a look at the Express guide and API reference for a lot more useful examples, and the Node manual for Node API documentation. There are lots of useful gems that you’ll want to learn more about.
Conclusion
The key takeaways you should internalize from this chapter are:
Think of your application in terms of layers of responsibility.
Let layer separations inform your decisions about what should be included in each application tier.
Think about the relationships between modules, layers, and tiers in your application. How will you organize them?
Be aware when you’re passing information between different layers. Which messaging patterns will be most effective for communication?
Minimize intermodule and interlayer coupling. Use patterns like event emitters and facades to reduce the impact to dependent layers when you change something in another layer.
Maintain separation between your domain layer (data/business logic) and your presentation layer.
You should be aware by now why it’s important to separate different layers of responsibility into different application modules and tiers, and now that you’ve seen some tools and examples, you should be able to decide when and where to apply various techniques to you own applications.
The next few chapters will cover some concerns that almost every application needs to deal with at some point. For each one, try to keep in mind how the functionality being described can be implemented without intermingling user interface logic with the business domain.