Chapter 14
Endpoint Protection
Endpoint Protection is integrated in System Center Configuration Manager and allows you to easily manage antimalware policies and automatically download and deploy the latest antimalware definition files to your Configuration Manager hierarchy. Endpoint Protection also provides detailed reporting and monitoring abilities so you can rest assured that you will know immediately if any malware events occur in your managed hierarchy.
In this chapter, you will learn to
- Deploy and configure the Endpoint Protection site system and client
- Create and assign an Endpoint Protection policy
Benefits of Endpoint Protection
In this section we will review some of the benefits and features of Endpoint Protection. Note that this feature of Configuration Manager is sometimes referred to as Endpoint Protection in System Center Configuration Manager and you also may see it referred to as System Center Endpoint Protection. Both terms refer to the same feature within Configuration Manager.
Deployment
The configuration and deployment of Endpoint Protection is managed in the Configuration Manager console. Because of the tight integration with Configuration Manager, Endpoint Protection is easily deployable to environments of any size. The Configuration Manager administrator enables Endpoint Protection in Configuration Manager by deploying the Endpoint Protection site system role, enabling the Endpoint Protection client (for Windows 8.1 and earlier computers—more on this later), and then configuring the antimalware policies. Endpoint Protection includes several policy templates that provide recommended antimalware configurations for standard workloads. These templates are generally ready to deploy but can be customized to meet the specific needs of the organization if needed. You can also export policies that may have been created in Forefront Endpoint Protection 2010 or the Endpoint Protection feature that was included in Configuration Manager 2012 and import them into Endpoint Protection with Configuration Manager.
Protection
Endpoint Protection provides Configuration Manager administrators with the ability to ensure that their computer infrastructure is safe and secure from malware attacks. The Endpoint Protection feature of Configuration Manager protects the computer infrastructure by detecting and blocking malware and also by providing management of Windows Firewall. Endpoint Protection ensures that the computers are protected from many known exploits and vulnerabilities, and it is backed by the Microsoft Security Response Center. For more information on the Microsoft Security Response Center, visit
Monitoring
Configuration Manager provides extensive monitoring and reporting of the health and status of the environment. This is especially true for the Endpoint Protection feature of Configuration Manager. Configuration Manager utilizes a client communication channel that uses state messages to deliver malware activity information from the client to the site server in near real time. As a result, the Configuration Manager administrator will typically become aware of malware activity within just a few minutes of it taking place. Configuration Manager uses this channel for all endpoint-related operations as well as other client actions. You will learn more about the fast channel later in the Client Notification section of this chapter.
Security
The role-based access security model in Configuration Manager greatly simplifies the process of defining access for administrative users. The Configuration Manager security role that is related to the Endpoint Protection feature is the Endpoint Protection Manager. This security role provides the administrative user with the ability to create, modify, and delete security policies. Administrative users with this security role can also manage the security policies that are assigned to collections, monitor the status of Endpoint Protection, and execute remediation tasks on managed computers.
One possible use of this role is to assign it to the corporate IT security department and allow them to manage the configuration of Endpoint Protection without giving them access to other areas of Configuration Manager.
Now that you understand some of the benefits of Endpoint Protection, let’s take a closer look at the feature.
Endpoint Protection Point Site System Role
The Endpoint Protection Point site system role is a critical component for the Endpoint Protection feature of Configuration Manager and must be installed and configured before you can use the feature. The role must be installed at the top of the Configuration Manager hierarchy. If the hierarchy includes a central administration site (CAS), the role should be installed there.
The installation and configuration of the Endpoint Protection role is fairly straightforward:
- In the Configuration Manager console, select Administration ➢ Overview ➢ Site Configuration ➢ Servers And Site System Roles.
- Select the CAS (or the standalone primary site server), right-click, and select Add Site System Roles. The Add Site System Roles Wizard opens.
- On the General page, specify the settings for the site system server. Click Next.
- Select the proxy settings and configure them if needed; then click Next.
- On the next screen, select Endpoint Protection Point from the list of available roles and click Next. See Figure 14.1.
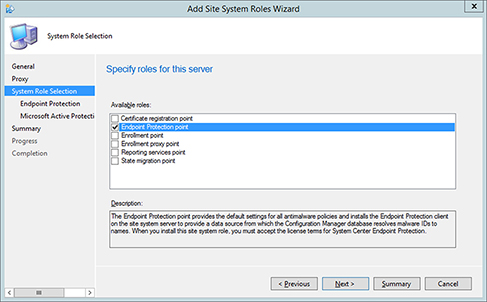
FIGURE 14.1 Selecting the Endpoint Protection Point role
- On the Endpoint Protection License Terms Page, review the license terms and privacy statement if needed and then check the box to acknowledge that you accept the terms. Click Next.
- On the Specify Microsoft Active Protection Service membership type window, choose the membership option you require for your environment and click Next.
- On the Confirm Settings page, click Next and then click Close once the role has been successfully installed.
- You can monitor the status of the installation of the role in the EPMgr.log and EPSetup.log files on the site server.
Endpoint Protection Client Agent
Once the Endpoint Protection Point site system role has been enabled and configured, the next step is to configure the System Center Endpoint Protection client agent. The Endpoint Protection client cannot be enabled until the Endpoint Protection site system role is enabled. The installation media for the Endpoint Protection client is distributed to the managed devices as part of the Configuration Manager client install media. The name of the file is SCEPInstall.exe, and it can be found in the CCMSETUP folder (C:\Windows\CCMSETUP) on the client. Although the Endpoint Protection client install media is copied to the CCMSETUP folder during the Configuration Manager client install, the Endpoint Protection client won’t actually be installed until the Endpoint Protection client is enabled and configured in an assigned client settings policy.
If the client is running Windows 10, then the Endpoint Protection antimalware policies will manage the Windows Defender agent that is already included in Windows 10. In this scenario, the Endpoint Protection agent will install an additional management layer on the Windows Defender agent and will use that integration to manage the Windows Defender agent. As shown in Figure 14.2, you will still see the Endpoint Protection agent listed in the Programs and Features list on a Windows 10 computer but Windows Defender is protecting the Windows 10 client.

FIGURE 14.2 Endpoint Protection listed in Programs and Features
As with the other client agent settings, either you can configure the Endpoint Protection client policies in the default client settings or you can create a custom device client settings policy and use it to configure Endpoint Protection on the client. A general recommendation is to create a custom device client settings policy when enabling and configuring Endpoint Protection.
Use the following steps to create a separate client settings policy for Endpoint Protection:
- Open the Configuration Manager console and choose Administration ➢ Overview ➢ Client Settings.
- Click Create Custom Client Device Settings in the ribbon.
- Give the custom device settings a name and description.
- Select Endpoint Protection as the custom setting to be enforced on the client devices. See Figure 14.3.
- Click the Endpoint Protection option on the left side of the window. This will open the Endpoint Protection configuration settings. See Figure 14.4.
- Set the required configuration settings, and click OK.
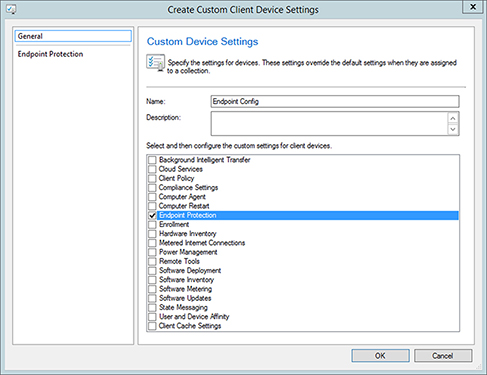
FIGURE 14.3 Selecting the Endpoint Protection custom setting
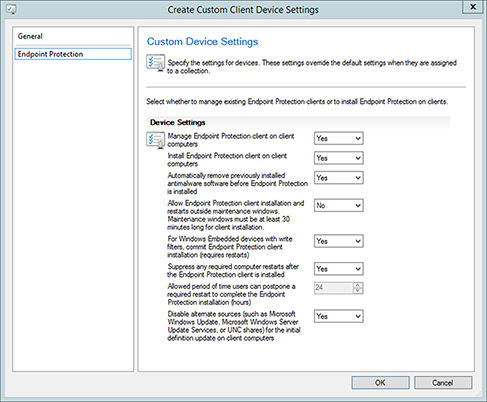
FIGURE 14.4 Configuring Endpoint Protection settings
After creating the client settings policy for Endpoint Protection, you will need to assign the policy to a collection:
- Select the policy you created.
- Choose Deploy from the ribbon.
- Select the appropriate collection.
The following are some of the options that can be configured:
- Define whether the Endpoint Protection client should be installed and whether it should be managed.
- Determine if previously installed antimalware software should be automatically removed (see the following list).
- Define if any required reboots after enabling Endpoint Protection will be suppressed.
- Disable alternate sources for the initial definition update.
The list of products that can be replaced by Endpoint Protection may change somewhat, but the following were the supported titles for removal as of this writing:
- Symantec AntiVirus Corporate Edition version 10
- Symantec Endpoint Protection version 11
- Symantec Endpoint Protection Small Business Edition version 12
- McAfee VirusScan Enterprise version 8
- Trend Micro OfficeScan
- Microsoft Forefront Codename Stirling Beta 2
- Microsoft Forefront Codename Stirling Beta 3
- Microsoft Forefront Client Security v1
- Microsoft Security Essentials v1
- Microsoft Security Essentials 2010
- Microsoft Forefront Endpoint Protection 2010
- Microsoft Security Center Online v1
Use this website to obtain an updated list of products that can be removed:
http://technet.microsoft.com/en-us/library/gg682067.aspx
If you have an antimalware product installed in the environment that is not on this list, you will need to deploy a removal package for that product. In that scenario, make sure you coordinate the removal of the old product and the enabling and deployment of the Endpoint Protection client in order to minimize the amount of time that the computer is not protected by antimalware software.
Endpoint Protection also supports Mac-based clients as well as Linux/Unix-based clients. The Endpoint Protection client installation files for these platforms are not supplied with the Configuration Manager client setup media; they can only be obtained from the Microsoft Volume Licensing website: www.microsoft.com/Licensing/. Also, the configuration of the Linux/Unix-based and Mac clients is different from the Windows devices. For Windows devices, these settings are received from the client settings and antimalware policies via the Configuration Manager client. For Linux/Unix and Mac, it is a manual process. For Linux/Mac, you must create a scep.cfg file and copy and deploy it to each Linux/Unix machine in order to configure the Endpoint Protection agent. For Mac devices, you can configure the Endpoint Protection agent on a Mac device, export the configuration, and then deploy this to other Mac devices.
Endpoint Protection Policies
Endpoint Protection has two policy types:
Antimalware The antimalware policy is used to define the antimalware settings that will be applied to the endpoint client.
Windows Firewall The Windows Firewall policy can be used to control the configuration of Windows Firewall on managed computers.
Both types of Endpoint Protection policies can be created and modified in the Configuration Manager console.
Antimalware Policy
Configuration Manager includes a default antimalware policy (Default Client Malware Policy) that can be modified. However, you should understand that changes made to that policy will be applied to all managed computers in the environment. Instead, the Configuration Manager administrator may decide to create a custom policy (or policies), and use those policy settings to override the default client policy.
The following configuration changes can be made in the antimalware policy:
Scheduled Scans This option defines various information about the antimalware scan, including when the scan should occur, when the definition files should be updated, and if CPU usage should be limited. See Figure 14.5.
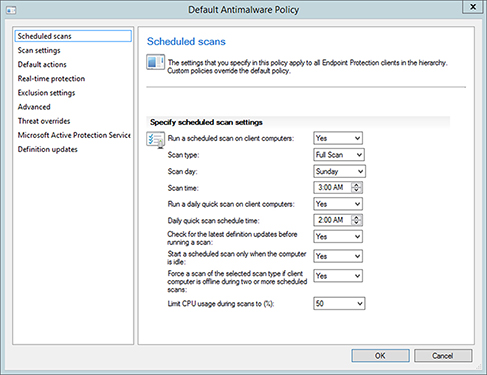
FIGURE 14.5 Configuring the Scheduled Scans settings
Scan Settings This option defines what types of items should be scanned and also defines whether the end user can change the scan settings (Figure 14.6).
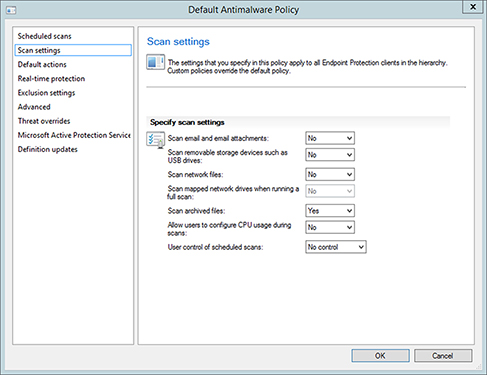
FIGURE 14.6 Configuring the Scan Settings
Default Actions This option defines the action that will be taken on threats based on their classification (Figure 14.7).
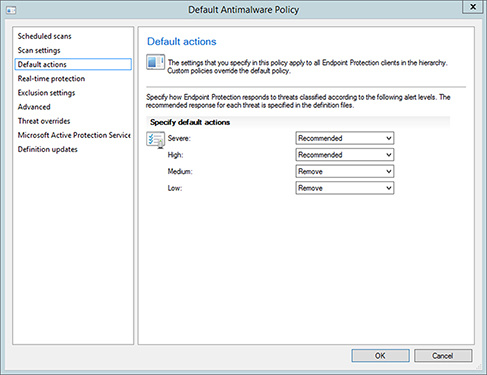
FIGURE 14.7 Configuring the Default Actions settings
Real-Time Protection This option defines the configuration of real-time protection and scanning (Figure 14.8).
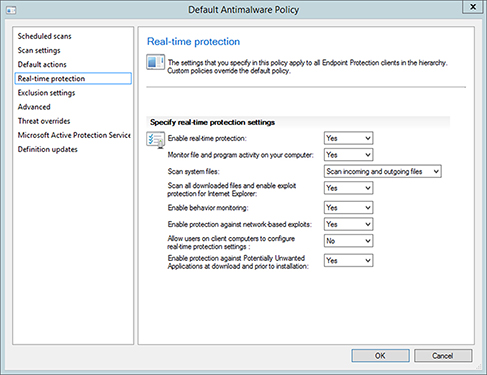
FIGURE 14.8 Configuring the Real-Time Protection settings
Exclusion Settings This option defines any files, folders, file types, or processes that should be excluded from malware scanning (Figure 14.9). Note that excluding items may increase the risk of malware not being detected on a computer.
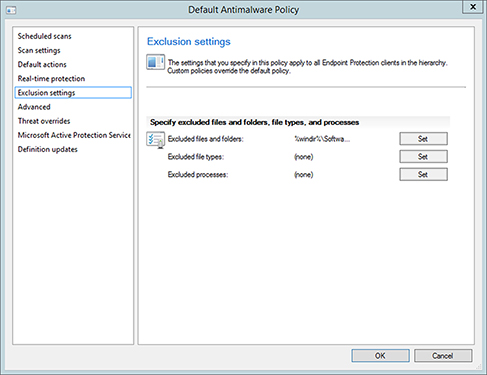
FIGURE 14.9 Configuring the Exclusion Settings
Advanced This option provides the ability to customize advanced settings, including interaction with users, how long quarantined files should be retained, and so on (Figure 14.10).
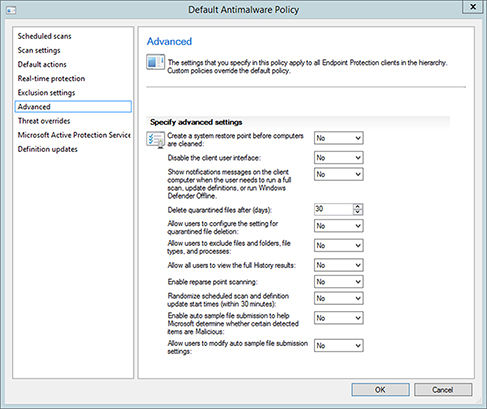
FIGURE 14.10 Configuring the Advanced settings
Threat Overrides This option allows you to add threat names to the threat list (Figure 14.11).
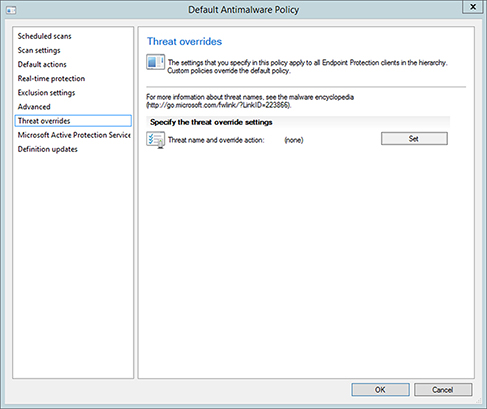
FIGURE 14.11 Configuring the Threat Overrides settings
Microsoft Active Protection Service This option allows you to configure MAPS (Figure 14.12).
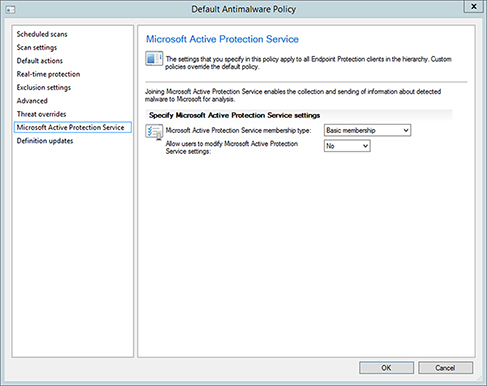
FIGURE 14.12 Configuring the MAPS settings
Definition Updates This option allows you to configure how Endpoint Protection clients will receive definition updates (Figure 14.13).
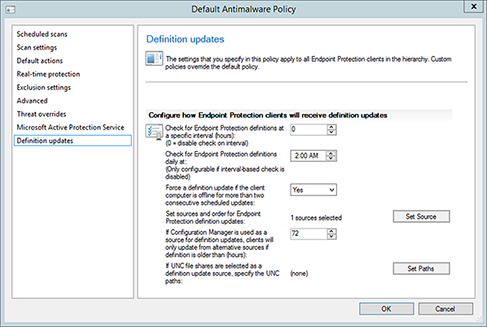
FIGURE 14.13 Configuring the Definition Updates settings
Configuration Manager includes several predefined antimalware policy templates:
SCEP_Default_CfgMgr
SCEP_High_Security
SCEP_Performance_Optimized
SCEP_Standard_Desktop
These policies apply settings that are optimized for a particular product or feature and can easily be imported and used in the environment. You can also import antimalware policies that were created in Forefront Endpoint Protection (FEP) 2010 if you were previously using it in earlier versions of Configuration Manager.
To import one of the predefined antimalware policy templates:
- Open the Configuration Manager console and choose Assets And Compliance ➢ Overview ➢ Endpoint Protection ➢ Antimalware Policies.
- Right-click on Antimalware Policies and select Import.
- Select the desired policy template and click Open.
- Make any adjustments to the imported template that may be required for your environment and click OK.
- Deploy the template to a collection.
In Configuration Manager you can also merge policies by taking a default policy and merging it with another policy. This scenario may be useful if you want to use the default client policy but apply some specific file or folder exclusions that were included in one of the policies that was imported.
Windows Firewall Policy
The Endpoint Protection feature of Configuration Manager can also be used to manage the Windows Firewall policies for managed computers. Configuration Manager does not include a default Windows Firewall policy, and there is no ability to import or export a policy, but you can easily create a new policy in the Configuration Manager console.
As you can see in Figure 14.14, the Windows Firewall policy configuration is straightforward. You can create a new Windows Firewall policy in the Configuration Manager console and configure the policy to enable/disable the firewall, to block incoming connections, and also to define user communication. Once you have configured the policy, you can then deploy it to a collection.
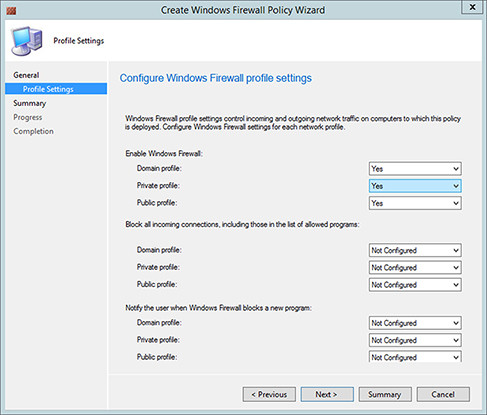
FIGURE 14.14 Configuring Windows Firewall policy
The Windows Firewall policy includes three profile types: domain, public, and private. These profiles are related to the network that the user or computer is connected to.
Domain The domain profile will be applied if the connection is authenticated to a domain controller for the domain of which the user or computer is a member. By default, all other network connections are initially classified as public networks, and Windows asks the user to identify the network as either public or private.
Public The public profile is intended for use in public locations (such as airports and coffee shops).
Private The private network location is typically intended for use in a home or office.
Assigning Policy
The Default Client Malware Policy is automatically applied to all of the computers managed by Configuration Manager. If you create a custom policy and assign it to a collection, the settings in the custom policy will override the settings that are defined in the default policy.
Use the following steps to assign a custom antimalware policy to a collection:
- Open the Configuration Manager console and choose Assets And Compliance ➢ Overview ➢ Endpoint Protection ➢ Antimalware Policies.
- Select the custom policy and choose Deploy from the ribbon.
- Select the collection, and click OK.
The next time the Configuration Manager clients in the targeted collection retrieve policy (every 60 minutes by default), they will apply the Endpoint Protection client settings that were established in the policy. If two custom policies have different values configured for the same settings, the policy with the highest order value will be applied. You can adjust the order in the Configuration Manager console by right-clicking the custom policy and selecting Increase Priority or Decrease Priority. See Figure 14.15.
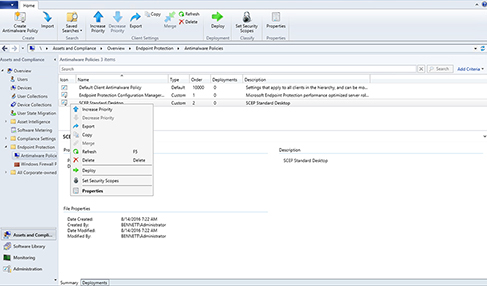
FIGURE 14.15 Increasing policy priority
Definition Files
As discussed in Chapter 8, “Software Updates,” Configuration Manager provides the ability to automatically download and deploy security updates to managed computers using a feature called Automatic Deployment Rules (ADR). These rules can be used for monthly security updates (Patch Tuesday, for example), and they can also be used for Endpoint Protection definition file updates. The Endpoint Protection definition files are updated several times a day, and an automated deployment solution like an ADR is quite useful in ensuring that your Configuration Manager clients received updated definition files as they become available. For more information on how to create automatic deployment rules, refer to Chapter 8. Note that if you are managing Windows 10 devices, those clients will utilize Windows Defender as the antimalware agent, not the Endpoint Protection agent, so you will need to ensure that your ADR retrieves the definition files for both FEP 2010 and Windows Defender.
Once the automatic deployment rules for Endpoint Protection have been configured, you may want to verify that the automatic deployment rules are working properly for the Endpoint Protection definition updates. The following process will help verify that the clients have the latest definition files.
The first question you may be wondering is, what is the latest version of the Endpoint Protection definition files? Checking the Microsoft Malware Protection Center website
https://www.microsoft.com/en-us/security/portal/definitions/whatsnew.aspx is one quick method to provide that answer.
As you can see in Figure 14.16, the latest definition update that was available at the time this image was captured is 1.225.3909.0. So you now know how to tell which version of the definition file the Configuration Manager environment should be using.
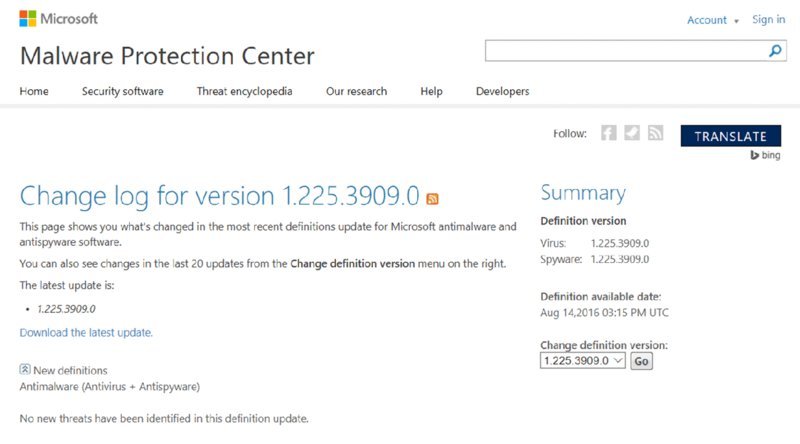
FIGURE 14.16 Obtaining the definition update version
If you open the Configuration Manager console and choose Software Library ➢ Overview ➢ Software Updates ➢ All Software Updates, you can view the list of software updates in the catalog in your Configuration Manager environment. If you search for “definition update,” you can look for software updates that have a matching title and focus on the Endpoint Protection definition files.
Expect to see several definition files listed, but only one should typically be current and active (the black arrow in the image highlights the current definition file). As you can see in Figure 14.17, the version of that file is 1.225.3909.0, so all of your clients should be using that version of the definition file. Note that in the console the current updates have a green arrow, superseded updates have yellow arrows, and the expired definition files have a black X.
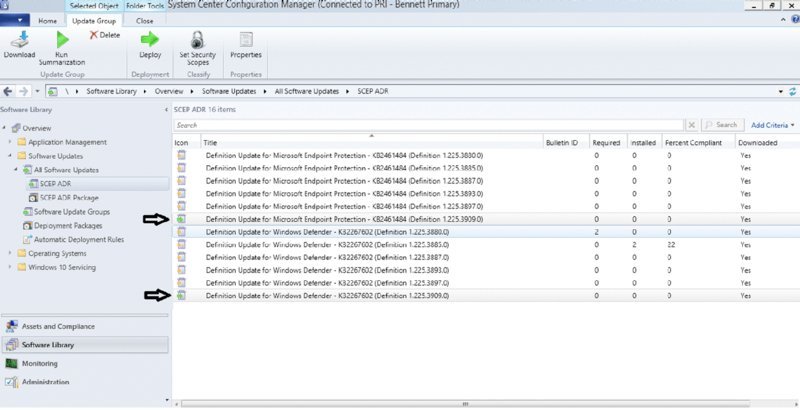
FIGURE 14.17 Definition update status
You now know that the endpoint clients should be using version 1.225.3909.0 of the definition file. If you open the Endpoint Protection client on a managed workstation, you can check the definition file that is currently being used by the client. See Figure 14.18.
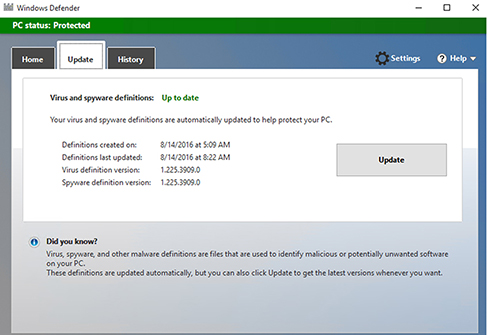
FIGURE 14.18 Verifying the Endpoint Protection client definition version
As you can see, this client is using the correct version of the definition file. If you find in your environment that the definition file is an older version, it’s possible that the client hasn’t triggered the process yet to get the latest definition file. You could click Update and force the client to obtain the latest file. If the client still does not have the latest definition file, then you may need to troubleshoot the issue further and determine why the client is unable to retrieve the updated content.
Alerts
The ability to create alerts is a very useful feature in Configuration Manager. Alerts can be used to notify a Configuration Manager administrative user when specific events (such as a malware outbreak) have occurred in the environment. The administrator can view alerts in the Configuration Manager console, in reports, and via email subscriptions. The ability to display alerts in the console or via email is especially important for Endpoint Protection–related events because it allows the administrator to quickly become aware of a malware event.
Endpoint Protection alerts are configured in the device collection properties. You cannot configure user collections for alerts. Configuration Manager has alerts for various issues and conditions and includes four alerts related specifically to malware:
Malware Detection An alert is generated if a managed computer in the specified collection has malware.
Malware Outbreak An alert is generated when a certain percentage of managed computers in the specified collection have malware detected.
Repeated Malware Detection An alert is generated if specific malware is detected more than a certain number of times over a certain number of hours in a specified collection.
Multiple Malware Detection An alert is generated if more than a specified number of malware types are detected over a given period for a specified collection.
To receive alerts, you must enable a device collection to send alerts. Here is the process:
- In the Configuration Manager console, select the device collection that should be configured to send alerts, and select Properties from the ribbon.
In this example, we will select a collection named Dallas Computers.
- In the collection properties window, select the Alerts tab. See Figure 14.19.
- Enable the View This Collection In The Endpoint Protection Dashboard option, and click Add to specify alert thresholds.
When you click Add to specify alert thresholds, the Add New Collection Alerts window will appear, and all of the items will be unchecked by default. You can make the necessary changes that meet your requirements and click OK to apply the change.
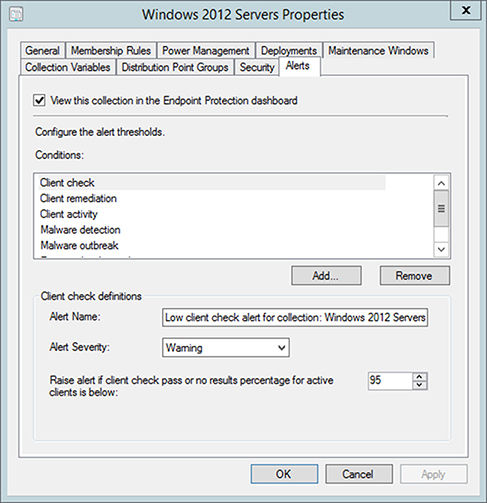
FIGURE 14.19 Alerts tab in the collection properties
At this point, you have configured the devices in a collection to generate alerts if the alert conditions are met. Those alerts can be viewed in the console, viewed in reports, and sent via email subscriptions.
Reporting
Configuration Manager has several reports related to the Endpoint Protection products. There are currently six reports in the Endpoint Protection category:
Antimalware Activity Report This report shows an overview of antimalware activity and is shown in Figure 14.20.
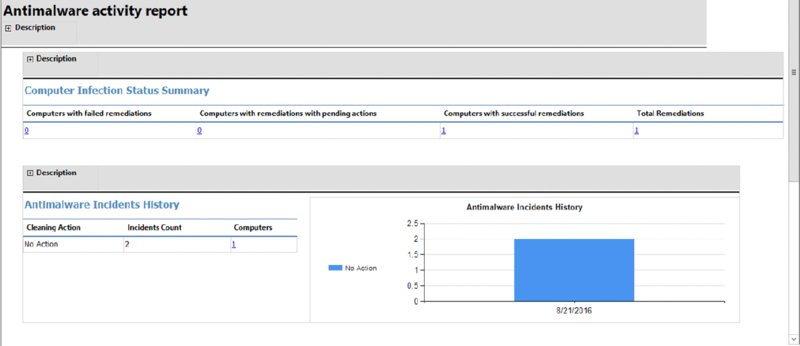
FIGURE 14.20 Antimalware Activity Report
Antimalware Overall Status And History This report shows an overall status of antimalware activity over a specified period.
Computer Malware Details This report shows the endpoint client status and antimalware activity.
Infected Computers This report shows a list of computers with a particular threat detected.
Top Users By Threats This report lists the users with the highest number of detected threats.
User Threat List This report shows the list of threats found under a particular user account.
Client Notifications
Many activities in Configuration Manager are pull-based and use polling intervals and scheduled intervals to define when processes take place. This is acceptable for many features in Configuration Manager, but in the case of an outbreak of malware in an environment, an administrator may need to take immediate action on the managed clients and not wait for a policy cycle to occur. Configuration Manager accomplishes this expedited communication process by creating a client notification channel between the site server and the managed clients. This “fast” channel is used for all endpoint-related activities as well as other client actions, including triggering the retrieval of computer or user policies and initiating a hardware or software inventory cycle. This client notification channel is a push-based communication process and allows a Configuration Manager administrator to take immediate action against clients, like forcing clients to perform a scan to look for malware. The client notification channel is supported only on Windows devices.
The client notification process consists of several parts. The Notification Manager component exists on the Configuration Manager site server and the notification server exists on the management points. The notification agent is part of the Configuration Manager client. The notification agent on the client initiates a persistent connection with the notification server and will attempt to use TCP mode first and then fall back to HTTP if TCP mode fails. Once the connection is established, the notification agent will send a keep-alive message every 15 minutes to maintain the connection with the notification server. The default TCP port is 10123.
The following are the related Configuration Manager logs for the client notification channel components:
- Notification Manager: ..\Microsoft Configuration Manager\Logs\bgbmgr.log
- Notification Server: ..\Microsoft Configuration Manager\Logs\BgbServer.log
- Notification Agent: C:\Windows\ccm\logs\CcmNotificationAgent.log
For example, if you use the Configuration Manager console to trigger a quick malware scan against a client computer, you can monitor the client communication channel request via CcmNotificationAgent.log on the client and the status of the endpoint scan via EndpointProtectionAgent.log. See Figure 14.21.
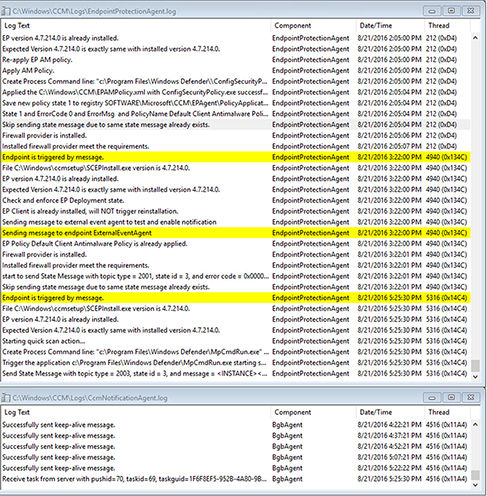
FIGURE 14.21 Notification Agent log and Endpoint Protection log
We will use the remainder of this chapter to work through a real-world scenario and show Endpoint Protection in action.
The Bottom Line
Deploy and configure the Endpoint Protection site system and client. The three main components of enabling Endpoint Protection are as follows:
- Install and configure the Endpoint Protection site system.
- Enable and configure the Endpoint Protection client.
- Configure the antimalware policies.
- Master It Do you need to create a package or application to deploy the Endpoint Protection client? Do Windows 10 computers use the Endpoint Protection agent?
Create and assign an Endpoint Protection policy. Endpoint Protection has two types of policy:
- Antimalware
- Windows Firewall
The antimalware policy is used to define the antimalware settings, whereas the Windows Firewall policy can be used to control the configuration of Windows Firewall on managed computers. Both types of Endpoint Protection policies are created and modified in the Configuration Manager console.
- Master It If you modify the default client antimalware policy and also create a custom antimalware policy with different values for the settings and apply it to a collection, which settings will be applied?