
Arthritis
Arthritis is an insidiously progressive condition, regardless of its type, of which there are many. The most common include:
• Osteoarthritis, also called degenerative joint disease, affects as many as 32.9 million Americans over the age of forty, according to the National Center for Health Statistics.1 While it is often considered a “wear-and-tear” condition, there is evidence that nutrition, activity level, gender, and other factors are also significant. Osteoarthritis usually affects fingers and weight-bearing joints, especially the knees, hips, feet, and back.
• Fibromyalgia is classified by the Arthritis Foundation as an arthritis-related condition,2 which is more common among women than men. It affects fascia, muscles, and their attachments to bones. Symptoms range from pain and stiffness to difficulty sleeping and emotional distress.
• Rheumatoid arthritis is an immune system problem also more common in women than in men. It damages joint linings, cartilage, and bone, causing destructive inflammation and resulting in deformities.
The pain of arthritis may be acute pain that can develop one day and hurt a great deal, or it can be chronic pain that is there most, or all, of the time in varying intensity. In an episode of acute pain, medications and physical therapy can help, and yoga may also bring relief. The key to this, of course, is that by its very nature, an episode of acute pain ends. The chronic pain is harder to deal with, both psychologically and physically. Yoga, slow and steady, is well suited to helping an individual cope with chronic complaints.
Whether pain is chronic or acute, it comes from three sources. First, if a joint is degenerating, you can expect it to hurt. Second, when a degenerating joint is causing discomfort, an individual is less likely to move it; when it does move there is pain in the joint from the stretch of the tightened ligaments, tendons, and joint capsule itself. Last, when a joint is damaged and moves poorly, problems may arise in the ligaments, tendons, and capsules of other joints nearby. For example, if you can’t bend your back enough to tie your shoelaces, you may start to use your hip joint more than you did before you had the back problem. Actually, in this situation you’re in a double bind because the arthritis in the spine is making it necessary to move the hip more, but the arthritis may also be restricting the hip’s range of motion even below its previous levels.
Every joint is the interface of two bones. The collagen that makes up the joint surfaces is secreted by live cells. In the hip bones there are beautifully regular alignments of cells in spheres underneath the joint surface that secrete the collagen. As you get older, the underlying rows of cells and the collagen they secrete come in a bit unevenly on both surfaces. This is exacerbated by normal wear and tear, and when the outside forces on the joint are uneven. When this begins happening to the collagen, it becomes irregular, and instead of being evenly distributed throughout the joint, the pressure in certain spots inside the joint goes up a great deal. At that point, the disruption in the underlying tissue makes those beautifully aligned rows of cells get out of line and begin to produce collagen that has bumps, lumps, and ridges in it. Of course that concentrates the already immense pressure on both joint surfaces, causing more damage.
Yoga works by stretching the joints, ligaments, tendons, and capsules so they don’t get as tight as they would otherwise. This tends to broaden the distribution of pressure and reduce disruptive forces. When you try to move a joint that has degenerated somewhat, yoga may reduce the pain at its original source. It also helps take care of the problem of a stiff back causing overuse of a hip joint, which results in arthritis and restricted range of motion in the hip.
But in addition, there is evidence and theory that practicing yoga can actually improve the smoothness and symmetry of the two surfaces of a joint.3 Yoga appears to work to realign the underlying rows of cells that produce the joint surface collagen. In my opinion, after having worked with arthritic patients for twenty years, the slow, orderly stretches of yoga are easier to tolerate than regular movement. Stretches on neighboring joints are also not as severe when an individual has increased range of motion in the area of the original problem. After years I believe that doing yoga may also positively affect the joint itself. Yoga, through its non-impact, self-regulated pressure, may help realign those collagen-secreting cells and may work against the inevitable disruptions of everyday stresses and strains. It could be that a joint will never return to the condition it was in when you were two years old, but yoga will definitely help.
People in acute pain, and especially those in chronic pain, suffer from emotional stress and depression. Yoga is good for both. For those with acute pain, sometimes a hiatus from yoga is needed to prevent aggravating the problem. When it’s possible to do yoga, however, many people find it can reduce the intensity and duration of an acute episode now or in the future. It also helps to improve concentration so that someone suffering from chronic pain can place his or her attention on more enjoyable matters.4
1. URDHVA MUKHA SVANASANA
Upward-Facing Dog
NOTE: There are two dog poses. One is a continuation of the other. They are called the Upward-Facing Dog, which is the earlier and easier of the poses, and the Downward-Facing Dog, which is more demanding. Each has separate benefits and cautions.
BENEFITS OF UPWARD-FACING DOG: Increases range of motion of entire spine, and strengthens the muscles that move it. Stretches the front of the hip joint. Mobilizes ribs and improves respiratory volume. Especially good for scoliosis.
CAUTION: Do not do this pose if you are pregnant. Can’t be done after abdominal surgery. Do not do if you have ankylosing spondylitis.
PROP: Mat, optional.
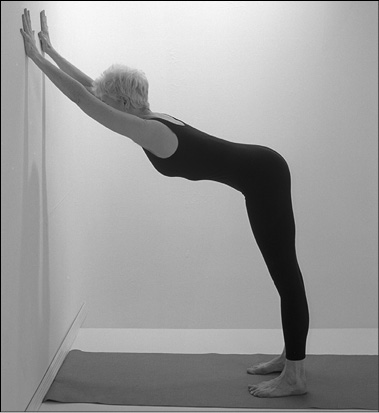
URDHVA MUKHA SVANASANA MODIFIED Stand facing a wall. You should be about eighteen inches away, with your feet directly under your hips. Distribute the weight evenly on the feet. Look straight ahead. Place your hands high on the wall, well above eye level, a few inches more than shoulder width apart, fingers pointing up. Keeping knees straight, pull your hips back. Bring armpits as close to the wall as possible. Keep elbows straight. The curve of your back will automatically bring your forehead toward the wall. Don’t tilt your head. This is an invigorating pose. Breathe slowly and deeply for ten to fifteen seconds.
To exit, push gently against the wall so that your armpits come further away from the wall. Coordinate this with pulling your hips in toward the wall until you are back in the position from which you started. Lower your hands.
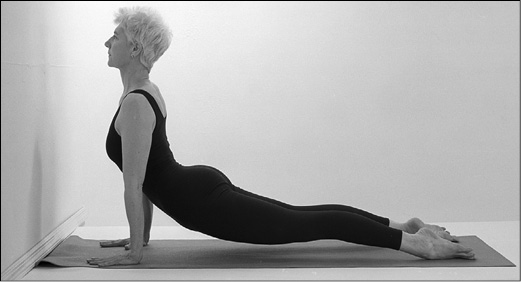
URDHVA MUKHA SVANASANA REGULAR Lie on your stomach, feet a foot apart. Your hands should be beneath your shoulders, palms on the floor, fingers pointing forward. Toes are flexed, i.e., curled away from the floor. Do not bend your hips or knees. Lift your head, brow, bridge of nose, then chin, top of throat, chest, and abdomen until elbows are straight. At this point only palms and tops of feet are on the floor. Breathe, inflating lungs completely, for ten to fifteen seconds.
To get out of the pose, gradually lower your chest from the point just above the navel, where it has left the floor. Unfold your chest, neck, and head, slowly bring your chest, shoulders, and head back to the floor.
2. ADHO MUKHA SVANASANA
Downward-Facing Dog
BENEFITS: Stretches hip joint and hamstrings, strengthens extensor muscles in spine. Increases upper back, shoulder, and neck mobility
CAUTION: Do the modified pose if you have severe arthritis or rotator cuff problems.
PROP: Mat, optional.
ADHO MUKHA SVANASANA MODIFIED This is the same pose as the modified version of Urdhva Mukha Svanasana (1, above). Stand facing a wall. You should be about eighteen inches away, with your feet directly beneath the hips. Distribute the weight evenly on the feet. Look straight ahead.
Place your hands high on the wall, well above eye level, a few inches more than shoulder width apart, fingers pointing up. Keeping knees straight, pull your hips back. Bring armpits as close to the wall as possible. The curve of your back will automatically bring your forehead toward the wall. Don’t tilt your head. This is an invigorating pose. Breathe slowly and deeply for ten to fifteen seconds.
To exit, push gently against the wall so that your armpits come farther away from the wall. Coordinate this with pulling your hips in toward the wall until you are back in the position from which you started. Lower your hands.

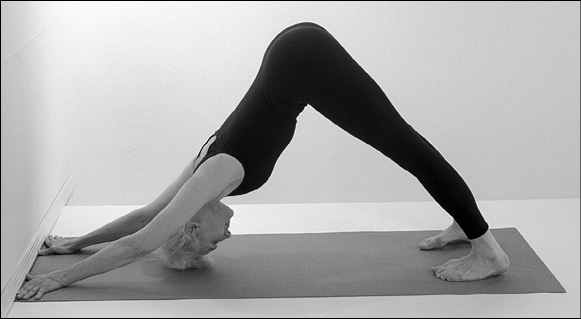
ADHO MUKHA SVANASANA REGULAR Go down on all fours in front of a wall. Place index fingers and thumbs at the base of the wall. Straighten your elbows and knees. Bring your hips up as high as possible and stretch your heels to the floor. Bring your shoulder blades together and back so that your entire back is arched, with your head a continuation of your spine. There should be a ski-slope type of arch from the nape of your neck to your pelvis. You may need to adjust your position by walking your feet forward or back a few inches. Raise your hips up as if someone were pulling you back by holding your belt from behind. Keep your heels on the floor. Breathe quietly for fifteen to twenty seconds.
To come out of the pose, gradually release the pressure on your arms by bending your elbows. Bring your right knee to the floor, then your left knee so that you are on all fours with your head facing the wall.
3. PARIGHASANA
Gate
(looks like a farm gate with a crosspiece)
BENEFITS: Increases spinal range of motion in the side-to-side dimension. Takes stress off the spine by increasing hip range of motion.
WARNING: Do not do this pose if you are pregnant. If balance is severely impaired, this pose can be done facing a wall.
PROP: Mat, optional.
PARIGHASANA BASIS FOR MODIFIED AND REGULAR
NOTE: This is the basis for the modified and regular poses: Kneel with the back erect. Place hands on hips. Then extend arms out horizontally from shoulders, palms down.
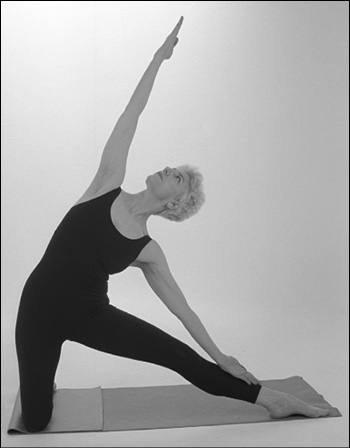
PARIGHASANA MODIFIED Extend left leg out to the side. Place left palm on the left knee. Extend right arm over ear, fingers pointing in the same direction as the extended leg. Bend directly to the left side. Do not twist. Breathe as symmetrically as possible for ten to fifteen seconds.
To come out of this pose bring your head back so that your torso and head are vertical and in line. As you do this, slide your left arm along the top of your extended left leg. Bring the left leg beside the right so that you are kneeling comfortably.
Reverse and do on the other side.
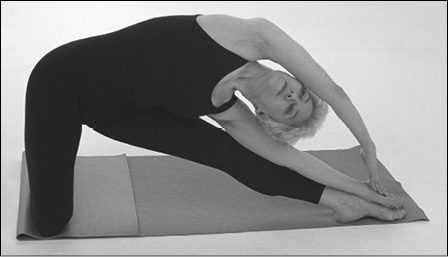
PARIGHASANA REGULAR Continue from the modified pose. Bend further until the right palm meets the left hand on top of the left foot, keeping the left foot on the floor. Arms frame the head at each ear. Breathe calmly for ten to fifteen seconds.
To come out of this pose, release your right (upper) hand and gradually bring it with your head back to the center. Do this while sliding your left arm along the top of your extended left leg until you are kneeling on your right knee with your left leg extended. Bend your left knee and bring the leg to the middle until you are kneeling comfortably.
4. ARDHA PADMA PASCHIMOTTANASANA
Half-Lotus Forward Bend
BENEFITS: Increases flexion of thoracic and lumbar spine. Improves shoulder-blade and upper-arm range of motion, strength, and control. Stretches hamstrings and improves hip range of motion.
WARNING: Do not do the regular version of this pose if you are pregnant. Use extra caution and do not push yourself if you have severe knee arthritis.
PROP: Blanket.
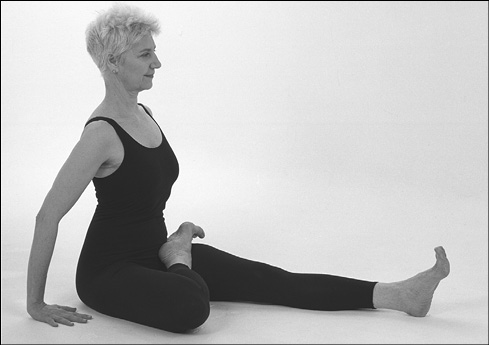
ARDHA PADMA PASCHIMOTTANASANA MODIFIED Sit straight in Dandasana, the Staff Pose (1 in chapter 14, “After Back Surgery,” page 179). Take the right leg and place it high on the left thigh so that the foot is close to the groin. Bring the right knee as close to the floor as possible. If your knee doesn’t reach the floor you can place a blanket under it. Inhale. Keeping back straight, bend from the hips as much as possible, and press your fingers to the floor. Relax the hamstrings in your left thigh by tightening the quadriceps muscle that extends the knee. Open the chest, attempting to bring the navel toward the left inner thigh. Breathe symmetrically for ten to fifteen seconds, inflating the entire lungs.
To come out of this pose, release the pressure of your fingertips and sit back until your torso is vertical. Release the right foot from its position on the left thigh. You are now in Dandasana. Repeat the pose on the opposite side.
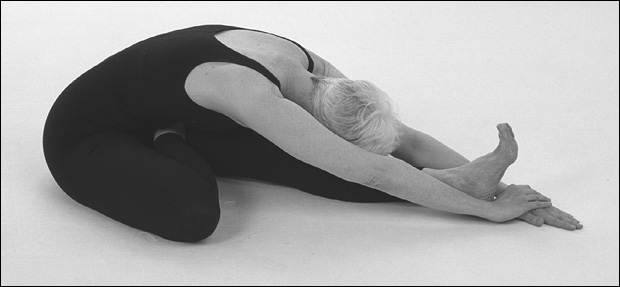
ARDHA PADMA PASCHIMOTTANASANA REGULAR Sit straight in Dandasana. Take the right leg and place it high on the left thigh so that the foot is close to the groin. Bring the right knee as close to the floor as possible. Inhale. Keeping your back straight, bend forward so your abdomen comes in contact with your right foot. Try to relax the muscles in the back of your left thigh by tightening the quadriceps muscle that extends the knee. Stretch the torso and arms forward toward the left foot and beyond its sole. The right hand grasps the left wrist. Let your chin rest on the left leg below the knee. Hold this pose for ten to fifteen seconds, breathing through your nose. Gradually work up to holding it for one minute.
To come out of this pose, release the grasp of the right hand on the left wrist. As you do so both hands slide up the leg and your torso comes to vertical. Release the right foot from its position on the left thigh. You are now in Dandasana. Repeat the pose on the opposite side.
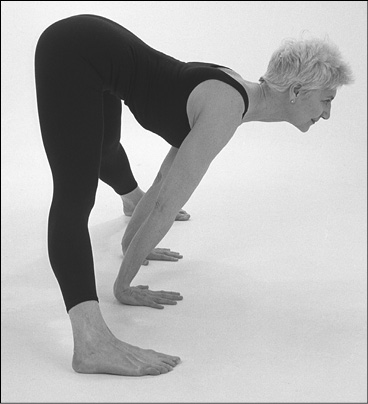
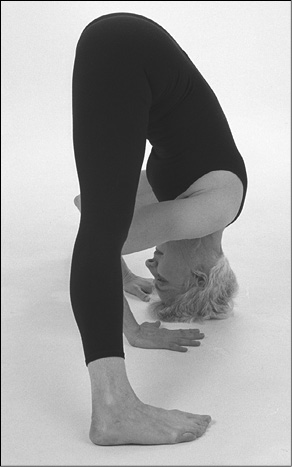
5. PRASARITA PADOTTANASANA
Spread Legs
BENEFITS: Good for lower spine, sacroiliac, and hip joints. Stretches hamstrings and adductors.
WARNING: If your have narrow angle glaucoma, discuss this pose with your ophthalmologist before trying it.
PROP: Stable card-table chair.
PRASARITA PADOTTANASANA MODIFIED Stand with feet parallel and about thirty-six inches apart. Bend forward and place palms on the seat of a chair. Arch your back as much as possible. At first hold for ten to fifteen seconds. Elbows are straight. Head is up and back as far as possible. As time goes on and you practice this pose, use lower and lower supports for your hands, letting the torso descend further.
To come out of this pose, if the chair has arms on it, put your right hand on the arm of the chair. Use pressure on your upper limbs to bring yourself to vertical, bringing left hand to the chair arm as soon as possible. With an armless chair, bend your knees as you raise your torso to vertical. You are now standing, looking at the chair. Bring your legs together.

PRASARITA PADOTTANASANA REGULAR Stand with feet four feet apart and parallel. Then lower your palms until they are flat on the floor; fingertips should be in line with the toes. Arch the entire back and neck, raising your head as much as possible. Breathe quietly for ten to fifteen seconds. Now grasp the outsides of your ankles with your hands. This pose can be extended even farther. To exit, place hands on hips and straighten torso to vertical.
PRASARITA PADOTTANASANA REGULAR (EXTENDED) Keep your back and neck straight. Pull your torso down so your ears are in line with your ankles. Resist the tendency to breathe deeply so as to avoid tightening some of the muscles you’re trying to stretch. Breathe quietly for ten to fifteen seconds.
To exit the pose, release your grasp on your ankles. Gradually, with back arched, bring your head and torso first to horizontal, pausing with your hands on the floor, your fingertips in line with your toes. Breathe smoothly for ten to fifteen seconds. Then place hands on hips and return to vertical until you are standing. Bring your legs together.
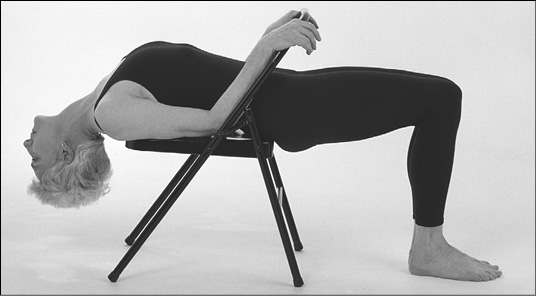
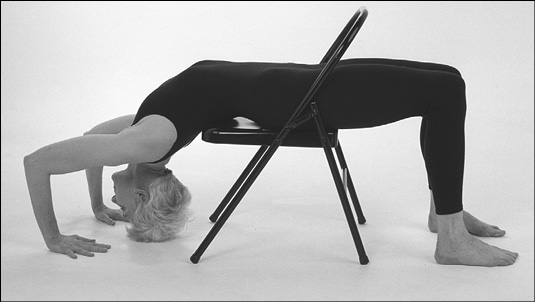
6. SETU BANDHA SARVANGASANA
Bridge Pose
BENEFITS: Improves strength of the entire back and abdomen. Increases range of motion of these regions and opens the chest.
CAUTION: Do not do this pose if you are pregnant or have glaucoma. If you have high blood pressure, reduce the time that you hold the pose and the angle at which you do it.
PROP: Stable card-table chair.
SETU BANDHA SARVANGASANA MODIFIED Stand facing the chair. Hold the chair back, insert the right foot into the space between the back and the seat of the chair, and as you do so, sit on the chair. Then bend the left knee and insert the left foot beside the right so that both feet are stationed on the floor behind the chair. (NOTE: Use care. If the chair begins to tip, then try sitting a little farther from the chair’s back. If it still seems unstable, a partner can help you enter and leave the pose.) Slide farther into the space between the chair back and seat until your buttocks emerge almost fully behind the chair. Hold the chair back with both hands, and gradually lean back until your spine is on the seat of the chair. Your shoulder blades should be on, not off, the edge of the seat. Let your neck gradually relax, allowing your head to descend to a comfortable level. Breathe slowly and evenly with mouth closed for ten to fifteen seconds.
To exit the pose, retain the head and neck in their extended position while pulling your torso up with your arms. Then straighten the head and neck. Slide your hips some distance toward the front of the chair, but remain seated. Carefully move your hips to the right and bend your left knee to extricate the left leg and place it on the floor beside the chair. Stand on the left foot while holding on to the back of the chair. Pull your right foot back until you can put it or your right knee on the seat of the chair. After gaining full balance, bring your right foot to the floor and release the chair back.
SETU BANDHA SARVANGASANA MODIFIED (INTERMEDIATE)This is essentially the same as the first version, with a significant difference. After leaning back, with the shoulder blades firmly supported by the edge of the seat of the chair, carefully release your grip on the chair back. Slowly raise both arms to vertical, then lower them behind you, further opening the armpits and chest. The backs of your fingernails may reach to the floor. Let your neck gradually relax while your head descends as far as it can comfortably. Breathe slowly and evenly with mouth closed for ten to fifteen seconds.
To exit the pose, keep your head and neck in their extended position while you slowly return your hands to the lower part of the chair back. Use your elbows to help pull your torso up with your arms. Then straighten the head and neck. Slide your hips a little out of the chair, but remain on it. Carefully move your hips to the right and bend your left knee to extricate the left leg and place it on the floor beside the chair. Stand on the left leg. Still holding on to the back of the chair, pull your right foot back until you can put it or your right knee on the seat of the chair. After gaining full balance, bring your right foot to the floor and release the chair back.
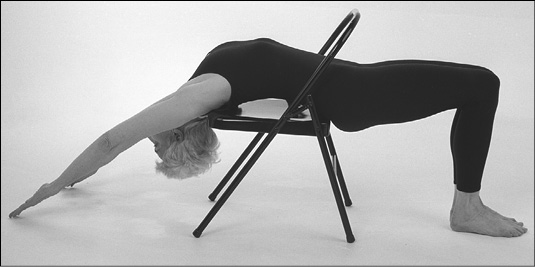
SETU BANDHA SARVANGASANA REGULAR Stand facing a folding chair. Hold the chair back, insert the right foot in the space between the back and the seat of the chair, and as you do so, sit on the chair. Then bend the left knee and insert the left foot beside the right so that both feet are firmly on the floor behind the chair. Slide farther into the space between the back and seat until the lower part of each buttock is just slightly behind the chair. Hold the chair back with both of your hands, and gradually lean back until your spine is on the seat of the chair. As you do, slide your hands down to where the back and seat of the chair meet. Your shoulder blades should be off the edge of the seat. This is how it differs from the modified version.
Let your neck and shoulders and upper chest gradually relax, enabling your head to descend as much as your comfort level allows. Let go of the chair back and bend your elbows ninety degrees as you place your palms on the floor, fingers facing your heels. Balance the weight evenly between your two palms. Breathe slowly and evenly with mouth closed for ten to fifteen seconds.
To exit the pose, keep your head and neck in their extended position while you slowly return your hands to the lower part of the chair back. Slide your torso a safe distance farther into the space between the chair back and seat so that your shoulder blades come closer to the edge of the seat of the chair. Use your elbows to help pull your torso up with your arms. Then straighten the head and neck. Slide your hips partially out of the chair, but remain on it. Carefully move your hips to the right and bend your left knee to extricate the left leg and place it on the floor beside the chair. Stand on the left leg. Still holding on to the back of the chair, pull your right foot back until you can put it or your right knee on the seat of the chair. After regaining full balance, bring your right foot to the floor and release the chair back.
There are some additional poses that are described and pictured elsewhere in the book for other diagnoses that may also be helpful for arthritis. They are, in order of acute to chronic pain:
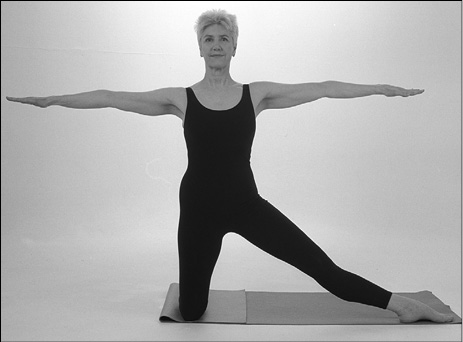
TRIKONASANA—Triangle Pose
MATSYENDRASANA I—Matsyendra was one of the fathers of Hatha yoga
PADMASANA—Lotus
PARIVRTTA JANU SIRSASANA—Twisted Head to Knee Pose