
Pregnancy
|
CAUTION: Throughout this book I have identified poses that should not be done if you are pregnant. Please read the cautions and warnings before doing any yoga pose that is not in this chapter. At the same time, I have indicated which poses should be done with care and which ones are perfectly all right. The photographs in these pages show my own version of every pose. Do the poses pictured here, but understand that there are other interpretations and other versions, and those may not be safe, even though they have the same name. |
Let me state the obvious: When you’re pregnant, you gain weight. The baby forms and is carried in front of you. Taking the baby with you wherever you go requires support, which your back supplies. The baby really puts your back to work. When walking or standing the added weight you’re carrying causes your back to arch more than it does when you aren’t pregnant. This may cause your shoulders to slump. All this is a recipe for back pain. In addition, all the muscles supporting you—your back, your buttocks, your legs—get tired after a long day’s work of carting around the baby. It’s important to work to maintain good posture. It’s one of the basics for avoiding back pain during pregnancy.
Another factor that may be connected with back pain during pregnancy is blood volume. Physicians, especially in Europe, believe that some of the increased blood supply during pregnancy enters the spinal canal, raising the pressure on the nerves there, which of course can cause trouble.1 Those who subscribe to this idea and who are knowledgeable about yoga recommend inverted poses as a way to find relief from back pain, and I think that done carefully these poses, including the headstand, are certainly safe for women who regularly do yoga. These can be done right up to the last weeks of pregnancy.
Estimates about how many pregnant women have back pain run as high as 70 percent. This may be back pain that has never occurred before and never will again. Still back pain and pregnancy are a common and difficult combination. For one thing, pregnancy and most medications don’t mix. For another, it’s considered unwise during pregnancy to have many of the standard diagnostic tests such as X rays and MRIs. This makes both diagnosis and treatment by conventional means problematical. The medical specialty called Physical Medicine and Rehabilitation and yoga offer methods of choice for diagnosis and treatment.
Last we must recognize the hormonal aspect of pregnancy. The placenta secretes Relaxin, which, as its name suggests, relaxes ligaments and other connective tissue, before but especially during the childbirth process. When doing yoga during your pregnancy, you might find that your body is more flexible because of the Relaxin your body is manufacturing. I urge you not to take advantage of this increased elasticity by pushing yourself too far in yoga or elsewhere. If you find that you are able to get into a position that would have been difficult before you were pregnant, do it with extreme caution. But there is a less positive aspect to Relaxin: The overarched lumbar spine and the overburdened sacroiliac and hip joints with looser ligaments are a setup for sacroiliac and vertebral joint dysfunction, which are major sources of back pain in pregnancy.
If you have mild low back pain, it’s probably from carrying around fifteen or twenty extra pounds in front of you. I would suggest strengthening back muscles, but carrying the progressively greater weight for months takes care of that. For the back pain, stretching the vertical muscles in your back on either side of your spine should help.
Hip problems that occur during pregnancy can be transitory or serious. If the pain increases with weight bearing or moving the leg and seems to be coming from the hip, ask your doctor before doing yoga.
Then there’s the last problem of pregnancy for which yoga may also be perfectly suited: sleep. When the already tired pregnant woman retires, respite may not be easy! The added weight and its distribution often require special new sleeping positions and prohibit the old favored ones. If you are used to sleeping on your back, you might be out of luck because the weight of the fetus and fluids may press down on the back and on spinal nerves, causing pain. Also, as the baby grows, his or her head can press against the lower spine and sacrum, where nerves exit the spine and travel through the intersection called the lumbosacral plexus—another cause of pain. Night may also bring leg cramps.
First, learn what sleeping positions are comfortable through trial and error, and I advise using as many bed pillows as you need to for support. Yoga stretches are wonderful for cramps. Do not hesitate to read up on how to meditate. A good place to begin is with the book, The Heart of Meditation by Sally Kempton.2 Meditation may help you prepare for sleeping at night, and may help with going back to sleep if you wake up because you need to go to the bathroom.
Yoga meditation and breath control will stand you in good stead all through your pregnancy and through the childbirth process. Meditation is valuable for quelling the jitters and for relieving anxiety that accompanies pregnancy, especially a first pregnancy. It will be useful for achieving the calm necessary for a good night’s rest.
Breath control is part of yoga meditation, and when you go into labor you will find that there is good reason that a combination of breath control and meditation is at the core of the time-tested Lamaze Method. Breath control helps you master your pain and your reaction to pain, as well as helping you maintain calm and directing thoughts to a secure and confident inner place.
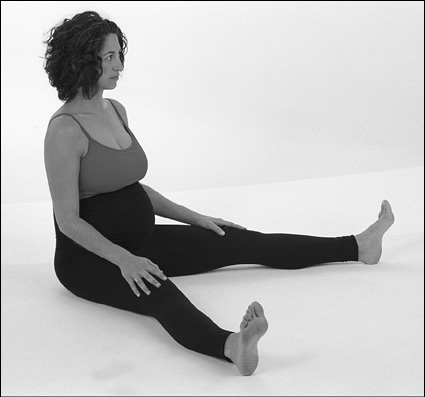
1. UPAVISTHA KONASANA
Seated Angle
BENEFITS: Stretches hamstrings and adductor muscles, improves circulation to pelvic area. This pose is also good for most pain related to sciatica.
WARNING: If you have sacroiliac joint derangement, do not do this pose.
PROPS: Two yoga straps and a blanket
UPAVISTHA KONASANA MODIFIED Sit on the floor, back straight, legs spread apart as much as possible. Your spine is erect and your weight should be evenly distributed on the sit bones. You may be more comfortable sitting on a blanket than on the bare floor. Take a breath in. Keeping your back straight, lean forward as you exhale and place your hands on your knees, shins, or ankles as far down as you can. Breathe quietly for ten to fifteen seconds. As you inhale, rise to your original sitting position.
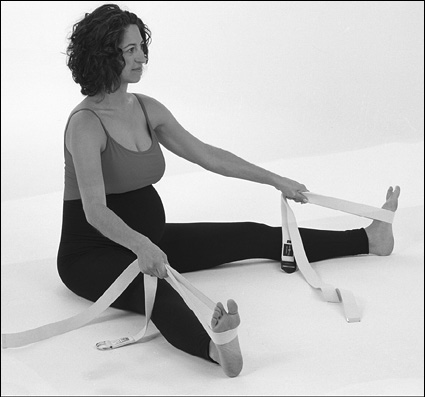
UPAVISTHA KONASANA REGULAR Same as above. Grasp the outsides of your heels or use straps to maximize the forward stretch.
2. BADDHA KONASANA II
Bound Angle
BENEFITS: Good for entire urinary tract. Relieves sciatica by reducing lumbar lordosis (overarching). May minimize tendency to develop varicose veins by maximizing venous drainage.
CAUTION: Do not do this pose if you have sacroiliac joint derangement, because the pose temporarily closes the sacroiliac joints.
BADDHA KONASANA II MODIFIED Sit on the floor with weight evenly distributed on sit bones. Thighs are apart, feet are together. Back is straight. Bring the outsides of your knees down toward the floor. Keeping your back straight, lean forward and place your palms on the floor in line with your shoulders. Crawl forward with your fingertips if possible. When you have gone as far forward as you can, hold that position. Relax the inner thighs and outer buttocks. You can press your elbows into the crevices between your calf and thigh to lower your knees still farther. Breathe quietly for ten to fifteen seconds. Walk fingers back; return to the original position.
BADDHA KONASANA REGULAR Sit on the floor. Bring heels together and as close to your perineum as possible. Press your knees out and toward the floor. Interlock your fingers around the soles of the feet. Breathe in and, as you exhale, bring your navel down to your heels. Your knees come as close as possible to the floor. Hold the pose for ten to fifteen seconds.
To exit, inhale as you slowly raise your torso.
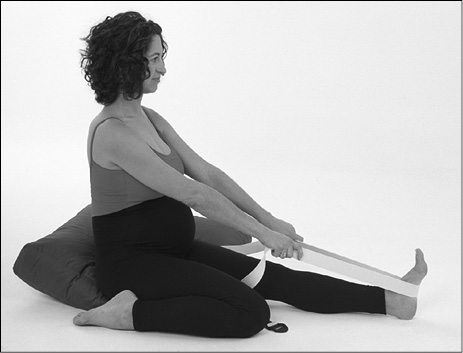
3. TRIANGA MUKHAIKAPADA PASCHIMOTTANASANA
Three Limbs Placing Face to Leg in West Pose
(literal translation),
or Half Hero
BENEFITS: Reduces low back pain by stretching muscles in spasm. Reduces lumbar lordosis (overarching). Helps knee and hip coordination critical for efficiently carrying baby.
CAUTION: Use several pillows or cushions if you have knee problems.
PROPS: Pillows or cushion and yoga strap.
TRIANGA MUKHAIKAPADA PASCHIMOTTANASANA MODIFIED Sit with a cushion under the right buttock. Extend left leg. Bend the right knee and fold the leg under so that the heel is in line with the hip but off the pillow. Thighs should be parallel, with your right shin at a slightly outward angle. Put your hands on the floor at your sides. Carefully bring your whole torso forward, keeping the left leg and back straight. Move the hands forward as your torso comes forward so that your arms continue to support you. When you have come forward enough to stretch your hamstrings, the lower back, and the muscles that will work during the birth process, hold that position for ten to fifteen seconds. Keep your weight evenly distributed on the sit bones, right shin, and left leg and heel.
Gradually crawl the fingertips back to your sides to exit the pose. Reverse.
TRIANGA MUKHAIKAPADA PASHIMOTTANASANA REGULAR The modified and regular versions of this pose differ only in the placement of the heel. In the regular version the foot is beside the thigh, permitting both sit bones to reach the floor. With this difference, the two poses proceed the same way.
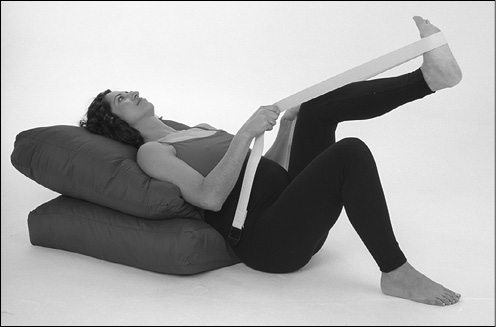
Holding Big Toe While Supine
BENEFITS: Relieves low back pain by stretching hip extensor muscles. Reduces sciatica, increases hip joint flexibility, drains blood from legs.
CAUTION: May raise blood pressure slightly (less than ten points).
PROPS: Two pillows and a yoga strap.
SUPTA PADANAGUSTHASANA MODIFIED Lie on the floor with two cushions supporting your back, heels stretched out straight away and far from hips. Your head is stretched away from your shoulders. Raise your left leg, with the knee bent. When the thigh is vertical, straighten your knee. Bring your leg as close as you can to vertical. Grasp your leg with your left hand where you can, as close to the heel as possible. Alternatively, loop a strap around the foot and hold it in the left hand. It is also possible to hold the strap with both hands, but remember, keep your shoulders flat against the pillows. You may use a strap across the bottom of the left foot. Keep your right foot relaxed on the floor. Relax your neck and the abdominal and pelvic musculature. Hold for ten to fifteen seconds, breathing evenly.
To exit the pose, release the hand, bend the knee, and then gradually lower the leg. Repeat the pose on the other side.
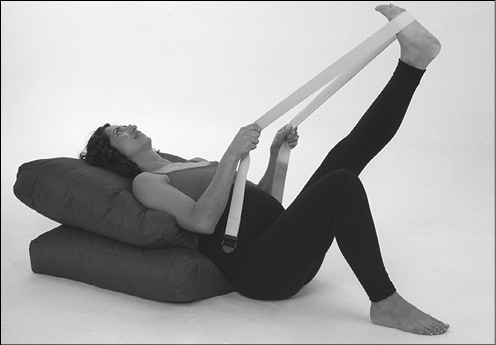
SUPTA PADANAGUSTHASANA REGULAR Lie stretched out on your back as in the modified pose, heels stretched out straight and far from your hips. Your head is stretched away from your shoulders, lengthening the neck. Raise the left leg toward vertical, with the knee bent, until you can either grasp the big toe with the left thumb and first two fingers or loop a belt around the sole of the foot. Then straighten the knee as you raise the leg to vertical. Lie flat, keep the right side relaxed on the floor and both shoulders flush against it. Relax your neck and abdominal and pelvic musculature. Hold for fifteen to thirty seconds.
To exit the pose, release the hand or the belt slowly as you bend the knee and then gradually lower the leg. Repeat the pose on the other side.
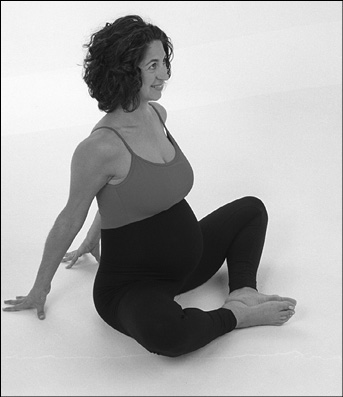
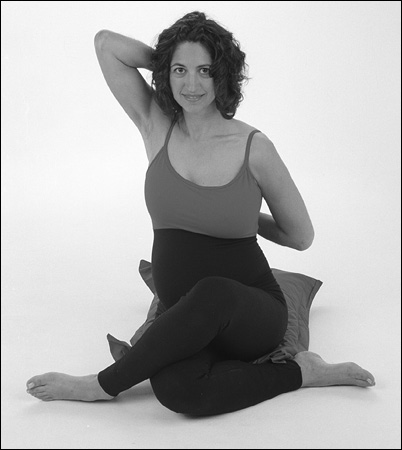
5. GOMUKHASANA
Cow Face
BENEFITS: Good for leg cramps, sacroiliac joint problems, and upper back pain and stiffness.
WARNING: Do with care if you have knee problems.
PROPS: Two blankets or pillows.
GOMUKHASANA MODIFIED Sit on floor on two blankets or pillows with legs straight in front of you. Bend your right knee so you are sitting with your right heel under the left thigh and beside your left hip joint. Use your hands to bring your left leg over your right leg. Your left heel should now be beside your right hip joint. Knees will be in line vertically. Bring your right hand, wrist, and forearm behind your head. Press your head back against your forearm to stretch your right armpit. Keep your left hand unengaged to help with balance. With your back straight and chest open, breathe quietly for ten to fifteen seconds.
To leave the pose, use your left hand for balance. First return your right arm to your side, then use your hands to lift your left leg and return it to the floor. Reverse the legs and arm and repeat the pose on the other side.
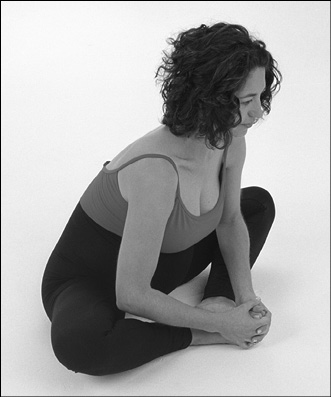
GOMUKHASANA REGULAR Legs and right hand are in position as in the modified pose with blankets or pillows. Bring your left hand around behind you and reach up until you can grasp your right hand. Open your chest. Breathe quietly for ten to fifteen seconds.
When exiting the pose, release your hands first. Then, using your hands to guide your leg, place your right heel in front of you. Use your hands to balance as your left leg releases. Reverse and do the pose on the other side, using legs and arms in the opposite positions.
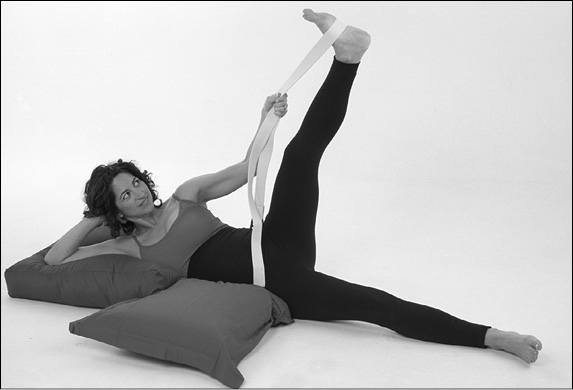
6. ANANTASANA
Vishnu’s Couch
BENEFITS: Relieves low back pain by stretching hamstring and quadratus lumborum muscles. Reduces sciatica, increases hip joint flexibility, drains blood from legs. Increases range of motion for leg movement out to the side (adductors and internal rotators).
CAUTION: May raise blood pressure slightly (less than ten points).
PROPS: Blanket, pillow, and yoga strap.
ANANTASANA MODIFIED Lie on your right side with your right arm supporting your head. Bend your left knee and bring your left leg toward your chest. Hold the left big toe with the index and middle finger of your left hand, or loop a strap around your foot at the arch. You can use a wall behind you for balance. Breathe quietly for ten to fifteen seconds. Then reverse and do the pose on the other side.
To exit, bend your knee as you bring your thigh down to the floor, and release your big toe.
ANANTASANA REGULAR Start in modified pose. Then, keeping your body on the right side and holding your left big toe with your left thumb and fingers or a strap as before, straighten your left leg as it comes to the vertical. Keep your hip joints perpendicular to the floor. Hold this position for ten to fifteen seconds.
Bend your knee as you come out of the pose, using your right hand for balance. Release the toe. Reverse and do the pose on the other side.
There are some poses that are described and pictured elsewhere in the book for other diagnoses that may also be helpful for backache during pregnancy. These poses are listed in order of acute to chronic pain:
VIRABHADRASANA II—Warrior Pose II
PARSVOTTANASANA—Stretching of the Flank
VIPARITA KARANI—Inverted Lake
VIRASANA—Hero Pose