
Piriformis Syndrome
It’s a pain in the butt, often associated with marathon running or marathon sitting in front of the computer, or hours in the car, commuting. Athletes get piriformis syndrome, especially runners, skaters, and dancers. Sometimes this syndrome coexists with other problems, for example, sacroiliac joint derangement, tight hip muscles, hip joint problems, leg-length discrepancy, spondylolisthesis, or herniated disc.
Piriformis syndrome may be the result of an injury suffered in a fall or other trauma. Most often the extreme pain is caused by spasm of the piriformis muscle in the buttock, which compresses the sciatic nerve.
At one time the very existence of piriformis syndrome was in question, and even now there are a few skeptics in the medical profession. However, a few years ago there was a newspaper article in which my research on this problem was published and widely distributed.1 It led to my seeing many people from inside and outside the United States who had the pain but hadn’t known what it was or how to deal with it. Fortunately, those days are behind almost all of them. No pun intended.
Now, with advanced nerve conduction tests, this condition can be identified more easily. Nerve conduction across the tightened piriformis muscle is measurably slowed in stressed positions. This allows for tracking an individual’s piriformis syndrome over time, using not only subjective reports of pain intensity, but with objective tests showing that the nerve impulses are gradually picking up speed over time. Since piriformis syndrome has become easier to diagnose and follow, research has been done on treatment efficacy, and treatment has improved. I have found that a combination of medication, physical therapy, and yoga has cured the majority of patients.2 In a study my colleagues and I published in the American Journal of Physical Medicine and Rehabilitation, 90 percent of patients improved 50 percent or more within the first three weeks!3
The sciatic nerve almost always leaves the buttock below (and rarely, through) the piriformis muscle—a part of human anatomy I compare to the chain guard on a bicycle. Like the chain guard, the piriformis muscle shields the sciatic nerve but isn’t important for the motion of the leg.
This muscle is the weakest and least active of the six muscles that abduct and externally rotate the thigh. But it protects the sciatic nerve from injury that comes from sudden movement during sitting and damage from compression by other muscles, against bones or from trauma due to external forces. The piriformis muscle causes trouble when it becomes scarred or tightened and presses against the very nerve it’s meant to cushion and protect. A piriformis muscle in spasm squeezes the important sciatic nerve, the largest nerve in the body, causing pain and often altering the function of other muscles further down the leg. But the piriformis muscle’s actual function has very little to do with the movement of the bones to which it is attached.
That is why, in rare cases where there must be a last resort, surgery can help piriformis syndrome. The piriformis muscle is routinely cut, removing it from the area of the sciatic nerve, during hundreds of thousands of total hip replacement surgeries that take place every year. These patients have absolutely no ill effects from that aspect of the operation.
Unfortunately piriformis syndrome caused by muscle spasm can become chronic. Once at a Hawaiian luau I was seated next to a neurologist who sat on a special cushion. He carried this cushion with him everywhere he went, and that night he used it as he ate. But even with it, he had trouble remaining seated on the bench. When I asked him what was wrong, it took only a moment for him to confide that he had suffered from piriformis syndrome for fifteen years. His pain was excruciating, his wife confirmed. It was making him miserable, and there seemed no way out. Dinner hadn’t started yet. I invited the gentleman to come with me for a few minutes to a secluded spot beneath a tree. There I showed him the Parivrtta Trikonasana, the Twisted Triangle pose. Within five minutes he was feeling enough relief to return to the table, sit down on his cushion, and eat his dinner and dessert without discomfort. Now, to keep acute symptoms from returning, this forty-five year-old physician does just fifteen minutes of yoga every morning before breakfast.
Yoga is an ideal treatment for piriformis syndrome, with one and only one rare exception: If a fall or trauma has scarred the front or edge of the muscle, sometimes stretching won’t help. Otherwise, yoga helps by:
• Stretching the muscle and keeping it out of spasm.
• Calming the person and helping relax tension in the piriformis muscle and hip joint.
• Synchronizing coordination and simultaneous muscle contraction that makes it possible to take pressure off the piriformis muscle by improving posture and finding new positions for sitting, walking, and lying down.
• Giving a new bodily outlook that promotes weight loss. Keeping weight down is important because fatty tissue “wads up” and obstructs the path of the sciatic nerve between the hip joint and the ischial tuberosity, narrowing it during sitting and actually contributing to the compression of the nerve.
• Relieving sacroiliac joint dysfunction that frequently plays a key role in spasm of the piriformis muscle.
1. ARDHA MATSYENDRASANA I
Matsyendra was one of the fathers of hatha yoga.
BENEFITS: Asymmetrically stretches tendons, ligaments, and muscles connected to SI joint as well as the piriformis muscle.
CAUTION: Do not do this pose if you are pregnant. Do not push yourself when doing this pose. Beginners risk dislocating rib joints if they push themselves too much. If you have recently had total hip replacement surgery, avoid this pose.
PROP: A blanket can be used for both the modified and regular versions of this pose.
ARDHA MATSYENDRASANA I MODIFIED Sit on the floor. Bend your left knee. Place your left calf under the right knee and the side of your left foot on the floor near your right buttock. Bend your right knee and raise the right leg over the left thigh. Place the sole of the right foot on the floor just beyond your left thigh. Bend your left elbow as you incline your torso forward and to the right. Keeping the elbow bent, slide your left arm as far as possible along the outside of the right knee.
Walk your right fingertips behind you and to the left. Bring the left side of the chest forward and to the right. Bring the right shoulder back and to the left. Turn your torso clockwise. Your shoulders should be parallel with your right leg. Breathe as symmetrically as possible for ten to fifteen seconds.
To exit this pose, release the pressure of your left elbow on your right leg and slide both arms to your sides. Do it on the other side.
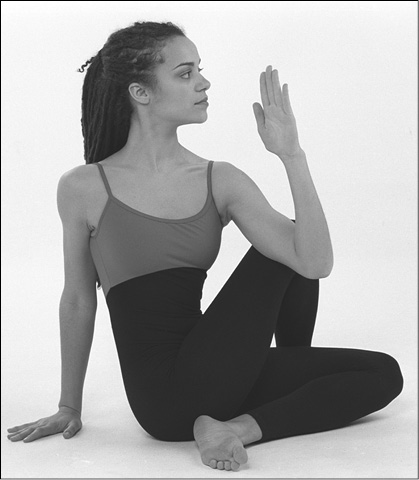
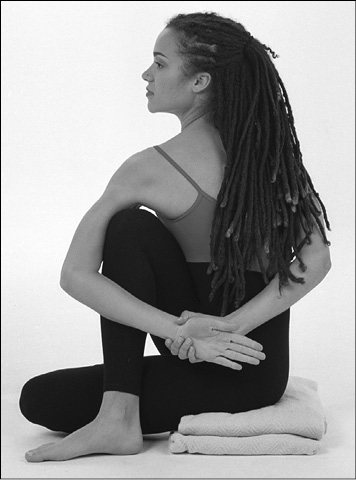
ARDHA MATSYENDRASANA I REGULAR Sit on the floor. Bend your left knee and place your left calf under the right knee and your left foot on the floor near your right buttock. Bend your right knee and raise the right foot over the left thigh. Place the sole of your right foot on the floor beside and beyond your left thigh. Your right shin should be vertical. Raise your left arm and slide it outside the right knee so that the back of the armpit gets as close to the knee as possible.
Walk your right fingertips behind you. Bring your left chest forward and to the right. Bring your right shoulder to the left and back. Keep your spine as vertical as possible and twist your torso ninety degrees clockwise. If possible slide your left hand behind your right shin and bring your right hand forward and to the left so you can grasp your left wrist with your right hand. Your shoulders should be parallel with your right leg, and horizontal. Relax all pelvic muscles. Breathe slowly, inflating each lung equally, for ten to fifteen seconds.
To exit the pose, release your grip on the left wrist and slide your arms to your sides. Reverse the legs to do the pose on the other side.
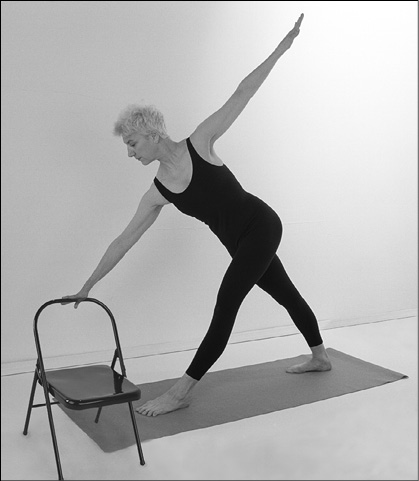
2. PARIVRTTA TRIKONASANA
Twisted Triangle
BENEFITS: Stretches piriformis muscle diagonally, as well as glutei and abductors and external rotators of the thigh and the posterior hip capsule.
CAUTION: Do not do this pose if you are pregnant. Do not do this on a full stomach or after total hip surgery
PROPS: Stable card-table and a mat.
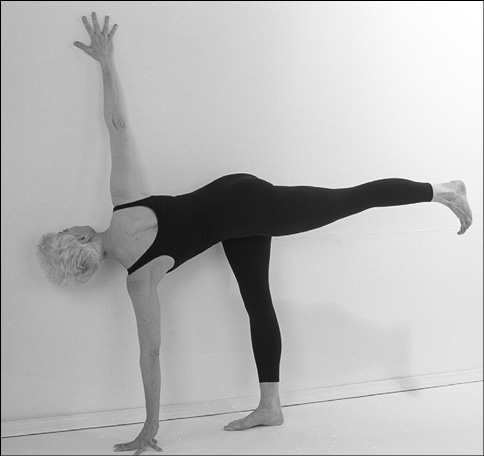
PARIVRTTA TRIKONASANA MODIFIED Stand facing a wall with your feet about three feet apart. Left foot is parallel to the wall. Right foot is at a thirty degree angle with the wall. Stretch your arms out horizontally as far as possible at shoulder height. Turn your entire torso to the left. Keeping your knees straight, bring your right hip forward and your left hip back until the inner thighs are touching. Slide your right arm along the wall, to the left and down until you can grasp your left shin or ankle. You may also use a chair. Now you can horizontally stretch the muscles in the left buttock and the hip joint capsule more by bringing the left part of your back in contact with the wall. If you cannot keep your left arm elevated, place it at your side. Breathe smoothly and symmetrically. Hold the pose for ten to fifteen seconds.
To exit, stretch the arms horizontally while you reverse the twist in the hips and at the same time turn the feet so they are perpendicular to the wall. Step back if you feel off balance. Bring your hands to your sides. Repeat on the other side.
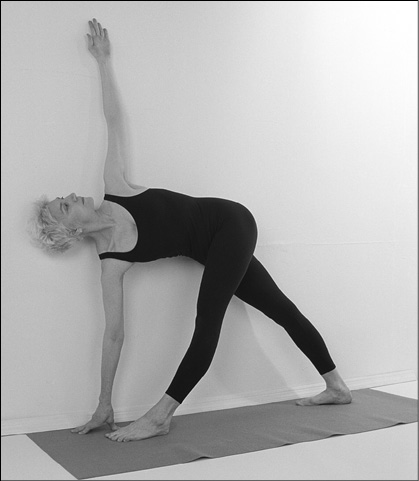
PARIVRTTA TRIKONASANA REGULAR Do the pose without the wall. This requires more balance. Fine points of this more advanced version include attaining the pose and then lengthening the inner thigh of the front leg and equalizing your weight within each foot and between your feet. Breathe as symmetrically as possible for ten to fifteen seconds.
To exit the pose, release your right hand. As you bring your torso to vertical, stretch both arms horizontally and simultaneously return hips and feet to a forward-facing position.
3. PARIVRTTA ARDHA CHANDRASANA
Twisted Half-Moon
BENEFITS: Horizontally stretches piriformis muscle and glutei and abductors and external rotators of the thigh, as well as the hip joint capsule.
CAUTION: Do not do this pose if you are pregnant. Try this against a wall first. Do not do it on a full stomach or after total hip surgery.
PROPS: Two chairs.
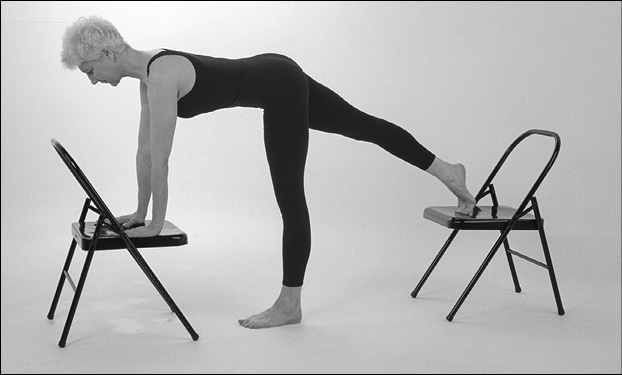
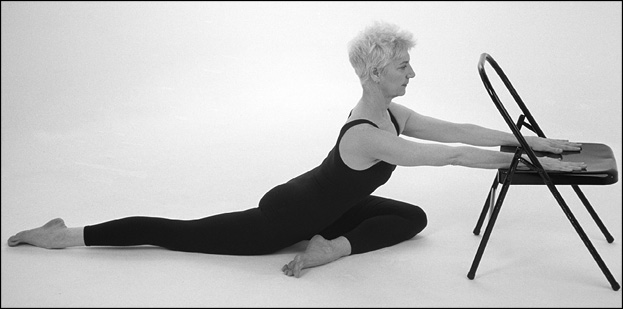
PARIVRTTA ARDHA CHANDRASANA MODIFIED Stand with one chair behind you and another chair about two feet in front of you. Stretch out the left leg behind you until the top of the left foot is resting on the chair seat. Place the left hand on the chair in front of you or on the floor (or grasp the leg of the chair), in line with the left foot. As you do this the entire left side of your body—the shoulder, chest, hip, and leg—should curl downward as much as possible, as shown in the photo.
The right arm should rise, with the elbow straight, in line with and directly above the left shoulder. This position stretches the right buttock quite a bit. Breathe slowly and symmetrically for ten to fifteen seconds.
To exit the pose, raise the left side of your body to the horizontal at the same level as the right. Then bring the left foot back to the floor. Keep your left hand on the chair until then. Return the right hand to your side or use it with the left on the chair seat to balance as you bring your torso back to vertical.
Do the pose on one side, then reverse the legs and do on the other side (pictured above).
PARIVRTTA ARDHA CHANDRASANA REGULAR Do the same pose without the wall and with one chair to support your leg. With practice you should strive to become proficient enough doing the modified pose so that you can do the regular pose with at most one chair. As you improve your calm and balance, you may lift the leg off the chair. Some practitioners do not need the chair at all. Hold the pose for ten to fifteen seconds. To exit the pose, lower the horizontal leg to the floor and raise your torso to vertical.
4.VIRASANA
Hero
BENEFITS: Stretches lower back muscles and stretches lateral hip muscles. Stretches soft tissue of back (ilio lumbar fascia). Relaxes iliopsoas and rectus femoris (other hip flexor). Good for pregnant women.
CAUTION: Don’t do this pose if you have knee problems.
PROPS: Pillows or blankets.
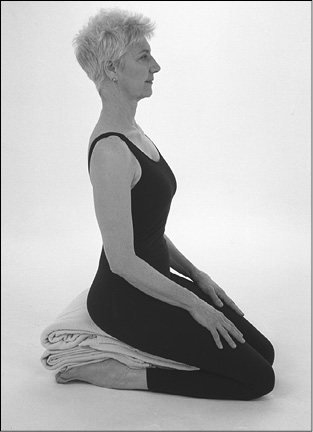
VIRASANA MODIFIED Sit on a large pillow, knees bent, thighs close to parallel, feet and toes pointing back. Your shins should be outside your thighs but touching the sides of the pillow. Use your hands to pull your calves to the outside so you can sit lower and more comfortably. Arch your back slightly. Try to put your ears, shoulders, hips, and heels in one plane. Open your chest. Place the palms or backs of your hands on your thighs. Keeping your head erect, tuck in your chin. Pull in your stomach. Relax leg, chest, and back muscles. Breathe quietly with your mouth closed for ten to fifteen seconds.
To leave this pose, bring your hands to the floor and kneel on all fours.
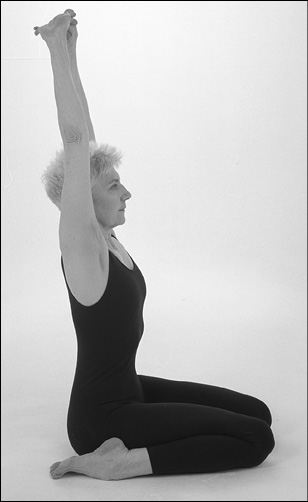
VIRASANA REGULAR To progress in this pose, reduce the size of the pillow you are using until you don’t need it anymore. Do not do this too quickly, however, or you could injure your knee. Interlock your fingers and extend them fully overhead, bringing your biceps behind your ears.
Exit as above.
5. EKA PADA RAJAKAPOTASANA I
King of Pigeons
BENEFITS: Stretches buttock musculature. Stretches flexors of the opposite thigh. Balances flexor-extensor mechanism.
CAUTION: Be careful not to exaggerate the arch of the lumbar spine.
PROPS: Chair and mat.
EKA PADA RAJAKAPOTASANA I MODIFIED Kneel with one foot behind a chair or other means of support. Slide your left knee forward as you turn your left shin inward, i.e., toward the right. As you do this, slide your right leg backward. Your torso will descend more and more as the left thigh comes forward and the left leg goes back. As this happens, put your hands and forearms on the seat of the chair for support. Keep your hips parallel to the front of the chair. Your navel should face forward. Shoulders should be even. Breathe quietly for ten to fifteen seconds.
To exit the pose, press down on the seat of the chair with your forearms and pull your left leg back until you are able to slide your right knee forward. You are now in a kneeling position. Repeat on the opposite side.
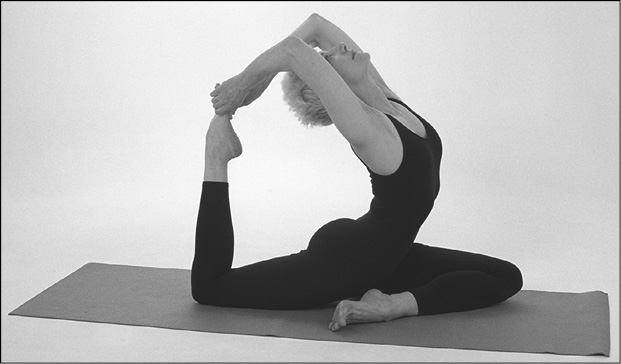
EKA PADA RAJAKAPOTASANA I REGULAR Kneel, then assume an all-fours position. Advance your left knee toward your left hand, inclining the thigh outward so the shin is in contact with the floor, and the left foot comes closer to the right hand. The pelvis will move forward toward the outstretched hands, and the right leg will end up straighter and farther behind.
Continue to slide the left leg forward and slide your straight right leg backward until your left heel is in contact with your right groin and the outside of the left foot is on the floor. Put your hands at your waist, palms facing downward. Arch your entire spine, beginning just above the pelvis. Bring your head back as far as possible. Breathe quietly for ten to fifteen seconds to establish balance. Place your right palm on the floor and bring your left hand over your head as you bend your right knee ninety degrees. Grasp your right foot with your left hand and bring your right hand back to join it. Breathe quietly, being careful to relax unnecessary tension. Hold for ten to fifteen seconds, breathing evenly.
To exit the pose carefully, release the foot and bring both hands to the floor. Straighten your right knee. Bend forward, weight on your palms, and bring the left knee back until you are on all fours. Repeat on the opposite side.
6. JATHARA PARIVARTANASANA
Rolling Stomach
BENEFITS: Stretches piriformis muscle. Stretches hamstrings; vertically stretches buttocks. Stretches and adjusts legs and abdominal fascia and entire digestive system and spleen. Opens sacroiliac joint. Improves lower back range of motion. Strengthens abdominal and lower back muscles.
WARNING: May be painful with spondylolisthesis or herniated disc. Do not do if you have an abdominal hernia.
NOTE: Slowly transition from the modified pose to the regular one by straightening your knees a little more each time you do the pose. You can do this over a period of months.
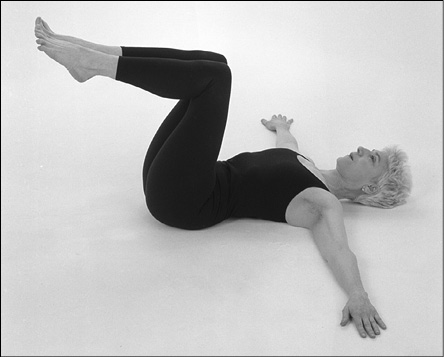
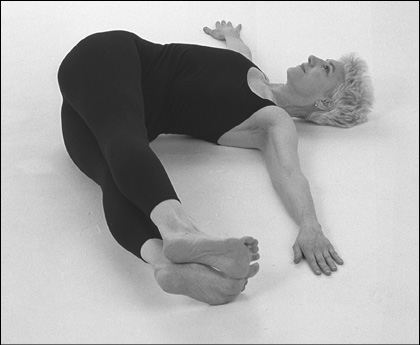
JATHARA PARIVARTANASANA MODIFIED Lie on your back with arms stretched out horizontally, palms down. Bend your knees. Bring your heels and knees together and the heels as close to the buttocks as possible. Raise your feet off the floor until your thighs are vertical. Keeping your legs together, swing your hips slightly to the left. Then bring your thighs over to the floor on the right. Press your right hand and arm onto the floor to bring your left shoulder flush with the floor. Relax rectal muscles, torso, neck, and shoulders. Breathe with your mouth closed for ten to fifteen seconds.
To exit, bring your legs to vertical, lower your thighs until your feet are on the floor. Do this pose on the other side.
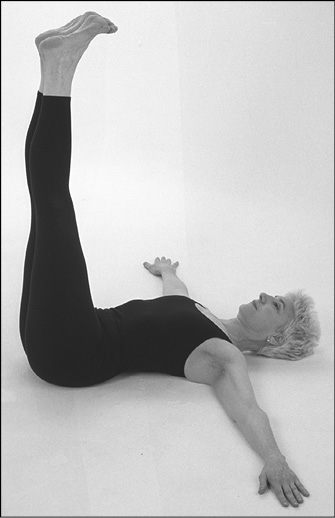
JATHARA PARIVARTANASANA REGULAR Lie on your back with arms stretched out horizontally, palms down. Bring your knees and heels together, heels as close to the buttocks as possible. Raise your feet off the floor until your thighs are vertical. Once you are there, straighten your knees until your legs are vertical. Swing your hips a little to the left. Keeping your legs straight and extended, exhale and let your legs descend to the right until they reach the floor. Adjust your hips, if necessary, to keep your heels in line with each other. Pressure on your right palm will bring your left shoulder blade to the floor. Relax rectal muscles. Breathe with your mouth closed for ten to fifteen seconds. Then raise legs to vertical, swing hips to the right and then let the legs descend to the left, using the left hand to lower the right shoulder blade to the floor. Relax rectal muscles, torso, neck, and shoulders. It is best to perform the pose on the other side at this point using the same breathing.
To exit the pose, bring your legs back to vertical, bend your knees, lower your legs to the floor.
There are some poses that are described and pictured elsewhere in the book for other diagnoses that may also be helpful for piriformis syndrome. These poses are, in order of acute to chronic pain:
GOMUKHASANA—Cow Face
HALASANA—Plow
PASCHIMOTTANASANA—West Posture
JANU SIRSASANA—Head to the Knee Forward Bend