If you’ve ever made cookies or cakes from a recipe, odds are good you’ve come across this sentence: “Cream butter (or shortening) with sugar until light and fluffy.” The reason is this: Creaming creates products with a fine, regular texture and a soft, moist (but not necessarily tender) tooth. The problem is that most recipes fail to explain why you need to “cream” anything, nor do they tell you how to manage the creaming process.
The Creaming Method
 Scale or measure all ingredients. Fats should be pliable but solid (no sign of melting). If kitchen temp is over 70°F, chill the mixing bowl.
 Combine all Dry Goods (except sugar) by pulsing in food processor.
 In a small bowl, beat eggs together along with any extracts.
 Using a stand mixer, with the paddle attachment, on medium speed:
 Mix the fat(s) alone for a minute to spread them around the bowl.
Add sugar(s) slowly and beat until mixture lightens noticeably in texture and increases slightly in volume.
 Reduce the speed to “stir” and add the eggs very slowly, stopping to scrape down the sides of the bowl as necessary.
 Work in the Dry Goods in three installments alternating with any additional liquids, such as milk. Always start with the dry ingredients and finish with the wet for a smoother batter.
 Stir in any bits and/or pieces (chocolate chips, nuts, etc.).
 Bake according to the recipe’s instructions.
Fat is either too warm or too cold.
Adding sugar directly to fat without briefly beating the fat first.
Pouring sugar all at once instead of adding it in a slow steady stream with the mixer on.
Not knowing when to stop: although you’re no longer able to see sugar granules, if you rub a bit of the creamed fat between your fingers you should still be able to feel them.
(Technically speaking, sugar can dissolve quickly in butter because it’s hygroscopic and there is water in butter. If the recipe was formulated with the butter’s moisture in mind (and any good recipe would be) then things can start getting out of whack if the sugar is allowed to hoard that moisture. This doesn’t happen with cakes calling for shortening because there’s no moisture in it.)
Not beating the eggs and refrigerating them before adding to the creamed fat. In this case, the eggs absorb heat from the fat, which make it harder. If the fat has been getting too warm, this could be a good thing. The point is to be aware that the temperature of each ingredient has a substantial effect on the process.
To me, “cream” is the most troublesome word in the baking canon. The problem is that it has so many meanings.
Cream (n.) the stuff that floats to the top of fresh milk.
Cream (vt.) to beat into a creamy froth.
Cream (vi.) to dress with a creamlike sauce.
Then of course there’s
Creamy (adj.) something that’s been creamed, or reminds you of cream.
The second definition, the verb transitive, is the most difficult of these. Besides being almost completely subjective—after all, one baker’s “light and fluffy” may be another’s “dense and crunchy”—one cannot become a baker without grasping its meaning. If a person tells me that they believe baking to be difficult, I blame this word (along with “knead,” but that’s another chapter).
Most home bakers think the goal of “creaming” is to soften the fat. But softening is only a side effect of the true mission, which is aeration—the integration of tiny “seed” bubbles into the fat. Butter, when properly creamed, significantly lightens in color because billions and billions of tiny air bubbles change the way light reflects from the mass. Creaming also significantly increases the volume of fat. Most of the time this is done with sugar, which acts as an abrasive, cutting tiny holes into the fat, which then seal over, creating tiny bubbles. Leaveners like baking powder produce the gases that blow up the bubbles that create the texture of a baked good, but they don’t create those bubbles—creaming does. As you no doubt recall from the shortening/butter sections, these bubbles are greatly responsible for the final texture of the good in question. In fact, the fine texture of cakes and cookies is due more to creaming than any other single factor.
So what’s the best way to achieve this airy state? Ideally in the work bowl of an electric stand mixer fitted with a paddle. The fat, a little on the cool side, goes in, and you turn the machine to low, just to break things up. Then sprinkle in the sugar and edge the power up to about 50 percent. After a couple of minutes, you’ll need to stop and scrape the bowl, especially the bottom, with a rubber spatula to ensure that all the fat and sugar gets a good beating.
Don’t do this with the whisk attachment. For one thing, a firm fat could break or bend the tines, and even when soft, a huge ball will probably form in the middle of the whisk and just sit there. No, only the paddle can slap the fat against the side of the bowl and scrape the sugar into it.
Your other technological options are limited. I’ve seen creaming done with an electric hand mixer, but it took forever and it wasn’t pretty. The biggest problem with hand mixers is that they throw a lot of material around and they take longer to get the job done. That means more heat is produced and that can melt the fat. And, since hand mixers usually have thin metal beaters, they aren’t very good at rubbing fat and sugar together. No, you have to have a stand mixer if you’re going to cream properly. And no, you can’t use your food processor. Believe me, I’ve tried. Is there an “unplugged” option? Well let’s put it this way, once upon a time people made cakes by hand, but they had something most of us don’t have today: servants.
Here’s how the Creaming Method works:
Sift together the Dry Goods. (See the information on sifting here.) That means any and all flours, your chemical leavening, salt and other dry spices—basically, everything but sugar.
Cream the solid fat and sugar(s), preferably with a stand mixer using the paddle attachment on medium speed, until light and fluffy. Okay, there I go using those vague terms of “light” and “fluffy.” Here’s when to stop: when you’re no longer able to see sugar granules, but you can still feel them if you rub a bit of the creamed fat between your fingers. Although you can overcream (and you’ll know that you have when your mixture moves from a smooth and homogeneous mixture to something akin to curdled milk), inadequate aeration (i.e. undercreaming) is far more common. As a rule of thumb, I like to see the volume of the fat increase by a third.
Add the eggs slowly. Many recipes call for adding eggs one at a time. I think that’s kinda silly, because in most cases that means adding water (in the form of egg whites) directly to fat. Since fats and water don’t get along very well, batters mixed this way tend to come together slowly. To get around this, mix the eggs together first so that the water in the egg whites can hook up with the emulsifiers in the yolks. Add them in a steady stream and the eggs will be absorbed in no time.
Drop the mixer speed to low and add the dry goods slowly, alternating the addition of the dry goods with any other liquid ingredients. Then stir in any bits and pieces like chocolate chips at the end.
Depending on the amount of liquid involved, the mixture produced may be a pourable batter (a cake) or a thick paste (a chocolate chip cookie). So your final step would be to pour the batter into or “drop” the cookies onto a pan and bake.
THE SUCCESS OF CREAMING depends in no small part on the temperature of the fat. Most recipes use the term “room temperature” as though it actually meant something. Depending on the season, my kitchen can range from 65° to 80°F, and that’s if I break down and use the air conditioner.
So, if butter is the fat in question, I break it out of the fridge and counter it until it hits between 65° and 70°F, maintaining the temp with a probe thermometer.
If shortening is the fat, I like 70°F or lower. During warm summer months, I keep my shortening tightly lidded (Tightly lidded because fats are quite good at picking up random flavors.) in the refrigerator so that it’s always ready. The nice thing about shortening is that it’s almost as easy to work with at 50° as 70°F. If you just can’t bring yourself to refrigerate shortening, you can always stick it in ice water.
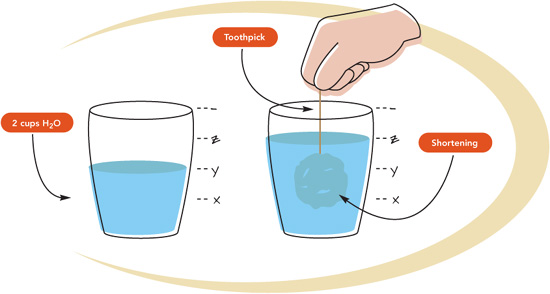
Shortening can be measured by volume and chilled at the same time by being placed in a measured amount of ice water. Simply submerge shortening with a skewer or fork and measure by displacement. Leave in water 5 minutes. Fish it out, dry on a paper towel, and go to work.
FEW THINGS CAN RUIN YOUR DAY LIKE a cake or loaf or muffin that refuses to let go of its cooking vessel. Proper pan prep can prevent such stubbornness. I grease and line every pan I bake with, even if the application doesn’t call for it. It only takes a couple of minutes to take out an insurance policy against such disasters…isn’t your baked good worth it?
I use one of the following three methods, depending on the target food.
Baker’s Joy. This is a spray lube that actually contains flour. So when some recipe (none herein, I hope) demands that you grease and flour, you can do it all with the push of a button. It’s the only manufactured pan release application I use in baking—and it’s especially good for Bundt pans, muffin tins, and any pan with hard-to-get spots. If you can’t get your hands on some, then there’s…
AB’s Kustom Kitchen Lube. Yep, make this stuff up right there at home. Just toss 2 cups of shortening into the ol’ stand mixer with 1 1/2 cups of all-purpose flour and mix it on low, just until the shortening sucks up the flour. Then hike the speed up to medium to aerate it a bit for easy application. Store it in a resealable plastic container and use it to lube up anything and everything. It’s good on just about any type of pan.
Lube pan with shortening. Why shortening and not butter? Because butter contains two things I don’t want under or around the sides of my baked good: water and protein. Butter may only contain some 15 percent water, but as that water changes to steam, it increases in volume by about a thousand times. That steam’s got to go someplace and it can wreak havoc as it does. Butter also contains proteins…so does Elmer’s glue. Enough said.
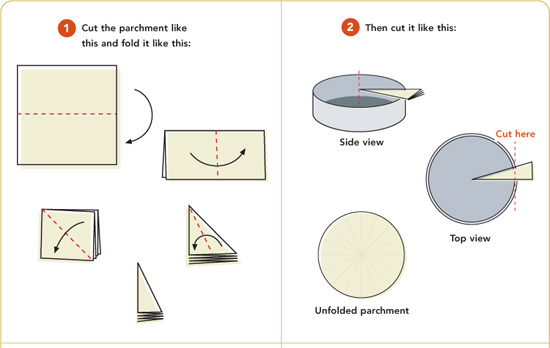
Parchment. (No, wax paper will not do. Parchment is impregnated with silicone, which is a wonderfully nonreactive substance (that means it doesn’t stick), and it’s very stable. Wax paper is nonreactive only as long as the wax isn’t melted. Line your cake and bread pans with wax paper only if you’re looking for a nice crayon flavor to infuse your foods.) I paper just about everything. Here’s how:
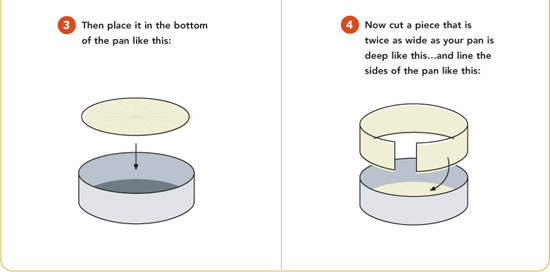
In the case of squares or rectangles, I generally make a sling, leaving two of the sides (the short ones on a loaf pan) greased only.
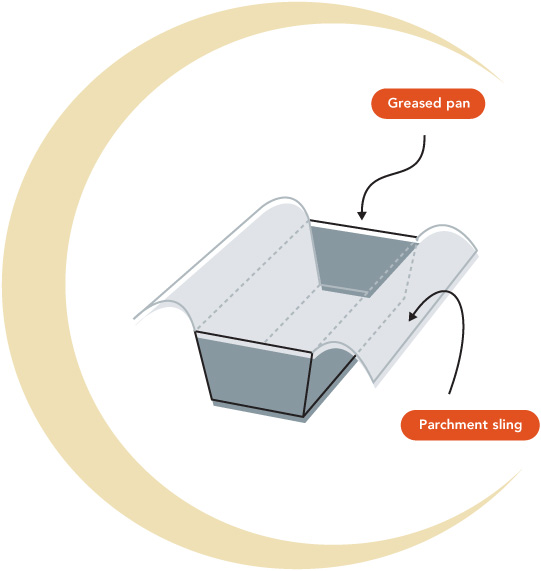
Another reason to love parchment paper: Often the starch and protein inside cookies hasn’t set all the way when it’s time to evacuate the oven. In these cases attempting removal via spatula can end in misshapen cookies or worse. By baking on parchment, you can simply slide the entire batch off to a cooling rack without touching a single cookie. That way the pan is free for another load and the cookies are safe and sound.
The two exceptions. Soufflé dishes get buttered then dusted with flour or grated cheese (see here) because the foam needs something to cling to as it climbs. Pans used for angel food cakes aren’t lubed at all, because the fat would break down the foam structure. That’s why you generally have to cut angel food cakes out of the pan with a knife…hence the two-piece tube pan.
Another really old recipe from the Brown family books.
Hardware:
Digital scale
Dry measuring cups
Wet measuring cups
Measuring spoons
Nutmeg grater or microplane
Chef’s knife
Cutting board
12-cup Bundt pan (This is the classic Bundt. The fancier flower and castle shapes usually have a 10=cup capacity.)
Food processor
Large mixing bowl
Whisk
Stand mixer with paddle attachment
Rubber or silicone spatula
Cooling rack


Apples: I like Galas.
Place an oven rack in position C and preheat the oven to 275°F.
Prepare the Bundt pan (see here) and set aside.
Assemble the ingredients via the CREAMING METHOD, folding in the apples and pecans last.
Pour the batter into the Bundt pan and bake until the internal temperature reaches 212°F, about 1 hour and 45 minutes.
Cool in pan for 15 minutes, then remove to rack to cool completely.
Wrapped tightly, this will keep for 5 days.
Yield: Serves 12
You’ll be sure that you’ve done something wrong when you’ve made this batter—it’s very loose for a cake. Don’t worry. It will be fine. In fact, this cake is so good that it doesn’t even need frosting, but I’ve given you a recipe anyway. And if you liked Hostess Cupcakes when you were growing up, this recipe comes pretty close. Just substitute a muffin tin for the cake pan, fill the cups (with or without paper inserts) three-quarters full, and bake for 15 to 20 minutes in a 350°F oven, rotating the pan half-way through. You’ll get about 2 dozen cupcakes.
Hardware:
9 x 3-inch round cake pan or 9 x 13-inch rectangular cake pan
Food processor
Digital scale
Dry measuring cups
Wet measuring cups
Measuring spoons
Large mixing bowl
Whisk
Stand mixer with paddle attachment
Rubber or silicone spatula
Cooling rack
Chef’s knife
Cutting board

Unlike most creaming procedures in which the sugar disappears into the butter, in this case the butter will completely and uniformly disappear into the sugar. That’s okay.

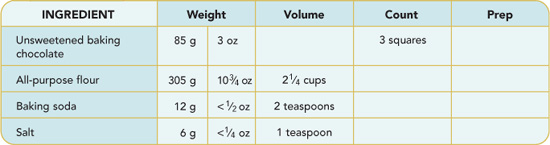
All-purpose flour: If you want a softer cake, you can substitute 10 ounces of cake flour. I like the A-P version better—it’s meatier.


Place an oven rack in position C and preheat the oven to 350°F.
Prep a 9 x 3-inch-deep round cake pan or a 9 x 13-inch rectangular pan (see here) and set aside.
Pulverize the chocolate in a food processor until there is nothing but chocolate dust and small chunks. Add the remaining Dry Goods and pulse several times until the chocolate and flour are completely homogenized. Set aside.
Beat together the eggs and the vanilla extract. Set aside.
Assemble all the ingredients, except the water, via the CREAMING METHOD, alternating three doses of the Dry Goods with two doses of the sour cream.
With the stand mixer on low, add the boiling water and continue mixing until a loose but uniform batter (with no lumps) is achieved.
Pour the batter into the prepared pan and bake for 1/2 hour at 350°F, then reduce the oven to 300°F and bake for another 1/2 hour. The cake is done when the internal temperature has reached 175° or 180°F. Although a toothpick inserted at mid-radius (halfway between the edge and the center) will come out clean, that same toothpick plunged into the center of the cake will come out gooey. Don’t mind that…the cake will continue to cook as it cools.
Remove the cake from the oven and let it sit in the pan for 15 minutes before turning it out onto a cooling rack. Allow the cake to cool completely before frosting.
If you’ve chosen the round option, split the cake into two or three layers (see here) before frosting. If you have chosen the rectangular option, frost and then cut into squares.
Yield: Serves 8 to 12
This is an interesting mixing method that you’ll often run into with very dense cakes and bars. It starts like a curd and finishes with the Creaming Method.
Hardware:
Digital scale
Wet measuring cups
Dry measuring cups
Measuring spoons
Food processor
8-inch square aluminum cake pan
Electric stand mixer fitted with whisk attachment
Medium saucepan
Medium mixing bowl
Balloon whisk
Rubber or silicone spatula
Parchment paper
Toothpick
Cooling rack
Pizza cutter
Don’t forget the frosting.


Place an oven rack in position C and preheat the oven to 350°F. Prepare an 8-inch square aluminum baking pan (see here).
Sift together the dry ingredients in the food processor.
In an electric stand mixer fitted with a whisk attachment, whip the eggs at medium speed until light (both in texture and color). Add the vanilla.
Mix the sugars together, reduce the mixer speed to 30-percent power, and add the sugars to the eggs, incorporating thoroughly.
Add the batter and remaining dry ingredients in three alternating doses starting with the wet and finishing with the dry. Fold in the nuts.
Pour the batter into the prepared pan and bake for 55-60 minutes. Check for doneness with the tried-and-true toothpick method: a toothpick inserted into the center of the pan should come out clean.
Remove the pan to a cooling rack and resist the temptation to cut until the brownies are completely cool. When ready, cut into squares with a pizza cutter.
Yield: Sixteen 2-inch-square brownies


Hardware:
For the frosting
Digital scale
Dry measuring cups
Measuring spoons
Medium saucepan
Rubber or silicone spatula or wooden spoon
Large mixing bowl
Electric hand mixer
Offset spatula for frosting
Combine the chocolate, cream, and butter in a saucepan and stir over medium heat until melted and smooth.
Remove from heat and use a hand mixer to beat in powdered sugar. When dissolved, place pan inside a bowl filled with ice, then crank an electric hand mixer to medium and beat until frosting lightens and holds its shape.
Yield: 3 1/2 cups
(Store in refrigerator for up to a week.)
If you’ve read my Gear book, you’ve seen a earlier version of this recipe. I liked it then, but I like it more now…hey, that’s how it is with recipes. Sure, some stay the same, but more often than not they evolve. Oh, and you’ll no doubt notice that although these are muffins, they’re not included in the Muffin Method section. That’s because these devices possess a texture more like a cake. So while Carrot Cake is a muffin, Bran Muffins are cakes.
Hardware:
Two 12-hole muffin tins
Digital scale
Dry measuring cups
Wet measuring cups
Measuring spoons
Food processor
Large mixing bowl
Stand mixer with paddle attachment
Rubber or silicone spatula
2 1/2-ounce disher
Instant-read thermometer or toothpick
Cooling rack


Place an oven rack in position C and preheat the oven to 400°F.
Prep the muffin tins (see here) and set aside.
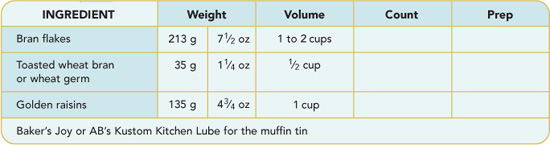
Assemble the batter via the CREAMING METHOD, but when you’re ready to add the Dry Goods, work in just half, then alternate with half of the buttermilk, then the remaining flour mixture, then the rest of buttermilk. Fold in the bran flakes, toasted wheat bran, and raisins and stir just until combined.
Using the disher, spoon the batter into the tins, filling them to the top (about 2 1/2 to 3 ounces).
Bake for 20 minutes, until the muffins reach an internal temperature of 210°F or a toothpick inserted into the center of a muffin comes out clean.
Allow the muffins to cool before taking them out of the tins. They’ll keep in an air-tight container for up to 5 days.
Yield: About 20 standard muffins
Note: This batter keeps in the fridge for up to 2 weeks. Allow an additional 5 to 7 minutes in the oven when you’re using refrigerated batter.
This application is interesting because it’s a hybrid—at first the batter goes together via creaming, then it finishes like a muffin. The result is not as rustic as an old-school muffin but not as refined as a cupcake.
Hardware:
12-hole muffin tin
Digital scale
Dry measuring cups
Wet measuring cups
Measuring spoons
Chef’s knife
Cutting board
Juicer
Zester or microplane grater (Or you can remove the orange zest (and only the zest, not the pith) with a peeler and mince it fine with a chef’s knife.)
Food processor
Large mixing bowl
Stand mixer with paddle attachment
Rubber or silicone spatula
2 1/2-ounce disher
Instant-read thermometer or toothpick


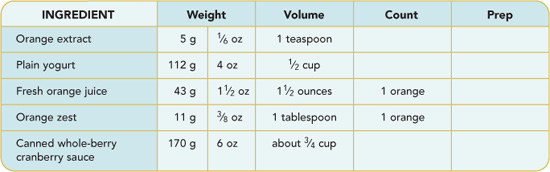
One recipe Streusel (see here) Baker’s Joy or AB’s Kustom Kitchen Lube for the muffin tins
Make the streusel according to the recipe here and set aside.
Prep the muffin tin (see here) and set aside.
Place an oven rack in position C and preheat the oven to 350°F.
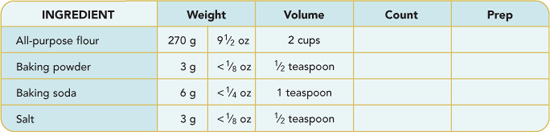
Combine the Dry Goods via the food processor and place in a large mixing bowl.
Assemble the batter via the CREAMING METHOD through Step 5, the integration of the Eggs into the Creamed.
Finish the batter via the MUFFIN METHOD, that is, combine the remaining Liquids and add them to the Creamed. Then dump all the wet ingredients onto the Dry Goods and stir until the batter just comes together.
Using the disher, scoop the batter into the tins, filling them to the top (2 1/2 to 3 ounces). Top with the Streusel and bake for 30 to 35 minutes, until the interior reaches a temperature of 210°F, or a toothpick inserted into the center of a muffin comes out clean.
Allow the muffins to cool before taking them out of the tins. These will keep, in an air-tight container, for up to 5 days.
Yield: 12 standard muffins
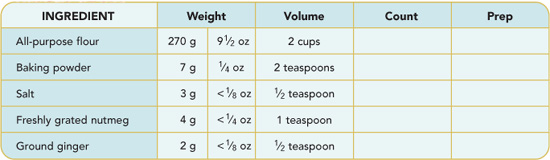
Like a gingersnap, only chewier. Note that you will refrigerate the dough overnight before baking.
Hardware:
Digital scale
Dry measuring cups
Wet measuring cups
Measuring spoons
Chef’s knife
Cutting board
Food processor
2 large mixing bowls
Stand mixer with paddle attachment
Rubber or silicone spatula
Wax paper
2 cookie sheets
Metal spatula
Cooling rack


Assemble the dough via the CREAMING METHOD and stir in the crystallized ginger.
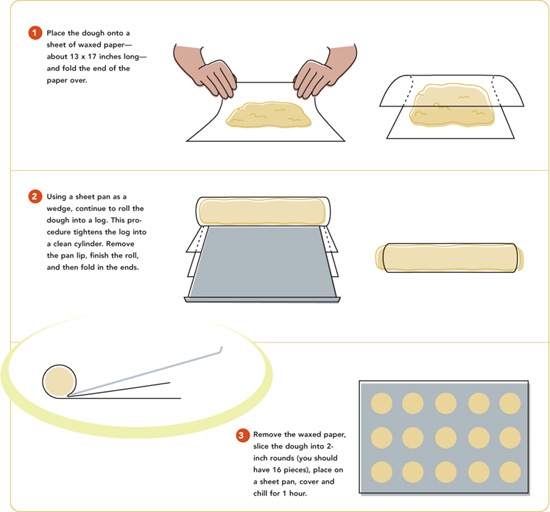
Roll the dough into two logs, 2 inches in diameter. Wrap them in wax paper, and refrigerate overnight.
The next day, place two oven racks in positions B and C and preheat the oven to 375°F.
Prep the cookie sheets (see here) and set aside.
Remove the dough from the refrigerator and cut each log into 1/4-inch slices.
Place the slices on the prepared cookie sheets, and bake for 8 to 10 minutes, until the cookies have soft set, (Meaning that the centers of the cookies have set, but the cookies are still soft.) rotating the pans after 4 minutes. (I move the pans from one rack to the other and rotate the trays front to back.)
Remove the pans from the oven and move the cookies onto a rack to cool.
Store in an air-tight container for up to 2 weeks.
Yield: Three dozen 2-inch cookies
ABOUT COOKIE PORTIONS

Once upon a time you could count on the numbers etched into the side or the sweeper of dishers. I love dishers and have about ten in different sizes. The problem is, you can’t trust them anymore. See, the number that’s etched on the side or on the sweeper itself is supposed to state how many scoops will make a quart—so a #32 is a 1-ounce portion. But not any more. These days you can find three different #20s, all different sizes. So, in order to come up with accurate yields (Yield accuracy goes downhill if you eat the batter straight from the bowl.) we’re going with 1-ounce cookies across the board. That means that you’ll have to weigh a few until you get the hang of what an ounce looks and feels like. When rolled into a rough sphere, it’ll range between a ping-pong ball and a golf ball, depending on the dough in question. If you think that a 1-ounce cookie is stingy, then just eat more cookies.
While we’re on the subject of yields, you may notice that the cookie recipes in this book, by and large, make a heap of cookies. If you don’t really want to bake that many, I suggest you make and scoop the entire batch, then place however many portions you don’t want to bake on a parchment-lined sheet pan and park them in the freezer overnight. When they’re hard as a rock, bag ’em in zip-top freezer bags and freeze for up to 6 months. When you’re ready to bake, move the blobs to a sheet pan before you turn on the oven. By the time the oven hits its target temp, the cookies will be thawed enough to bake. Or you can simply eat them like ice cream. Yes, I sometimes do this.
This is one of those types of cookies that people have strong feelings about. I know I can’t please everyone, but this comes pretty darned close to pleasing me.
Hardware:
2 cookie sheets
Digital scale
Dry measuring cups
Wet measuring cups
Measuring spoons
Food processor
2 large mixing bowls
Stand mixer with paddle attachment
1-ounce disher
Kitchen fork
Metal spatula
Cooling rack
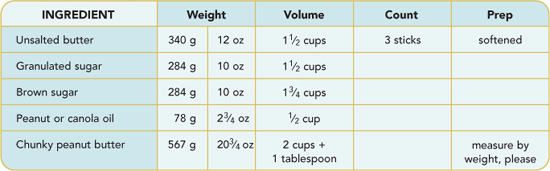
Peanut Butter: Please, in the name of all that is good and pure, weigh this stuff—especially this stuff.


Place oven racks in positions B and C and preheat the oven to 350°F.
Prep the cookie sheets (see here) and set aside.
Assemble the Dry Goods, then combine the butter and sugars via the CREAMING METHOD through Step 4.
When the butter-sugar mixture has lightened, drop the mixer speed to Low and add the oil and peanut butter in a single dose. Increase the mixer speed to 50 percent and cream for another 2 minutes until well combined.
Add the Liquid and finish mixing the dough via the CREAMING METHOD. (You’ll definitely have to scrape down the side of the bowl a couple of times.)
Place the dough in the refrigerator and chill for a half hour, then—using the disher—portion into golf ball–size balls and place them on the cookie sheets. Use a fork to press the dough down in two directions to create a criss-cross pattern.
Sprinkle the cookie tops with the additional granulated sugar.
Bake for 17 to 20 minutes, rotating the pans after 10 minutes, or until the cookies are lightly browned around the edges.
Remove from the oven and let the cookies sit for 2 minutes on the pans before removing them to a rack to cool completely.
The cookies will keep in an air-tight container for 2 weeks.
Yield: About 6 dozen cookies
This recipe calls for plain ole regular oatmeal. Don’t use quick, instant, or any of the fancy Irish stuff, which I do like, but not for cookies.
Hardware:
Digital scale
Dry measuring cups
Wet measuring cups
Measuring spoons
Food processor
2 large mixing bowls
Stand mixer with paddle attachment
1-ounce disher
Parchment paper, if using
2 cookie sheets
Metal spatula
Cooling rack


Place oven racks in positions B and C and preheat the oven to 375°F.
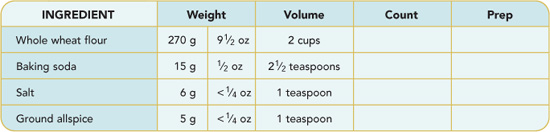
Assemble the dough via the CREAMING METHOD, stirring the oats and the raisins into the mix last.
Using the disher, scoop and drop the dough onto ungreased or parchment-lined cookie sheets, with each mound of dough at least 2 inches apart.
Bake for 15 to 17 minutes, rotating the pans after 8 minutes, until the cookies have begun to brown at the edges.
Remove from oven and hold the cookies on the baking sheets for 2 minutes before moving them to a rack to cool completely.
The cookies will keep in an air-tight container for 2 weeks.
Yield: About 6 dozen cookies
In terms of method, halfway between a banana bread and fruitcake, this application features another hybrid procedure beginning with the CREAMING METHOD and finishing with the MUFFIN METHOD.
Hardware:
9 x 5 x 2 3/4-inch nonstick loaf pan
Digital scale
Dry measuring cups
Wet measuring cups
Measuring spoons
Nutmeg grater or microplane
Chef’s knife
Cutting board
Food processor
Large mixing bowl
Small mixing bowl
Whisk
Stand mixer with paddle attachment
Rubber or silicone spatula
Instant-read thermometer or toothpick
Cooling rack


Soak the figs in the boiling water for 20 to 30 minutes until softened.
Place an oven rack in position C and preheat the oven to 375°F.
Prep the loaf pan (see here) and set aside.
Assemble the Dry Goods, the Creamed, and the Eggs via the CREAMING METHOD through Step 5.
Add the milk to the creamed ingredients.
Drain the figs and chop them into a small dice.
Apply the MUFFIN METHOD by adding the wet ingredients to the dry and stirring just until combined.
Fold in the figs and hazelnuts. Pour the batter into the prepared loaf pan and bake for 50 to 60 minutes, until the internal temperature reaches 210°F, or a toothpick inserted in the center of the loaf comes out clean.
Remove the bread from the pan and place on a rack to cool before slicing.
Wrapped and refrigerated, this will keep for a month. You can also freeze it for up to 3 months.
Yield: One 9-inch loaf
When I was a kid I had an affinity for prepackaged pastries filled with fruity goodness and designed to slide down the gullet of a toaster, (The toaster, developed at the dawn of the twentieth century, is probably America’s greatest contribution to the culinary world. As the first electric kitchen appliance to be mass marketed (and mass purchased), the toaster heralded a new era.) which just happened to be the one heat-emitting culinary device my mom allowed me to use. I consumed thousands of these deadly devices as a child, but when my big boy teeth came in I dispensed with such childishness. But then about a year ago I started thinking that those tidy rectangles might be just the thing to snap me out of the monotony of my grab-n-go breakfast malaise. So I picked some up and…they tasted horrible. Clearly, my tastes had changed. But I didn’t want to give up on the treat I had once enjoyed—so I decided to make them myself. After much trial-and-error, here’s the result—and a fine result it is.
Hardware:
Digital scale
Dry measuring cups
Wet measuring cups
Measuring spoons
Food processor
Large mixing bowl
2 small mixing bowls
Whisk
Stand mixer with paddle attachment
Rubber or silicone spatula
Wax paper
2 sheet pans
Rolling pin (preferably the French kind)

Bench scraper
Kitchen fork
Cooling rack


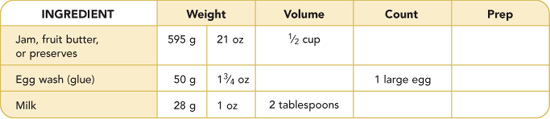
Jam: More and you’re likely to pop your tart from overfilling.
Assemble the dough via the CREAMING METHOD, alternating 3 doses of the dry mixture with 2 doses of milk.
Place oven racks in positions B and C and preheat the oven to 350°F.
Get out several of your favorite jams, preserves, and butters—as in apple butter.
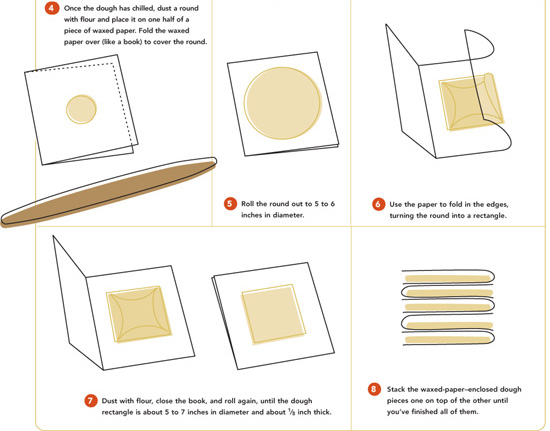
When the dough is chilled, get ready to roll. (As is true of just about every pastry dough on the planet, the cooler the work environment the easier the task. I’ve got a screened-in porch with a wooden table, so on cool evenings I roll out there. It’s sorta peaceful like.)
Take a look at your pieces and try to pair them up. Sure, in a perfect world they’d all be exactly alike. This is not a perfect world, so try to match up good pairs.
Mix up your egg wash—actually, you should have done that while the dough was chilling. What’s the matter with you anyway?
Now follow the pictures:

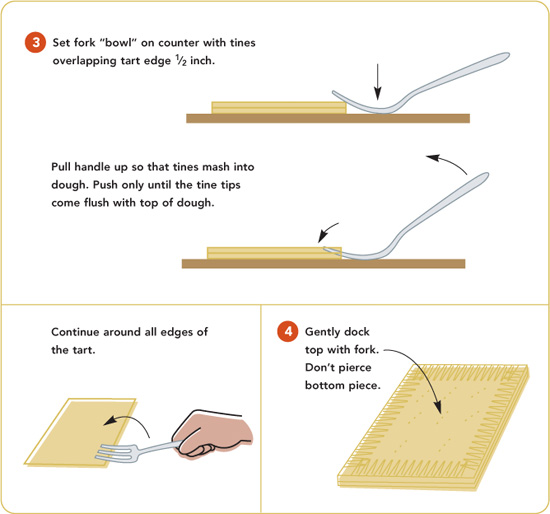
The forking, or “docking,” is crucial. If you skip this step, the water inside the preserves will blow the tarts up like balloons. But beware—if you poke with too much gusto, you might go through the bottom piece of dough, and preserves will ooze out the bottom where the sugar will fuse to the pan. Chisels will be required to remove the baked-on mess.
Bake for 25 minutes, or until the edges are just starting to brown. Remove from the oven and place on a rack to cool for about 15 minutes, then eat one with a glass of milk. Cool the rest thoroughly and store in a zip-top bag for about a week. (Or wrap them individually and freeze for up to a month.) To reheat, insert into your friendly neighborhood toaster and enjoy.
Yield: 8 tarts
Note: Yes, you could frost these, but I really don’t think that…oh, okay. In a small bowl slowly whisk 4 ounces of confectioners’ sugar into 2 tablespoons whole milk, then paint on to the front of the tarts. Allow to dry before stacking, storing, or snarfing.
I have no idea where this recipe came from, but since it calls for “sweet” milk, I have to think that it’s at least forty years old, if not older. (Sweet milk is simply regular whole milk. In the days when people churned their own butter, buttermilk (the natural residue of the churned butter) was much more common on this country’s tables. In fact, it was so common that many recipes—especially Southern recipes—distinguished whole milk from buttermilk by referring to it as “sweet.”) If you want to kick up the chocolate “a few notches,” then consider making a slurry of the milk and cocoa powder and bringing it to a boil in the microwave (a couple of minutes does it in mine). The boiling liquid “opens up” the chocolate, giving you more bang for your nib, so to speak. That said, this cake is just dandy the way it is described below.
Hardware:
10-inch aluminum tube pan
Digital scale
Dry measuring cups
Wet measuring cups
Measuring spoons
Food processor
Large mixing bowl
Small mixing bowl
Whisk
Stand mixer with paddle attachment
Rubber or silicone spatula
Cooling rack


Place an oven rack in position B and preheat the oven to 325°F.
Prep a 10-inch tube pan (see here) and set aside.
Assemble the batter via the CREAMING METHOD, alternating additions of the flour/cocoa mixture with the milk. Given the amounts involved, start with dry and end with dry.
Pour the batter into the pan and bake for 1 hour and 20 minutes, until the internal temperature hits 212°F, or the cake leaves the sides of the pan.
Remove the cake from the oven and allow to cool 15 minutes in the pan, then turn out onto a rack to cool thoroughly.
It will keep, tightly wrapped at room temperature, for 1 week.
Yield: One 10-inch cake
It’s the buttermilk that makes this so gosh-darned good. All that acid gets with the soda and takes care of business. If you’ve never ever made a cake, this is a good place to start. It’s good toasted for breakfast, too, and leftovers make for a very nice bread pudding…if it lasts that long.
Hardware:
12-cup tube or Bundt pan
Digital scale
Dry measuring cups
Wet measuring cups
Measuring spoons
Food processor
Large mixing bowl
Small mixing bowl
Whisk
Stand mixer with paddle attachment
Rubber or silicone spatula
Cooling rack


Place an oven rack in position B and preheat the oven to 325°F.
Prep a tube or Bundt pan (see here) and set aside.
Assemble the batter via the CREAMING METHOD, alternating additions of the Dry Goods with the Liquid.
Pour the batter into the pan and bake for 1 hour, or until the cake pulls away from the sides of the pan and the internal temperature hits 212°F.
Remove from the oven and allow to cool 15 minutes in the pan, then turn out onto a rack to cool thoroughly. Tightly wrapped at room temp, the cake will keep for 1 week.
Yield: Serves 6 to 8