
At one time I was going to call this last section the “blender” method. All the recipes would be assembled in said appliance and each leavened in the oven by nothing more than the turning of water to steam. But then I realized that to do this would mean leaving out one of the great steam-leavened devices of all time. So I’ve decided to break ranks with the rest of the book because it simply makes sense to do so—at least when considering… the Curious Case of Crepes, Popovers, and Pâte à Choux.
As you’ll soon see (if it hadn’t crossed your mind already) crepes and popovers are made from nearly identical batters. One stays flat because it’s cooked in a flat pan. The other puffs up like a cathedral (with a big empty space inside, to boot) when cooked in a muffin tin or popover pan in a very hot oven. Although constructed from a similar grocery list, Pâte à Choux, or choux paste, differs from crepes or popovers in that its batter is firm and moldable rather than the consistency of heavy cream. That means it can be piped into things like éclairs and cream puffs. How can this be? By cooking this batter on the stove top first, the starch in the flour is gelatinized, thus soaking up and holding on to the water. The resulting dough is every bit as wet as a crepe batter, it’s just a lot more viscous—ain’t science fun?
Let’s make some of each, shall we?
If a formula contains more liquid than flour, or liquid or melted fat, or no chemical or biological leavening, then the food is leavened only by the steam created during cooking. Two examples that jump to mind (and stomach) are crepes and popovers. I realize that one is expected to climb high while the other is as flat as…well, actually, flatter than a pancake, but the difference isn’t in the composition of the batter, it’s in the way the batter is handled after it’s made. Crepes and popovers are worth talking about because they are extremely versatile, and ridiculously easy to make, mainly because you can make them in a blender.
 It’s effective.
It’s fast.
It aerates well.
It’s easier to clean than a mixer bowl.
Hardware:
Digital scale
Dry measuring cups
Wet measuring cups
Measuring spoons
Blender
For the crepes:
8 to 10-inch non-stick pan (see CREPE PANS, here)
1 to 2-ounce ladle
Silicone spatula or narrow wooden spatula
Kitchen timer or stopwatch
Basting brush or natural-bristle paintbrush (preferably never used with paint)
For the popovers:
1 six-hole muffin tin or popover pan
Basting brush or natural-bristle paintbrush (preferably never used with paint)

If the fat in question is drippings from a standing rib roast or some other roast critter, the resulting popovers will be what’s called Yorkshire pudding. If you use butter, it’s just a popover…but that’s okay. What you can’t do is use shortening or oil. You need butter. Why? You tell me. I’ll wait…. Right, butter contains milk solids and proteins that add to browning. Not to mention the fact that butter is close to 15 percent water and that water is going to turn to steam, giving the popover even more lift.
A blender carafe can be a darned violent place. You don’t want the liquid and the flour spinning around in there any longer than necessary or you could end up with a gluten network so tough it would make a gill net blush. So start by placing all the liquids (including fats), eggs, salt, sugar, and flavorings such as vanilla extract in the carafe and blend to combine. Then stop the machine, add the flour, put the lid back on (Do I really need to be telling you that?) and blend again, on low, for no more than 10 seconds total. Note that I say “low” because all the blenders that I have and like only have three settings, including off. If you have one of those blenders that has fifteen buttons, just push one in the middle. By the way, what is the difference between purée and frappe? When measuring, I put the blender carafe on the scale, hit the tare function, and just measure all the Wet Works right into it.
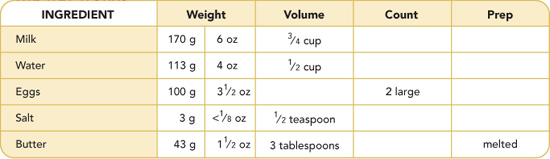
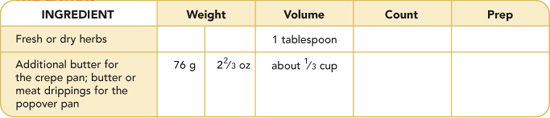
Place the milk, water, eggs, salt, melted butter, and herbs, if using, in the blender and blend smooth, about 10 seconds or so.
Add the flour and blend in bursts until smooth, about 10 more seconds.
If you’re planning to make crepes, refrigerate at least one hour. (Skip this step and you’ll have big holes and bubbles in your crepes.) The batter will keep for up to 48 hours.
Why “rest” the batter? Keep in mind that when liquidous matter is spun in a blender (and what that goes into a blender doesn’t end up “liquidous” in the end?) you get a swirling vortex like this:

Such a vortex is very good for aerating mixtures. So, right after mixing, there are zillions of bubbles in your batter. If you attempt to cook a crepe, those bubbles would blow up and either tear round holes in your crepe or make it lumpy. By resting the batter for an hour, most (but not all) of those bubbles will work themselves out. Also, chilling the batter will make it easier to deal with when it’s going into the pan because it won’t run around like water.
Heat a non-stick skillet over medium heat until a drop of water jumps and sizzles away. Add a teaspoon of butter and, using a clean paint brush (natural bristle only) or pastry brush, paint the bottom and side of the pan with butter.
Pour 1 ounce of batter into the center of the pan and swirl to spread.
Cook for 30 seconds, then flip and cook another 10 seconds then serve—or remove to a rack and cool. (The first crepe will be for the dog. Trust me. I’m not sure if it has to do with heat moderation or the amount of fat, but I’ve never managed to make the first of the batch turn out.) Don’t stack them until they’ve cooled, or they will stick together. Once cool, you can stack them and store in sealable plastic bags in the refrigerator for several days. To freeze, place wax paper between the crepes and seal stack in a zip-top freezer bag. (If you plan on serving the crepes right away but need to make several before you can serve, roll the warm crepes and store under plastic wrap and a clean kitchen towel.)
For sweet crepes, add 2 1/2 tablespoons sugar, 1 teaspoon vanilla extract, and 2 tablespoons of your favorite liqueur to the batter.

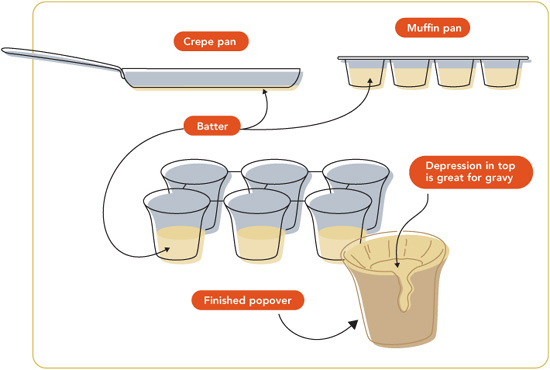
A crepe is flat, a popover towering and tall—how can both come from one batter? The aforementioned bubbles notwithstanding, it all comes down to the shape of the vessel.
The crepe doesn’t rise beyond a millimeter because the steam simply escapes across the wide expanse of the surface. Since the recesses in a popover or muffin pan are relatively narrow and deep, the steam has nowhere to go but up, taking the batter with it. Popover procedures generally call for an oven that’s at 450° to 500°F. Since the batter is high moisture, steam forms and drives upward before the protein or starch has an opportunity to set.
Heat oven to 450°F and place lightly greased muffin tin or popover pan on a rack in position C.
When the oven and pan are rippin’ hot, pour 1 tablespoon of the fat into the bottom of each cup to coat.
Pour enough batter in each hole to come just a little more than halfway up the side and bake for 15 minutes.
Reduce the oven to 350°F and bake another 10 minutes. The popovers should rise a good 1 to 1 1/2 inches out of the cup and turn golden brown and delicious.
CREPE PANS

When it comes to crepe pans, you don’t just want non-stick, you want slick. The slicker the better. In my experience, this is a surface that usually only comes on aluminum pans. Look for them at restaurant-supply houses.
When you think you’ve found one, there are two little tests you should run. Hold the pan in one hand and close your eyes. Then run the fingertips of your other hand across the floor of the pan. Is it smooth, or textured and rough? If it’s rough, even though it may be a non-stick pan, it won’t be slippery enough for crepes. If it is sufficiently slick move to the second part of the test: with your eyes still closed, run your fingertips across the floor of the pan toward the edge. If you can feel a clear break point between the floor and the shoulder, you potentially have a great crepe pan on your hands. If the floor simply sweeps up to the lip, you’ve got an omelet pan—good for flipping, but not so good for forming a clean, round shape.
As for actual crepe pans which feature very short sides, all I can say is that if you cook crepes every day, okay. Otherwise, it’s a unitasker and if you know anything about me you know I just cannot tolerate a unitasker.
Since there’s so much more heat around the perimeter of the batter, the walls are going to rise quickly leaving a hole in the middle.
This is normal. Just consider yourself lucky. Now you have a place to pour your gravy.
Note: What to do with leftover popovers? I have a friend whose name shall remain unspoken who takes the soft shriveled leftover popovers, lines them up in a deep casserole, pours cream and cheese over them and bakes the whole mess at 400°F. The steam from the cream moves into the popovers and pops them again. When it’s brown she serves it like a casserole. Sound disgusting? It is…not.
(What happens when Pâte à Choux meets the county fair.)
Hardware:
3 small glass bowls for separating eggs
Large, deep frying pan or cast-iron skillet
Medium-sized heavy-bottomed saucepan
Wooden spoon or rubber spatula
Stand mixer fitted with paddle attachment
Plastic freezer bag or piping bag fitted with #12 pastry tip
Pancake turner
Cooling rack
Paper towels or sheets of newspaper


Heat about 1 1/2 inches of oil in a pan to 375°F.
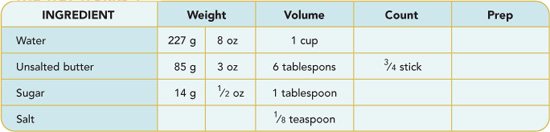
In a heavy-bottomed saucepan, combine the water, butter, sugar, and salt and bring to a boil.
Add the flour and stir with a wooden spoon or rubber spatula until it is completely incorporated and the dough forms a ball. Transfer the dough into the bowl of an electric stand mixer fitted with the paddle attachment and let cool for 3 to 4 minutes.
With the mixer on stir or its lowest speed, add the eggs and the egg whites, 1 at a time, making sure the first egg is completely incorporated before continuing. Once all eggs have been added and the mixture is smooth put the dough into a plastic freezer bag with one lower corner snipped off, or a piping bag fitted with a #12 tip.
Pipe the dough into the hot oil, making a free-form lattice pattern and cook until brown, flipping once using a pancake turner. Remove cake from oil, drain on a cooling rack placed over paper towels or newspaper, and top with powdered sugar. Continue until all of the batter is used.
Yield: 10 cakes
The literal translation from the French of pâte à choux is “paste of cabbage.” I guess if you tried hard you might make something that looks like…actually I can’t imagine anything about this stuff that looks like cabbage—those wacky French! Pâte à choux (It’s also called choux paste, choux pastry, or just cream-puff pastry.) is made like no other type of pastry dough. The dough is sticky and, yes, paste-like, and the addition of eggs makes for large, irregular puffs. This is a pastry that’s made for filling—you can poke a hole in the side and pipe in pastry cream or split and fill them with ice cream; a savory puff can be filled with chicken salad or any other combination of ingredients.
Hardware:
Digital scale
3 bowls for separating eggs
Large metal bowl
Stand mixer, electric hand mixer, or balloon whisk
Dry measuring cups
Wet measuring cups
Medium saucepan
Wooden spoon
Pastry bag fitted with round tip or plastic bag with one corner snipped off
Parchment paper
2 half sheet pans or jellyroll pans
Paring knife


Place an oven rack in position B and preheat to 425°F.
Line 2 half sheet or jellyroll pans with parchment and set aside.
Combine the water, butter, sugar, and salt in a medium saucepan over medium heat and bring to a boil, stirring occasionally.
Add in the flour and remove from heat. Work the flour into the liquid mixture and return to the heat, continuing to work it until all the flour is incorporated and the mixture forms a ball.
Transfer the mixture into the bowl of a stand mixer and let cool for 3 or 4 minutes. With the mixer set for Stir or the lowest speed, add the eggs, 1 at a time, making sure each egg is completely incorporated before continuing.
Once all the eggs have been added and the mixture is smooth, immediately place the dough into a plastic bag with one corner cut off, or a pastry bag fitted with a round tip. Pipe the pâte à choux into golf ball–size shapes onto the parchment-lined sheet pans. Space them 2 inches apart from each other.
Bake for 10 minutes, then turn the oven down to 350°F and bake another 10 minutes, or until golden brown.
Remove the pâte à choux from the oven and immediately pierce them with a paring knife to release steam.
Unfilled, these will keep air-tight in a zip-top bag for 3 days, or freeze for up to two months.
Yield: 4 dozen bite-size cream puffs
To make savory pâte à choux, omit the sugar and increase the amount of salt to 1 teaspoon.