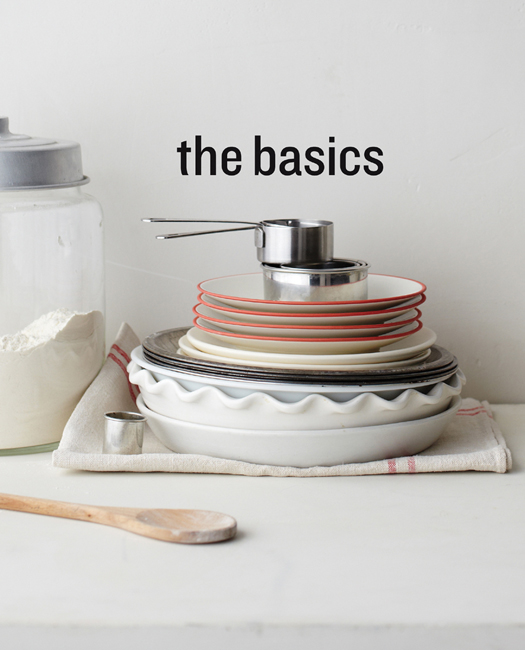
On the pages that follow, you should find everything you need to know in order to produce consistently beautiful, delicious pies and tarts. We’ve included ingredient and equipment glossaries, as well as illustrated techniques. You’ll learn to properly roll out dough, weave a lattice crust, make a meringue topping, and more. You’ll also find essential recipes for the most frequently used crusts, fillings, and finishes.

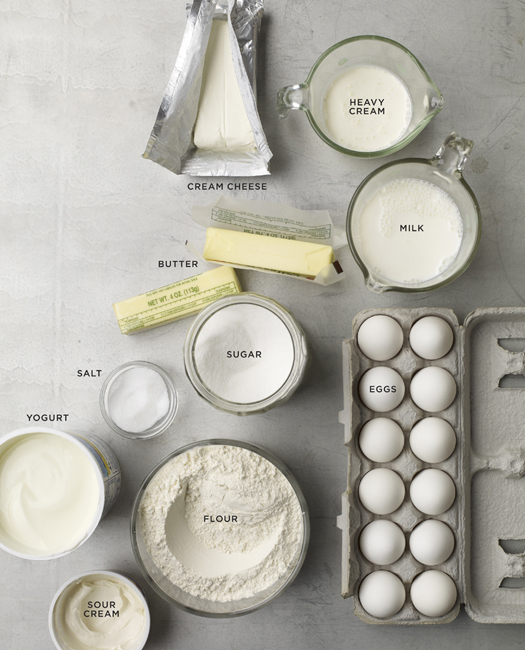
FLOUR When mixed with water, flour forms the gluten proteins that give baked goods their structure. All-purpose flour has just the right amount of protein for most pie dough—producing crusts that are neither too tough nor too crumbly—and is used for nearly all of the crusts in this book. The exception is puff pastry, which requires a small amount of cake flour (not the self-rising variety) along with all-purpose flour to achieve a lofty, lightweight texture. Flour can be used as a thickener in fruit pies as well, and is used in almost every pie recipe for dusting a work surface when rolling out dough. Store flour in an airtight container at room temperature up to one year. See here for tips on how to properly measure flour.
BUTTER Fat is what gives pastry crusts their flaky layers and tender texture. Butter is most commonly used in the recipes in this book because of its incomparably pure, rich flavor. When cut into flour to make dough, butter should be very cold; warmer butter will begin to melt as you work with it, resulting in a tough—not flaky—crust. Butter is also melted and tossed with cookie crumbs to make crumb crusts, stirred into creams and curds, and dabbed onto fruit fillings before baking to help them thicken. Choose unsalted butter, and start with fresh sticks: Since butter readily absorbs odors from the foods around it, older butter may impart an off taste to baked goods. Butter freezes nicely for up to six months (thaw overnight in the refrigerator before using).
SUGAR White granulated sugar, made from refined sugarcane or sugar beet, is the most widely used variety, especially for baking. Sanding sugar has large crystals and is better for decoration: Sprinkle it over a top crust that’s been brushed with an egg wash before baking for a sparkly finish. Turbinado sugar and other “brownulated” sugars can be used in place of sanding sugar in some recipes. Confectioners’ sugar dissolves easily into whipped toppings, and can be dusted over the top of a finished dessert. It often forms clumps, so you may want to sift with a fine sieve before using. Brown sugar is a combination of granulated sugar and molasses; dark-brown sugar has a higher molasses content than light-brown sugar, and a deeper color and flavor. See here for how to measure brown sugar. After opening, seal the package securely or transfer brown sugar to an airtight container to keep it from hardening. (To soften hard brown sugar, place a wedge of apple in the bag and reseal; leave a day or two, until sugar is sufficiently soft, then remove apple.)
SALT A little bit of salt in any recipe—sweet or savory—enhances the primary flavors. The recipes in this book call for salt (table salt), coarse salt (kosher salt), or, in a few recipes, sea salt, such as fleur de sel or Maldon. If you don’t have coarse salt, you can substitute table salt—just use about a quarter of the amount called for. Do not, however, substitute table salt for sea salts, which are used primarily for flavor; table salt doesn’t compare.
EGGS Eggs are the basis for custards, curds, and pastry cream; the whites form the structure of airy meringues. Certain pastry doughs—such as pâte sucrée and pasta frolla—contain eggs as well: The fat in the egg yolks makes these crusts more tender, while the additional protein simultaneously strengthens them. Use large room-temperature eggs. If separating yolks from whites, do so while eggs are still cold, then bring them to room temperature.
HEAVY CREAM Sweetened or unsweetened whipped cream is a favorite pie topping (for a recipe). Use heavy cream (or whipping cream); light cream will not whip. Cream can also be brushed onto a piecrust, on its own or combined with a beaten egg in an egg wash.
MILK Combine milk with egg yolks, sugar, and cornstarch to make custard or pastry cream. Whole milk is used for the recipes in this book.
CREAM CHEESE Pie dough made with cream cheese is easy to work with; the finished crust has a tender texture. Cream cheese can also be incorporated into baked or unbaked fillings.
SOUR CREAM The addition of sour cream (or its French cousin, crème fraîche) gives baked custard fillings a tangy flavor that pairs especially well with fresh fruit toppings.
YOGURT An unbaked filling, such as mousse made with yogurt, can be a fresh-tasting alternative to pastry cream. Use plain, full-fat yogurt for the recipes in this book unless otherwise specified.
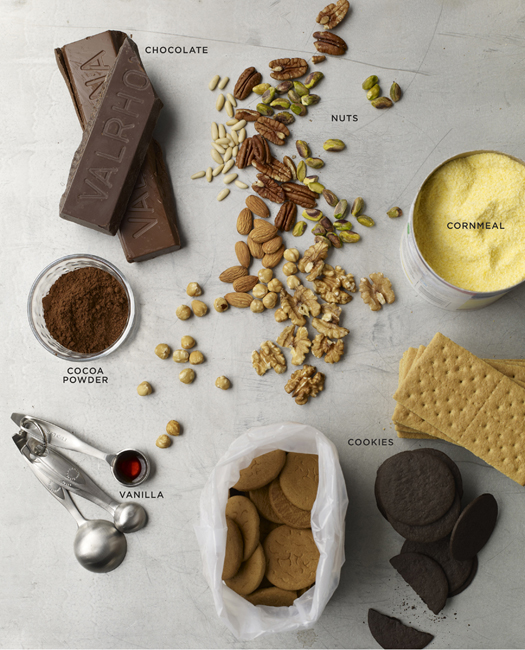
NUTS Nuts may be used whole as the main component of a pie or tart filling, or finely chopped and mixed into a crust. Almonds and other nuts, such as hazelnuts, are used to make frangipane, a rich batter for fruit tarts and other classic French desserts. Nuts are naturally high in oils, which give them their rich flavor but also cause them to turn rancid quickly. Buy nuts from a source with high turnover, and store them in an airtight bag or container in the freezer for up to six months.
COOKIES A press-in cookie-crumb crust is easy to make and is the traditional choice for many cream pies and icebox pies. Graham crackers are common, as are chocolate and vanilla wafers (such as Nabisco Famous Wafers and Nilla Wafers), gingersnaps, and shortbread (such as Walkers). All cookies can be ground in a food processor; or, if you don’t have a food processor, place them in a large resealable plastic bag and crush them with a rolling pin. Prepackaged graham-cracker crumbs are also sold in most supermarkets. For measuring purposes, in this book the term “graham cracker sheet” refers to a 5-by-2½-inch rectangle.
CORNMEAL Incorporating stone-ground cornmeal—white or yellow—into a crust along with the flour adds a delightful crunch. Store cornmeal in an airtight bag or container, away from sources of heat and light, and be sure to check the sell-by date on the bag; it has a shorter shelf life than flours and other dry ingredients.
CHOCOLATE Solid chocolate is used in many applications in pie and tart making, including ganache and cream fillings. It can also be melted and drizzled over desserts or shaved into curls for garnishes. When buying chocolate for baking, look for the best quality bar, block, or chips you can find; Valhrona, Callebaut, El Rey, and Scharffen Berger are all premium brands. The higher the percentage of cacao (often noted on the label), the deeper the flavor. Milk chocolate must contain a minimum of 10 percent cacao, while unsweetened chocolate is 100 percent; dark chocolate (including bittersweet and semisweet) contains at least 35 percent. We like semisweet chocolate with 55 percent cacao, and dark chocolate with at least 70 percent. Use a serrated knife to finely chop chocolate, or a vegetable peeler to make chocolate curls.
COCOA POWDER You’ll find two types of cocoa powder available for baking: natural (sometimes called “nonalkalized cocoa”) and Dutch-process, which is treated with an alkaline solution that reduces cocoa’s natural acidity and gives the powder a milder flavor and darker color. Use the type of cocoa specified in the recipe. If it is not specified, either type should work fine.
VANILLA Always choose extract labeled “pure”—never “imitation.” Some recipes call for vanilla beans instead of extract for a more complex flavor and fragrance. To release the seeds, lay the bean flat on a cutting board; holding one end, slice it open lengthwise with a paring knife, then run knife along each cut side. You can generally substitute 1 tablespoon extract for the seeds of one whole bean. Save the pod and use it to make vanilla sugar, which is excellent for baking or sweetening drinks: Place split pod in a jar of sugar, seal the lid, and leave for at least a week (shake daily to distribute flavor); use sugar within several months.

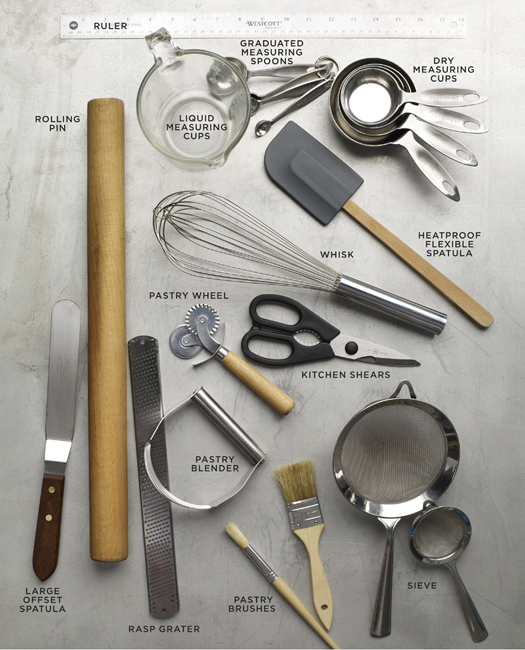
DRY MEASURING CUPS Dry ingredients (such as flour and sugar) and semisolid ingredients (such as jam, sour cream, and peanut butter) should be measured in graduated dry measuring cups. Level ingredients with a straightedge, such as an offset spatula, for the most accurate measurements. See here for more on measuring dry ingredients.
LIQUID MEASURING CUPS Use a clear liquid measuring cup (preferably made of heat-resistant glass) with a spout and a handle to measure liquid ingredients. Set the cup on a flat surface, and read measurements at eye level.
GRADUATED MEASURING SPOONS Measure both dry and liquid ingredients with a set of graduated metal measuring spoons. Level dry ingredients, such as salt, with a straightedge; pour liquids, such as vanilla extract, to the rim of the spoon. Never measure directly over the bowl.
SIEVE A fine-mesh sieve can be used to sift ingredients (such as flour or cocoa powder) into a bowl, or to dust confectioners’ sugar or cocoa over the top of a baked pie or tart as a garnish.
RASP GRATER The small, sharp blades of a rasp grater are perfect for zesting citrus fruits: they remove the flavorful zest but leave the bitter white pith behind. A rasp grater can also be used to finely grate chocolate, nutmeg, and fresh ginger.
WHISK A whisk with a bulbous shape, also called a balloon whisk, quickly and thoroughly incorporates dry and liquid ingredients, and is also used to whip heavy cream by hand. Choose a sturdy stainless-steel whisk that won’t bend out of shape.
HEATPROOF FLEXIBLE SPATULA A silicone spatula (which is heatproof, unlike a rubber one) is handy for transferring custards, creams, and batters from a bowl or pan, and for evenly spreading fillings and toppings.
PASTRY BLENDER Use a pastry blender to cut butter into dry ingredients by hand (some bakers prefer this tool to a food processor). Press down and turn with the pastry blender to work the butter into the flour, taking care not to overwork it.
ROLLING PIN The most common rolling pin design features two handles on an axis around which the pin rotates. Many professional bakers, however, prefer a long, slender wooden pin without handles or tapered ends, as this type allows for the most control and lets you “feel” the dough as you roll. Whichever you choose, opt for a longer pin that will accommodate a large piecrust. Wood is the standard, but marble is an excellent choice (and Martha’s favorite) because it stays cool as you work and is less likely to stick to the dough.
PASTRY WHEEL Use a double-sided pastry wheel to create lattice strips or to cut straight edges for free-form pies; the fluted wheel creates scalloped edges. For straight-edged strips, you can use a pizza cutter in place of a pastry wheel.
RULER Using a ruler ensures perfectly even lattice strips. It’s also handy for measuring dough as you roll it out on a work surface. A long ruler (such as 18 inches) is most helpful.
LARGE OFFSET SPATULA To release dough that is beginning to stick to the work surface, slide an offset spatula at least 10 inches long underneath. Do this periodically as you roll, and lightly flour the spatula if necessary.
KITCHEN SHEARS Trim excess dough from the edges of bottom and top crusts with a pair of kitchen shears; they’re easier to maneuver than a knife.
PASTRY BRUSHES Choose pastry brushes with natural, tightly woven bristles that are securely attached to the handle, and label one brush for dry tasks and one for wet. Use a large brush to remove excess flour from rolled-out dough and to apply glazes and egg washes to piecrusts; use a small brush to apply egg wash to appliquéd or shingled piecrusts. Let brushes dry completely before storing.
OVEN THERMOMETER Because oven temperature is critical to successful baking, an oven thermometer is one of the baker’s most important gadgets. Place it in the center of your oven to monitor the temperature, and adjust your oven’s dial accordingly.
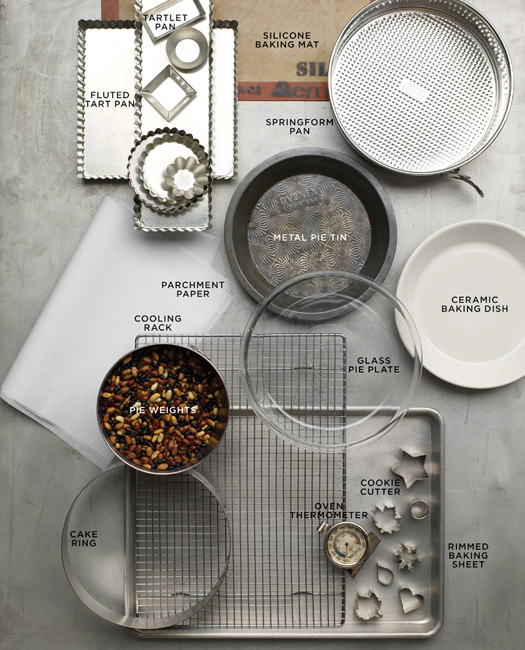
RIMMED BAKING SHEET Juicy fruit pies can bubble and drip during baking, making a mess of your oven. To protect your oven and for easier cleanup, set the pie on a rimmed baking sheet lined with parchment paper or a silicone baking mat. You can also use a rimmed baking sheet to hold a batch of tartlets or miniature pies as they bake, and to bake a rectangular “slab” pie.
PARCHMENT PAPER With a multitude of uses, this heat-resistant, nonstick, disposable paper is indispensable in the kitchen. Use it to line your work surface, to contain pie weights when blind-baking pastry shells, and to line baking sheets beneath pie plates. Waxed paper is not an acceptable substitute.
SILICONE BAKING MAT A reusable, versatile alternative to parchment paper, a silicone baking mat provides a nonstick surface for baked goods. Use it to line a baking sheet underneath a fruit pie, as described above, or when baking cookie-like tuile tartlet shells, such as those on here.
COOLING RACK A raised wire rack allows air to circulate around baked goods as they cool. Choose a rack with stainless steel mesh and feet on the bottom, with bars that go in both directions.
COOKIE CUTTER Double-crust pies require vents or holes to let steam escape as they bake. These are usually cut with a sharp knife, but for a decorative touch, use a small cookie cutter instead. You can then appliqué the cutout shapes to the top crust with a bit of egg wash (cutouts can also be used to decorate the edges of single-crust pies, as shown on here, or to top jam tartlets such as the ones on here).
PIE WEIGHTS You can buy ceramic or metal pie weights at baking-supply stores, or use dried beans or rice. All prevent a blind-baked crust from shrinking and puffing up as it bakes.
GLASS PIE PLATE Tempered glass (such as Pyrex) is the best choice for pie plates, as it disperses heat well, allowing for more even browning. The clear glass also lets you see the color of the bottom crust as it bakes.
METAL PIE TIN Although it does not conduct heat as well as a glass plate, a metal pie tin has an old-fashioned appeal. Tins are also available in miniature sizes.
CERAMIC BAKING DISH Pie plates and other baking dishes made of earthenware or porcelain conduct heat well and are lovely enough to go from oven to table.
FLUTED TART PAN Tarts gain much of their elegant appearance from the pans in which they’re baked. The pans have short, fluted sides and removable bottoms, and are sold in a variety of sizes and shapes, the most common of which are round and rectangular.
TARTLET PAN Miniature tart pans, available in multiple shapes and sizes, are used to produce an array of tiny treats. Baked tarts are usually small enough to flip right out; no removable bottoms are needed. Small brioche molds can be used in their place.
SPRINGFORM PAN Traditionally used to make cheesecake, a springform pan is also excellent for baking modern-looking straight-sided tarts and savory pies such as quiche. Once it has cooled completely, unhinge the clasp on the side to open the pan and release the tart inside.
CAKE RING Cake, tart, and flan rings can all be used to bake single-crust pies and tart shells. The bottomless molds—positioned on parchment-lined baking sheets—lift off easily after baking and produce elegant results.


The rich flavor, delicate texture, and versatility of pâte brisée have made it the standard at Martha Stewart Living and in this book, where it is used for pies and tarts both sweet and savory. From three main components—flour, fat, and water—plus a little sugar and salt, you get a crust that is incomparably flaky, yet sturdy enough to contain nearly any filling. An all-butter pâte brisée tastes best, but some cooks use shortening or lard for additional tenderness. The name pâte brisée means “broken pastry,” and refers to cutting the butter into the flour, either by hand or with a food processor. The butter-flour mixture should resemble coarse meal, with some pieces of butter the size of small peas, before cold water is drizzled into it; these bits of unincorporated butter give pâte brisée its famously flaky texture by releasing steam as they melt.
MAKES ENOUGH FOR ONE 9-INCH DOUBLE-CRUST PIE OR TWO 9-INCH SINGLE-CRUST PIES
2½ cups all-purpose flour
1 teaspoon salt
1 teaspoon sugar
1 cup (2 sticks) cold unsalted butter, cut into small pieces
¼ to ½ cup ice water
1. Pulse flour, salt, and sugar in a food processor (or whisk together by hand in a bowl). Add butter, and pulse (or quickly cut in with a pastry blender or your fingertips) until mixture resembles coarse meal, with some larger pieces remaining. Drizzle ¼ cup water over mixture. Pulse (or mix with a fork) until mixture just begins to hold together. If dough is too dry, add ¼ cup more water, 1 tablespoon at a time, and pulse (or mix with a fork).
2. Divide dough in half onto two pieces of plastic wrap. Gather into two balls, wrap loosely in plastic, and press each into a disk using a rolling pin. Refrigerate until firm, well wrapped in plastic, 1 hour or up to 1 day. (Dough can be frozen up to 3 months; thaw in refrigerator before using.)
Shortening Variation: Replace ½ cup (1 stick) butter with ½ cup cold vegetable shortening, cut into small pieces.
Lard Variation: Replace ½ cup (1 stick) butter with ½ cup cold lard. For the best quality, it’s worth seeking out leaf lard. You can buy rendered leaf lard from online vendors, or from artisanal butcher shops.
Cornmeal Variation: Replace ½ cup flour with ½ cup coarse cornmeal.
Cheddar Variation: Reduce butter to ¾ cup (1½ sticks) and add 1½ cups shredded sharp cheddar to the flour mixture along with the butter. Increase sugar to 1 tablespoon.

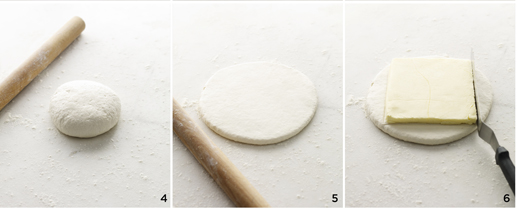
1. COMBINING INGREDIENTS Be sure all ingredients—even the dry ones—are cold before you begin (refrigerate them for 30 minutes). Pulse flour, salt, and sugar in a food processor. Cut butter into small pieces and add to processor.
2. CUTTING IN BUTTER Pulse just until mixture resembles coarse meal, with some larger pieces remaining (up to ½ inch), about 10 seconds.
3. ADDING THE WATER Drizzle ¼ cup ice water evenly over mixture, and pulse until the dough just begins to hold together. Pinch off a piece of dough with your fingers: It should just hold together when squeezed without being wet, sticky, or crumbly. Add up to ¼ cup more water, by the tablespoon, if necessary.
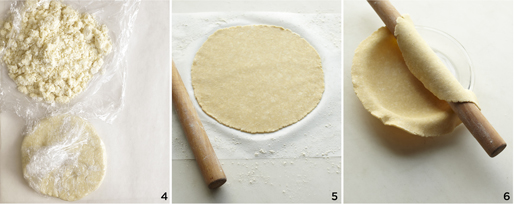
4. CHILLING THE DOUGH Turn out dough onto plastic wrap. Use your hands to quickly gather wrap to shape the dough into balls; flatten slightly. Unwrap; rewrap loosely, leaving half an inch of air space around the dough. Roll to ½ inch thick, filling space. Refrigerate until dough is firm, 1 hour or up to 1 day.
5. ROLLING OUT THE DOUGH If necessary, let dough sit at room temperature 10 minutes to soften. On a lightly floured surface, roll dough, working from center out to edges. Turn dough one-eighth of a turn with every roll, loosening it with a large offset spatula. Remove excess flour with a dry pastry brush.
6. FITTING THE DOUGH INTO DISH Once the dough is rolled out to its proper dimension, roll it back up over the pin. Next, carefully unroll to drape the dough over the pie plate, and gently press to fit it into the dish.
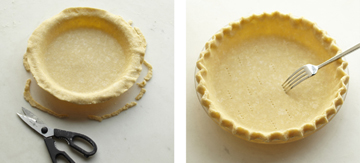
TRIMMING THE DOUGH
Trim excess dough to a 1-inch overhang. Crimp edges (as shown, right) with your thumb and forefinger, or create another decorative edge.
DOCKING THE CRUST
Piercing the unbaked crust with a fork (called “docking”) allows steam to escape from inside, preventing the crust from puffing as it bakes. Chill shell after docking.

BLIND-BAKING THE CRUST
Line chilled pie shell with parchment and fill with pie weights or dried beans. For a partially baked shell, bake just until the edges begin to brown. Remove weights and parchment. For a completely pre-baked shell, continue baking until bottom of crust is lightly browned.
MAKING A FOIL RING
A foil ring protects a crust’s edges from browning too quickly. Press a piece of foil onto an empty pie plate to shape; trim the outer edge and cut out the center to make a ring that’s about 2 inches wide.

To make a checkerboard border (1), snip the dough at even intervals and bend every other section toward the center. Cutouts can be adhered with an egg wash or water: Overlapping tiny triangles form an arrowhead pattern (2), while strips of dough are woven into a braid (3). Traditional crimping with a thumb and forefinger can be varied to make a diagonally pinched (4) or fork-crimped edge (5).
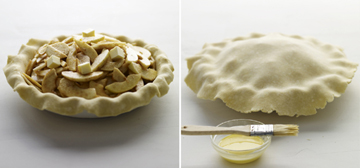
1. FILLING Pile the filling evenly into the pastry shell, mounding it in the center. Dotting a tablespoon or two of butter, cut into small pieces, on top of the filling will help emulsify the juices and add richness.
2. ADDING THE TOP CRUST Brush the edge of the bottom crust with some egg wash. Center and drape the top crust over the filling.

3. SEALING EDGES Trim excess dough to leave a 1-inch overhang. Fold edge of top crust under bottom edge and press to seal. To crimp edges: With thumb and index finger of one hand, press dough against thumb or knuckle of other hand; continue around edge of pie.
4. FINISHING TOUCHES Use a paring knife to cut several slits (for steam vents) in the top crust, each about 3 inches long (or cut vent into a shape using a small cookie cutter). Brush top crust with egg wash and sprinkle evenly all over with fine or coarse sanding sugar.
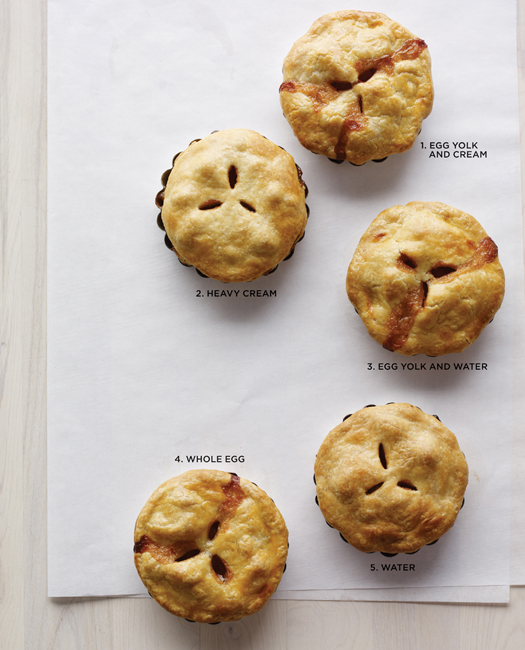
Washes made with different ingredients or proportions of ingredients can alter the look and texture of a baked top crust. A wash made of one egg yolk and one tablespoon heavy cream whisked together (1) is Martha’s favorite. It creates a lovely golden color. Heavy cream (2) imparts a paler finish than egg but adds a nice shine. Egg yolk and water (3) is the standard; use one tablespoon cold water to one egg yolk. An egg simply whisked and then brushed onto unbaked pastry results in a rich, golden color and a shiny surface (4). Brushing on water by itself (5) creates a crisp, crackly, pale-colored surface. It works well to adhere sugar, and is good in a pinch.
1. Cut an even number of strips (we cut 10) of rolled-out pie dough using the plain or fluted edge of a double-sided pastry wheel. (If you don’t have a pastry wheel, you can use a pizza cutter or sharp knife in its place.) The strips pictured are about 1 inch wide; make them as wide or as narrow as you like. Wide strips are easier to work with, especially for beginners.
2. Lay half the strips vertically and evenly spaced across the pie, starting in the center and working out toward the edge.
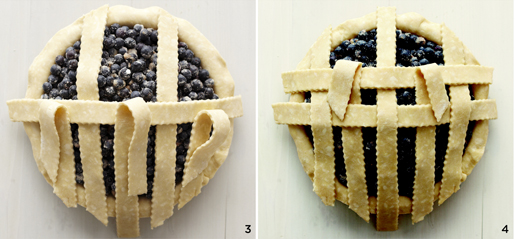
3. Fold back the odd-numbered strips, as shown, and lay a horizontal strip across the center of the pie.
4. Unfold the odd-numbered dough strips, then fold back the even-numbered pieces; lay another perpendicular strip as shown. Repeat, unfolding and folding alternating strips of dough.
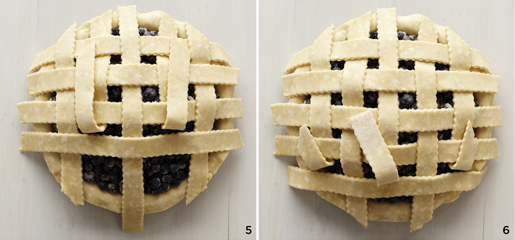
5. Continue on the other side of the pie, folding back the even-numbered strips and placing another horizontal piece.
6. Unfold the even-numbered dough strips, and fold back the odd-numbered pieces; place the last horizontal strip. Unfold strips.
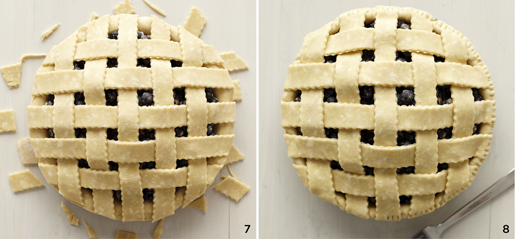
7. Trim excess on ends of dough strips flush with the overhang of the bottom crust (but not flush with rim of pan).
8. Fold lattice ends and edge of bottom crust under. Crimp edge with a fork or your thumbs. Finish by brushing the entire surface with the egg wash of your choice and sprinkling with fine or coarse sanding sugar (not shown).

Those new to working with pastry would do well to start with a cream cheese dough. The combination of butter and cream cheese produces a supple, forgiving dough that rolls out quickly and smoothly, thanks to the high moisture content of the cream cheese. It also has a tender crumb and a pleasingly tangy flavor that pairs well with sweet or savory fillings.
MAKES ENOUGH FOR ONE 9-INCH SINGLE-CRUST PIE
2 teaspoons cold water
1 teaspoon cold cider vinegar
1½ cups all-purpose flour, plus more for dusting
½ teaspoon salt
½ cup (1 stick) cold unsalted butter, cut into small pieces
4 ounces cold cream cheese, cut into small pieces
1. Combine water and vinegar in a small bowl. Combine flour and salt in another bowl. Using a pastry blender or your fingers, cut butter and cream cheese into flour mixture until mixture resembles coarse meal, with some larger pieces remaining. (Alternatively, pulse ingredients in a food processor.)
2. Add water mixture to dough in a slow, steady stream, stirring (or pulsing), until mixture just begins to hold together. Turn out onto plastic, and wrap. Press dough into a disk using a rolling pin. Refrigerate until firm, 1 hour or up to 1 day. (Dough can be frozen up to 3 months; thaw in the refrigerator before using.)

1. SETTING UP As with all pie doughs, cold ingredients are essential to producing a flaky texture. Measure all ingredients, cutting the butter and cream cheese into small cubes, and then refrigerate everything (including the flour and salt in the bowl) for 30 minutes before you start.
2. MAKING THE DOUGH Avoid overmixing as you cut the butter and cream cheese into the flour mixture. The dough is meant to be a bit crumbly, with pieces ranging in size from coarse meal to about ½ inch, all evenly coated in the flour mixture.
3. WRAPPING THE DOUGH Covering the dough with plastic compresses the ingredients while protecting them from warming under your hands. Turn out dough onto plastic wrap, then use the plastic to gather dough into a ball. Flatten into a disk; refrigerate at least 1 hour or up to 1 day.

The crumbly texture of a graham cracker crust pairs best with creamy fillings; it is extremely easy to make—just combine cookie crumbs with melted butter and a small amount of sugar, press the mixture into a pie plate, and bake.
MAKES ONE 9-INCH CRUST
12 graham cracker sheets (6 ounces), broken into pieces, or 1½ cups graham cracker crumbs
6 tablespoons butter, melted and cooled, plus more for pie plate
3 tablespoons sugar
Pinch of salt
Preheat oven to 375°F. Lightly butter a 9-inch pie plate. In a food processor, pulse graham crackers until finely ground. In a bowl, combine crumbs, butter, sugar, and salt. Press mixture firmly and evenly into bottom and up sides of pie plate. Bake until lightly browned, about 12 minutes. Let cool completely on a wire rack. (Crust can be stored up to 1 day, loosely covered with foil, at room temperature.)

Chocolate wafers (or nearly any wafer cookie) make a delicious crumb crust, especially for cream pies.
MAKES ONE 9-INCH CRUST
25 chocolate wafers (6 ounces), broken into pieces, or 1½ cups wafer-cookie crumbs
5 tablespoons unsalted butter, melted
3 tablespoons sugar
Pinch of salt
Preheat oven to 350ºF. In a food processor, pulse wafers until finely ground. Add butter, sugar, and salt, and process until well combined. Press mixture firmly into bottom and up sides of a 9-inch pie plate. Bake until crust is firm, about 10 minutes. Let cool completely on a wire rack. (Crust can be stored up to 1 day.)
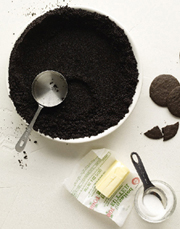
FORMING A CRUMB CRUST For a firm, evenly packed crust, use the flat bottom of a dry measuring cup to press the crumbs into the bottom and up the sides of the pan.

This crumbly cocoa-enriched shell is used to make the Chocolate-Caramel Cream Pie; it pairs nicely with other cream fillings as well.
MAKES ENOUGH FOR ONE 9-INCH SINGLE-CRUST PIE
1¼ cups all-purpose flour, plus more for dusting
⅓ cup sugar
2 tablespoons unsweetened Dutch-process cocoa powder
½ teaspoon salt
6 tablespoons cold unsalted butter, cut into small pieces
3 large egg yolks
½ teaspoon pure vanilla extract
In a food processor, pulse flour, sugar, cocoa, and salt until combined. Add butter, and pulse just until mixture resembles coarse meal. Add yolks and vanilla, and pulse until mixture just begins to hold together. Shape dough into a disk. Wrap in plastic, and refrigerate until firm, 1 hour or up to 2 days.

Pâte sablée is essentially a sugar-cookie dough used to produce a crumbly, sandy pastry crust. In fact, “sablée” comes from the French word for “sand.” Because the dough is very soft, it can be difficult to roll out; instead, press it gently into the pan. Any scraps of dough can be cut out and baked into cookies.
MAKES ENOUGH FOR ONE 9-INCH TART
¾ cup (1½ sticks) unsalted butter, room temperature
½ cup confectioners’ sugar
1½ cups all-purpose flour
¾ teaspoon salt
With an electric mixer on medium, beat butter and sugar until pale and fluffy, 3 minutes. Reduce speed to medium-low. Add flour and salt; beat until just combined and crumbly (do not overmix). Shape dough into a disk, and wrap in plastic. Refrigerate 1 hour or up to 2 days, or freeze up to 3 months (thaw in refrigerator before using).

Pâte sucrée, or “sweet pastry,” is a sturdy dough, thanks to its proportion of sugar and the addition of egg yolks. It’s a good choice for tarts, which are most often unmolded before serving. It is also more tender than pâte brisée, breaking cleanly under a fork instead of shattering into flakes.
MAKES ENOUGH FOR TWO 8- OR 9-INCH TARTS, OR TWO DOZEN 3-INCH TARTS
2½ cups all-purpose flour
¼ cup sugar
¼ teaspoon salt
1 cup (2 sticks) cold unsalted butter, cut into small pieces
2 large egg yolks, lightly beaten
2 to 4 tablespoons cold heavy cream or ice water
Pulse flour, sugar, and salt in a food processor until combined. Add butter, and pulse just until mixture resembles coarse meal. Add yolks and drizzle 2 tablespoons cream evenly over mixture; pulse just until dough begins to come together, no more than 30 seconds. If dough is too dry, add remaining cream, 1 tablespoon at a time, and pulse. Divide dough in half, pat each half into a disk, and wrap in plastic. Refrigerate 1 hour or up to 2 days, or freeze up to 3 months (thaw in refrigerator before using).
Citrus Variation: Add 2 teaspoons finely grated orange zest and 1 teaspoon finely grated lemon zest to the dry ingredients.
Poppy Seed Variation: Add 2 tablespoons poppy seeds to the dry ingredients.
Chocolate Variation: Replace ¼ cup flour with ¼ cup unsweetened Dutch-process cocoa powder.
Cornmeal-Lemon Variation: Replace ¾ cup flour with ¾ cup coarse cornmeal; reduce sugar to 2 tablespoons. Add 1 teaspoon lemon zest to the dry ingredients.

The texture of puff pastry comes from the way its essential ingredients—flour, butter, water, and salt—are combined. You begin by making two separate components. The first, the dough package, or détrempe in French, is mostly flour with just a bit of butter worked in (a combination of all-purpose and cake flour results in just enough protein to support the dough as it puffs). The second, the butter package, or bourrage (“filling”), is mostly butter, with a little flour worked in. The two packages are combined by repeatedly rolling and folding the dough, creating a total of 1,458 distinct layers. In the heat of the oven, the steam that is produced by the butter in the dough creates pockets of air and expands the many layers. Tarts made with a puff pastry base are among the simplest to assemble. The following recipe makes enough pastry for four large tarts (freeze unused pastry up to 3 months).
MAKES ABOUT 2 ½ POUNDS
FOR THE DOUGH PACKAGE
3 cups all-purpose flour, plus more for dusting
¾ cup cake flour (not self-rising)
1½ teaspoons salt
4 tablespoons cold unsalted butter (cut stick lengthwise; use other half to make the butter package), cut into ½-inch pieces
1¼ cups cold water
FOR THE BUTTER PACKAGE
1 tablespoon all-purpose flour
1¾ cups (3½ sticks, halve last stick lengthwise and use other half for the dough package) cold unsalted butter
1. Make the dough package: In a large bowl, whisk to combine both flours with the salt. Scatter butter pieces over flour mixture; using a pastry blender or your fingers, cut in butter just until mixture resembles coarse meal. Form a well in center of mixture, and pour the water into well. Using your hands, gradually draw flour mixture over water, covering and gathering until mixture is well blended and begins to come together. Gently knead mixture in bowl just until it comes together to form a dough, about 15 seconds. Pat dough into a rough ball, and turn out onto plastic wrap. Wrap tightly, and refrigerate 1 hour.
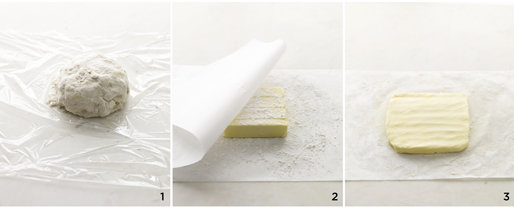
2. Make the butter package: Sprinkle 1½ teaspoons flour on a sheet of parchment. Place sticks of butter on top, side by side, and sprinkle with remaining 1½ teaspoons flour. Top with another sheet of parchment; using a rolling pin, pound butter to soften and flatten to about ½ inch. Remove top sheet of parchment, and fold butter package in half onto itself. Replace top sheet of paper, and pound again until butter is about ½ inch thick. Repeat process 2 or 3 times, or until butter becomes quite pliable. With a large offset spatula and parchment paper, shape butter package into a 6-inch square. Wrap well and refrigerate until chilled but not hardened, no more than 10 minutes.
3. Remove dough package from refrigerator and lightly dust with flour. On a lightly floured surface, gently roll dough package into a 9-inch round. Place butter package in center of dough round. Using a paring knife or bench scraper, lightly score dough to outline butter square; remove butter. Starting from each side of center square, gently roll out dough with rolling pin, forming four flaps, each 4 to 5 inches long; do not roll the raised square in center of dough. Replace butter package on center square (remove parchment). Fold flaps of dough over butter package so that it is completely enclosed. Gently press with your hands to seal. (If at any point in rolling process, dough becomes too soft or elastic, return it to refrigerator to rest at least 30 minutes.)
4. Using rolling pin, press down on dough at regular intervals, repeating and covering entire surface area, until it is about 1 inch thick. Gently roll out dough into a large rectangle, about 9 by 20 inches, with a short side closest to you. Be careful not to press too hard around edges, and keep corners even as you roll out dough by squaring them with the side of the rolling pin or a large offset spatula. Brush off excess flour. Starting at near end, fold rectangle in thirds as you would a letter; this completes first single turn. Wrap well in plastic; refrigerate 45 to 60 minutes.
5. Repeat process in step 4, giving dough five more single turns. Always start with flap opening on right as if it were a book. Mark dough with your knuckle each time you complete a turn to help you keep track. Refrigerate 1 hour between each turn. Dough can be made in advance through fourth turn and then kept overnight in refrigerator or up to 1 month in freezer before continuing. After sixth and final turn, wrap dough in plastic; refrigerate at least 4 hours or overnight before using. Divide into 4 pieces. Freeze unused portions for up to 3 months (thaw in refrigerator overnight before using.)
USING STORE-BOUGHT PASTRY
Homemade puff pastry is incomparably buttery and flaky. While not difficult to make, it does require multiple steps over the course of several hours. This recipe yields four 11-ounce pieces—enough for four large tarts; freeze the unused portion up to 3 months. If you choose to use store-bought frozen puff pastry, look for an all-butter brand, such as Dufour, which is sold in a 14-ounce rectangular sheet. Pepperidge Farm frozen puff pastry, which is made with vegetable oil, is sold in a 17-ounce box, with two square sheets per box. The recipes in this book allow for some flexibility when it comes to puff pastry: You may use one 11-ounce sheet of homemade pastry, one 14-ounce box of store-bought all-butter pastry, or one 17-ounce box (two sheets) interchangeably. Simply roll or cut the pastry to the desired size. To combine 2 smaller pieces into 1 larger rectangle, overlap the 2 pieces slightly, brushing the overlap with water to seal. Then roll or cut the pastry as directed.
1. Make the dough package. Form dough into a ball, wrap in plastic, and refrigerate 1 hour.
2. Make the butter package: Place 3½ sticks butter on a sheet of floured parchment paper, sprinkle with more flour, and top with a second sheet of parchment. Pound the butter with a rolling pin until it is flattened to about ½ inch thick. Remove top piece of parchment, and fold butter in half onto itself. Replace paper, and pound again until butter is about ½ inch thick.
3. Repeat process two or three times, until butter becomes pliable. With a large offset spatula and parchment paper, shape butter into a 6-inch square; wrap in plastic and refrigerate for no more than 10 minutes.
4. Remove dough package from refrigerator and lightly dust with flour.
5. Roll dough package into a 9-inch circle.
6. Place butter package in the center of the dough round. Lightly score dough with a paring knife or offset spatula to outline the butter square; remove butter.
7. Starting from each side of the center square, gently roll out dough to form four flaps, each 4 to 5 inches long. (Do not roll over raised square.)
8. Place butter package in the center of the dough package.
9. Fold flaps over butter package.
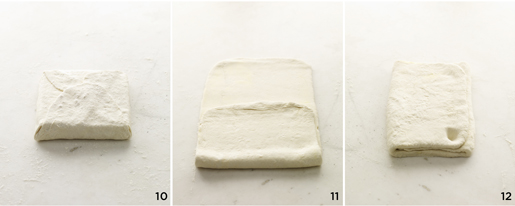
10. Once butter package is completely enclosed, seal with your hands.
11. With a rolling pin, press down on the dough at regular intervals until it is about 1 inch thick. Roll out dough into a large rectangle with the short side closest to you. Starting at near end, fold rectangle into thirds as you would a letter. This completes the first turn. Wrap dough in plastic and refrigerate 45 to 60 minutes.
12. Repeat steps 10 and 11, giving dough 5 more single turns. Always start with flap opening on the right as if it were a book. Mark dough with your knuckle each time you complete a turn to help you keep track. Refrigerate dough 1 hour between each turn.

Pastry cream is the classic filling for French fruit tarts; it can also be folded into other fillings, such as whipped cream or the rich ricotta custard in the Neapolitan Easter Pie. Like many other custards, it is thickened with eggs and cornstarch; the mixture must be brought to a full boil to activate the starch and set properly. We use a whole vanilla bean, but you can substitute vanilla extract in its place.
MAKES 1½ CUPS
2 cups milk
1 vanilla bean, halved lengthwise and seeds scraped (or 1 tablespoon pure vanilla extract; omit step 1 if using)
4 large egg yolks
½ cup sugar
¼ cup cornstarch
1. Bring milk and vanilla-bean seeds and pod to a simmer in a medium saucepan. Remove from heat. Cover; let stand 20 minutes.
2. In a large bowl, whisk egg yolks until smooth. In a medium saucepan, combine sugar and cornstarch. Gradually add milk mixture (or milk and vanilla extract, if not using vanilla bean) in a slow, steady stream and cook over medium heat, stirring constantly, until mixture thickens and begins to bubble, about 5 minutes.
3. Whisking constantly, slowly pour one-third of milk mixture into egg yolks. Pour mixture into remaining milk in saucepan. Cook over medium heat, whisking constantly, until mixture comes to a full boil and is thick enough to coat the back of a spoon, 2 to 4 minutes. Remove from heat.
4. Strain mixture through a fine sieve into a heatproof bowl; discard solids. Cover with parchment or plastic wrap, pressing directly on surface to prevent a skin from forming. Refrigerate until well chilled and firm, at least 2 hours or up to 2 days. Whisk to soften slightly just before using.

MAKES 1¾ CUPS
6 large egg yolks
1 tablespoon finely grated lemon zest plus ½ cup fresh lemon juice (from 3 lemons)
¾ cup sugar
Pinch of salt
½ cup (1 stick) cold unsalted butter, cut into pieces
Whisk together yolks, zest, juice, sugar, and salt in a heavy saucepan. Bring to a simmer over medium heat, whisking constantly. Cook until thickened, 8 to 10 minutes. Strain through a fine sieve into a bowl. Whisk in butter, one piece at a time, until smooth. Press plastic wrap directly onto surface, and refrigerate until cold, 1 hour or up to 1 day.

Use this technique to make other candied citrus slices, such as lime, orange, or kumquat.
MAKES 3 DOZEN
3 lemons, washed well and dried
4 cups water
4 cups sugar
1. Using a very sharp knife or an adjustable-blade slicer, cut lemons into very thin slices (remove and discard seeds). In a heavy saucepan, bring the water and the sugar to a boil, stirring to dissolve sugar.
2. Add lemon slices to pan, and cover with a round of parchment to keep lemons submerged; return to a boil. Remove from heat, and let cool to room temperature. Candied citrus slices can be refrigerated (in syrup) in an airtight container up to 1 week. Place on a wire rack to dry before using.
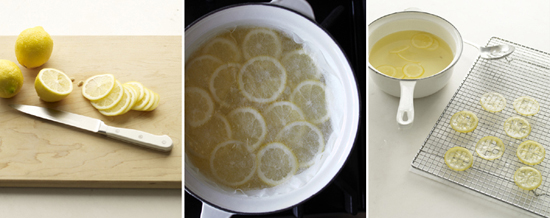
SLICING LEMONS;
COOKING LEMON SLICES;
DRYING LEMON SLICES

This recipe yields an extraordinarily lofty topping. You may halve the recipe for a meringue with less volume. Either way, be sure to spread meringue until it completely covers the filling to prevent shrinking or “weeping.”
MAKES ENOUGH FOR ONE 9-INCH PIE
8 large egg whites
¼ teaspoon cream of tartar
¾ cup sugar
½ teaspoon pure vanilla extract
1. With an electric mixer on medium speed, whisk egg whites and cream of tartar until foamy. Gradually add sugar. Increase speed and whisk until meringue is glossy and forms stiff peaks. Whisk in vanilla.
2. Spoon meringue onto surface of the pie until it reaches the crust, then use an offset spatula to create a swirling pattern.
3. If desired, use a kitchen torch to toast the meringue, moving flame back and forth until evenly browned. Or brown the meringue under the broiler, but keep an eye on it—a minute or two is all you need.

FORMING STIFF PEAKS;
SPREADING MERINGUE OVER FILLING;
BROWNING MERINGUE

You can adjust the amount of sugar in this recipe to suit your preference; for unsweetened whipped cream, simply omit the sugar.
MAKES ABOUT 2 CUPS
1 cup heavy cream, chilled
2 tablespoons confectioners’ sugar
With an electric mixer on medium-high speed (or by hand), whisk cream in a well-chilled bowl until soft peaks form. Add confectioners’ sugar, and whisk until medium-stiff peaks form.

You can make praline from any variety of toasted nuts (preferably blanched or skinless). The Butterscotch Praline Cream Pie features this variation, crushed and folded into the whipped cream and sprinkled over the top.
MAKES ENOUGH FOR 1 CUP
Vegetable-oil cooking spray
½ cup sugar
1 teaspoon light corn syrup
1 tablespoon water
Pinch of salt
⅓ cup toasted and skinned hazelnuts
Coat a rimmed baking sheet with cooking spray. Combine sugar, corn syrup, water, and salt in a small saucepan over medium-high heat, stirring constantly until sugar dissolves. Continue to cook, without stirring, until deep amber. Remove from heat and stir in nuts. Immediately pour mixture onto prepared baking sheet, and spread into an even layer. Let cool completely on sheet on a wire rack. Break praline into medium-size pieces, and transfer to a resealable plastic bag. Using a rolling pin, crush into pea-size portions.

MAKES 2 CUPS
8 ounces (about 2 cups) fresh cranberries
1 teaspoon finely grated orange zest plus 3 tablespoons fresh orange juice
1 cup sugar
¼ teaspoon ground cinnamon
½ teaspoon pure vanilla extract
In a saucepan, over medium-high heat, combine all ingredients and cook 7 to 10 minutes, stirring occasionally, until berries start to pop but are still whole. Transfer to a bowl to cool. Compote can be refrigerated in an airtight container up to 3 days.

MAKES 10 PEAR HALVES
1 cup dry white wine
3 cups water
¼ cup honey
1 vanilla bean, halved lengthwise and seeds scraped
5 ripe, firm Bartlett or Comice pears
1. Bring wine, water, honey, and vanilla-bean seeds and pod to a simmer in a large saucepan. Cook over medium-low heat 5 minutes.
2. Meanwhile, cut a round of parchment the same diameter as the saucepan. Peel pears and halve lengthwise. Use a small spoon or melon baller to scoop out cores, seeds, and stems. Trim fibrous strip from center with a paring knife. Gently lower pears into pot. Place parchment round directly on pears to keep them submerged (this will help keep them from turning brown).
3. Cook until a paring knife slides easily into pears, meeting slight resistance, 15 to 20 minutes. Remove from heat; let cool in liquid 30 minutes. Use a slotted spoon to transfer pears to a large bowl; cover with cooking liquid and let cool completely. Pears can be refrigerated in an airtight container up to 3 days.

MAKES 9
4 cups water
¼ cup fresh lemon juice (from 1 to 2 lemons), plus 1 lemon, halved
2 cups sugar
3 golden apples, such as Golden Delicious
2 red apples, such as Gala, McIntosh, or Red Delicious
1. Bring the water, lemon juice, and sugar to a boil in a medium saucepan. Remove syrup from heat; cover. Cut a round of parchment the same diameter as the saucepan.
2. Core apples. Peel golden apples; using 1 lemon half, rub flesh. Squeeze juice from remaining half into hollows of (unpeeled) red apples. Using a mandoline or a sharp knife, cut all apples crosswise into paper-thin (less than ⅛ inch) slices. Transfer to syrup; shake pan to coat slices. Place parchment directly onto surface of apple mixture. Let syrup cool completely, about 40 minutes.
3. Remove slices from syrup. Cut slices into semicircles. Stack 1 red apple slice on top of 1 golden slice, with cut edges nearest you. Wrap slices together into a cone shape to form a “bud.” Stack 2 more slices. Placing them slightly above base (to create a staggered appearance), wrap them around bud. Repeat, wrapping until rose is about 2½ inches in diameter. Reserve leftover peeled slices for garnish.
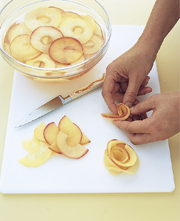
FORMING APPLE ROSES

MEASURING DRY INGREDIENTS Measure dry ingredients (such as flour and sugar) and semisolid ingredients (such as peanut butter and sour cream) in graduated dry measuring cups. For flour, dip the cup into the flour and fill to overflowing, then level with a straightedge such as an offset spatula. (Never shake the cup or tap it on the counter to level; both will lead to inaccurate measurements.) If a recipe calls for “sifted flour,” sift the flour first, and then measure it; if it calls for “flour, sifted,” measure first and then sift. When measuring brown sugar, pack firmly into a dry cup.
MEASURING LIQUID INGREDIENTS Measure liquid ingredients such as milk in a liquid measuring cup; to read, set the cup on a flat surface and view the measurement at eye level.
TOASTING AND GRINDING NUTS To toast nuts such as pecans, walnuts, and almonds, spread them on a baking sheet and cook in a 350°F oven until fragrant, about 10 minutes. (Start checking after 6 minutes if toasting sliced or chopped nuts.) Toast pine nuts at 350°F for 5 to 7 minutes. Toast hazelnuts in a 375°F oven until skins split, about 10 to 12 minutes; when cool enough to handle, rub warm nuts in a clean kitchen towel to remove skins. Chop cooled nuts coarsely or finely with a chef’s knife, or pulse them in a food processor to grind. Do not over-process, or nuts will turn into a paste.
STORING GROUND SPICES Keep ground spices in a cool, dark place for up to a year; labeling the jars when you buy them will remind you when it’s time to replace them.
GRATING NUTMEG Nutmeg has a nutty, spicy flavor that beautifully complements aromatic spices such as cinnamon and ginger. Grating fresh nutmeg results in a more complex, nuanced flavor (whole nutmeg also has a longer shelf life). Use a specialty nutmeg grater or a rasp grater. If you would like to substitute ground nutmeg for freshly grated, use half the amount.
MELTING CHOCOLATE Melt chocolate in a metal bowl set over (not in) a pan of simmering water, or in a double-boiler. Alternatively, you can melt chocolate in the microwave: In a microwave-safe bowl, heat chocolate in 30-second intervals, stirring after each, until almost melted. Remove from microwave and stir to melt completely.
MAKING CHOCOLATE CURLS AND SHAVINGS Use a vegetable peeler to shave tight chocolate curls from a large block of slightly warm chocolate (heat in microwave for 5-second intervals, checking after each, until just warm to the touch). To make uneven shavings, finely slice a block of chocolate lengthwise with a large chef’s knife.
ZESTING CITRUS Use a rasp grater such as a Microplane to remove citrus fruits’ flavorful zest while leaving the bitter white pith behind. A citrus zester (a small tool with a row of small, sharp holes at one end) makes decorative curls for garnishes.
PITTING CHERRIES Use a cherry pitter to remove the pits from cherries. Or gently press down on each cherry with the flat side of a chef’s knife until it splits open, then remove the pit. As an alternative, you can use a paper clip: Unbend the clip at the center; insert the tip of one bent end slightly into the stem end of cherry. Twist the clip to loosen the pit, and pull to remove.
PEELING PEACHES AND APRICOTS With a paring knife, lightly score the bottom of each peach with an X before blanching. Working in batches of 3 or 4, add peaches or apricots to boiling water for about 1 minute. Use a slotted spoon to transfer them to an ice-water bath to stop the cooking. Remove skin with a paring knife.
MAKING PUMPKIN PURÉE One small sugar pumpkin (about 4 pounds) will yield about 3 cups pumpkin purée. Heat oven to 425°F. Halve pumpkin and roast, cut sides down, on a rimmed baking sheet until soft, 50 minutes to 1 hour. Let cool completely; roasted pumpkin can be refrigerated in an airtight container overnight. Discard seeds and scoop out flesh using a large spoon; transfer to a food processor. Process until smooth, about 1 minute.