CONCEPT 18
Fat Makes Eggs Tender
Scrambled eggs should be a dreamy mound of big, soft, wobbling curds. They should be cooked enough to hold their shape when cut but soft enough to eat with a spoon. An omelet must be firm enough to roll or fold, but the eggs should still be tender and soft. The reality is that all too often both dishes turn out dry, tough, or rubbery. Overcooking is one culprit, but the eggs need some help—in the form of fat—to ensure that they remain soft and tender, even when fully set.
HOW THE SCIENCE WORKS
We call them scrambled eggs, no doubt because of the mixing that occurs before the eggs are cooked, but this recipe relies on a process called coagulation and could rightly be called “coagulated eggs.” Cooking causes the egg proteins to denature (unfold) and form a latticed gel. As a result, eggs transition from a liquid to a semisolid you can pick up with a fork. Coagulation also explains how eggs thicken custards, puddings, and sauces.
To understand what’s really happening, you have to start with the notion that eggs actually contain distinct elements—the whites and the yolks—that behave quite differently. The whites, which represent about two-thirds of the total volume in an egg, are 88 percent water, 11 percent protein, and 1 percent minerals and carbohydrates. The yolks are 50 percent water, 34 percent lipids (fats and related elements), and 16 percent protein.
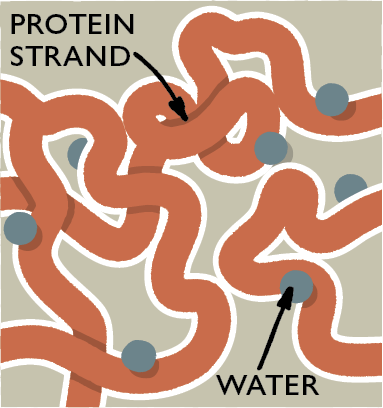
When eggs are heated, the water they contain turns to steam. At the same time, the protein strands are unfolding, sticking to each other, and eventually forming a latticed network. Ideally, these proteins form a loose network that’s capable of holding on to the water in the eggs, which will make the cooked eggs tender and fluffy. However, with continued cooking, these cross-linked proteins form very tight bonds that squeeze out too much liquid, and the end result is tough, dry eggs.
Most scrambled egg recipes call for some sort of dairy, usually milk. The fat in the milk coats the proteins and slows down the coagulation process. The water in the dairy provides additional moisture, which helps keep scrambled eggs tender. This added liquid also produces more steam, which translates into fluffier, lighter scrambled eggs.
The science of omelets is similar but the technique used to prevent overcoagulation is different. While scrambled eggs should be fluffy, an omelet is more compact (so it can be rolled or folded). Thus, there’s no need for additional liquid or steam. In fact, adding dairy to eggs causes problems when making an omelet—the extra liquid prolongs the cooking time and toughens the omelet. We turned to small cubes of butter, which contains lots of fat and very little liquid. The fat in the butter coats the egg proteins and produces an omelet that is set but still tender. Frozen butter works even better because it doesn’t melt as quickly and disperses more evenly throughout the egg.
To demonstrate the effect of fat on eggs, we cooked up a batch of our Perfect French Omelet recipe, which uses two whole eggs, one yolk, and a half tablespoon of cubed frozen butter to make each omelet. We prepared two omelets using this recipe, so that we would have one omelet for tasting and one omelet for testing.
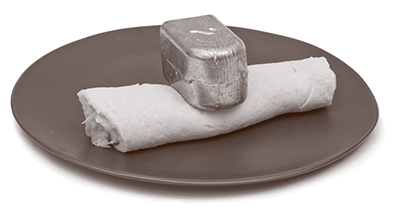
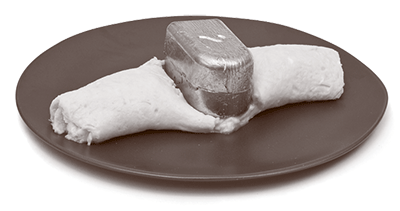
We also prepared the recipe without the frozen butter, again making one omelet for tasting and one for testing. All omelets were prepared as follows: We preheated an 8-inch skillet over low heat for 10 minutes, added the eggs, increased the heat to medium-high, and stirred with chopsticks until small curds formed. Off the heat, we smoothed the eggs into an even layer, covered the skillet, and allowed residual heat to finish the cooking. For both the omelets with and without butter, we rolled the omelets up like cigars, tasted one, and placed a 2-pound lead fishing sinker on the middle of the other. We repeated this test three times.
THE RESULTS
While our tasters’ reactions said a lot (everyone found the omelets with butter to be more tender than the ones without butter), the lead sinkers told the story best. The heavy 2-pound weights easily crushed the omelets that contained butter. On the other hand, the samples without butter showed only a slight depression. Why the dramatic difference?
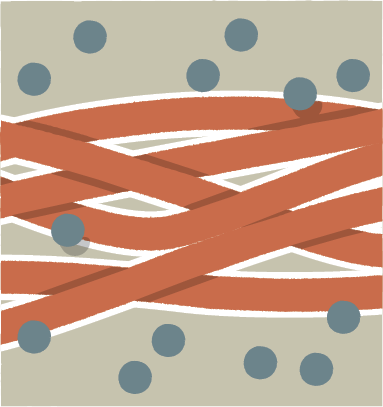
Since the eggs in the butter-less omelets contained little fat to interfere with coagulation, the latticed protein network was able to form tighter bonds. These tighter bonds resulted in a tougher, more resilient omelet—great for supporting a lot of weight, but not for eating.
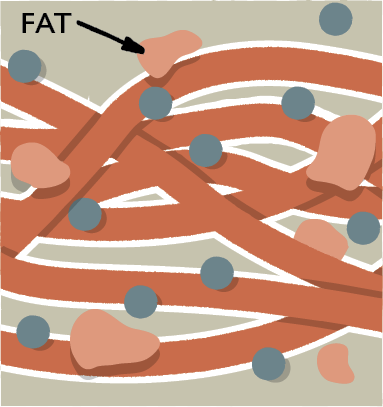
As the frozen butter cubes melted in the omelets made with butter, the fat prevented the protein strands in the eggs from forming tight bonds. The result was an omelet that held its shape but was still very tender.
THE TAKEAWAY
An omelet needs enough structure to allow for rolling or folding, but too much will result in rubbery eggs. Added fat, in the form of frozen butter, coats protein strands, producing a looser network and more tender omelet.
COAGULATION AT WORK
SCRAMBLED EGGS
Cooking turns liquid eggs into a semisolid. The goal is to get the eggs set but to keep them moist and tender. Dairy is an essential addition to ensure that the eggs coagulate but still remain tender—we often choose half-and-half. The fat in the half-and-half coats the egg proteins and keeps them from overcoagulating and squeezing out too much liquid. The water in the half-and-half adds moisture to the eggs and produces extra steam, which results in scrambled eggs that are especially light and fluffy.
PERFECT SCRAMBLED EGGS
SERVES 4
It’s important to follow visual cues, as pan thickness will affect cooking times. If using an electric stove, heat one burner on low heat and a second on medium-high heat; move the skillet between burners when it’s time to adjust the heat. If you don’t have half-and-half, substitute 8 teaspoons of whole milk and 4 teaspoons of heavy cream. To dress up the dish, add 2 tablespoons of minced fresh parsley, chives, basil, or cilantro or 1 tablespoon of minced fresh dill or tarragon to the eggs after reducing the heat to low.
|
8 |
large eggs plus 2 large yolks |
|
¼ |
cup half-and-half |
|
|
Salt and pepper |
|
1 |
tablespoon unsalted butter, chilled |
1. Beat eggs, yolks, half-and-half, ¼ teaspoon salt, and ¼ teaspoon pepper with fork until eggs are thoroughly combined and color is pure yellow; do not overbeat.
2. Melt butter in 10-inch nonstick skillet over medium-high heat (butter should not brown), swirling to coat pan. Add egg mixture and, using heatproof rubber spatula, constantly and firmly scrape along bottom and sides of skillet until eggs begin to clump and spatula leaves trail on bottom of pan, 1½ to 2½ minutes. Reduce heat to low and gently but constantly fold eggs until clumped and just slightly wet, 30 to 60 seconds. Immediately transfer eggs to warmed plates and season with salt to taste. Serve immediately.
WHY THIS RECIPE WORKS
Adding salt and half-and-half to the raw eggs before beating them lightly are key steps toward creating great scrambled eggs. With these additions, as well as a dual-heat cooking method, we’ve discovered the route to perfect—glossy, fluffy, wobbly—scrambled eggs.
BEAT LIGHTLY For uniform texture, it’s important to beat the eggs before cooking them. That said, you can overdo. Some recipes suggest whipping the eggs with an egg beater or electric mixer. We found that overbeating causes premature coagulation of the egg proteins. When overbeaten eggs are then cooked, they turn out tough. For a smooth yellow color and no streaks of white, we whip eggs with a fork and stop once large bubbles form.
WHAT KIND OF DAIRY? We tested milk, half-and-half, and heavy cream while making these scrambled eggs. Milk produced slightly fluffier, cleaner-tasting curds, but they were particularly prone to weeping. Heavy cream, on the other hand, rendered the eggs very stable but dense, and some tasters found their flavor just too rich. Everyone agreed that ¼ cup of half-and-half fared best. The benefit of the dairy is threefold: First, the water it contains (80 percent in half-and-half) interrupts the protein network and dilutes the molecules, thereby raising the temperature at which the eggs coagulate and providing a greater safety net against overcooking (and disproving the classic French theory that adding the dairy at the end of cooking is best). Second, as the water in the dairy vaporizes, it provides lift (just as in a loaf of baking bread), which causes the eggs to puff up. And third, the fat in the dairy also raises the coagulation temperature by coating and insulating part of each protein molecule so that they cannot stick together as tightly.
ADD YOLK To boost the egg flavor and minimize the dairy tones of our scrambled eggs, we add more yolks to the mix. There’s no need to overdo it, though: Two extra yolks per eight eggs balance the flavor nicely. Even better, the high proportion of fat and emulsifiers in the yolks further raises the coagulation temperature, helping to stave off overcooking.
CHOOSE THE RIGHT PAN Pan size is important when scrambling eggs. If the skillet is too large, the eggs spread out in too thin a layer and overcook. A smaller pan forces you to mound the eggs on top of each other, which traps steam and ensures tender, fluffy eggs.
FORGET LOW AND SLOW Since overcoagulation is a danger, many cooks use low or moderate heat for scrambling eggs. That’s a big mistake. Getting the pan hot is crucial for generating the steam that creates moist, puffy curds. But cooking on high heat alone can easily cause overcooking. As a result, we use a dual-heat method. First, cook the eggs over medium-high heat, scraping the eggs with a spatula to form large curds and prevent any spots from overcooking. As soon as the spatula just leaves a trail in the pan with minimal raw egg filling in the gap (about two minutes in), drop the heat to low and switch to a gentle folding motion to keep from breaking up the larger curds. When the eggs look cooked through but still glossy (about 45 seconds later), slide them onto a plate to stop the cooking process. The result? Fluffy and tender; a fail-safe method for perfect scrambled eggs.
FORMULA FOR PERFECT SCRAMBLED EGGS
Half-and-half adds liquid that turns to steam when eggs are cooked, thus helping them cook into soft, fluffy mounds. You need 1 tablespoon of half-and-half for each serving of eggs. In addition to varying the half-and-half to match the number of eggs, you will need to vary the seasonings, pan size, and cooking time. Here’s how to do that.
Servings: 1
Eggs: 2 large, plus 1 yolk
Half-and-half: 1 tablespoon
Seasonings: pinch salt, pinch pepper
Butter: ¼ tablespoon
Pan size: 8 inches
Cooking time: 30-60 seconds over medium-high, 30-60 seconds over low
Servings: 2
Eggs: 4 large, plus 1 yolk
Half-and-half: 2 tablespoons
Seasonings: 1⁄8 teaspoon salt, 1⁄8 teaspoon pepper
Butter: ½ tablespoon
Pan size: 8 inches
Cooking time: 45-75 seconds over medium-high, 30-60 seconds over low
Servings: 3
Eggs: 6 large, plus 1 yolk
Half-and-half: 3 tablespoons
Seasonings: ¼ teaspoon salt, 1⁄8 teaspoon pepper
Butter: ¾ tablespoon
Pan size: 10 inches
Cooking time: 1-2 minutes over medium-high, 30-60 seconds over low
HEARTY SCRAMBLED EGGS WITH BACON,ONION, AND PEPPER JACK CHEESE
SERVES 4 TO 6
Note that you’ll need to reserve 2 teaspoons of bacon fat to sauté the onion. After removing the cooked bacon from the skillet, be sure to drain it well on paper towels; otherwise, the eggs will be greasy.
|
12 |
large eggs |
|
6 |
tablespoons half-and-half |
|
¾ |
teaspoon salt |
|
¼ |
teaspoon pepper |
|
4 |
slices bacon, cut into ½-inch pieces |
|
1 |
onion, chopped |
|
1 |
tablespoon unsalted butter |
|
1½ |
ounces pepper Jack or Monterey Jack cheese, shredded (1⁄3 cup) |
|
1 |
teaspoon minced fresh parsley (optional) |
1. Beat eggs, half-and-half, salt, and pepper with fork in medium bowl until thoroughly combined.
2. Cook bacon in 12-inch nonstick skillet over medium heat, stirring occasionally, until crisp, 5 to 7 minutes. Using slotted spoon, transfer bacon to paper towel–lined plate; discard all but 2 teaspoons bacon fat. Add onion to skillet and cook, stirring occasionally, until lightly browned, 2 to 4 minutes; transfer onion to second plate.
3. Wipe out skillet with paper towels. Add butter to now-empty skillet and melt over medium heat, swirling to coat pan. Pour in egg mixture. With heatproof rubber spatula, stir eggs constantly, slowly pushing them from side to side, scraping along bottom and sides of skillet, and lifting and folding eggs as they form curds (do not overscramble or curds formed will be too small). Cook until large curds form but eggs are still very moist, 2 to 3 minutes. Off heat, gently fold in onion, pepper Jack, and half of bacon until evenly distributed; if eggs are still underdone, return skillet to medium heat for no longer than 30 seconds. Divide eggs among individual plates, sprinkle with remaining bacon and parsley, if using, and serve.
HEARTY SCRAMBLED EGGS WITH SAUSAGE, SWEET PEPPER, AND CHEDDAR CHEESE
SERVES 4 TO 6
We prefer sweet Italian sausage here, especially for breakfast, but you can substitute spicy sausage if desired.
|
12 |
large eggs |
|
6 |
tablespoons half-and-half |
|
¾ |
teaspoon salt |
|
¼ |
teaspoon pepper |
|
1 |
teaspoon vegetable oil |
|
8 |
ounces sweet Italian sausage, casings removed, sausage crumbled into ½-inch pieces |
|
1 |
red bell pepper, stemmed, seeded, and cut into ½-inch cubes |
|
3 |
scallions, white and green parts separated, both sliced thin on bias |
|
1 |
tablespoon unsalted butter |
|
1½ |
ounces sharp cheddar cheese, shredded (1⁄3 cup) |
1. Beat eggs, half-and-half, salt, and pepper with fork in medium bowl until thoroughly combined.
2. Heat oil in 12-inch nonstick skillet over medium heat until shimmering. Add sausage and cook until beginning to brown but still pink in center, about 2 minutes. Add bell pepper and scallion whites; continue to cook, stirring occasionally, until sausage is cooked through and pepper is beginning to brown, about 3 minutes. Spread mixture in single layer on medium plate; set aside.
3. Wipe out skillet with paper towels. Add butter to now-empty skillet and melt over medium heat, swirling to coat pan. Pour in egg mixture. With heatproof rubber spatula, stir eggs constantly, slowly pushing them from side to side, scraping along bottom and sides of skillet, and lifting and folding eggs as they form curds (do not overscramble or curds formed will be too small). Cook until large curds form but eggs are still very moist, 2 to 3 minutes. Off heat, gently fold in sausage mixture and cheddar until evenly distributed; if eggs are still underdone, return skillet to medium heat for no longer than 30 seconds. Divide eggs among individual plates, sprinkle with scallion greens, and serve immediately.
HEARTY SCRAMBLED EGGS WITH ARUGULA, SUN-DRIED TOMATOES, AND GOAT CHEESE
SERVES 4 TO 6
Rinsing and patting the sun-dried tomatoes dry prevents them from making the eggs greasy.
|
12 |
large eggs |
|
6 |
tablespoons half-and-half |
|
¾ |
teaspoon salt |
|
¼ |
teaspoon pepper |
|
2 |
teaspoons olive oil |
|
½ |
onion, chopped fine |
|
1⁄8 |
teaspoon red pepper flakes |
|
5 |
ounces baby arugula (5 cups), cut into ½-inch-wide strips |
|
1 |
tablespoon unsalted butter |
|
¼ |
cup oil-packed sun-dried tomatoes, rinsed, patted dry, and chopped fine |
|
3 |
ounces goat cheese, crumbled (¾ cup) |
1. Beat eggs, half-and-half, salt, and pepper with fork in medium bowl until thoroughly combined.
2. Heat oil in 12-inch nonstick skillet over medium heat until shimmering. Add onion and pepper flakes and cook until onion has softened, about 2 minutes. Add arugula and cook, stirring gently, until arugula begins to wilt, 30 to 60 seconds. Spread mixture in single layer on medium plate; set aside.
3. Wipe out skillet with paper towels. Add butter to now-empty skillet and melt over medium heat, swirling to coat pan. Pour in egg mixture. With heatproof rubber spatula, stir eggs constantly, slowly pushing them from side to side, scraping along bottom and sides of skillet, and lifting and folding eggs as they form curds (do not overscramble or curds formed will be too small). Cook until large curds form but eggs are still very moist, 2 to 3 minutes. Off heat, gently fold in arugula mixture and sun-dried tomatoes until evenly distributed; if eggs are still underdone, return skillet to medium heat for no longer than 30 seconds. Divide eggs among individual plates, sprinkle with goat cheese, and serve immediately.
WHY THIS RECIPE WORKS
When vegetables are added to scrambled eggs, they can become oversaturated and weep. Adding lots of cooked sausage or bacon as well as cheese just complicates matters further. Here’s how to keep hearty scrambled eggs tender and moist—but not soggy.
PRECOOK ADD-INS We found that precooking vegetables drives off excess moisture that can ruin scrambled eggs. If you’re adding bacon or sausage to eggs, they need to be cooked to render excess fat, which can then be used to cook the vegetables and boost their flavor. Also, folding these cooked ingredients (as well as cheese) into the nearly finished eggs reduces the risk of weeping.
HALF-AND-HALF IS ESSENTIAL Removing some liquid from the scrambled eggs also compensates for any liquid left in the add-on ingredients. To accomplish this, we use a smaller amount of half-and-half—with its higher percentage of fat and lower water content—than the milk used in most scrambled egg recipes.
LOWER THE HEAT Finally, reducing the heat to medium provides a greater margin of error and reduces the risk of overcoagulation. As a result of these changes, hearty scrambled eggs—loaded with vegetables, meat, and cheese—will be a bit less fluffy than plain scrambled eggs (less heat generates less steam), but at least they won’t weep.
COAGULATION AT WORK
FRENCH OMELETS
Unlike scrambled eggs, which should be cooked until they are just set, an omelet requires cooking the eggs a bit further. After all, the omelet needs be rolled (for the traditional French version) or folded (for a diner-style version). This extra cooking pretty much guarantees tough, rubbery eggs. We found that cubes of butter coat the egg proteins with plenty of fat and do so without adding much water. Freezing the butter cubes ensures that they melt slowly enough to disperse evenly through the eggs, just at the point when the eggs are beginning to coagulate.
PERFECT FRENCH OMELETS
MAKES 2
Because making omelets is such a quick process, make sure to have all your ingredients and equipment at the ready. If you don’t have skewers or chopsticks to stir the eggs in step 3, try the handle of wooden spoon. Warm the plates in a 200-degree oven.
|
2 |
tablespoons unsalted butter, cut into 2 pieces |
|
½ |
teaspoon vegetable oil |
|
6 |
large eggs, chilled |
|
|
Salt and pepper |
|
2 |
tablespoons shredded Gruyère cheese |
|
4 |
teaspoons minced fresh chives |
1. Cut 1 tablespoon butter in half. Cut remaining 1 tablespoon butter into small pieces, transfer to small bowl, and place in freezer while preparing eggs and skillet, at least 10 minutes. Meanwhile, heat oil in 8-inch nonstick skillet over low heat for 10 minutes.
2. Crack 2 eggs into medium bowl and separate third egg; reserve egg white for another use and add yolk to bowl. Add 1⁄8 teaspoon salt and pinch pepper. Break egg yolks with fork, then beat eggs at moderate pace, about 80 strokes, until yolks and whites are well combined. Stir in half of frozen butter cubes.
3. When skillet is fully heated, use paper towels to wipe out oil, leaving thin film on bottom and sides of skillet. Add ½ tablespoon of reserved butter to skillet and heat until melted. Swirl butter to coat skillet, add egg mixture, and increase heat to medium-high. Use 2 chopsticks or wooden skewers to scramble eggs, using quick circular motion to move around skillet, scraping cooked egg from side of skillet as you go, until eggs are almost cooked but still slightly runny, 45 to 90 seconds. Turn off heat (remove pan from heat if using electric burner) and smooth eggs into even layer using heatproof rubber spatula. Sprinkle omelet with 1 tablespoon Gruyère and 2 teaspoons chives. Cover skillet with tight-fitting lid and let sit for 1 minute for runnier omelet or 2 minutes for firmer omelet.
4. Heat skillet over low heat for 20 seconds, uncover, and, using rubber spatula, loosen edges of omelet from skillet. Place folded square of paper towel on warmed plate and slide omelet out of skillet onto paper towel so that omelet lies flat on plate and hangs about 1 inch off paper towel. Roll omelet into neat cylinder and set aside. Return skillet to low heat and heat 2 minutes before repeating instructions for second omelet starting with step 2. Serve.
WHY THIS RECIPE WORKS
The added fat from the frozen butter helps produce a tender omelet, but there are a few other key steps in this recipe.
LOSE A WHITE Our recipe starts with six large eggs (enough for two omelets) but we discard two egg whites along the way. We found that the amount of butter needed to keep the proteins in three eggs from toughening resulted in a very rich omelet. Removing a single white from the equation allows us to use less butter and keeps our cheesy omelet from becoming too rich.
BREAK UP EGGS, DON’T BEAT ’EM Many sources suggest beating eggs with a whisk or even an electric mixer. We found that such tough treatment unravels egg proteins and causes them to cross-link when cooked. The end result is tough eggs. You want the yolks and whites to be fully combined before you start cooking, so some beating of the eggs is a must. We found that a fork does the job nicely and reduces the risk of overbeating. Once the eggs look well combined, stop beating. This will take about 80 strokes.
STIR GENTLY AS EGGS SET Stirring the eggs as they set breaks the coagulating eggs into small curds that produce a more refined omelet with a silkier texture. We found the usual tool for cooking eggs in a nonstick skillet—a rubber spatula—wasn’t up to the job. The smaller tines of a fork break the curds into much smaller bits. Unfortunately, a fork will scratch the nonstick surface. We get excellent results with nonstick-friendly wooden chopsticks or bamboo skewers. The handle of a wooden spoon can be used if you don’t have either chopsticks or skewers.
PUT A LID ON IT Preheating the skillet over 10 minutes (see “Preheat Your Omelet Pan Slowly”) ensured that the heat was evenly distributed across the pan surface and reduced the risk of an overcooked, tough omelet. But we still had trouble getting the eggs furthest from the heat source to cook fully. By the time they did, often the bottom of the omelet had become tough. The solution is quite simple: Once the eggs are set but still runny, slide the pan off the heat, smooth the eggs into an even layer with a spatula, add the cheese and chives, then cover the pan. After a minute or two (depending on whether you like a runnier or firmer omelet), the residual heat trapped by the lid will have gently cooked through the top layer of eggs, and since the pan is off the heat there’s no danger that the bottom of the omelet will become tough.
SLIDE AND ROLL The traditional way to remove an omelet from the pan is to give the skillet a quick jerk in order to fold the omelet over. You then slide it out of the pan, tilting the skillet so that the remaining flap of eggs rolls over neatly. Sounds good, but this method has a high failure rate. For an easier approach, we tried slipping the omelet onto a plate, then using our fingers to roll it. The eggs are still pretty hot, so we prefer to line the plate with a paper towel, which can be used to roll the omelet into a neat cylinder without burning your fingertips.
