CHAPTER 5
Finishing Touches
ROOFS, BASES, AND EXTERIOR DETAILS
With the basic components of the faerie house built and the interior assembled, it’s time to put it all together by finishing the exterior of the house. Roofs offer plenty of opportunity for creativity, as do landscaped bases. Learn the basics and let your creativity do the rest.
The roof and the base should complement each other and the house they surround. If the house is to be a gift, then adding a personal, secret touch will make it even more enchanting.
ROOFS
A well-designed and well-crafted roof brings considerable style and visual impact to your faerie house. Even if your house will never go outside, because the roof is what shelters the house from the “elements,” having one that looks solid and substantial, yet whimsical, is ideal for tying the faerie house together and making it come together as a visual success.
Design options are infinite. From felted or pinecone roofs to straw roofs that look like thatching, you are limited in your creation only by your imagination. Usually, the roof will extend out over the edge of the house in all directions, and the steeper the angle or pitch, the greater the charm. Roofs can have small porthole windows, gables, or towers that are part of the structure, so it is helpful to have a sketch of what you want before you build.
As noted in the lighting section, there are two main kinds of roofs: those that are attached permanently to the house (fixed roofs) and those that are designed to be removable. A removable roof will need a means of support when it is on the house. Some rest directly on the walls of the house, while others can sit on pegs or faux eaves that are fixed to the house walls. Small tower roofs can be made with a lip that fits inside the walls of the tower.
No matter how the roofs are supported, most have the same basic components.
THREE MAIN COMPONENTS OF ROOFS
Base layer.
On twig frame roofs, this is made of twigs or branches that may or may not be visible from the inside. Some base layers are simply made from heavy paper or stiff felt.
Middle layer.
This joins the branches together on a frame roof and gives shape and a degree of sturdiness. On paper roofs, a strengthening layer is applied to the paper.
Exterior roof covering.
The top, decorated, outer layer of the roof—what is visible from the outside.
TYPES OF ROOF COVERINGS
There are many materials that make excellent roof coverings. Let’s take a look at some different examples for inspiration.
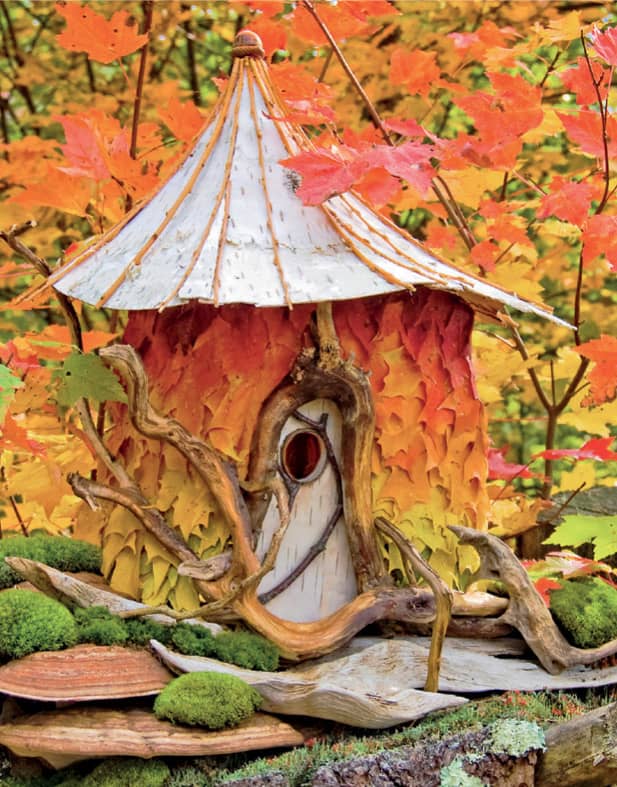
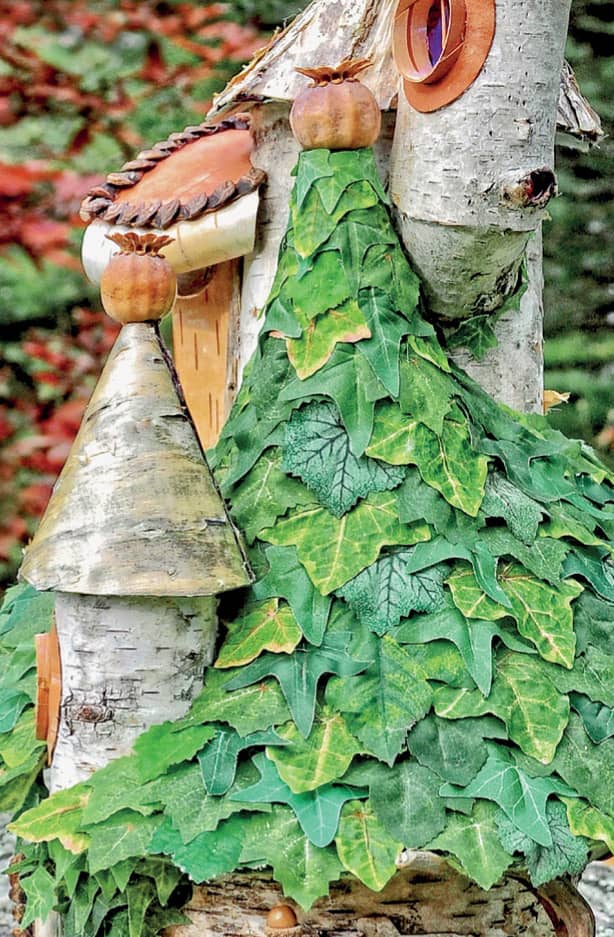
Bark roofs.
You can take pieces of bark apart and use them as shingles or cut and glue together larger sheets to make whimsical roofs. Never remove bark from a living tree.

Silk botanical roofs.
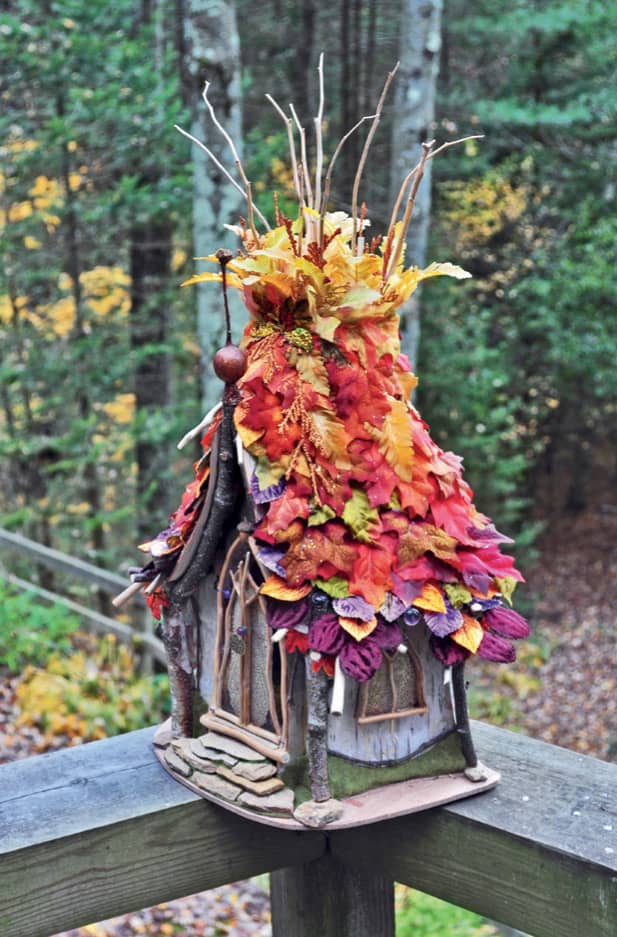
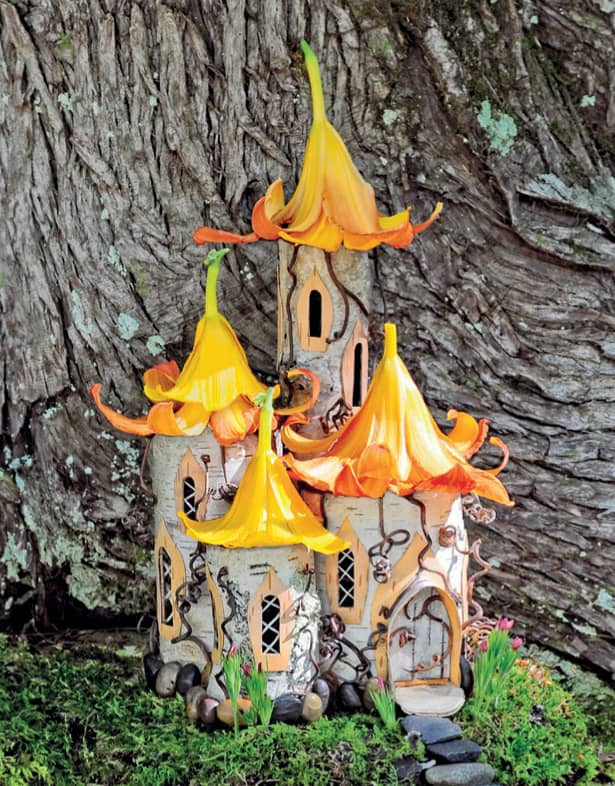
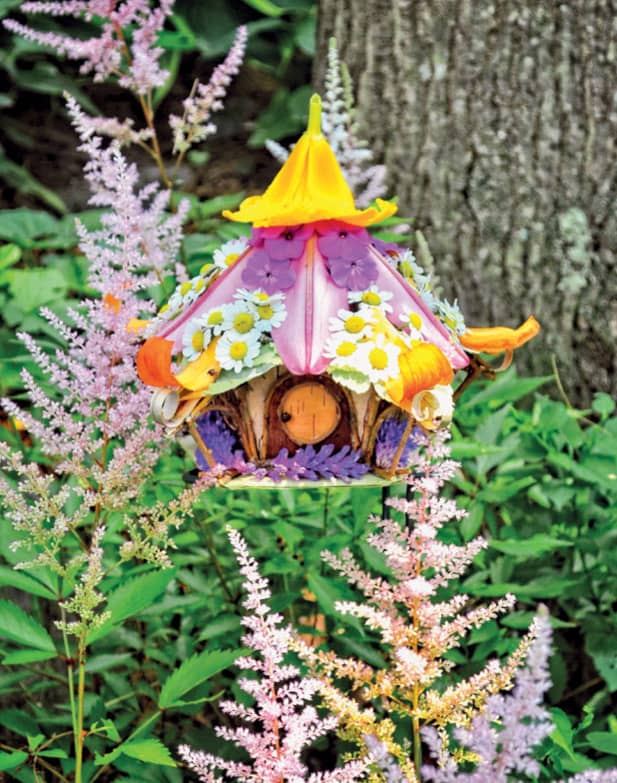
These roofs have it all: color, texture, whimsy, and durability. They are a good choice for removable roofs because they are lightweight.
Live collected flower roofs.
These are for ephemeral, field-based creations only. Though they only last a very short time, flower roofs are truly magical. You can use them with prebuilt houses for photo shoots in order to preserve the memories forever.

Live collected leaf roofs.
Much like flowers, these creations are ephemeral, but beautiful. With some houses, you can get a great photo with live leaves and flowers, and then, if you want to keep the house indoors for longer, you can make a silk botanical facsimile.
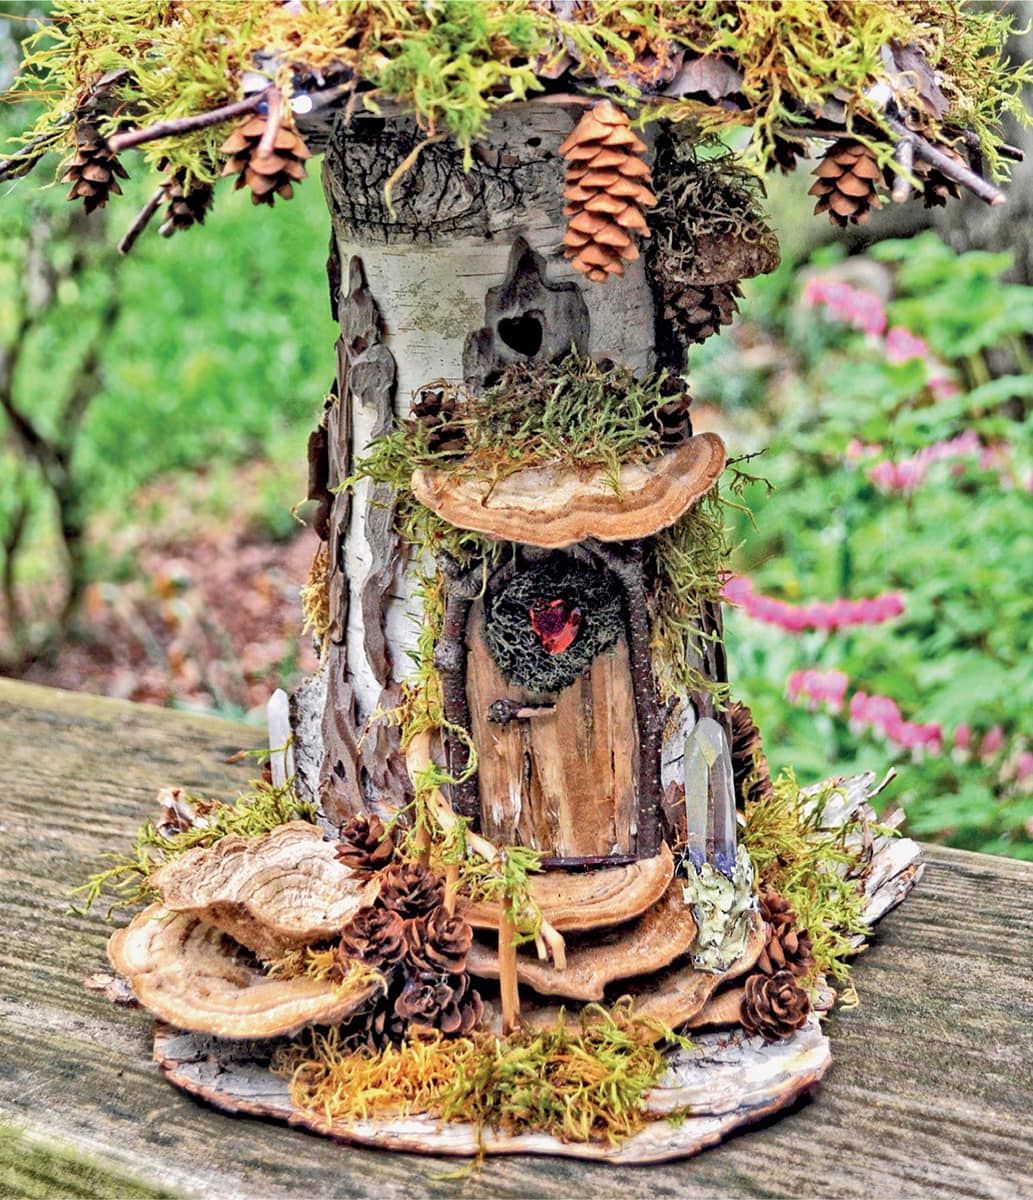
Moss roofs.
Moss is not the longest-lasting material for a roof covering, but it does make a perfect finish for many woodland faerie houses. Use dried, preserved moss from floral supply stores for indoor houses.
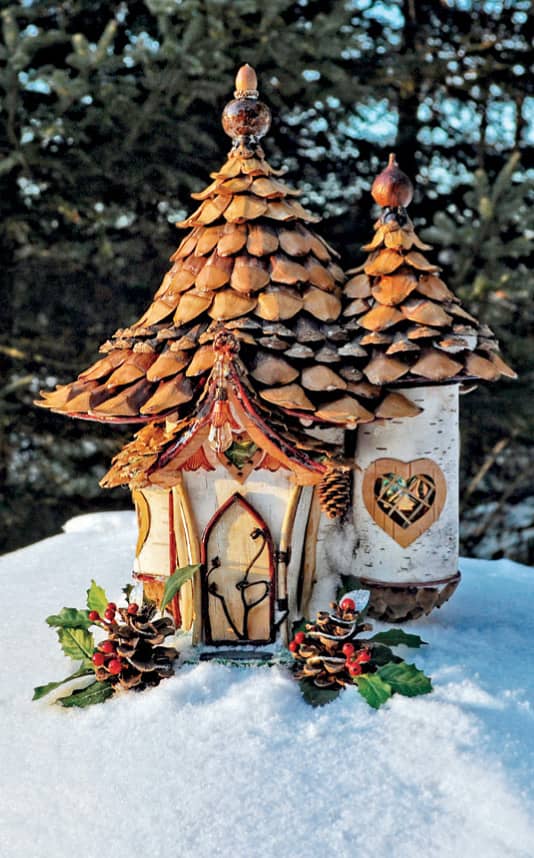
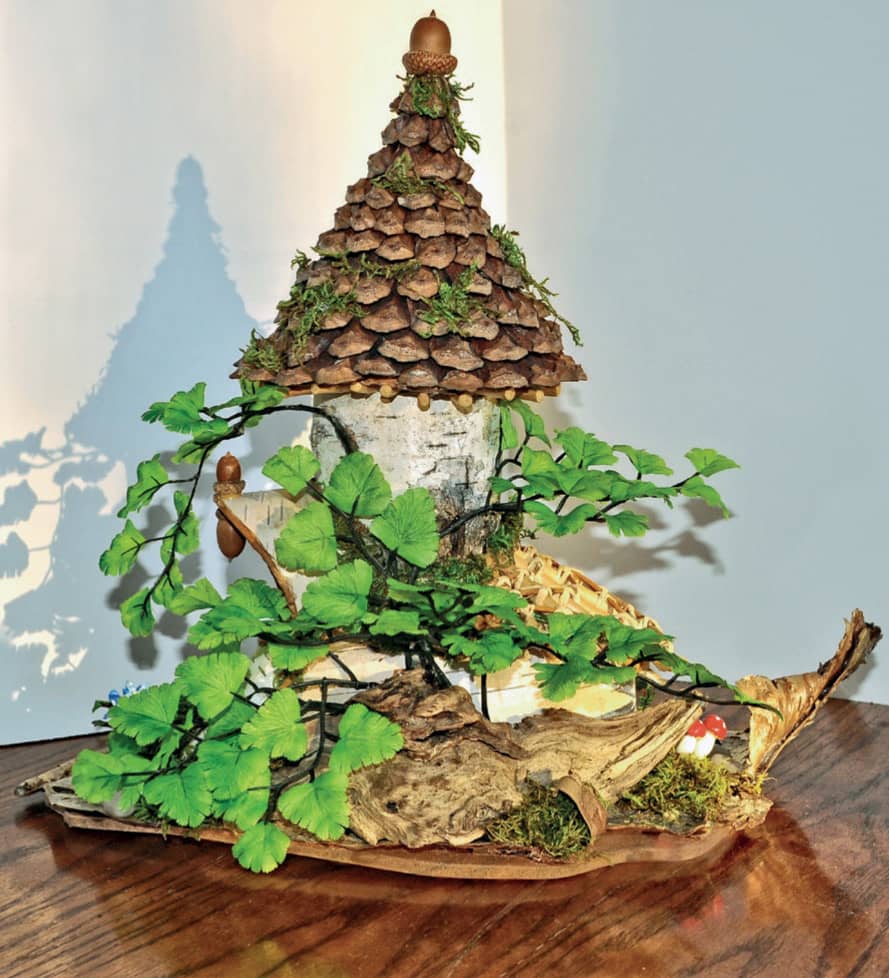
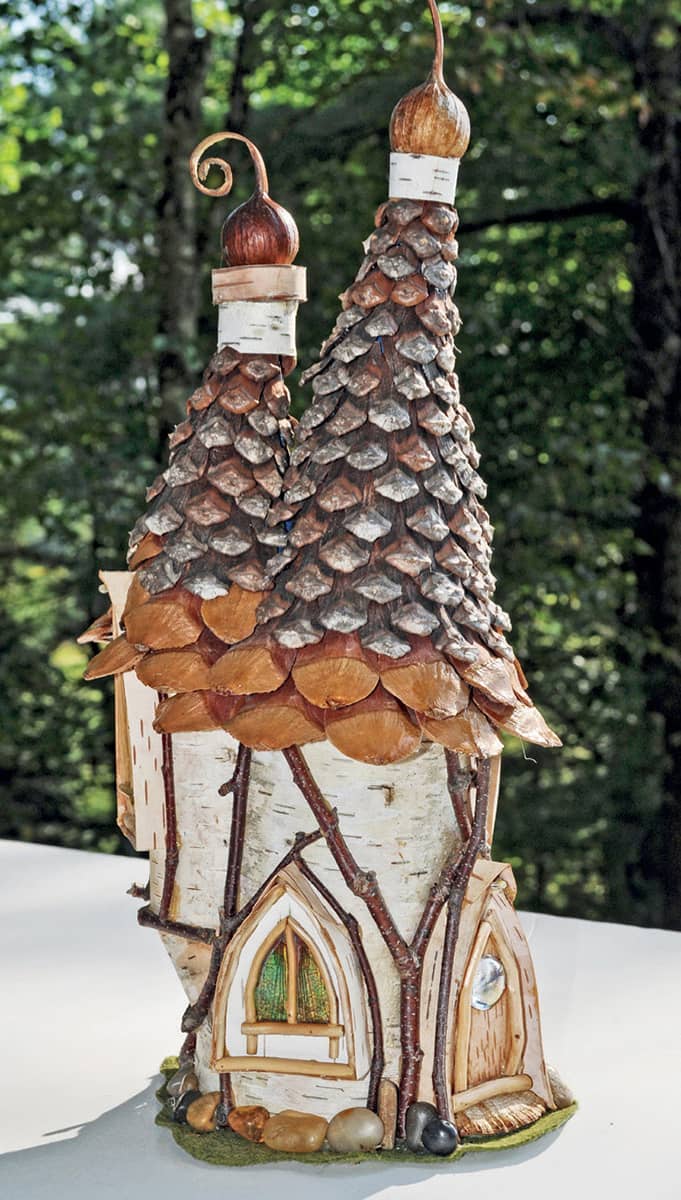
Pinecone scale roofs.
Carefully take apart pinecones and use the scales just like you’d use tiny roof shingles.
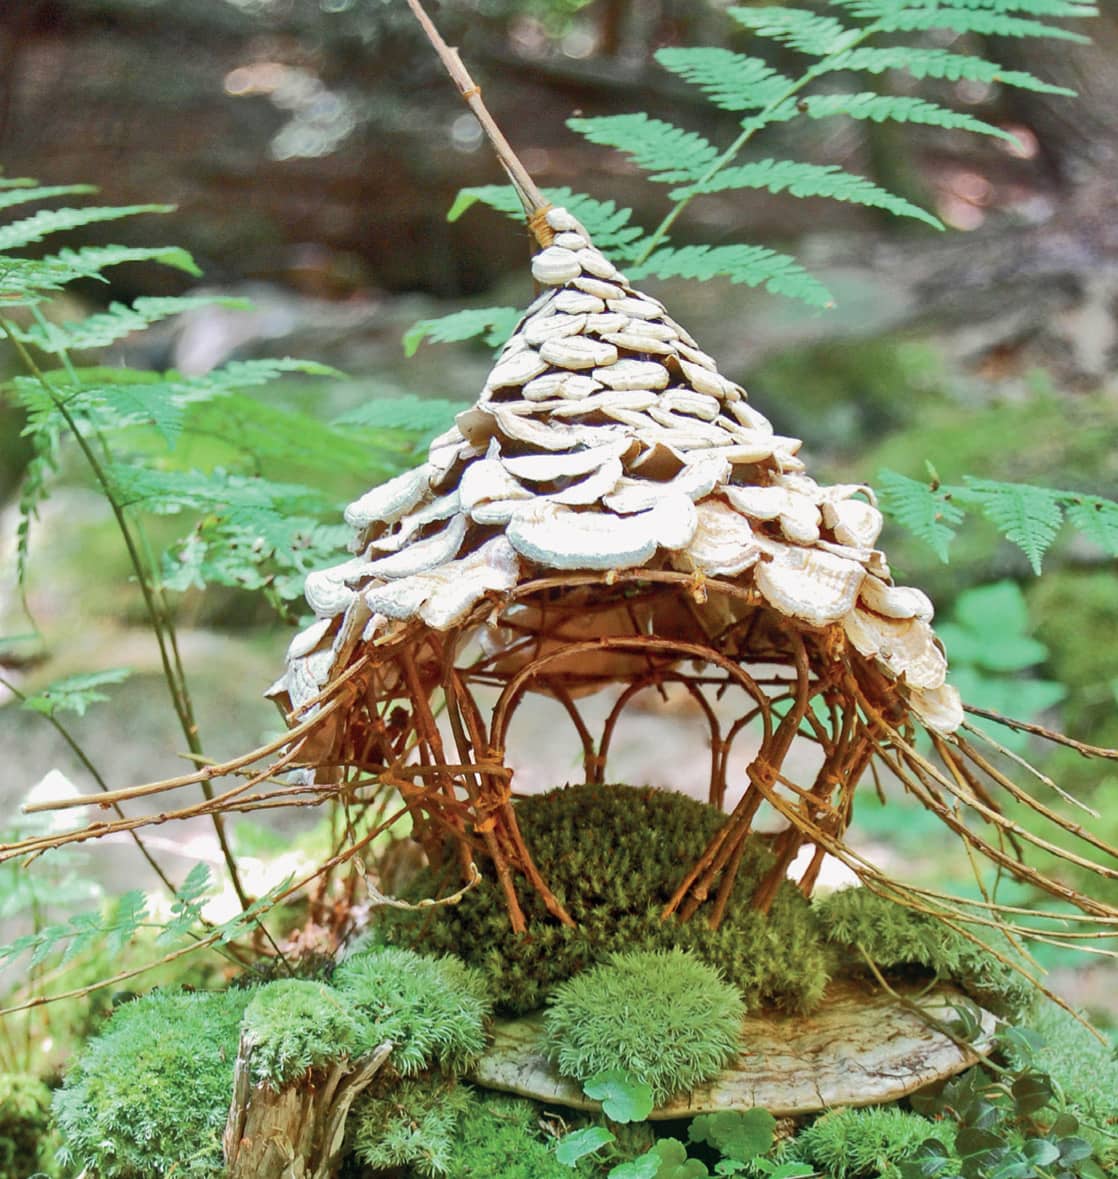
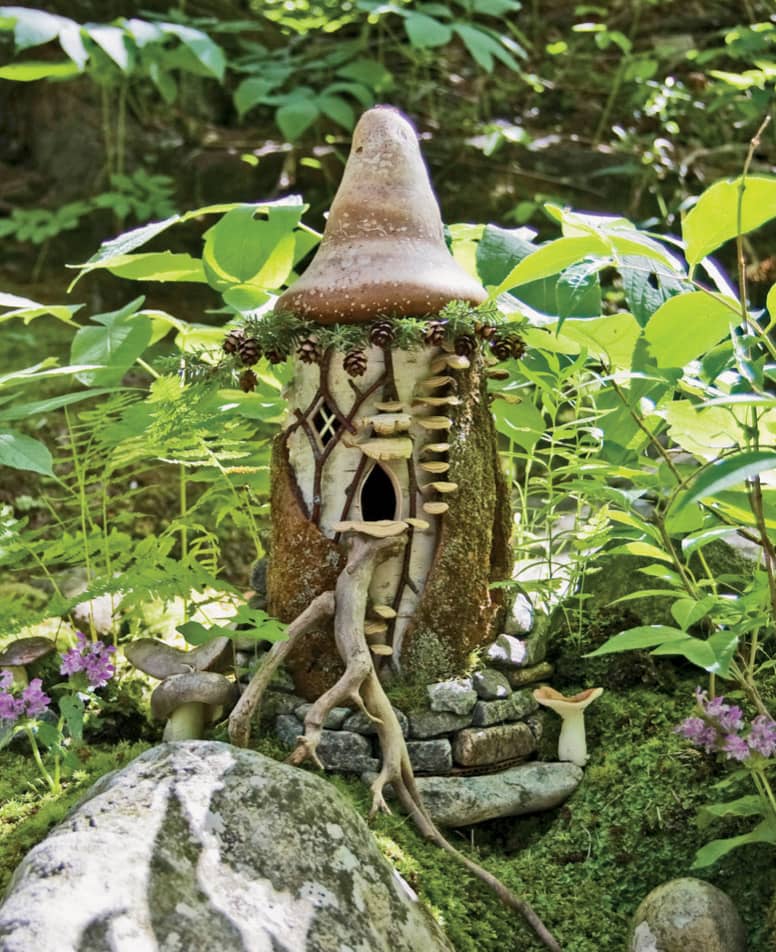
Mushrooms/fungi.
If you’re planning to keep your faerie house for a long time, the fungi you use must be dried and hard. Some last longer than others.
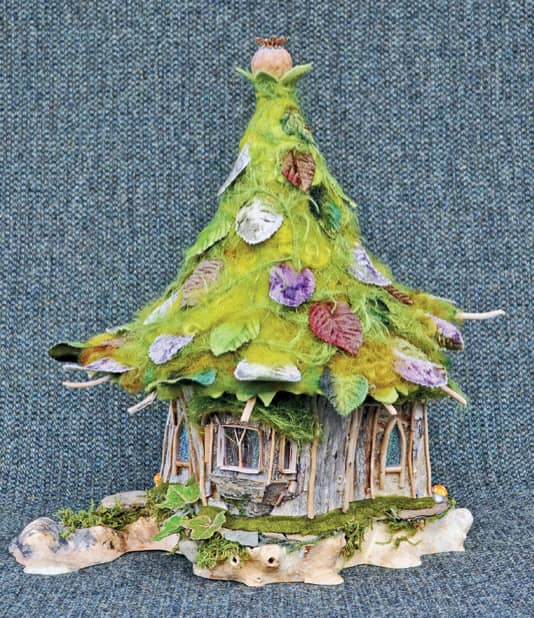
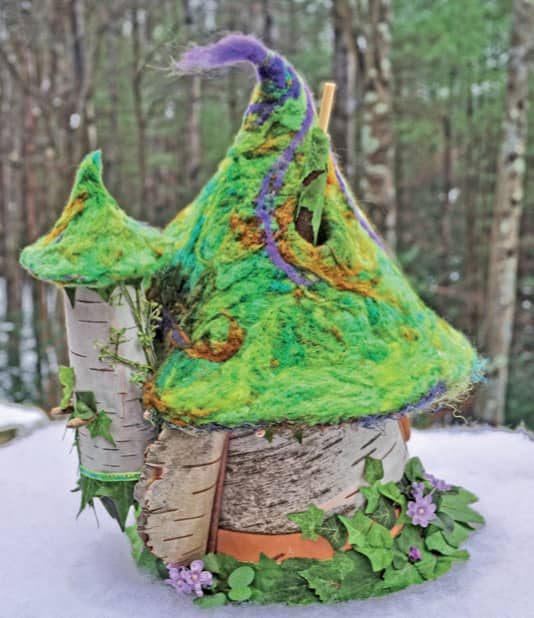
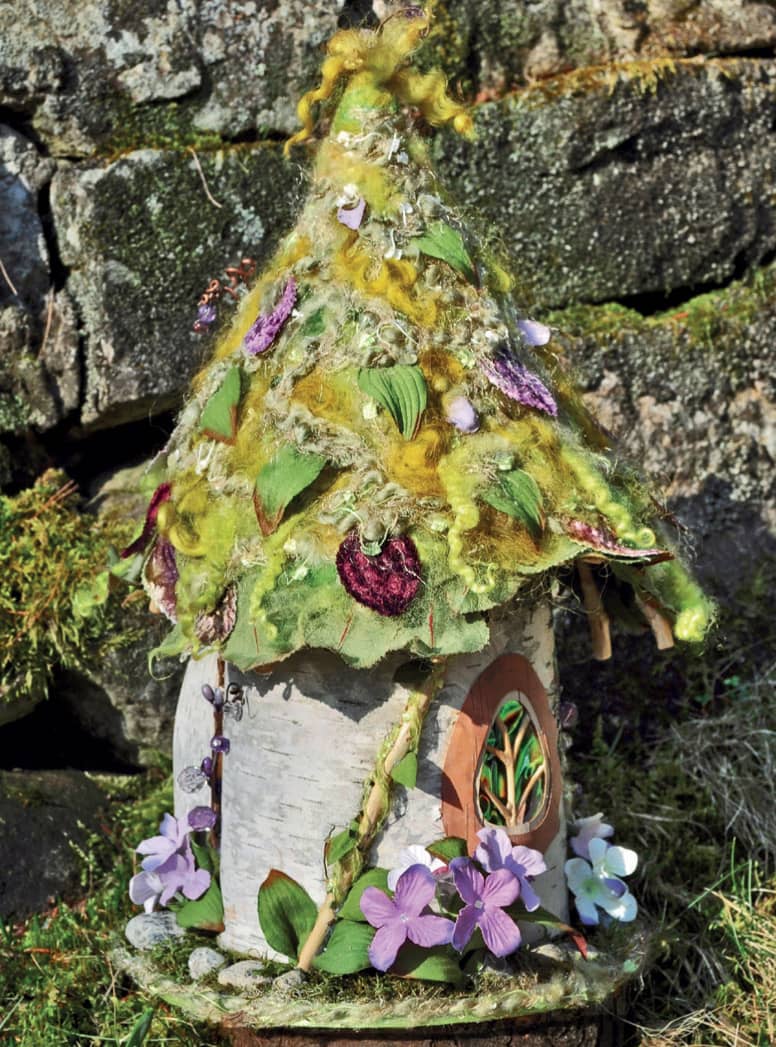
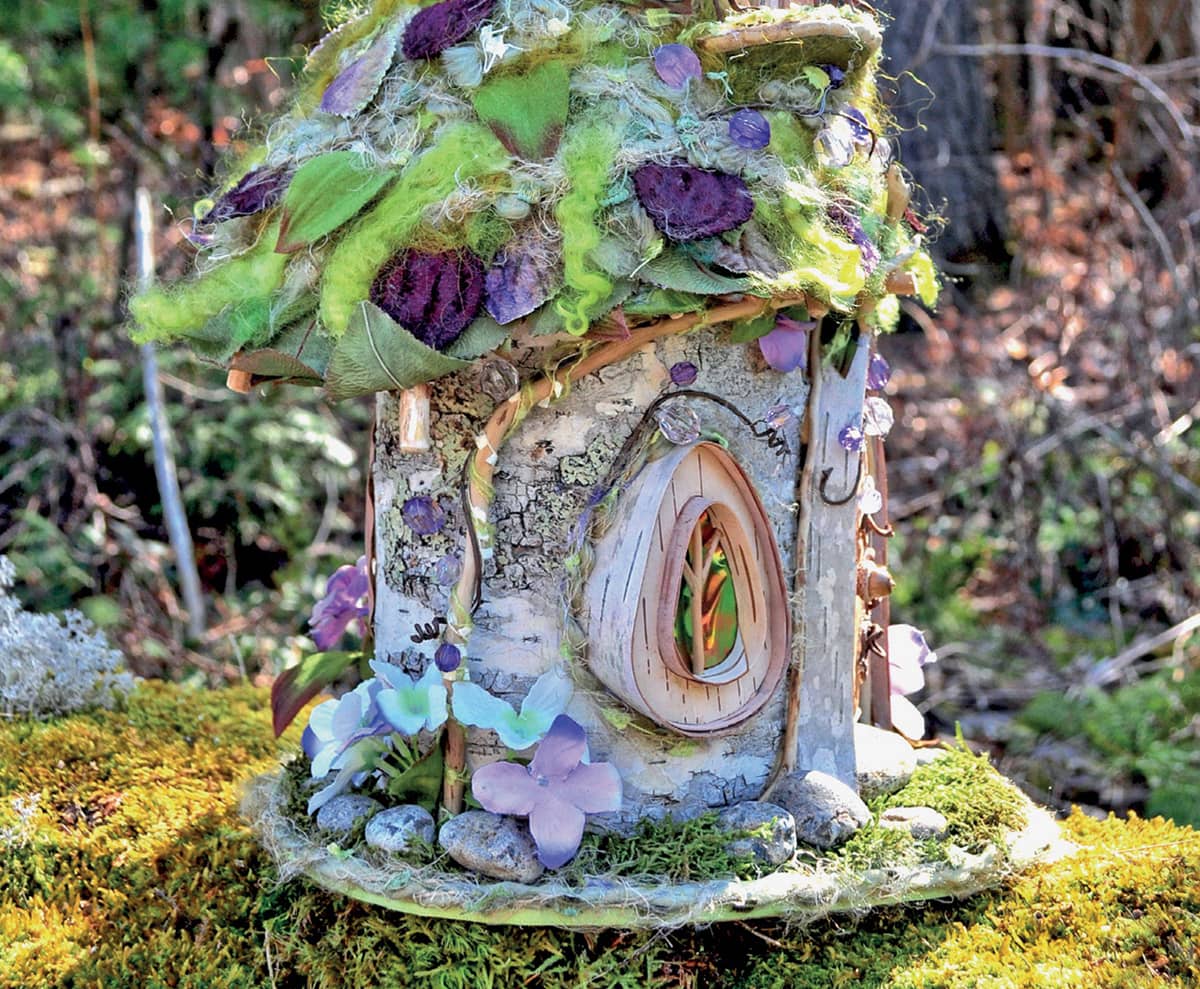
Needle felted roof.
All the whimsy you want in a roof! A middle layer of felt is covered with novelty yarns, raw dyed wool, silk and velvet leaves/flowers, beaded vines, or whatever your imagination inspires.
Single fungus roof.
For houses using a single fungus for the roof, make sure that you choose a variety that is completely dried out and will not fall apart quickly. The fungus should be hard and dense, like soft wood. Many types of shelf fungus will work well. If you live in a humid climate, you may want to seal the fungus with polyurethane. This will reduce the “natural” look, but will keep secondary mold from developing.
HOW TO MAKE A
TWIG FRAME ROOF
It may not look very glamorous, but this roof is the goal for this tutorial (for now). This framed roof with a raffia and felt middle layer is an excellent design to learn because it can be adapted for nearly every situation and finishing material. You can also adapt the construction—as I will also describe in this tutorial—to make a removable roof for nearly any cottage. Later I’ll show you one way to beautifully finish this roof base.
Read through all of the instructions before you begin so you are clear about what you’ll be doing. Most roofs are started once the body of a house has been built, so this tutorial starts at that point.
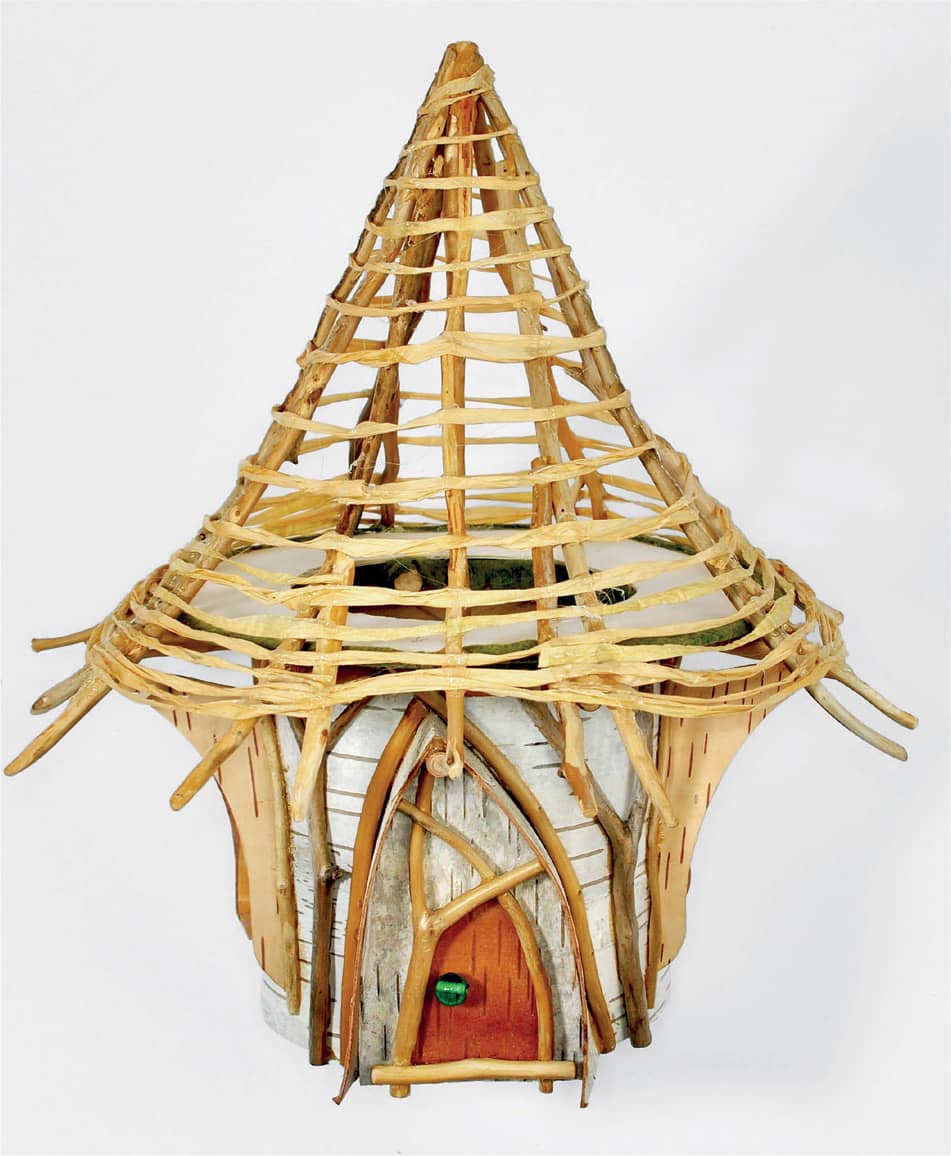
Examples of a finished twig frame roof and the accompanying house.

MAKING THE ROOF
STEP 1
 For both roof styles: Turn the house upside down onto a sheet of acid-free cardboard or matboard. Trace around the outside circumference of the house with a pencil. Cut out the cardboard/matboard slightly inside your pencil line so that the piece of cardboard will fit snugly inside the top of the house and function as a ceiling.
 For the removable roof: Insert the circle into the top of the house and lightly tack in place with three to four small drops of hot glue—it will be removed later.
STEP 2
For both roof styles: Cut six or more roof beams using the fine-toothed saw for flat ends. The number of beams is a style choice. Eight is a good average. The beams should all be approximately the same diameter and length and nicely finished on the ends.
 For the fixed roof: Glue cardboard circle in place so that the cardboard is lower than the top edge of the house wall by the thickness of the beams.
For the removable roof: Do not do this step.
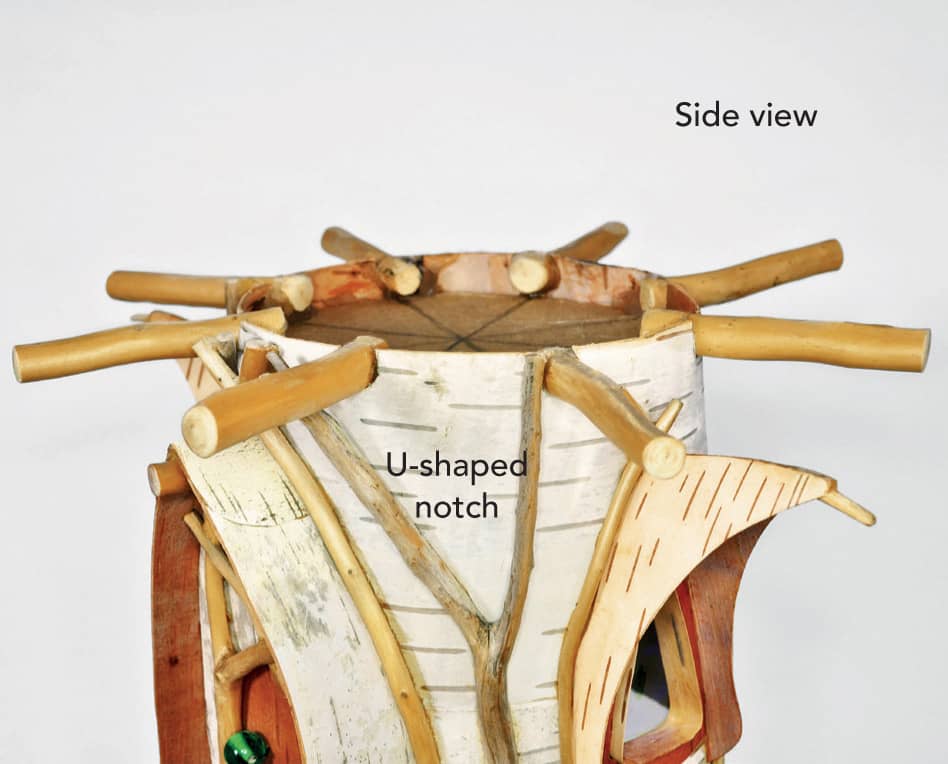
STEP 3
For the fixed roof: Use the X-Acto knife to cut U-shaped notches in the top edge of the house wall to hold the roof beams. Attach the roof beams to the body of the house using epoxy glue on the inside of the notches, extending the beams inside the house a little bit. Do this one beam at a time, letting the glue set before you move to the next one. That way you can make sure all of the beams stay level.
For the removable roof: Do not do this step.
(Handy trick: Once the glue begins to set, turn the house upside down onto a flat surface and adjust the beam so it is pressed flat while the glue finishes setting. Do this with each beam and all the beams will be flat and true.)
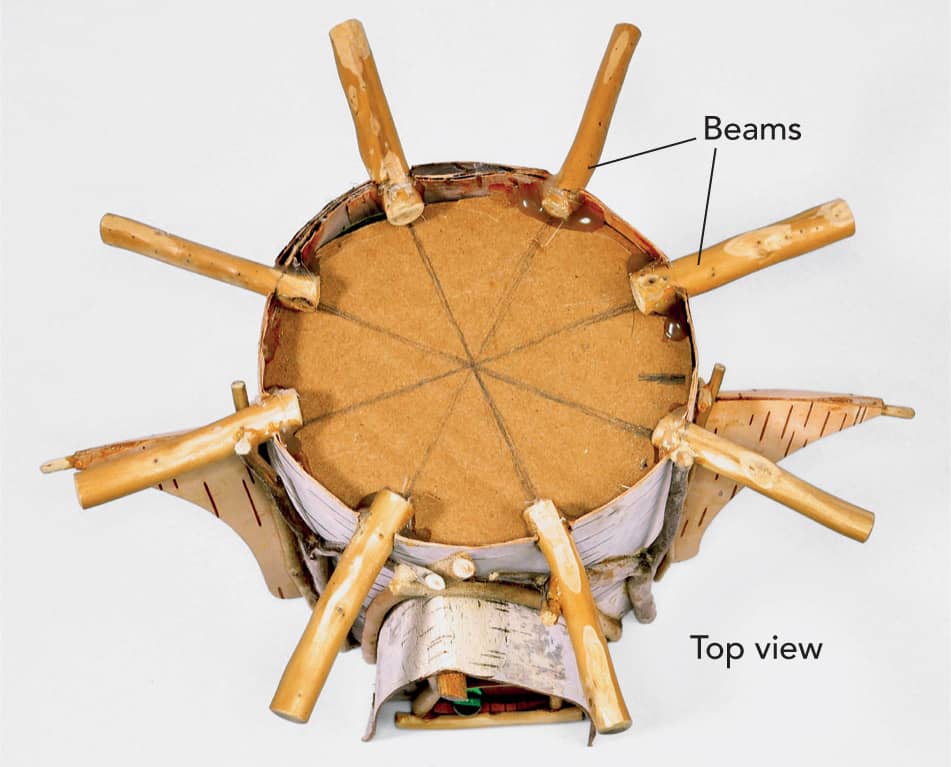
For the fixed roof: Here is a view of how the house looks with all the beams in position for a fixed roof but before they are glued permanently in place. Note how the beams extend slightly to the inside of the house. This allows for extra surface area for the glue to make a solid contact and creates strong joints to support the rest of the roof.
STEP 4
For both roof styles: Create and affix the eaves ring that will support the rafters. To determine the shape and dimensions of the ring, turn the house upside down onto a clean sheet of matboard and trace around the walls of the house.
For the fixed roof: On the paper mark the location of outer ends of the beams. Remove the house. Draw a circle 1/2 to 3/4 inch inside those beam ends. Also draw a circle 1/2 inch inside the outline of the house wall. Cut out the ring.
For the removable roof: Trace around the house wall first. Lay down a few roof beams and trace another circle that is 1/2 to 3/4 inch inside those beam ends. Remove house and retrace the inner line 1/8 inch inside. Cut out the circle.
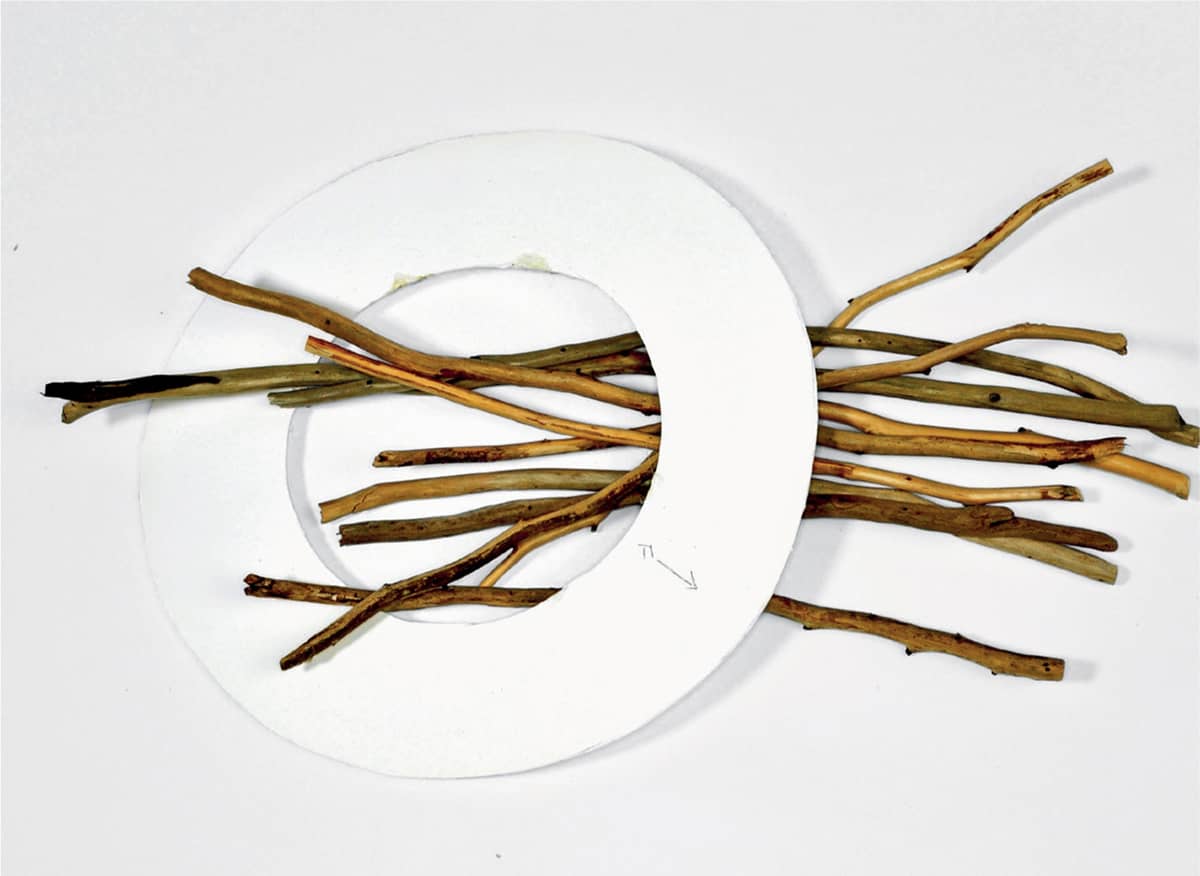
For both roof styles: Collect twigs that will be used for the roof rafters. You will also need a piece of acid-free matboard to create the eaves ring. You will need one good twig rafter for each roof beam, plus some additional twigs that are similar in size and appearance. The main rafter twigs should all have a similar diameter and shape. If you want a pleasing bell-shaped roof, select rafter twigs that have a slight curve at one end and are straight at the other.
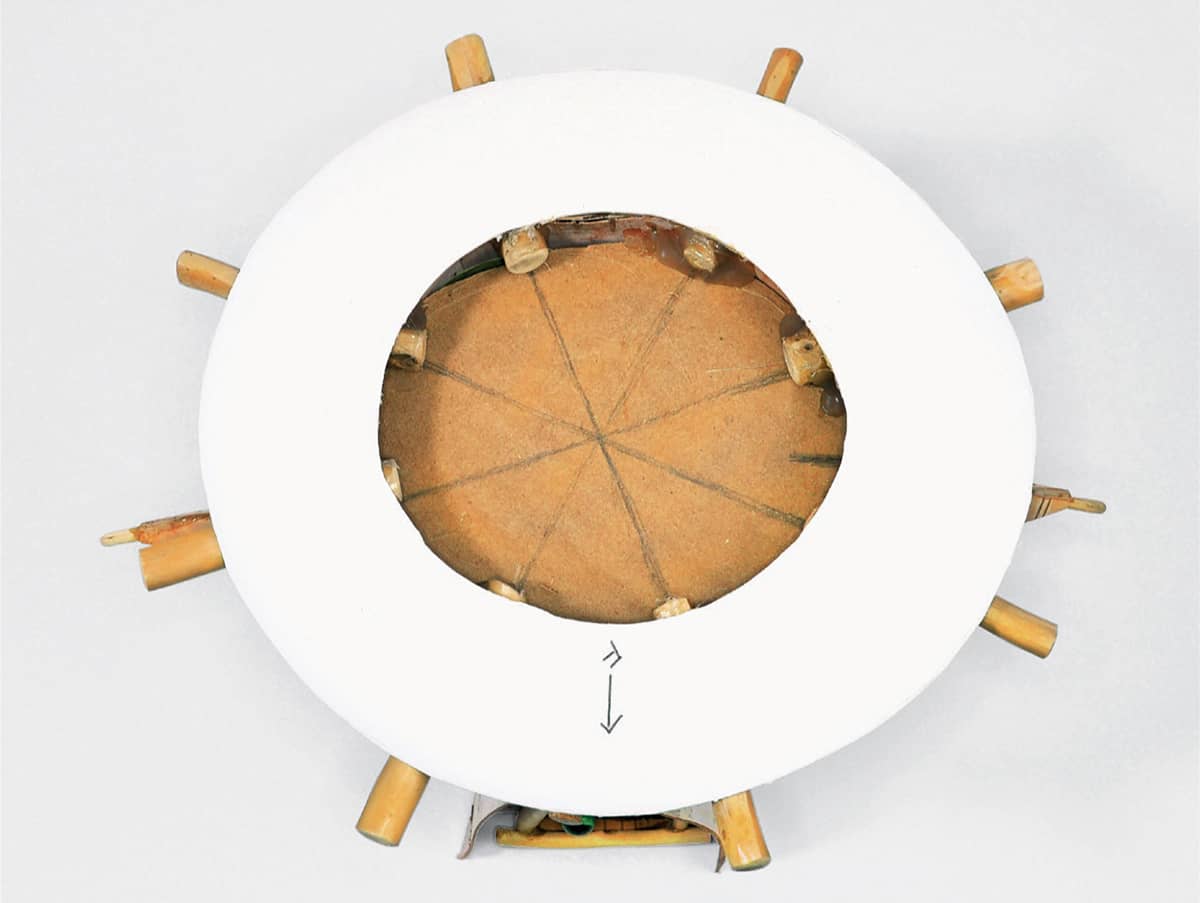
For the fixed roof: This is how the cardboard cutout should fit the house while it is stilling on top of the beams. Note that the front of the house is indicated with an arrow drawn in pencil on the top of the eaves ring. This helps to ensure that the correct side is down—not all structures are perfectly symmetrical.
STEP 5
For both roof styles: Cover the matboard eaves ring with your choice of desired material, such as felt or paper to give a decorative finish to the underside of the eaves. Cut the decorative material so that it is larger around the outside edge and smaller than the inside edge of the ring. Fold over the outside edge and glue the fabric to the board well, so that the good side faces down.
For the fixed roof: When you have completely covered the ring, glue it (good side facing down) to the beams using wood-colored epoxy.
For the removable roof: Once the ring is covered, place it on the table good side up. Attach it to the house by applying a bead of hot glue to the rim of the house wall, then quickly turning the house upside down and centering it onto the felted ring. Take the twig beams and glue them evenly around the ring with wood-colored epoxy. Apply glue also to the end of each beam where it is meeting up with the wall of the house. Do this step well because the weight of the roof will rest on this ring.
STEP 6
For both roofs: The height of this support pole will define the total height of the roof. To determine the ideal height for this central pole, hold one of the selected rafter twigs in position from the top of the support pole out past one of the twig beams to make sure that enough of the curved end of the rafter twig extends well beyond the outer end of the roof beams. The height of the roof is simply a matter of personal preference and not a specified measurement, so make this adjustment to your own taste. Just make sure that your rafters are long enough to extend beyond the roof beams when the other end is attached at the peak/top of the main pole support. You will need to lower the height of the support pole if the roof rafters do not meet the beams properly.
For the fixed roof: Glue the long straight support pole twig to the center of your cardboard insert using epoxy glue.
For the removable roof: Do the same thing, only glue very lightly—you will remove this later.
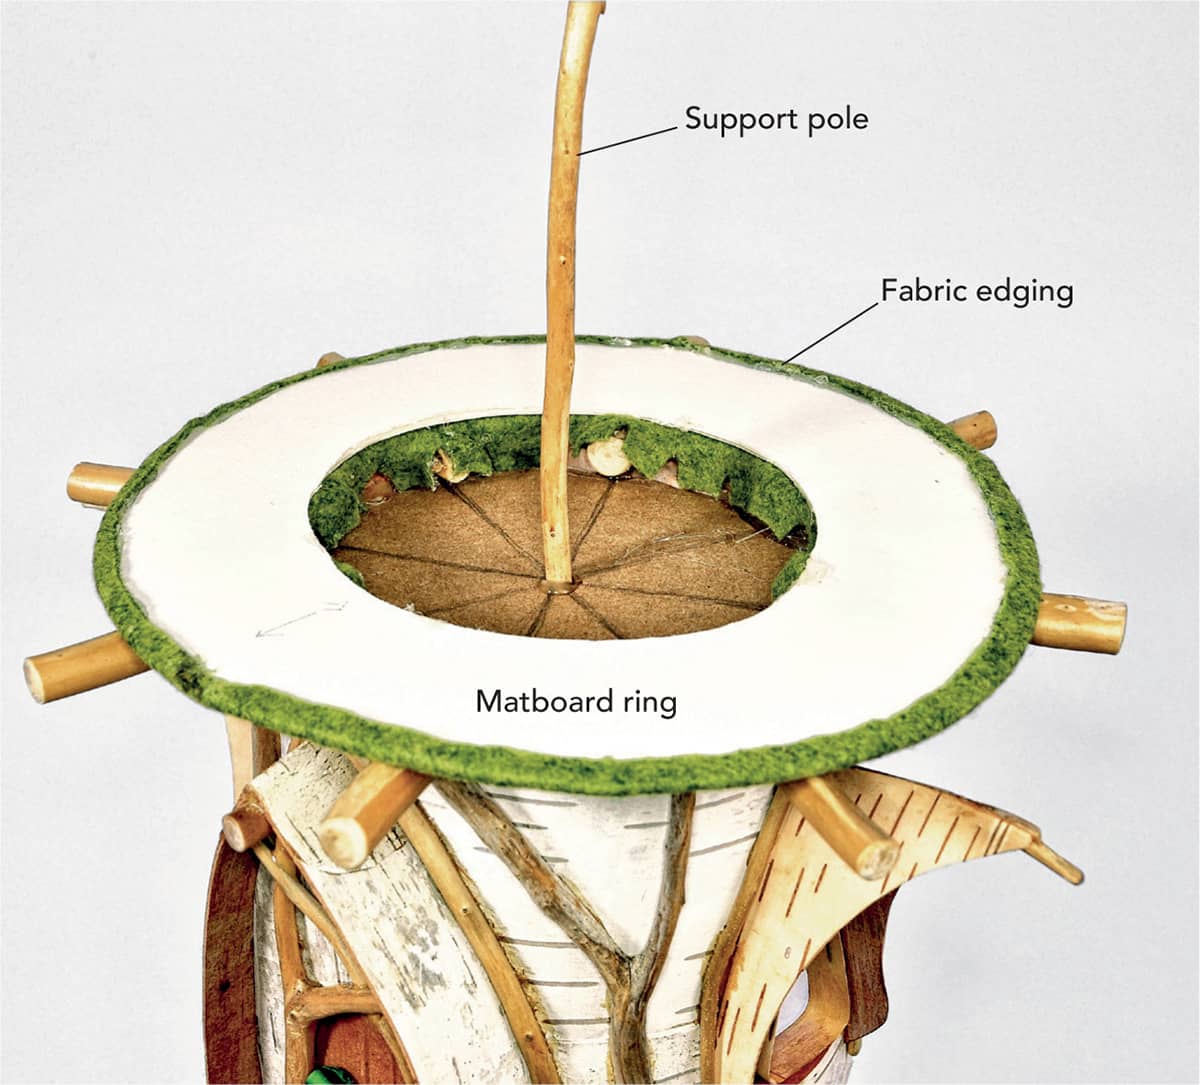
The felt-covered eaves ring glued onto the beams for the fixed-roof design. The central twig is also glued firmly in place. For removable roofs, the ends of the twigs inside the ring do not show as they butt up against the wall of the house. Also, the central support twig is very lightly glued in place to be removed later.
STEP 7A: PRIMARY RAFTERS
For both roofs: You will now begin to install the individual rafter twigs. Do this step carefully because the shape of your roof depends on good technique and attention to detail in this step. Use the straight ends of the rafter twigs at the peak of the roof and the curved ends at the bottom (beam end) to give a pleasing silhouette to your roof. Cut the specially selected matching rafter twigs to approximately the same length and trim the curved ends so they all have approximately the same angle cut to the others.
For the fixed roof: Use wood-colored epoxy, not hot glue, to glue the rafters in place. Watch for drips and remove them before they set. Use wood-colored epoxy glue to attach each primary rafter to the central support pole and to one side of the appropriate roof beam. Use small amounts of epoxy glue to simply anchor the rafters in place. Once they are all dry, you can apply more epoxy to each rafter joint to make sure it is solid, taking care not to drip.
For the removable roof: Wrap the top of the center pole in the waxed paper to keep glue from sticking to it. Secure with tape. Use tiny drops of hot glue to affix each rafter to each beam. Be careful to not get glue on the felt/eaves ring. Use epoxy glue to affix the other ends of the rafters to each other as they rest on the waxed paper covering the tip of the central support pole. You’re going to need to remove the roof afterward, at which time you will reinforce all the joints. Glue just enough to hold it together.
STEP 7B: SECONDARY RAFTERS
For both roofs: Once the primary rafters are securely attached it is time to apply the secondary rafters. These are the next-best twigs in your collection and ideally should have curved ends similar to the primary rafters. Trim off 1/2 inch from the top end of the twig. Glue the secondary rafters in place so that the curved end is attached to one of the beams already attached to a primary rafter and the straight end is attached to the adjoining primary rafter. Attach all secondary rafters in the same manner.
For the removable roof: Do the same thing, using small dabs of epoxy at the roof top and tiny drops of hot glue to (temporarily) attach to the beams.
STEP 7C: TERTIARY RAFTERS
For both roofs: After the primary and secondary rafters are attached, it is time to install the tertiary rafters. These twigs should be about one-third the length of the secondary rafters. Attach these twigs onto the opposite side of each beam where the primary or secondary rafter is already attached. Glue these into position so that the outside ends roughly match the primary and secondary rafter ends to make a full and complete circle around the edge of the roof. Each beam should now have two rafters attached to it.
For the fixed roof: Use epoxy glue at both ends.
For the removable roof: Use epoxy glue at the top and tiny drops of hot glue at the beam/bottom ends.
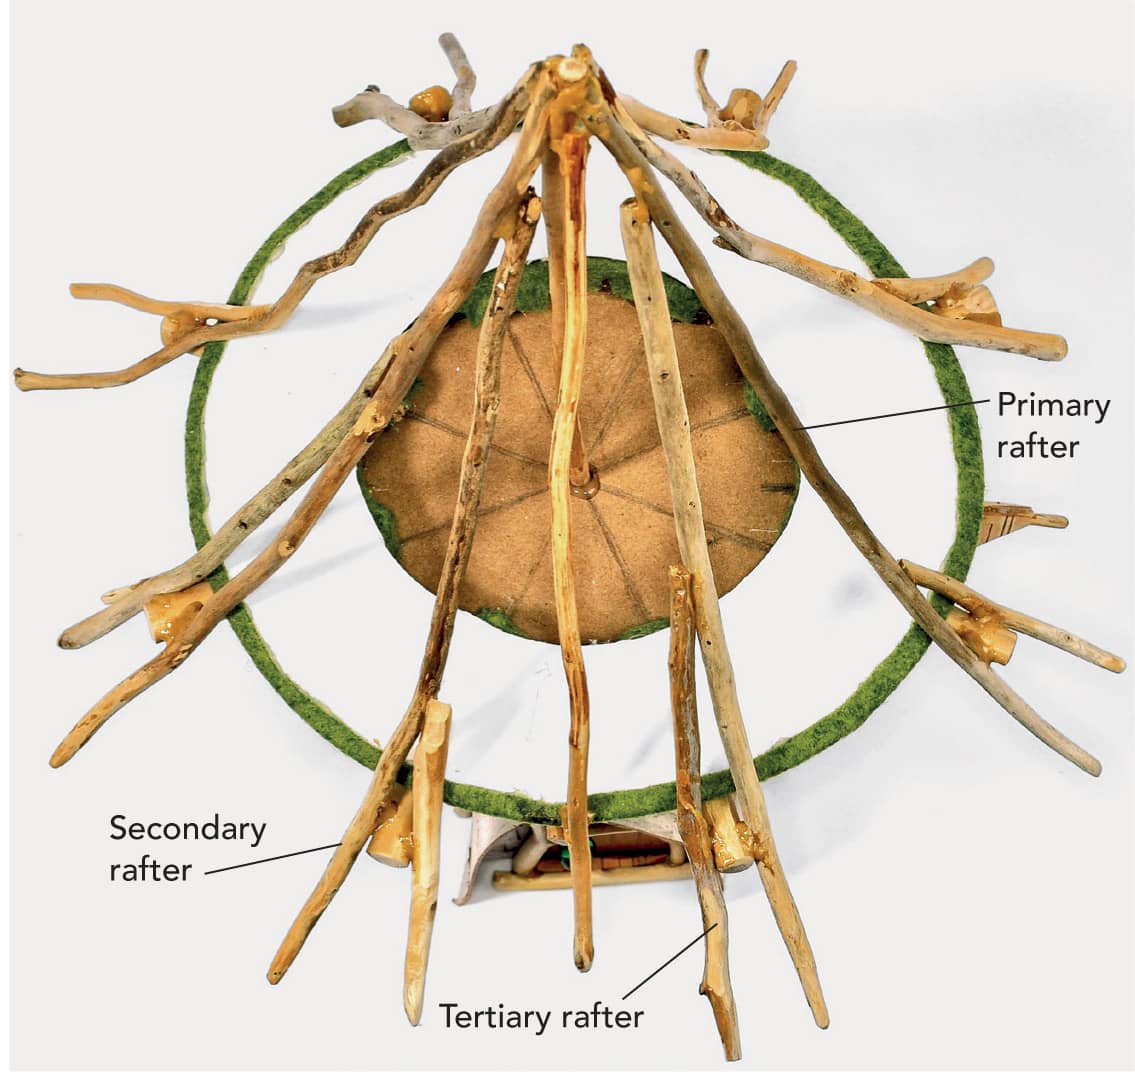
Select the four best rafter twigs that match one another and use these as your primary rafters to be installed first. They should be equally spaced, roughly speaking, one at each quadrant, and are attached first to help establish the roof shape. Trim the top ends of the primary rafter twigs so that there is a good surface joining the central pole, then add the rest of the rafters.
STEP 7D: DOORWAY RAFTER
For both roofs: The final rafter to be put in place will be a single rafter that is centered over the doorway. This rafter can be longer or shorter than the primary or secondary rafters, it is simply a matter of personal preference. Note that a support beam from below is not required for this rafter. Just make sure that it follows the same general shape and curve of the primary and secondary rafters.
For the fixed roof: Glue with epoxy at both ends, but attach to the eaves ring if there is no available beam for this rafter.
For the removable roof: Attach with epoxy glue at the top end only. Allow the lower end to be free for now. For this roof only, go back to all the epoxy joints above the ring line and reinforce with extra epoxy. Glue the tops of the rafters to one another, not to the central pole.
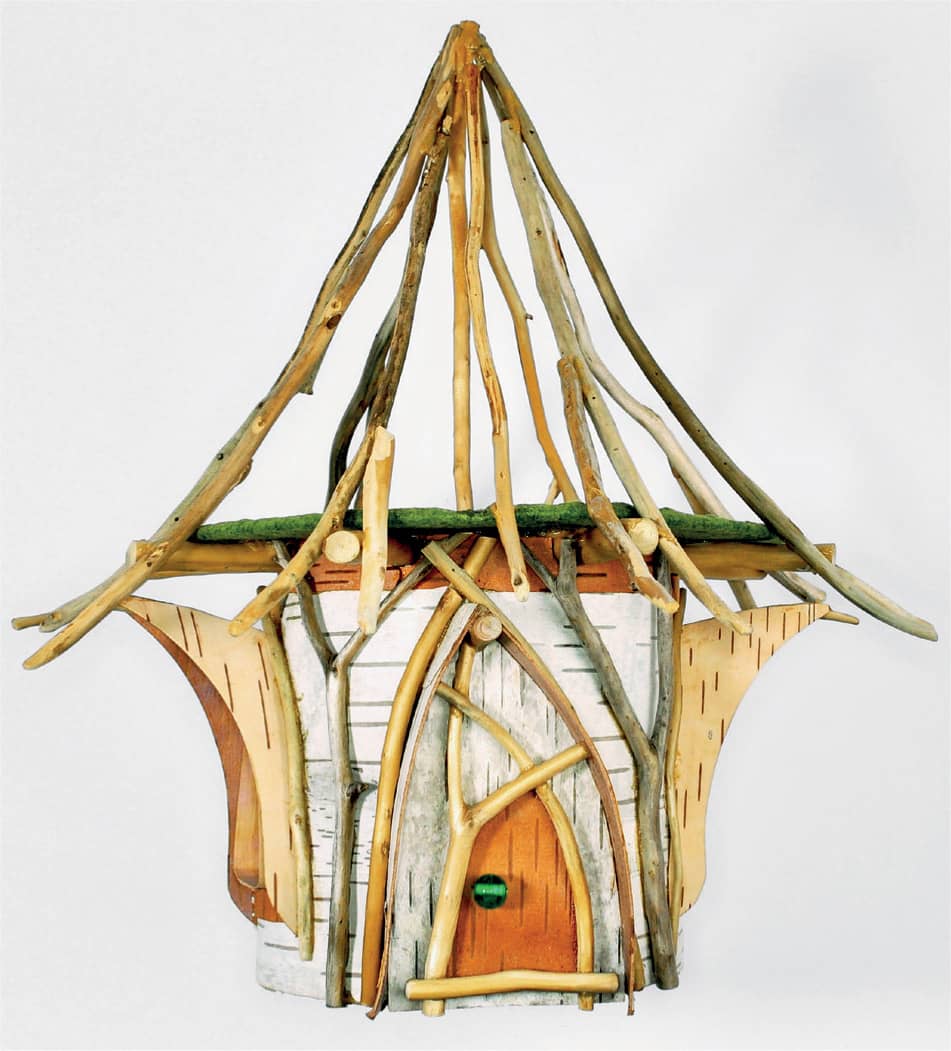
Roof with all rafters glued into place. Both styles of roofs should look similar to this.
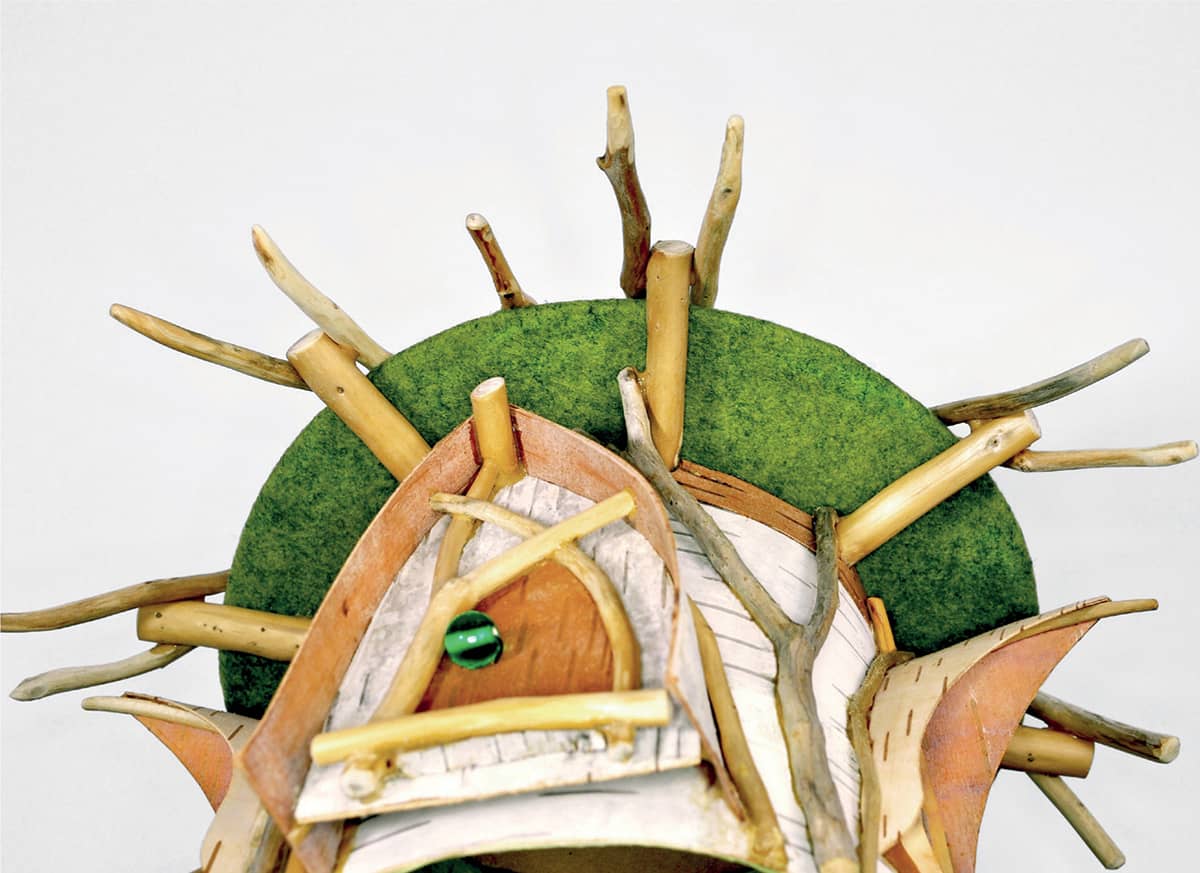
From below, both styles of houses should look similar to this except the removable roof will have tiny dots of hot glue joining the rafters to the beams. This image shows how the tertiary rafters are matched to the primary and secondary rafters on either side of each beam. You can see how important it is not to let epoxy glue drip while you are attaching rafters for a fixed roof. The key is patience! Let each piece dry before gluing the next.
STEP 8A
For both roofs: Using a hot glue gun, attach strands of raffia to the rafters in a spiral pattern starting from the top of the roof and working downward. Only a small drop of hot glue is necessary to attach the raffia to each rafter. Space the strands approximately 1/2 inch apart at the top of the roof and space them gradually closer together as you approach the bottom. Apply the raffia below the eaves ring but not all the way to the ends of the rafters. Space these last few strands closer together.
STEP 8B
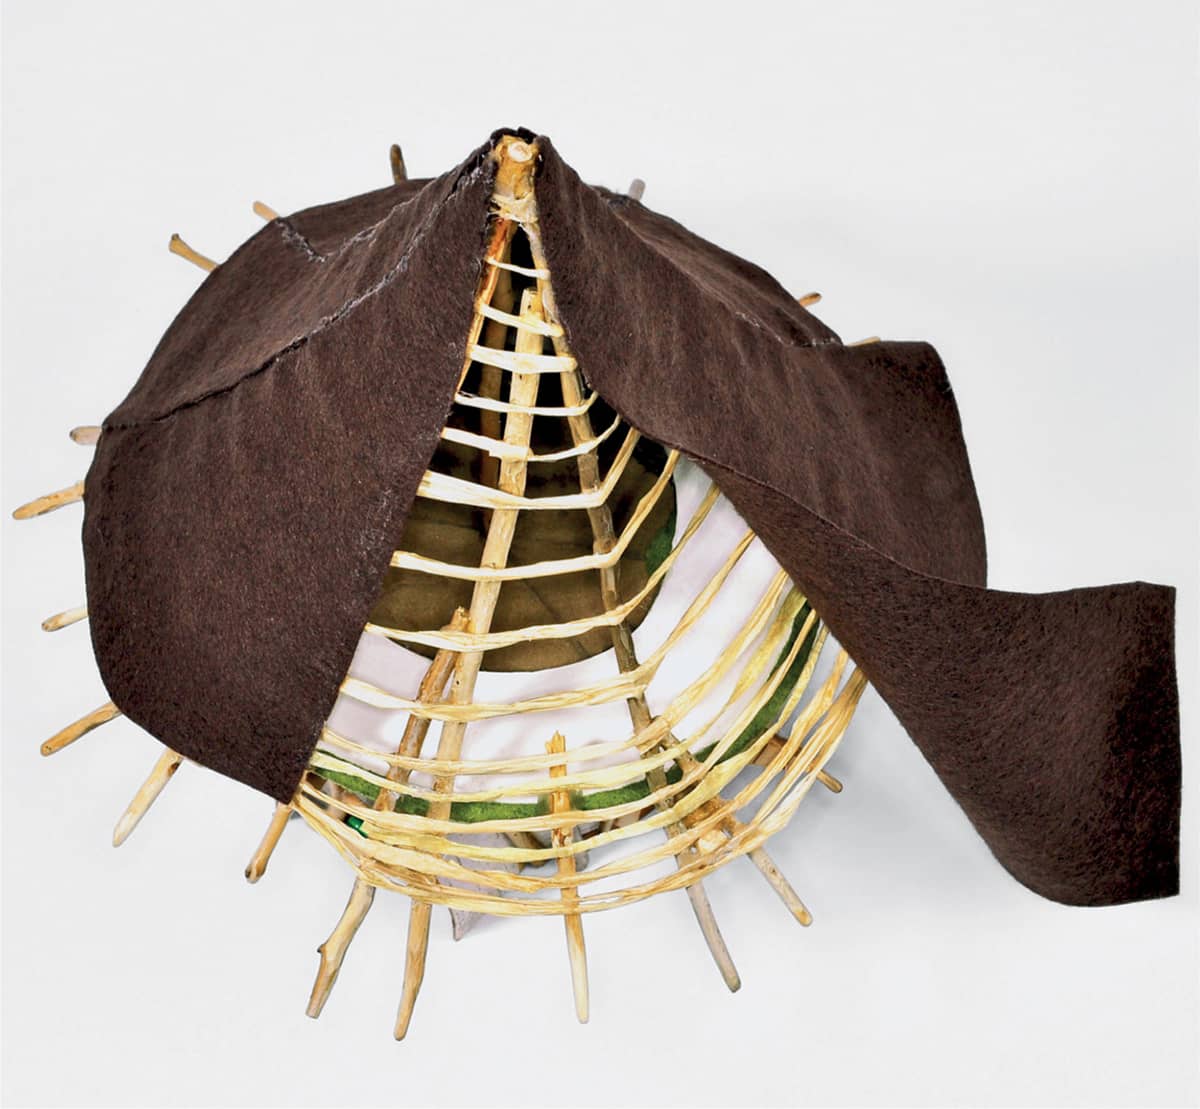
For the removable roof: Using a sharp craft knife, cut the twig rafter frame free from the beams at the glue dots. Gently remove the twig frame. Pull out the central support pole and discard. Pull out the initial cardboard insert circle and discard. Pull out any loose bits of waxed paper and discard. Clean and trim any glue drips. Apply small dabs of epoxy glue to all wood joints if needed. Replace roof onto house.
STEP 8C
For both roofs: If you plan to apply lighting to your roof, do that next before applying the felt layer.
For the removable roof: Keep in mind that the lights applied to the roof will not be able to be attached to the body of the house. However, a lighted roof can illuminate the interior of a single room house very well.
Strands of raffia are wrapped around the roof support structure to strengthen it and provide a gluing surface for the roof covering.
STEP 9
For both roofs: Install the underlayer for the roof skin. Ordinary felt works really well for this step because it can be stretched slightly if needed to fit the natural curves and bumps made by the twig rafters while still giving a smooth continuous cover upon which the finished roof materials will be applied. The color of felt to be used depends on the material you will be using on the outer, visible layer of the roof. Silk botanical or needle felted roofs work better with green felt as the underlayer because it gives a natural look.
Begin by cutting out triangular-shaped pieces of felt that closely match the space between the major rafters. Depending on the size and shape of your roof this can usually be achieved using six large pieces. The important issue is to match up the edges of the felt with primary and secondary rafters going all the way from top of the roof to the bottom of the raffia. Apply the felt with hot glue. Many small drops of glue are preferable to large amounts that might drip down onto the inside of the house. Start at the top of the triangle and work down. If desired you can also attach the felt to the freely floating raffia if desired, but the felt needs to be firmly attached to all the wood raters.
Triangular strips of felt are glued to the roof structure to create the roof underlayer.
Here we have the finished framing and roof ready to be decorated with the final layer of covering materials.
For the fixed roof: Turn the house over and trim off the excess felt at the bottom edge, leaving a 1/8-inch margin of felt that extends beyond the last raffia strand.
For the removable roof: Simply remove the roof to trim the felt.
Stretch and adjust the felt triangle during the attachment process as needed for a smooth fit, but do so gently with the removable roof as it is more delicate.
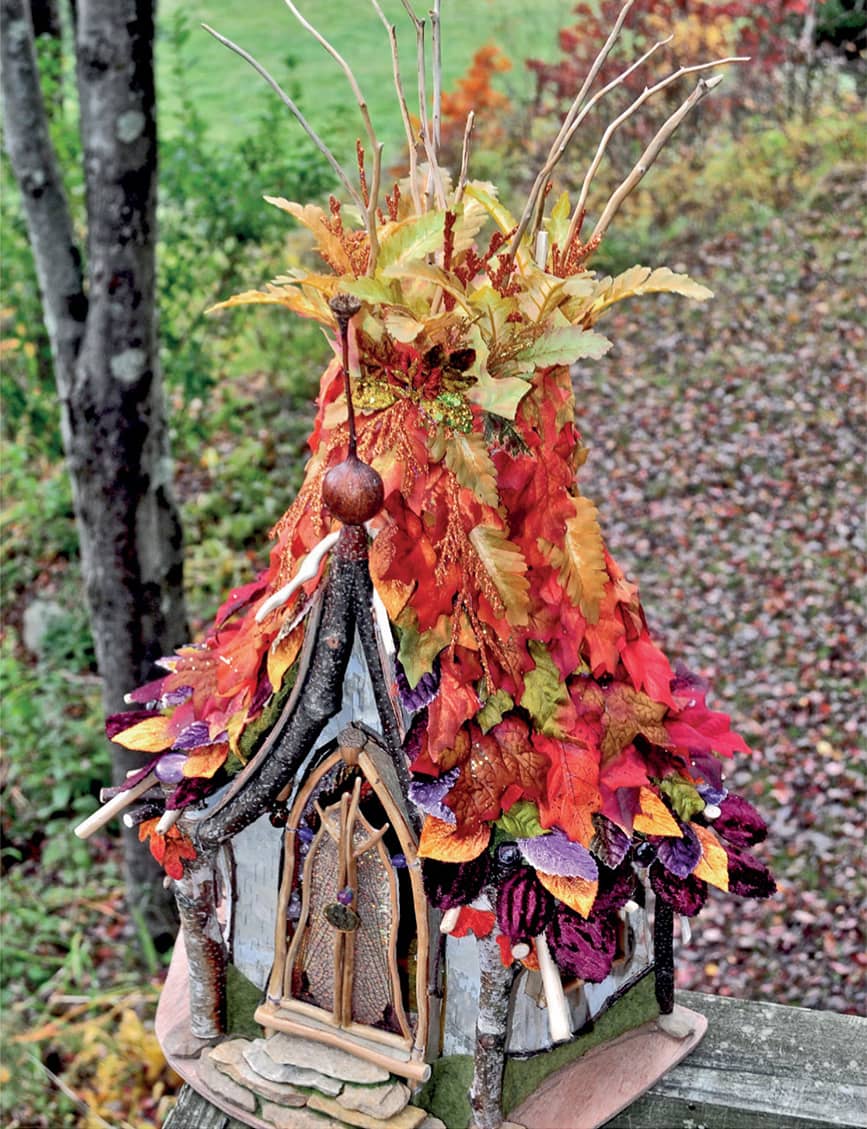
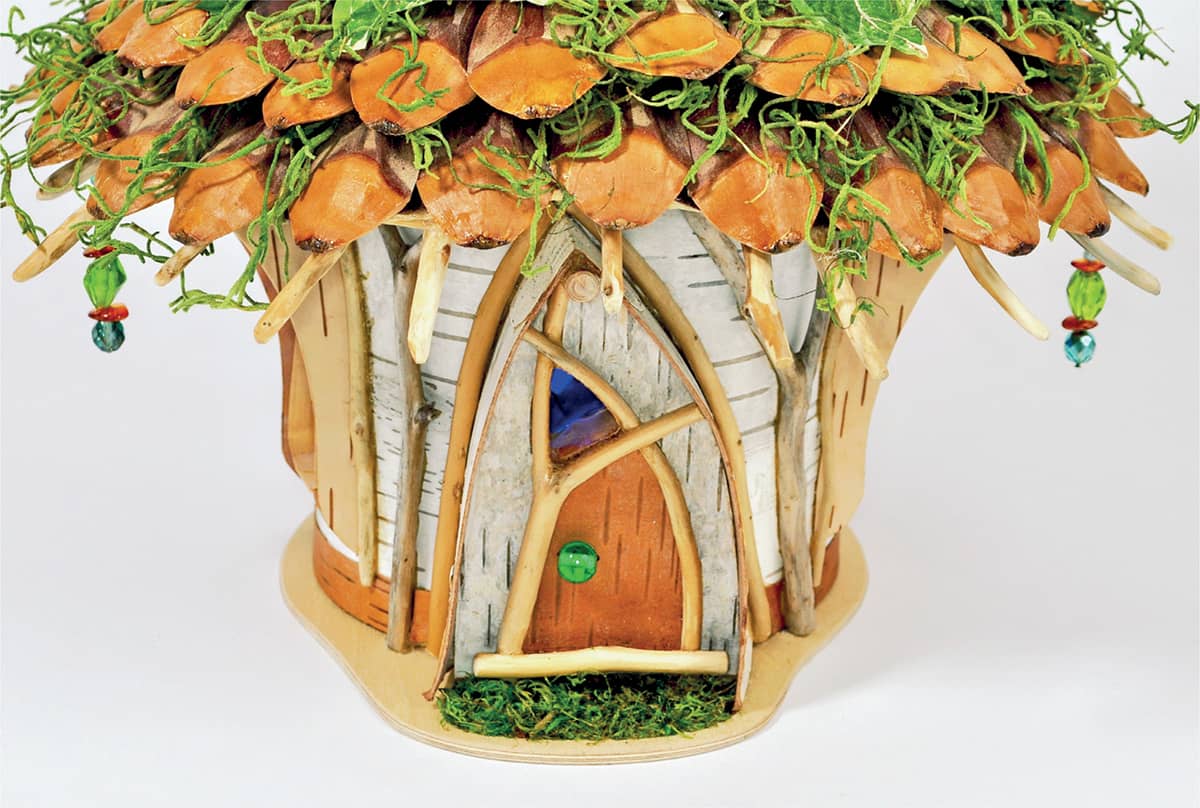
COVERING THE FRAMED ROOF WITH PINECONE SCALES AND SILK BOTANICALS
Now we can apply a decorative finish to the roof. The steps are the same for both the fixed and removable roofs.

Here are the various silk leaves for this roofing project. You can see a variety of sizes, colors, and textures, but they all look good together.
STEP 1
Prepare the pinecone scales. Any large conifer cone can be used. These cones are from sugar pines, which I purchased from reputable sellers on eBay who collect them in a sustainable way.
Cut off the individual scales as close to the core as possible. With some cones you can pull the scales off the core with just your fingers. This is the preferred method because it causes the least amount of damage to the scales. Discard split/broken scales.
Trim the scales to make them ready for use. Most scales have a tough ligament where it was connected to the cone. Trim that off. You may also need to reshape the lower edge of some scales with sandpaper so they are more uniform and rounded.
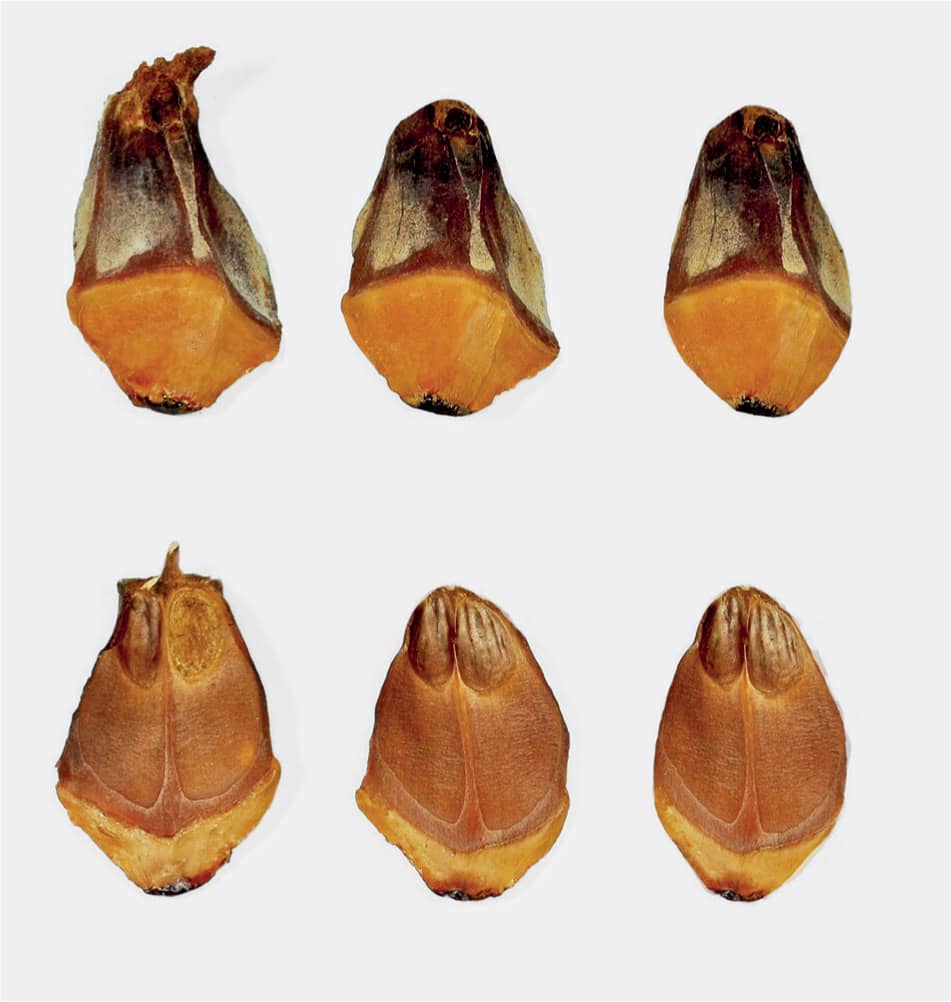
The image [above] shows this process. Scale #1 shows the top and bottom views of the scale as it came off the cone. Scale #2 shows how the top of the scale has been trimmed and rounded using the needle nose pruners and sandpaper. Scale #3 shows how the bottom edge has been trimmed and rounded using only sandpaper. This scale is now ready to be applied in a roofing project.
STEP 2
Apply the scales as shingles. Use the largest prepared scales at the bottom, gradually using smaller and smaller scales as you work up the roof. Begin laying down the lowest/first row of scales starting at the back of the house, working around the roof returning to the starting point. The reason: sometimes the final few scales need to be trimmed or narrowed in order to finish the row. Keep that less visible by starting in the back. Always use the best materials on the front.
Hot glue is easiest for this step, but tends to come away from the scales over time. Epoxy is better but takes longer to apply. Whichever glue you choose to use, application is fairly straightforward: simply dab on a suitable amount of glue to just the top of the back of the scale and press the scale down into position close to the previous scale. You may need to trim and adjust the scales for a tighter side-by-side fit (before you apply the glue) as you go along.
Once the first row of scales is glued on, add a few tendrils of preserved Spanish moss, using the hot glue gun. After applying the layer of moss, add the second row of scales like fish scales: apply a single scale over the space between the two scales that are on the row below. This gives a lovely decorative pattern. Trim the width of scales as needed.
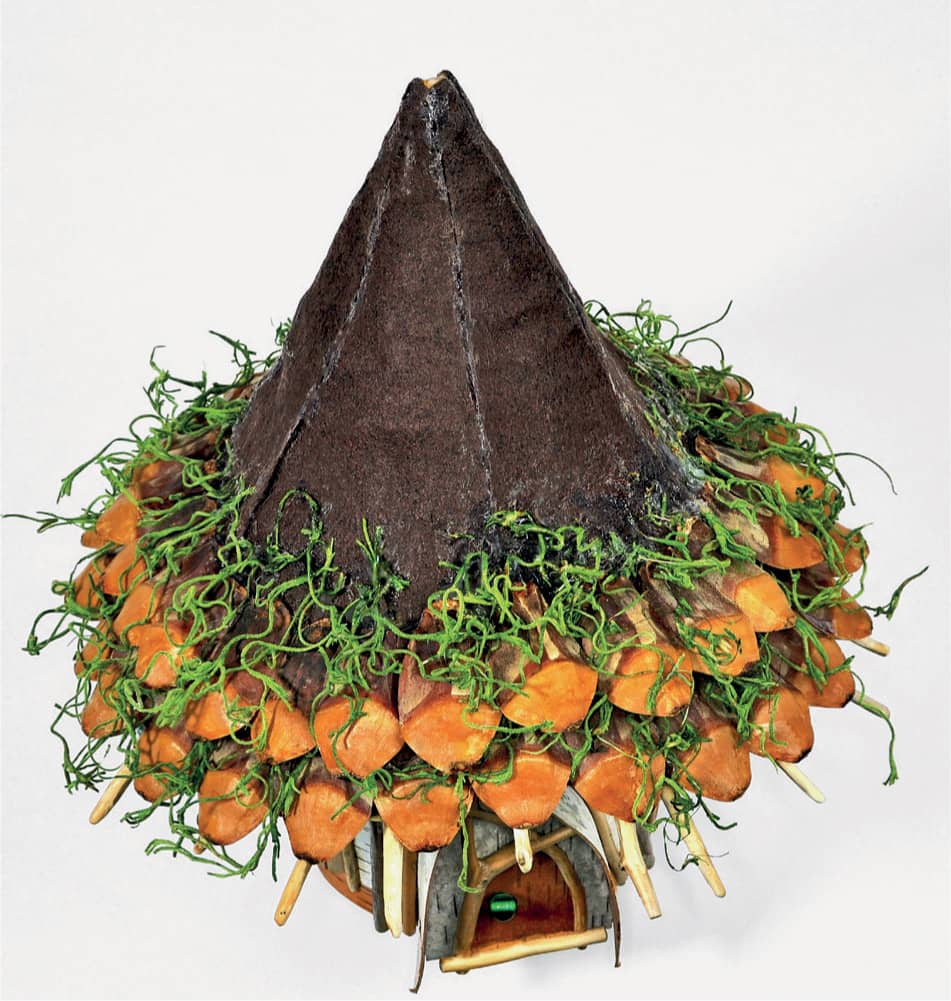
The roof now has two complete rows of scales applied so you can see how the overlapping pattern works. You could cover the whole roof this way. Usually the last few layers require careful trimming and fitting of the scales so that they are perfectly matched and sit side by side with no gaps. Finish the roof using the epoxy glue instead of hot glue for the last three rows, if you chose this method.
Another option is to apply something completely different yet harmonious. This could be done with pine bark pieces, a different species of pinecone scale—or you could use silk botanicals, which is what we will add next.
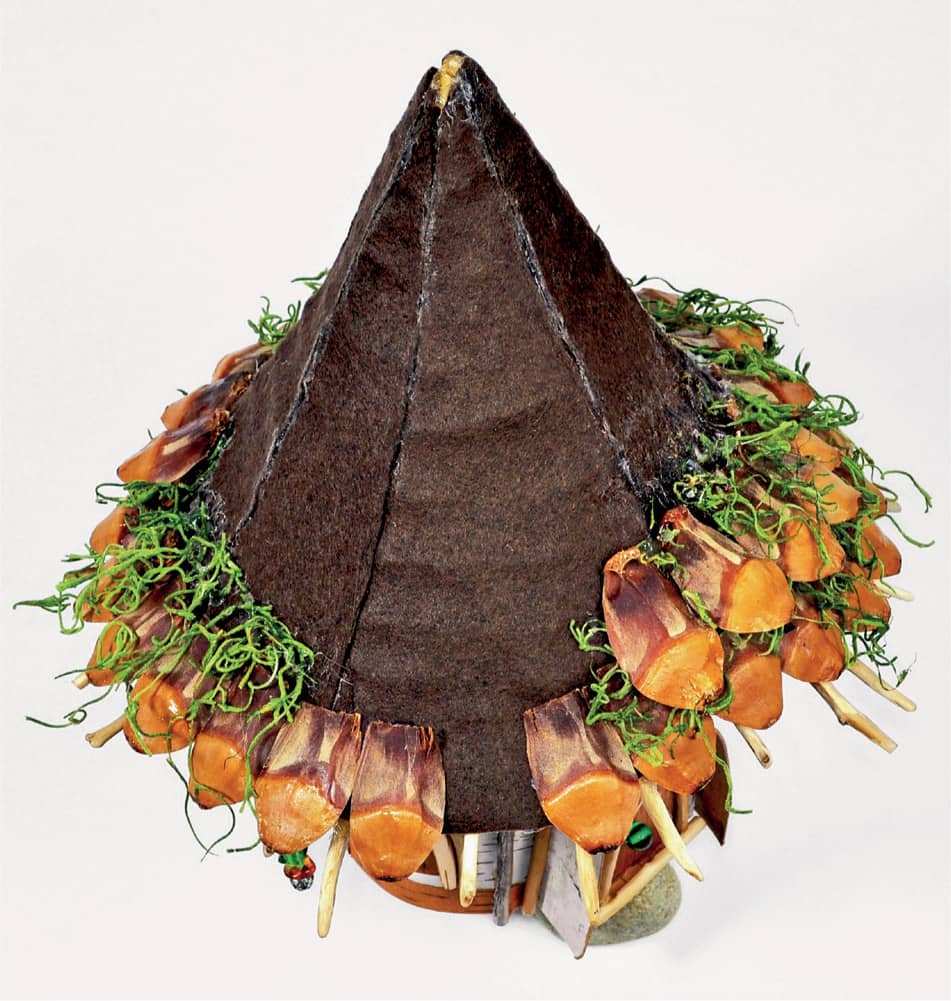
Notice how the first row of scales extends well beyond the edge of felt but not as far as the edge of the rafter twigs.
Work upward from the roof eave, starting with your longest pinecone scales. Layer in Spanish moss strands as you go.
STEP 3
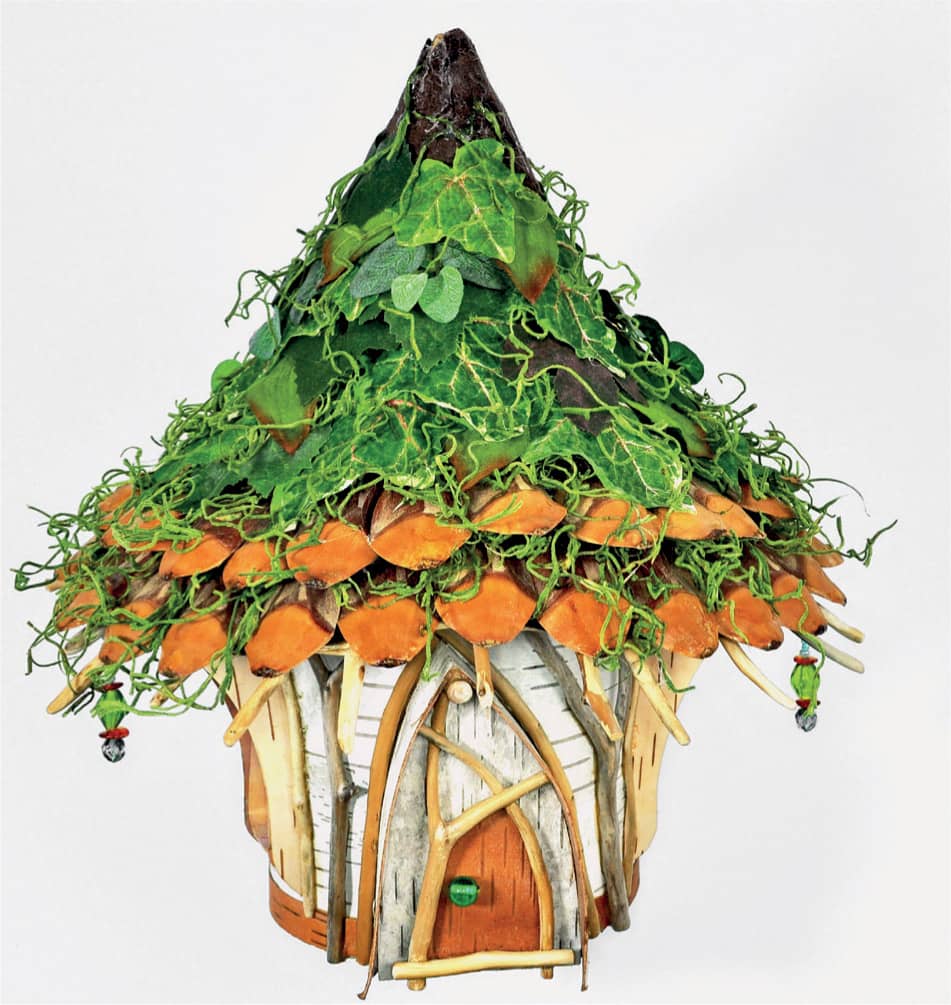
Apply the silk botanicals. Just as with the scales you’ll want to have all of your botanicals sorted according to size, color, etc., before you actually begin.
Begin at the back of the house using the largest leaves first. You don’t need to apply glue to the entire leaf surface—in fact it’s best not to. Rather, apply the glue to just the top third of the leaf back and let the rest of the leaf float freely after it is stuck onto the roof. Optional: Continue to apply small tendrils of the Spanish moss along with the leaves to help visually tie the two layers together.
Alternate the colors and textures of the leaves while applying for a more natural-looking and interesting roof. Continue working in this manner using smaller and smaller leaves going up the roof until you reach the very top.
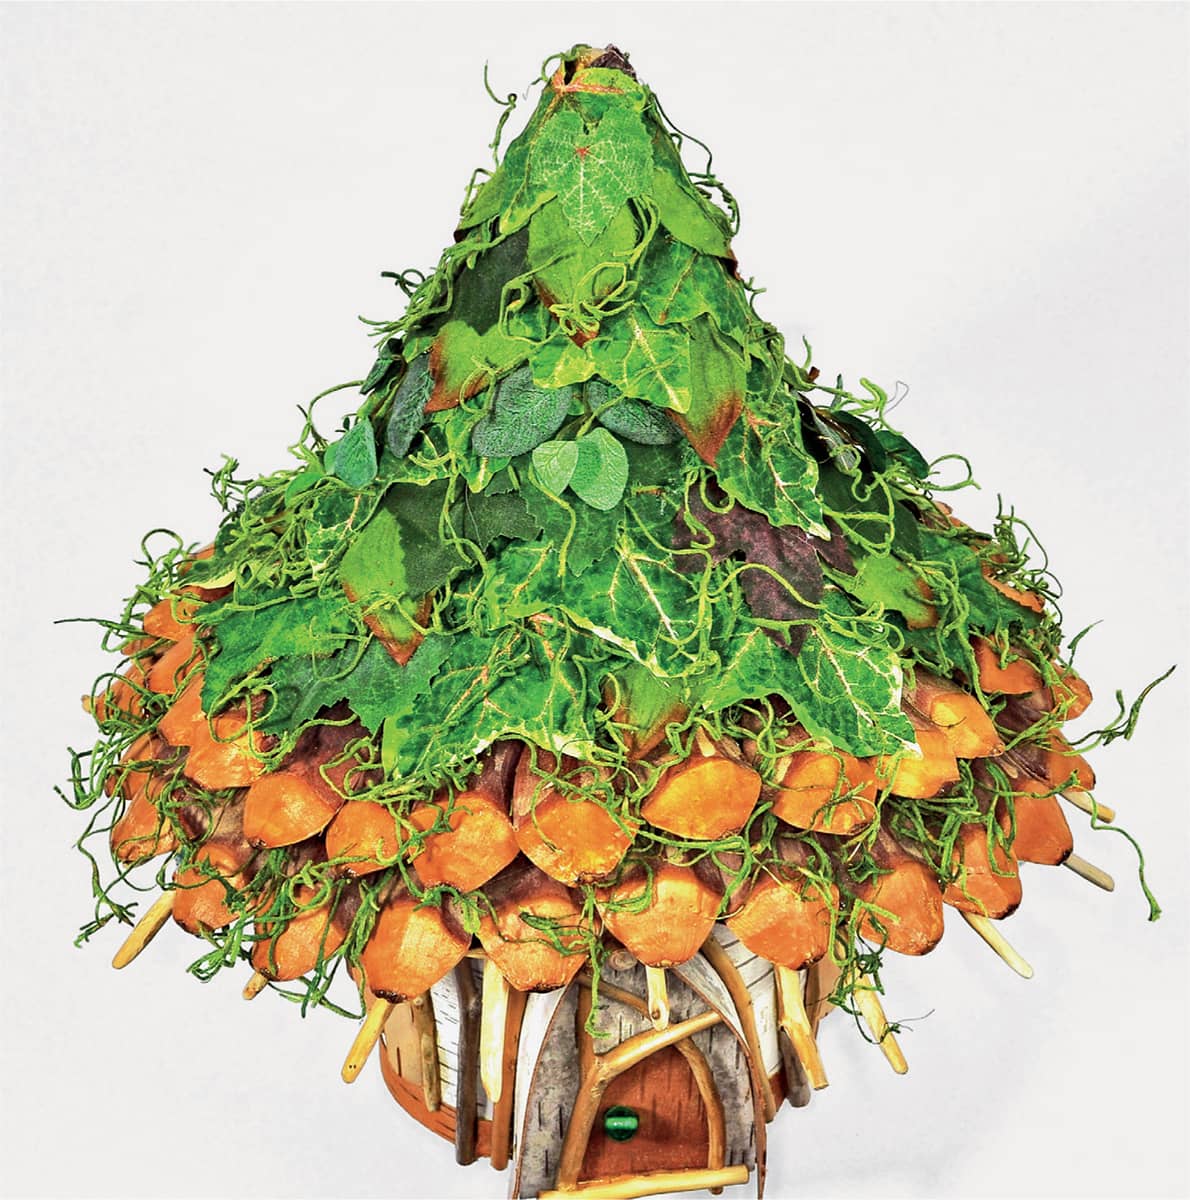
Use smaller silk botanicals as you move higher up on the roof. Save the smallest leaves for the peak, adding small tendrils of Spanish moss in the layers as you go.
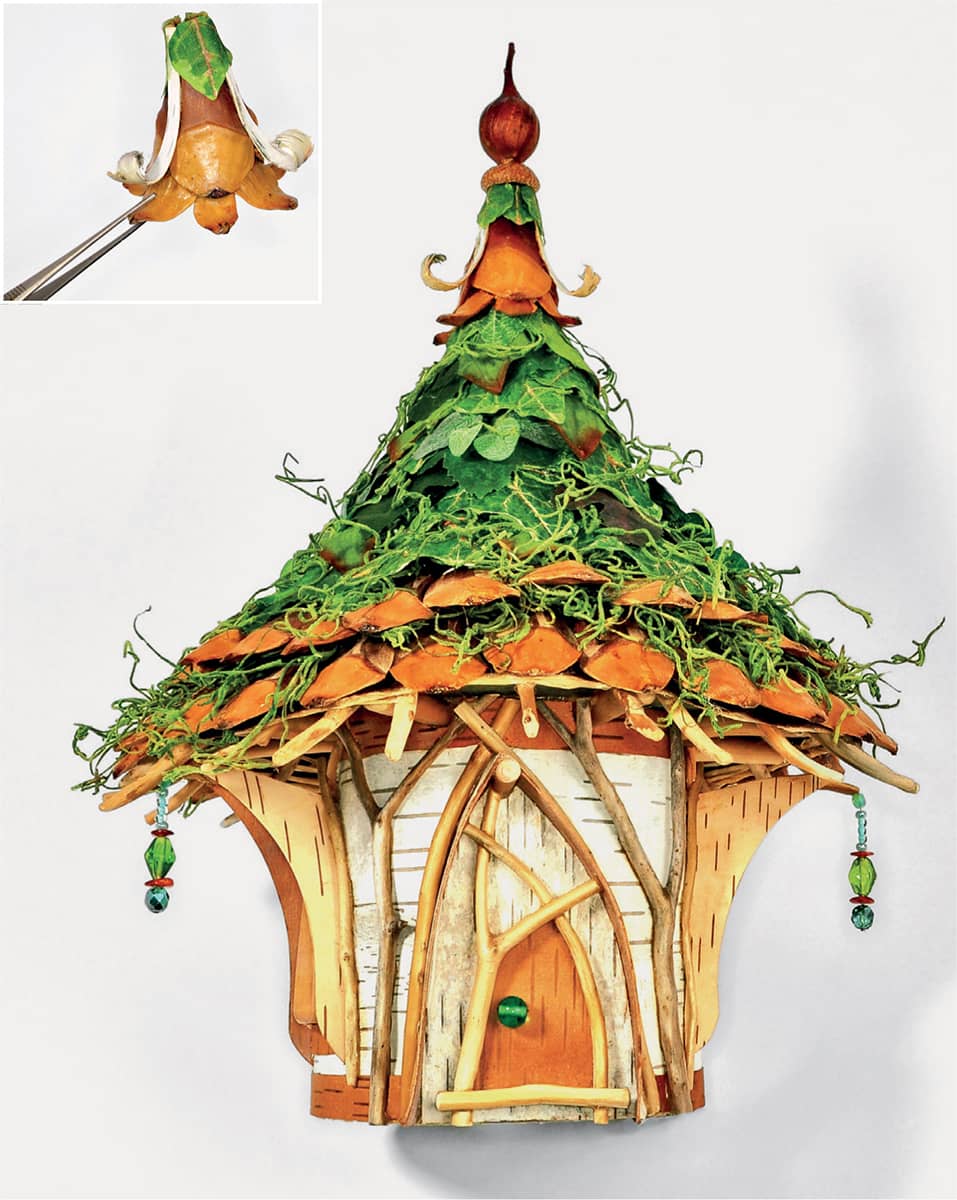
Create a finial and attach it to the peak with wire. If you do not have these exact materials, improvise! Other finial options include a small pinecone, a walnut, a large acorn, an unusual piece of driftwood, or a shell. Use what nature provides.
STEP 4
Finish the roof with a decorative finial. You can build your finial on a tiny funnel to help control the shape. The curls of birch bark used for this finial add another layer of texture that also harmonizes with the walls of the house. Glue the finial together using the wood-colored epoxy, so it will be sturdy even though it looks delicate.
Insert a short, sturdy wire into the top of the point of the roof and glue it in place with epoxy glue (you may need to drill a hole in your rafters for a secure fit). Once the wire is secure, lower the finial (without the acorn cap) onto the wire and fill the space with generous amounts of epoxy resin for an absolutely secure junction. Watch out for drips! Drill a small hole in the acorn cap and lower it onto the wire, glue in place. Finally, drill the goldenrod burl to accept the wire and glue it into place.
Optional: Use extra-fine sandpaper to finish the ends of the rafters in whatever way appeals to you.
Congratulations on building a great roof for your house!
For removable roofs, you may wish to add some sort of liner to your roof. Here paper “petals” have been glued in place inside this twig-framed roof.
HOW TO CREATE A
NO-FRAME REMOVABLE ROOF WITH SILK BOTANICALS
In this lesson you will learn how to build a no-frame roof, which makes a great base for simple removable roofs. You can use heavy paper, birch bark, felt, or any other thin, flexible material for this base. Adapt the technique for different materials and for polygonal houses.
You will also learn how to apply silk botanicals, which add lots of color without adding lots of weight to your faerie house roof. Additionally, you can have so much fun mixing up different elements and textures for a colorful, organic look. Any sort of silk flower, leaf, or fern can be used, just apply them using the same basic technique.
MAKING THE NO-FRAME ROOF FOUNDATION
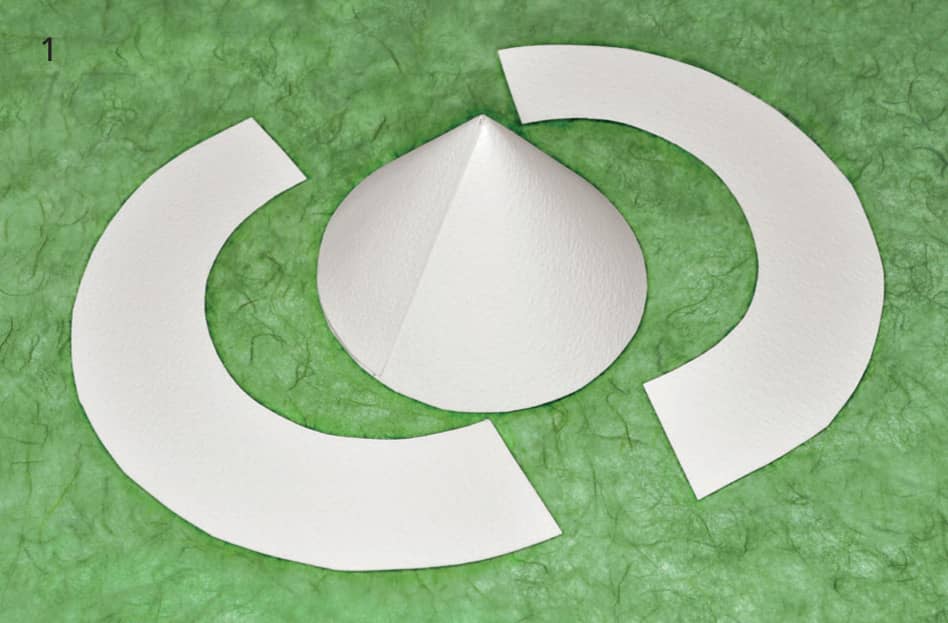
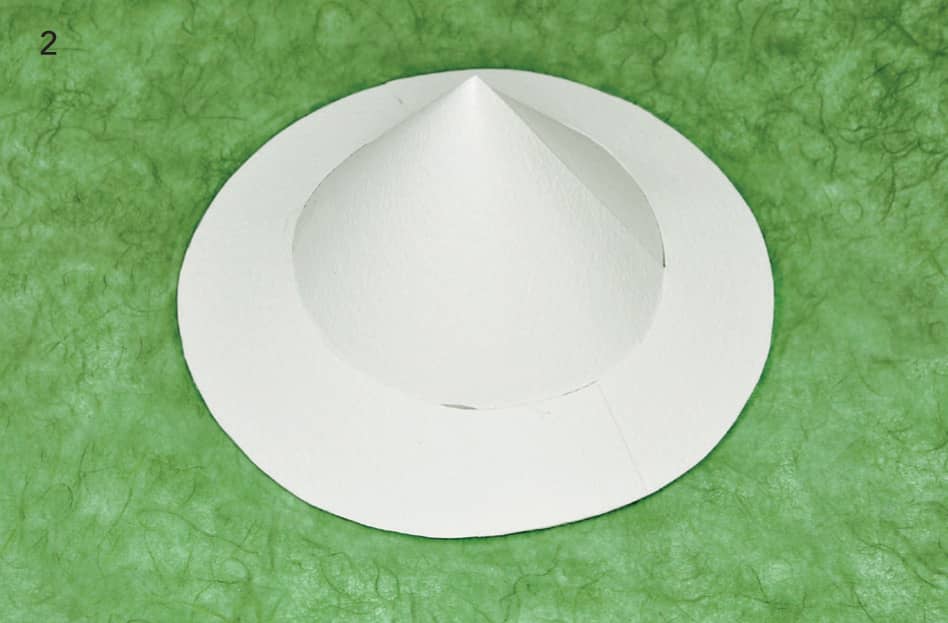
STEP 1
To begin, make a basic cone that fits the circle of the body of the house. Heavy watercolor paper works well, and it can be found at good art supply stores. Use hot glue or epoxy to glue the paper together. This is one of the few times when I like to use hot glue because it’s fast-drying and relatively strong. To make the “brim” for the roof, cut out two arcs of paper as shown. Each house will be different so adapt your pattern accordingly.
STEP 2
Approximate the angle of the brim to the cone by taping it together. Once you’re satisfied with the shape, glue it in place.
STEP 3
Once the paper foundation is satisfactory, give it a little strength using tissue paper and glue. I like to use green tissue paper or thin, gauzy fabric to give the no-frame roof strength and a consistent color. Tear strips of tissue paper into small strips. Use a brush to coat the strips with slightly thinned white glue. Apply the pieces to the roof overlapping the strips as you go. Use the glue mixture sparingly—just enough to anchor the pieces in place. If you use too much glue-mix you run the risk of making the base too soggy and it could bubble and warp. Cover the no-frame roof completely on the top side. Let it dry. Add an extra layer of tissue paper to the edge of the brim for added strength. Let dry again. Turn the roof over and repeat the process on the interior. If you plan to line the roof with decorative paper, you do not need to cover the inside of the cone.

STEP 4
When the roof has dried to a leathery feel, put a piece of waxed paper over the rim of the house, and put the roof on the faerie house to make sure everything is fitting properly. Gently press and mold to fit well.

STEP 5
Check the roof from all angles to make sure that it is fitting as snuggly as possible against the base of the faerie house. Let dry overnight. Remove and discard wax paper.
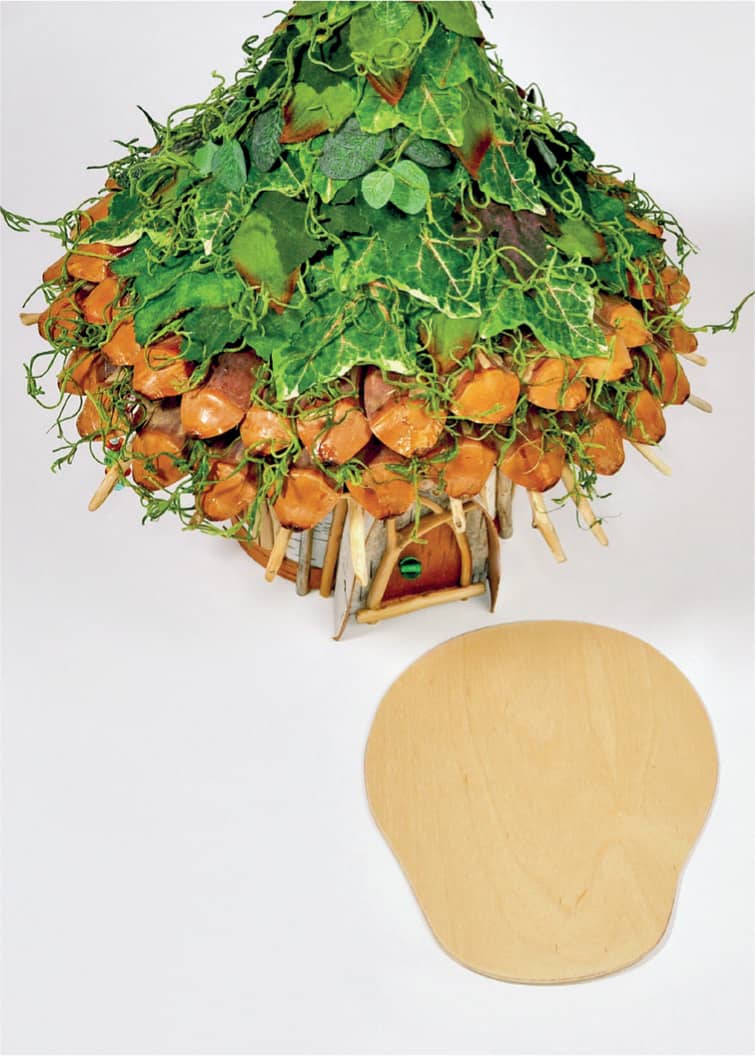
DECORATING WITH SILK BOTANICALS
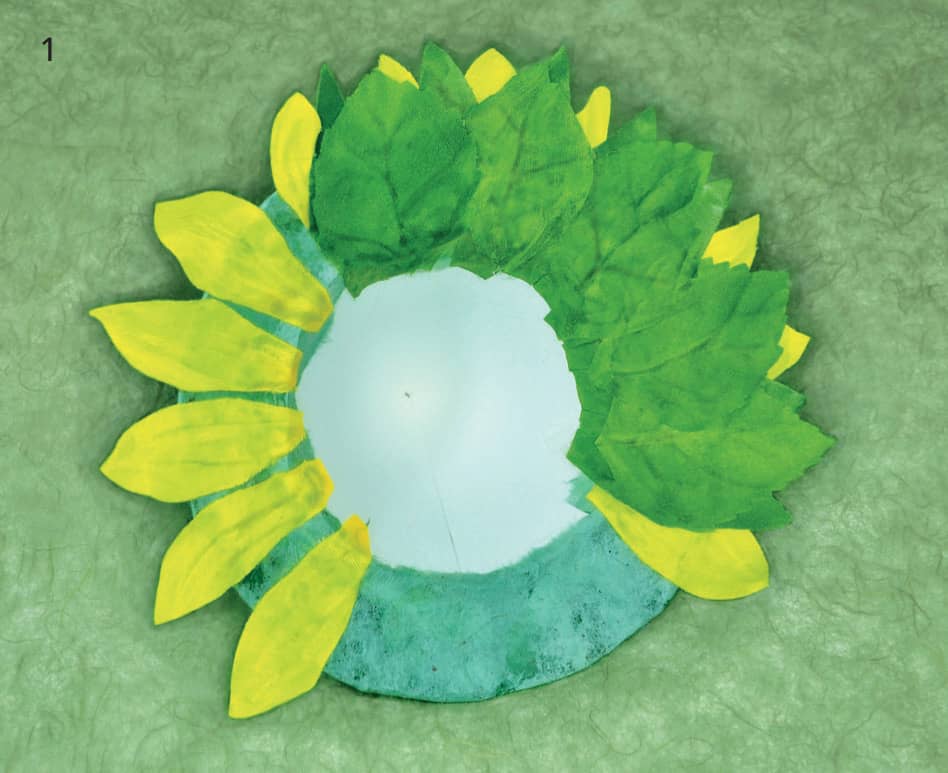
STEP 1
Because the inside of the roof is going to be visible when you remove it from the house, give it a nice finish. Turn the roof over. Apply some yellow petals to the underside of the brim. Use hot glue sparingly; you don’t want to add too much weight to the roof. Because these petals will barely show, it’s okay if they’re not of the best quality. Next, apply the green silk leaves, making sure that they overlap one another so that no paper brim is visible. Make sure to extend the edges of the leaves up inside the cone, past the brim. Cover the brim completely. Turn the roof over for the next step.
STEP 2
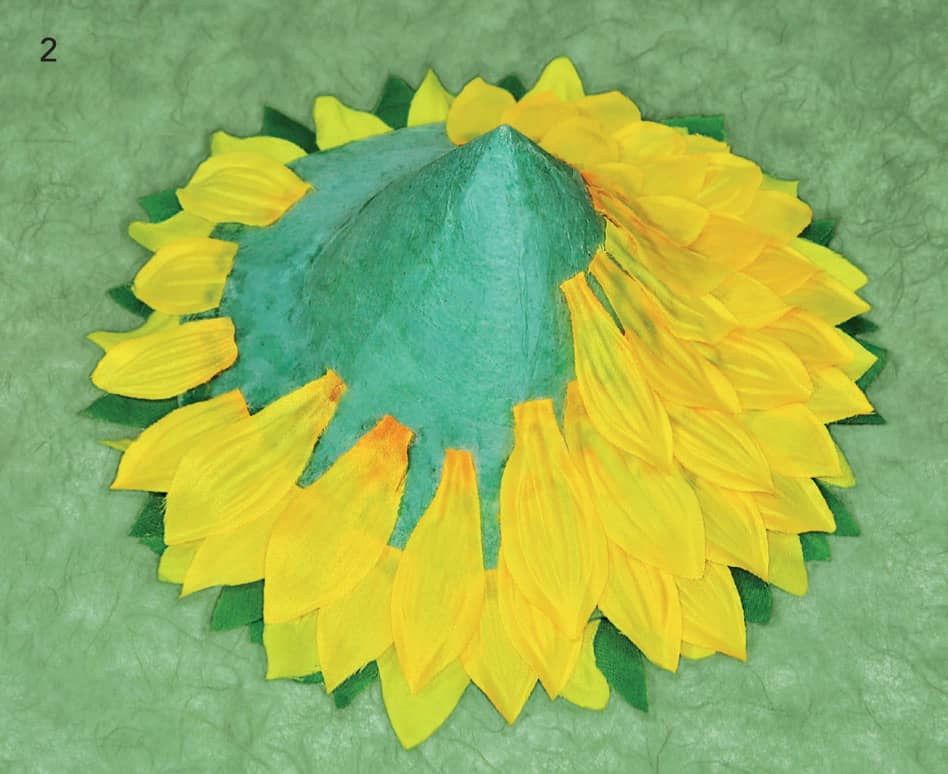
You should see the petal ends and the leaves from the underside of the roof extend past the edge of the brim. Check around the entire edge of the brim to make sure all of the petals and leaves from the underside are securely anchored to the edge of the brim.
Begin adding the first layer of silk botanicals to the top side of the paper roof, placing one petal tip in the space between the two petals from the underside.
Use two-part epoxy (mix equal amounts in small batches) or hot glue, but use sparingly. The epoxy is stronger, but test it first on scrap pieces because it sometimes leaks through the silk fabric and gives an undesired result. The wood-colored epoxy seems to soak in less.
Apply the first layer of petals so that none of the paper roof shows underneath or between the petals. Apply the glue to the upper fourth (top) end of the petals only and leave the pointy ends free to float for a more natural look.
STEP 3
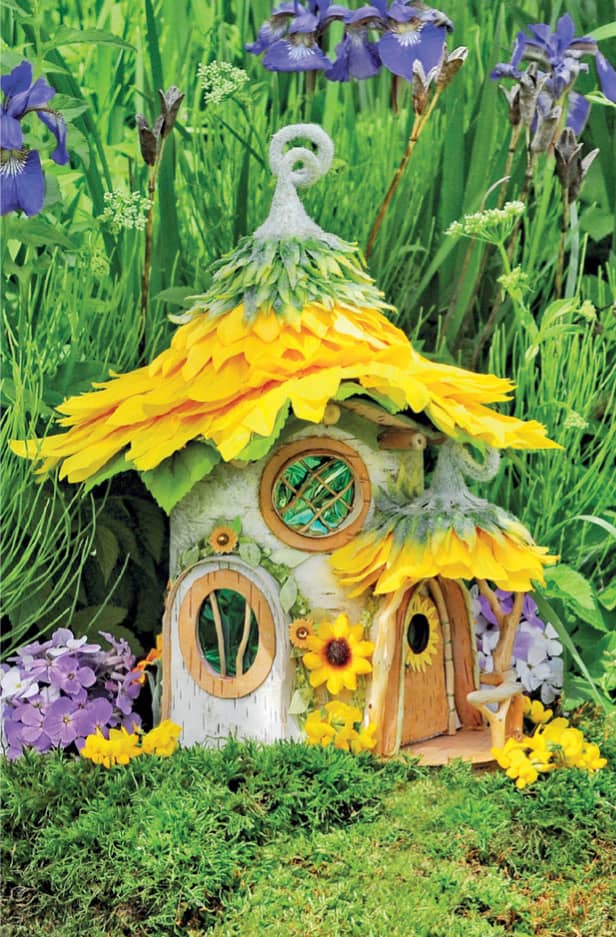
After applying the first row of petals, add the next row. Again, place the next petal so that the point rests in the space between the two petals on the layer below. Use the largest pieces for the bottom/first rows, middle-sized pieces for the middle of the roof, and save the tiniest pieces for the top of the roof. If the silk botanicals are all the same size, you can trim them so that you have different sizes. Follow the same steps applying smaller and smaller botanicals as you ascend the roof until you come to the apex.
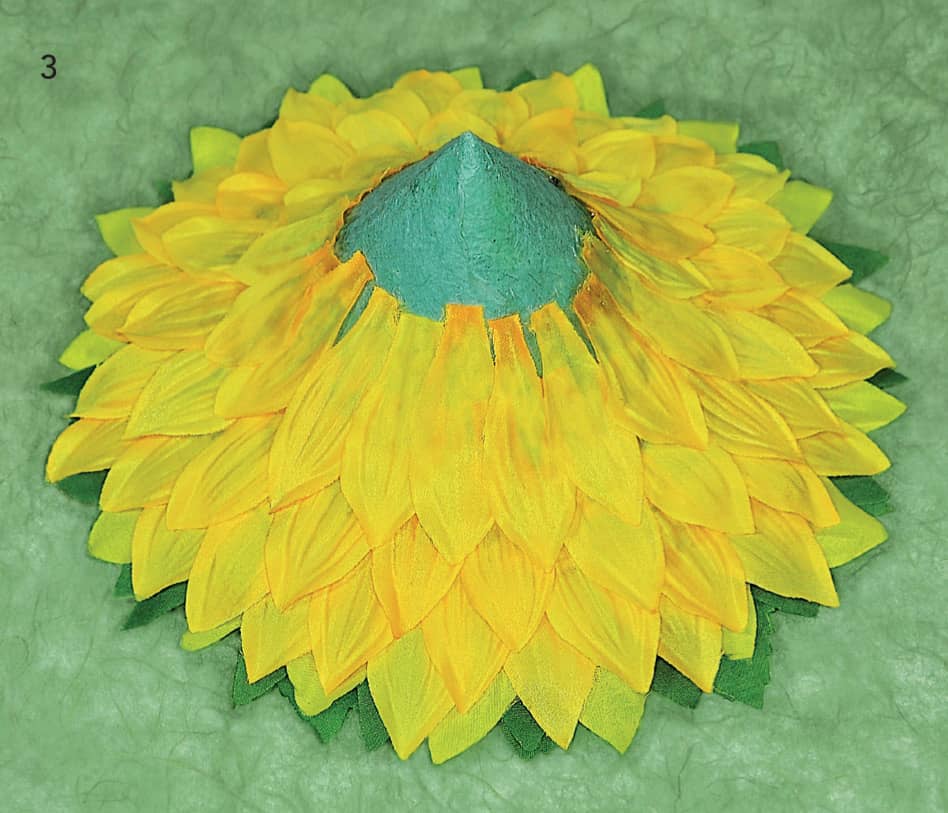
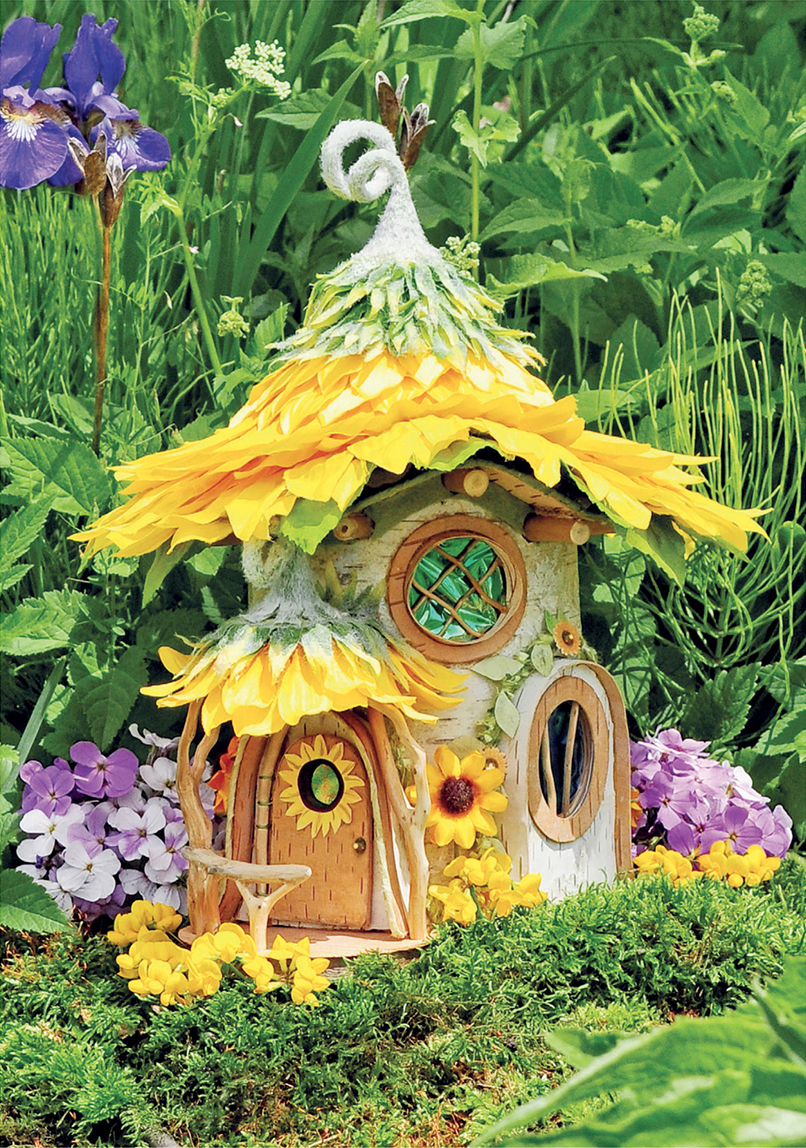
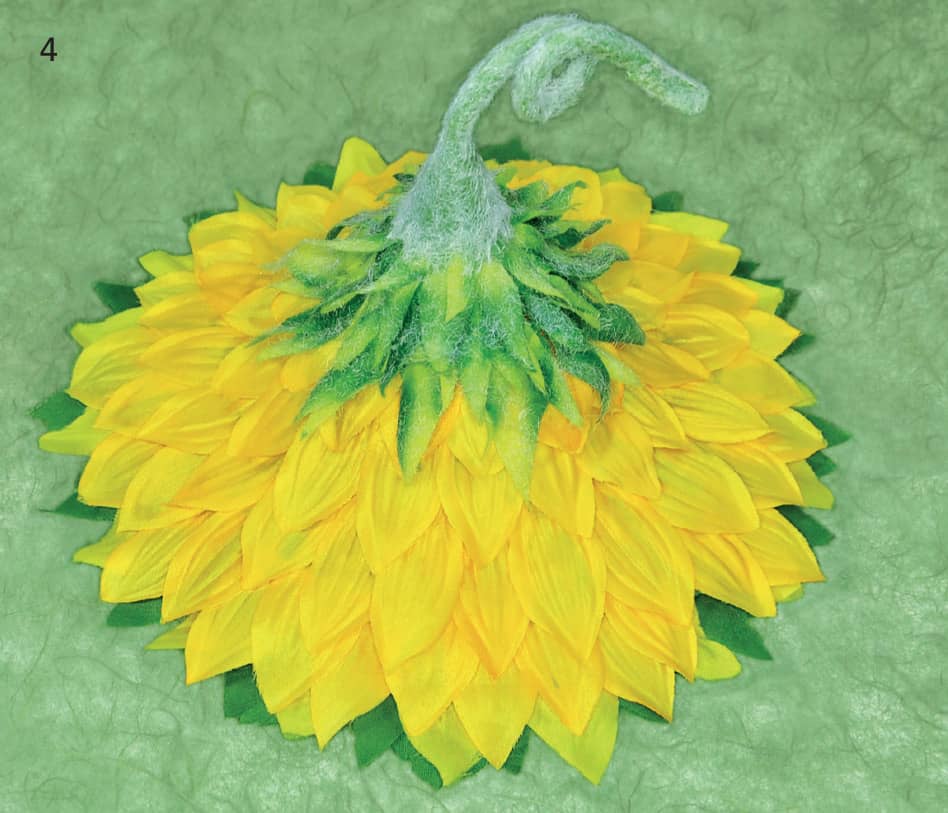
STEP 4
If your artificial flower comes with a stem, you may be able to modify it to act as the finial for the roof. In this example, the green petals of the back of the artificial sunflower were applied in the same manner as the large petals to come all the way up to the point of the roof. I bent the artificial stem into a pleasing design.
Attach the stem from the artificial flower onto the apex of the roof. Because this junction point is critical to the integrity of the roof, use epoxy glue to make sure that the stem is glued solidly. Use a wire connector before applying the glue for a stronger bond (see above in the previous roof tutorial). If you’re not using an artificial stem, you can simply bring the botanicals up until they make a natural point or use an acorn or seedpod as your finial. Whatever you use, make sure it’s glued down really well.
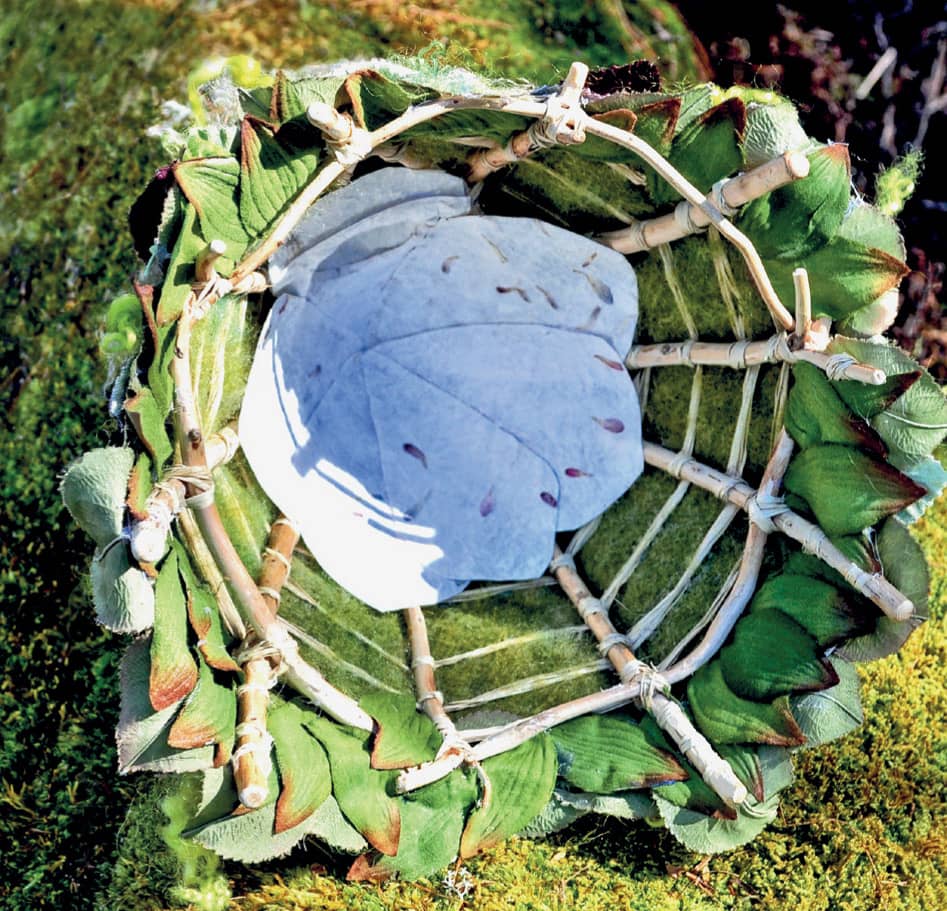
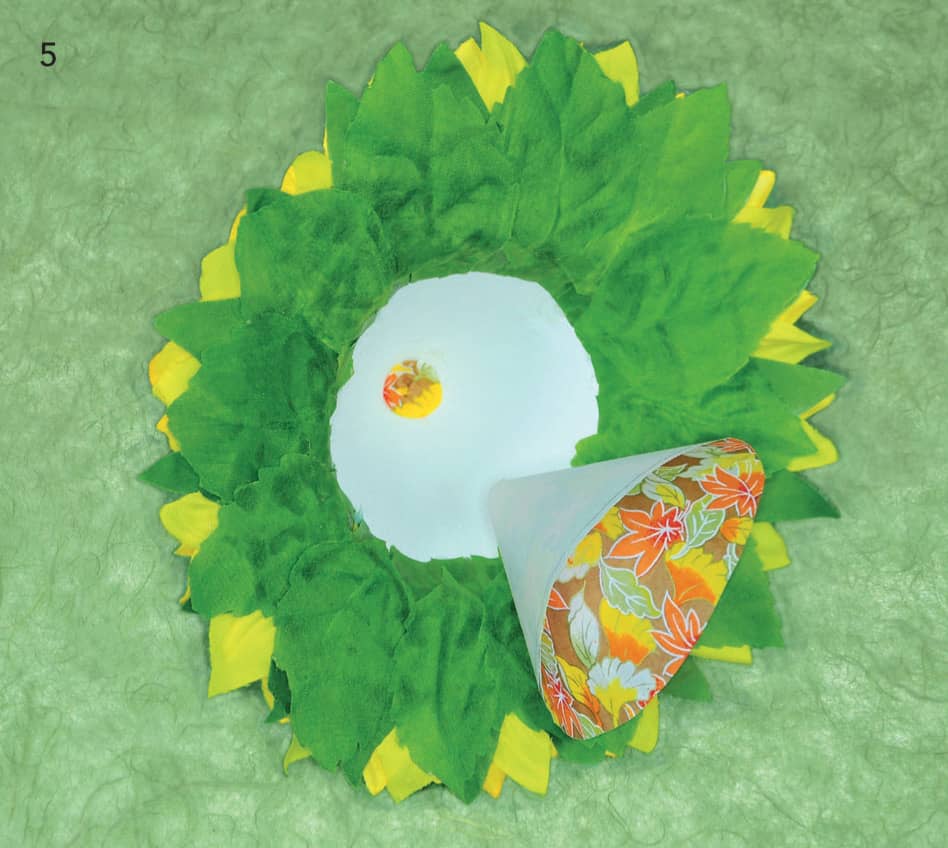
STEP 5
To finish the inside of the roof, make a cone of decorative paper or fabric and trim to the proper size so that it overlaps any of the raw edges. When you have determined that the cone of decorative material fits nicely, glue it all in place really well with the hot glue. Optional: Add a bit of fun trim around the raw edge of the liner to seal it up well.
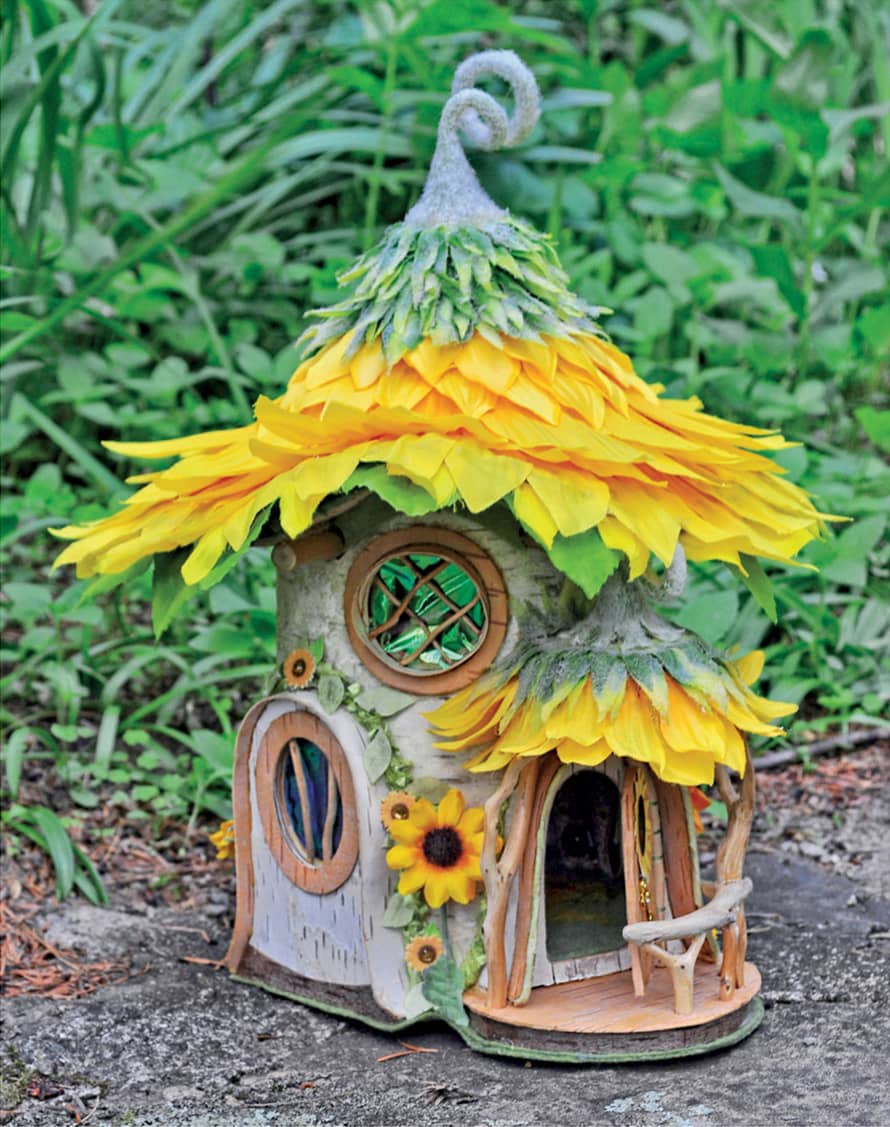
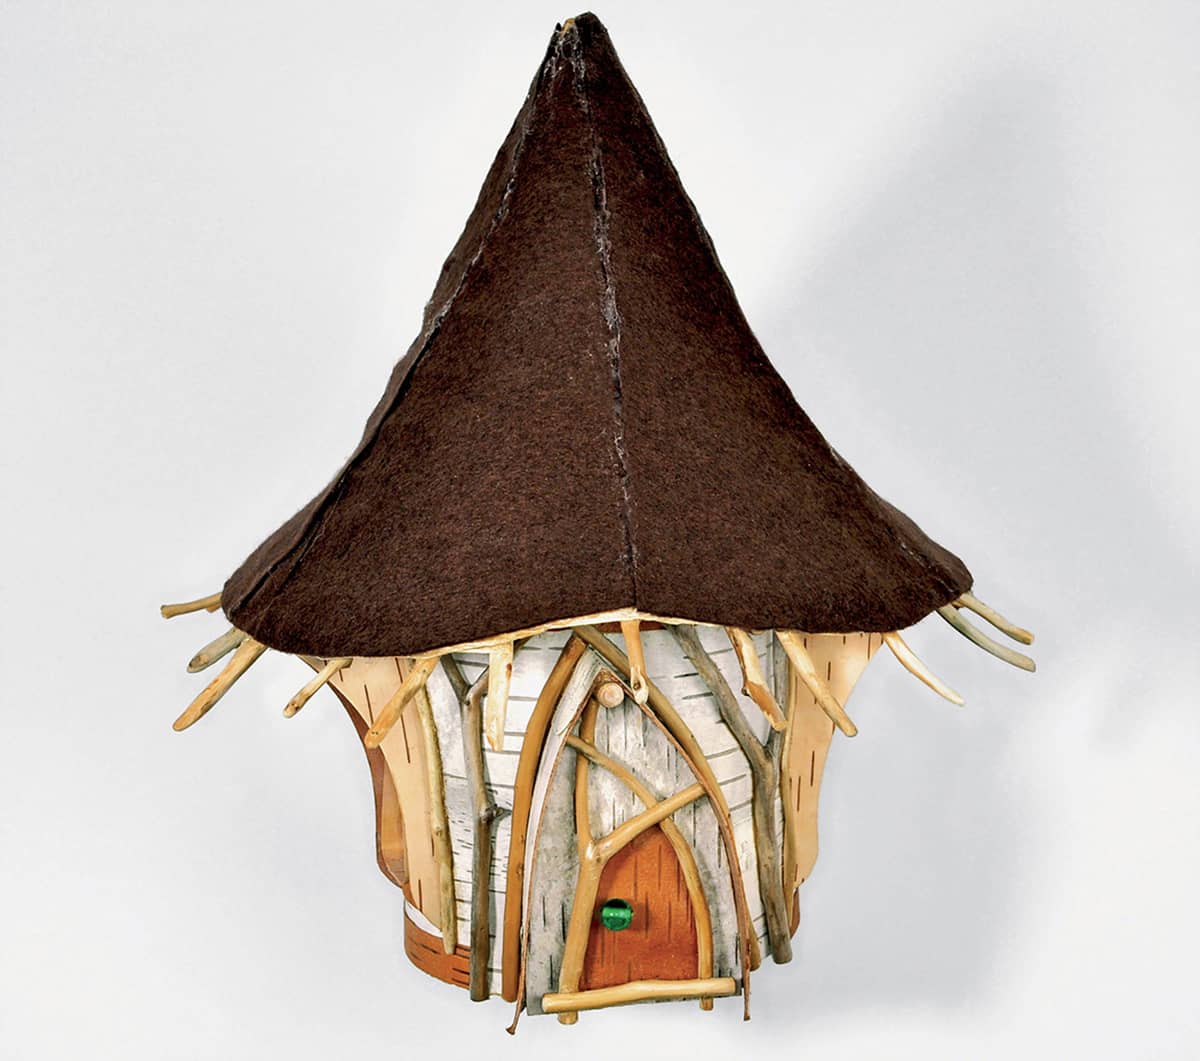
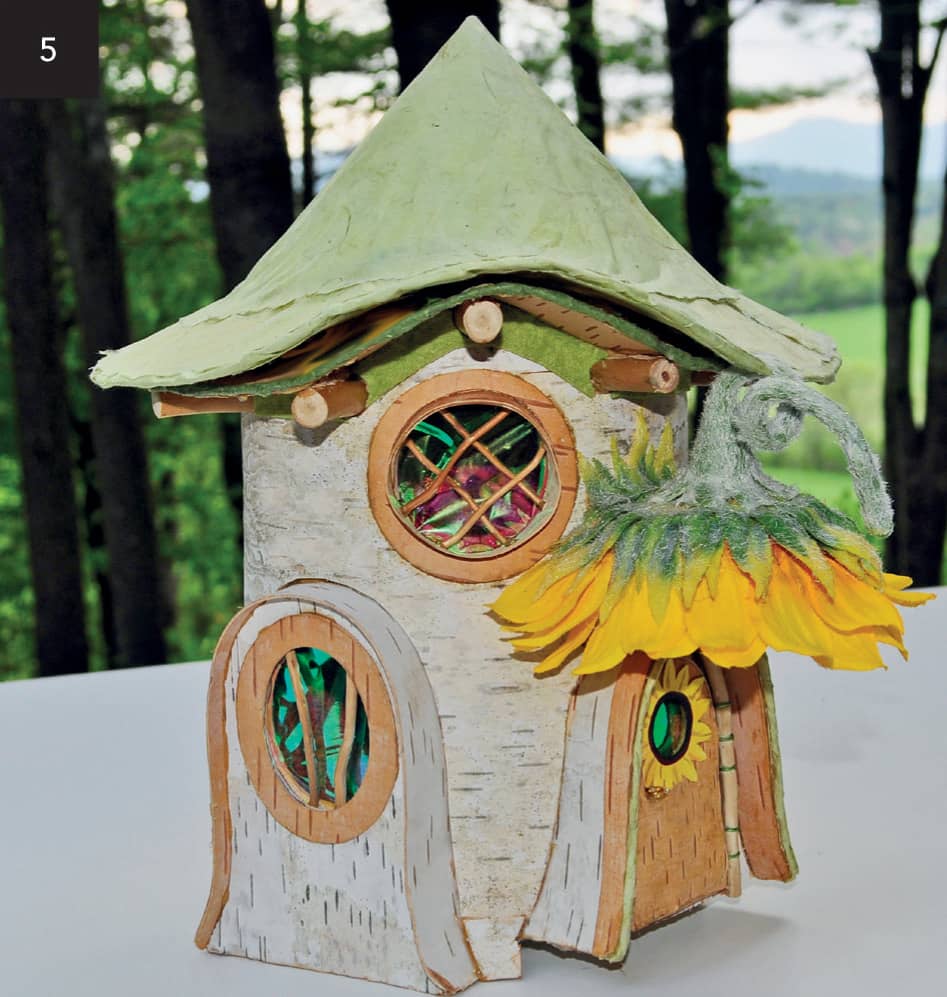
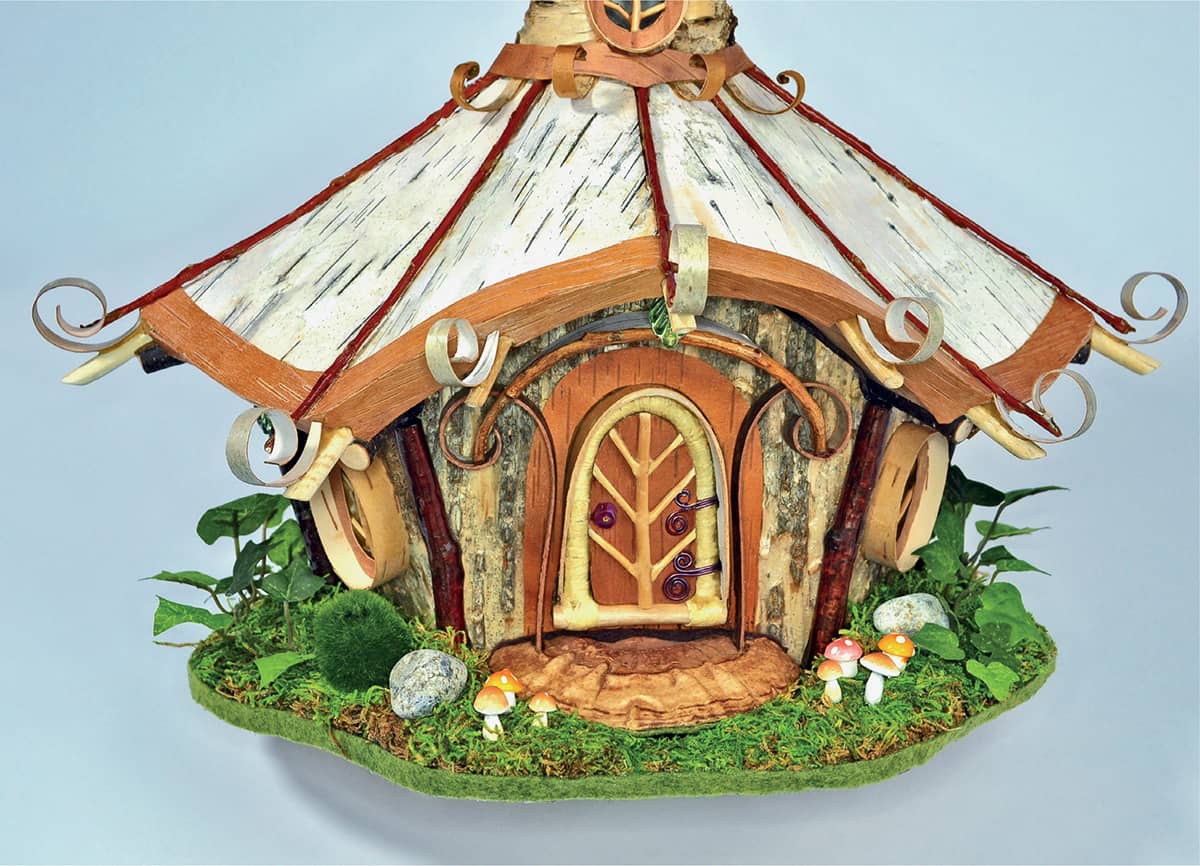
The finished roof sitting on the finished house.
Feel free to add bits of sparkly material, yarn, ribbons, or whatever you like in the layers as you go up the roof. They will add interest and dazzle to your faerie house.
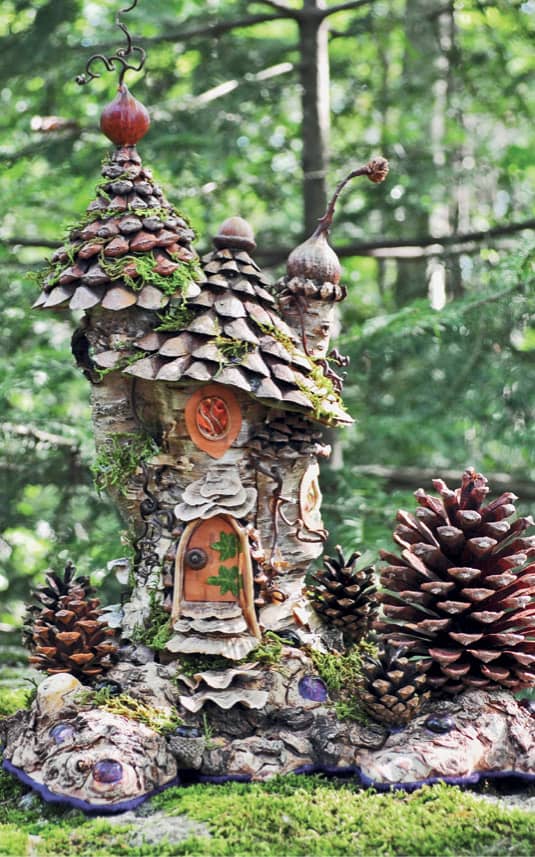
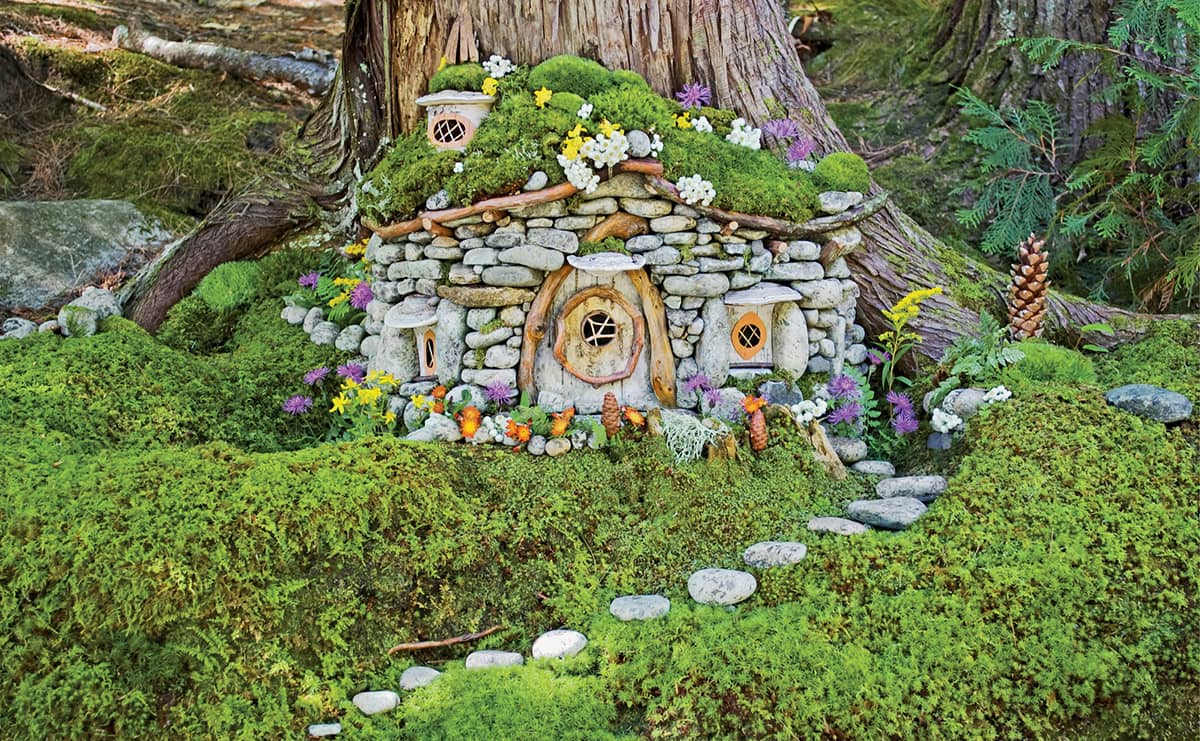
BASES & LANDSCAPING
There are so many options for faerie house bases! The base can be a major part of the look and feel of the house. Depending on the design, a base can be added after a house is completed or can even be the initial inspiration for creating a house.
Let’s look at some bases to get “grounded” in the possibilities and see some construction details.
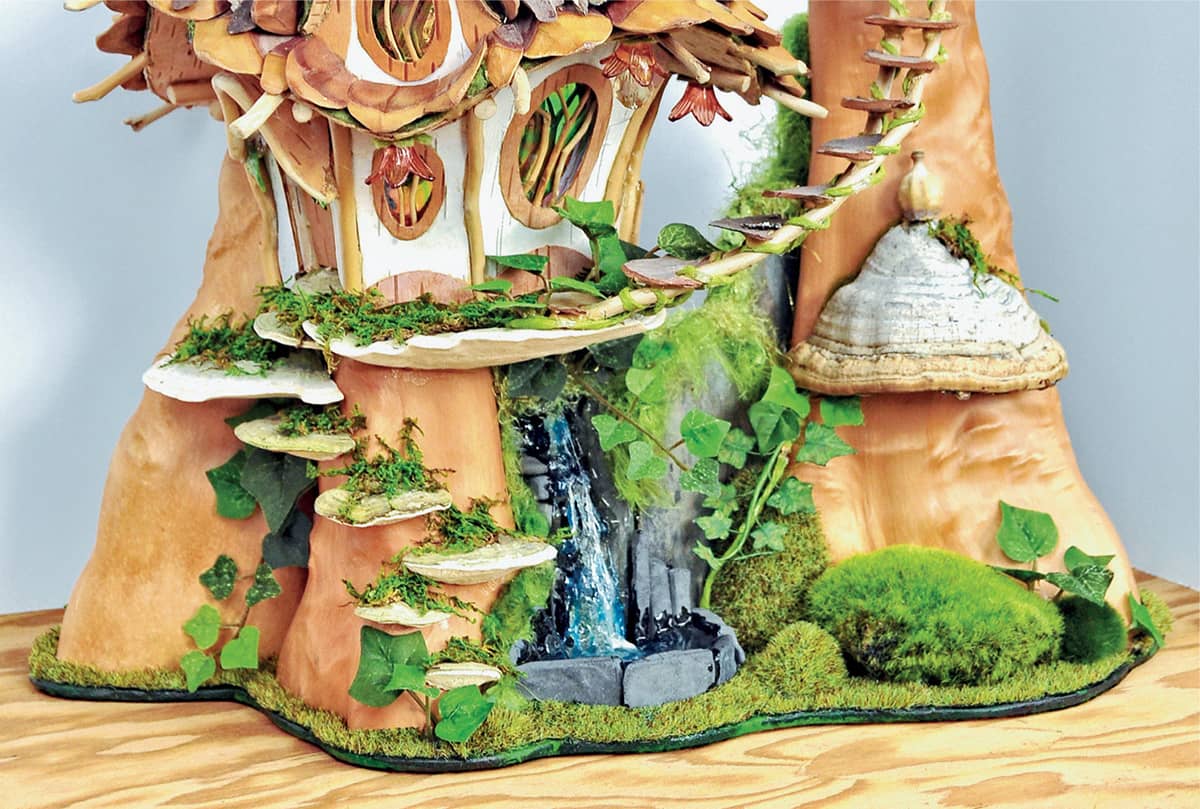
This base forms the foundation for the tree trunk–like structures that support the house and gazebo. The base also provides structure for the waterfall and mossy landscaping.
A modest base can still be lovely and should harmonize with the house design and materials.
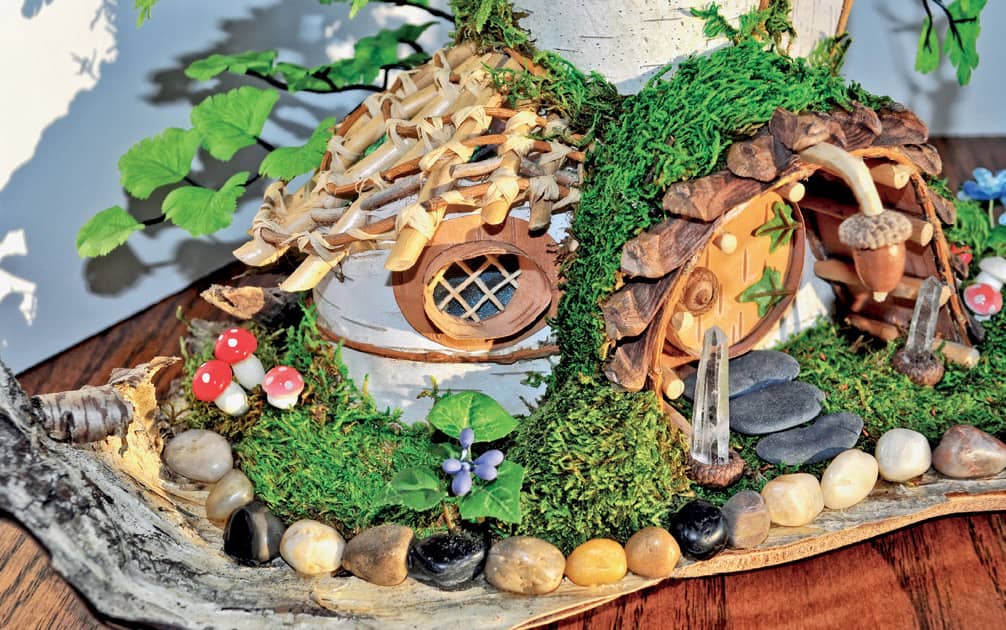
More elaborate designs can provide additional opportunities for miniature landscaping.
A base can help tell a story. Here is an “island” waiting for its house.

Here there (may) be dragons in a crystal-lined cave beneath a faerie castle!
Don’t forget to decorate the back!
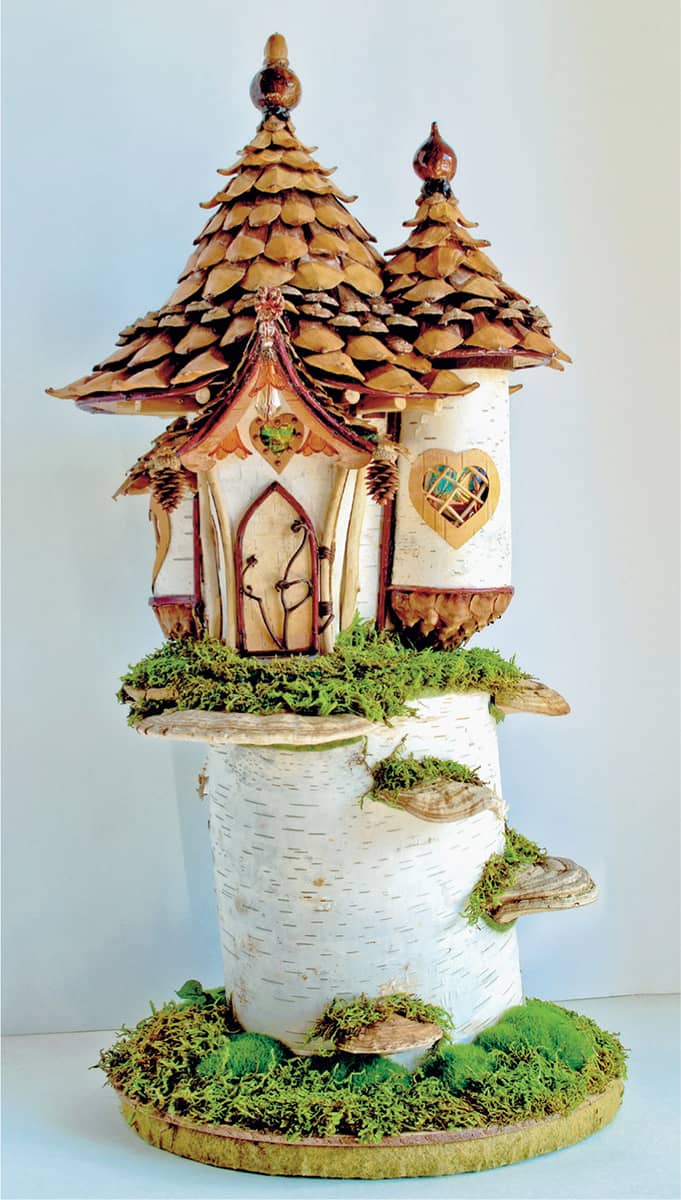
Some bases add considerable height for better viewing. This house can come off the base to be taken to other locations.
HOW TO MAKE A SIMPLE BASE
Here is an example of the simplest solution for the bottom of a faerie house. A piece of dollhouse-grade birch plywood has been cut out in an oval-like shape slightly larger than the actual footprint of the house. The finished house is then glued onto the base using wood-colored epoxy glue. A small piece of preserved moss is added at the front entrance, but otherwise the polished plywood is visible as an undecorated yet sturdy base for the house.
You may wish to add several small circles of felt to the very bottom of the base if the house is going to be placed on fine wood furniture. The felt pads help prevent scratches.
A base is cut to fit from dollhousegrade plywood.
Preserved moss is attached to the base to create an entry mat.
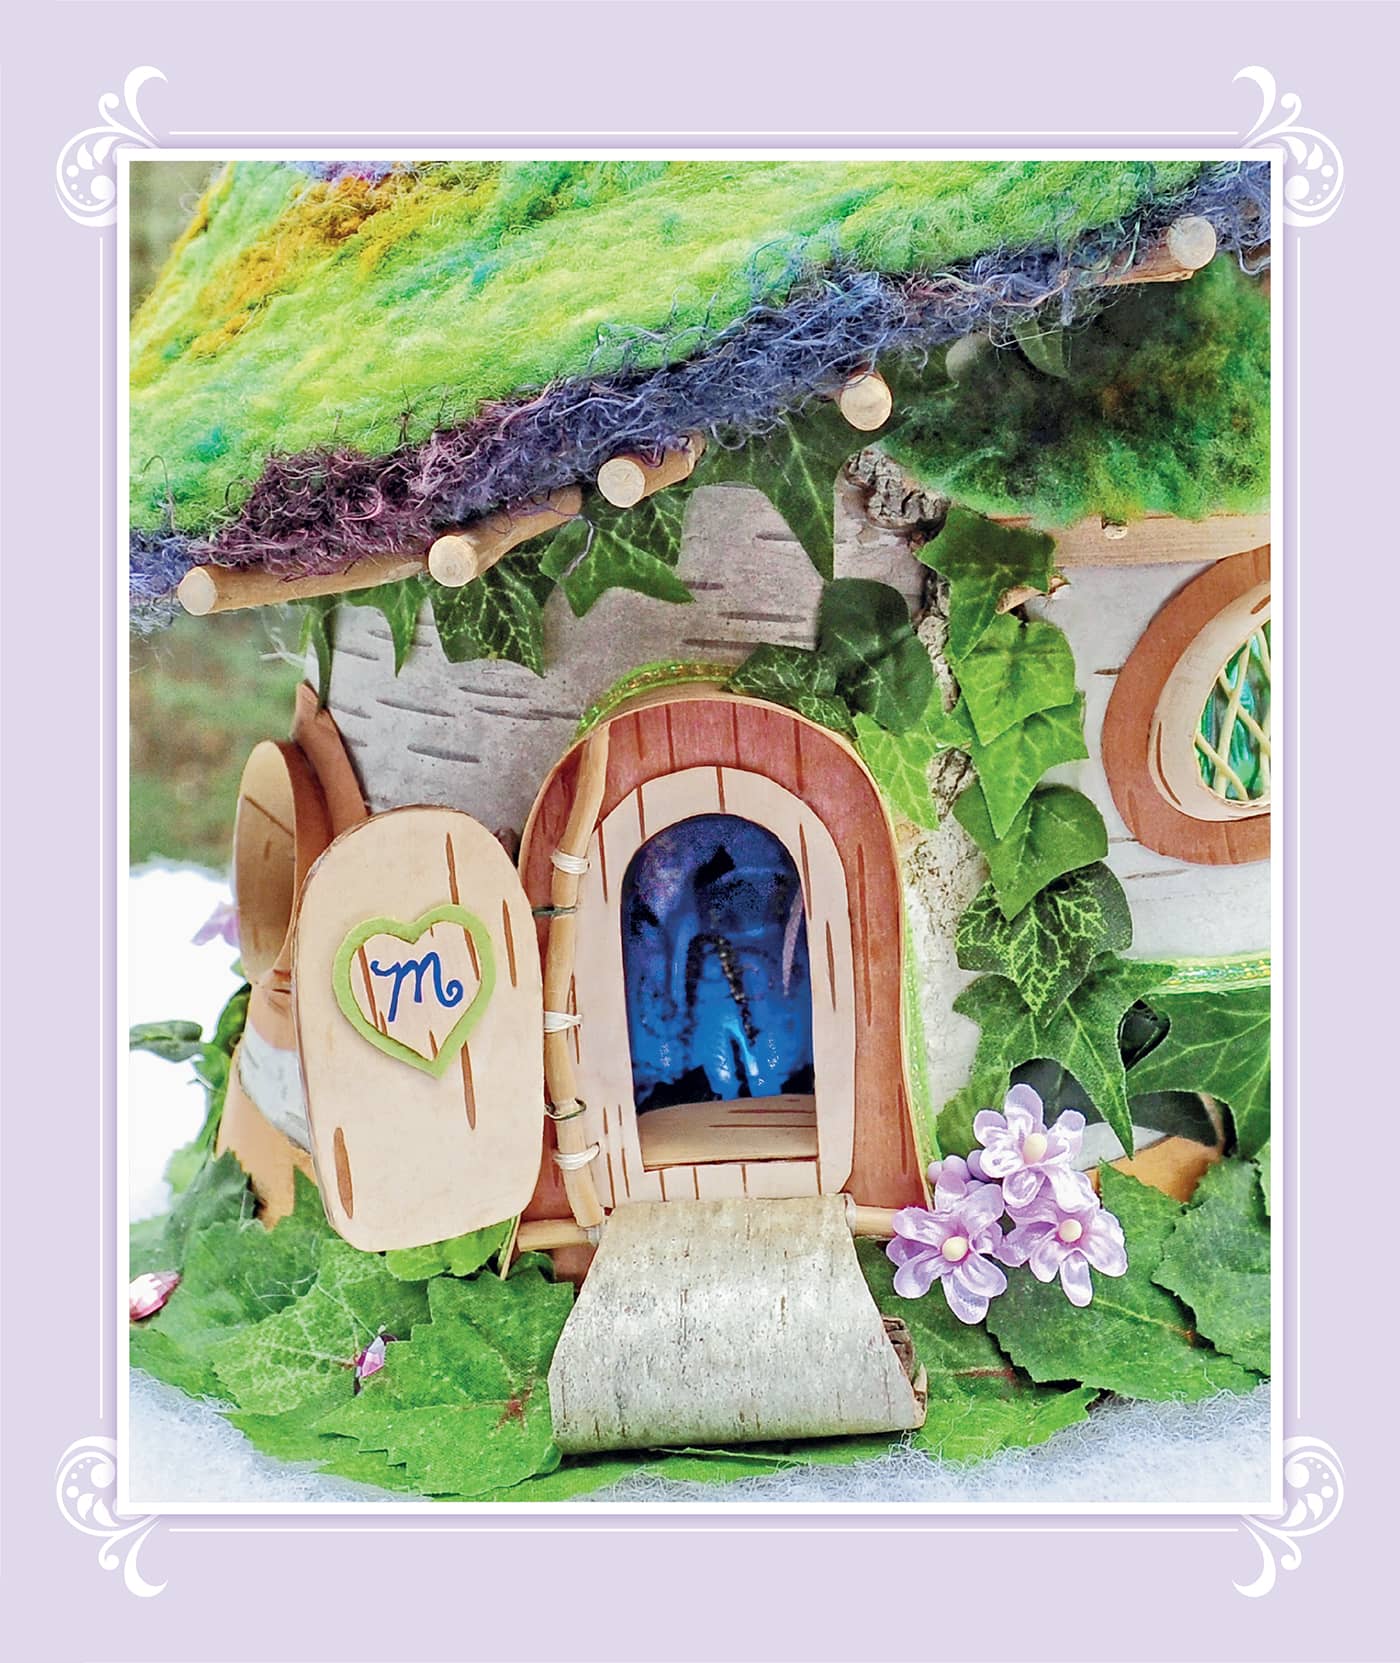
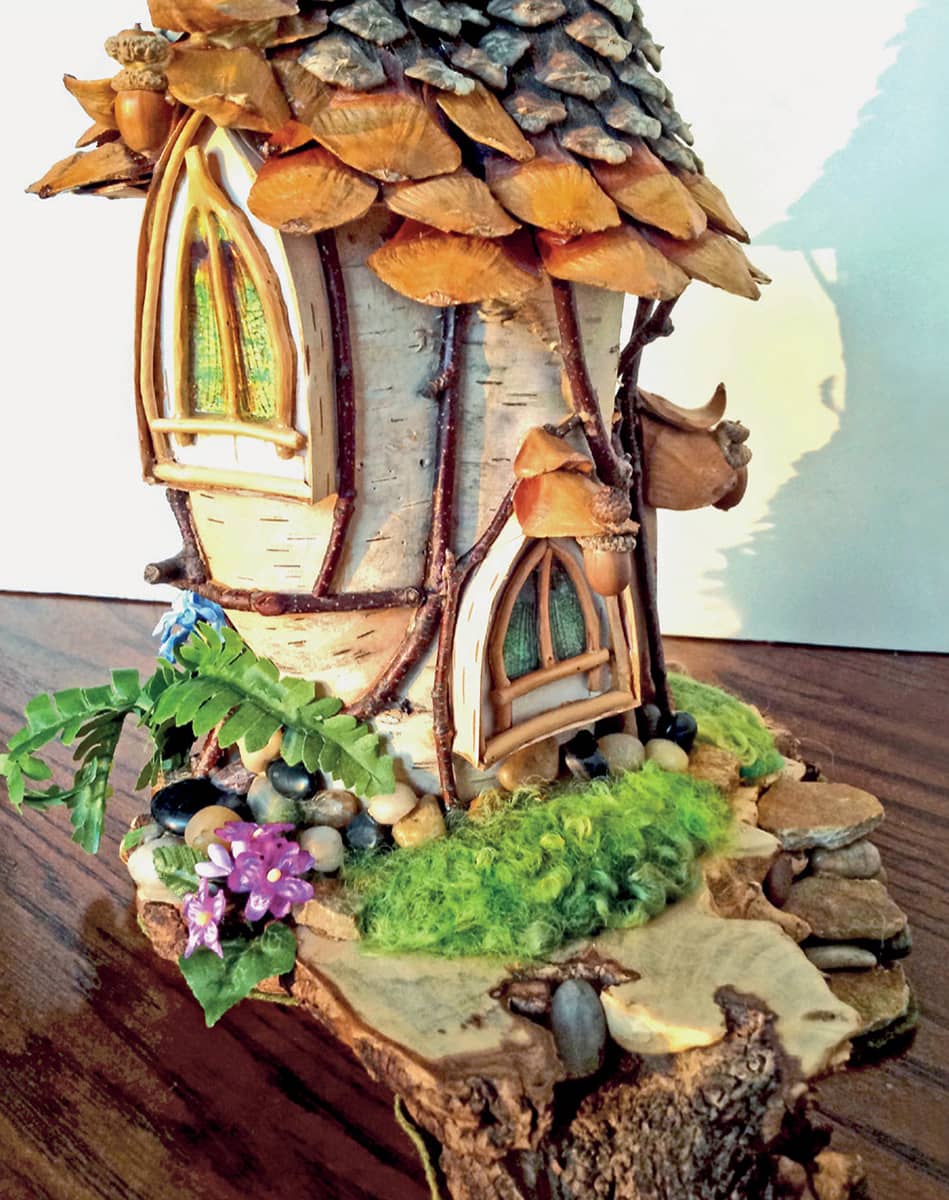
A more organic version of a modest base. Decorations add great appeal and unify house with base.
A top-heavy house needs extra stability. This tall house is not a good design for a stand-alone structure. To firmly attached it to a broader base, first glue felt to the bottom rim of the finished house with a generous application of epoxy. Next, glue pebbles to the outside wall and the felt for extra strength.
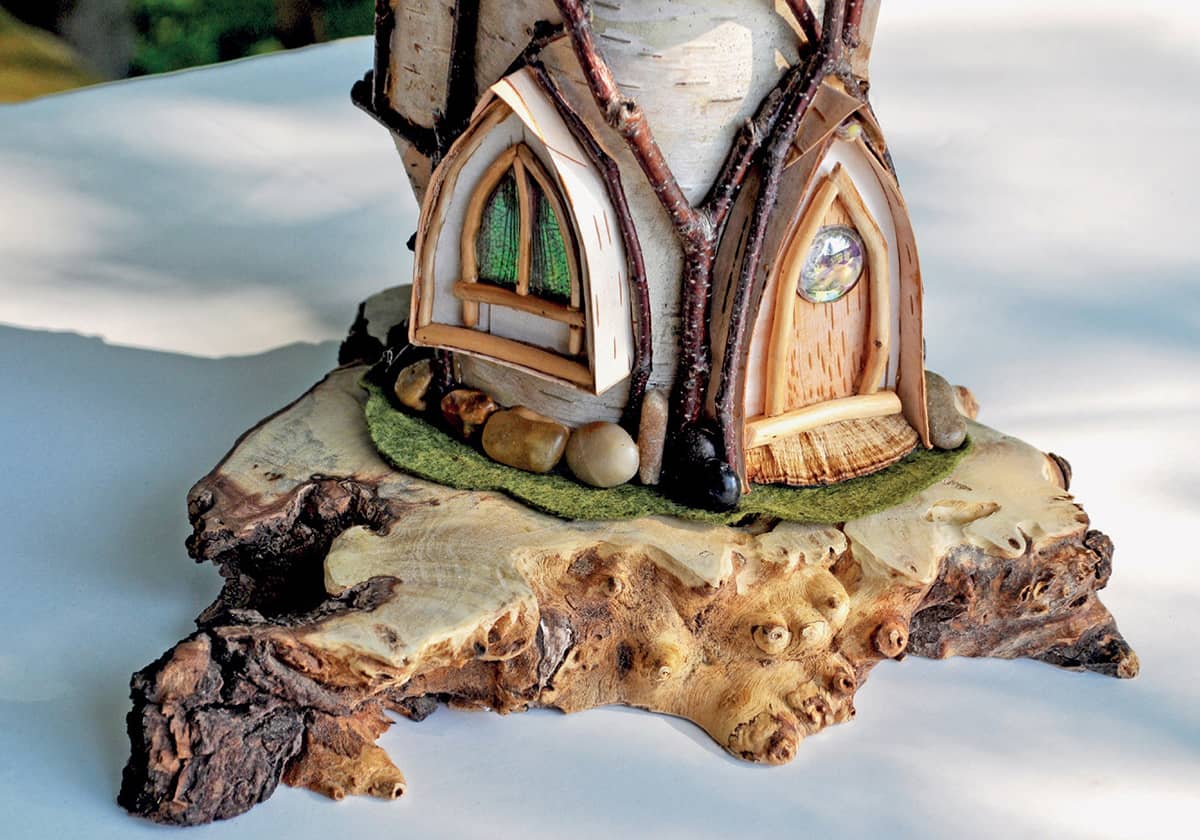
The base slab of wood is minimally prepared by trimming and sanding any rough edges on the top and bottom surfaces. The raw side/edge is left as natural as possible. Use liberal amounts of epoxy on both the base and the bottom of the felt and then press the house into place for a secure bond. See the next page for landscape decorations.
Finished and decorated base from here.
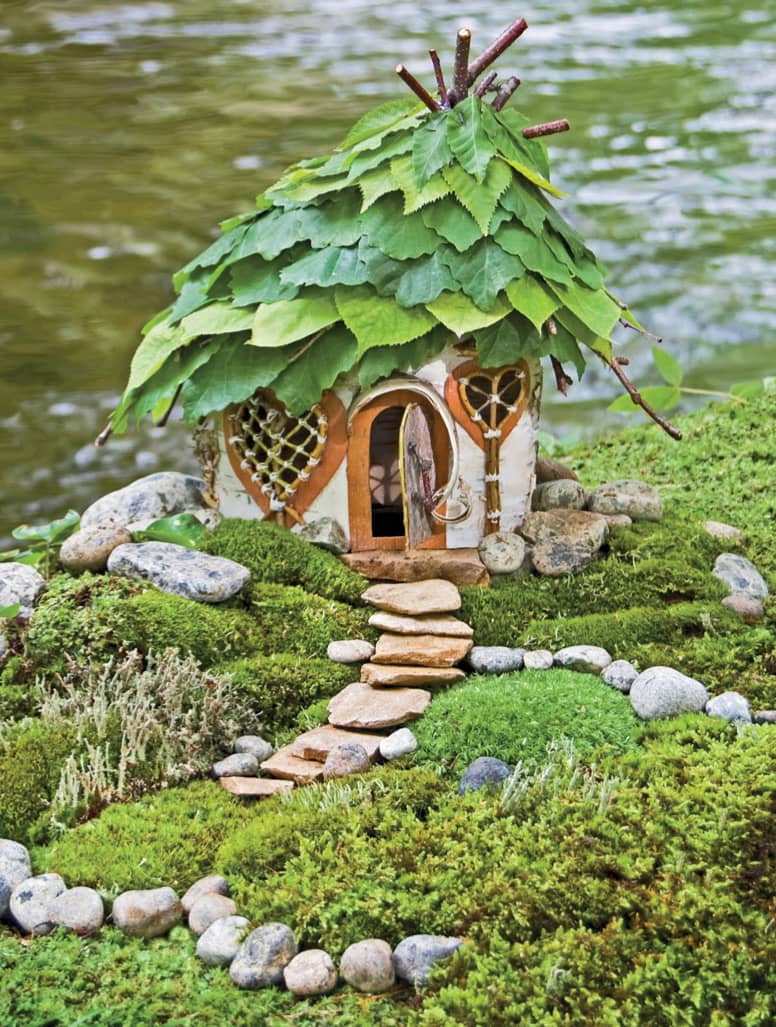
Stone steps and mossy accents help seamlessly blend house with base. The base was created first, and the house was then crafted to fit it very precisely. Applications of small stones add physical weight, which can add helpful stability to a lightweight cottage.
This base is made from 1/8" cabinet-grade plywood and has subtle contours built from multiple layers of felt. Preserved moss, silk botanicals, river stones, and faux moss-covered stones are used as landscaping materials. The tiny mushrooms help with a sense of scale and bring in spots of color. The edge of the plywood is covered with a 1/4"-wide strip of green felt. Another option is to paint the sanded plywood edge with acrylic paint before it is landscaped.
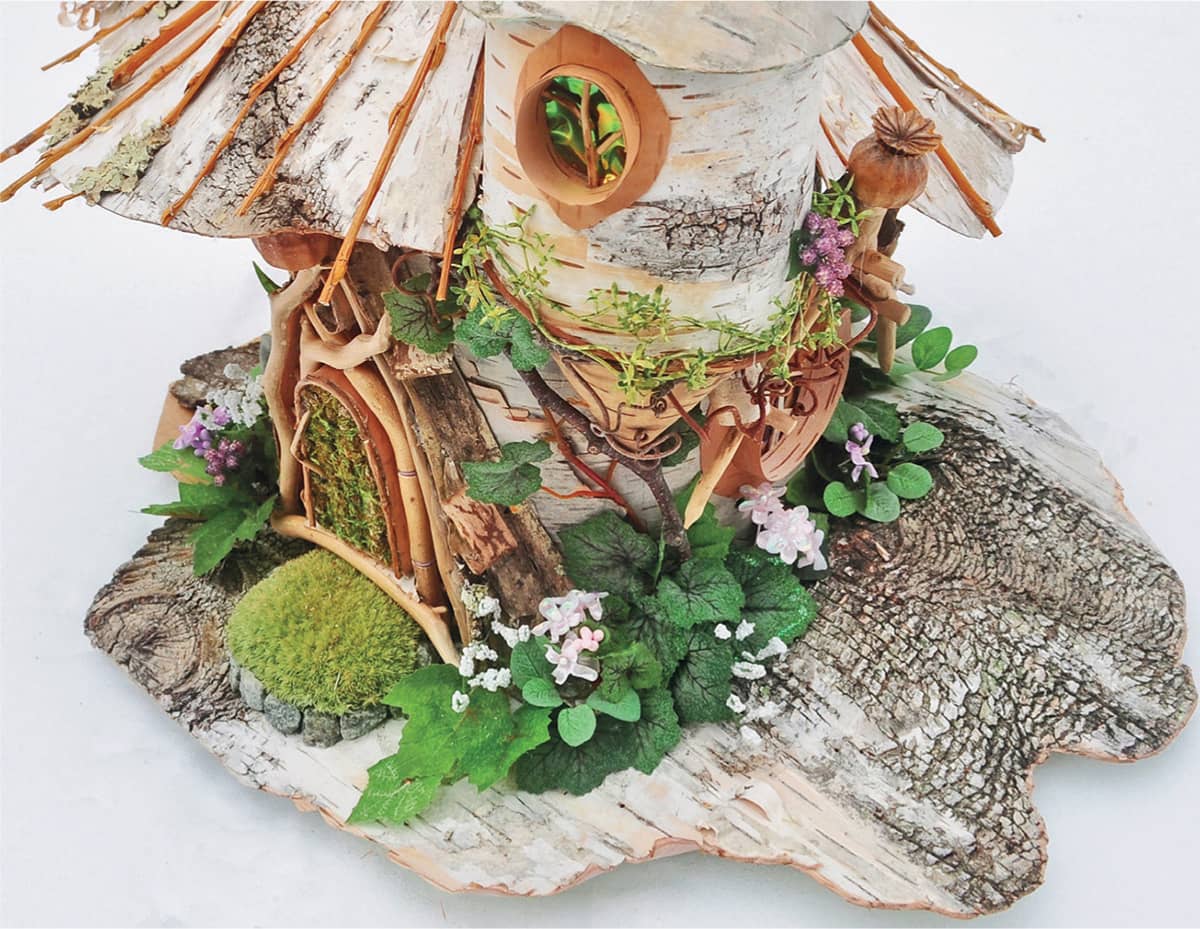
A thick piece of natural birch bark has been trimmed and shaped into an asymmetrical base. There is a smaller circle of 1/8" plywood underneath the bark, but it is invisible from the top. It was added to give extra support to the base and also to keep the bark from curling. The main house is attached to the birch bark using liberal applications of wood-colored epoxy glue. Several types of silk botanicals are applied around the base for landscaping. Notice how the leaves are glued in place to give a natural appearance.
When creating a base like this, use several different kinds of silk leaves to maximize the visual impact and create a more natural-looking setting. Adding a few sprigs of climbing greenery to mimic vines on the walls visually ties the house to the base and gives it a sense of age. There is a battery pack hiding in the foliage on the left.

A good base will add physical and visual stability to your faerie house creation.
PATHWAYS TO HOME
The making of paths, steps, and stairs is a deeply intuitive part of the whole faerie house process. I’ve learned this from watching children making faerie houses either alone or in a group. At some point, usually after the main components of the house are complete, kids will almost always lavish great care on the pathway to the house. It is as if some part of our deep, innocent selves knows that finding our way to the place of magic and sanctuary must be mapped.
I like to think of stairs, steps, and paths as the metaphorical bridges our imagination needs to help us connect to the magical world. While the front door allows us to actually enter the magical space within, our eyes instinctively seek our way to that door by following paths, stairs, and steps. Everyone will have his or her own style and method for crafting this part of their dream house. Some builders like to create extravagant bridges and bordered paths. For others, a humble set of stepping stones will do.
Here are some constructions to help spark your own creativity.
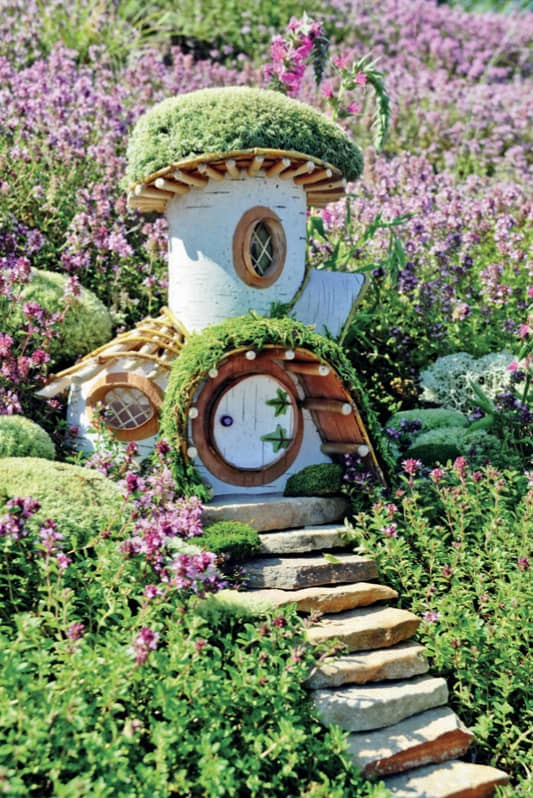
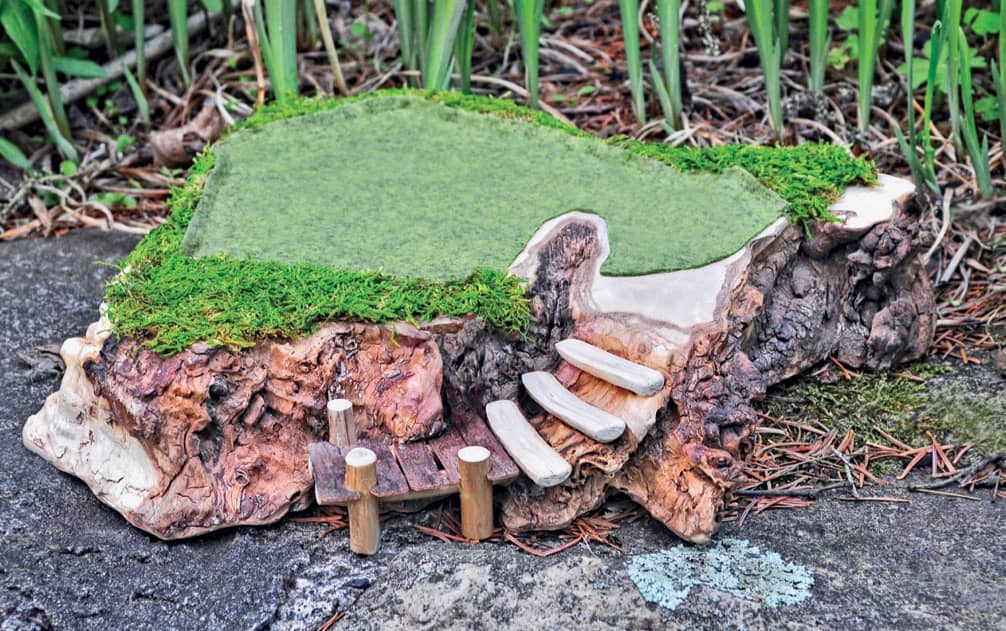
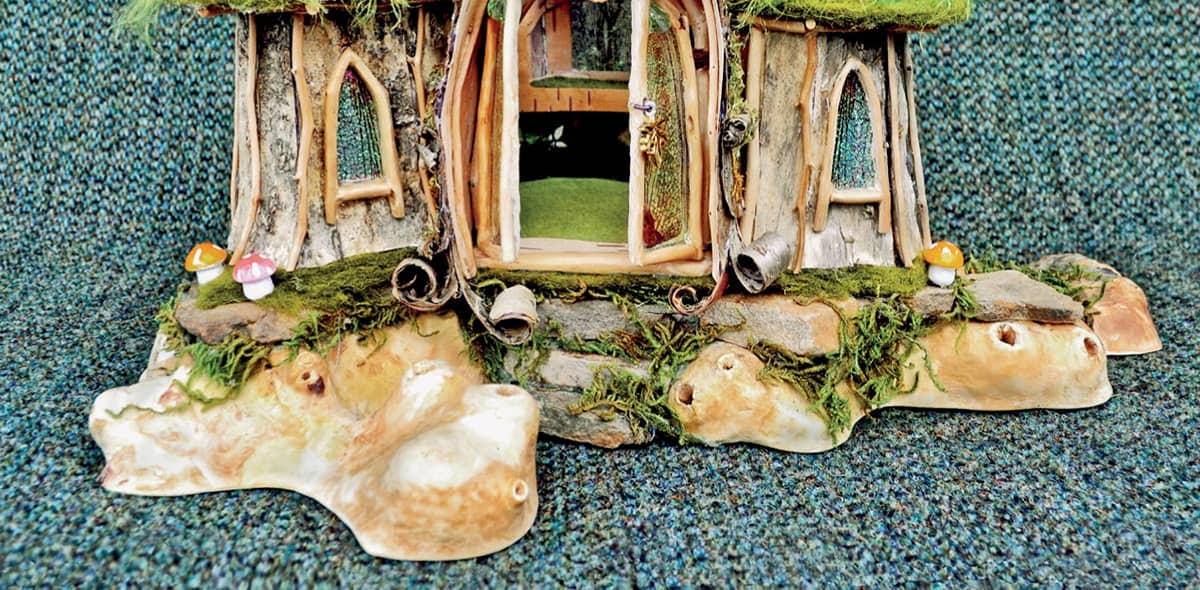
Stone stairs enhance any faerie house entrance.
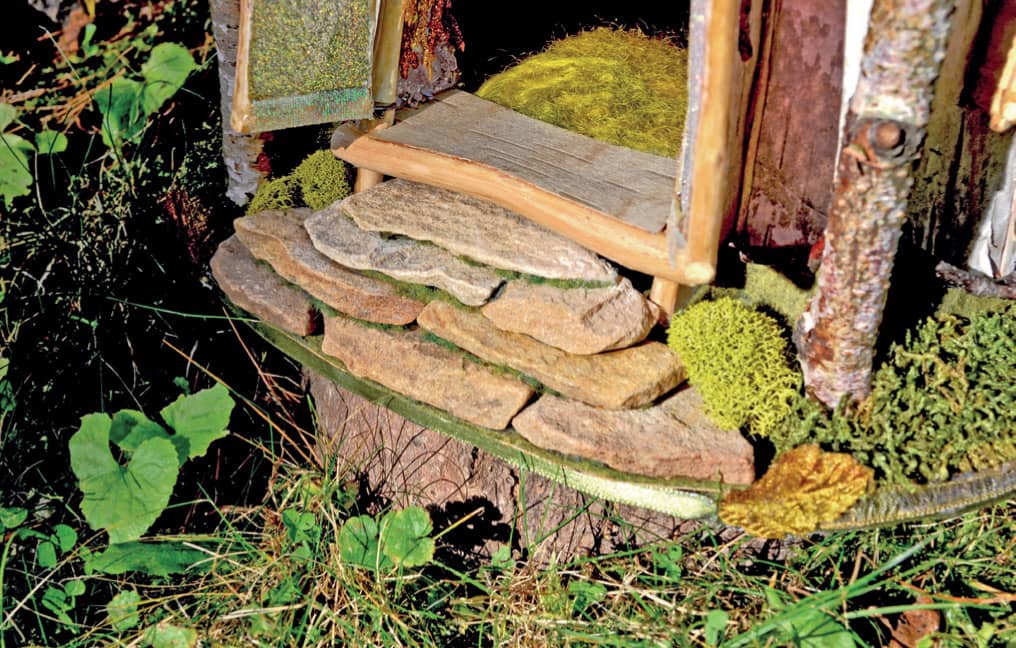
Tiny strips of green felt look like moss when added to stonework for tiny houses. Rough up the cut edges of the felt with sandpaper for a softer edge and tuck in as you glue the stone in place.
To lay in a set of simple stairs, start with uniformly thick stones. Then, beginning at the bottom, rest the front edge of the second stone onto the back edge of the first stone. Repeat until you have the height you want. You may need to provide additional support behind and under some stones.
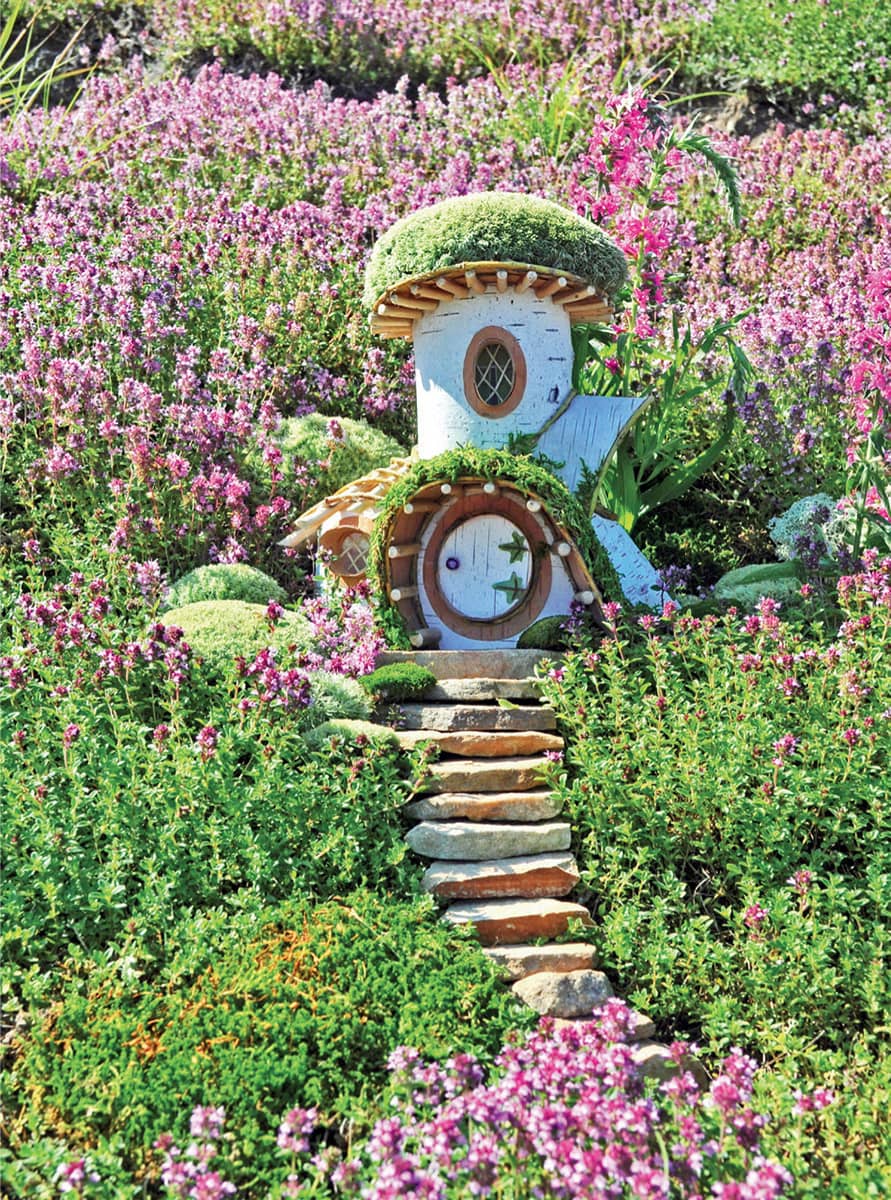
Out in the wild, a meander of sandstone steps brings the viewer up the thyme-covered slopes right to the round front door.
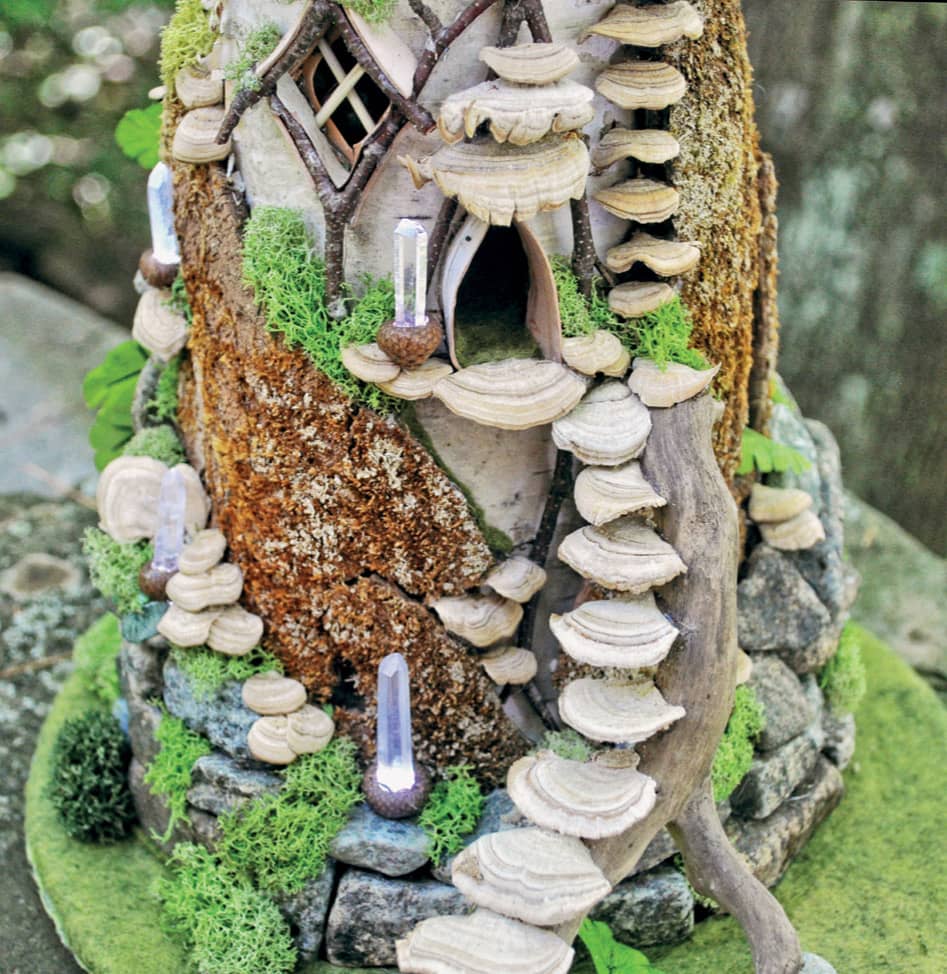
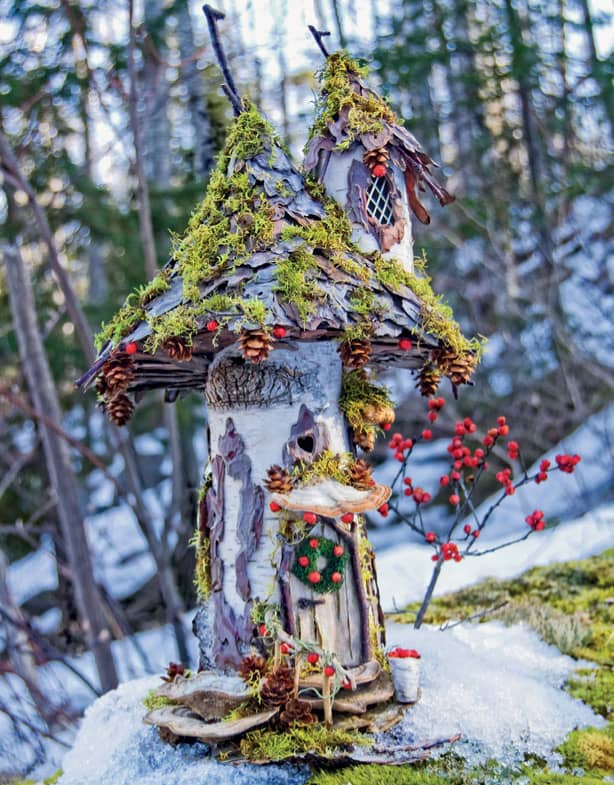
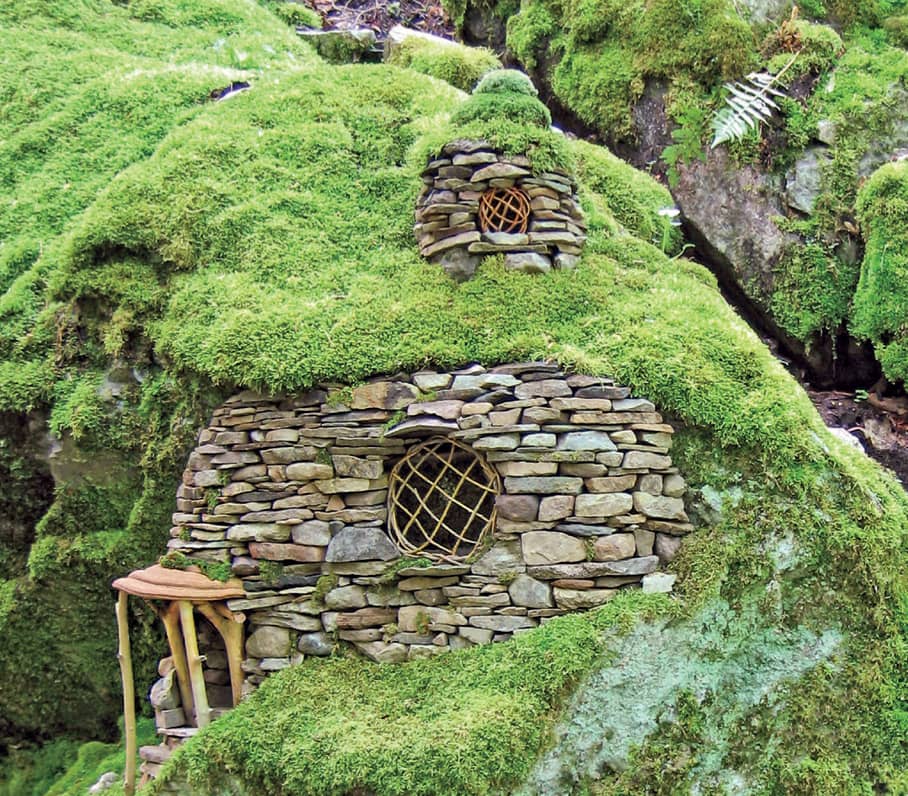
In this example, tiny bracket fungi are being used as a stairway to the front door as well as for additional decorations on the exterior of the house.
TWIGGY BITS
Making the little twig details for faerie houses is a lot of fun and doesn’t require a lot of skill or equipment. What it does require, however, is patience, a delicate touch, and a little bit of creative ingenuity. Here are some samples of twig work to help you get inspired to experiment with embellishing your own projects with these delicate details. All of the components in these images were made with very simple tools: a fine-toothed saw, a sharp knife for trimming and carving, sandpaper for smoothing, and wood-colored epoxy for gluing the twigs together. In some cases raffia or moss were added for decoration.

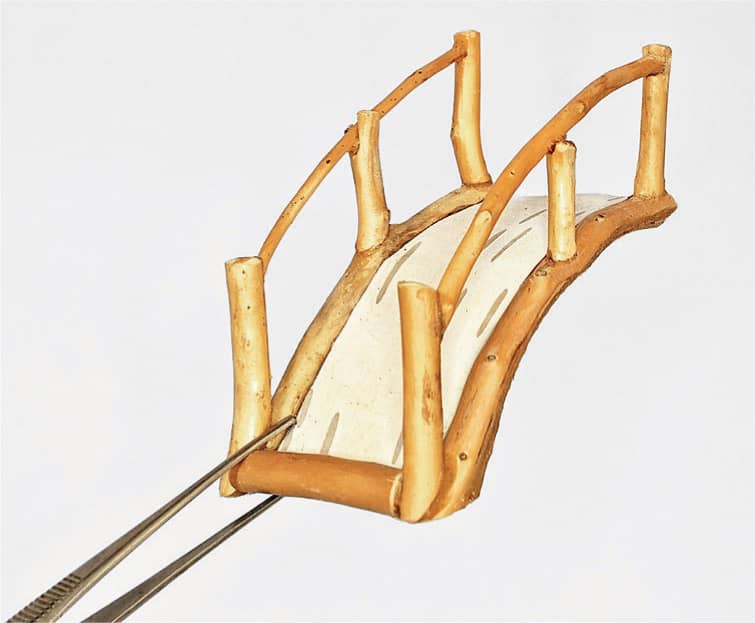
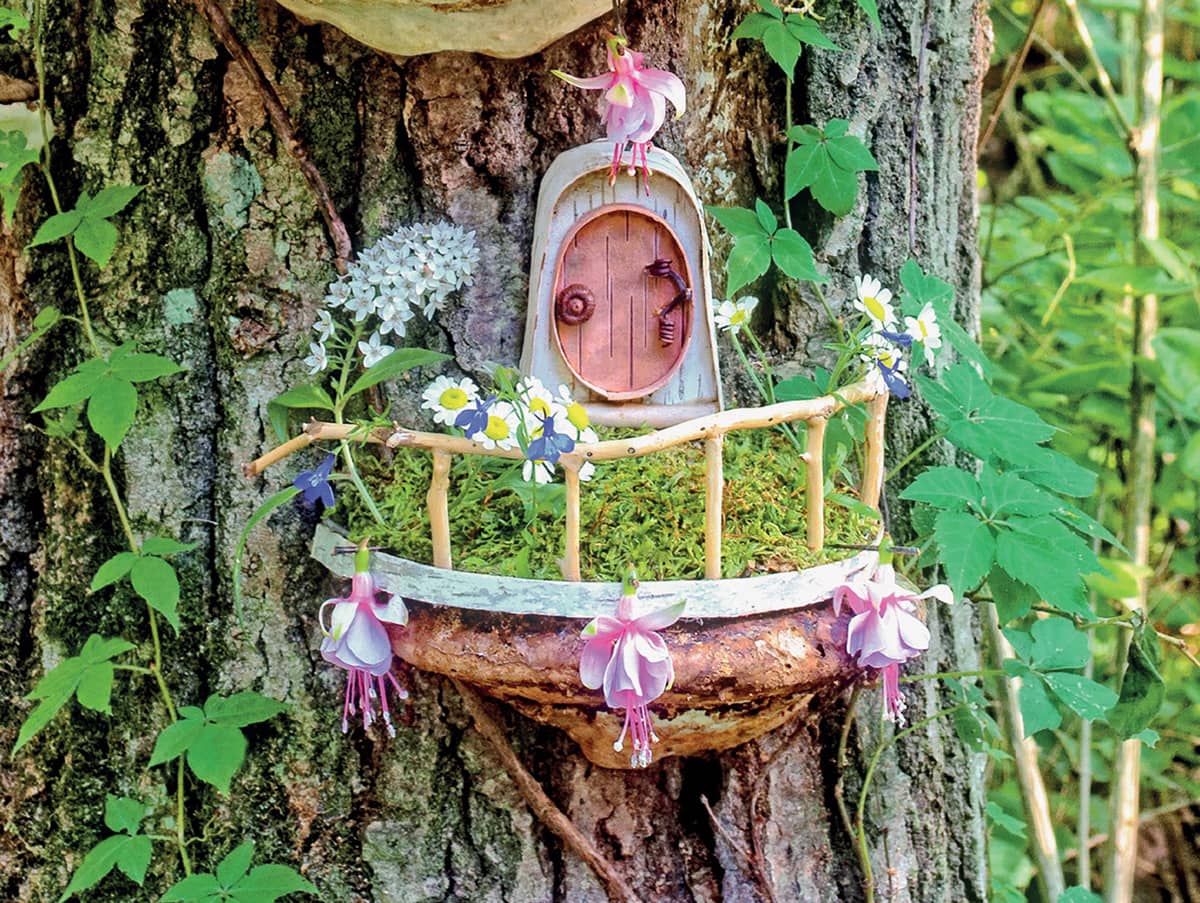
A simple footbridge is made from two similarly curved twigs of the same length. They are joined together at regular intervals by crosswise twigs glued underneath the bridge. The joints are wrapped with raffia to conceal the glue. Once all the crossbars are in place and decorated with spiraling strands of raffia, a long narrow strip of birch bark is cut, fitted, and glued in between the two railings. These simple bridges can be flat or arched.
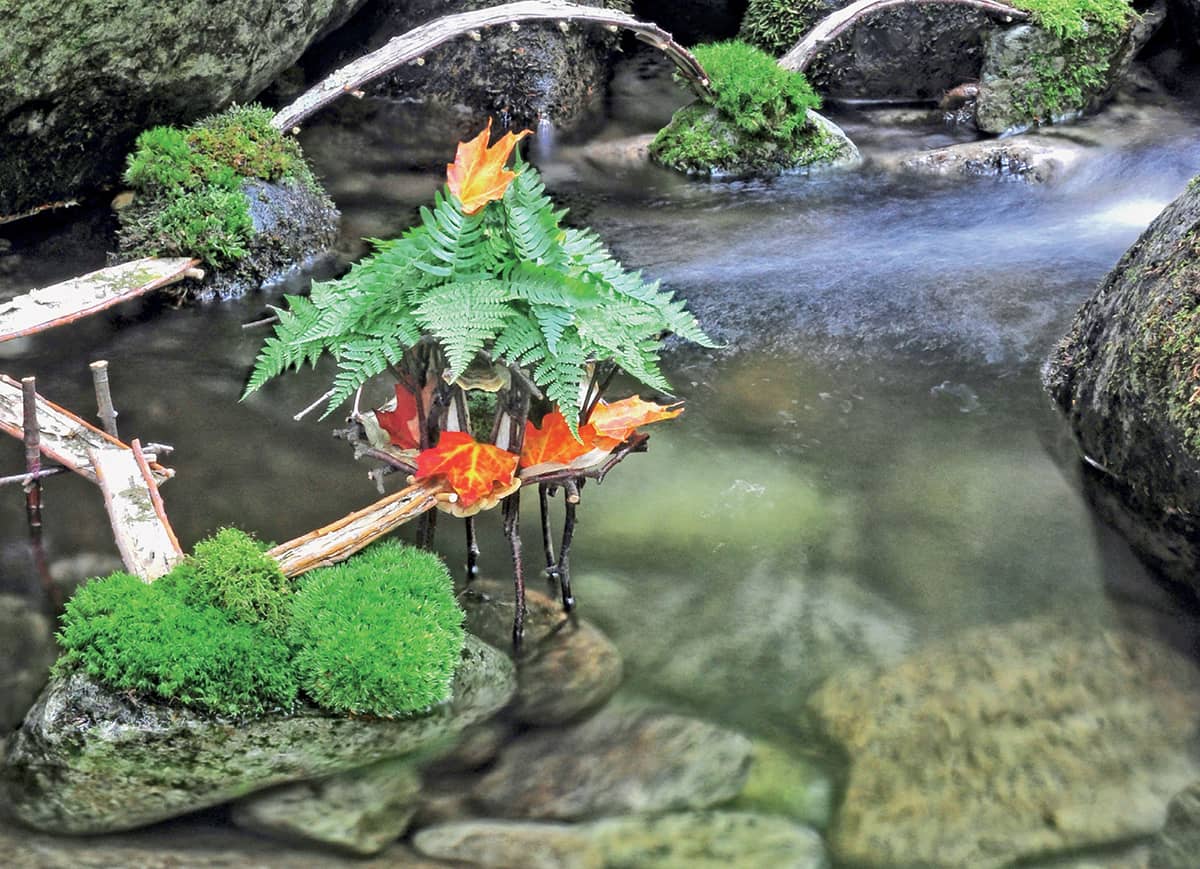
This faerie footbridge leads to a magical teahouse set in the middle of a forest stream. It was constructed using the same techniques as the other footbridge. The rustic nature of the sections enhanced the whole setting for this tiny tea house.
This tiny footbridge was made using a similar technique as shown here. The curved footbridge base was made first. There are three crossbars hidden underneath. Next, the upright posts were cut and carved to fit, and finally the curved railing was attached.
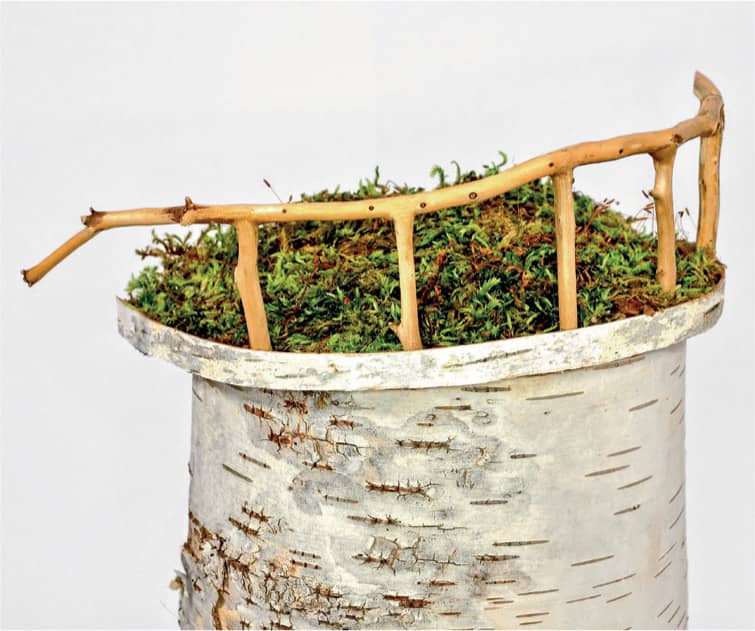
A balcony with a twig railing and a mossy carpet were designed for a special location. Choose a long twig with interesting curves and details for the railing and similarly colored twigs for posts.
The balcony and railing installed.
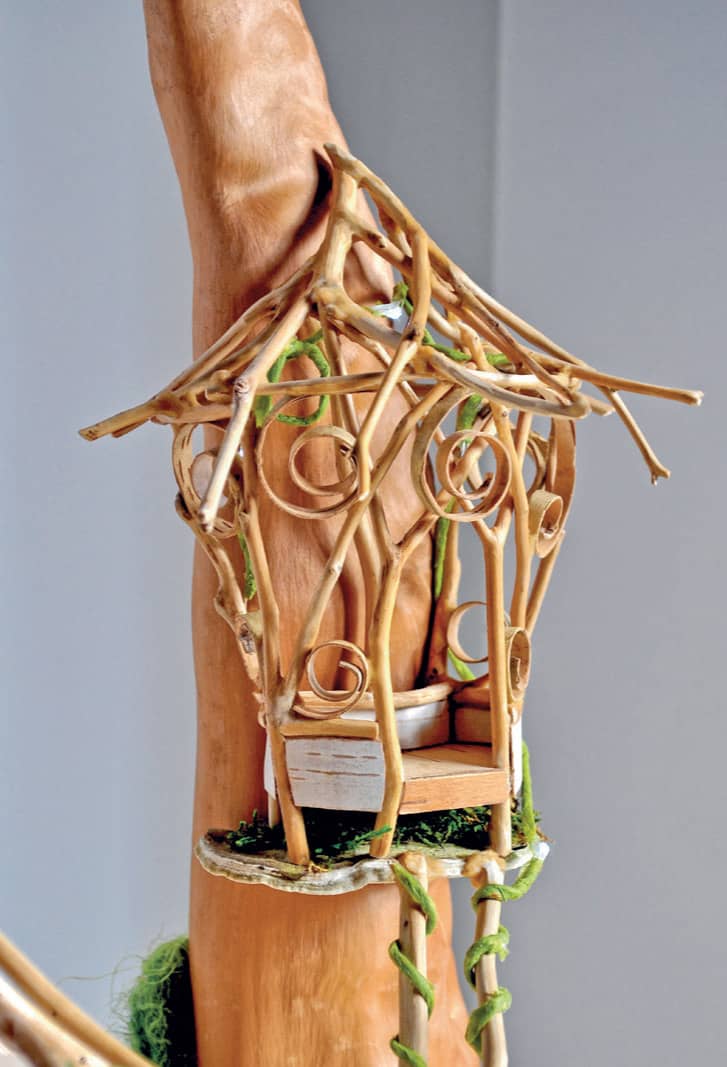
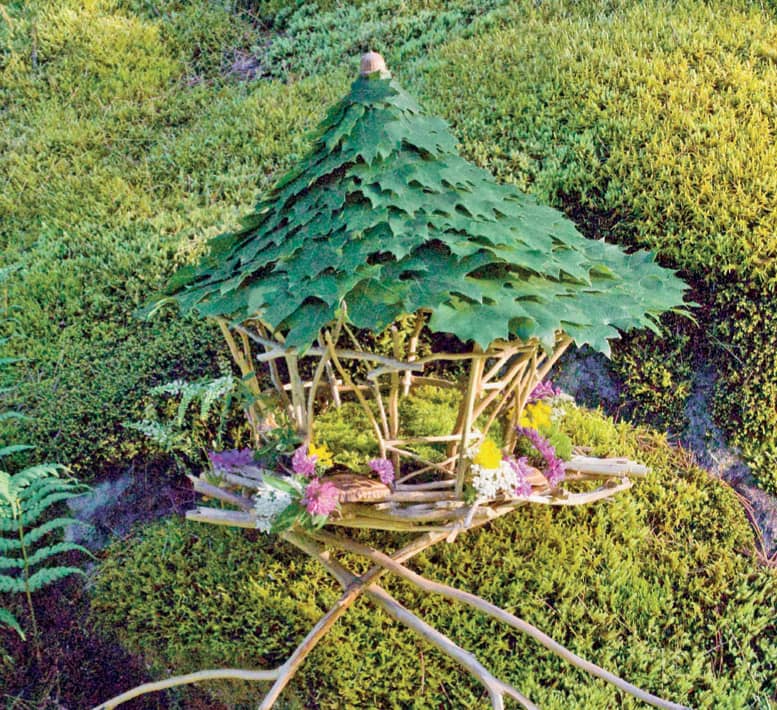
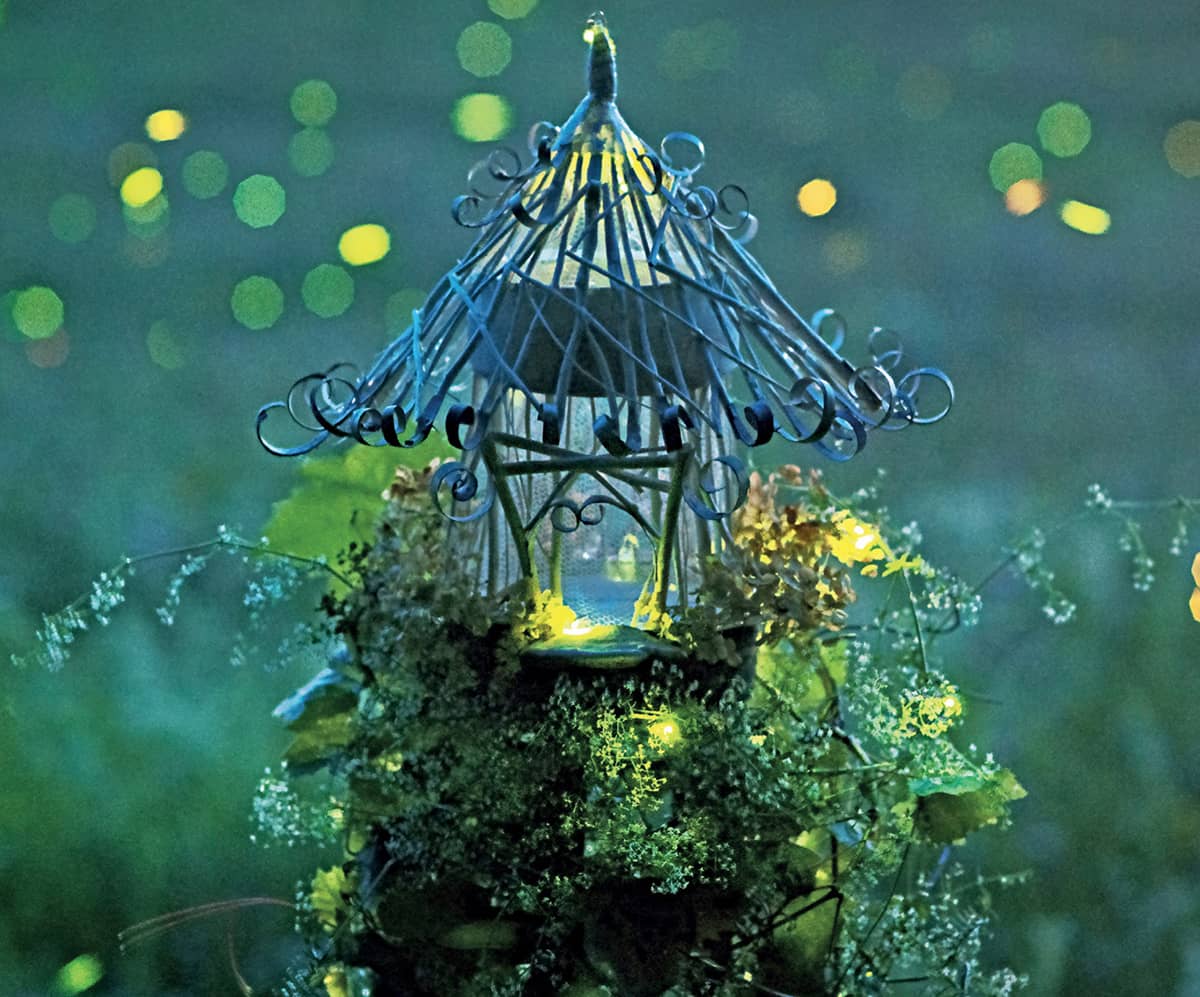
These tiny structures add a lot of charm and style, but they do take time and patience to make. This little gem, at 3 1/2" tall, took more than eight hours to make! The “vines” are actually covered wires that allowed the miniature gazebo to be lighted.
If the space you want to decorate with railings is too small for twigs, you can try using dried grapevine tendrils instead. They come in strange and crazy shapes, but they add a wonderful sense of wildness for tiny balconies and windows. The tendrils from wild or cultivated grapes need to be collected in the fall after they have dried on the vine. Use needle pruners to snip them off and clear epoxy to glue in place, as the wood-colored epoxy will show against these dark tendrils.
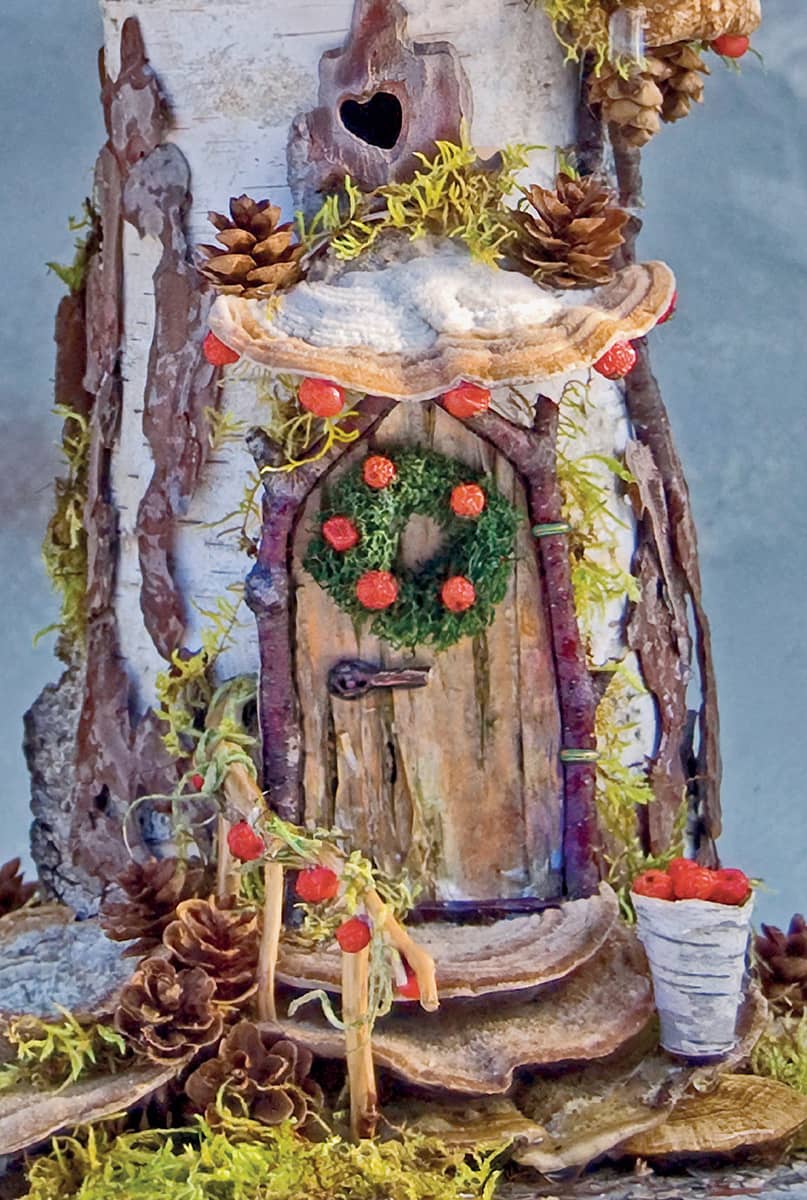
Don’t forget to have fun decorating your tiny twig details too. Wrap with ribbons or bring out beads and berries for holiday cheer. A birch bark bucket of berries and a tiny wreath completes the festive look.
It is my sincere hope that the images and instructions in these pages have filled you with inspiration and courage to try your own hand at making something magical from nature’s bounty. Whether you are just a beginner or an experienced crafter, these pages should give you the information you need to get started on a whole new adventure imagining new dimensions of creative expression and joy.
Please remember to collect your own materials from nature with respect and gratitude but always do so in a sustainable fashion. Be kind to Nature and she will be kind to you.
Now it’s time to put everything together and build a couple of delightful houses from the ground up!
Fireflies and a faerie house—a midsummer’s dream.