Configuring your mouse is a little easier than the keyboard, as there are fewer options. To start the process, select System → Preferences → Mouse to call up the window in Figure 3-12, which offers two sets of options: General and Accessibility.
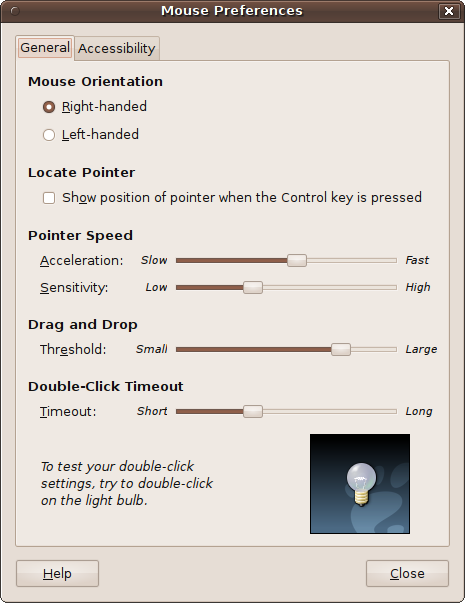
Under the General tab you can choose whether you will use your mouse left- or right-handed, and whether to highlight the location of the mouse pointer when the Ctrl key is pressed. You also can adjust various settings such as the Acceleration speed and Sensitivity, the Drag and Drop Threshold, and the Double-Click Timeout.
Adjust the settings to your preference, and then click the light bulb image. A single click will make it light dimly for a while and then go out. This length of time is the Double-Click Timeout, which increases as you move the slider to the right.
The Acceleration setting determines the speed at which the pointer will move as you move the mouse, whereas the Sensitivity determines the responsiveness. If you find the mouse pointer is a little jerky, move the slider to the left; if it seems sluggish, move the slider to the right.
The Drag and Drop Threshold specifies the distance you have to move an item before Ubuntu decides you are conducting a drag-and-drop operation.
The Accessibility tab provides enhanced features to provide assistance when a user’s mouse control is limited. The options available, Simulated Secondary Click and Dwell Click, are shown in Figure 3-13.

If you can’t use the second button on your mouse, you can enable the Simulated Secondary Click feature to invoke the function of a second button, which generally opens a menu. This feature invokes the right-click function when you hold down your primary button (usually the left button) for the period of time specified.
However, for this feature to work, the system has to enable Assistive Technology Support, which is disabled by default. So if you haven’t already enabled the support, when you click in the checkbox, a new window will open up, as shown in Figure 3-14. This window will ask you to enable Assistive Technology Support and then log out so that you can log back in again with everything correctly set up.
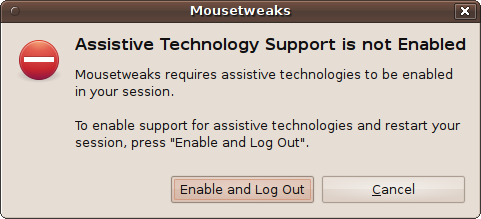
If you want this support, click the Enable and Log Out button and Ubuntu will return to the login screen, where you should re-enter your username and password. Having done this, try moving your mouse pointer to an open area of the desktop and hold down the left button. As you hold it, you will see the mouse pointer icon slowly fill with a different color.
If you leave the button held down until the pointer has fully changed color, a right mouse click event will be generated, and you’ll see the context menu you’d expect as a result of right-clicking the desktop. Set the delay before the secondary click is activated by returning to the Mouse Accessibility dialog and sliding the delay timer left or right.
With Assistive Technology Support enabled, the Mouse Accessibility dialog also lets you try out the Dwell Click option. This performs a click for you, even if you are unable to depress the mouse button. It does this by noticing that the pointer has stopped moving, and then starts to fill the mouse pointer icon with a different color.
If you leave the pointer still and the cursor fills up, it will then change to a crosshair symbol. If you then move the cursor a little bit to the left (while the crosshair is visible), a mouse click will be generated at the position at which the mouse was just resting. In fact, you can generate four different types of mouse events according to the direction in which you choose to move the mouse while the crosshair is visible:
Move left: single click
Move up: double click
Move down: drag click
Move right: secondary click
You can modify these directions and behaviors if you like, using the drop-down boxes provided in the Mouse Accessibility window.
The initial delay while the mouse cursor fills up can be changed by moving the delay slider left and right, and the amount of cursor movement required to initiate an action can be set using the motion threshold slider.
If this behavior turns out to be a little too complicated, you can use a simpler system by clicking the “Choose type of click beforehand” option and ensuring that “Show click type window” is checked. A new control window will pop up (see Figure 3-15) that lets you rest the mouse over the action that you want to happen next.

So, to create a right-click, you would pass the mouse pointer over the Right Click icon and leave it there until the mouse pointer fills up with the new color. Now move the mouse pointer to a clear part of the desktop and leave it there to call up the desktop right-click context menu.
To disable either of these options, just uncheck their associated radio buttons or boxes.