Now that you’ve set up your desktop exactly how you like it, you may want to give access to your computer to friends, family, or colleagues. Luckily, you can do this very securely using Ubuntu, and each user will be able to customize her working environment to her preferences (or you can do it for them).
The place to start is System → Administration → Users and Groups, which brings up the window shown in Figure 4-47.

In this figure, you can see there are two users, Robin and root. The user root is the main and most important user as far as managing your computer goes, as will be explained later, but for now you can ignore it. The other user is me, Robin. Because administrating users is a potential security risk, I can edit my own details at this point by clicking my name, followed by the Properties button (which becomes enabled at that point). However, I cannot edit the root user or add new users.
To enable these features, you need to click the key icon next to “Click to make changes.” You will then be asked for your password, and after you enter it the various grayed-out options will become enabled.
Once you have entered your password and the Add User button becomes accessible, you should click it to bring up the “New user account” window, shown in Figure 4-48.
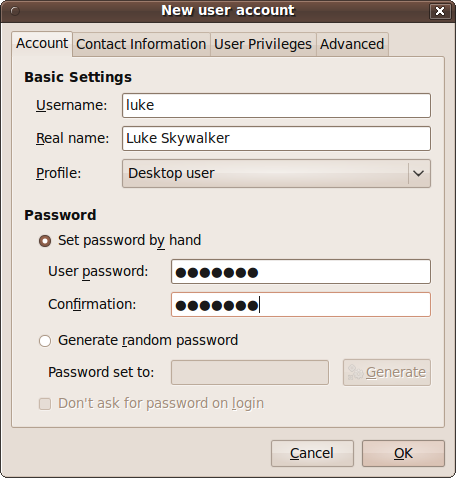
Here, you need to enter the Username and Real name of the new account. The username is the short, single-word text that is used to name the Home folder and for other information about the user on the system. The real name is a longer string that can contain spaces and is used to display the user’s name on the desktop; if you fail to provide one, the desktop will just display the username. Then, either enter the new user’s password manually or ask the computer to generate a random one for you. You should leave the user’s profile as “Desktop user” unless you have a reason for changing it.
That’s all you need to do to create a new account, but don’t press OK yet, though. I recommend you click the other tabs first to fill in other information you may wish to save, such as the user’s contact details, their privileges (such as whether they can use printers and video devices, and so on), and advanced settings, such as their Home directory. But unless you know what you’re doing, I recommend you ignore the Advanced tab for now.
When you click OK, the new user will be added to the computer and become available at the login screen. Now you can click the Close button and test the new account by logging out and then back in as the new user, or by starting a new session. Both of these options are available from the Quit button.