Now that you have your Ubuntu system up and running, it’s time to look at how you can keep it that way by taking the proper security precautions and maintaining your computer in tip-top condition.
Don’t worry that this chapter will be full of convoluted command-line statements and advanced Linux features, because you can actually do almost everything you need right from the desktop, with just a little mouse pointing and clicking.
Mostly, all you need to know is how to use a selection of programs and utilities that are accessible from Ubuntu’s menu system, and how to install a couple of others that aren’t. As you’ll soon see, it’s all quite easy.
Proper maintenance includes power management to limit unnecessary wear on components when the computer isn’t in use, configuring your preferred and startup applications, setting up how your removable media is treated, and various other system settings.
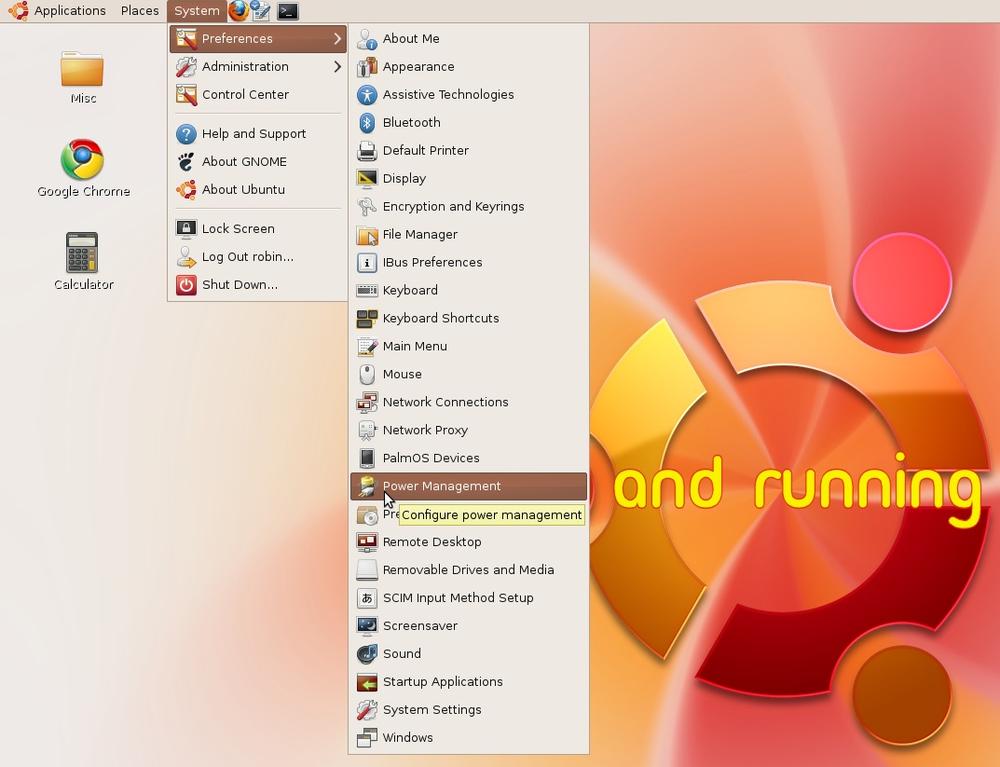
The place to find most of your maintenance and administration tasks is in the System → Preferences menu (see Figure 9-1). Some of these programs offer fairly advanced options that you most likely won’t need, but there are half a dozen of them with which you should acquaint yourself.
I’ll run through these programs in the order in which they appear in the menu.
This program is useful for extending the product life of the components used by your PC, by giving you the ability to turn some or all off when the computer is idle.
It displays differently depending on whether you’re using a laptop or a desktop computer. Laptops will usually display items you won’t see for a desktop, such as a battery power tab.
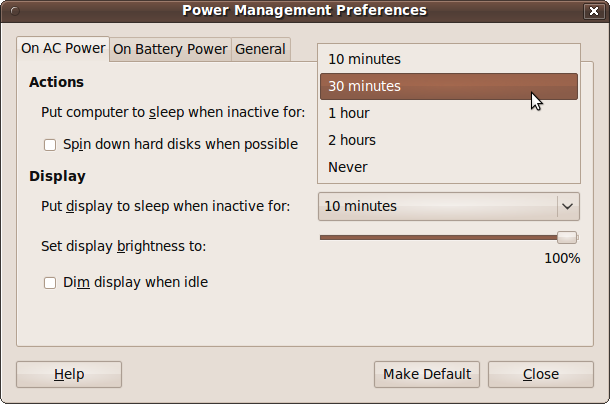
Figure 9-2 shows what the window looks like on a laptop. On a desktop PC there is no On Battery Power tab and no ability to set the display brightness.
This is the first tab, which is shown on all computers. With it, you can choose whether to put your computer to sleep after a period of inactivity. This is good for cost savings, reducing wear on the computer, and ecological benefits—but obviously, if you make the time too short and cycle frequently between sleeping and waking, the effects will be both annoying and detrimental. You can also choose an interval after which, if no user input is detected, the display will go to sleep.
Another option makes hard disks spin down slowly, which can help the battery last longer on a laptop. Also on a laptop computer, you have the opportunity to choose your display’s default brightness and to dim the display when your computer is idle.
This tab is available only on laptops or when a battery power source is detected. Its actions are similar to those on the AC power tab, as shown in Figure 9-3.

You also get some additional options, such as the ability to choose what to do—suspend, hibernate, or shut down your PC—if battery power becomes critically low. A hibernated PC is a little safer because it can lose all power and yet return to where it left off when power resumes, including all documents and open programs, whereas a suspended PC will lose all of these once power is lost. On the other hand, a suspended PC starts up much more quickly than a hibernated one.
Finally, you can use this panel to reduce the backlight brightness from its AC power level when the laptop is running on battery power.
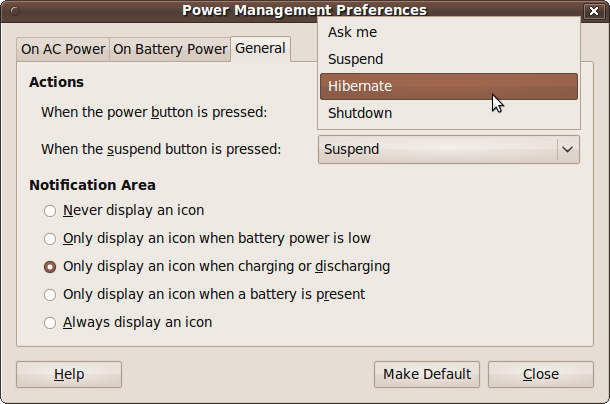
Using this tab you can choose your preferred action (suspend, hibernate, shut down, or prompt the user with these choices) when either the power or suspend button is pressed, as shown in Figure 9-4. You can also choose which icon, if any, to display in the notification area.
Using this window, you can choose the programs to use for the most common computing tasks, such as web browsing and reading email. Whenever one program has to call another—such as when you open an attachment in email or download a PDF in your browser—the system checks your preferred applications to make its choice. Figure 9-5 shows what the Preferred Applications window looks like when you call it up.

In this tab you can choose which programs to use as your
preferred web browser and email reader. To change a program, you can
click it and then select Custom, which will enable the Command
input field. The concepts I laid out in Chapter 7 help you here. You can enter a program
name, which you should normally follow with %s to allow files dropped onto the
program’s icon to be passed to it. If the program is not in your
path, you’ll need to provide its full path and program
name.
You can also check the “Run in terminal” checkbox if the program runs in text output mode (in other words, if it uses standard output).
This works in exactly the same way as the previous tab, but it sets your preferred multimedia player.
This tab is for system commands and is similar to the previous two, except that the command you enter is split up into Command and “Execute flag” sections, as shown in Figure 9-6.
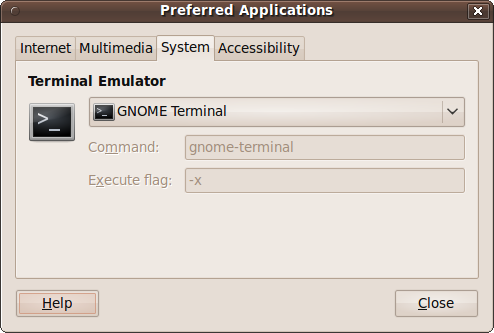
Most terminal applications have an option that causes them to
treat the remaining command-line options as commands to run. This
can be set by entering -x in the
“Execute flag” field.
When Ubuntu boots up, there are a number of programs that get started by default, such as Bluetooth and network managers, the power manager, volume control, and so on (see Figure 9-7).
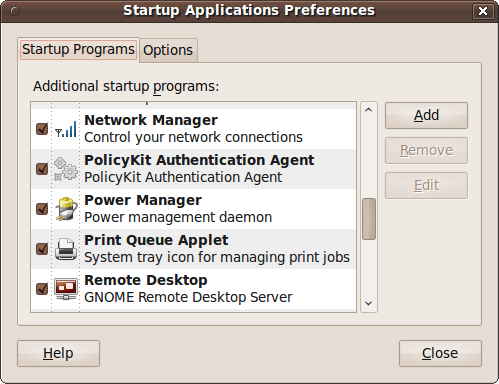
Using the Startup Applications utility, you can disable any of these or add new programs to the list using the Add, Remove, and Edit buttons. Remove and Edit will be grayed out until you select a program.
Be careful which programs you remove, as you could have difficulty restoring them if you need them later. The same goes for editing any of the default programs.
To add a program, click the Add button to bring up the dialog shown in Figure 9-8.
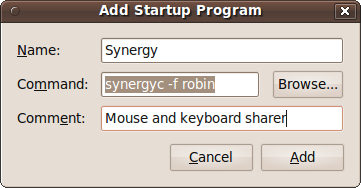
Here, I have chosen to add the program synergyc to run at startup. This is the client program of the Synergy utility, which lets me use a single keyboard and mouse on the computer named robin to operate all my Windows, OS X, and Ubuntu PCs. So now, each time this computer starts up, it will accept input from the robin computer’s keyboard and mouse. Chapter 10 offers more details on setting up and using this great little program.
If you don’t know a program’s name and/or location, you can click the Browse button and look for it.
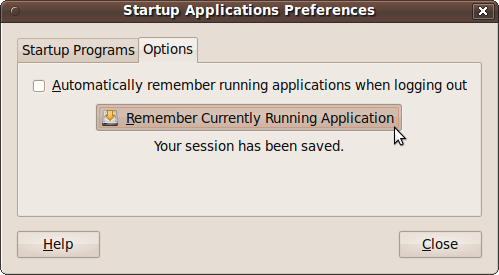
After you log out, all your programs will be closed. If you want Ubuntu to remember them and reload them for you when you next log in, you can click the Options tab and then check the box called “Automatically remember running applications when logging in,” as shown in Figure 9-9.
Thereafter, all your programs will be reloaded each time you log in. If you close any programs before logging out, only those that remain open will be remembered.
You can also have Ubuntu remember your open applications by clicking the button with the label Remember Currently Running Application (even though there is no final “s” on the end of the button label to indicate that the option potentially controls multiple applications), and they will be loaded in again each time you log in. To turn this behavior off, ensure all applications have been closed, and then click the Remember Currently Running Application button again.
The Window Preferences window allows you to control the way windows behave in conjunction with the mouse and keyboard (see Figure 9-10).
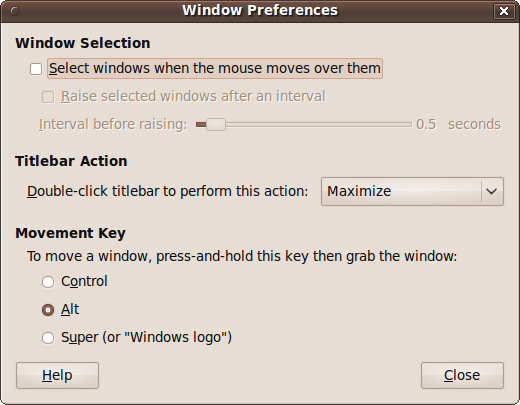
The window is divided into three main sections.
In this section, you can choose to make the desktop select a window when the mouse moves over it. This means that whichever window happens to be under the mouse will be focused, and therefore the target for mouse and keyboard actions.
Although a window becomes focused as soon as you pass a mouse over any portion of it, if any part of the window is obscured by another, you won’t be able to access that portion unless you click the window to bring it to the front, also known as raising it.
For this reason, you can also choose an interval after which a newly selected window will automatically be raised, as long as the mouse stays over it. By default, the interval is half a second, which is convenient for most users. If you pass over one window on the way to another, you won’t be distracted by having it raised, but as soon as you hover for half a second, the window is raised. You can change the time to any value between 0 and 10 seconds.
Normally when you double-click a window’s titlebar, it will cause the window to maximize. But with this pull-down menu, you can choose the action to associate with this event. The options are:
- Maximize
Expand the window to fill the whole desktop.
- Maximize Vertically
Expand the height of the window to the height of the desktop.
- Maximize Horizontally
Expand the width of the window to the width of the desktop.
- Minimize
Reduce the window to a tab on the bottom panel.
- Roll up
Stop displaying the window’s contents, but leave the titlebar in place.
- None
Do nothing.
Double-clicking the title bar another time reverses the action, restoring a window to its previous state.
You can drag windows around by clicking and dragging their titlebars, but when a titlebar is off-screen, you can hold down the Alt key and then drag the window by clicking any visible part of it.
Using the Movement Key option, you can change this action from the Alt key to either the Ctrl key or the Windows logo key.
Moving on to the Administration menu next, there are several more maintenance options you may need.
The Computer Janitor helps you remove old files that are no longer needed. When you select it, you will be prompted for your password, and then a screen such as the one in Figure 9-11 will be displayed.
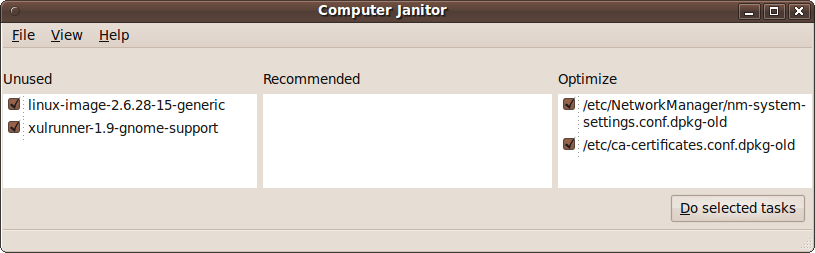
In the lefthand frame, you can see that two old packages have been found and their checkboxes automatically checked. Clicking either of them will display more details and help you decide whether to uncheck it.
The central frame will list any recommended changes to make, whereas the righthand one lists changes you can make to optimize Ubuntu. Again, in each case you can click an entry to view more information about it.
Once you have selected all the changes you wish to make, click the “Do selected tasks” button and you’ll be asked whether you are sure you want to clean up. If you are, click the “Clean up” button.
Sometimes after cleaning up, the program will discover one or more new items that can be optimized, and you can repeat the process. If the Computer Janitor can’t find anything to clean up, it will pop up a window to tell you so and advise you to close the program.
With this utility, you can choose the action that should occur on login. By default, all users will be required to select their username and then enter their password. But if you click the Unlock button and enter your password, you can select one user who will be logged in automatically, as shown in Figure 9-12.
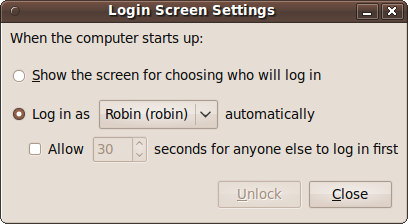
You can either have that user logged in as soon as the computer starts or reboots, or set a time delay during which other users can select their usernames and log in. If the delay is passed without another account being chosen, then the automatic login of the selected user will proceed.
Warning
Allowing automatic logins is an extremely unsafe option where security is an issue—for example, if you have access to sensitive data via a particular computer. Generally, I recommend using this setting only in a home environment in which you are certain there are no security issues. Even if you trust everyone with access to your computer, remember that they can always pull an annoying prank on you if you leave open access to your account.
In our house, we keep a Netbook PC in the living room so that we can look things up and check our email and social networking sites from time to time. We used to have just one account on it that we all shared, but we decided it was annoying to keep logging in and out and entering passwords in the web browser each time when changing users.
So, I decided to create a completely unsecure environment on this machine, because ease and speed of use were much more important to us than privacy and security, particularly since it never leaves the house.
The Netbook now has multiple users, each with empty passwords that the system automatically accepts. Any user can now click the User Switch icon at the top right of the desktop, and then choose a username from the list shown to automatically log in as that user. As long as the PC hasn’t been restarted, each of us now has all the programs we want open all the time, and which we can instantly return to—with all our settings and password details already entered.
If you want to create such a system, call up a Terminal window and then, for each user, enter the following:
sudo passwd -d usernameThe first time you do this you’ll need to enter your own password, but for the next 15 minutes you won’t be prompted. So, for example, if you have the users andy, brian, claire, and denise, you would enter the following:
sudo passwd -d andy
sudo passwd -d brian
sudo passwd -d claire
sudo passwd -d denise
This removes the password from all the users mentioned. You now need to edit a file to tell the system that users without passwords are allowed to log in automatically. To do this, enter the following:
sudo gedit /etc/pam.d/common-authThe file will then be opened up in the editor, so move the cursor to the line (about 17 lines from the top) that looks like this:
auth [success=1 default=ignore] pam_unix.so nullok_secure
Now delete the _secure at the
end of the line, click the Save button, log out, and enter your
username to verify that you can now log in without a password. You
will now have a completely open system, and even sudo commands will not require
passwords.
Warning
Remember that a fully open computer is completely unsecure,
and that if it is lost or stolen, account information for each user
could be easily extracted and used maliciously. Also, having no
password for sudo means that it
is very easy for someone careless (not even necessarily malicious)
to seriously mess up or break your computer. So don’t create such a
system lightly.
The System Monitor is the place to go when you need to know how well your computer is handling its resources, such as memory, the network, hard disks, and so on. Figure 9-13 shows the program’s first tab, the System summary screen.
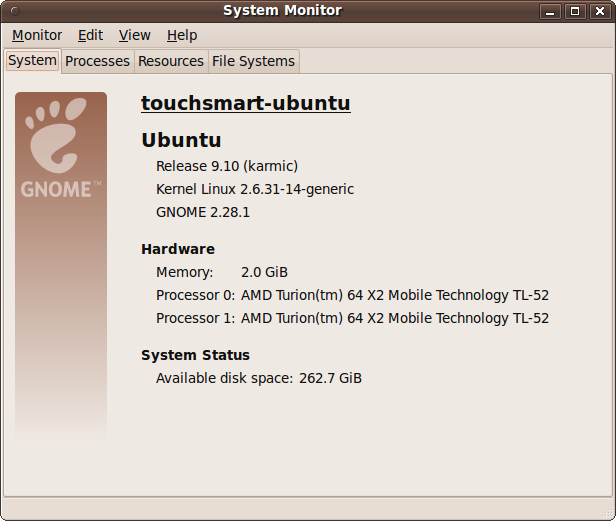
This tab provides an at-a-glance summary of your computer, including the name it has been given, the versions of Ubuntu, Linux kernel, and GNOME desktop, the amount of memory, the processor(s) used, and available disk space.
This tab provides full details on the processes currently running, as shown in Figure 9-14. You can click on any of the column titles to sort by the data in that column and determine, for example, which processes are consuming the most CPU time or memory.

To kill a process (in other words, to terminate its execution), highlight it and click the End Process button. But be careful—you may lose or corrupt data that the program was using, or disrupt another program that depends on the program you kill. Use this button only when you know what you are doing, and only when the program has hung or you can’t close it normally for some other reason.
This tab shows you graphically how your computer’s various resources are being used, as shown in Figure 9-15.
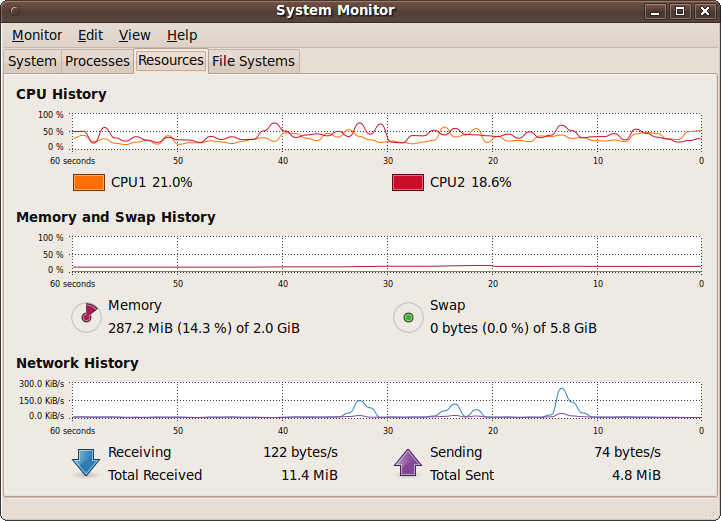
Each graph slowly moves to the left with the latest data point plotted on the right. In the figure you can see that the processors are averaging about 20% or less usage, the memory used is only in the region of 15% (with no use of a swap file), and the network graph shows four peaks, corresponding to web pages I called up in the Firefox web browser.
Note
Compared to the Windows Vista operating system that this PC came with, these low levels are a tribute to the power and compactness of Linux. The fan on this PC also runs in its slowest and quietest mode under Ubuntu, but under Vista it whines away as it tries to diffuse the heat generated by the extensive CPU workload.
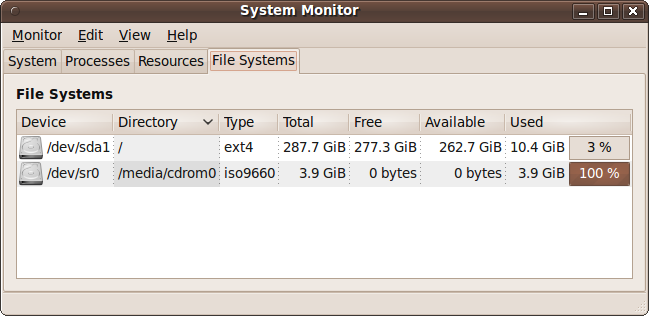
This final tab shows how your hard disks are doing. It lists the device name, location, and type, as well as its total, used, and free space, as shown in Figure 9-16.
To thoroughly test your hardware, you can use the System Testing facility, as shown in Figure 9-17.
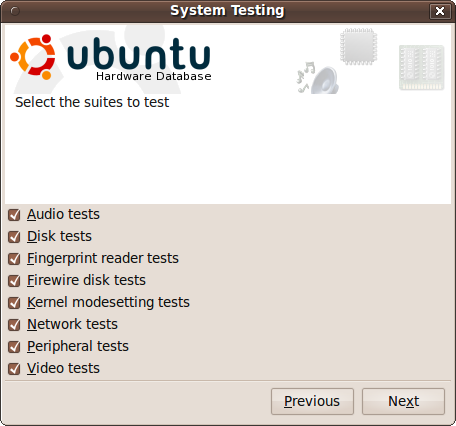
Select the tests you would like made, and click Next. You will then be taken through various tests. For example, when testing the audio on your computer, you’ll be asked to open the volume control application and make certain setting adjustments before clicking the Test button. The process will then continue for Bluetooth headsets, microphones, and USB audio devices.
Performing all the tests may take a while, but doing so will alert you to any problems with your computer that might need your attention.