Flowers have been my inspiration for many years, and I use the theme a lot. Nothing cheers up a room more than flowers, and this flower garden throw will brighten any corner. I have included twelve flower garden squares in this book, though only six of them were used for this throw. For this design, same-flower squares are arranged in diagonal rows. You might choose to design yours with some of the other flower garden squares.
YARN Red Heart Soft Yarn, 100% acryllic, 5 oz (140 g)/256 yd (234 m): lavender #3720 (A), 3 skeins; dark leaf #9523 (B), 2 skeins; leaf #9522 (C), 2 skeins; and lilac #9528 (D), turquoise #2515 (E), pink #6768 (F), honey #9114 (G), and tangerine #4422 (H), 1 skein each
HOOK 8/H (5 mm)
GAUGE 1 square = 6" x 6" (15 x 15 cm)
FINISHED SIZE Approximately 44" x 44" (112 x 112 cm)
SKILL LEVEL Intermediate

Make 6 each of the following Flower Garden Squares:
Flower Garden Square I (page 16), using A for foundation, rnds 1 and 2, C for rnds 3–5, B for rnds 5–7, A for rnd 8.
Flower Garden Square IV (page 19), using H for foundation and rnds 1–3, C for rnds 4–6, B for rnds 7 and 8, A for rnd 9. When square is completed, tack down a few petals from behind.
Flower Garden Square V (page 20), using F for foundation and rnds 1 and 2. C for rnds 3, 4 and 5, B for rnds 6 and 7, A for rnd 8.
Flower Garden Square VI (page 21), using A for foundation and rnds 1–3, D for rnd 4, C for rnds 5–7, B for rnds 8 and 9, A for rnd 10.
Flower Garden Square VIII (page 24), using C for foundation and rnd 1, G for rnd 2, E for rnds 3 and 4, C for rnds 5–7, B for rnds 8 and 9, A for rnd 10. When square is completed, tack down a few petals from behind.
Flower Garden Square XI (page 27), using C for foundation and rnd 1, G for rnds 2 and 3, C for rnds 4 and 5, B for rnds 6 and 7, A for rnd 8.
Assemble squares following the diagram using the Chain Join method shown on page 31.
RND 1: With A, join with a Sl st in any corner sp, ch 3, 1 dc in same sp (half corner made) [*sk 2 sc, 1 dc in next sc, ch 2, rep from * to next corner sp, 2 dc, ch 3, 2 dc in corner], rep bet [ ] on rem 3 sides, end last rep 2 dc, ch 3 in first half corner sp, join with a Sl st to complete corner.
RND 2: Ch 3, work 2 dc in space to right of ch-3 (half corner) *[ch 2, sk 2, 1 dc in next dc] 52 times, ch 2, 3 dc, ch 3, 3 dc in corner sp, rep from * 3 times more ending last rep 3 dc in same sp as beg half corner, ch 3, join with a Sl st to 3rd ch of beg ch 3 to complete corner, fasten off A.
RND 3: Join C with a Sl st in any corner sp, *ch 5, sk 2 dc, 1 sc in next dc [ch 5, sk next dc, 1 dc in next dc] 27 times, ch 5, 1 sc in corner sp (29 ch-5 sps), rep from * 3 times more, end last rep Sl st in the beg Sl st.
RND 4: With C, work 7 sc in each ch-5 sp around, end with a Sl st to first sc, fasten off C.
RND 5: Join A with a Sl st in any corner sc, working from the back loop, sk 1 sc, *1 sc in each of next 3 sc, ch 3, 1 sc in same sc as ch 3 (picot made), 1 sc in ea of next 2 sc, sk 2 sc, rep from * all around, join with a Sl st to beg Sl st, fasten off.
Blocking is not recommended for this throw.
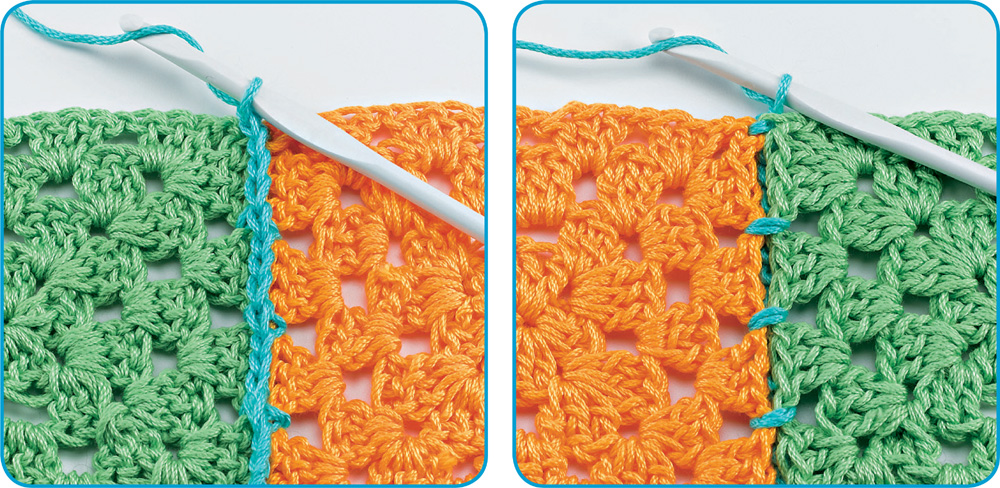
CHAIN JOIN
When the outer rounds of your squares have open spaces, you can join pieces with a stitch pattern that suits the spacing. This decorative join can be worked from either side. Place the pieces right sides together (or wrong sides together), aligning the stitches. Join yarn in one corner through both layers. *Chain 3, skip 3, single crochet through spaces of both layers, repeat from *.
