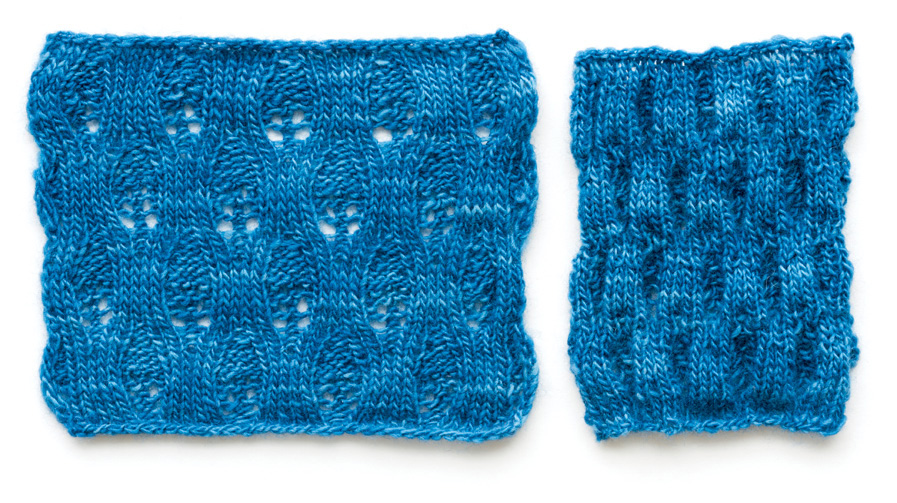
These pieces have exactly the same number of stitches, knit in the same lace pattern. Only one was blocked!
Long thin wires called blocking wires help to ensure even edges when blocking a large lace piece, such as a shawl. You’ll need to use pins with the wires and block onto a surface that you can pin into, such as a blocking board or a blocking mat. If your shawl has straight edges, simply run the wires through the edges and then pin the wires out so that the shawl is the desired size.
If your shawl has an edging with points you can do one of two things. You can run the wires through the straight edges and pin out the points. Or you can run the wires through the points and pin the wires. The latter method will ensure even points.
Blocking is important to most knitting, but never more so than with lace. What comes off your needles is often a wrinkled mass of little shape with undefined patterning. Once blocked, a piece will usually be significantly larger than it was and when all those eyelets are opened up you’ll see the lovely airy pattern.
If you’re knitting a garment that needs to fit, such as a hat or a sweater, be sure to fully block your swatch before measuring for gauge — otherwise your finished piece could be too large to wear.
These pieces have exactly the same number of stitches, knit in the same lace pattern. Only one was blocked!
Because your lace piece will “grow” when it is blocked, it’s important that the beginning and ending edges can grow with it. Use a flexible cast on such as the long-tail (see page 294) or the tubular method (see page 299). To bind off, use a needle at least two sizes larger than the one you’ve used for the project, or try the sewn bind off (see page 298).
If you’re instructed to cast on hundreds of stitches, place a marker after every 20th or 30th stitch so you don’t have to count each stitch if you get interrupted and lose track.
If you have a fear of charts, now is the time to free yourself from that fear. Because charts mimic the pattern that they represent, it is much easier to find your place on a chart than in a long string of written words should you get distracted. Each symbol used in charts represents a specific stitch or combination of stitches, and they are designed to look like the finished stitch; for example, a yarnover is represented by a large circle and a k2tog is represented by a right-leaning symbol.
Because knitting progresses from the bottom up, you’ll begin following a chart on the bottom-most row, and since we work from right to left, the first stitch of the row is the rightmost stitch in the bottom row. When knitting back and forth, follow all right-side chart rows from right to left and follow all wrong-side chart rows from left to right. When knitting in the round, all rows are right-side rows and you’ll follow all rows from right to left.
A good way to keep track of where you are is to use a Post-it note on the chart — place the note just above the chart row you’re currently working and move it up when you’ve finished each row. Placing the note above the knitting allows you to see all the chart rows that you’ve already knit, and this should look very similar to the work in your hands.
If you find it necessary to join a new yarn, do this at the beginning of a row so you can hide the ends in the edge of the piece. Alternatively, if your lace pattern includes small fields of stockinette or garter stitch, you could join a new yarn here and hide the thread on the back side. Just don’t try to join a new thread where you’re doing yarnovers and other pattern stitches — at best it will be difficult to hide the ends, at worst you’ll interrupt the pattern with a change of tension.
If you haven’t used a lifeline but have to rip back more than a couple of rows, remove the knitting from the needles and rip back to the row before the one you want to rework. Place the stitches back on a needle and undo the last row one stitch at a time. This will ensure that you don’t miss any yarnovers and keep the integrity of the pattern.
One fear many knitters have about knitting lace is dropping stitches. While picking up stitches is easy in stockinette or other simple stitch patterns, with lace it’s nearly impossible to pick up a dropped stitch. So for insurance, many of us use lifelines.
Thread a piece of smooth contrasting yarn that is longer than your knitting row onto a yarn needle. When you’ve successfully finished a few rows, thread the cord through all the stitches on the needle (but don’t pass through the stitch markers!) and leave the ends hanging out on each side of the row. (If you’re the nervous type, use a lifeline that is twice the width of your knitting and tie the ends together.) Now continue knitting your lace pattern. If you drop a stitch in the next few rows that you can’t pick up, simply rip back to the row with the lifeline and place the stitches back on the needle. If you place a lifeline every eight rows, you’ll never have to re-knit more than that!
To make your purse even more useful, consider adding pockets to the lining. Simply cut squares or rectangles to the desired pocket sizes and sew them to the right side of the lining fabric before you join the ends to form a cylinder. You can add buttons, snaps, or Velcro to keep the pockets closed if desired.
If you’re knitting along and realize that you forgot to make a yarnover in the previous row, you can easily pick one up in this row (figure 1). Place the left needle from front to back under the thread that’s between the needles (figure 2). This becomes the yarnover, and you can work it as instructed.
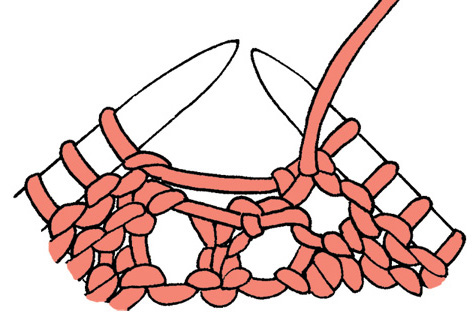
figure 1
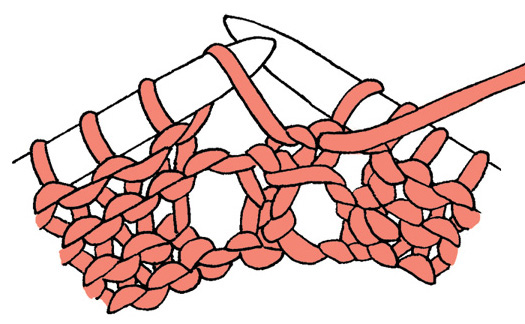
figure 2
If you missed a yarnover from two rows before, you can usually still correct this without going back. If you pull the two needles away from each other, you should be able to see two parallel threads between the stitches on the needles (figure 3). Insert the right needle under both threads from front to back (figure 4). Use the left needle to lift the lower thread over the upper thread and off the needle (figure 5). Now transfer the newly made stitch to the left needle and proceed according to plan.
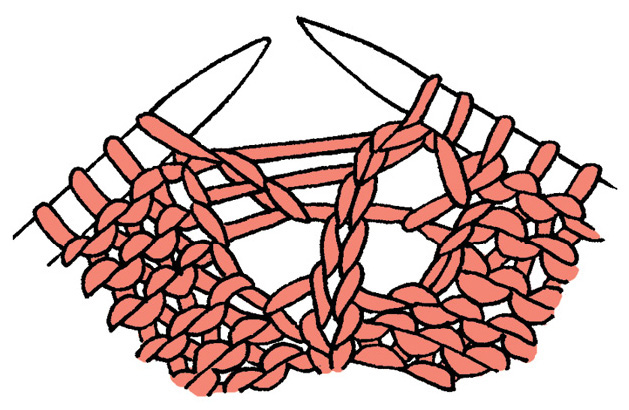
figure 3
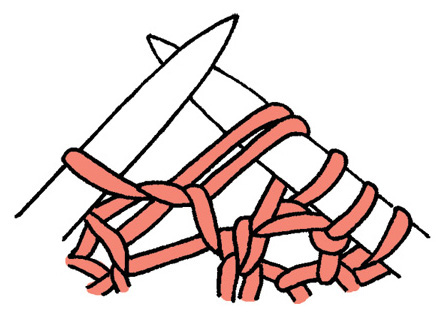
figure 4

figure 5
When knitting lace, you may sometimes need to knit or purl three stitches together and it can be difficult to get your needle into the three stitches. This is easily accomplished with pointy needles made especially for lace knitting.
Even if you usually work complicated patterns without stitch markers, consider using lots of them when knitting lace. Because mistakes are so difficult to find and then even more difficult to fix without ripping back, if you use a stitch marker between each repeat you can more easily count the number of stitches between the markers with each repeat to make sure you’re staying on track.