Glossary
Backward loop cast on. Hold the end of the yarn and a knitting needle in your right hand. Hold the working yarn in your left hand. Bring your left thumb over the top, down behind, and up in front of the yarn, creating a loop. Insert needle into loop on thumb as if to knit and slide loop onto needle. You may also use the backward loop cast on to add stitches to the end of a row of knitting or to increase stitches mid-row.
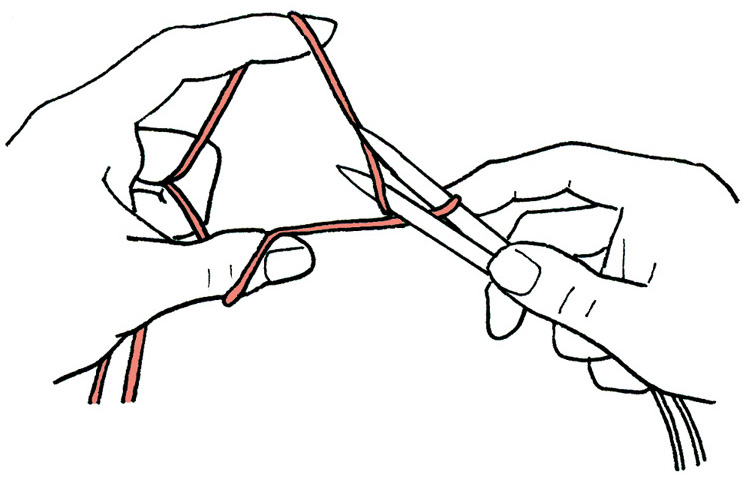
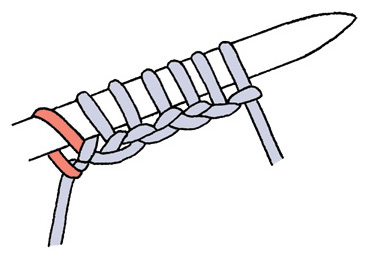
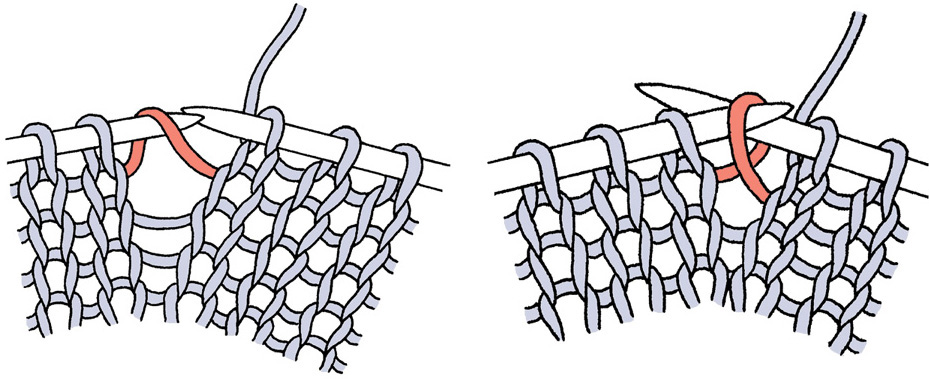
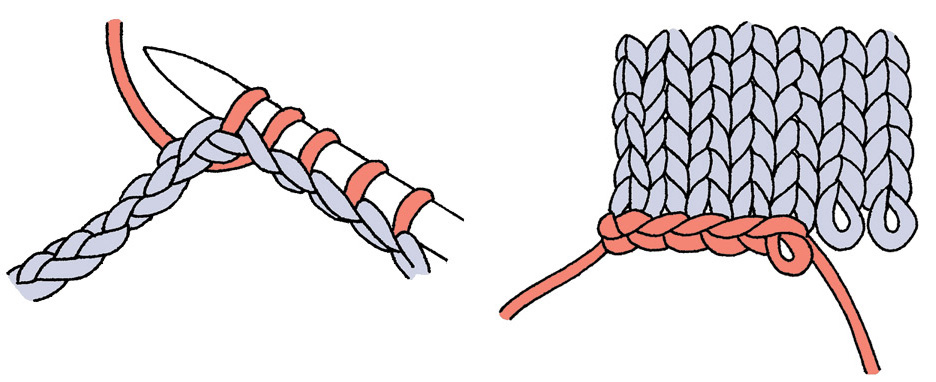
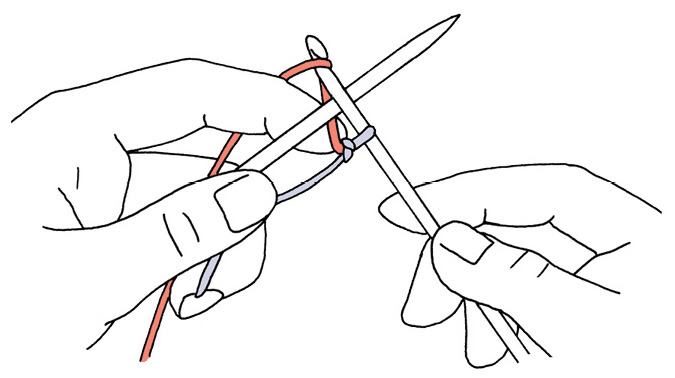
Cable cast on. Make a slip knot and place it on your left-hand needle. Follow steps 1 and 2 for knitted-on cast on (see page 294) and then proceed as follows.
- 1.Place the second needle between the 2 stitches on the first needle (see figure 1).
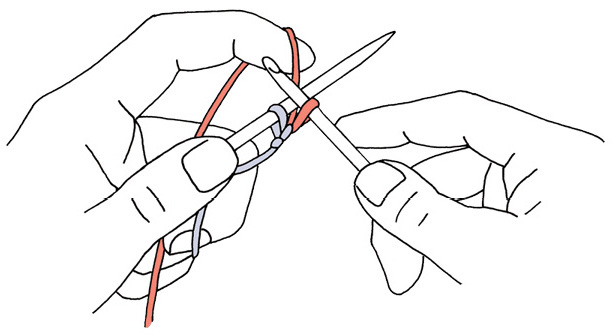
- 2.Knit a new stitch between the 2 stitches, pull it long, and place in on the left-hand needle (see figure 2).
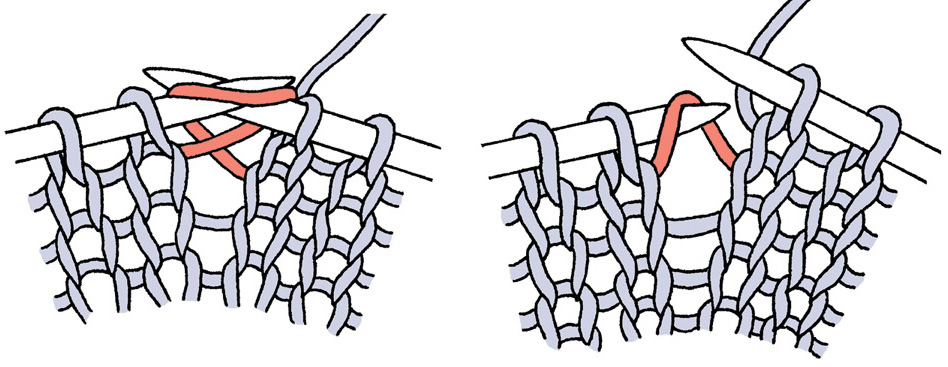
Continue in this manner, knitting between the last 2 stitches on the left-hand needle until you have the required number of stitches.
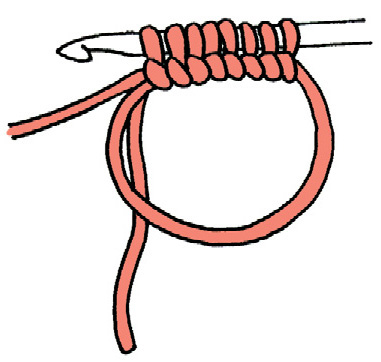
Chain (crochet). Begin with a slip knot on the hook. Wrap yarn over the hook and pull the loop through the slip knot. Yarn over hook, and pull loop through loop on hook to make second chain. Repeat for the required number of chain stitches.
Circular cast on (cast on and divide). Using double-point needles, cast on the desired number of stitches and slip half of the stitches to a second needle. Join into a round and knit the stitches evenly onto three or four needles.
Circular cast on (crochet).
- 1.Leaving a 4"/10 cm tail, wrap the ball of yarn loosely around your thumb. Remove the loop from your thumb and work a single crochet into the loop for the desired number of stitches.
- 2.Distribute the stitches evenly onto three or four double-point needles.
- 3.Pull up on the tail to snug the stitches into a tight ring.
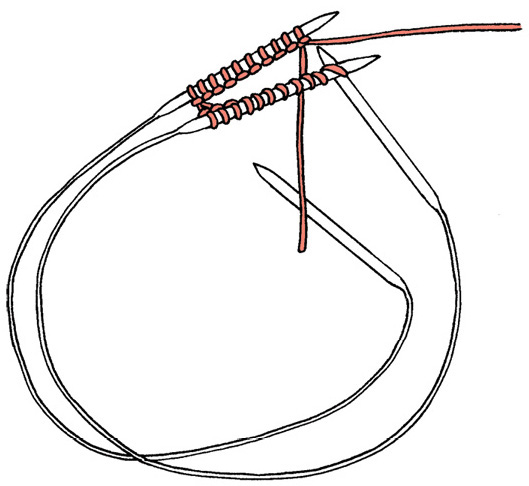
Circular knitting on two circular needles. Using two circular needles of the same size and length (16"/40 cm for small projects), cast on the required number of stitches onto one needle, then divide them evenly between the two needles, keeping the stitches on the needle tips. Holding the needle tips parallel, slide the stitches from both needles down along the cables and up onto the needle tips at the opposite ends. The working yarn should be at the right-hand side of the back needle (figure 1). Still holding the tips parallel, pick up the empty needle tip of the front needle and use it to knit the first stitch on the front needle, joining the stitches into a round (figure 2). Knit the remaining stitches from the front needle and drop the empty needle tip.
Turn the work and slide the stitches that are now on the front needle down along the cable to the other needle tip. Pick up the empty needle tip of the front needle and work the stitches from this same needle. Continue in this manner, sliding stitches and knitting half the stitches with one needle and half the stitches with the other needle (figure 3).
Double crochet. Yarn over hook. Insert hook through both loops of the next stitch. Draw a loop through the stitch. Yarn over hook. Draw loop through the first 2 loops on the hook. Yarn over hook. Draw loop through 2 loops on hook.
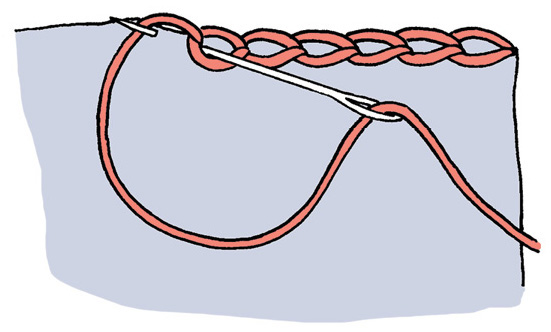
Embroidered Chain Stitch. Bring the needle from the back to the front through the fabric at the starting point and pull all but a short tail through the fabric. Bring the needle from front to back one or two threads away from the starting point and pull the thread through, leaving a small loop of thread on the front. Bring the thread to the front and through the loop at the desired length of your chain stitch. Bring the thread to the back one or two threads away from the last point, catching the loop; pull the thread through to the back, leaving a loop for the next stitch.
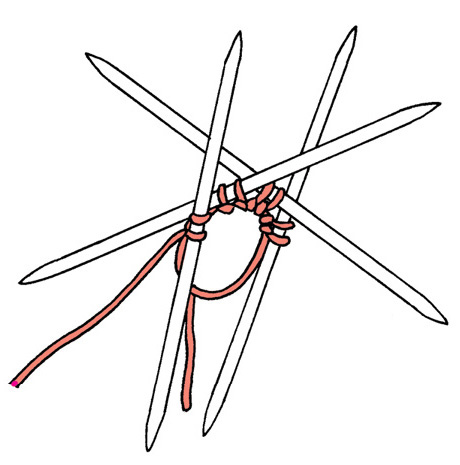
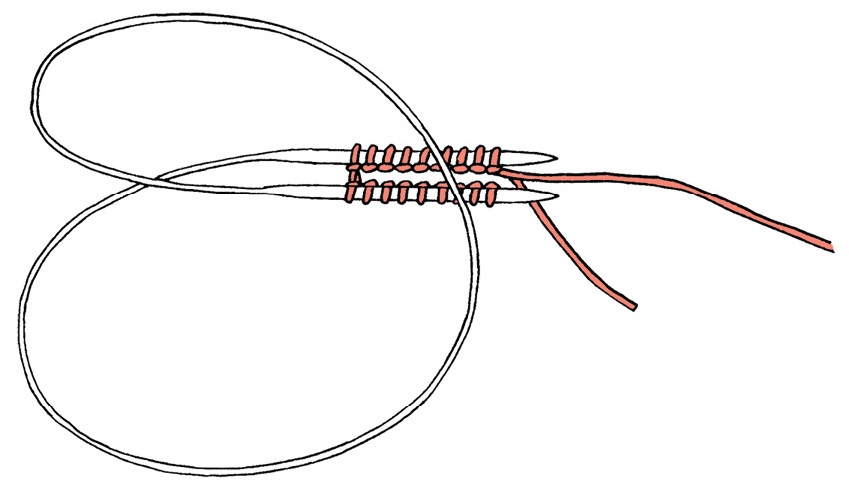
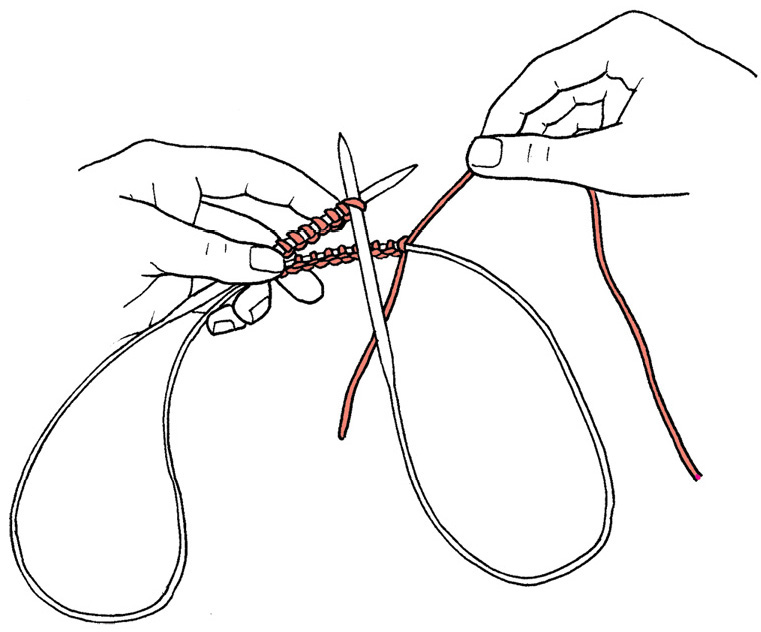
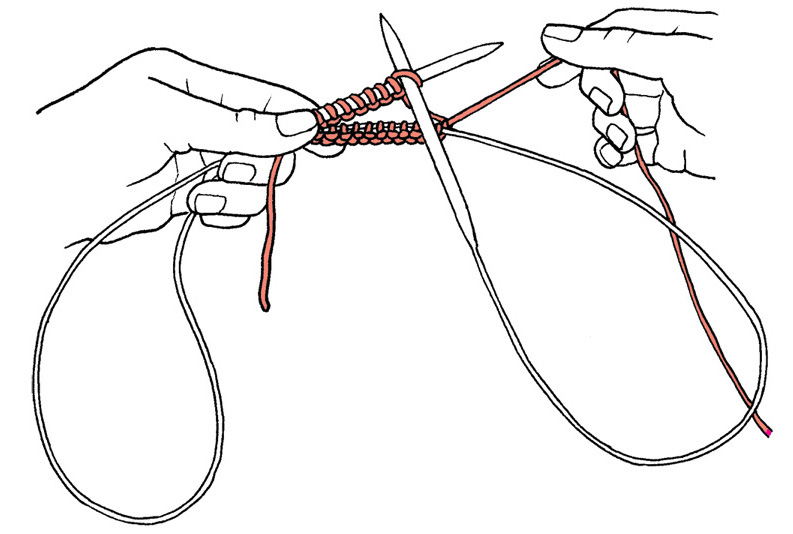
Figure-8 cast on.
- 1.Hold two double-point needles parallel. Leaving about a 4"/10 cm tail, and holding the tail against the needles with your left hand, *bring the yarn over the top needle from front to back, then bring the yarn between the needles and under the bottom needle from front to back (figure 1). Repeat from * until you have the desired number of stitches, with the same number on each needle.
- 2.With a third needle, knit the stitches from the top needle (figure 2). Turn the work 180 degrees and, with another needle, knit the stitches from the bottom needle.
Garter stitch. When knitting back and forth in rows, knit all rows. When knitting circularly, knit 1 row, purl 1 row.
I-cord. Use two double-point needles to make I-cord. Cast on the required number of stitches. *Knit all stitches. Without turning work, slide the stitches to the other end of the needle. Pull the working yarn across the back. Repeat from * until cord is desired length. Bind off.
I-cord bind off. At the beginning of the bind-off row, cast on 3 stitches using the cable cast on (see page 290). *K2, ssk. Slip the 3 worked stitches back onto the left-hand needle. Pull the working yarn across the back of those 3 stitches and repeat from *. When 3 stitches remain, k3tog tbl.
To work the bind off with 2 stitches, work k1, ssk instead of k2, ssk; to work the bind off with 4 stitches, work k3, ssk instead of k2, ssk, and so on.
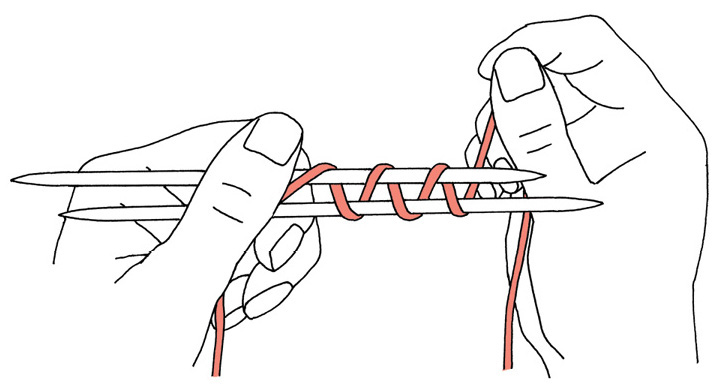
Judy’s Magic Cast On. This invisible cast on for sock toes, mitten and hat tops, and bag bottoms comes to the knitting world from Judy Becker. To see Judy’s original instructions, go to www.persistentillusion.com/blogblog/techniques/magic-cast-on.
- 1.Hold two double-point needles together with your right hand, tips pointing left.
- 2.Loop the yarn around the top needle, with the tail sandwiched between the top needle and the bottom needle and coming out the back. The tail should measure approximately 3⁄4"/2 cm for each stitch you are casting on. The working yarn goes over the top needle.
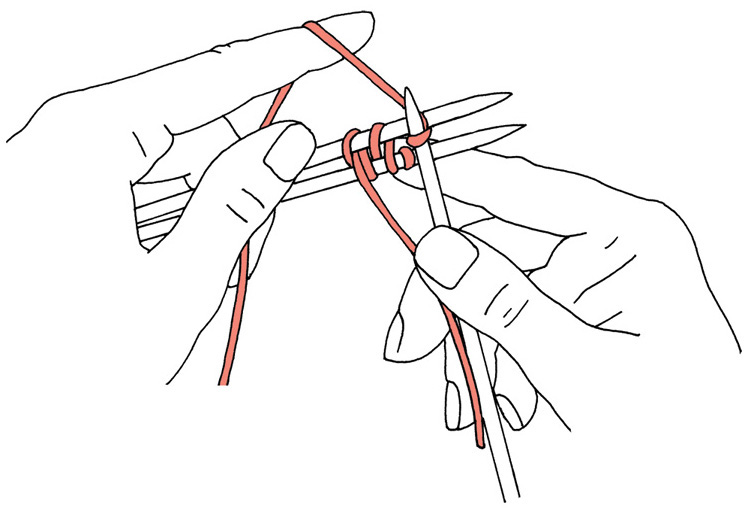
- 3.Pick up the yarns with your left hand in the slingshot position, with the tail over your index finger and the working yarn over your thumb. This twists the yarns and creates a loop on the top needle that counts as the first stitch.
- 4.While holding the stitch in place with a finger on your right hand, rotate the pair of needles up and wrap the yarn on your finger around the bottom needle, as if making a yarnover. Gently tighten the loop.
- 5.Rotate the pair of needles downward and wrap the thumb yarn around the top needle as if making a yarnover. Gently tighten the loop.
- 6.Repeat steps 4 and 5 to cast on the desired number of stitches. Alternate between top and bottom needles, with thumb yarn wrapping around the top needle and finger yarn wrapping around the bottom needle. End with step 4.
- 7.Turn the needles so that the bottom one is on top and the yarn ends on the right. Drop the tail and bring the working yarn up behind the top needle. Make sure the tail lies under the working yarn, between it and the needle. This twists the yarns so you can knit the first stitch. Knit the first row. The first stitch may become a little loose; just pull on the tail to tighten it.
- 8.Turn needles at end of the first row and knit the next row (the second half of the first round).
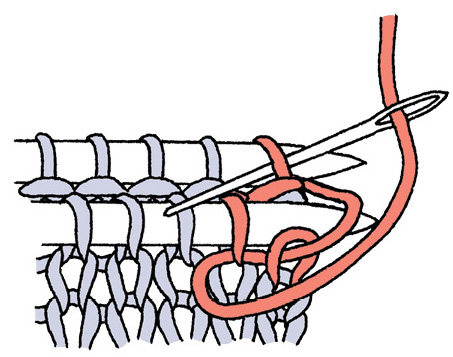
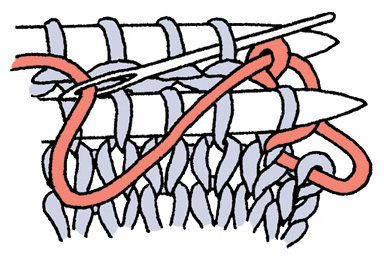
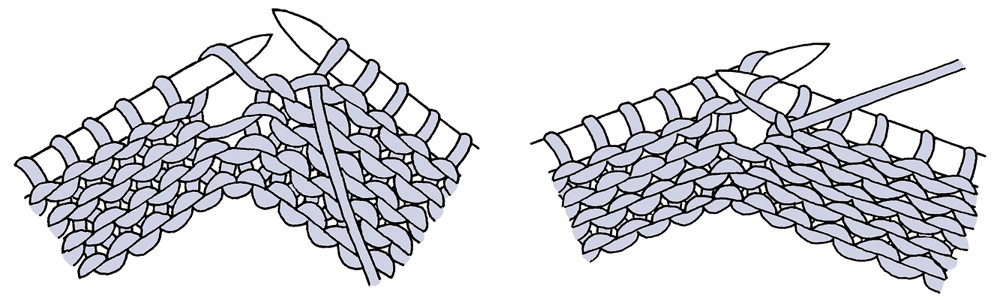
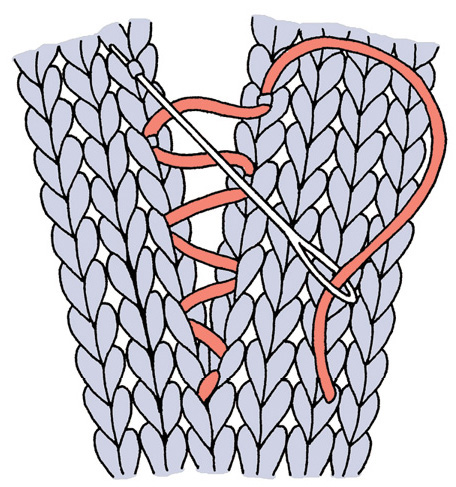
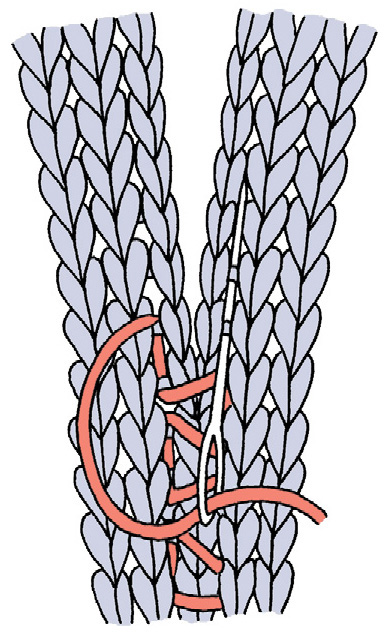
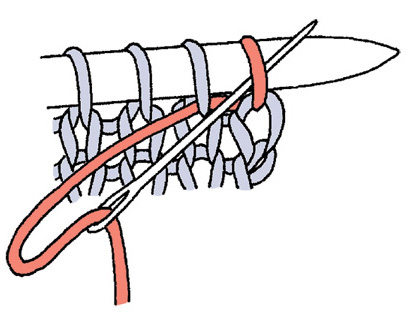
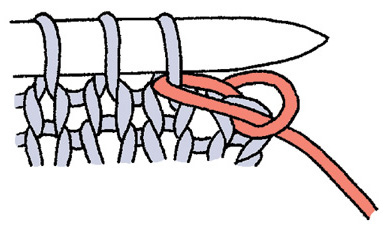
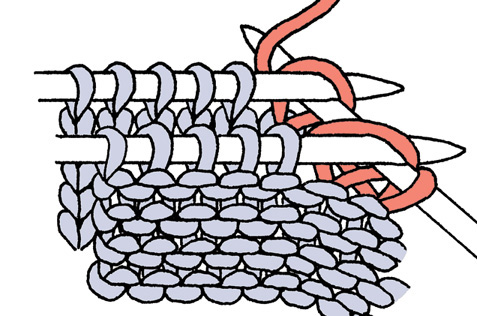
Kitchener stitch. This grafting technique is used to join two sets of live stitches invisibly. It is most often used for sock toes but can be used to join shoulder seams or two halves of a scarf.
- 1.Place the two sets of live stitches to be bound off on separate needles. Hold the needles parallel in your left hand with right sides of the knitted fabric together.
- 2.Thread the yarn tail on a yarn needle, insert the yarn needle into the first stitch on the front needle as if to knit, and slip the stitch off the needle. Then insert the yarn needle into the next stitch on the front needle as if to purl, and leave the stitch on the needle (figure 1).
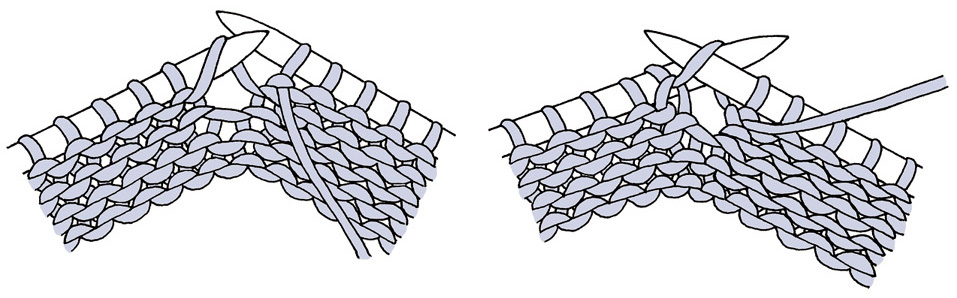
- 3.Insert the yarn needle into the first stitch on the back needle as if to purl, and slip the stitch off the needle (figure 2).
- 4.Insert the yarn needle into the next stitch on the back needle as if to knit, and leave the stitch on the needle (figure 3).
Repeat steps 2–4 until all stitches have been joined.
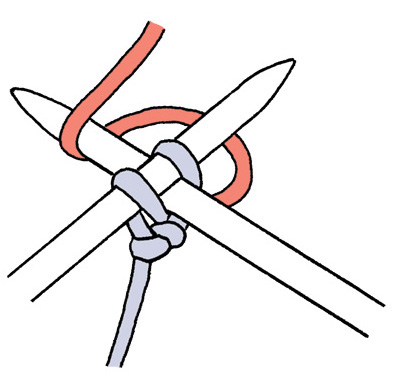
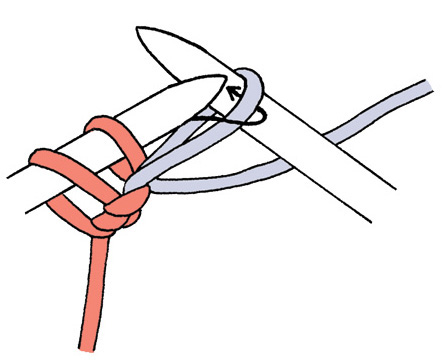
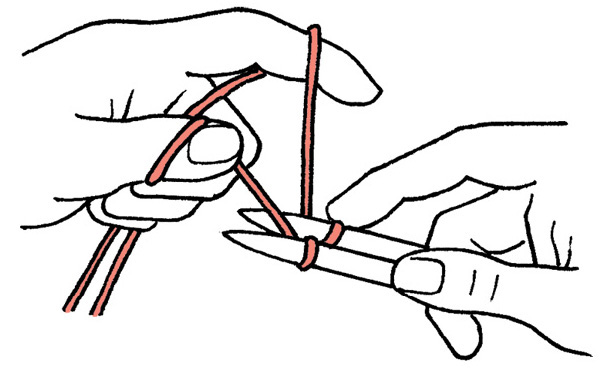
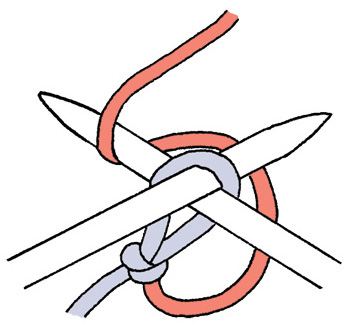
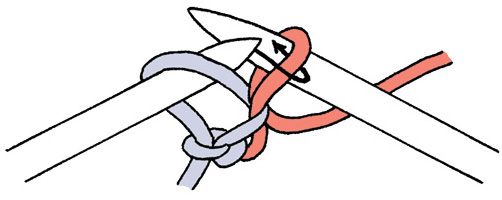
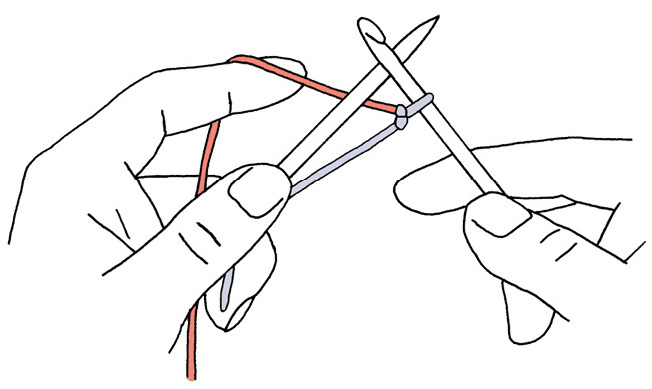
Knitted-on cast on. Make a slip knot and place it on your left-hand needle.
- 1.Knit a stitch into the slip knot, leaving the slip knot on the needle (figure 1).
- 2.Place the new stitch onto the left-hand needle by inserting the left-hand needle into the front of the new stitch (figure 2).
- 3.Tighten the stitch and continue until you have the required number of stitches (figure 3).
Knitwise. When a pattern says “slip the next stitch knitwise,” insert your needle into the next stitch on the left-hand needle from front to back as if you were going to knit it, then slip it to the right-hand needle without knitting it.
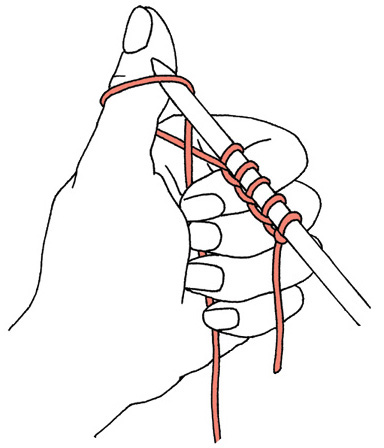
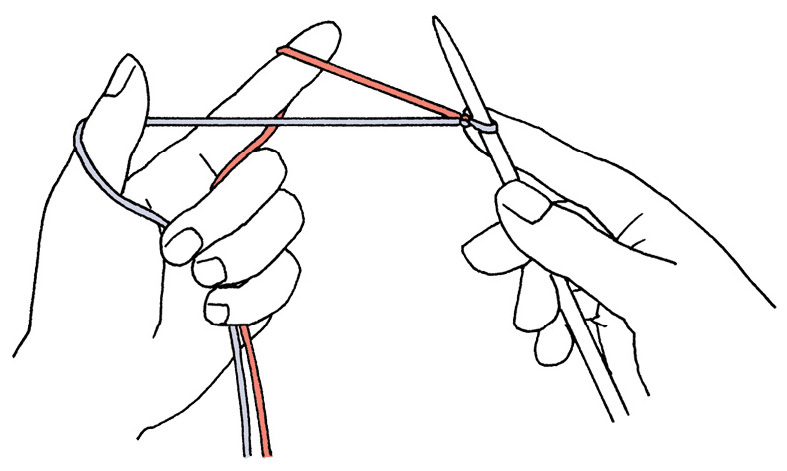
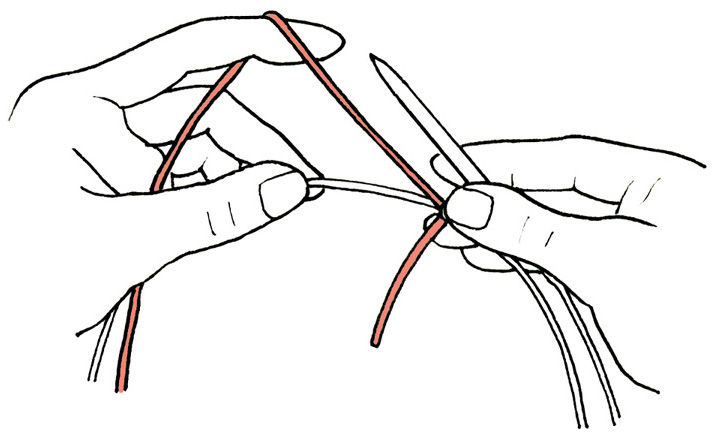
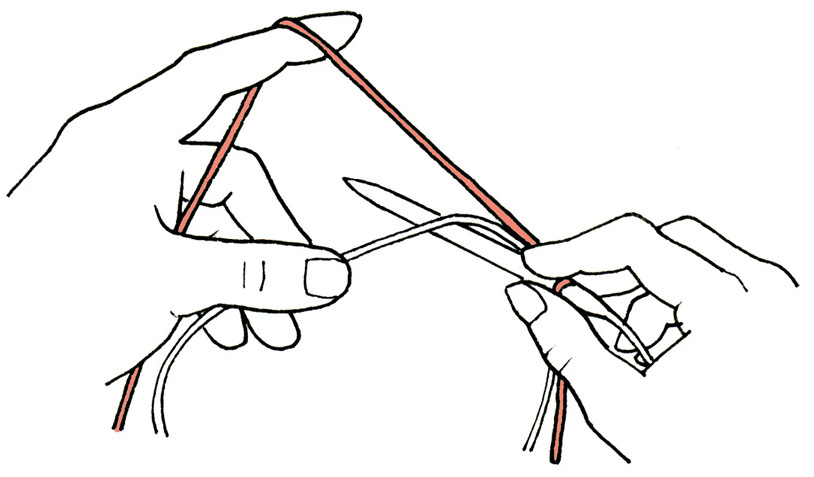
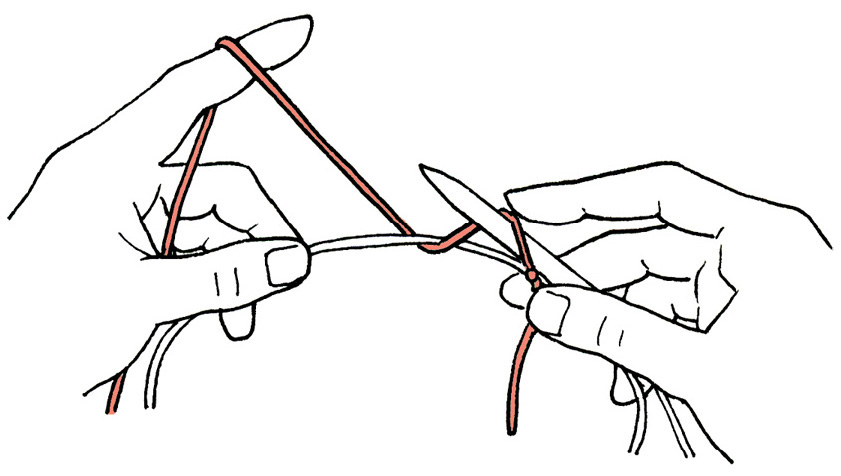
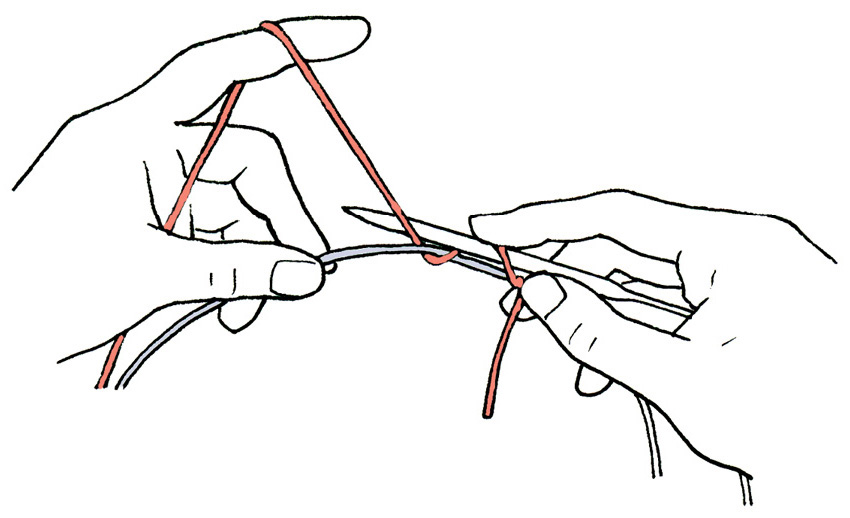
Long-tail cast on. Leaving a tail long enough to cast on the desired number of stitches (a generous guess would be 1"/2.5 cm per stitch), make a slip knot and place it on the needle.
- 1.Wrap one of the tails around your thumb and the other around your index finger. Hold the tails with your other three fingers (figure 1).
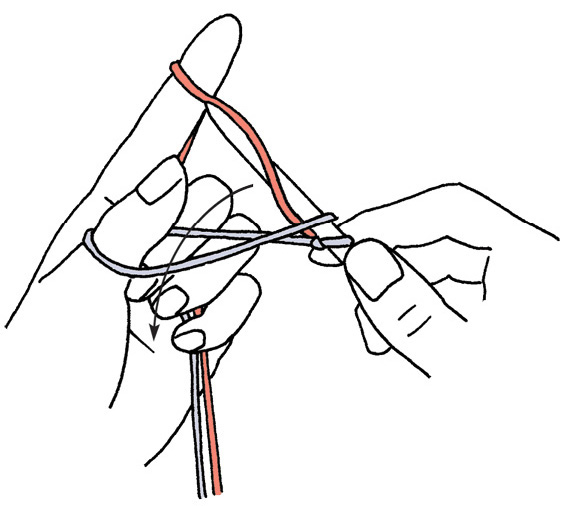
- 2.Insert the needle into the loop around your thumb from front to back and over the yarn around your index finger (figure 2).
- 3.With the needle, bring the yarn from in front of your index finger down through the loop around your thumb (figure 3).
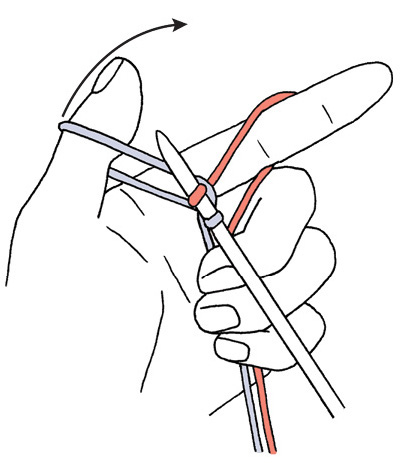
- 4.Drop the loop off your thumb, tighten the stitch, and form a new loop around your thumb (figure 4).
M1 (make 1) increase. This increase is worked into the strand between the current stitch and the next one. Work in pattern to where you want to increase, lift the strand between the two needles, place the lifted strand on the left-hand needle as shown below, then knit or purl the stitch.
M1L (left slant, knit). Insert the left-hand needle from front to back, knit through the back.
M1R (right slant, knit). Insert the left-hand needle from back to front, knit through the front.
M1LP (left slant, purl). Insert the left-hand needle from front to back, purl through the back.
M1RP (right slant, purl). Insert the left-hand needle from back to front, purl through the front.
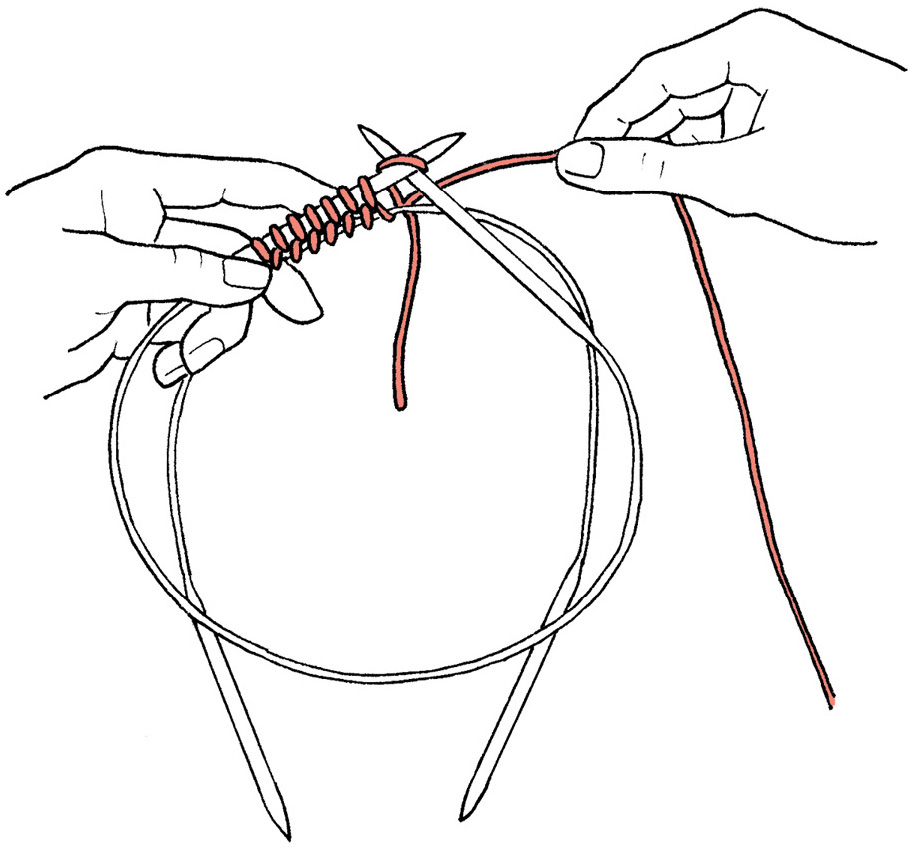
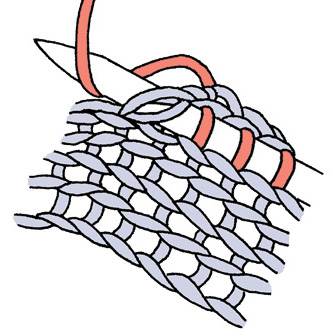
Magic loop. Using a circular needle at least 32"/ 80 cm long, cast on the required number of stitches and slide them onto the cable. Pull a loop of cable out between the two center cast-on stitches. Keep pulling the cable out between the stitches until the stitches are moved onto the needle tips, half the stitches on each tip (figure 1).
Hold the needle tips parallel and make sure the working yarn is on the back needle tip — if it’s not on the back needle, slide the stitches back to the cable and start again, making sure the yarn ends up on the back needle tip. Now slide the stitches on the back needle tip down onto the cable and use the back needle tip as your working (right-hand) needle to knit the stitches from the other (left-hand) needle tip (figure 2). You’ve just knit half the round.
Turn the work and hold the needles with both tips facing to the right and slide the unknit stitches onto the free needle tip and then slide the stitches that you just knit onto the cable. Now use the free needle tip as your right-hand needle to knit the second half of the round (figure 3). Continue in this manner, rearranging the stitches after completing each half-row.
Mattress stitch. For a half-stitch seam allowance, work through the horizontal bar at the base of the stitches in every other row (figure 1).
For a full-stitch seam allowance, work through two horizontal bars on either side of the stitches (figure 2).
Möbius cast on. This clever cast on was made popular by Cat Bordhi in A Treasury of Magical Knitting. It requires a 40"/100 cm circular needle. For more information visit catbordhi.com.
- 1.Holding the needle in a circle with the tips at the top, make a slip knot with a short tail, place it on the left-hand needle, and slide it into the middle of the cable; let the left-hand needle tip dangle.
- 2.Hold the yarn attached to the ball from behind the needle with your left hand and pinch the left side of the cable with the thumb and middle finger of your left hand. The yarn, your hand, and the cable of the circular needle make a kind of triangle. Your right hand holds the right-hand needle tip, while pinching the slip knot with the thumb and middle finger of the right hand. This is the “home” position.
- 3.Reach the right-hand needle tip in front of the cable, then underneath the cable and up between the cable and yarn.
- 4.Reach the needle over the top of the yarn and scoop it forward and under the cable, then back up top to the home position.
- 5.Reach the needle up, over, and behind the yarn and scoop a loop forward. (This looks like a yarnover). Both stitches will be slanting the same way.
- 6.Repeat steps 3–5 for the desired number of stitches. Count each stitch made by the right-hand needle as 1 stitch. Do not count the stitches that appear on the cable beneath the needle.
- 7.To keep the stitches from twisting, make sure the cable and needles cross only once (making that Möbius twist). To do this, push/pull the cable, needles, and stitches so that the cable is flat and the sides are parallel to each other. With both needles at the top ready to knit, let the right-hand needle cross the cable at the top. The cable and left-hand needle are parallel to each other all the way around. You may have to rotate the left-hand needle around the cable to make this happen.
- 8.Place a marker on your right-hand needle and knit the slip knot.
- 9.The stitches on the first half of the round often tend to slide out of order and over each other, so make sure you spread them out as you move them up onto the left-hand needle. Notice, too, that the stitches are mounted alternately. Your job is simply to knit through whatever open triangle presents itself. This means you knit 1 stitch through the back and the next stitch through the front.
- 10.When you have knit to the point where the stitch marker is hanging on the cable beneath your needle (it cannot be removed at this point), you are halfway around. You’ll see your original slip knot again, too. Tug down on it, and knit into the stitch formed by the side of the slip knot.
- 11.Continue knitting (all stitches are now mounted correctly, although they now look as though you’ve purled them) until the stitch marker reaches the left-hand needle tip. You have completed the first round. From this point on, knit each round as desired.
Pick up and knit. With right side facing, insert the needle under both strands of the edge stitch, then wrap the yarn around the needle and knit the picked-up stitch.
Pick up and purl. Insert the needle under both strands of the edge stitch from back to front, then wrap the yarn around the needle and purl the picked-up stitch.
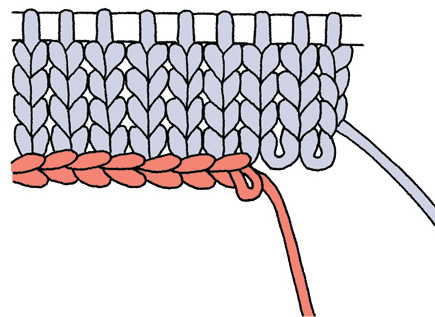
Provisional cast on (crochet chain).
- 1.Make a crochet chain with scrap yarn that is at least 6 chains longer than the number of stitches to be cast on.
- 2.Cast on by knitting with the project yarn into the back loops of the chain.
- 3.To remove the scrap yarn when you’ve finished the knitting, pull out the crocheted chain and carefully place the live stitches on a needle.
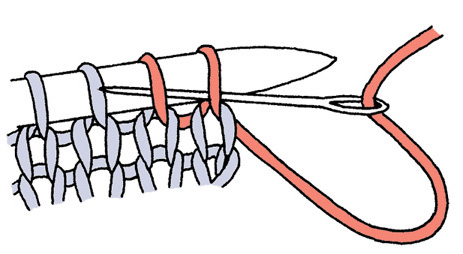
Provisional cast on (crochet over needle).
- 1.Make a slip knot and place it on a crochet hook. Hold your knitting needle on top of a long strand of yarn (figure 1).
- 2.*With the crochet hook, draw the yarn over the needle and through the loop on the hook. To cast on another stitch, bring yarn behind knitting needle into position as for step 1, and repeat from * (figures 2 and 3). Note: If you find it awkward to cast on the first couple of stitches, work a few crochet chain stitches before casting onto the needle so you have something to hold on to.
- 3.When the last stitch has been cast on, work 2 or 3 extra crochet chain stitches without taking the yarn around the knitting needle, then cut the yarn, leaving a 10"/25.5 cm tail, draw the tail through the last loop on the hook, and pull the tail to close the loop loosely — just enough so the tail can’t escape. To remove the scrap yarn when you’ve finished the knitting, pull the tail out of the last loop and gently tug on it to “unzip” the chain and carefully place the live stitches on a needle, holder, or separate length of scrap yarn as they are released (figure 4).
Purlwise. When a pattern says “slip the next stitch purlwise,” insert your right-hand needle into the next stitch from back to front as if you were going to purl it, then slip it to the right-hand needle without purling it.
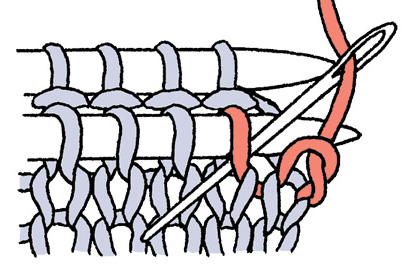
Sewn bind off. Cut yarn three times the width of knitting to be bound off, and thread it onto a yarn needle. Working from right to left, *insert the yarn needle purlwise (from right to left) through the first 2 stitches (figure 1) and pull yarn through.
Bring the yarn needle knitwise (from left to right) through the first stitch (figure 2), pull yarn through, and slip this stitch off the knitting needle. Repeat from *.
Single crochet. Insert hook into next stitch, wrap yarn over hook, and draw the loop through the stitch. You now have 2 loops on the hook. Yarn over hook and draw loop through both loops on hook.
Slip stitch crochet. Insert hook into the next stitch, wrap yarn over hook, and draw the loop through the stitch and the loop on the hook.
Stockinette stitch. When knitting back and forth in rows, knit the right-side rows, purl the wrong-side rows. When knitting circularly, knit all rounds.
Three-needle bind off. This technique is used to join two sets of live stitches.
- 1.Place the two sets of stitches to be bound off on separate needles. Hold the needles parallel in your left hand with right sides of the knitted fabric touching.
- 2.Insert the tip of a third needle into the first stitch on both needles and knit these 2 stitches together.
- 3.Repeat step 2. You now have 2 stitches on the right-hand needle. With one of the needles in your left hand, lift the first stitch on the right-hand needle over the second and off the needle as for a regular bind off. Repeat until all stitches are bound off.
Tubular cast on. Using scrap yarn and your method of choice, cast on half the number of stitches needed. Divide the stitches onto four double-point needles, join for working in the round, and knit 1 round with a smooth cotton cord. Join the main yarn and proceed as follows.
Round 1: :*K1, yo; repeat from * to end of round.
Round 2: :*K1, yarn forward, slip 1 purlwise, yarn back; repeat from * to end of round.
Round 3: :*Yarn back, slip 1 purlwise, yarn forward, p1; repeat from * to end of round.
Round 4: :*K1, p1; repeat from * to end of round.
When you’ve completed the rib, pull the cotton cord gently to remove it and the scrap yarn from the work.