 IN THIS CHAPTER
Living and dining rooms, bedrooms, and the hallways can be treated similarly by the fixer-upper because they’re all decorated in the same way. In this chapter, we’ll cover living spaces from floor to ceiling, along with quick fixes and updates for some of the little things, like switches, thermostats, and smoke alarms.
Ask any number of real estate agents to name the two things you should do to improve a home, and they’re bound to say the same thing: “Paint everything and replace the carpet.” A fresh coat of paint usually costs less than $50 and has a transformative quality that goes well beyond erasing the scuffs and stains of everyday life. A new shade of paint also rids walls of ugly colors that never quite hit the mark. Replacing carpets is certainly not necessary in every case. Sometimes a good cleaning and a spot repair or two can make a quality carpet look almost new. As for other types of flooring, most can be cleaned, repaired, or renewed to be in harmony with your freshly painted walls.
With the painting and floors done, you can focus your attention on quickie upgrades, such as new switch plates, outlet covers, and heating registers—inexpensive little touches that dress up a room. Finally, we’ll show you how an inexpensive organizer can make every inch of bedroom closet space count.
 Walls & Ceilings
Because it’s always best to patch and paint the ceiling before the walls, we’ll tackle ceilings first. By virtue of their location, ceilings tend to receive the least amount of everyday abuse. However, they are usually the first surfaces to show signs of water damage from a leaky roof, and they fight their own private battle with the steady pull of gravity over the years. Like walls, ceilings are also vulnerable to the ravages of ill-conceived decorating fads, as evidenced by the ubiquitous popcorn texture applied to most living room ceilings in ‘60s and ‘70s era homes.
The following repairs pertain primarily to drywall ceilings. If you have plaster ceilings, you can hide cracks and minor surface flaws with regular drywall compound, then hand-texture the repair to match the original surface. However, if you detect any sagging in a plaster ceiling—caused by the plaster surface layer pulling away from its supporting framework of lath—leave it alone and call a professional. It’s not uncommon for large (and very heavy) sections of plaster to fall from ceilings when disturbed.
Ceiling damage is usually caused by a combination of water and gravity. Water that drips onto a ceiling surface eventually works its way through, leaving telltale stains on the surface. Gravity is especially a problem if builders used 3/8-inch drywall on ceilings, or spaced joists too far apart. In the old days (before drywall screws) most contractors used nails to fasten ceiling panels, which can be a problem because the weight of the panels tugs on the nails, causing them to slip in some instances.
To repair a damaged seam in a ceiling, cut back any loose joint tape to a point where it’s still well adhered. Scrape along the exposed seam with a 6-inch drywall knife to smooth the surface and bring it as close as possible to bare drywall. Also scrape off any texture for 6 inches on both sides of the seam. Make sure the panel edges are securely fastened to the framing above. If necessary, drive 1¼-inch coarse-thread drywall screws every few inches along the edges.
Using the 6-inch drywall knife, fill the seam with all-purpose drywall compound, then add a 3-inch-wide, 1/8-inch-thick layer of compound centered over the seam. Embed a strip of paper joint tape into the compound, and smooth it out with the knife, pressing firmly to flatten the tape and squeeze out most of the compound from behind it. Let the joint dry overnight. Add one or two finish coats, then texture the surface to blend in the repair. Seal water-stained drywall with a primer/sealer (see page 65).
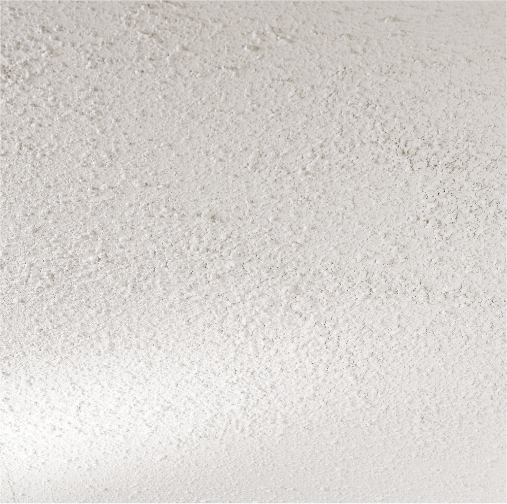
A popcorn ceiling is no treat if you are trying to sell a house (or just keep it clean, for that matter). The best thing about textured ceiling treatments is that they are easy to remove.
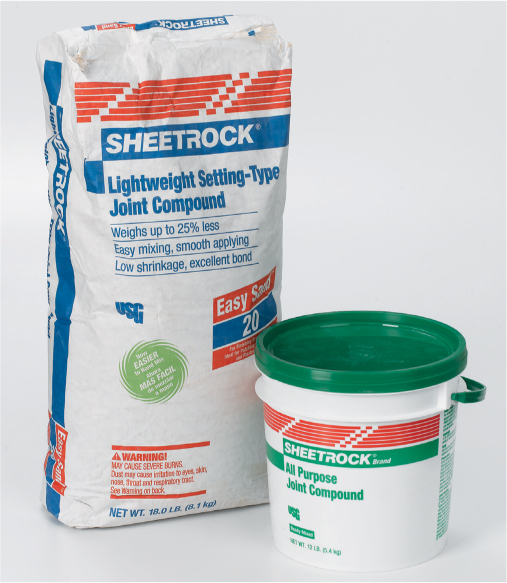
Premixed joint compound (right) is convenient, but it tends to shrink and crack and the shelf-life isn’t very long once the tub is opened. Dry bagged joint compound (left) can be mixed with water in small batches, dries smoothly, and comes in a wider range of types with special application and drying characteristics.
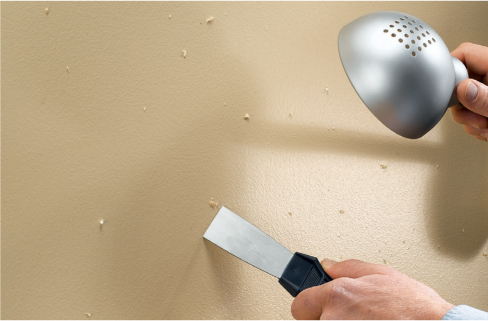
Common signs of a sagging ceiling are cracks along the edges near the walls and a wavy ceiling surface. You can also tell that a panel is sagging by pushing up on the panel where it’s fastened to a joist: The panel will yield somewhat, and you may see nail heads pop out slightly. The quick fix for this is quite simple. First, use a studfinder to locate the ceiling joists. At each joist, push up the panel tight against the joist and drive a 1¼-inch coarse-thread drywall screw about every 6 inches along the joist. Drive the screws slightly deeper than flush without breaking through the drywall’s face paper.
The old fasteners will probably begin popping out as you refasten the panel. Wherever this happens, drive a screw about 2 inches from each popout, then hammer the old nail back in, leaving a slight dimple in the surface. When all sagging areas are refastened, cover the screw heads and nail heads with joint compound, using a four-inch drywall knife or a putty knife. Add a second coat of compound after the first coat dries. Sand the final coat smooth, if necessary.
Saving Future Repair Costs
A ceiling stain or water-damaged section is usually a sign of water leak—most often through the roof or siding. It can also be the first sign of a water problem. Water can wick over great distances, so it’s important to determine exactly where the leak comes from by following the trail (it should be fairly obvious and will run along ceiling joists to the point where the water drips down from the leak). Remedy the leak before fixing the ceiling, and you’ll save yourself major water damage repairs down the road.
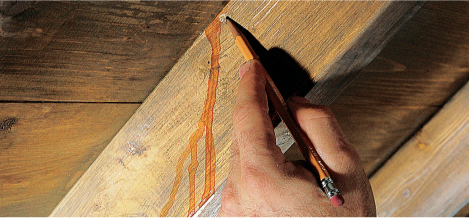
A roof leak inevitably leaves a trail. Follow it to the source and remedy to save bigger repair costs in the future.
How to Repair a Sagging Drywall Ceiling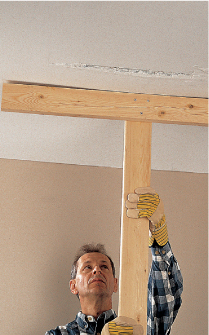
1 Position a T-brace under the lowest point of the sagging area with the bottom end on a piece of plywood or hardboard on the floor. Nudge it forward until the sagging panels are tight to the joists. If fasteners pop through the surface, drive them back in.
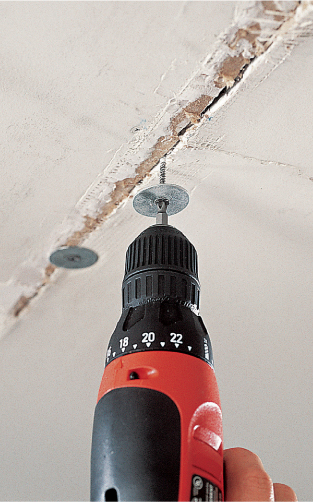
2 Remove loose tape and compound at joints between loose panels. Starting at one end, drive wallboard screws with broad, thin washers every 4" through the center of the joint and into the joists. In the field of panel, drive screws 2" from existing fasteners.
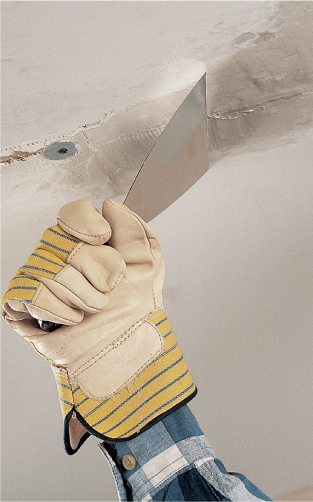
3 When the area is securely fastened, remove the T-brace. Scrape off any loose chips of paint or wallboard around joints and screws, then fill with compound. Cover large cracks or gaps with fiberglass tape before applying the compound.
The first step in dealing with a popcorn ceiling texture is to remove a sample and send it in to a local lab to have it tested for asbestos. A lot of pre-1980 homes have popcorn ceilings made with the cancer-causing material. The last thing you want to do is start scraping and sanding it off, spreading the fibers throughout your home and HVAC system. To find a lab, look in the phone book under Asbestos/Environmental Testing and Consulting. You can have a sample tested within a day or two for about $45. Ask the lab for recommendations on safe removal and storage of the sample, and/or refer to the U.S. EPA’s website (www.epa.gov) for more information.
If the lab results show no asbestos, proceed to the next step: removing the texture. If the sample tests positive for asbestos, inquire at your local waste disposal agency. In some areas you’ll be required to hire an abatement contactor to remove the material, but in others you may be allowed to do it yourself if you follow the very exacting removal and disposal guidelines.
To remove asbestos-free popcorn ceiling texture, first cover the floors and walls with plastic sheeting, taped together at the seams. Then lay down sheets of cardboard to create a non-slip surface. Follow the steps below and, when all of the texture is gone, let the ceiling dry completely. Fill in holes, nail pops or gouges with joint compound, and let dry overnight. Sand the dry compound with a 150-grit sanding sponge to smooth out imperfections.
If the ceiling is smooth enough, begin priming and painting. A stippled paint job with a heavy-nap roller or texture paint can help hide imperfections. If, however, the surface flaws are clearly noticeable, it probably needs a skim coat of drywall compound. This is skilled work, so you should consider hiring a pro for the skim coat, or give yourself plenty of time for practicing first.
How to Remove Ceiling Texture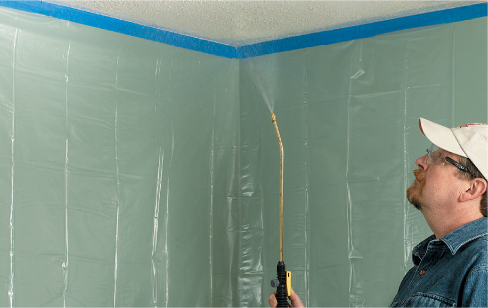
Fill a hand-pump sprayer with a solution of one teaspoon dish soap to one gallon of water. Spray the ceiling and wait about 20 minutes, then test the texture by scraping with a 6" drywall knife. If it’s too dry, make a second pass with the sprayer. However, try not to saturate the face paper of the underlying drywall, which makes it vulnerable to tears.
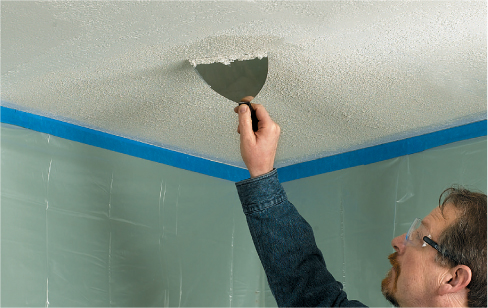
Once saturated, scrape off the texture with a 6" drywall knife. Don’t let the photo fool you; this is a very messy job. Scrape the entire surface systematically with the knife. Work carefully, leaving the surface smooth without damaging the drywall paper
Most homes end up with a few holes or cracks here and there, whether from doorknobs impaling the wall, improperly hung pictures, or basic settling of the structure. Small holes and cracks—no bigger than a dime—can be filled with spackle or drywall compound, then smoothed over with a couple more coats of compound. The finish coats are needed because the initial fill-coat will shrink quite a bit, leaving a shallow depression in the surface.
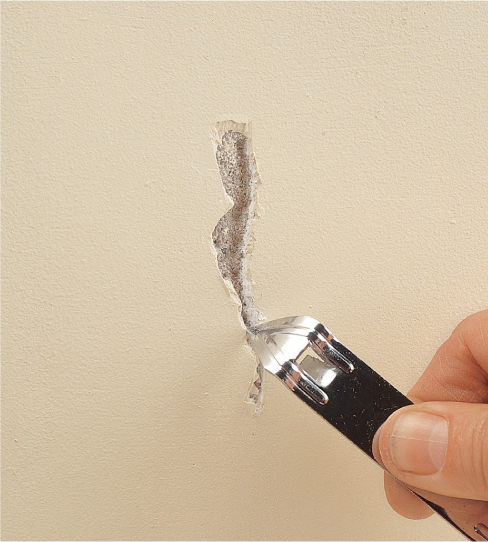
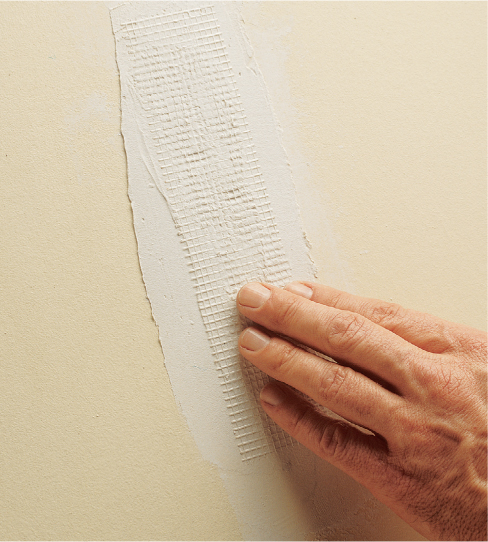
To repair doorknob-size holes, cover the hole with two strips of self-adhesive mesh drywall tape. Coat the area with a thin layer of drywall mud, pressing a little extra compound into the tape where the hole is. Let the mud dry overnight, then add one or more thin finish coats to hide the tape and feather the repair into the surrounding wall surface. Sand and prime the area before painting. Tip: You can use this same repair for small holes in plaster walls. Or, if the hole is shallow, you can skip the tape and fill the hole with plaster repair compound or a few layers of drywall mud. Patching large holes in drywall requires a little more work, as described on page 61.
Cutting Drywall Repair Costs
Buying all the loose elements to repair a drywall crack or hole often means purchasing far more materials than you’ll need or use. Even a modest pail of spackle, a roll of mesh tape, and a package of sandpaper will accommodate more wall defects than you’re likely to deal with in the life of your home. For a cheaper, handier alternative, investigate drywall repair kits. These all-in-one packages provide everything you’ll need—compound, mesh tape, sanding blocks or paper—plus extras such as screws to secure patches, special clips for stabilizing cracks, and complete instructions to help you get achieve a perfectly smooth wall with a minimum of effort. Drywall kits range in price from $7 to $15, depending on the size and complexity of the repair they’re meant for.
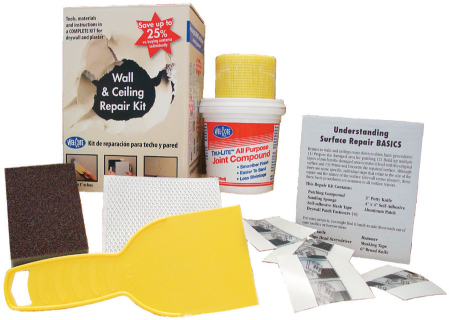
A drywall repair kit makes fixing a hole or crack easier and quicker.
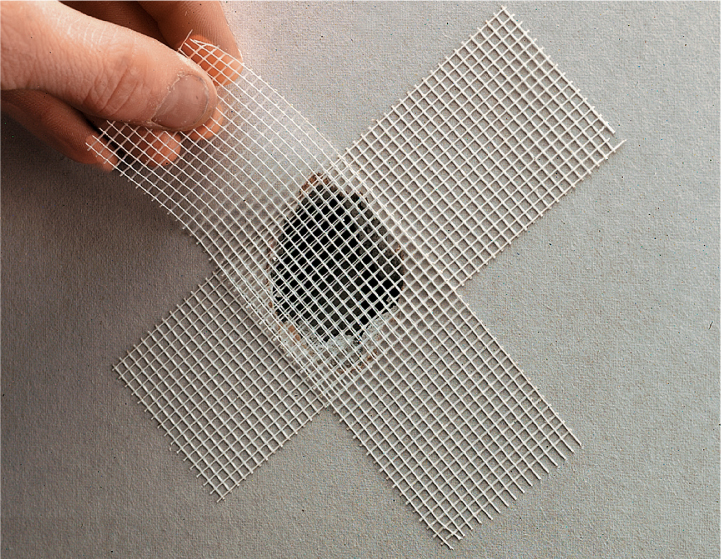
Patch smallish holes with crossed strips of mesh drywall tape and three coats of drywall compound. The tape strengthens the repair and minimizes compound shrinkage and cracking.
How to Repair Cracks in Walls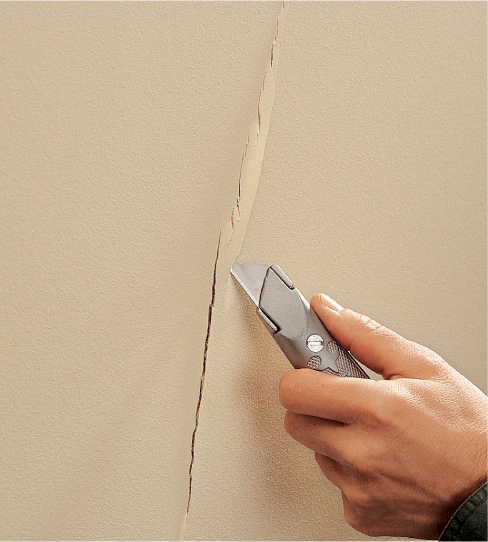
1 Prepare cracks in drywall by cutting a V-shaped groove along the crack, using a utility knife. Try to make the sides of the groove as clean as possible.
Variation: For cracks in plaster walls, undercut the crack with a utility knife or a “church key” bottle opener. Clear out all the loose debris, widening the crack as necessary to remove unstable plaster.
2 Fill the crack completely by forcing compound into it with a four-inch drywall knife or broad putty knife. Set a strip of mesh tape into the compound, centered over the crack. Apply a layer of compound over the tape and let it dry.
3 Apply additional layers of compound over the tape. It may take up to three layers to completely conceal the tape. Sand the final coat lightly until smooth, and feather the edges into the surrounding wall surface.
How to Repair a Hole in the Wall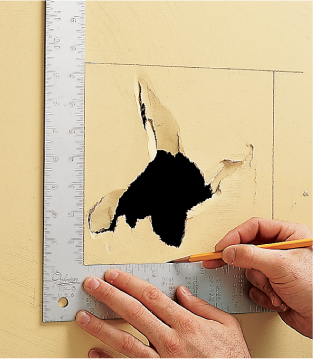
1 Mark cutout lines around the damaged area. The shape of the cutout isn’t important, but square lines make it easier to cut the patch material.

2 Insert backing strips of scrap lumber into the wall behind the damaged area and attach the strips with drywall screws driven through the wall around the perimeter of the repair area.

3 Finish the joints around the patch with self-adhesive drywall joint tape and apply and sand joint compound.
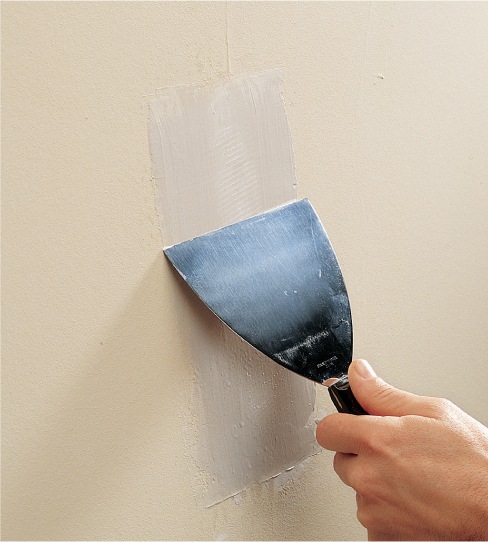
The secret to making a patch or repair job blend in is to use multiple thin finish coats of joint compound to conceal the repair. Then texture the repair area to match the existing surface treatment. For untextured walls and ceilings, the trick lies in adding progressively broader (but thinner) finish coats for a smooth transition to the original surface.
Apply the first coat of joint compound with a six-inch drywall knife, filling the seams and applying just enough on top to fill the holes in the mesh tape (with paper tape, the first coat doesn’t need to cover the top of the paper). After the compound dries, sand it smooth with a 150-grit sanding sponge.
Apply the second coat over the entire area, using a 10- or 12-inch drywall knife (a six-inch knife is okay for small repairs). Feather the compound flush with the surrounding surface. Let the second coat dry, then sand it smooth. At this point, you shouldn’t see any of the drywall tape. If necessary, apply a third coat of compound. Let the compound dry, then sand.
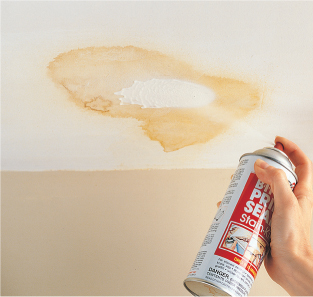
Texturing a patch may require some trial and error, but if at first you don’t succeed, scrape off the texture while it’s still wet and try again. You can mimic most drywall and plaster textures with standard drywall compound, using your hand or any tool that will do the trick. Just lay on some joint compound to an appropriate thickness, then work it to approximate the original texture. Alternatively, you can use spray texture to reproduce popcorn textures or professionally applied effects. Be warned, however, that canned ceiling texture is very difficult to work with.
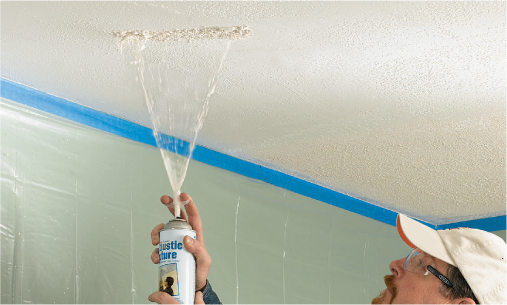
Canned spray-on ceiling texture can cover up small-area repairs, but the product is very tricky to control.
Wallpaper tends to generate strong opinions. That’s why real estate professionals recommend against hanging wallpaper (or even keeping old paper) before putting a house on the market. If you’ve just bought a fixer-upper, chances are good that you’ve already made plans to tear off some dated or worn wallpaper left by the previous owners.
Fortunately, most wallpaper sold in recent decades is made to be stripped without too much trouble. Standard vinyl papers have a thin, vinyl top layer that protects the paper layers beneath and provides a washable, water-resistant surface. To remove the wallpaper, you have to strip off the vinyl layer, then attack the paper layers with water. Some vinyl papers can be stripped off in one pass.
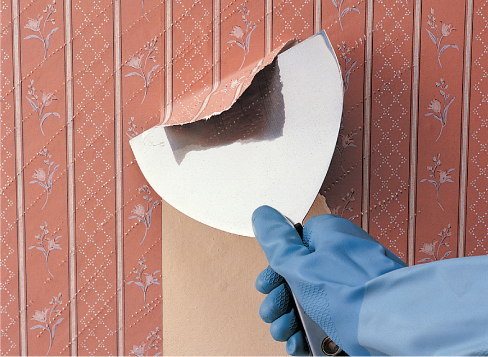
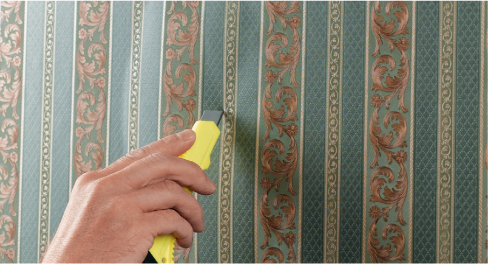
To start removing old wallpaper, look for a loose edge and, with the help of a wide putty knife, peel up the top layer. If everything comes up at once, great—you’ve got “strippable” paper. More than likely, however, you’ll just be peeling off the protective vinyl layer, along with the decorative layer beneath, leaving a thick layer of paper that’s glued to the wall. Be patient, and take the time to remove every last inch of the plastic film.
If the layers of the covering won’t separate and you’re getting nowhere with the stripping, you may have to abandon this step and go buy a perforating tool (or wallpaper scorer). Run the tool all over the wall to create thousands of tiny holes in the wallpaper. The holes will let water or a chemical stripper penetrate to the adhesive behind the paper.
Prepare for this process by covering the floor and baseboards with plastic and tape.
Of course, if you’re a fan of wallpaper or don’t have the time to strip an entire wall, you can spruce up any problem areas using the techniques discussed on page 63.
Lastly, if you’re dealing with thin wallpaper or an older or specialized type, it may be impossible to remove without seriously damaging the wallboard underneath (wallpaper should always be installed over primed or painted walls for just this reason). In this case, you can leave the paper and paint over it. Simply remove any loose sections, skim coat holes, dings, gouges, or low areas as well as the seams, and sand smooth. Then prime with an oil-based primer, and paint with the topcoat color of your choice.
A wallpaper scorer perforates the waterproof coating so wallpaper stripping solution can penetrate into the glue layer between the wallpaper and the wall.
How to Remove Wallpaper
1 Score the wallpaper all over with a scoring tool to allow moisture to soak the paper. Combine water and stripping solution in a hand-pump sprayer, and spray the wall top to bottom. Let soak and repeat as necessary—often three times. Collect excess fluid with a sponge at the bottom of the wall.
2 Scrape away saturated paper and adhesive with a wide putty or putty knife. Use a damp sponge to remove residue and rinse with clean water when done. Allow the wall to dry thoroughly before painting.
How to Repair Wallpaper DamagePATCHING DAMAGE

1 To replace a damaged section of wallpaper, tape a scrap of matching wallpaper over the damaged area. Align so that the patterns match.
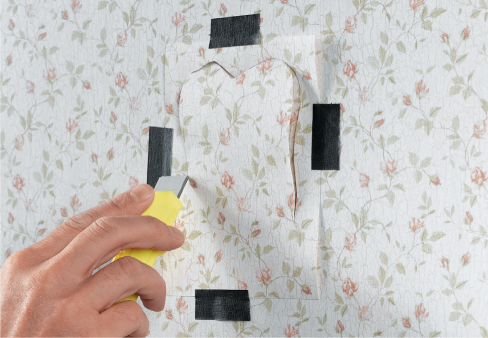
2 Cut through both layers of wallpaper with a utility knife equipped with a new blade. Remove the scrap and damaged section, and then apply wallpaper adhesive to the back of the patch and press it in place. Roll patch and wipe clean with a damp sponge.
FIXING BUBBLES
1 Fix a bubble by piercing with a sharp utility knife, making a tiny slit. Cut along any line in the pattern of the wallpaper to better hide the slit.
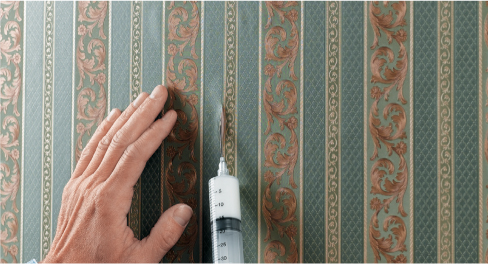
2 Insert the tip of a glue syringe through the slit and apply a small amount of wallpaper adhesive. Press the wallpaper down firmly to bond it with the wall or paper underneath. Use a damp sponge to wipe away any excess adhesive.
Inspect the Wall
Thoroughly removing wallpaper takes some work. Often, you may think you’ve got all of the residue scraped off, only to find there are bumps and flaws once you begin to paint. To inspect the walls after cleaning (and before painting), shine a lamp from the side to highlight imperfections that may not show up under direct or overhead light.
Painting walls, ceilings, and trim is hands-down the quickest and cheapest way to spruce up your fixer-upper. But before we get into specific techniques and strategies, here’s a word of advice: There’s no such thing as a “quickie” paint job. It takes nearly as much time to do a bad job as it does to do it right. You still have to clean the walls, tape and cover everything you don’t want painted, and put on enough paint to completely hide the old surface. In fact, rushing the project usually takes more time in the long run, because you have to go back and touch up missed spots, and you’ll probably have more paint splatters and messes to clean up from the careless work.
Doing the job right begins with the right paint. Bargains in paint often aren’t bargains at all. Remodelers on a budget often use the least expensive paint they can find and plan on doing two or more coats. Or they spend more for one-coat paint and hope to cover everything in one go. When it comes down to it, low-quality paints aren’t really that much cheaper than good, mid-grade paints (bargain brands start at around $13 while quality name brands start at about $20), and the former almost never cover as well. Also, the colors aren’t as true or as rich with low-quality paints, and they tend to fade more quickly than with better paints. The main knock against one-coat paints is that they don’t always live up to their primary claim of one-coat coverage.
The one-coat strategy works best when the new paint is darker than the old, for obvious reasons. If you’re trying to change a wall from burgundy to antique white, for example, your best bet is to prime the walls with a less-expensive base primer, then use a better-quality paint for the finish coat (or coats). In general, instead of spending extra for a so-called one-coat paint, look for a good-quality, ordinary paint that is rated highly for coverage. Several products that are rated best for coverage are available for around $20 a gallon. When it’s time to paint, lay on a consistent, heavy coat and let it dry. If you’re satisfied with the coverage, great. If not, apply another light coat of the same paint.
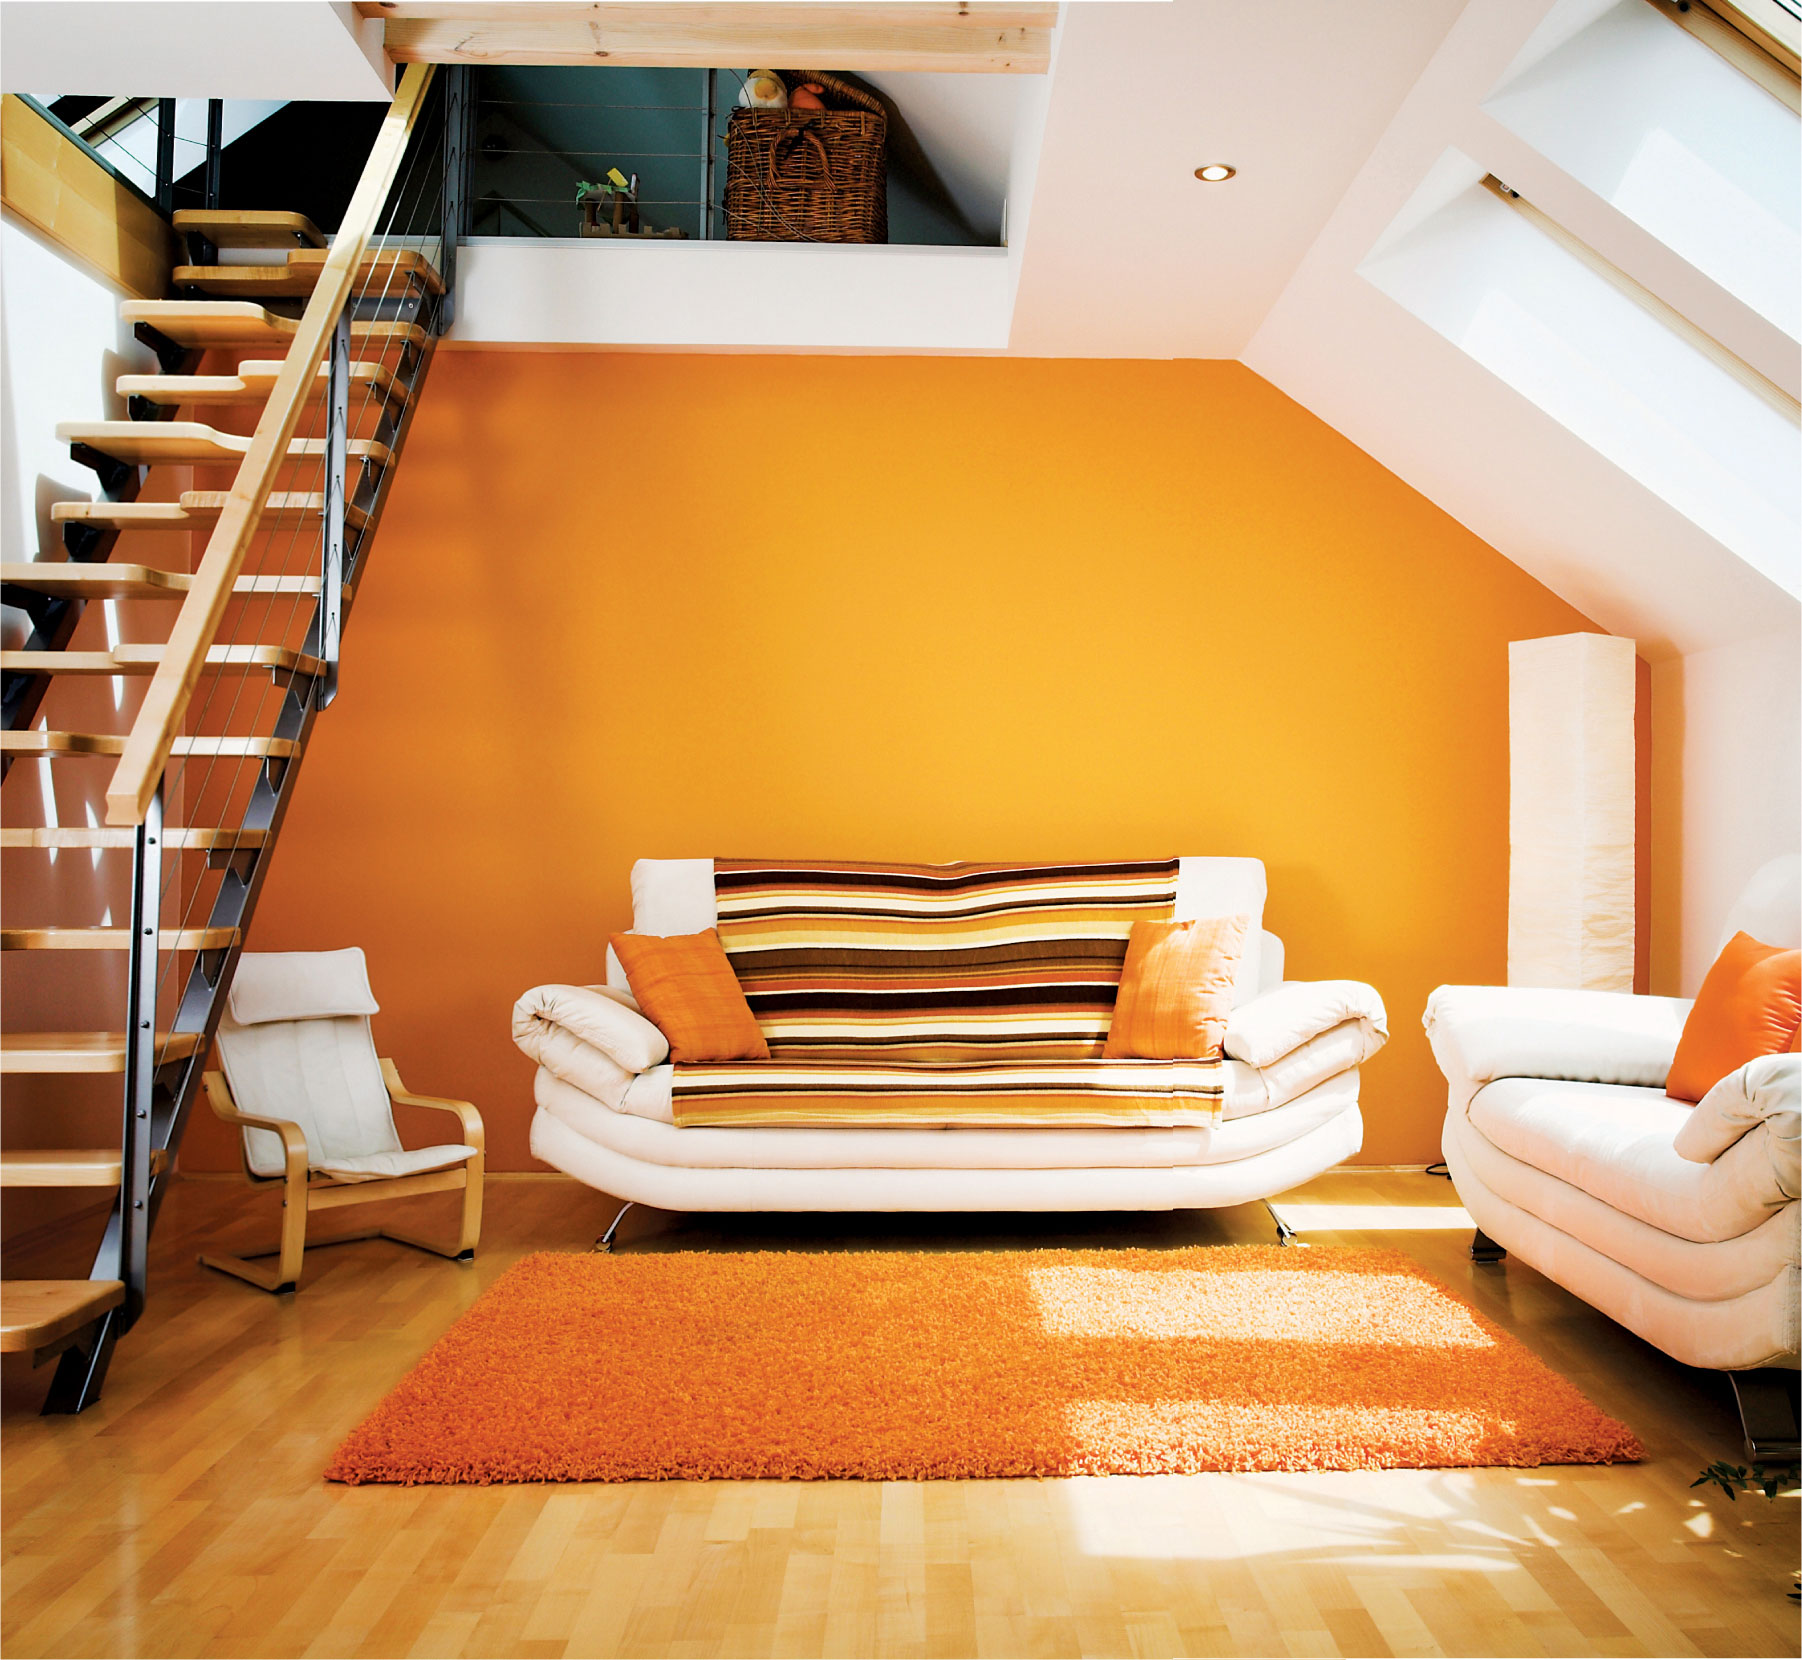
A fresh coat of paint on the walls and ceiling makes the whole room feel cleaner and, in some cases, larger.
The standard choice of paint for ceilings in living areas is flat white (often pretinted and labeled as Ceiling White). Flat paint hides imperfections better than glossier sheens, and you don’t need the washability of satin or eggshell on a ceiling.
If the ceiling is clean and is white or a light color, you probably don’t need a primer. Living rooms with wood-burning fireplaces and dining rooms near kitchens may need a thorough cleaning with TSP (trisodium phosphate) to remove soot and cooking residue. Also be sure to seal any water-stained areas with a good primer/sealer.
Cover the floor with a drop cloth, wrap the light fixtures in plastic bags, and get down to painting. First, cut in along the edges of the ceiling with a sash brush, making a three-inch band along the perimeter. If you’re painting the walls a similar color to the ceiling, you can save time by letting the paint lap onto the walls slightly while cutting in.
The easiest way to paint a ceiling is with a roller sleeve on an extension pole. For smooth-texture ceilings, use a 3/8"-nap synthetic roller cover. Work in three-foot-square sections, starting in the corner farthest from the room’s entrance. Load the roller with paint, and make a diagonal pass across the middle of the working area, then roll in parallel strokes through the diagonal line. This helps distribute the paint evenly for consistent coverage.

Roll the ceiling after cutting-in with a brush along the entire perimeter. A long extension pole for your roller makes ceiling work go much faster.
Move on to the next section as soon as the first is done, overlapping the wet edges of the first section before it dries. To help hide roller marks, work from the far corner to the room entry, and finish each section by rolling with strokes directed toward the entry wall. With a thorough, even coat on the ceiling, you can usually get by with one coat.
Sealing Stains
Common surface stains, including mildew, grease, wax, smoke, crayon, residue of oil-based adhesives, and discoloration from water damage, will show through ordinary primer and paint, no matter how many coats you put on. The best way to hide these stains is with a thorough coat of oil- or shellac-base primer/sealer. These run about $20 per gallon, usually around $7 more than a gallon of standard water-based primer. However, for the protection against stain bleed-through in messy rooms such as kid’s rooms and kitchens, the extra expense is money well spent. The newest versions of these are made with odorless formulations and dry quickly.

Oil-base or shellac-base primers are messier to work with and require more clean up than latex-base, but they create a superior bonding surface for paint—not to mention blocking unsightly bleed-through. Interior-rated primer (left) should be used indoors. Use an exterior primer (right) for outdoor surfaces. Don’t use them interchangeably.
Window and door trim, baseboard, ceiling molding, and all other interior millwork looks best when painted with semi-gloss or gloss paint (also called enamel). These surfaces need the added durability and washability that comes with a glossy finish.
Paint color is an important consideration when it comes to trim. If you want the trim to pop out, choose a color that contrasts with the walls. For a more subtle, blended look, use the same or similar colors for the trim and walls.
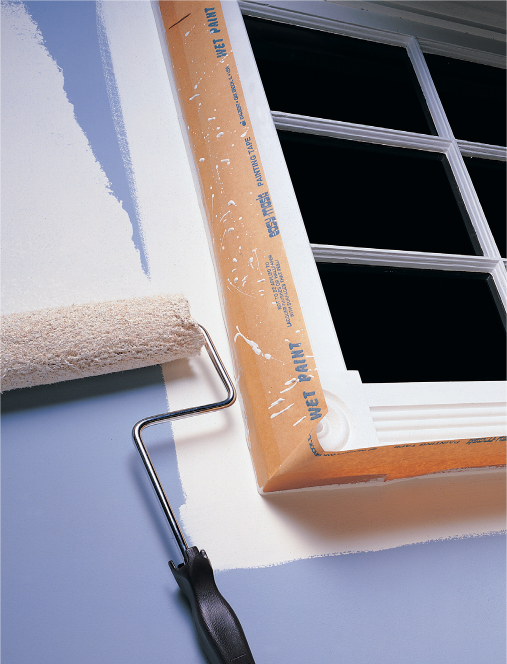
To paint window and door trim, start at the top, then do the sides, and finish with the sill (on windows). If you over-brush onto the walls a little, you can cover up the marks when you paint the walls (paint trim first when possible). For most trim work, a 2½-inch angled sash brush works best, but for small trim pieces and window grilles, you might prefer using a 1½-inch sash brush.
When painting a window, never paint the tracks or any parts involved in the window operation.
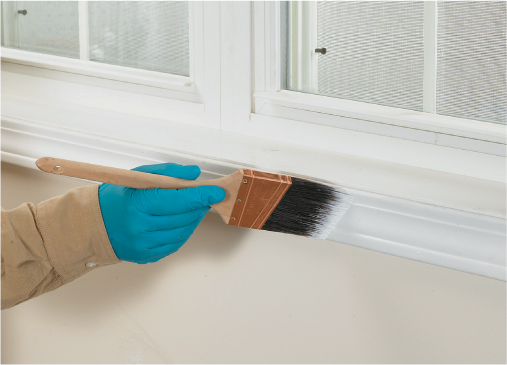
Always paint trim with the grain of the wood (parallel to the length of the piece) to minimize brush marks. Be aware of joints where trim pieces meet and avoid leaving brush marks that cross against wood grain.
If you’re fixing up your house to live in, the walls can be your blank canvas for any color or treatment you desire. But if you’re fixing up to sell, stick with the age-old real estate rule of neutrals—white (or any of the hundreds of variations on white), beige, or another soft, neutral tone. It may be boring, but neutral colors are safe, and that’s the point. Many real estate pros also recommend using the same color throughout the living spaces, and why not? It makes it easier for you, and the buyers can (and likely will) repaint with their own colors.
Once you choose a color for your walls, decide on a sheen. Although flat is probably the most common choice, eggshell is generally considered the best all-around sheen for living spaces. It makes colors look good and is durable and reasonably washable without being too shiny. Flat paint is usually cheaper and has the benefit of hiding imperfections. If you choose flat, consider one of the newer “cleanable” types.
Before painting the walls, remove all switch plates, outlet covers, heat register covers, and anything else that shouldn’t be painted. Tape over switches, outlets, and thermostats.
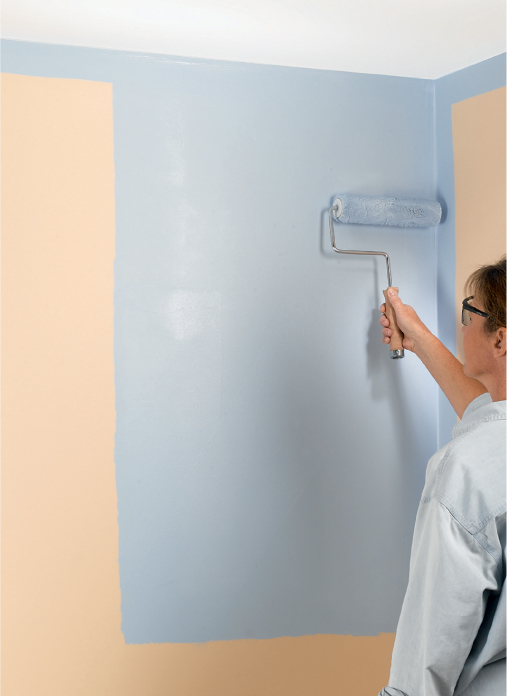
Make an N with a freshly loaded roller to begin each 3- to 4-ft. section, lifting the roller between each stroke. The first few passes unload the bulk of the paint onto the wall for even distribution.
Start by cutting in along the ceiling, wall corners, and next to all trim work. Roll the walls using a ¼- to ½-inch nap synthetic roller cover, depending on how much stippling you prefer; the deeper the nap, the more stippling you will get, resulting in a slight orange peel texture. Work in three-foot to four-foot-square sections, starting at the top of the wall. Then do the section just below before moving up and over to the next section, at the top again.
Proper wall-rolling technique saves time and paint. It starts with loading the roller fully in the paint tray, then going back and forth a few times along the tray’s ridged ramp to distribute the paint. Make a diagonal pass from bottom to top of your square section. Lift the roller and make a vertical pass down from the top corner of the diagonal line. Lift again, then roll up from the bottom of the diagonal line with another vertical sweep to create an N. Fill in with horizontal sweeps, then make final, vertical sweeps to smooth out the roller marks.
Mind if I Cut In?
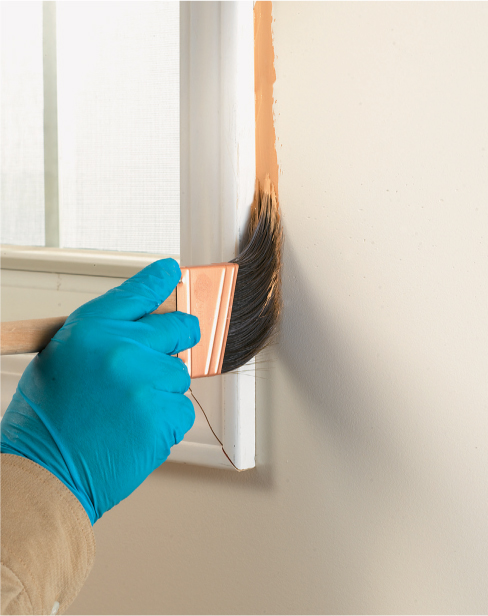
Cutting in is the trade term for freehand painting along an edge. Pros know that cutting in without the crutch of using masking tape gives you greater control of where the paint goes and is ultimately faster and easier. The trick is to fan out the brush close to the edge and essentially push the paint where you want it to go. It takes a little practice, but once you get the hang of it, you’ll swear off tape forever.
Be sure to use a quality, nylon-bristle brush with a flagged edge, which means the bristle ends are split and cut to slightly different lengths to hold paint better. A 2½" angled sash brush is considered the best brush for most cutting-in.
Press the brush into the surface as you move it slowly, parallel to the edge. The bristles should bend in the middle and fan out at the ends so they nearly touch the cut-in edge. But because they don’t actually touch, you’ll see a fine line of paint getting pushed toward the edge as you move the brush. Follow that line with your eye, and adjust the brush accordingly to create the desired final line. Once the fine edge is established, you can brush less precisely to the side to create the 3-inch band that you’ll overlap with the paint roller. Make sure the cut-in band completely hides the old paint, so you don’t have to cut in again.
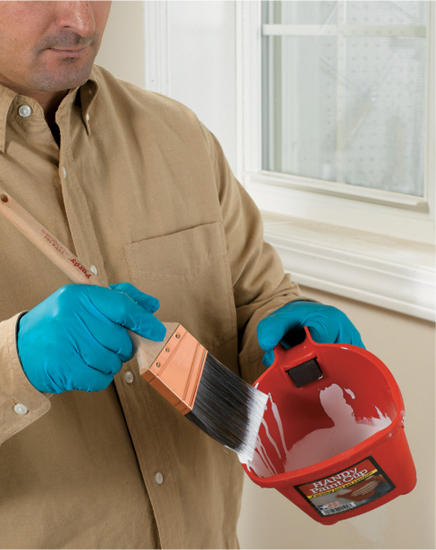
Don’t overload the brush for cut-in work. Dipping into a small pail with 1" or less of paint will give you the right amount on the brush. Tap the brush against the sides of the pail before each stroke.
Fanning out the edge of the brush and moving with a slow, steady stroke are the keys to a clean cut-in line. Done correctly, the technique will produce a thin ridge of paint that flows from the brush and into the crevice at the point of intersection.
FloorsFlooring for living spaces runs the gamut from ceramic tile to lush carpeting. Cleaning, repairs, and replacement of vinyl and tile flooring are discussed in beginning of this book, so here we’ll focus on the two materials you’re most likely to have in your living spaces—carpet and wood. Plus, we’ll discuss laminate plank flooring, which is arguably the best option for replacement flooring when a quick and easy upgrade is called for.
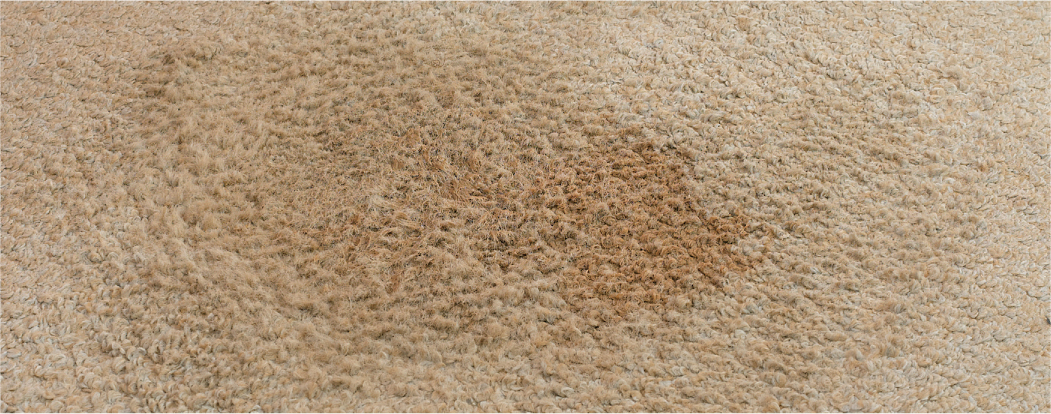
If you can’t identify disgusting old carpeting with your eyes, you can usually spot it with your nose. Replace it before moving in whenever possible, and don’t put your house on the market if your carpet looks like this.
How to Eliminate Floor Squeaks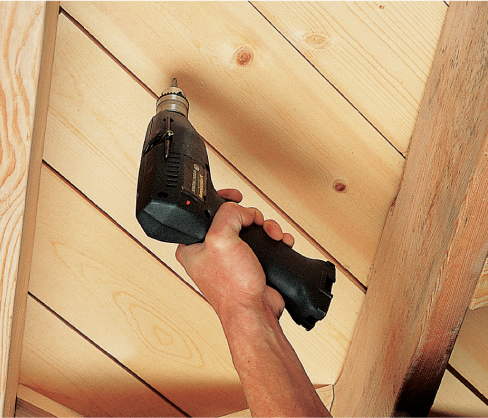
If you can access floor joists from underneath, drive wood screws up through the subfloor to draw hardwood flooring and the subfloor together. Drill pilot holes and make certain the screws aren’t long enough to break through the top of the floorboards. Determine the combined thickness of the floor and subfloor by measuring at cutouts for pipes.
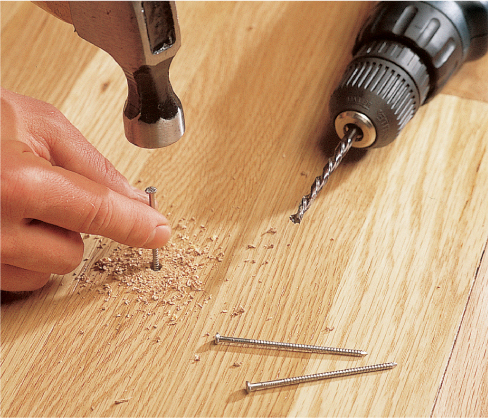
When you can’t reach the floor from underneath, surface-nail the floor boards to the subfloor with ring-shank flooring nails. Drill pilot holes close to the tongue-side edge of the board and drive the nails at a slight angle to increase their holding power. Whenever possible, nail into studs. Countersink the nails with a nail set and fill the holes with tinted wood putty.
Real estate agents frequently recommend replacing old carpets as part of prepping a home for sale. Carpeting looks most appealing to potential buyers (as well as guests) when the same material is used throughout the house, or throughout each floor in multistory homes. This often saves you money, too, because the cutoffs from large spaces may be used in smaller rooms, hallways, and entries.
If you’ve decided to replace your wall-to-wall carpeting, a midgrade carpet and pad are a safe choice for fixer-uppers in good condition.
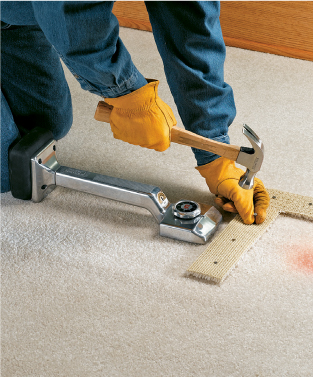
Installing wall-to-wall carpeting properly is a considerable undertaking and one that most homeowners are better off hiring out to a qualified professional. If an installer is amenable to the idea, you can probably save a few bucks by tearing out the old carpet and pad yourself and vacuuming the subfloor so it’s ready for the installation. This also gives you a chance to take care of squeaks by screwing loose areas of the subflooring to the floor joists below.
Removing conventional carpet is easy: With all of the furniture out of the way, grab a corner of the carpet with pliers and pull it away from the tackless strips along the wall. Roll the carpet back about four feet all the way down the room’s longest wall, and cut through the backing (from the backside) with a sharp utility knife to remove a two- to three-foot-wide strip.
With the carpet removed, cut through the pad from the top and roll it up as well. Remove the pad’s staples (there will be hundreds of them) from the subfloor with a scraper and pliers. Disposing of the old carpet and pad might take some finagling. Your trash service might take it, since it’s in manageable rolls, or you can haul it to a dump yourself or try to work a deal with your carpet installer. Ask your installer about places where you can recycle the pad, which can save you some money and is a good thing to do for the environment.
How to Remove Old Carpeting
Tacked carpet: Cut wall-to-wall carpeting into strips as you work to make removal and disposal easier.
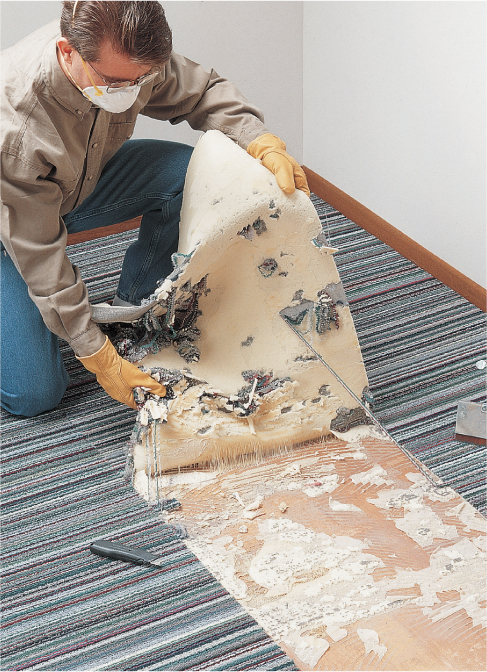
Bonded carpet: Carpet that has been bonded to the floor or floor underlayment is a pain to remove. You may be better off removing and replacing underlayment rather than trying to salvage it.
If carpet replacement isn’t warranted or just doesn’t fit into your budget, you should probably opt to have it professionally cleaned, or at the very least do it yourself with a rented machine.
If your carpet is largely fine, you may be able to get away with addressing just the problem areas. Localized spot damage, such as burn marks, marring an otherwise presentable carpet can often be repaired by cutting out the damaged area and filling in with a patch cut from a remnant of the same carpet.
But check with an expert at a carpet store first, because some carpets such as Berbers, are woven with long threads that extend well beyond the damaged area. Cutting any threads in these carpets can lead to serious unraveling.
To make a spot repair, you’ll cut out the damaged area using a round cookie-cutter tool available at carpet stores. For larger areas, you’ll need to cut a square-edged patch with a utility knife and glue it in place with carpet tape and seam adhesive.
If you simply want to renew the look of the entire carpet, steam cleaning machines are widely available for rent at supermarkets, home centers, and other retail stores. Using them is pretty straightforward: First, vacuum the carpet with your regular vacuum. Apply pretreatment solutions as needed to help eliminate tough stains. Steam machine companies offer their own cleaning products and can advise you on how to treat various common stains. Next, mix the general carpet-cleaning solution with tap water and pour it into the steam machine. Turn on the machine and pull it backward at an even, steady rate to steam clean the carpet. Steam cleaning tends to work best with one pass, but check with the store if you think really dirty areas could use a second pass (this isn’t recommended with Berber and other loop-weave carpets).
How to Patch Damaged Carpeting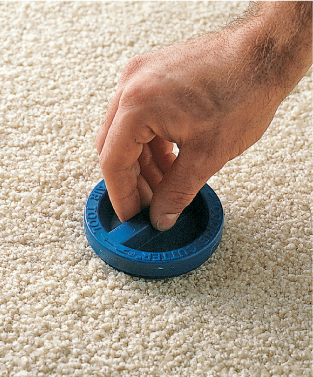
1 Cut the damaged patch of carpet out with a cookie-cutter tool and cut an identical patch from a scrap piece of carpet from an innocuous area such as the floor of a closet. Insert double-face carpet tape under the cutout, so it overlaps the patch borders.
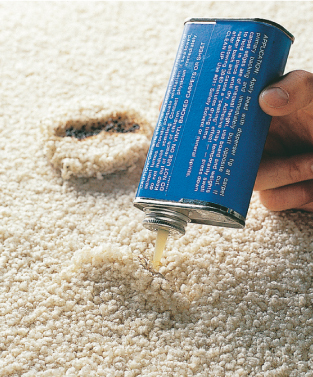
2 Press the patch into place. Make sure the direction of the nap or pattern matches the existing carpet. To seal the seam and prevent unraveling, apply seam adhesive to the edges of the patch.
Variation: Before cutting out larger areas for patching, relieve the tension of the carpet you’re repairing by nudging in toward the damage with a carpet knee-kicker, then tacking the carpet in place with a nail every 2 to 4". Nail through scrap strips of carpet laid face down to help protect and hold the surrounding carpet while you patch it.
How to Steam-Clean Carpet
1 Pre-treat any stains with the manufacturer’s recommended treatment, or another compatible cleaning solution, to get the best results with a rented steam cleaner.

2 Move the cleaning machine over the carpet as directed. It’s best to complete the job with one pass, because multiple passes can overwet the carpet and pad.
Real wood floors are coveted features in the home marketplace, and are almost always worth the expense of refinishing for a sale or for enjoying the floors for years to come. Aside from its undeniable beauty, perhaps the best feature of solid-wood flooring is how renewable it is. Even serious neglect and years of everyday wear and tear can be nearly or totally erased with a good sanding and careful refinishing. Boards with extensive damage can be replaced prior to refinishing. Minor repairs to scratches and isolated damage can improve the look of the floor and prevent further damage, but blending them in can be a challenge.
However, there is a limit to how many times a wood floor can be refinished. The sanding process removes anywhere from 1/32 to 1/8 inch of the wood. Solid hardwood flooring found in most homes can be sanded several times, while engineered wood flooring (a laminated material with a thin solid-wood top layer) can be sanded only one or two times in most cases.
Skilled do-it-yourselfers will find floor-sanding machines and sanding belts or pads at rental centers. The job needs to be done carefully, because in addition to being hard labor, it can be a bit tricky. For everyone else, professional floor refinishers are a good option. For around $2 to $3 per square foot, you’ll usually get better results in much less time. Although several traditional and specialty finishes are available, most homeowners end up choosing clear polyurethane for its economy, durability, and ease of maintenance.
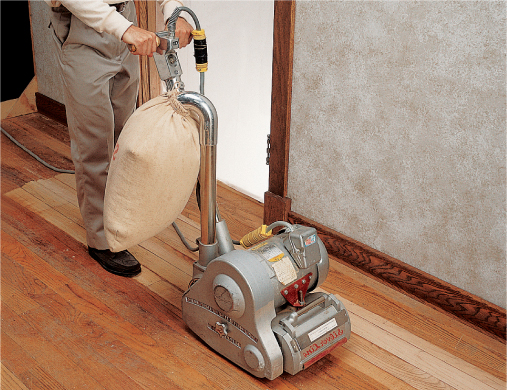
Refinishing hardwood floors is a labor-intensive and dirty DIY project that requires careful use of rental equipment for high-quality results. But even hiring a pro is an affordable solution.
How to Clean a Hardwood Floor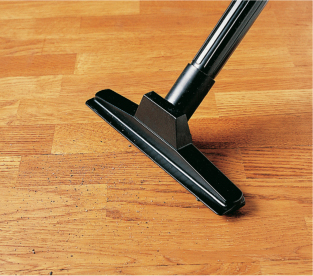
1 Vacuum the entire floor. Mix hot water and dishwashing detergent that doesn’t contain lye, trisodium phosphate, or ammonia. Working on 3-ft.-square sections, scrub the floor with a brush or nylon scrubbing pad. Wipe up the water and wax with a towel before moving to the next section.
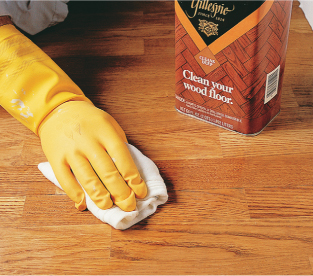
2 If the water and detergent don’t remove the old wax, use a hardwood floor cleaning kit. Use only solvent-type cleaners, as some water-based products can blacken wood. Apply the cleaner following the manufacturer’s instructions.
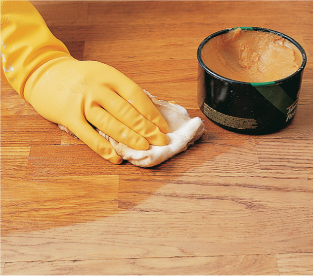
3 When the floor is clean and dry, apply a high-quality floor wax. Paste wax is more difficult to apply than liquid floor wax, but it lasts much longer. Apply the wax by hand, then polish the floor with a rented buffing machine fitted with synthetic buffing pads.
A single damaged floorboard can be replaced on your hardwood floors, but it isn’t as simple a job as you might think. It involves removing the damaged board, finding a replacement that matches, and installing the new board. The trick lies in finding a good match and in altering the new board so it can fit into the tongue-and-groove installation system.

1 Cut out the damaged portion of the board using a combination of saws and chisels. Remove boards in full-width (tongue to groove) pieces.

2 The replacement board must be altered by cutting off the lower lip of the grooved edge so it can be fitted over the tongue at the edge of the repair area. Patches are fastened by face-nailing, and then covering the nail heads with tinted wood putty.
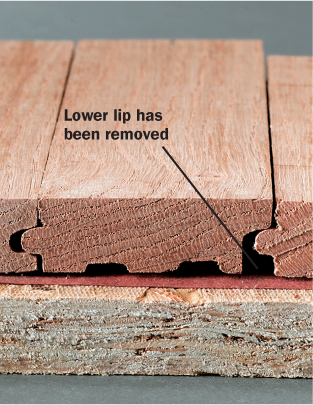
3 Remove the lower lip from the grooved edge of the replacement board by rapping the end of the lip with a sharp chisel and mallet.
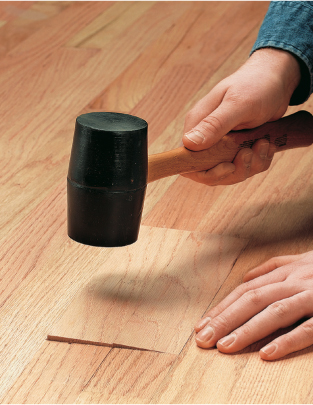
4 Install the patch board or boards in the damaged area that has been cleared. Setting the patch with a light blow from a wood mallet is fine, but do not force the patch into the opening. If it doesn’t fit, remove it and trim the edge slightly.
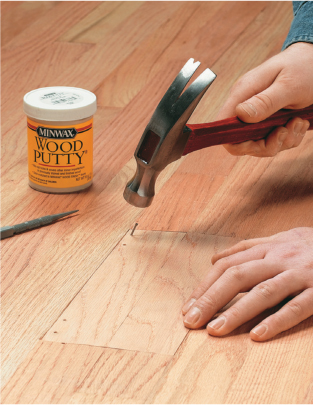
5 Drive 4d finish nails through the edges of the replacement board and into the subfloor. Drill pilot holes first. Cover the nail heads with wood putty and finish the patch to match the surrounding wood.
When a room is crying out for new flooring, you really can’t beat a laminate plank floor. Starting at $2 to $3 per square foot, laminate is one of the cheapest floor coverings you can buy, and it’s very easy to install. It’s also a great performer, thanks to its durable wear layer that resists scratches, dents, and stains and cleans up with a cloth or a damp mop.
Laminates are made with high-density fiberboard covered with a photo layer that can mimic everything from distressed, old-growth hardwood to marble tile. Cheaper versions are predominantly available in standard wood finishes, such as oak, maple, and cherry. The photo layer is protected by a clear wear layer on top, while another protective layer usually covers the bottom for added moisture protection. Overall thickness ranges from 6 mm to 12 mm, and 8 mm laminate is a good standard to shop for. Combined with the foam pad that cushions the flooring and allows it to “float” over the subfloor, the total installed thickness is about 3/8 inch.
You can lay laminate flooring directly over any standard subflooring, or over existing flooring, including solid or engineered wood, vinyl, tile, and concrete. However, the floor must be relatively level, smooth, and firmly affixed to the surface below it. For concrete floors, particularly those in basements and other below-grade locations, follow the laminate manufacturer’s recommendations for installing a plastic moisture barrier below the new pad and flooring. Older versions of laminate (and a few current versions) were glued along the joints, but most types today simply snap together with special interlocking edges. This allows the flooring to be disassembled for moves, or for replacing damaged planks.
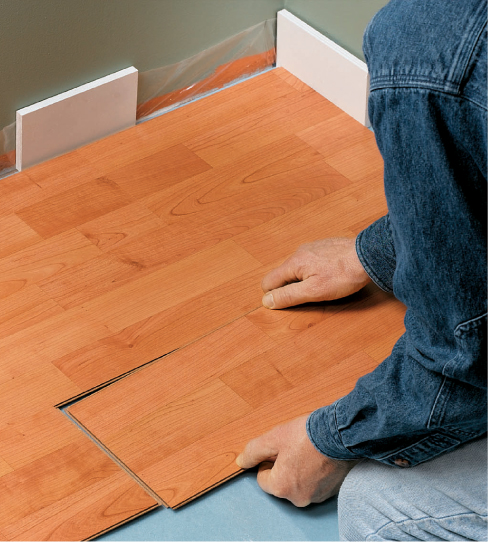
The installation process itself is remarkably easy and the flooring can be installed by the average do-it-yourselfer in less than a day, in the average room.
Here’s an overview of the standard installation process: Unroll the manufacturer’s recommended underlayment to cover the entire subfloor (some laminate planks come with underlayment attached). Tape the underlayment strips together, as directed. Starting at one long wall of the room, lay out the first row of planks, maintaining the specified expansion gap from the wall. Lay out the first pieces of the next row, beginning with a half-length plank, to create an offset for the end-joints between rows, and so on. As soon as you finish laying the floor, it’s ready to walk on.

Strip laminate flooring is a thin, durable flooring that easily snaps together with interlocking joints at the edges and ends of the strips.
How to Install a Laminate Floor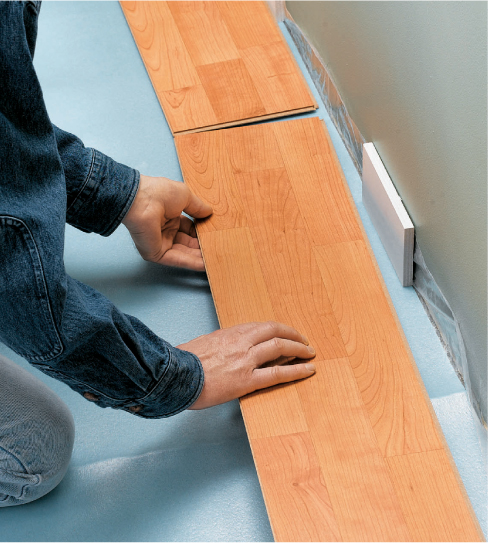
1 Lay out the first row of planks along the starting wall. Use spacers to maintain expansion gaps (typically 3/8") along all walls. Lock the planks together at the ends.
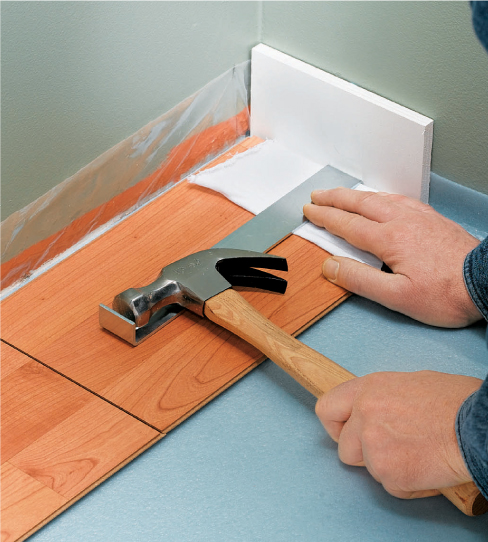
2 Use a drawbar, available at home centers and flooring stores, to lock in the end joint for the final plank in each row.
3 Continue to lay rows of planks, locking all the edges together in a row, then locking the entire new row into the previous one. Make sure the joints are staggered by starting each row with a plank one-third the length of the previous row’s starting plank.
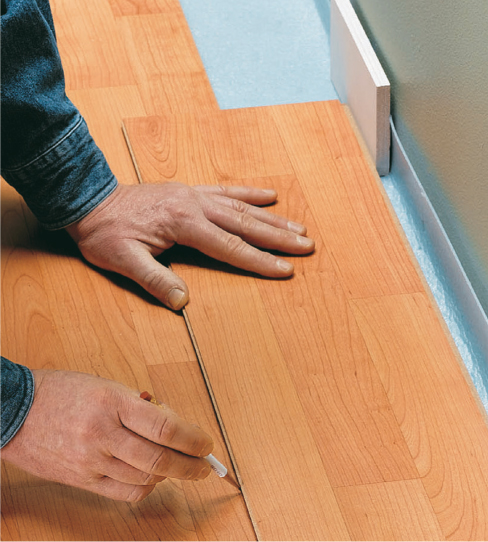
4 Fill in the last row. Rip-cut planks as necessary to fit. Mark for cutting by placing the board backwards over the gap and marking where the edge should be. Rip-cut to width using a circular saw and straightedge guide, and cutting on the backside of the plank.
Electrical UpgradesWhether you’re a new buyer or a seller, a few simple upgrades can have a big impact on home design and performance. For example, replace the cover plates on all switches and electrical receptacles to add a nice fresh touch.
Swap out an old thermostat with a modern digital model to send a subtle message that your heating and cooling system is up to date. Add brand-new smoke alarms, even if the older ones still appear to be in working order.
Replacing an old thermostat with a more efficient unit (especially if it is a programmable model) adds an updated look and energy efficiency that house hunters are likely to notice—as will you when you receive your lower utility bill. Be sure the new thermostat is compatible with your heating and cooling system. Basic programmable electronic thermostats start about $40.
To replace an old thermostat, turn off the power to the heating/cooling system at your home’s main electrical service panel. Remove the thermostat’s cover to expose the wiring and the mounting screws securing the thermostat body to the wall plate. Remove these screws and carefully pull off the thermostat body.
Thermostats are wired with color-coded, low-voltage wires (typically four) connected to screw terminals on the wall plate. Label each of these wires according to the letter next to its respective screw terminal. Loosen the screw terminals to free the wires. Tape the wire cable to the wall to keep them from slipping into the wall cavity, then unscrew the wall plate and set it aside.
Feed the cable through the wall plate of the new thermostat, and mount the plate to the wall. Connect each of the low-voltage wires to a screw terminal on the new unit, following the manufacturer’s wiring diagram. Install the backup battery in the new thermostat body, and secure the body to the wall plate. Restore power to the system and test the thermostat.
How to Replace a Thermostat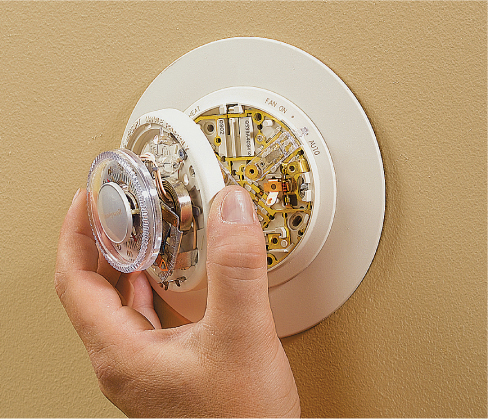
1 Examine the body of the thermostat to see if it has a mercury switch, then remove the body to access the wiring.
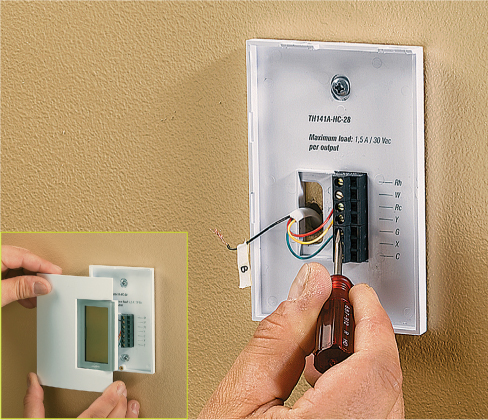
2 Connect the low-voltage wires to the terminals on the new thermostat wall plate, then snap on the cover (inset) to complete the installation.
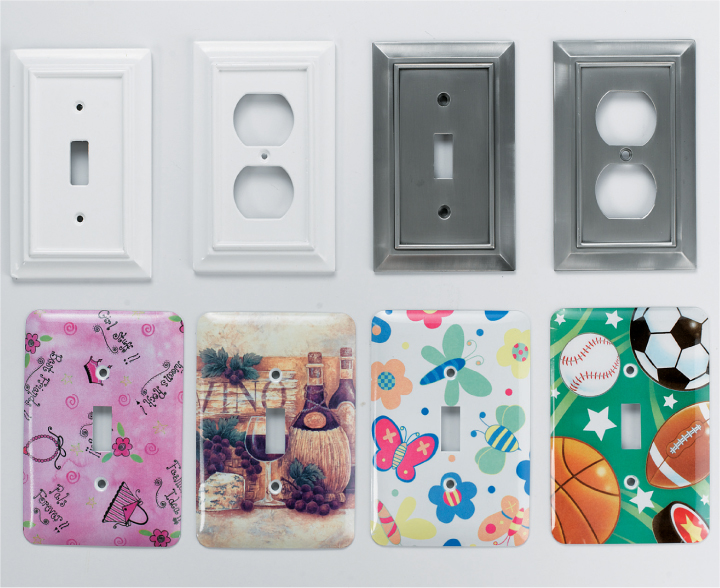
Decorative cover plates for switches and receptacles make a strong design statement for very little cost (ranging from $.50 for plain white plastic, to $5 to $8 for the fancy versions shown here). Plates for bathrooms and kitchens are often made with high-tech materials and a modern appearance. You’ll find plenty of designer plates that fit better in formal living areas.
The local building code is the final authority on where you need smoke alarms in your house, but here are the most commonly required locations:
• Each story, including the basement (at least one alarm)
• Bedrooms
• Hallways adjoining bedrooms
If you’re missing a working alarm in any of these areas, it’s time to get one. In new home construction, smoke alarms typically must be wired together on a household circuit, so they’re always armed (unless the power goes out, in which case a backup battery takes over), and they all go off simultaneously if one alarm is tripped. In existing homes, battery-powered alarms are generally acceptable.
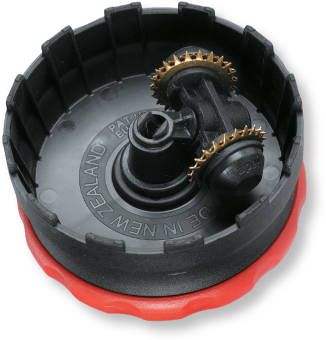
Installing a battery-powered smoke alarm takes just a few minutes. Consult the manufacturer’s instructions for proper placement (this is no time to ignore the fine print and wing it). Alarms aren’t as effective when installed too close to ceiling fans, air registers, or wall-ceiling junctures, for example. Once you’ve marked the location, screw the mounting plate to the ceiling (or wall, as appropriate), load the battery into the body, then twist the body onto the mounting plate. Test the alarm, and you’re done. Don’t worry, your hearing will return to normal in a moment.
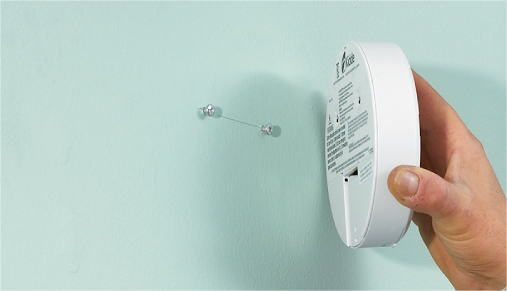
Smoke alarms are essential safety devices and are always included in home inspections. Most building codes allow battery-powered alarms in existing homes. Replacing all your alarms, even if they’re working, is advisable. You must leave at least 4" of clearance between the alarm and any adjoining walls or the ceiling.
Bedrooms are typically among the simplest items on a fix-up checklist, usually calling for no more than a general freshening of paint, flooring, and possibly window treatments. But if you’re showing your house for sale, it’s important that the bedrooms look as spacious and inviting as possible.
Size and comfort notwithstanding, perhaps the most important aspect of a bedroom for both buyers and sellers may just turn out to be the closet. Years ago, house hunters paid little attention to closets, and home designers and builders considered storage spaces to be more perfunctory than primary considerations. But that’s changed. Today’s house hunters always check the closets, secretly hoping that the door will open onto a cavernous, uncluttered space that promises to hold every wearable item they own. Your closets probably can’t promise all that, but you can easily make a small closet more promising by installing an inexpensive closet organizer.
Economical vinyl-coated steel closet system parts are available piece-by-piece or in sets at any large home center. Ask a salesperson to help you choose the right pieces for your closet. Shelves, hanger bars, and prefabricated organizer units are made to hang on steel tracks that mount to the back wall of the closet. Whenever possible, designate some space for double-hanging clothes—with shirts and coats on top and pants below. Also include a full-length hanger section for dresses and long coats. Shoe organizers are great for clean and compact shoe storage, leaving the closet floor free and uncluttered.
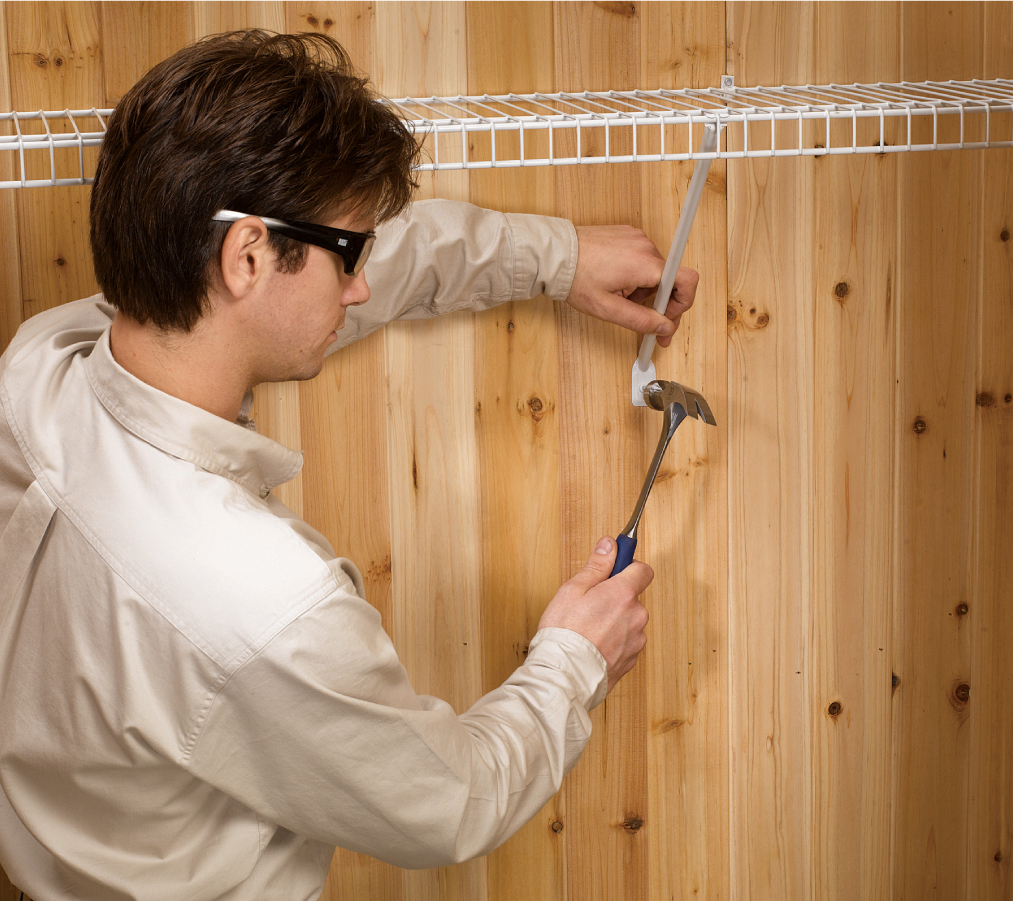
With a little creative planning and a half-day’s work, you can overhaul the storage space of a small closet for a very small investment.
WALLS & CEILINGS
Painted surfaces: Remove ordinary stains by blotting with a cloth sprayed with all-purpose cleaner/disinfectant. Blot again with a sponge wetted with household cleaning powder mixed with hot water. Rinse with a damp cloth. Remove scuffs with a commercial sponge eraser (such as Mr. Clean Magic Eraser).
Wallpaper (vinyl): Remove dirt and ordinary stains by blotting with a cloth and solution of 1 teaspoon dish soap to 1 quart warm water. Remove scuffs and smudges with a commercial sponge eraser or a clean pencil eraser.
Wood paneling (painted): Remove dirt and ordinary stains by blotting with a cloth and solution of 1 teaspoon dish soap to 1 quart warm water. Blot again with an appropriate wood cleaner (such as for wood floors). Rinse with a damp cloth, then dry. Remove scuffs with a commercial sponge eraser.
WOOD TRIM
Paint or polyurethane finish: Remove beverage stains and cooking oil by blotting with a cloth and solution of 1 teaspoon dish soap to 1 quart warm water. Blot again with commercial wood cleaner, as directed. Wipe dry. Remove water stains by blotting with a cotton cloth and solution of 1 teaspoon dish soap to 1 quart warm water; buff with a dry cloth. Scrape up hardened wax with a plastic scraper or credit card, then wipe with a damp cloth, and buff with a dry cloth.
Oil finish: Remove beverage stains and cooking oil by blotting with a cloth and solution of 1 teaspoon dish soap to 1 quart warm water. Blot again with commercial wood cleaner, as directed. Wipe dry. Remove water stains by rubbing with mineral spirits and fine steel wool (rub with the grain). Buff with a dry cloth. Scrape up hardened wax with a credit card, then blot with a 1-to-1 paste of baking soda and water. Wipe with a damp cloth, and buff with a dry cloth.
Shellac (varnish) finish: Remove beverage and food stains with furniture polish, as directed. Remove water stains by blotting with solution of 1 part mineral spirits, 1 part raw linseed oil, and a small amount of white vinegar.
FLOORS
Carpet (synthetic fiber): Note: Test all cleaning solutions on a carpet remnant to check for color-fastness and staining. Remove common stains (including crayon, permanent marker, ink, chewing gum, wax, and butter) by applying a small amount of non-acetone nail polish remover (or another oil solvent) to a cloth and blot. Rinse with a spray of water, then blot dry. Remove beverage and pet stains by blotting with solution of 1 teaspoon dish soap to 1 quart warm water. After 15 minutes, blot with 1-to-1 solution of white vinegar and water. After 15 minutes, blot with damp cloth and let dry.
Wood (polyurethane finish): Remove cooking oil and crayon by blotting with hydrogen peroxide solution applied to a cloth. Blot again with commercial wood cleaner, as directed. Remove beverage stains, pet stains, chewing gum residue, and wax by blotting with commercial wood cleaner, as directed. Remove scuffs with a commercial sponge eraser. Note: Oil soap, floor wax, and other products may preclude the option of recoating polyurethane finishes.
Laminate: Remove beverage stains, grease, and chocolate with cloth and laminate floor cleaner, as directed. Remove tar, shoe polish, paint, ink, crayon, and nail polish with rubbing alcohol or nail polish remover applied to a cloth. Remove hardened wax and chewing gum by scraping gently with a plastic scraper. Note: Consult the flooring’s manufacturer for specific cleaning recommendations.
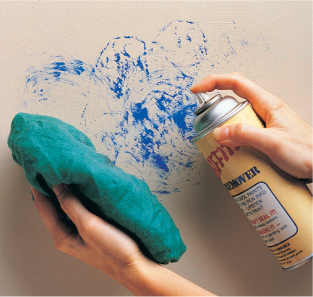
Apply stain remover to a clean, dry cloth and rub lightly to remove the stain.
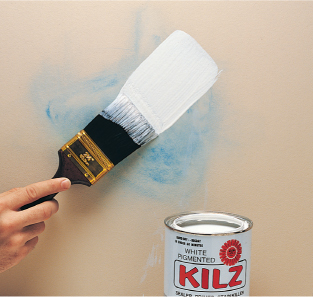
Seal all stain areas with white pigmented shellac. Pigmented shellac prevents stains from bleeding through the new paint.
Water or rust stains may indicate water damage. Check for leaking pipes and soft plaster, make needed repairs, then seal the area with stain-killing sealer.