 IN THIS CHAPTER
A house really has only two kinds of moving parts: doors and windows. And that’s a good thing, because all moving parts sooner or later end up with problems. Chances are you know exactly which doors and windows are giving you trouble at the moment. What you may not care to recall is exactly how many dozens of times you’ve intended to fix each of those problem parts, and perhaps you don’t know how. This chapter will help with the how-to information; you’ll find it’s more about motivation than about any significant expense.
If you’re selling your home, you may have asked yourself, “Do I really need to fix something as insignificant as a sticking door or a torn screen?” The answer is yes, for the same reason that you patch a hole in the driveway or trim an overgrown shrub: You want the house to look like it has been well cared for over the years, and that you’re not trying to pawn off minor problems onto the home’s new owners. On the other hand, if you happen to be a new owner who has inherited some nagging door and window problems, now’s the time to make a fresh start and show the world that you’re not the type who leaves such nuisances to posterity.
Of course, there’s more to fixing up doors and windows than basic repairs and maintenance. One of the primary house features house hunters notice is the main entry door. The presentation of the front door is an important sign of welcome, and an attractive entry is like a friendly greeting, while an unappealing one is a sure way to start off on the wrong foot. So we’ve included some simple projects and upgrades to give your home’s facade a winning smile.
 Doors
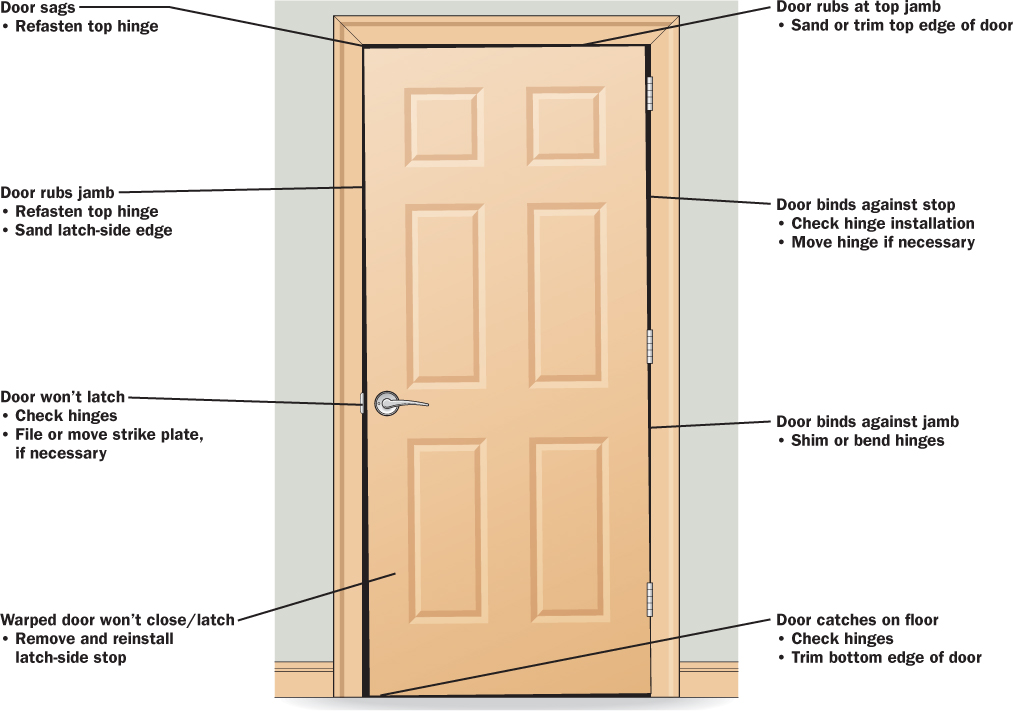
DoorsThe key to doctoring doors is an accurate diagnosis. You already know the symptoms—the door rubs against the jamb when it closes, or it won’t latch, or you have to put your shoulder into it to get it to stay closed, or whatever—now you have to figure out what’s causing the problem. The illustration on page 83 points to the most common door ailments and their usual causes. The following pages show you how to administer specific treatments.
A door that is in poor repair, or even simply outdated, gives exactly the wrong first impression to visitors and potential buyers alike. Making simple repairs to the door and frame and upgrading the lockset and deadbolt are easy, inexpensive solutions.
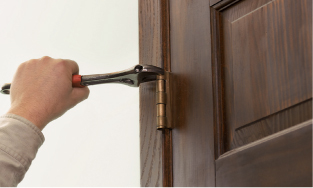
Most door problems start with the hinges. By far the most common door ailment is a loose top hinge, for which gravity is mostly to blame. Hinges are held in place by screws driven into the door jamb, which is typically made of ¾-inch softwood ill equipped to support the weight of a door over many years. When the top-hinge screws loosen, the door hangs askew in its opening, eventually rubbing against the latch-side jamb and/or the floor or threshold. To determine if this is your problem, open the door a few inches, and lift up on the knob to see whether the door moves toward the hinge jamb. If so, try tightening the screws on all of the hinges.
If the hinge screws don’t hold any more, replace one or more of the old screws with a 2½- or 3-inch wood screw, to fasten the hinge not just to the jamb but also the stud behind the jamb. Replace the screws one at a time, and drill pilot holes so you don’t split the jamb.
If a hinge leaf has come loose from the door, you can replace the original screws with longer ones if the door frame is solid wood. With hollow-core doors, longer screws won’t help. Instead, apply a little epoxy filler into the screws holes, then re-install the screws. Support the weight of the door while the epoxy cures.
Another common problem is a bent top hinge that allows the door to lean toward the latch jamb. To correct this, remove the hinge pin from the offending hinge. Grab each knuckle of the bent hinge leaf with an adjustable wrench and bend it back into shape. Most hinges have a little bit of play in them, so you can bend a little extra in either direction to adjust the gap between the door and jambs. If you bend too much, the pin won’t go back in. Replace the pin and test the door’s fit and operation.
If a door binds against the hinge-side jamb, it’s usually because the hinge leaf is set too deeply into its mortise, so that the door edge is compressed against the jamb when the door closes. Remove the hinge screws and place a thin cardboard shim between the hinge leaf and the jamb.
How to Fix Door Hinge Problems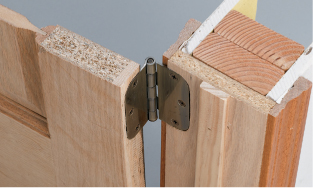
Long screws driven into the framing secure a loose hinge and pull the door toward the hinge-side jamb. Screws closer to the wall surface tend to hit the drywall instead of the wall studs.
Hinges or hinge pins that are bent have a negative impact on door operation. Remove the hinge pin with pliers or an adjustable wrench so you can inspect the parts. If either a leaf of the plate or the pin itself is bent, straighten it in a vise.
Adjust the door if it is binding on the hinge side by bending the hinge slightly. One quick way to do this is to insert the butt of a nailset between the leaves and then draw the door shut, causing the tops of the leaves to bend slightly. Take care not to do this too fast or too long.
The Door to Energy Savings
Drafty exterior doors can cost you hundreds of dollars a year in unnecessary heating and cooling costs. Fortunately, weatherizing your doors to make the home more energy efficient is a cheap and easy upgrade. Add felt strips to the edge of the jamb doorstop on the exterior side (about $3 a roll), and attach new door sweeps (at right, about $10) to the bottom of doors on the interior side (use felt or bristle sweeps over uneven floors).
This common household malady is often caused by humidity, as wood doors swell with moisture until they rub against their jambs. In other sticky cases, the door frames get out of whack due to settling of the surrounding structural elements.
If the door sticks at the top or bottom, sand the appropriate edge of the door with coarse sandpaper. This may be all you need for a minor problem. But if you have to remove more than 1/32 inch or so, it will be faster cut the door with a circular saw.
When cutting a door with a saw, place a piece of hardboard or cardboard over the door to prevent the saw foot from marking or scratching the door. Round over the cut edges with a file or sandpaper, then paint or finish the bare edge to match the existing finish (this is important to prevent future swelling from moisture).
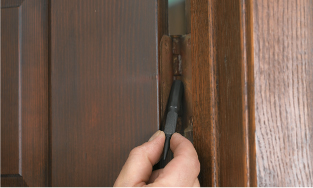
Doors don’t properly close and latch when the bolt isn’t lined up with the strike plate hole (the strike plate is the flat, metal plate mortised into the door jamb). To diagnose the problem, mark the location of the bolt onto the door jamb or edge of the strike plate, then compare the marks to the hole in the strike plate to see whether the bolt is too high or too low. If it’s too low, check the top door hinge to see if it can be drawn more tightly against the jamb by driving in long screws (page 82). If it’s too high, make sure the bottom hinge was installed properly, and make any necessary adjustments.
If the hinges are flush and securely fastened, turn your attention to the strike plate trying the solutions shown on this page. If the bolt seems to be aligned with the strike plate’s hole, it could be that the door isn’t closing far enough for the bolt to reach the hole. Check this by closing the door and watching what the bolt does. Will it engage the hole if you push the door hard? If so, remove the strike plate and bend the little tab on the inside of the hole. If that doesn’t do the trick, you can move the strike plate away from the stop. It’s best to move it at least ¼ inch, so the strike plate screws won’t slip back into the old holes. Another common cause of this problem is a warped door. The easiest fix for that is to move the stop (see page 85).
How to Fix Latch Misalignment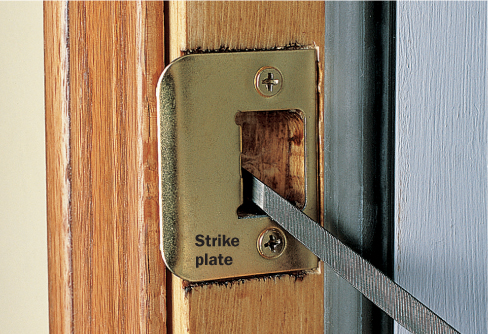
Correct minor strike bolt alignment problems by filing the top or bottom edge of the strike-plate opening.
Fix severely misaligned latches by moving the strike plate so it aligns with the bolt. You may have to drill into the jamb to enlarge the counterbore for the bolt, and you will have to expand the mortise with a chisel so the strike plate sits flush. You can fill in the exposed area of the original mortise with wood filler.

Trim doors to length with a circular saw and straightedge guide. To prevent splintering, score the cutting line with a utility knife. Clamp a straightedge to the door to keep the saw from drifting during the cut.

If your door is binding in the door frame, one solution is to plane or trim it to fit into an opening that has fallen out of square. Use a compass to scribe the edge of the opening onto the door in the area where it is binding. Then, remove the door and trim it with a plane or by cutting with a saw.
How to Adjust for a Warped Door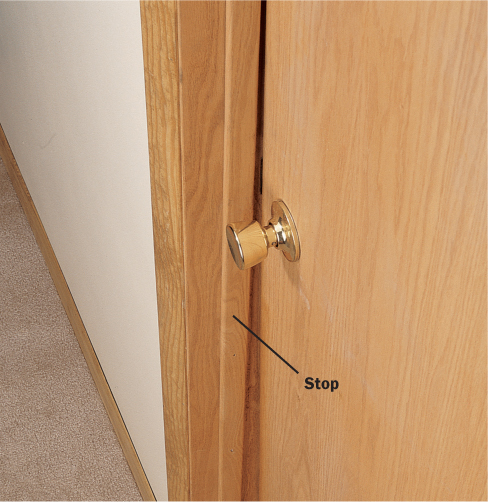
1 Warped doors are hard to correct. It’s easier to move the stop, and no one will ever notice the difference.
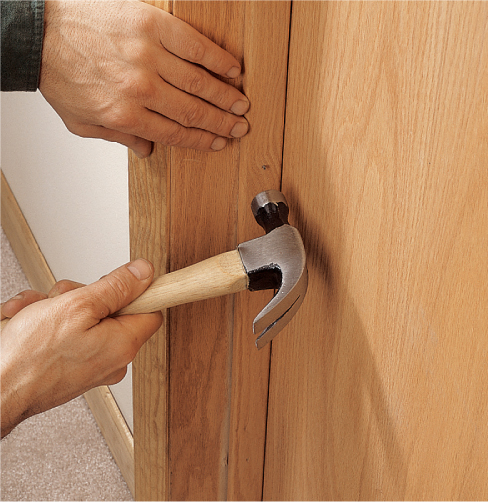
2 Push the stop up against the closed door, then back it off slightly before nailing it with finish nails.
While you may be accustomed to your pesky sliding glass door, prospective buyers won’t be impressed if they throw their backs out trying to wrench it open. Here’s how you can give a sliding door a 10-minute tune-up. First, clean the tracks with a screwdriver and then use a vacuum cleaner to remove accumulated dirt and grime. Wipe down the metal with a rag and all-purpose cleaner (such as Formula 409) or degreaser. Clean both the top and bottom tracks on both sides of the door.
Next, spray the tracks with a light coat of penetrating lubricant such as WD-40. Use the sprayer tube to inject lube onto the wheels inside the door. Open and close the door several times to see if it operates smoothly. If not, check to see if the wheel adjustment is causing rubbing or binding along the top and/or bottom track. Experiment with the wheel adjustment until the door runs smoothly. Wipe up excess lubricant so it won’t attract dirt. Finally, spray inside the keyhole or lock mechanism and operate the lock several times to distribute the lube.
Most sliding doors have screws on the side or back edges that raise or lower the wheels. Turn the screws to level the door and keep it from rubbing along the tracks.
There isn’t much that goes wrong with doorknobs that a little spray lubricant can’t fix. If a handle is sticking or a deadbolt is stiff, spray penetrating lubricant (don’t use graphite) into the keyholes and around the bolt. Run the key in and out a few times and turn the lock and handle repeatedly to loosen everything up. Wipe up any overspray runoff immediately, to prevent staining.
If a doorknob or lock still won’t turn, try slightly loosening the mounting bolts. The bolts pull the halves of the lockset together, and they can cause the handle to bind if they’re too tight.
If a lockset is acting up so much that you’re considering taking it apart, it’s probably time to replace it. A new lockset can dress up an ordinary door surprisingly well. That said, if you’re upgrading one doorknob on an interior door, it will look funny if the new one doesn’t match the knobs on all the other interior doors.
Replacing a lockset takes only a few minutes. Use a small, flathead screwdriver to pop off any decorative covers or escutcheons, exposing the two mounting bolts. Remove the bolts and slide out the two halves of the set. Take out the screws securing the latch bolt’s mounting plate to the edge of the door and pull out the bolt assembly. Insert the new latch bolt into the door edge to check the fit. If necessary, reshape the bolt mortise to accommodate the new mounting plate, using a sharp wood chisel.
With the outside face of the bolt plate flush with the door edge, screw it down with the provided screws. Insert the knob with the mounting-bolt sleeves through the holes in the latch bolt assembly, then position the other knob so the mounting bolt holes line up with the sleeves. Connect the two sides with the mounting bolts, tightening carefully and evenly. If the handles don’t turn easily, loosen the tension on the mounting bolts. On some locksets, you have to install the covers and knobs before you can test the action.
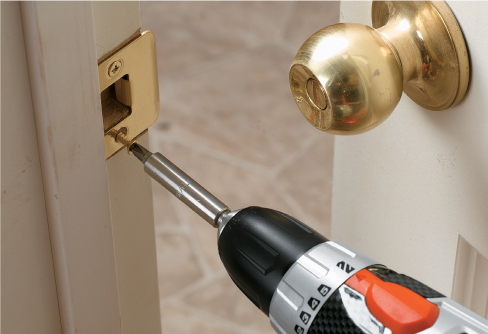
How to Install a Deadbolt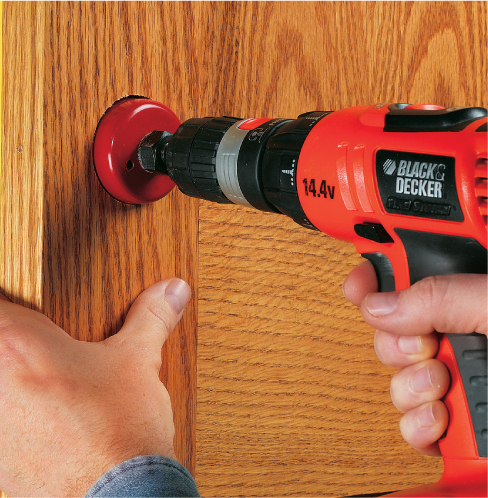
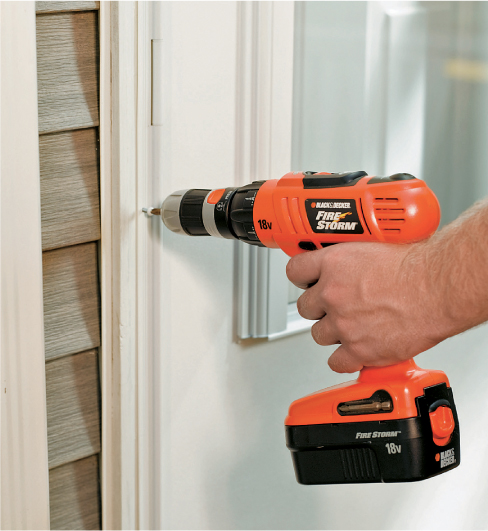
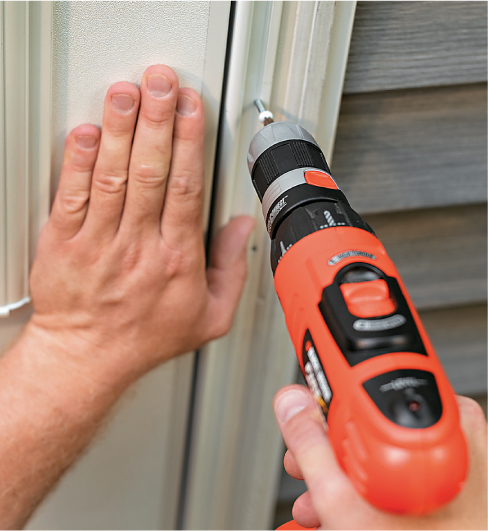
1 Position the supplied template for the deadbolt and mark the hole locations. Use the size holesaw indicated in the deadbolt instructions, boring through the door until you break through the other side. Drill the other side to remove the remaining waste material.
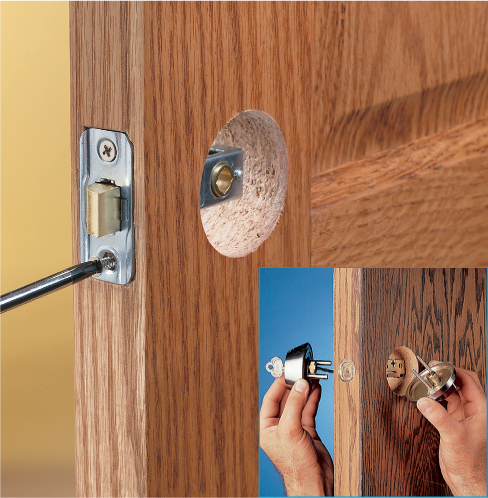
2 Drill the bolt hole through the door edge with a spade bit. Keep the bit level. Push the bolt assembly into the hole so that the plate is flat against the door edge. Trace around the plate with a utility knife, remove mechanism, and cut a 1/8"-deep mortise into the door edge with a sharp chisel. Screw the bolt mechanism into place on the door edge, and screw both halves of the lock into place.

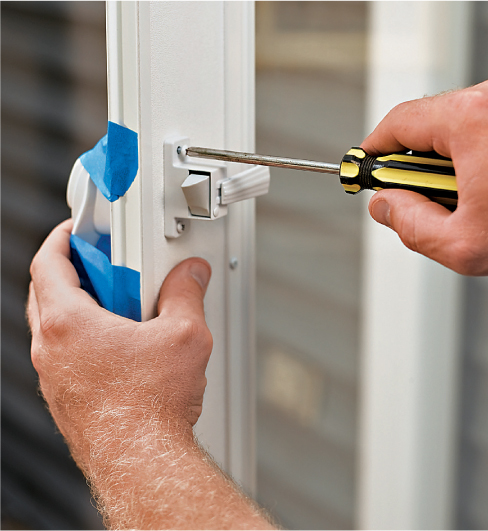
3 Extend the lock bolt and color the end with a grease pencil. Retract the bolt, close the door and extend the bolt so that it’s end hits the jamb. Drill a bolt hole at that mark, 1½" deep, using a spade bit.
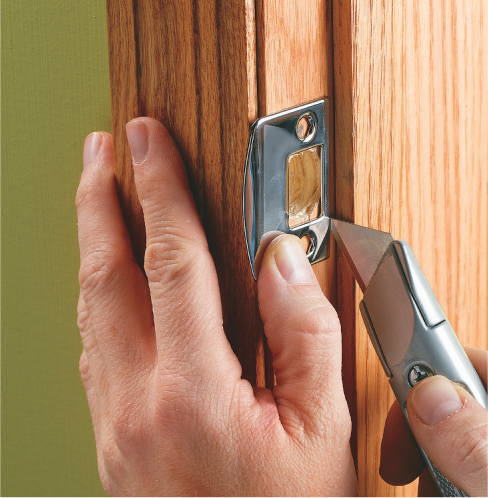
4 Close the door and test the deadbolt. If it doesn’t fit into the hole, enlarge the hole slightly. Center the strike plate over the bolt hole and trace around it with a utility knife. Cut a mortise for the strike plate and screw the plate in place.
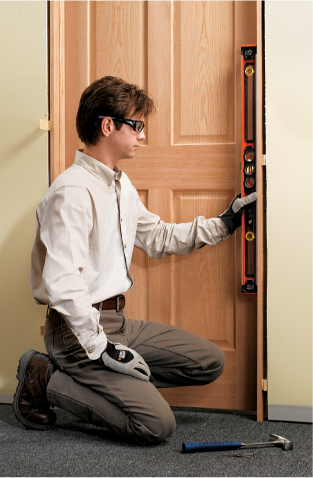
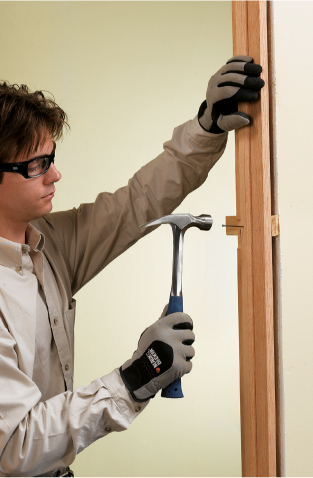
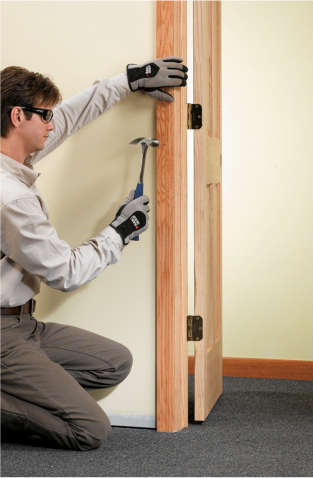
How to Install a Prehung Interior Door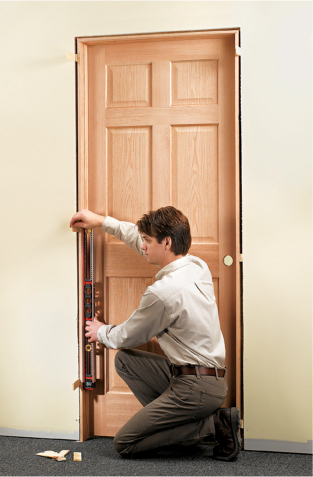
1 Set the door in the framed opening with the door closed. Shift it so it is centered side to side and the jambs are flush with the wall surface. Check for plumb by placing a level on the hinge side jamb. Shim as necessary and then open the door—the pressure from the shims should hold the door in place.
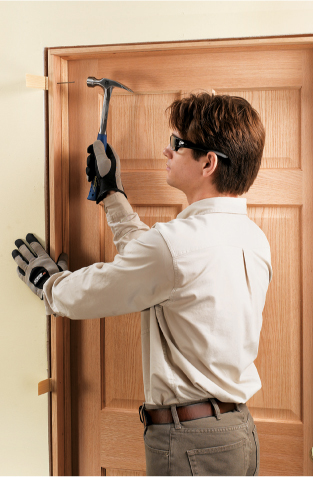
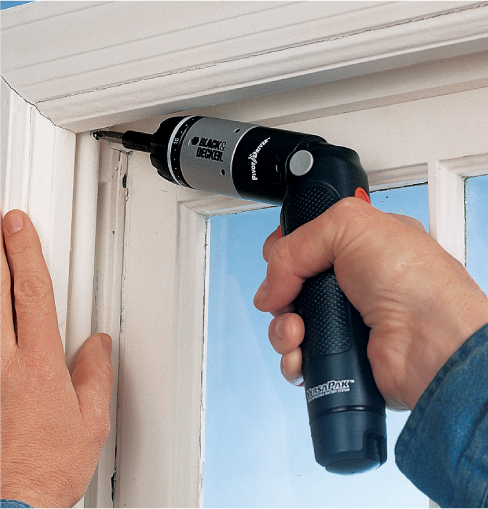
2 Anchor the hinge-side jamb with 8d casing nails driven through the jamb and shims and into the rough frame. If the jambs are made of hardwood such as oak, drill pilot holes for the nails.

3 Drive nails near the bottom hinge and then the middle, if your door has three hinges. Make sure to drive through shims. If you drive nails away form the shims the jambs may bow outward.
4 Double-check the jamb on the strike plate side to make sure it is plumb and flush with the wall surface, and then nail it to the framing, nailing through the shims as you did on the hinge jamb.
5 Drive a few nails through pilot holes in the center of the door stop for reinforcement. Locate the nails so they go through shims.
6 Attach the preattached case moldings to the framing members with 4d finish nails. Set the nail heads. Fill all nail holes with wood putty and then paint or stain. Use a nail set to recess the nail heads. Install a latch set.
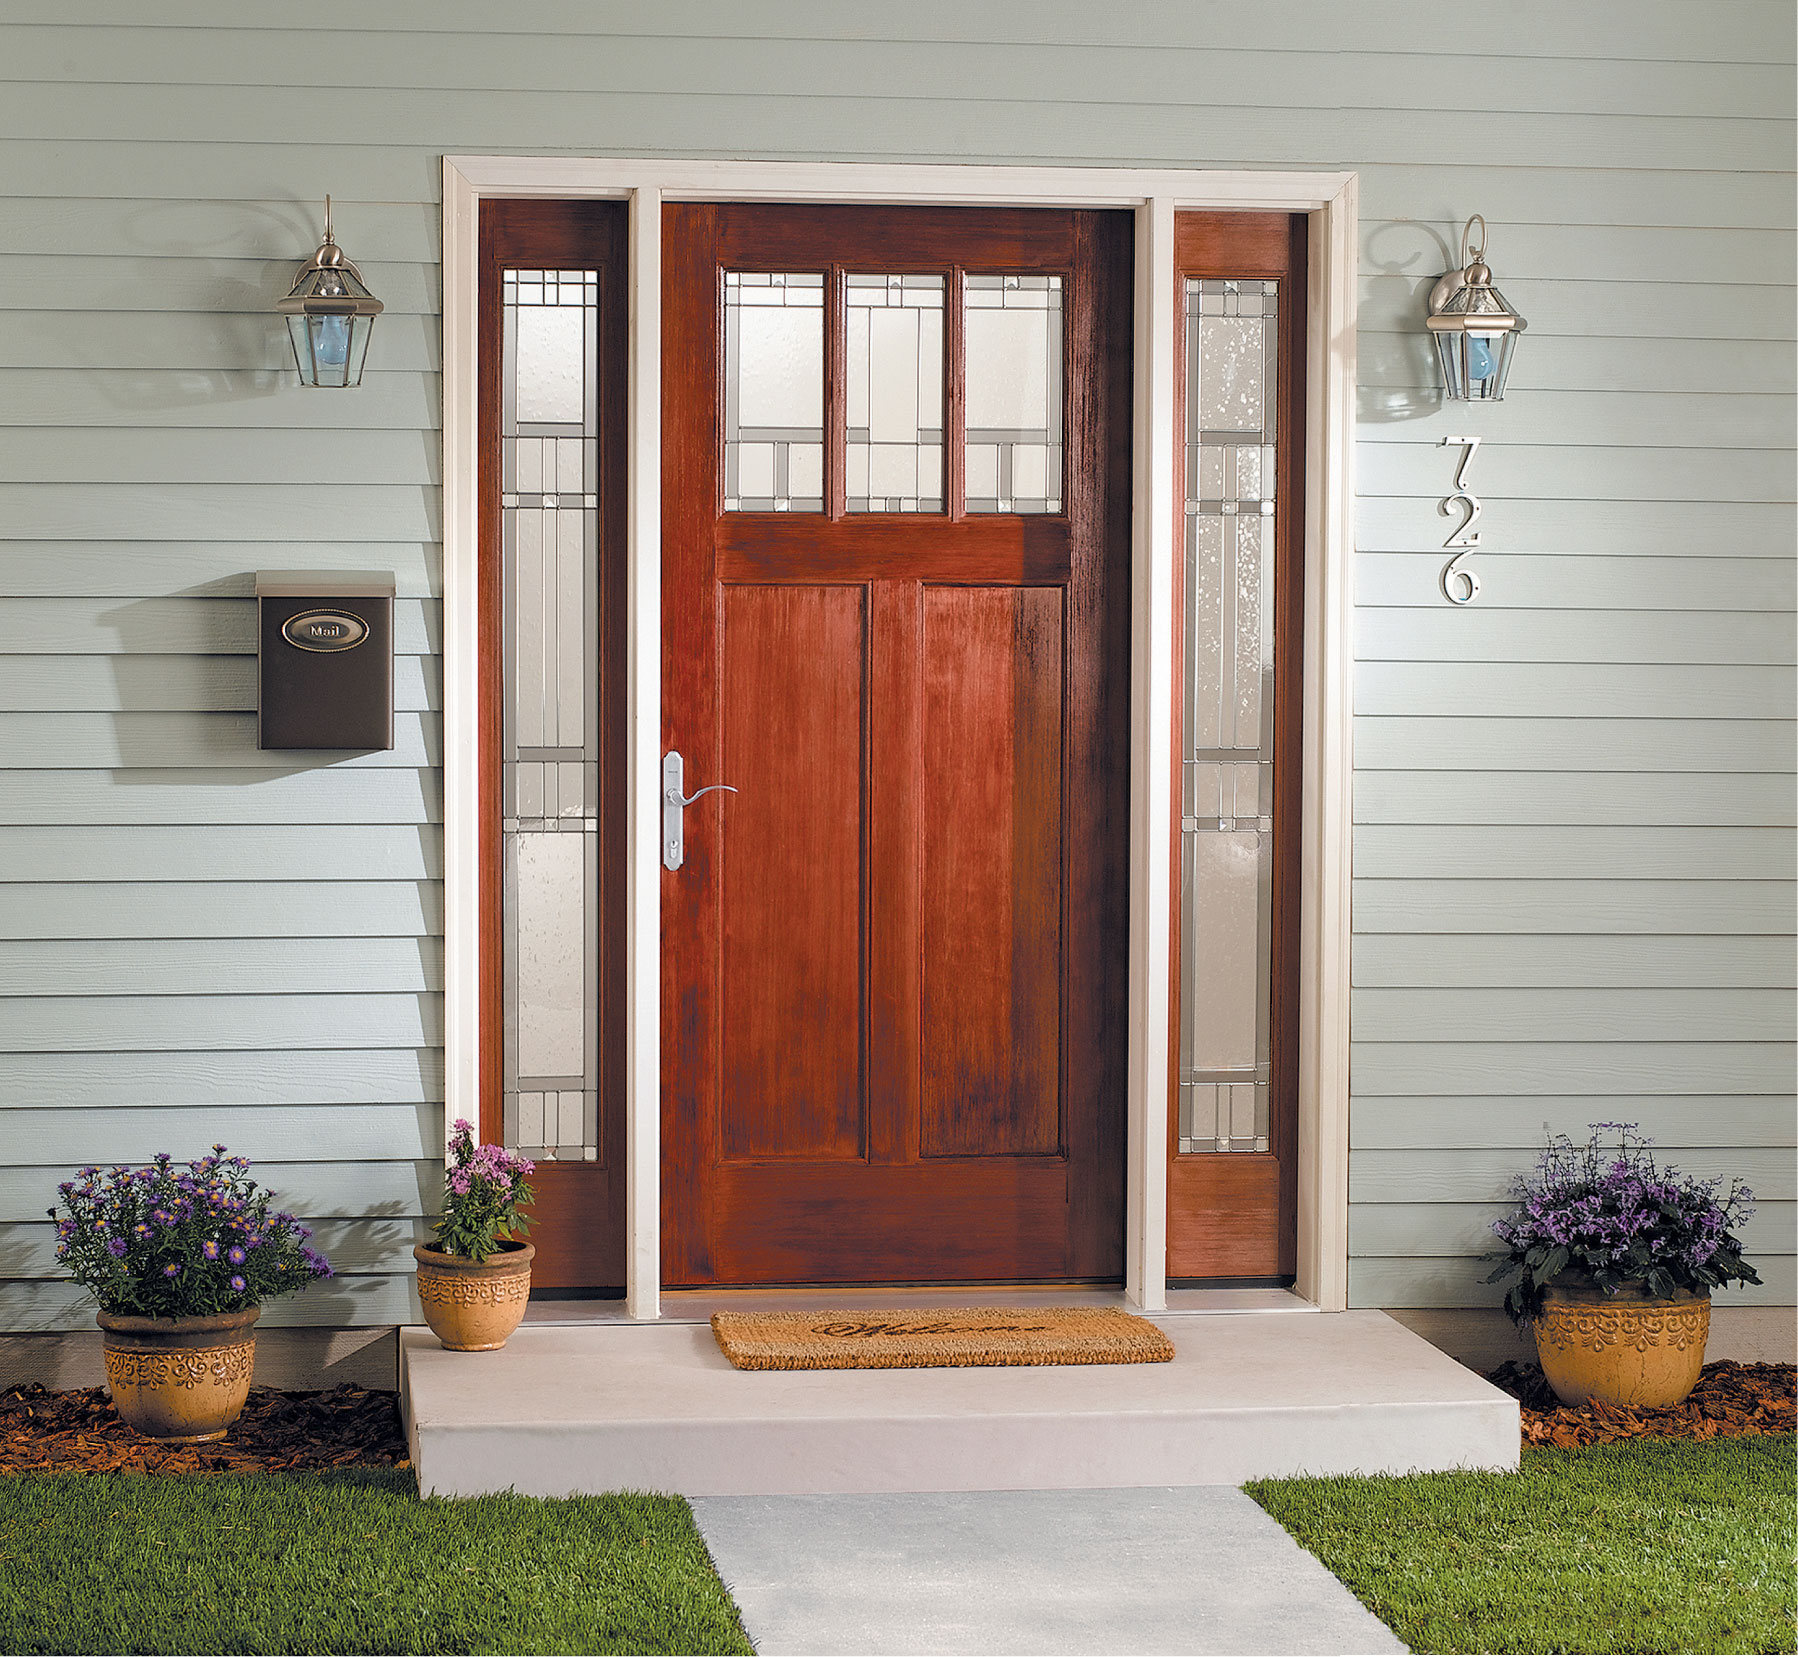
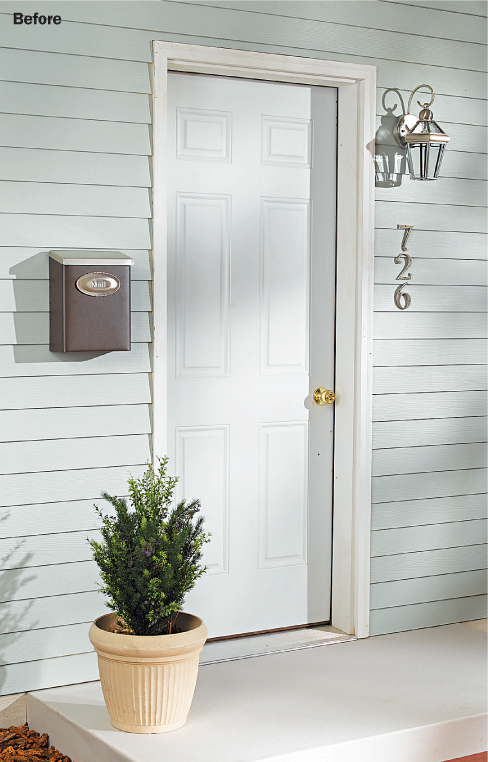
The main entry offers visitors a glimpse of the homeowner’s taste and style and a hint at what awaits them inside. That’s why any real estate agent will tell you that the front door is an important part of your home’s curb appeal.
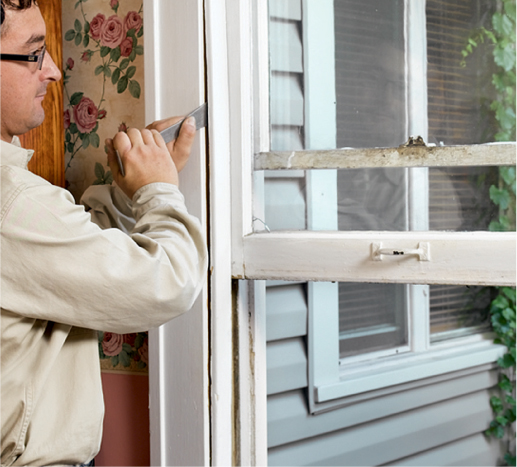
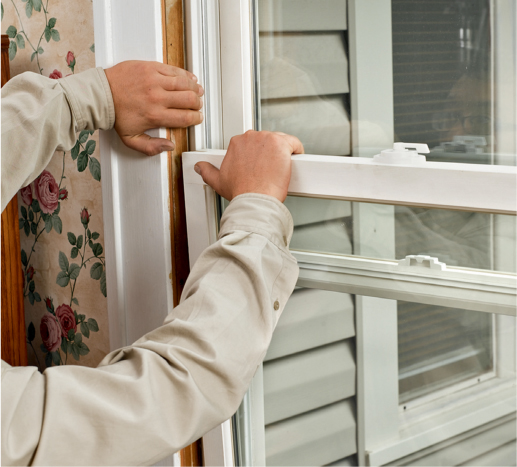
Replacing a front door is necessary only if the old one is severely warped, weather-beaten, damaged, or if it bears any telltale marks of a break-in. It’s possible to replace just the door itself and not the jambs. But the easier approach is to replace the entire package with a new prehung door unit, which includes everything but the lockset. You may choose to do a simple one-for-one swap, or go ahead and install an impressive entry door system with sidelights and more (as in the photo on this page). Either way, the basic process involves tearing out the old door and its frame, enlarging the opening if need be, replacing the weatherproofing materials that protect the wall framing, and installing and finishing the new unit.
But you don’t need to replace a door to make sure your entry sends a warm message of welcome. Take a step back and consider the whole package—the door, the light fixtures, the doorbell button, and the house numbers and mailbox (if they’re part of the composition). Also look at the porch floor or stoop below the door. Is there a welcome mat? Is there room at either side of the door for a pot of flowers or other homey touches? By all means, the entry should be neat and orderly, with a full, unobstructed view of the door, but small chairs or modest decorations to the side help to soften and personalize the space.
If your door is in good condition and works well, it may need only some new paint to look great. When painting a door, choose exterior enamel paint, and be sure to also paint the doorframe and brick molding. Real estate folks commonly recommend using an accent color for a front door, especially for drab facades that could use some “character building.”
Another trick is to add a brass kickplate to the bottom of the door. This can be an easy way to hide dings and pet scratches, but it’s not the right look for every type of door. If necessary, replace the lockset and/or deadbolt. However, front door locksets can be pricey, so you might opt to buff up the old one if it still works well.
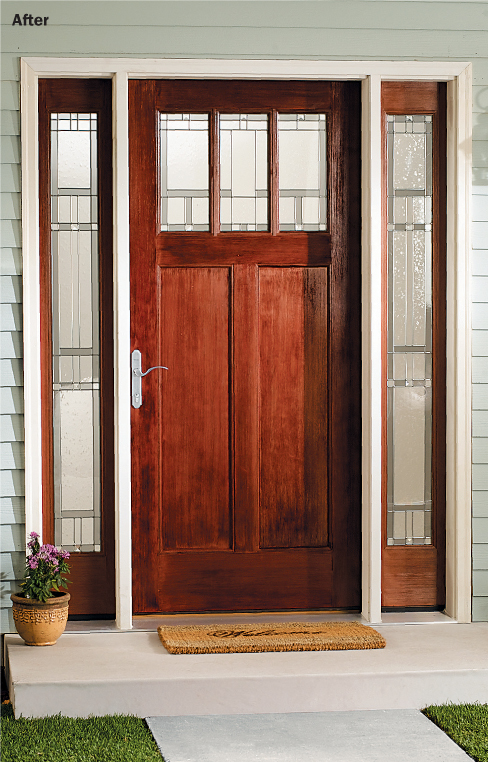
The added curb appeal from an entry makeover can be one of the major elements that seals a home sale.
Storm doors protect an entry door from driving rain or snow, but they are also a quick and inexpensive solution if your front or back door doesn’t look very appealing. Functionally, they create a dead air buffer between the two doors that acts like insulation. When the screen panels are in place, the door allows ventilation on a hot day. And they deliver a small measure of added security, especially when outfitted with a lockset and deadbolt lock.
Storm doors come in many different styles to suit just about anyone’s design needs, ranging in price from basic (fairly flimsy) units for around $70 up to handsome models with every option imaginable for as much as $500. They come in many different types of materials, including aluminum, vinyl, wood and even fiberglass. You’ll find that most units are fitted with full or nearly full glass exposure (half-panel storm doors are more efficient, but less popular). Higher end models include sliding panels that make switching from glass to screen a cinch.
Most units these days are prehung. Installation instructions vary, so be sure to check the manufacturer’s directions. Regardless of the installation process, though, you should start by adding drip cap molding at the top of the door opening (unless otherwise indicated in the manufacturer’s instructions).
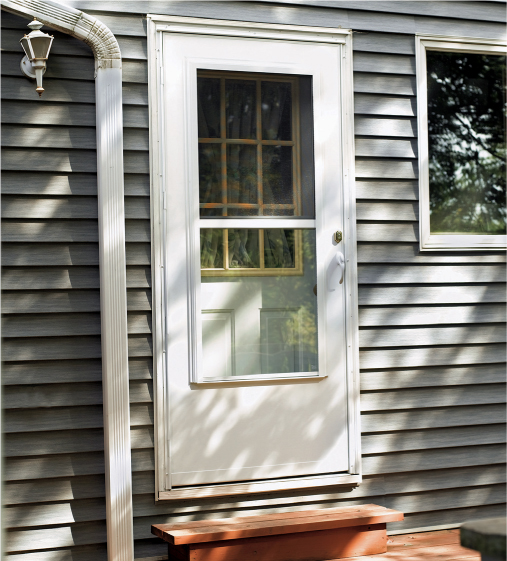
A quality storm door helps seal out cold drafts, keeps rain and snow off your entry door, and lets a bug-free breeze into your home when you want one.
Cold Comfort
Storm doors are intended as both protection against the elements and additional insulation against low temperatures. But when it comes to insulating values, not all storm doors are created equal. If you live in a colder part of the country and you’re looking for a storm door that will help keep your energy bills as low as possible, look for an insulated unit. The best of these feature half panels of glass to decrease exposure and a thick bottom panel and rails crafted of insulating materials.

Getting extra insulating power from a storm door doesn’t mean giving up design style, as this unit proves.
Door Closers
Storm doors are relatively lightweight, and because they open outward they are susceptible to catching the wind and becoming damaged. For this reason, a storm door should be equipped with a spring-protected safety chain at the top, and a pneumatic closer that can be located anywhere on the door (usually about handle level).
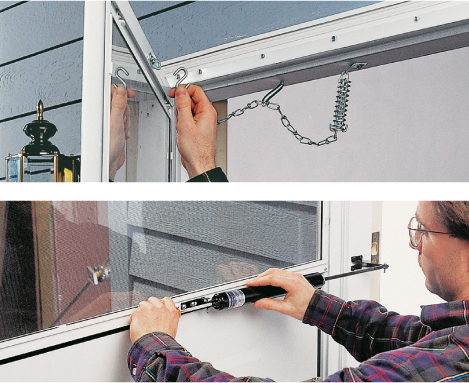
How to Install a Storm Door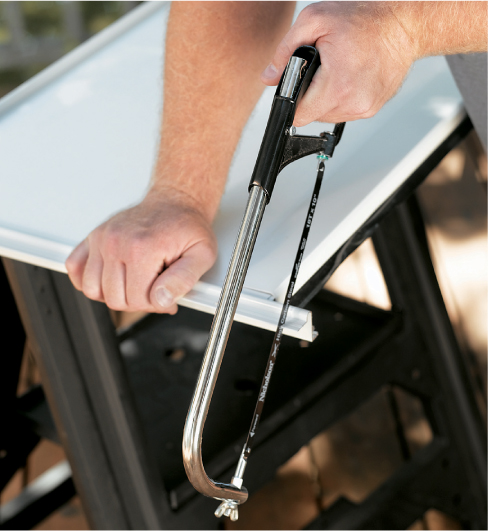
Test-fit the door in the opening. If it’s loose, add a shim to the hinge side of the door, flush with the front of the casing. Measure the height of the door opening and cut hinge flanges to length with a hacksaw.
Set the door in place and partially drive mounting screws near bottom and top. Check for plumb and, when you’re sure, screw the hinge-side flange to the casing.
Cut the latch-side flange with the hacksaw and attach it with two screws. Check for parallel to the hinge-side flange. Once you’re satisfied with the fit, screw the latch-side flange to the casing. Install the door sweep on the bottom of the door.
Slide the outside of the lockset into the mounting holes and tape it into place. Screw the inside half of the lockset to the outside and tighten the screws securely. Install the deadbolt if the door has one and install the door closer and safety chain, and adjust to proper tension.
A dead doorbell is a dead giveaway that your house needs some attention. It’s worth spending a little time getting a failed chime up and running again, or simply replacing it with a new wireless unit.
Conventional wired doorbell systems have a few main parts: the switch (or button), the chime unit, and the transformer that steps down the 120-volt household electrical current to 24 volts or less. Thin, low-voltage wires connect the parts from the transformer.
To find out where a doorbell problem lies, start with the easy stuff first. Turn off the power at the main electrical service panel and check that the switch is still connected and not corroded or otherwise damaged by the elements. Next, inspect the chime unit. If the unit has real chimes that ring mechanically—that is, the tones aren’t created electronically—clean the little pistons, or “plungers,” that strike the chimes. These can get gummed-up so badly that they stick in one position. Clean the pistons and springs with a cotton swab dipped in rubbing alcohol. Restore power to the system and test it.
At this point, if you still have a dead doorbell on your hands, you can either replace the wired switch and chime (try one first and then the other) or go the easier route and buy a new wireless unit that installs in about 10 minutes. You can find a quality wireless system for around $20, twice what the most basic wired system will run.

A home doorbell system is powered by a transformer that reduces 120-volt current to low-voltage current of 24 volts or less. Current flows from the transformer to one or more push-button switches. When pushed, the switch activates a magnet coil inside the chime unit, causing a plunger to strike a musical tuning bar.
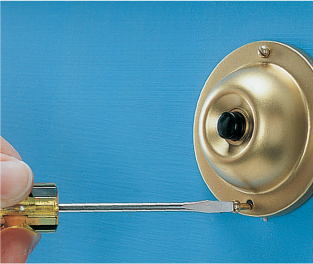
How to Test a Doorbell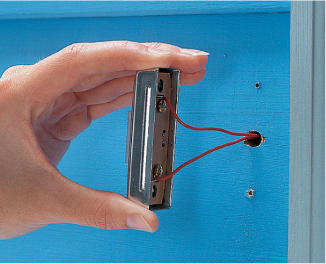
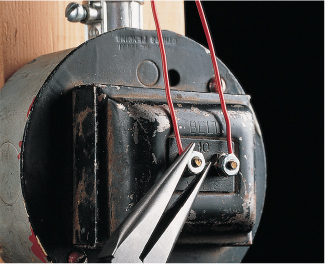
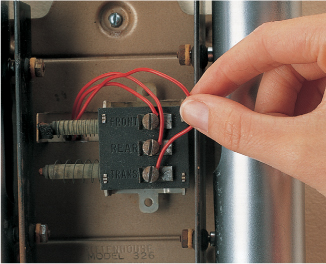
Start by testing all of the doorbell parts for loose wire connections. These parts include the switch (left photo), low-voltage transformer (middle photo), and the chime unit (right photo). The button and chime should be easy to access. The transformer is normally located in (or attached to) an electrical box in a wall or ceiling near the doorbell system.
Wireless Doorbells
Plug-in, wireless chime units can be plugged into any standard receptacle near the entry door, while battery-powered units offer more flexibility with placement. If you are replacing an old wired doorbell, be sure and disconnect the old transformer from the power source. When shopping for a new wireless doorbell, compare products for their transmission range, features, and sound quality. Basic systems come with one or two remote buttons and a plug-in or battery-powered unit. Mount the button to the wall next to the entry door (or doors), then plug in or mount the chime unit inside the house, making sure it’s within the recommended transmission range.
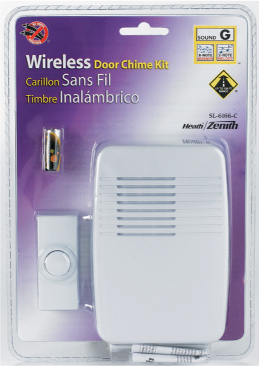
A battery-powered wireless doorbell system includes a button with a transmitter, and a chime unit with a receiver.
How to Replace a Doorbell Switch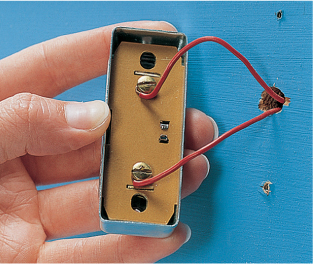
1 Remove the doorbell switch mounting screws, and carefully pull the switch away from the wall.
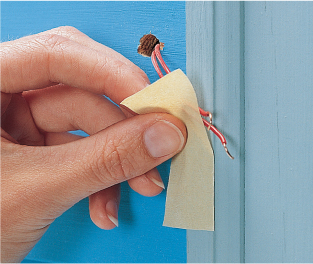
2 Disconnect wires from the switch. Tape wires to the wall to prevent them from slipping into the wall cavity.
3 Purchase a new doorbell switch, and connect wires to screw terminals on new switch. (Wires are interchangeable and can be connected to either terminal.) Anchor the switch to the wall.
WindowsLike doors, windows tend to get much less maintenance than they should. Nevertheless, most of them hold up pretty well over the years and can be tuned up nicely with a little attention and some inexpensive replacement parts. For a basic home fix-up, plan on cleaning all of your windows and freeing any stuck ones. Also replace any broken panes and torn screens, both of which are glaring symbols of neglect. All of these projects are covered here.
If you have a window that has been painted shut, begin to free it by cutting through the paint along the edges of the window sash using a utility knife, a putty knife, or a window zipper—a tool made specifically for this purpose. Tap around the sash frame with a hammer and a wood block, then cross your fingers and give the window a jerk. Repeat the tapping and jerking until the window gives. If all else fails, pry up the sash with a thin pry bar, but you may have to repair the wood later. Next, sand the paint inside the window tracks with fine sandpaper, and when you tire of that, wipe off the dust, then rub the tracks with a piece of wax candle to provide some lubrication.
To smooth the action on aluminum windows and storm units, clean the tracks with a toothbrush and a vacuum with a crevice attachment, and remove any stubborn gunk with a rag and all-purpose cleaner. Try the window to see if it moves satisfactorily. If not, spray the tracks with a little WD-40 or similar lubricant, and wipe up any excess. It’s preferable to avoid using lubricant, since it attracts more dirt than bare metal, but sometimes lube is necessary.
A window that is in need of help usually is not shy about displaying warning signs. In some cases, a little weatherstripping or a new storm window is all that is needed.
A window zipper has only one job: to release windows that have been painted shut.

Stubborn windows may require a little persuasion to unstick. After cutting paint seals, tap (carefully) along the sash frame with a hammer and wood block.
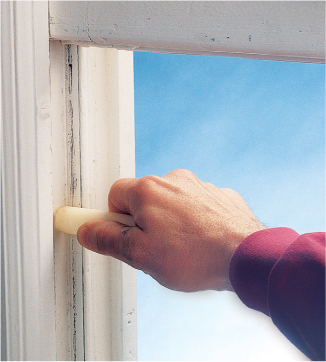
A white candle or block of paraffin wax is an all-purpose lubricant for wood windows. Never use liquid or greasy lubricants on wood windows.
To determine the type of tension device in your double-hung window, inspect the sash tracks. Spring-loaded tensioners may have an adjustment screw. Some older spring types have a metal tube on the inside of each track. The tube contains a spring that is wound by twisting the tube itself. To adjust these, grip the tube tightly to prevent it from unwinding, then remove the screw near the top end of the tube. Turn the tube clockwise to increase the spring tension or counterclockwise to decrease tension. Replace the screw and test the window operation. Finally, newer windows with vinyl tracks may have spring-tensioned tracks that can be adjusted via screws hidden behind cap pieces somewhere along the track.
Older double-hung windows employ a pulley system that counterbalances the sash with weights hanging in cavities (called weight pockets) behind the window tracks. These are easily identifiable by the ropes running up from the sash and over a pulley at the top of each track. The pulley system is so simple it almost never wears out, but the ropes can break.
To repair an old pulley system, pry off the stops at the sides of the window sash, then remove the lower sash and set it aside. This gives you access to the cover that conceals the weight pocket. Pry off or unfasten the cover piece and pull out the weight from the pocket. Tie a small weight, such as a nail, to the end of a new sash cord and thread the cord over the pulley and down through the pocket opening. Re-tie the weight and set it back into the pocket. Reinstall the pocket cover.
Next, set the window sash onto the sill. Pull the cord until the weight nearly touches the pulley. Cut the cord to length, knot the end, and fit the knot into the edge of the sash frame. Install the sash and stops. To replace a cord for the upper sash, remove the parting stop between the two sashes, then remove the upper sash to access its weight pocket.
How to Service Double-Hung Windows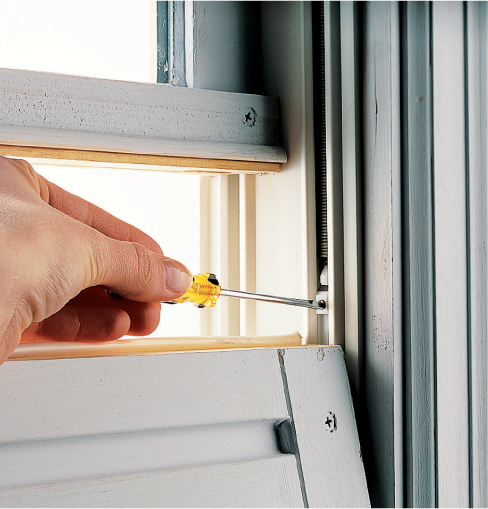
Look for adjustment screws inside the tracks (or sometimes behind the tracks) of single- and double-hung windows. Adjust both sides evenly to balance the sash movement.
Tube-type balancers have a spiraling spring inside a metal tube. The tube is secured with screws at the top and bottom ends and is always under tension.
Casement widows have a metal crank mechanism that opens and closes the window. They do not have a good track record for durability. Eventually, the opening mechanism wears out and the window won’t open or close without considerable assistance. You might be able to find a replacement handle at a local home center or hardware store. Beyond that, the only way to fix a bad crank is by replacing the whole mechanism. The window’s manufacturer may offer replacement cranks for specific models, or check out online sources for hard-to-find window parts.
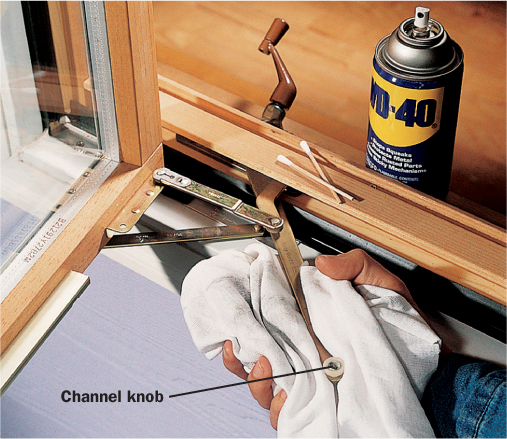
Lubricate the track and hinges on a casement window crank as part of your routine maintenance. Detach the extension arm from the bottom sash track so you can get access to the channel knob that fits into the track.
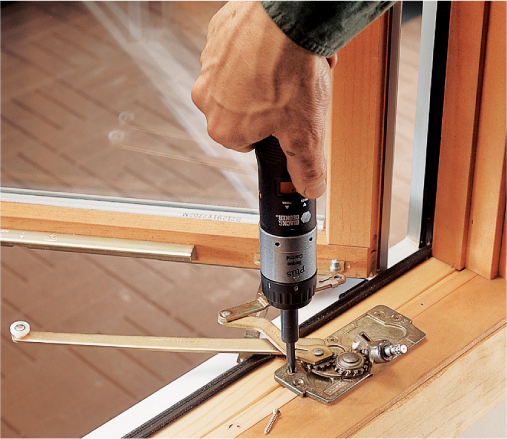
Casement window cranks are held in place with a few screws. Sometimes a crank is partially hidden under a trim piece screwed to the sill. The crank assembly can be removed and cleaned or replaced.
The Miniblind Solution
Completely bare windows can make a house look unfinished, even deserted. At the same time, it rarely makes sense to spend the money on fancy window treatments if you’re selling your home, and elegant drapery isn’t usually at the top of most new homeowners’ fix-up lists.
So what’s a fixer-upper to do with bare windows? Vinyl miniblinds. Depending on size and material, they run from $5 to about $30, so they’re well within most any homeowner’s budget. They’re completely neutral from a decorating perspective, and easy to install. You can even shorten the length of a blind or trim a little off the ends if your window’s too narrow. Miniblinds can be hung inside the window frame or on the trim or wall above the window. Install on the inside whenever possible, since trimwork is much more attractive than plastic blinds. Because the width is a more critical measurement when installing the blinds on the inside of the frame, you may have to order a custom size blind (cutting stock sizes to width yourself never works out well). If mounting on the frame or above the window, look for the narrowest available width that conceals the entire window pane.
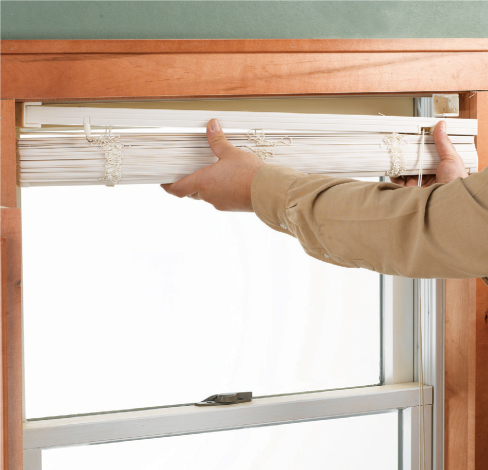
Two brackets and four screws (included) are all it takes to add new miniblinds for a pleasingly neutral window treatment.
The proper technique for replacing a broken window pane depends on the type of window you have. Traditional divided-light windows have individual panes set into a framework of wood muntin bars and are secured with glazier’s points and putty called glazing compound. Most older windows have a similar construction. Modern divided-light windows often have a single, large pane with a faux muntin frame that overlays the glass, or in some cases is installed between the glass panes. Replacing panes in sealed, insulated windows should be done by a professional to maintain the window’s thermal performance.
To replace a glass pane on a traditional window, first remove any shards of broken glass, then follow the steps below, being careful not to break glass as you work.
How to Replace a Glass Pane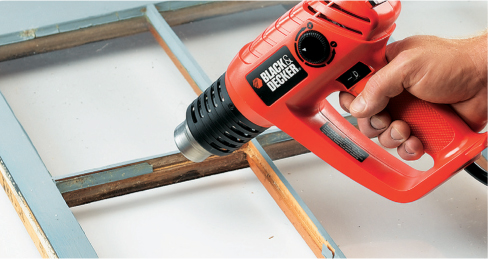
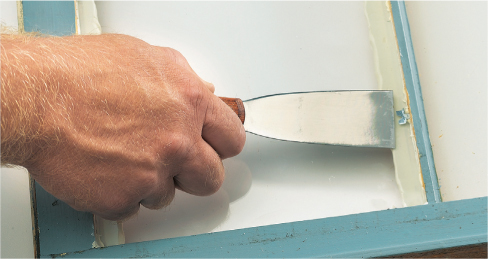
1 Soften old glazing putty with a heat gun set on medium or low, being careful not to scorch the wood. If the heat doesn’t work, coat the compound with linseed oil and let sit. The oil will eventually soften the putty.
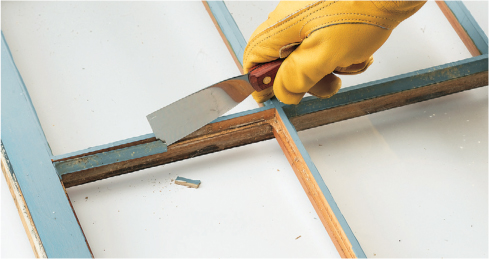
2 Remove softened putty with a putty knife. Repeat in small sections until all the putty is removed, and remove any old glazier points still in the frame. Scrape the edges clean and coat the bare wood with primer.
3 Measure the inside dimensions of the frame and order a replacement pane about 1/8" smaller in width and height than the opening. Make a bed for the pane with a thin bead of glazing putty inside the frame, and seat the glass securely in it to ensure a good seal. Drive glazier’s points into each side of the frame with a putty knife blade to secure the new pane.
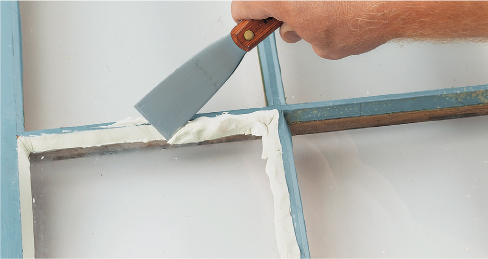
4 Lay another, thicker bead of putty along the pane’s edges, then smooth it into a clean bevel with a putty knife. Clean off any excess and let dry as directed. Prime and then paint the putty and frame edges to match the rest of the window.
Installing new window screening can be a little frustrating until you get the hang of it, but the materials are inexpensive and the work is, ultimately, easy. Standard window screen (technically called insect mesh) is made of fiberglass or aluminum, both of which come in black, silver, and grayish tones. Black tends to offer the best visibility and least glare, but it makes sense to match whatever you have on the other screens in the house. Keep in mind that aluminum will oxidize in coastal climates. Rolls of screening, vinyl spline (the solid tubing that holds in the screen), and spline rollers (an essential efficiency tool) are available at any home center or hardware store. Better still, purchase a screen repair kit with all those materials in one handy bag, for between $10 and $15.
The majority of window screens today are aluminum or vinyl frames with the screen secured by rubber spline that runs in a channel around the edges of the frame. When replacing the screen, both the spline and old damaged screen are removed and discarded.
Some older homes have wood window screen frames. Changing screening in these frames involves removing an inner trim piece, and pulling out staples that hold the screen, then stapling in a new one.
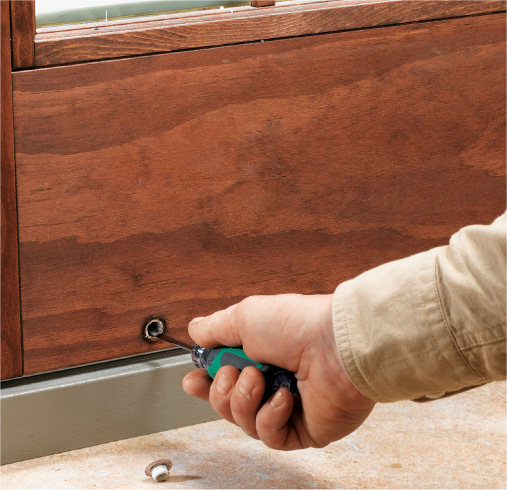
How to Replace Screening in a Metal Frame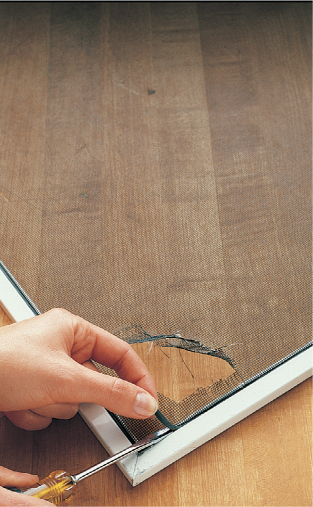
1 Remove the screen from the window and lay it on a flat work surface. Pry up the end of the spline cord with a small screwdriver, then pull out the rest of the spline by hand. Remove the old screening.

2 Cut a new piece of screen a few inches larger on all sides than the frame. Lay it over the frame opening and secure one edge by forcing the spline cord into the channel with a spline roller. Pull the screen taut and secure the remaining edges by rolling the spine into the groove. Trim off excess screening.
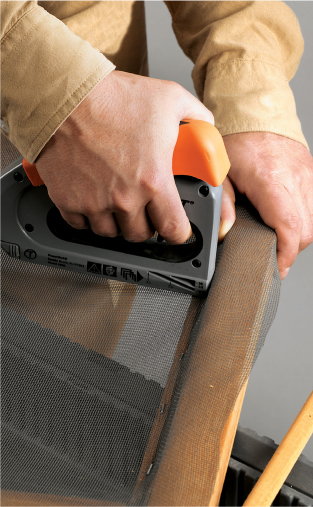
Variation: For wood frames, remove the wood trim piece to access and remove staples and the old screen. Fasten new screening to the frame using ¼" staples driven every 2". Pull the screen taut as you go.
Replacement window sashes are easy to install as long as you have measured and ordered correctly. (Many stores offer guidance or even on-site services to ensure proper measurement.) You simply pop out the old window sashes, stops, and sash cord.
Then, install new window mechanisms and sashes, weatherstripping, and trim.

Replacement windows for remodeling come prehung in window frames that are installed in framed window openings, usually with nailing flanges. The siding must be cut back to make clearance for the flashing.
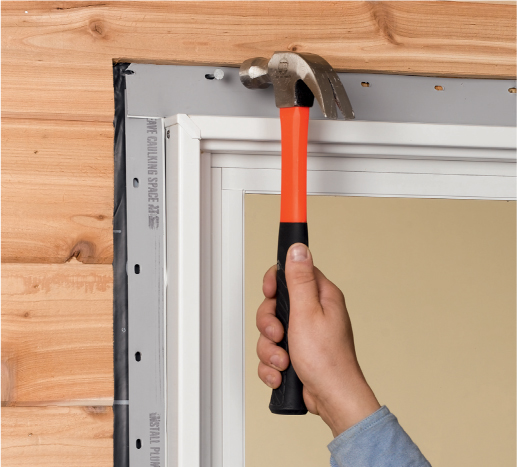
The siding must be cut back to make clearance for the nailing flanges as well. If you plan correctly, the removed siding area will be filled with exterior trim called brickmolding.