
(Brassica napus var. napobrassica)
10 plants
‘Laurentian’ and ‘American Purple Top’
Place in cold storage, freeze, or ferment
Rutabagas rarely make it onto “most popular vegetable” lists, but they should! An ancient cross between turnips and cabbage, rutabagas have thick, dark leaves similar to those of broccoli. Although they are slow to mature, the tough plants take care of themselves, and the buttery roots are worth the wait. Rich soil, ample spacing, and protection from deer are all you need to grow these delicious roots.
When grown from midsummer through fall, rutabagas produce dense, fine-textured roots that become sweeter as the soil gets colder. Rutabagas that are harvested just before the first hard freeze will store for several months in the refrigerator or in a cold root cellar, lasting well into winter. This gives you plenty of time to use your rutabagas in fall fermentation projects, or blanch chunks to be stored in the freezer.
I have noticed little difference when growing different rutabaga varieties side by side in the garden. It is best to bypass antique varieties, because for a while strains were selected to be good food to feed pigs in winter. Most garden seed companies sell culinary-quality varieties such as ‘Laurentian’, ‘American Purple Top’, or their descendants.
There are ‘Purple Top’ turnips, too, and a few turnip varieties with yellow flesh, but rutabagas are a distinctive root crop with a sweet cabbage flavor that sets them apart. The two crops also can work together in the fall garden. Rutabagas are planted a month before turnips, so you can increase the size of your turnip planting in years when you get a poor stand of rutabagas.
Here you must guess how many times you are likely to serve rutabagas over 3 months. About 10 big rutabagas is enough for most households, but in many climates garden rutabagas are smaller than the supermarket versions, which are grown over a long season in cool climates. Baseball-size rutabagas grown during summer’s second half are quite excellent, so you may want to grow more of them. There are many ways to cook rutabaga, but the most popular ones are to make baked rutabaga “fries,” to mash them with potatoes, or to include chunks of rutabaga in pans of mixed roasted vegetables.
When: Most root crops suffer when handled as transplanted seedlings, but not rutabagas. This is fortunate, because the best time to plant rutabagas is in midsummer, when both the soil and sun may be too hot to promote good germination and early growth. Start seeds 10 to 12 weeks before your first fall frost date. If you don’t have good weather for direct-seeding, simply start the seeds indoors where temperatures are constantly cool, grow the seedlings outside in partial shade for a couple of weeks, and set them out during a spell of kind weather.
Where: Rutabagas like slightly acidic clay loam soil best, but they can be grown in all soil types except extreme sand. The plants have big appetites, so planting holes should be enriched with compost and a balanced organic fertilizer. Rutabagas are sensitive to boron deficiency, so also amend the bed with a light sprinkling of household borax if you often see hollow stems in your broccoli. Hollow broccoli stems are no big deal, but when interior holes develop in rutabagas, their quality is seriously compromised.
Planting: Spacing directly affects the size of mature rutabaga roots. Plants grown less than 8 inches apart will tend to be elongated and small; plants grown 16 inches apart are more likely to produce large, round roots. Once the plants are set out or thinned and weeded, provide a mulch of grass clippings or other material to keep the soil cool and moist. If necessary, use a row cover tunnel to protect the little plants from grasshoppers and other summer pests.
Maintenance: As nights become longer and cooler in late summer, and pests become less numerous, you can uncover your rutabagas, start giving them more water, and watch the plants explode with growth. As rutabagas grow, they often shed their oldest leaves, which you should gather up and compost. This will reduce slug problems and interrupt the life cycles of many pests and diseases.
In the weeks just before they bulb, rutabagas need soil that is constantly moist. If the soil dries out, a heavy rain can cause drought-stressed rutabagas to crack.

You can get a head start with rutabagas by sowing seeds in flats and transplanting the seedlings to the garden when they are big enough to handle.
The same pests that bother broccoli and cabbage sometimes injure rutabagas; it is seldom favored because of the plants’ coarse leaves. Disease problems are rare in gardens where cabbage family crops are rotated to prevent the buildup of diseases that live in soil and infect plant roots.
When: You can start harvesting rutabagas for fresh use as soon as they reach acceptable size, but don’t hurry. Rutabagas become sweeter as the temperatures fall, so wait until after your first frost to harvest the bulk of the crop. Do bring them in before a hard freeze comes.
How: Immediately trim the tops back to half an inch to prevent moisture loss, and gently wash the roots to remove excess soil. Pat dry and store in plastic bags in your refrigerator, like carrots. In a root cellar, it is best to pack rutabagas in containers filled with damp sand or sawdust to delay shriveling.
A highly nutritious food, rutabagas are an excellent source of vitamins A and C, plus potassium and fiber. Good storage conditions are essential to preserving these nutrients, so if you can’t keep your rutabagas refrigerated, it’s best to cook and freeze them. Peel, pare, and steam until tender, and freeze in airtight containers. Rutabagas also can be pressure canned in combination with other low-acid end-of-season veggies in soup mixes. For fabulous crunch in fall fermentation projects, cut rutabagas into thin matchsticks and ferment with cabbage and other fall vegetables.
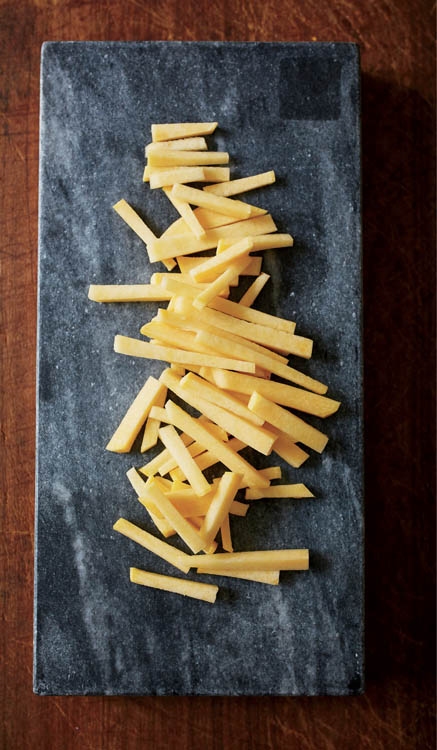
For fabulous crunch in fall fermentation projects, cut rutabagas into thin matchsticks and ferment with cabbage and other fall vegetables.
(Spinacia oleracea)
5 row feet per person in spring, 10 row feet per person in fall
‘Tyee’, ‘Winter Bloomsdale’, and ‘Space’
Freeze or ferment
Spinach gets the prize for the most cold-tolerant of salad greens, so it occupies a special place in the garden as a fall-to-spring crop. Spinach that is planted in fall and protected through winter beneath a tunnel or rigid cold frame grows very little while days are short and dim, and then comes back to life in spring and produces large amounts of crisp, sweet leaves. You can grow spinach in spring, too, though spring-grown plants promptly bolt when days get long in early summer.
Most gardeners blanch and freeze their excess spinach. When thawed and drained, frozen spinach is ready to use for dips, stuffed pasta, or creamy casseroles.

Spinach gets the prize for the most cold-tolerant of salad greens.
Sometimes called winter spinach, varieties with dark green, crinkled leaves like ‘Tyee’ and ‘Winter Bloomsdale’ hold up well to cold temperatures, so they are the best types to grow through the winter.
Smooth-leafed varieties like ‘Space’ are a lighter shade of green, and the plants tend to grow upright, making the leaves easier to clean. Fast and easy to grow, smooth-leafed spinach is ideal as a spring salad spinach.
Spinach does not hold very long in the garden when grown in spring, so keep plantings small, to less than 5 row feet per person. You will probably have extra to freeze. In fall, plant as much spinach as you can keep covered through winter, up to 10 row feet, or about 20 plants per person. Like other greens, spinach is harvested over a period of weeks or even months in the case of fall-to-winter spinach. Use my numbers as a starting point, and keep records of your plantings to find the right amount to grow for your household.
When: Make your first sowing of the year in late winter by starting a few spinach seeds indoors about 6 weeks before your last frost. Set out the seedlings under a row cover tunnel, and sow more seeds directly in the garden about 3 weeks before your last frost. In fall, sow spinach for fall harvest about 8 weeks before your last frost. Sow spinach for growing through winter about 1 month before your first fall frost date.
Planting: Prepare the planting bed by loosening the soil at least 10 inches deep and mixing in a 1-inch layer of compost and a balanced organic fertilizer. Sow seeds 1⁄2-inch deep and 2 inches apart in rows spaced at least 8 inches apart. As the plants grow, gradually thin them so the leaves of neighboring plants barely overlap.
Maintenance: In spring, fertilize overwintered plants with a thorough drench of a liquid organic fertilizer after they show new growth. Overwintered spinach often starts growing before the soil is warm enough to release enough nitrogen to meet the plants’ needs.
Spinach seeds can be spotty germinators, but you can improve their sprouting rate by priming them, a simple procedure that takes only a few days. About a week before planting, soak spinach seeds in room-temperature water for 24 hours. Place the wet seeds on a paper towel and allow to dry at room temperature for a day or two. Shift the seeds to an airtight container, and keep the seeds in a cool place for no more than a week before planting them. The primed seeds will retain enough moisture to complete the first stages of germination. After planting, primed spinach seeds germinate in only 5 days, compared to 10 days or more for seeds straight out of the packet.
Moist conditions can set the scene for mildews and leaf spot diseases, so keep plants spaced wide enough apart to permit good air circulation. Aphids and leafhoppers can transmit viral diseases to spinach, so pull up plants that show distorted new growth and yellowing of older leaves.
Leaf miners, the larvae of a small fly, sometimes make meandering trails in spinach leaves. Gently squash them with your fingers, or remove affected leaves. Where leaf miners are a common pest, use row covers to exclude them from your spinach patch.
When: Start pinching outer leaves when the plants are about 6 weeks old. New leaves will grow from the plants’ centers.
How: Rinse the leaves clean, spin or pat dry, and refrigerate immediately.
Food Preservation: Spinach is easy to blanch and freeze in small containers. I like to blanch it in steam for a minute or two, but some people use their microwaves to steam blanch spinach (allow 1 to 2 minutes, depending on your microwave). You can also include spinach in mixed fall ferments that include radishes, carrots, and garlic.

Spinach will stay productive for weeks if you harvest a few leaves at a time from the outside of the plants. New leaves emerge from the plants’ center.
(Cucurbita pepo)
4 plants per person
‘Yellow Crookneck’, ‘Raven’ zucchini, and ‘Sunburst’ pattypan
Dry, freeze, or can
Few crops express the exuberance of summer like summer squash. The oversize, overlapping leaves make efficient solar collectors, which energize fast growth and early maturation in this variable group of edible gourds.
Summer squash come in so many shapes, sizes, and colors that you can have great fun experimenting with different varieties. When you use up a seed packet, replace it with something slightly different — for example, a yellow zucchini in place of a green one. Different summer squash varieties happily pollinate one another, so you can grow a mixture of varieties in one row or bed without worrying about compatibility issues.
Summer squash makes its crop all at once, so be ready with plans to preserve big batches. Squash should be cooked before it is frozen, but it can be dried raw. You can also use your summer squash to make delicious canned relishes.

You probably like some types of summer squash better than others, but it pays to diversify into unusual forms, shapes, and colors. When it comes to summer squash, diversity in the garden prevents boredom at the table, in the dehydrator, and in the canning jar!
Some varieties grow into tight bushes, while others will sprawl 6 feet or more. Keep notes on how various varieties perform in your garden and whether their growth habit works well for you. In my experience, it’s worth tolerating the chaos of varieties that develop long vines because they produce so many squash. Many times I will pull out bush types that have gone buggy and continue harvesting squash from sprawling varieties for 2 or 3 more weeks.
Use four plants (yielding roughly 50 total pounds of squash) per person as a starting point for growing enough frozen, dried, and pickled squash to last a year, and adjust up or down based on how well summer squash produces in your garden and how much you like the preserved versions. For pollination purposes, six plants give bees plenty to work with during bloom season. A good average yield is 10 to 15 pounds per plant, or more for zucchini.
When: Plant summer squash in late spring, after the soil has warmed and the last frost has passed. You can direct-sow the seeds into prepared beds, but you will have better control over timing and spacing if you start seeds in containers and plant the seedlings exactly where you want them. You won’t need fluorescent lights, because by late spring you can grow the seedlings outdoors, in real sunlight. I use 4-inch square containers filled with ordinary potting soil, keep the pots indoors until the seeds sprout, and immediately move them to a sheltered spot outside. Squash seedlings are ready to set out as soon as the first true leaf appears, when they are about 3 weeks old.
Planting: Allow at least 2 feet of space between robust summer squash plants — 3 is even better. Mix a handful of a balanced organic fertilizer into each planting spot, and then go back and bury a heaping shovelful of compost in each planting hole, too. Do not skip the compost with this crop, because summer squash roots form dynamic partnerships with microcritters in the compost, which in turn makes a huge difference in the health and vigor of the plants.
Start with summer squash seeds from a reputable supplier. Cucurbit seeds are often offered at seed exchanges, but because different types of summer squash cross-pollinate with such enthusiasm, off-types are common in casually saved seeds. Buying summer squash seeds grown by professionals is money well spent.
Summer squash are the favorite host plant of two widespread pests: squash bugs and squash vine borers. The easiest way to sidestep these pests is to keep squash plants covered with floating row cover until they start blooming and need to be visited by bees.
You may see yellow and black cucumber beetles chewing on squash flowers, too, but they are usually a minor pest on this crop. As squash vines age, non-resistant varieties may show white patches of powdery mildew. Where powdery mildew is a persistent problem, make use of the many resistant varieties available.
Summer squash develops male and female flowers, and pollen from the male flowers must make its way to receptive females. Males often appear first, ready to attract pollinators, so by the time female blossoms open, the planting should be buzzing with bees during the morning hours. If few pollinators show up, you can do the job yourself. To hand-pollinate squash, use a feather or a dry artist paintbrush to wipe up pollen from inside male flowers, and then dab it inside female flowers. Male flowers are borne on straight stems, while there is always a tiny squash in place of a stem on the females. Pollinate random flowers for several minutes, just like a bee. The best time to hand-pollinate squash blossoms is midmorning, just after the flowers open and the pollen is fresh.

When: Summer squash can be harvested as babies, with the blossoms attached, for a beautiful show at the table, but the best squash for putting by are fully grown fruits at their peak. The skin should still be tender, with the gloss of youth, and inside the seeds should be barely formed and quite soft. When your squash is in full production, harvest daily to keep from missing perfect specimens.
How: Use a sharp knife to cut squash from the stem. Sometimes they will twist off, but using a knife is better for the squash and the plants. Immediately bring the squash indoors, wash them in cool water, pat dry, and refrigerate in plastic bags until you are ready to cook or process them. Hold summer squash in the refrigerator for no more than 5 days.
You will need more than one preservation method to do justice to prolific summer squash. Drying squash is fast and easy if you have a dehydrator, and some of your summer squash can go into canned pickles and relishes, too. Do freeze some of your crop, particularly little squash that are the right size for stuffing. Frozen single-serving squash take up freezer space, but in winter they emerge as stars in any meal.
You can simply blanch, cool, and freeze sliced or cubed summer squash, but grilling or roasting gives you a chance to flavor up your squash before it goes into the freezer. For example, you can marinate 1⁄2-inch-thick slabs of squash in an Italian dressing for an hour before grilling them until halfway done. When cool, freeze singly on cookie sheets before transferring to freezer-safe containers.
Another way to prepare summer squash for freezing is to roast 2-inch chunks in a large roasting pan. First sprinkle the pieces generously with sea salt and various dried spices — cumin and chili powder, paprika and turmeric, or a curry blend — and then toss them with 1 tablespoon or so of olive oil. Bake uncovered at 375°F (190°C) for 20 to 25 minutes. The sizzling-hot pieces lose moisture as they steam, which helps to concentrate their flavor. Pack into freezer-safe containers when cool.
You also can roast summer squash with savory vegetables like onions, garlic, and peppers. This mixture will cook down into a tasty veggie spread or dip perfect for freezing in small packages.
Food preservation experts do not agree on whether or not summer squash requires blanching before it is dried. Having tried both methods, drying raw 1⁄4-inch-thick slices is fast and easy, and the chips taste like what they are — condensed summer squash. Blanched slices take twice as long to dry, and go through a messy goo period halfway through when they cannot be touched. On the plus side, pre-blanched dried squash slices are better for snacking because they are easier to chew.
Note that you can dry summer squash in various shapes — including cubes, matchsticks, or even noodles cut with a spiral slicer made for veggies. Thin pieces dry very fast and also rehydrate quickly, so experiment with your mandoline or other cutting equipment to see what you like best.
I store my dried squash in the freezer, which means I can dry them to the leathery stage and not worry about spoilage from excess moisture. If you store your dried food under warmer conditions, dry your squash until it is hard but not cracker crisp, and use a vacuum sealer as an additional safeguard against spoilage.

Dry squash in different shapes for various recipes — thin ribbons for pasta, shreds for baking, or slices for soups and casseroles. Roasting squash before freezing it adds flavor and saves time.
In poor cucumber years, summer squash does a fantastic job filling in as a pickle ingredient as long as the recipe is well endowed with vinegar and sugar. Most recipes for bread-and-butter pickles can be made with summer squash, but I think the best use for a tabletop covered with summer squash is Zucchini and Friends Relish. As long as you don’t change the brine mixture, you can vary ingredients slightly according to what you have coming from the garden.

Makes about 5 pints

(Ipomoea batatas)
12 to 14 plants per person
‘Covington’ orange, ‘O’Henry’ white, and ‘Violetta’ purple
Place in cool storage, freeze, or dry
Sweet potatoes have long been a staple crop in climates with warm, muggy summers, but modern varieties have helped to push the growing range for this super-nutritious root crop all the way to Ontario. Few crops keep as well as sweet potatoes, which can be stored for months at cool room temperatures. Unlike many other crops, the quality of sweet potatoes improves in storage. Sweet potatoes taste best about 2 months after they have been dug.
In the garden, sweet potatoes make beautiful edible ornamentals because of their lush summer growth. An ideal crop to grow on a gentle slope, vigorous sweet potato vines knit themselves together into a tangle of foliage that shades the soil and suppresses weeds. A warm-season crop, sweet potatoes are planted in early summer, after tomatoes, and stay in the ground until early fall. Sweet potatoes grow best in warm, well-drained soil with a slightly acidic pH.
Unlike many other crops, the quality of sweet potatoes improves in storage.

Sweet potato varieties vary in the color of their flesh and skins, as well as in their leaf shape, texture, and vine length.
Climate and growing conditions influence sweet potato productivity, which ranges between 1 and 2 pounds per plant. Estimate 12 to 14 plants per person for eating fresh and storing, which should produce about 25 pounds per person.
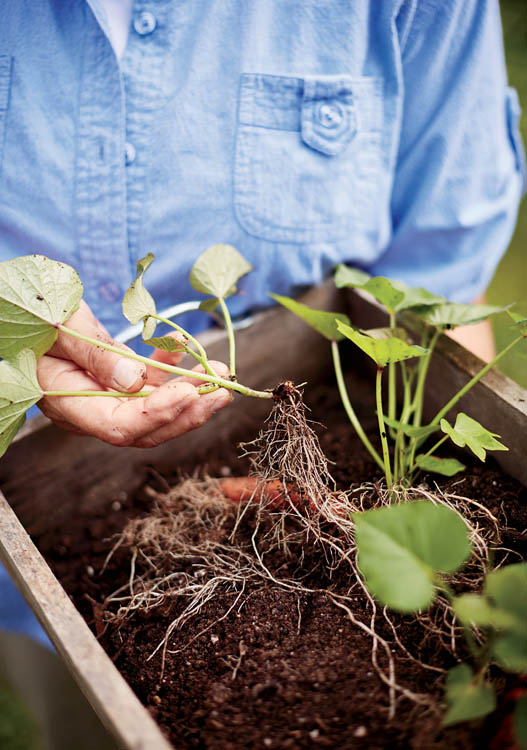
Growing sweet potatoes begins with rooted stem cuttings, called slips, which sprout from the ends of stored tubers. If you want to grow your own slips, you can start with sweet potatoes you grew the previous year, or work with purchased sweet potatoes you would like to grow.
Where: Choose a site with fertile, well-drained soil in full sun. Where summers are short, use black or clear plastic to warm the soil where you want to grow sweet potatoes. Row-cover tunnels (see Working with Tunnels) also can be used to give sweet potatoes the early-season warmth they crave.
Planting: Sweet potatoes benefit from a generous helping of fully rotted compost dug into the soil before planting, along with a light application of a balanced organic fertilizer. Space slips at least 12 inches apart, with at least 3 feet between rows. Plant sweet potato slips diagonally in prepared soil, so that only the top two leaves show at the surface. Water well. In hot, sunny weather it helps the slips tremendously to cover them with upturned flower pots or other shade covers for a few days after planting. With adequate moisture and protection from searing sun, sweet potato slips that look shabby usually recover quickly and make good crops.
Maintenance: Sweet potatoes do not need mulching because their vining foliage does such a good job of covering the ground. Do keep them weeded for the first few weeks after planting. As sweet potatoes mature in late summer, water them as needed to keep the soil from drying out. Heavy rains that follow dry spells can cause sweet potatoes to crack.
Slightly acidic soil helps to suppress sweet potato diseases, and many good varieties provide genetic resistance to common sweet potato problems. Sweet potatoes are members of the tomato family, and rotating them with non-related vegetables helps prevent problems, too. Avoid growing sweet potatoes in new garden areas previously covered with grass, because ground-dwelling grubs and wireworms (click beetle larvae) chew holes and grooves in sweet potato tubers, and they are often numerous in soil covered with grass and weeds. Deer love to eat sweet potato leaves, so row covers, fences, or other deterrents may be needed, especially in late summer. Only very hungry deer eat squash foliage, so interplanting pumpkins or butternut squash with sweet potatoes helps to deter casual browsing. Stored sweet potatoes are a great favorite of hungry mice.

When: Begin checking the root size of fast-maturing varieties 3 months after planting. If left in the ground too long, some early varieties will produce seriously oversize roots. Most varieties can be left in the ground as long as the vines are still growing and nighttime temperatures are above 50°F (10°C). Sweet potatoes left to sit in cool, moist soil are prone to developing skin issues.
How: Some sweet potato varieties develop a cluster of tubers right under the plants, but others may set roots 2 feet from the mother clump. Begin digging from the outside of the row, loosening soil with a digging fork before pulling up plants by their crowns. Place the potatoes in a laundry basket and clean off soil with a strong spray from your hose, but do not scrub. Place the rinsed potatoes in a shady spot to dry.
Fresh sweet potatoes need to be cured in a warm place for 2 to 3 weeks. During this time, wounds to the skin heal over, and the flesh becomes sweeter and more nutritious.
Arrange harvested sweet potatoes in a single layer in a warm, humid place where temperatures can be raised above 80°F (27°C) during the day for 7 to 10 days. In warm climates, a well-ventilated outbuilding is ideal. In cooler climates, a bathroom or closet with a space heater makes a good curing place. After curing, sort through your sweet potatoes and move the most perfect ones to any dry place where temperatures will stay above 55°F (13°C). The flavor and nutritional content of sweet potatoes improves after a couple of months of storage.
Sweet potatoes are so easy to keep in their raw, whole state that they are preserved only to cope with culls or to pre-cook them in the interest of convenience. Uncured sweet potatoes with minor issues should be set aside and allowed to dry indoors for at least a week; whatever problems they have will not get worse and may get better.
Cooked sweet potatoes give good results when frozen — whether sliced, mashed, or kept whole. Bake or steam sweet potatoes until just barely done before cooling and freezing them. Be careful with purple sweet potatoes, which bleed unless they are cooked whole, in their skins.
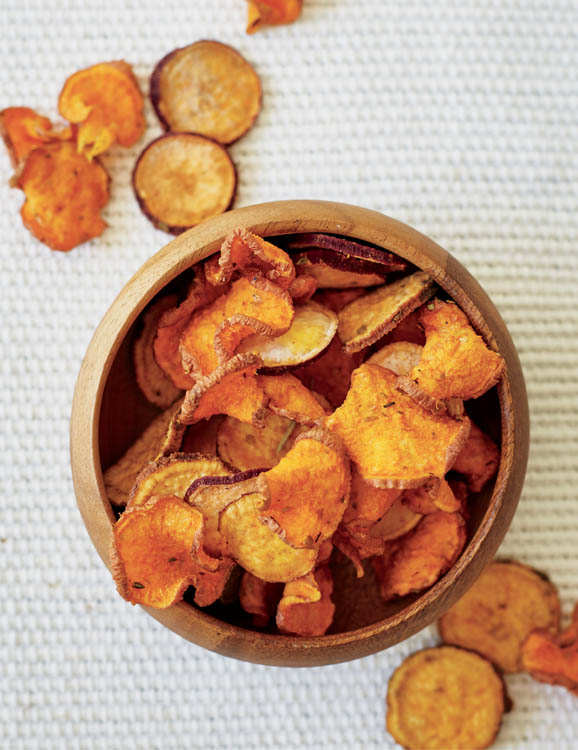
Sweet potatoes also can be dried, and there are two ways to do it. For future use in soups or casseroles, steam slices or cubes until barely done before drying in the dehydrator. Raw slices can be dried, too, but they must be kept quite thin. In addition, you can cut raw sweet potatoes into long, 1⁄4-inch-thick strips and dry them as dog treats.
Cooked sweet potatoes give good results when frozen — whether sliced, mashed, or kept whole.
These wavy chips are good for slow snacking, so vary the seasonings to your taste. For best results with this recipe, use a mandoline slicer to cut sweet potatoes into uniform 1⁄8-inch slices.
Makes about 3 cups
(Beta vulgaris ssp. cicla)
4 plants per person in spring, plus 4 plants per person in fall
‘Fordhook Giant’, ‘Bright Lights’, or ‘Silverado’
Freeze
Gardeners often show great enthusiasm for crops that they are not used to eating very often. The best example of this is Swiss chard, a workhorse cousin to spinach and beets. Of all the good greens you can grow in your garden, chard is the best one for keeping its eating quality through the hot summer months. Happy chard plants can be phenomenally productive, plus their upright growth habit helps them makes excellent use of space.
You can substitute cooked chard for spinach in recipes, or use chard leaves as a substitute for pastry crust when making quiches or vegetable casseroles. Simply oil the baking dish before arranging large chard leaves on the bottom and sides, and then pour in the filling. When frozen, chard retains its savory succulence but loses its stained-glass beauty.

If you want only a few plants from which to pick fresh leaves for cooking, choose a white-stemmed variety like ‘Fordhook Giant’ or ‘Silverado’. White-stemmed varieties are not as showy as those with colored stems, but they consistently outperform their more colorful counterparts in terms of productivity and bolt resistance.
Brightly colored chards are the queens of edible ornamentals. Varieties bearing red, pink, yellow, or orange ribs are available individually or in mixtures. If you want to buy only one packet of seeds, you can start with a mixture like ‘Bright Lights’ and select for color after the seedlings are up and growing. By the time chard seedlings have leaves, you can tell their mature colors.
For fresh eating and casual freezing (for example, when you include chopped chard in frozen packets of summer squash or snap beans), grow about four plants per person in spring, and another four plants per person in the fall. You can grow more for freezing, but don’t get carried away if you are also growing collards, kale, or other cooking greens for putting by. Over time, a healthy chard plant easily produces more than 2 pounds, but it is over a period of weeks or months, with two to three big leaves harvested per week.
When: In spring, either direct-sow or set out seedlings about 2 weeks before your last spring frost to ensure steady production. Chard seedlings that get well chilled often bolt, while those that experience only passing cold continue to produce leaves all summer. For a fall crop, start seeds about 10 weeks before your first frost date, and set out the seedlings when they are 4 weeks old. Chard often survives winter from Zone 7 southward, but the plants make little new growth while days are short, cold, and cloudy. Overwintered chard plants promptly bolt in the spring.
Where: Prepare a rich, fertile bed by mixing in a 2-inch layer of compost and a balanced organic fertilizer applied at label rates.
Planting: Plant seeds 1⁄2 inch deep and 3 inches apart. You can also start seeds indoors under bright lights and set out the seedlings when they are about 1 month old. Thin newly germinated seedlings with cuticle scissors instead of pulling them out. Like beets, chard seed capsules often contain two or more seeds. Snip off all but the strongest sprouts at the soil line. Thin or transplant chard to 12 inches apart.
Maintenance: As the plants grow, mulch between them to keep the soil cool and moist and to reduce splashing of soil onto leaves. Provide regular water to encourage strong, steady growth.
Slugs. Holes with smooth edges that appear overnight in the leaves are the work of slugs, which also may rasp grooves into the stems. Trap them by nestling shallow containers baited with beer into the soil, or mulch between plants.
Viral diseases. These cause new leaves to be small or distorted, with unusual crinkling. Plants sometimes outgrow infection, but chard showing viral symptoms should be pulled out if the plant fails to perk up after a couple of weeks.
Leaf spot diseases. Sometimes prolonged periods of warm rain can lead to outbreaks of cercospora leaf spot or other leaf spot diseases that cause leaves to shrivel as the fungi take hold. Remove affected leaves, and keep plants widely spaced to promote good air circulation.
Deer. Chard must taste like candy to deer, because it ties with beets as their favorite garden crop. If you cannot fence out your deer, you may need to use row covers to keep them from seeing your chard. If they can’t see it, they won’t eat it.
When: Twist or cut off individual outer leaves as you need them in the kitchen. Three to five leaves can be picked from mature plants at a time, but be sure to leave the growing crown intact.
How: Immediately refrigerate in plastic bags. You can wait until just before cooking or freezing chard to wash the leaves.
About once a week, remove older leaves that have lost their sheen and compost them. If you can’t stand throwing away all those second-rate leaves, dry them on cloths spread out in a parked car on a sunny day, and feed the dried greens to your chickens in winter. Thin chard leaves dry very quickly, and when offered the dry greens in a separate bowl, my chickens gobble them up.
Cooked chard can be substituted for spinach in any recipe, so it’s great to have several packets of frozen chard in the freezer. You can freeze chard in small batches, but I like to save up leaves for a few days and work with a sink filled with beautiful leaves. Thoroughly wash the chard leaves and shake them dry. Use the tip of a sharp knife to cut out the ribs, then coarsely chop the leaves into pieces about 3 inches square. When you have set aside several ribs, pull off any long strings from the outside of each one, and chop each rib into 1-inch pieces. Place the chopped ribs and leaves in a large pot, add 1 cup of hot water (just enough to provide steam), and bring to a boil. Stir once or twice, and turn off the heat. After about 3 minutes, pour out the cooked greens into a colander. When cool enough to handle, pack the steamed chard into freezer-safe containers.

When you have set aside several ribs, pull off any long strings from the outside of each one, and chop each rib into 1-inch pieces.
(Solanum lycopersicum)
6 plants per person
‘Sun Gold’ yellow cherry, ‘Stupice’ early, ‘Roma’ paste, and ‘Brandywine’ slicing
Freeze, can, or dry
A good tomato crop makes a happy gardener, in part because many people become food gardeners so they will have homegrown tomatoes. But tomatoes need a lot of precious space in the summer garden, so it’s important to think strategically as you plan a patch that will produce fabulous fresh tomatoes and productive processing tomatoes for putting by.
In most gardens, a mix of heirlooms and disease-resistant hybrids is a sure route to success. Many traditionally bred hybrid varieties are available as organic seeds, and hybrids like ‘Roma’ or ‘Plum Regal’ produce bigger crops because they stay healthier longer. You should still save room for a few fresh eating tomatoes chosen for flavor.
Try to match your variety choices with what you plan to do with the crop. Firm and fleshy paste tomatoes yield thicker sauces and salsas than juicier slicing tomatoes, which work well when dried, and cherry tomatoes make a fine dehydrator crop, too. There are many reasons to plan your tomato plot with the end in mind.
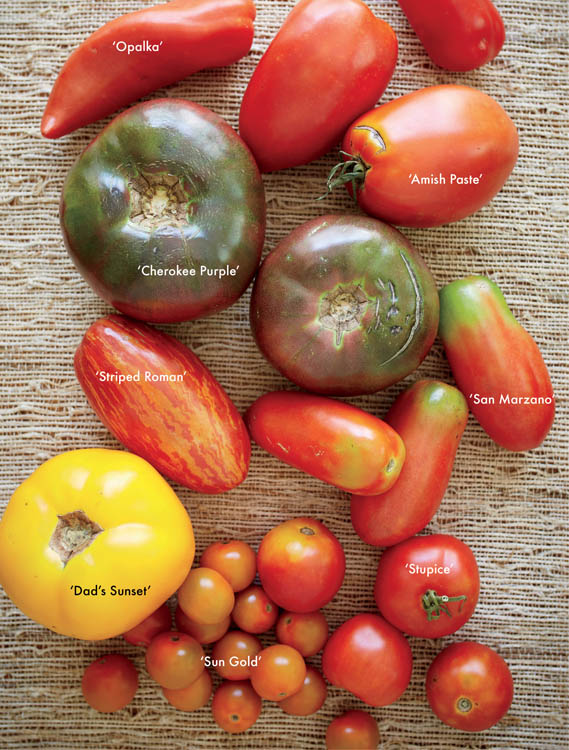
Drying concentrates the exquisite flavors of juicy cherry tomatoes and big slicers like ‘Cherokee Purple’, but paste tomatoes such as ‘Amish Paste’ or pepper-shaped ‘Opalka’ produce the best canned sauces.
A tomato planting plan designed to produce fresh and preserved tomatoes involves a mix of specialized varieties. You will want a few early tomatoes and some round summer slicers for the table, but for canned goodies like tomato sauce, salsa, or marinara sauce, you will get the best results with comparatively dry-fleshed paste tomatoes. With hundreds of choices, selecting varieties can get confusing quickly. The varieties named here are reliable producers in a wide range of climates, so they are a good place to start.
There are no standard numbers on pounds of tomatoes produced per plant because yield varies with climate and variety. Warm summer weather helps tomatoes produce heavier crops, while short, cool seasons mean fewer tomatoes per plant.
In a climate that is moderately kind to tomatoes, estimate three plants per person for fresh eating, or six plants per person if you are canning, drying, and freezing your tomatoes. It is also important to grow the different types in proper balance. For example, a two-person household might grow 12 plants, divided as follows:
When: Plant tomatoes in late spring, after the soil has warmed and the last frost has passed. Start seeds of early varieties 8 weeks before your last frost date, with others 2 weeks later (6 weeks before your last frost date). Provide very bright light, and transplant the seedlings to 4-inch containers after the first true leaf appears. As they gain size, move early tomatoes to dark-colored gallon pots, which provide extra warmth to the roots on sunny days.
Planting: Allow at least 2 feet of space between tomato plants. Into each planting hole, mix a standard dose of a balanced organic fertilizer and a heaping shovelful of compost. Set tomatoes deeply so that their seedling leaves are covered, and water well.
Maintenance: Tomatoes are vining plants that require support. You can buy wire cages or make your own from concrete reinforcing wire. Tomatoes also can be trained to grow on a fence, or they can be tethered to multiple sturdy stakes. The higher tomato foliage is held above the ground, the less the risk of diseases that thrive on damp leaf surfaces.
Tomato foliage contains nicotine-like compounds that are poisonous to people and shunned by most mammals, but tomatoes are the preferred host plant for leaf-eating tomato hornworms. Hornworms are easy to hand-pick, or you can control them with a Bacillus thuringiensis biological pesticide. Aphids and birds are occasional bothers, but by far the greatest threats to tomato health are diseases. Fusarium and verticillium wilts lurk in the soil, aphids and thrips spread devastating viruses, and damp weather invites a host of leaf spots and blights.
Good resistance to many of these diseases is easily available by choosing appropriate varieties; better seed catalogs list which forms of resistance various varieties offer. If your tomatoes (or those of your neighbors) are often hit by a certain disease, try both hybrid and heirloom varieties that offer some level of resistance.
Also keep in mind that young tomatoes are naturally vigorous and healthy, while older plants can’t stand up to trouble. Strive to grow your tomato crop quickly, get it put by, and then move on to your second season with cool-weather crops. In climates with very long, hot summers, give yourself a break and grow tomatoes in spring and fall.
When: Tomatoes can be harvested as soon as they begin to show blushes of color, and then allowed to finish ripening indoors at warm room temperatures. Or you can let them ripen fully on the vine. Much depends on weather conditions and predator pressure like birds pecking holes in tomatoes or squirrels stealing the crop. Cool nights can slow the ripening process, and heavy rains can cause almost-ripe fruits to split. Err on the side of safety by harvesting tomatoes promptly, and discard tomatoes that have gone soft.
When night temperatures regularly fall into the 40 to 50°F (4 to 10°C) range, gather all green tomatoes that might be close to ripe and bring them indoors. Very immature specimens should be composted, but those that show signs of ripening can be eaten fresh or made into relishes or chutneys.
How: Never subject ripening tomatoes to chilling. Keep them at room temperature until they show full color, and then process them for long-term storage.

Tomato skins slip off easily if you drop the fruits in boiling water for about 30 seconds. Scald tomatoes in small batches, waiting for the water to come back to a boil between each batch.
Tomatoes that are frozen whole split their skins as they expand. Instead of blanching them, let them thaw for about 10 minutes, and then peel the frozen tomatoes under warm running water.

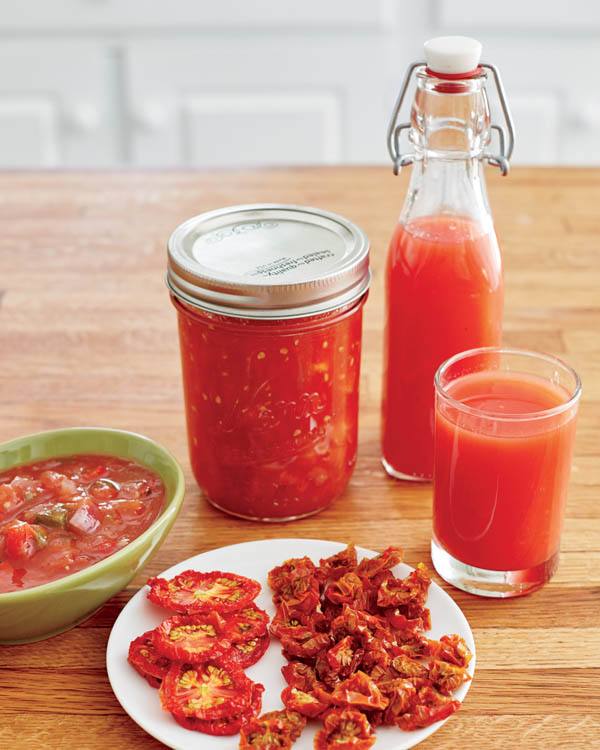
In a good tomato year, you can stock your pantry with an assortment of ready-to-eat tomato products. Freezing should be your backup plan, with most of your preservation time spent canning sauces and drying tomato slices and tomato “raisins” — halved cherry tomatoes dried to the texture of raisins. If you add one new tomato food preservation skill each season, it won’t be long before you are growing and preserving all the tomatoes you will need for a year, in ways that suit your style of cooking.
Most of your preservation time should be spent canning sauces and drying tomato slices and tomato “raisins” — halved cherry tomatoes dried to the texture of raisins.
Whole, well-washed tomatoes of any size can be tossed into freezer bags and stored frozen until they are needed for cooking. This is practical for a gallon or two of cherry tomatoes or small slicers, but few freezers have space for a bumper crop of tomatoes. You can save some space by cutting tomatoes into pieces and warming them to a simmer before packing the stewed tomatoes into freezer containers. Better yet, roast extra tomatoes with garlic, olive oil, and fresh herbs, and freeze the roasted tomatoes.
The notion of dried tomatoes may be new to you, but drying tomatoes requires much less kitchen time compared to canning because the tomatoes are sliced and dried raw, with their skins intact. A dehydrator takes care of the rest. You can add the dried bits to soups, stews, casseroles, salad dressings, and pasta dishes. All types of tomatoes can be dried, and drying is the best way to capture and condense the flavors of sweet cherry tomatoes or heirloom slicers. Once you get used to having dried tomatoes in your pantry, you will miss them when they’re gone!
Tomatoes contain a lot of water, so you will need a dehydrator to dry them. Tomatoes destined for drying need to be clean, but you don’t need to blanch or peel them. Cherry tomatoes must be cut into halves or quarters and are best dried until they are leathery yet soft. This may take 8 hours or more. Expect 3⁄8-inch tomato slices to stick to the trays as they dry — don’t try to move them during the drying process. When tomatoes are dry enough to store, they will lift off easily in one piece. Store your dried tomatoes in vacuum-sealed containers or in bags or canning jars kept in the freezer.
Care must be taken when canning tomatoes and tomato products, which require acidification to ensure that the pH is low enough to inhibit the growth of bacteria. The three choices for acidifying agents are powdered citric acid (1⁄4 teaspoon per pint), bottled lemon juice (1 tablespoon per pint), or vinegar (2 tablespoons per pint). Citric acid or lemon juice are usually better in tomato sauce or canned tomatoes because they affect flavor less than vinegar. However, vinegar can enhance the flavor of some tomato sauces, as it does in the Garden Salsa recipe below.
If you have a food mill or sieve, you can make a smooth, seedless sauce — or thick tomato juice — from tomatoes that have been cut into pieces and simmered slightly to soften them. You also can put tomatoes through a juicer to get a seedless juice.
Of all the canned tomato products you might stock in your pantry, diced tomatoes are probably the most versatile in the kitchen. Peel and dice paste tomatoes, then bring them to a simmer before canning them (with acidification) in a water-bath or steam canner for 20 minutes. Processing times are longer for tomatoes and tomato sauces than for other vegetables in order to kill microorganisms known to survive when the jars do not heat through completely.
In addition to plain sauce and diced tomatoes, most gardeners make some version of the standby recipes below for salsa and pasta sauce. Note that when low-acid ingredients like onions and peppers are added to these food products, proper acidification becomes even more crucial. In the recipes below, do not increase the amount of non-tomato ingredients, and don’t forget the vinegar or lemon juice!
Makes about 5 pints
Makes about 5 pints
(Brassica rapa var. rapifera)
12 medium-size turnips
‘Purple Top White Globe’, ‘White Egg’, and ‘Amber Globe’
Place in cold storage, freeze, pickle, or ferment
Turnips have been feeding people since prehistoric times, and they deserve star status in the fall garden. No other vegetable gives you super-nutritious greens and crisp roots that rival carrots for crunchiness, all in less than 60 days. An ideal crop for fall, turnips make easy follow-up crops to plant after beans or summer squash. Turnips grow so quickly that little or no weeding is required to establish a pretty bed.
When harvested just before the first hard freeze, turnip roots will keep in the fridge or root cellar through the first half of winter. Turnips are great veggies for adding to fall fermentation projects, and they bring spunky flavor to pans of roasted winter vegetables. You can blanch and freeze extra turnip greens.

Turnip varieties have distinct talents, and those described as salad turnips are best for fresh eating and pickling. Salad turnips like ‘Hakurei’, ‘Oasis’, and ‘White Egg’ are harvested when the roots are the size of a golf ball. Because salad turnips are harvested young, in about 50 days, the greens can be harvested in one fell swoop, at the same time as the roots.
All-purpose turnips take longer to mature than salad turnips, about 60 days, but the roots are larger, with a finer texture. The greens produced by these stalwart plants are delicious, but it is best to not pick greens from plants intended to produce big roots. Make an extra planting if you want to grow enough turnip greens for fresh eating and freezing.

All-purpose turnips take longer to mature than salad turnips, but the roots are larger, with a finer texture.
Turnips, rutabagas, kohlrabi, and radishes are similar as cooked vegetables, so consider them as a group when estimating yields. Beyond what you might eat fresh in late fall, a dozen medium-size turnips, or a few more if they are small, are enough to last most households through the first half of winter.
Where: Turnips grow best in fertile, well-drained soil with a pH between 6.0 and 7.0. They are a good crop to plant in space vacated by early potatoes or peas, or you can grow them between rows of harvested sweet corn as a “mop up” crop to utilize leftover nitrogen. If you are planting turnips after a heavy-feeding crop, mix a light application of a balanced organic fertilizer into the planting bed as you prepare it for seeding.
Planting: Sow turnips for fall harvest 60 to 70 days before your first fall frost. Hot weather can present challenges, because the seedbed must be kept constantly moist for about 3 days. In sunny weather, erect a cloth shade cover over the newly seeded bed to keep it from drying out in midday.
Maintenance: After 10 days, thin seedlings to at least 3 inches apart in all directions. Wide spacing leads to bigger roots, so go back after a couple of weeks and pull up half the seedlings so that the remaining ones are 4 to 6 inches apart. These thinnings should bear tender greens big enough to eat.
Water as needed to keep the soil lightly moist — the best way to grow big turnips with no splits and cracks. As the plants grow, pull off older leaves that turn yellow or show brown spots to reduce problems with pests and diseases.
Gather outer leaves from turnips to interrupt the life cycles of various leaf spot diseases and insect pests. Watch for outbreaks of aphids. If an aphid problem does develop, remove any badly infested leaves and compost them before dousing plants with water to dislodge wanderers. Do not use insecticidal soap unless you do not plan to eat the greens, which can taste slightly soapy no matter how well they are washed.
Flea beetles and other small insects may make small holes in young turnip greens, but the plants are so vigorous that they quickly outgrow the damage. Sometimes wet weather causes leaves to erupt with leaf spot disease. Seriously troubled turnips can often be rejuvenated if you cut all foliage back to 2 inches from the crown.
Mature turnips are surprisingly cold hardy. I have had roots survive at 0°F (–18°C) under snow, even when nibbled by deer. Turnips that survive winter promptly produce sprays of yellow flowers in spring. Both the unopened flower buds and the green seedpods are edible and make interesting additions to soups and salads. Honeybees love the flowers.
When: Turnips get sweeter as the weather gets colder, so it’s best to harvest them after a few light frosts but before your first hard freeze.
How: Handle turnips gently to avoid bruising, and trim back tops to just above the crown. If you plan to store your turnips in the refrigerator, wash the roots in cool water to remove excess soil, pat dry, and store in plastic bags. Do not wash turnips that will be stored in damp sand in a root cellar, because the idea is to trick the roots into thinking they are still growing in a garden.
The world seems divided into people who love or hate turnip greens, though many haters change their minds after tasting young, garden-grown turnip greens. Turnip leaves smaller than your hand are ideal for quick stir-fries, and they can stand in for spinach in calzones, casseroles, and many other cooked dishes. To freeze turnip greens, steam them until they are thoroughly wilted (about 5 minutes), then cool and freeze.

If you’re out of cold storage space for turnips, there are several ways to preserve them for later consumption, including freezing and fermenting, or you can turn them into pickles. Don’t wait until the roots start to soften to take action. It is better to work with fresh turnips in food preservation projects.
I freeze a few packages of steamed turnip greens, and I always include bite-size chunks of turnip roots with the greens to provide contrast in texture. Turnips work well in vinegar-brined canned pickles, too, and you can turn them red and savory by including sliced beets and red onions in the vegetable mix. But if food fermentation interests you, use turnips generously in creative krauts, kimchis, or other fermentation projects with cabbage, radishes, and other fall vegetables. Cut into sticks, squares, or wedges, fermented turnips retain their crisp texture as natural microorganisms transform them into a spunky, probiotic food.
When freezing steamed turnip greens, I always include bite-size chunks of turnip roots with the greens to provide contrast in texture.
(Cucurbita pepo, C. maxima, C. moschata)
4 to 6 plants per household
‘Waltham’ butternut, ‘Burgess’ buttercup, and ‘Honey Bear’ acorn
Place in cool storage or freeze
When you’re gardening to put nutritious food on the table, easy-to-store winter squash should be near the top of your planting list. One of the most nutritious crops you can grow, winter squash holds its vitamin A and other healthy riches even when stored for months at cool room temperatures. Food storage simply does not get easier than this.
Winter squash come in a huge range of sizes, shapes, and colors, and flavor varies from spicy and nutty to almost fruity. If you are new to winter squash, purchase different types at a fall farmers’ market and see which are your favorites. The goal is finding winter squash that please your tastes and fit your cooking habits — an enjoyable quest that may take several seasons of squash growing and eating. All winter squash grow best under warm conditions, in fertile, well-drained soil with a pH between 6.0 and 6.5.
Where you garden will affect your choice of which winter squash to grow, because climate influences their overall health and vigor. Here are the six most popular types, listed from smallest to largest.
Also called sweet potato squash because of the loaf shape, exuberant delicata vines produce striped oblong fruits weighing 1 to 2 pounds each. The fast-growing vines can be trained to tumble over a fence or low trellis, or you can let them run on the ground. Delicata squash are ready to harvest in about 90 days, and the cured fruits will store in a cool place for 3 to 4 months. These squash are usually served stuffed or cut into rings that are baked or grilled (the skins are edible).
Compact acorn squash plants quickly produce heavy crops of pleated, heart-shaped squash weighing 1 to 2 pounds each. More pest tolerant than summer squash, heirloom acorn varieties famous for flavor deserve consideration. Acorn squash mature in about 90 days and store for 3 to 4 months. Acorn squash are most often roasted or stuffed.
Prolific and easy to grow, the fast-growing plants produce heavy crops; fruit size varies with variety. Widely adapted in a range of climates, spaghetti squash mature in about 90 days and store for 3 months. The tender strings of cooked spaghetti squash resemble pasta because of their unique texture and mild flavor. Flesh from the cooked fruits is used as a pasta substitute in hot dishes and casseroles.
Bulbous, smooth-skinned butternuts are resistant to squash vine borers and are non-preferred by squash bugs, which makes them easy to grow. Butternuts need 100 to 110 days of warm weather to produce a good crop, so they may not ripen fully in cool climates. Where they grow well, butternuts become staple crops in most homegrown pantries because they are easy to grow, versatile in the kitchen, and can store for 6 months or more. Moist butternut flesh works well in soups, pies, and purées.
Bred to be a sweet potato substitute in northern climates, long-vined buttercup squash plants run 12 to 15 feet and produce blocky fruits weighing 2 to 5 pounds. Buttercups are moderately susceptible to common squash pests, and the fruits mature in about 100 days. Buttercups store for 4 to 6 months. Similar to Japanese kabocha squash, the dense, dark orange flesh of buttercup squash becomes flaky when baked, like starchy potatoes, so they are often regarded as the best winter squash for pies.
Prized for their dry, light orange flesh and stability in storage, long-vined hubbard squash grow best in the cool, moist climates of the Northeast and upper Midwest. Depending on variety, the fruits can weigh 5 to 15 pounds, with rinds that may be blue-gray, green, or red. Unfortunately, hubbard squash are attractive to all squash pests. Most varieties mature in about 100 days, and the fruits store for 6 months. These varieties are valued for baking and pies, but they do not have the deep orange flesh color of butternuts.
When: Sow seeds in prepared beds or hills in late spring, after your last frost has passed. You also can start seeds indoors under bright lights and set out the seedlings when they are about 3 weeks old. In most climates, there is no need to rush, and delaying planting may help with the management of squash bugs and other common pests. In Zone 6 and warmer, you can plant more winter squash in early summer, using space vacated by fall-planted garlic or early spring lettuce. Transplant container-grown seedlings to help get midsummer plantings growing in a hurry. Stop planting winter squash 14 weeks before your first fall frost date.
Where: Choose a sunny site with fertile, well-drained soil. Prepare planting hills within wide rows, or position them along your garden’s edge. Space 3-foot-wide hills 5 to 6 feet apart.
Planting: Loosen the soil in the planting sites to at least 12 inches deep. Thoroughly mix in a 2-inch layer of mature compost and a light application of a balanced organic fertilizer. Water well. Plant six seeds per hill, poking them into the soil 1 inch deep. Ten days after sowing, thin seedlings to three per hill. If using seedlings, set out three seedlings per hill. Where wild pollinators are plentiful, you will need five to six plants of the same species to get good pollination.
Powdery mildew. Among diseases, powdery mildew is a common problem best prevented by growing resistant varieties, which often have the letters PMR (for powdery mildew resistant) after their variety name. In addition, a spray made from 1 part milk to 4 parts water can suppress powdery mildew if applied every 2 weeks during the second half of summer.
Squash bugs, squash vine borers, and cucumber beetles. Winter squash often face challenges from insects, including these three. For gardeners in the eastern United States, where squash vine borers sabotage both summer and winter squash, butternuts are preferred because borers usually leave them alone. Winter squash varieties that are susceptible to borers can be protected with aluminum foil shields crumpled around their bases. Better yet, start plants indoors to give them a strong, pest-free start, and then grow them beneath row covers until the flowers open and need visits by bees to complete pollination.
Big, healthy plants will produce well despite pest challenges. In addition to using row covers to protect young plants, these techniques can keep pests at a manageable level:
Winter squash are such productive plants that it is possible to grow too many. Most gardeners grow only two or three varieties per season — for example, a small variety for stuffing and a larger butternut or buttercup for long-term storage. When planning for winter squash, consider your expected harvest from other orange-fleshed storage vegetables, particularly pumpkins and sweet potatoes. You can only store and eat so many orange veggies before you burn out.
You will need to grow four to six plants of any winter squash variety to ensure good pollination. Small-fruited acorns and delicatas will produce many small squash, while larger-fruited types will produce fewer but larger squash. In general, a successful winter squash plant will produce about 20 pounds of fruit, or two to five squash per plant, depending on fruit size.
When to harvest: Winter squash fruits are ripe if you cannot easily pierce the rind with your fingernail and the stem near the fruit becomes woody and brown. Many varieties also show a change of color. Do not hurry to harvest winter squash, because immature fruits do not store well. Unless they are threatened by pests or freezing weather, allow the fruits to ripen until the vines begin to die back.
How to harvest: Use pruning shears to cut fruits from the vine, leaving 1 inch of stem attached.
Curing: Clean away dirt with a soft, damp cloth, and allow the fruits to cure in a warm, 70 to 80°F (21 to 27°C) place for 2 weeks. Sun will not hurt the curing squash, and many cool-climate gardeners use their greenhouses as curing chambers.
Storing: Store cured squash in a cool, dry place such as your basement or a cool closet. Check every 2 weeks for signs of spoilage. See Enjoying Your Stored Foods for a quick reference to how long different squash and pumpkins can be expected to store.

Cutting up raw winter squash has a surprising side effect: it leaves your hands coated with a sticky substance that feels like thin, fast-drying glue that won’t wash off. Don’t worry, you probably are not having an allergic reaction, though this is a remote possibility. You are simply a victim of the squash trying to defend its valuable cache of seeds.
Squash plants use gluey juices in various forms to protect themselves from insects and other predators. Known to botanists as phloem latex and apoplastic fluids, these plant-produced glues are intended to shut down insect mouthparts, like built-in sticky traps.
As for the garden cook, you can protect your skin with gloves, or be prepared to deal with the aftermath with packing tape. When you’re finished cutting squash for the day, dry your hands well and make a loop of 6-inch-long packing tape, adhesive side out. Use the loop of tape to strip off the gluey residue if you don’t want to wait for it to wear off naturally, which usually takes several hours.
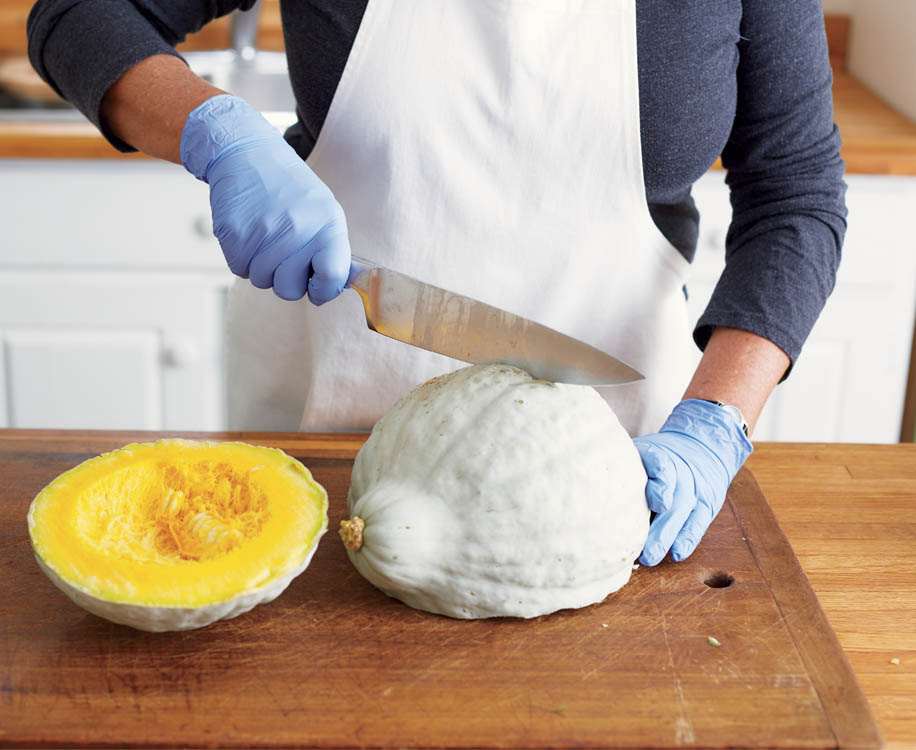
Cutting up winter squash. To make large fruits easier to cut, use your sharpest, heaviest knife to lop off a slice from one side of the squash to create a flat surface, then roll the squash onto the flat side. To cut into squash with very hard rinds, you may need to tap on the back of a sturdy knife with a mallet.
Cool storage of winter squash is so easy that you should rarely need to preserve it in other ways. The fundamental challenge is finding different ways to cook winter squash so that you use up your homegrown supply in a timely manner. Toward this end, I suggest roasting some of your winter squash every week or two, making a major dish like a batch of squash-apple soup, and putting the rest into the refrigerator. Even if you just peel and chop the squash and store it raw in the refrigerator, you are more likely to cook with winter squash that’s two steps away in the fridge than to take on a whole one from the basement.
You can use winter squash in any recipe that calls for pumpkin and in many recipes that use sweet potatoes. Grated winter squash can sometimes pass for carrots, especially when lightly cooked.
Old-fashioned squash pies laced with cinnamon and ginger will never go out of style, but newer trends in winter squash cuisine include savory risottos and creamy squash-stuffed ravioli. Sage is a great accent herb for winter squash, and many cooks brush chunks of baked or grilled squash with maple syrup or honey toward the end of cooking to get a caramel glaze.
Squash soup brings endless possibilities because you can take the flavor in any direction you like. Indian curries, Mexican chilis, and creamy cheese soups can be interpreted using winter squash as a major ingredient. Chickpeas or lentils work well for boosting the protein in squash soup to make it into a more satisfying meal. To reduce cleanup, try using an immersion blender rather than your food processor to purée cooked winter squash.

Grated winter squash can sometimes pass for carrots, especially when lightly cooked.
