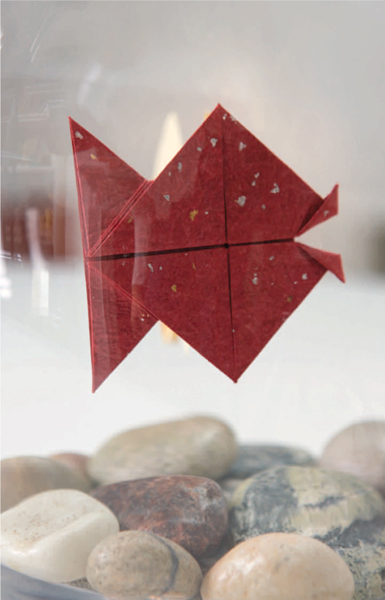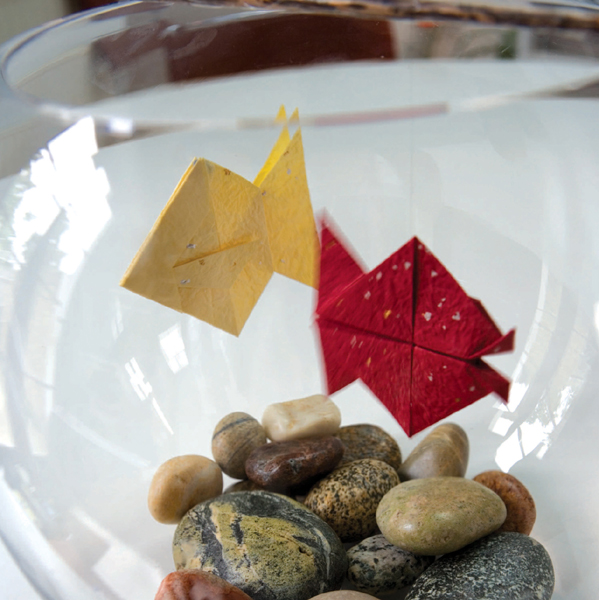
The Japanese Goldfish (left) is a traditional development of the Kabuto, effected by the help of two small, strategically-placed cuts. The Koi Carp (not shown) is a modern design developed in exactly the same way. It goes to show that even the Japanese sometimes overlook the obvious. The Knotfish (right) is a simple fish developed from the Lover’s Knot. You will recognise the mouth from the Piranha, although this particular design is not an action model.
Simple Transformations
It is often possible to transmute an existing origami design into a new one. There are sets of designs that develop from each other in the traditional repertoire, particularly in the Japanese tradition. These transformations may well have been happy accidents, or they may have been the result of some intentional exploration of possibilities. The origins of many of these folds are lost in time and these transformations are not always fish... although there does appear to be a theme developing.
Materials
For all three fish - a single square of mono paper and a small pair of scissors. Both surfaces of the paper are visible on the outside of the finished design.
To make Japanese Goldfish
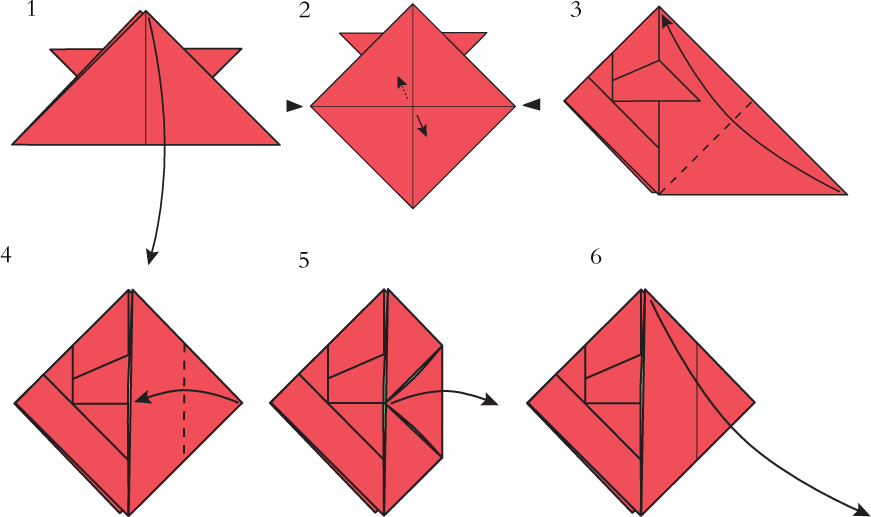
Complete Steps 1-11 of the Kabuto (see here).
1 Swing the front layer downwards.
2 Squeeze the left- and right-hand corners towards each other so that the centre opens up in front and behind. Continue squeezing until the corners meet in the centre. The result should look like Step 3.
3 Fold the right-hand point inwards and upwards using the existing crease.
4 Fold the right-hand point into the centre.
5 Undo the fold made in Step 4.
6 Undo the fold made in Step 3.
7 Squeeze the left and right-hand corners towards each other so that the centre opens up in front and behind.
8 Cut along the creases marked with a thick black line. Make sure you only cut through the front layer of the paper.
9 Squeeze the left and right-hand corners towards each other so that the centre opens up in front and behind. Continue squeezing until the corners meet in the centre. The result should look like Step 10.
10 Separate the front and back layers then gently push the darker shaded area of the paper completely inside out. As you do this the right-hand point will flip upwards.
11 This is the result. The dotted line shows the position of the darker shaded area of paper shown in Step 10 after the manoeuvre has been completed. The Japanese Goldfish is finished.
To make Koi Carp
Begin with the Japanese Goldfish. Align the design with Step 12.
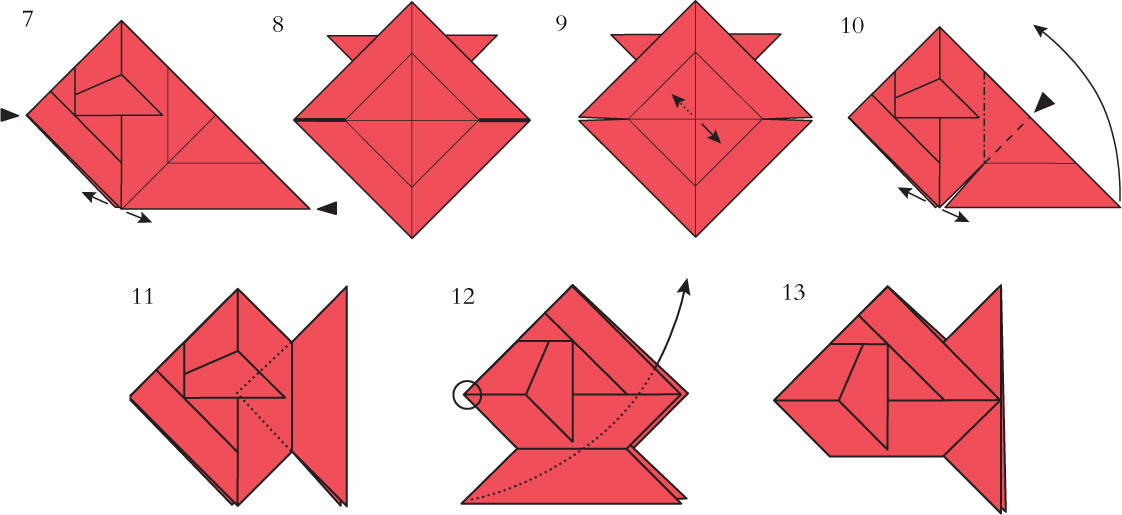
12 12 With your left hand take hold of the Japanese Goldfish at the point marked with a circle. Now use your right hand to turn the tail completely inside out between the other layers. This can be done in one smooth move.
13 Voilà! The Koi Carp is finished.
Using Cuts
While the use of cuts was common in the Japanese tradition of origami it is almost anathema to many modern paperfolders. This is partly because it goes against the pure origami ethic, and partly because it alters the papers interconnectedness, which makes the origami design process much less challenging. While it is better to avoid cuts if you can, there is a point at which avoiding them becomes so inelegant that the use of a few judicious cuts to simplify the design can be totally justified. You might like to work out for yourself how to fold the Japanese Goldfish without using cuts. Which method is more elegant and which is better overall?
Another use of cuts is to partly sub-divide a large sheet of paper into smaller individual but still connected sheets which can then be folded into a more complex design (see here).

Complete Steps 1-21 of the Lover’s Knot (see here).
1 Fold the centre of the front two layers of the right-hand edge to the left and flatten so that the design looks like Step 2.
2 The enlargements show how to form the mouth.
3 Fold the lips upwards and downwards as shown.
4 Open out the folds made in Step 3.

5 Outside reverse fold the lips. You will be able to open out the flaps marked with small circles in Picture 6 to make this easier to achieve.
6 Turn the project sideways.
7 The Knotfish is finished.