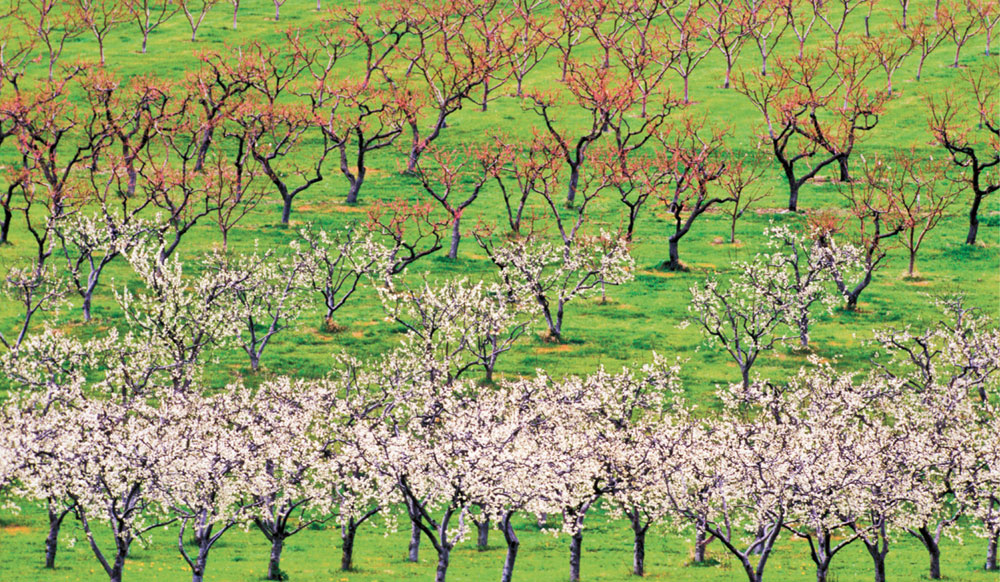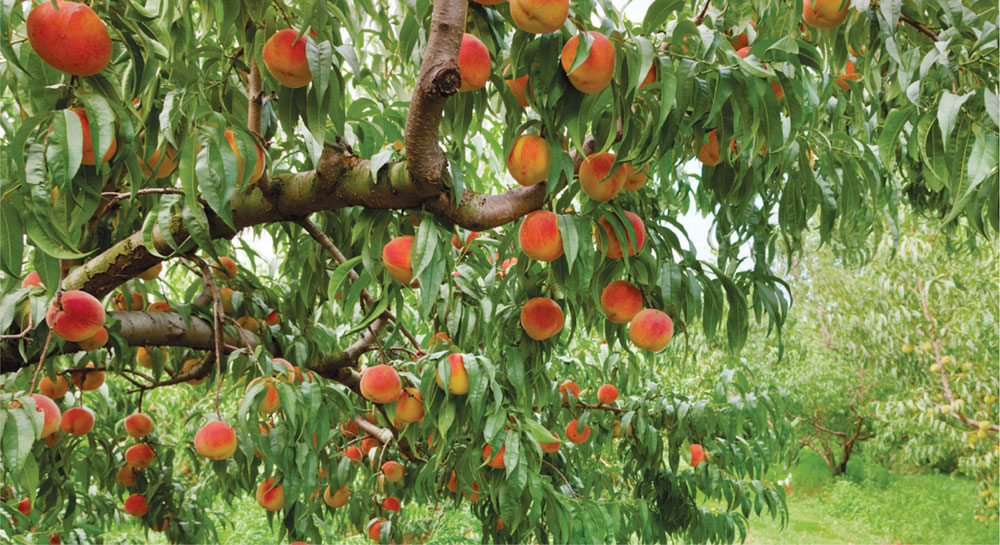
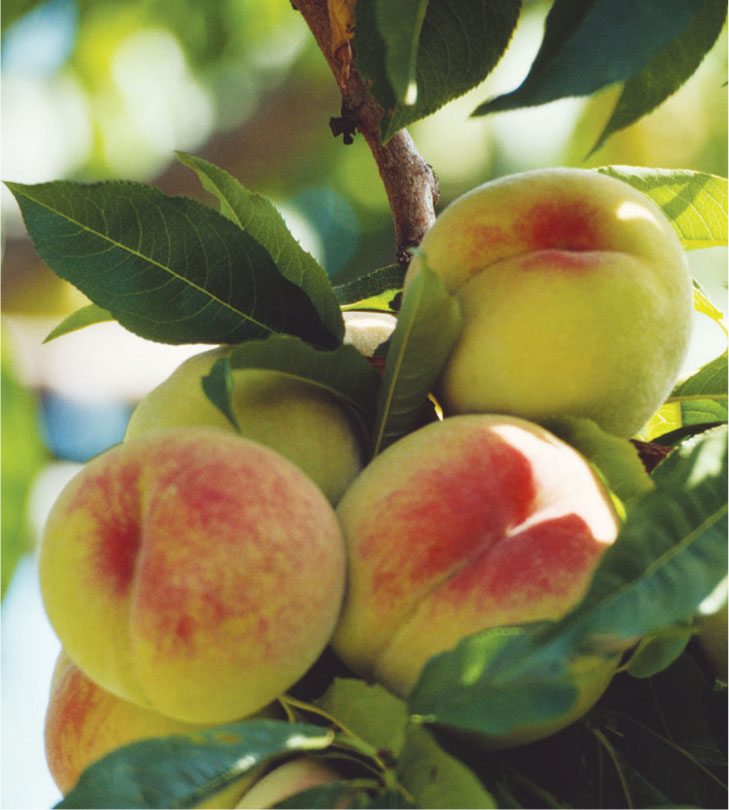
Peach trees laden with fruit.
Planting a fruit tree or shrub is like making an investment in the garden. It can take as many as ten years to get a harvest from a nut tree. Most fruit trees bear (produce) fruit somewhere between two and six years after planting. When you buy fruits, the source (website, catalog, garden center) should be able to tell you when the tree will bear. By the time you buy some plants, they’re already of bearing age and you won’t have to wait.
Peach trees laden with fruit.
First thing’s first: nut trees are fruit trees. Nuts are the fruits of the trees that bear them, just like a zucchini squash is the fruit of a zucchini plant, and a tomato is the fruit of a tomato plant. From this point, as there is just one nut tree in this book, all of the fruit trees and nut trees will just be referred to as “fruit trees.” Their care is similar enough that it won’t make a difference.
Fruit trees and shrubs (and vines, for that matter) take up a lot of space in the garden relative to vegetable and herb plants, and they’re more permanent. It’s important to choose plants that produce fruits that you like to eat, and to be mindful of space. Most fruit trees need full sun in order to produce well. If you’re starting with a blank slate of a landscape, the sky can be the limit. If you are trying to work fruits into an existing landscape, siting is trickier.
There are many factors that influence which fruit plants you choose for your garden. When selecting fruits to grow at home, you’ll need to pay attention to these characteristics:
Source
Tree size
Rootstock
Bloom time
Pollination requirements
Pest and disease resistance
Chilling hours
Cold hardiness
What you like to eat
Whether you’ll eat everything fresh or preserve part of your harvest
One is not more important than the other. All of the above characteristics influence how a fruit plant grows and whether you’ll be successful growing it.
Thoughtfully selecting the source of fruit plants is essential to successful fruit growing. You’ll have more long-term success if you purchase locally grown fruit plants than if you purchase plants grown in greenhouses or fields on the other side of the country. Different weather conditions, different pests, and different diseases affect fruit trees much more than plants such as tomatoes or green beans that live for one season and then are replanted.
Luckily, there are plenty of nurseries in the Northwest that grow fruit trees suitable for backyard gardeners. Make sure that you’re getting a variety that will do well in your climate. Different trees and plants will grow in the inland areas than in the maritime regions.
The largest fruit plants that you can grow are nut trees. Apples follow close behind, if they are not grafted on dwarfing rootstock. Pears, plums, and peaches are the next smallest (in that order). Vining fruits such as grapes are about equal with shrubby fruits such as raspberries in terms of space requirements. Melons and strawberries take up a lot of space but can be easily moved from year to year. Before buying a particular fruit, decide whether you truly have the space for its eventual size and if you want to commit that space over a period of ten to twenty years.
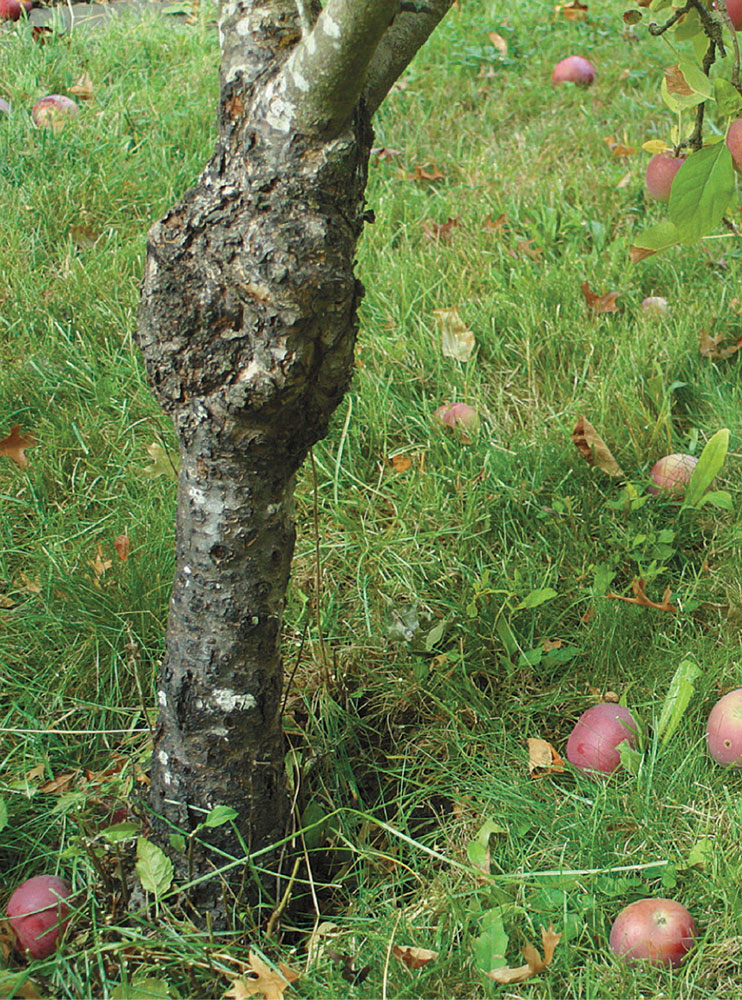
The swelling on a tree trunk indicates the graft union where the rootstock (bottom) and scion (top) of a fruit plant grow together.
The ultimate size of many fruit plants depends on the rootstock. Most fruit trees have two parts. The top of the plant, which produces the fruit that we eat, is called the scion. Rather than growing from seed, scions are cuttings from other plants of the same variety. (This process was the original “cloning.”) The bottom of the plant is called the rootstock. Rootstocks can cause a scion to grow more slowly, increase cold hardiness, shorten the time between planting and fruit production, and add resistance to pests. The scion is grafted onto the rootstock, and the two pieces of plant grow together to form one plant. The point where these two join is called the graft union.
In the Northwest rootstocks are equally valuable for their ability to add cold hardiness or disease resistance as they are for their ability to control size (which is discussed in the “Growing Tree Fruits and Nuts in the Northwest” section on page 84).
Fruit plants have to be able to flower in order to produce fruits. Most fruit plant flowers need to be pollinated, and some need to be cross-pollinated with pollen from another variety.
When selecting fruit trees and shrubs for your home orchard, pay attention to whether a plant is self-fertile or self-pollinating (in which case you can plant just one plant and still get fruit), or if the plant requires cross-pollination (in which case, you need at least two plants). If you have limited space, go for self-fertile plants.
For trees requiring cross-pollination, bloom time also matters. If one variety of tree or shrub is finished blooming before the one you bought to cross-pollinate it, neither will bear fruit. Apples, peaches, pears, and other flowering fruits are categorized into groups based on blooming times. You need to plant at least two from each group in order to get good pollination and fruit set.
Pay attention to pollination requirements when purchasing fruit plants. Otherwise, you could find yourself with healthy plants that never produce a harvest.
Fruit trees and shrubs are susceptible to an alarming number of pest and disease problems. There are sprays and treatments that you can use to get rid of the problems, but you can give yourself a head start by choosing resistant plants. In grafted fruit plants, both the scion and the rootstock play a part in disease resistance. Pay attention to the recommendations in individual plant profiles.
Fruit trees require a certain number of “chilling hours,” or hours when the air temperature is below 45°F. Most fruit trees have chilling hour requirements that correspond to the length of time a plant will remain dormant before flowering. Chilling hours are required in many plants to trigger a break in dormancy leading to blooming.
Temperatures above 60°F reverse chilling hours accumulated. If you plant a tree that requires 500 chilling hours in an area that receives only 300 hours, the plant will not flower and will not produce fruit.
Chilling hours are discussed in more detail in individual plant profiles. Recommended plant varieties for each area of the Northwest have been selected, in part, with chilling hours in mind.
Fruit trees and plants need a lot more care, for a much longer time, than other edibles. When picking out what you’re going to plant, think about what you like to eat. Many gardeners find themselves branching out and trying new things if those new things come from their own gardens, but you want to be realistic. How many figs can you eat? There’s no reason to plant six plants unless you’re going into business making fig jam for everyone in your city. You don’t need twelve apple trees if you’re not going to put up quarts and quarts of apple butter.
Only plant things you like to eat, and only plant trees that will bear a manageable harvest for you.
How many of each fruit do you plant? How much room do you need? The number of plants depends on the size of the plant, the yield you hope to harvest, and whether the plants require cross-pollination.
You can start small with two apple trees, four to six raspberry plants, four to six blueberry plants, and twelve strawberries.
Or you can tuck a few fruit trees along your lot line, add a row of blackberries near the vegetable garden, and devote a couple of rows or a raised bed from the vegetable garden to strawberries.
For me, the more fruit I can grow, the better. I have never had a problem giving away extra homegrown anything. The mistake most fruit gardeners make is not planting enough of each type of plant, thus limiting (or downright preventing) good pollination and fruit set.
Each type of fruit plant has its own specific schedule of care, but there are maintenance tasks that are important to all fruit plants. You will need to make time to take care of these tasks in your fruit garden.
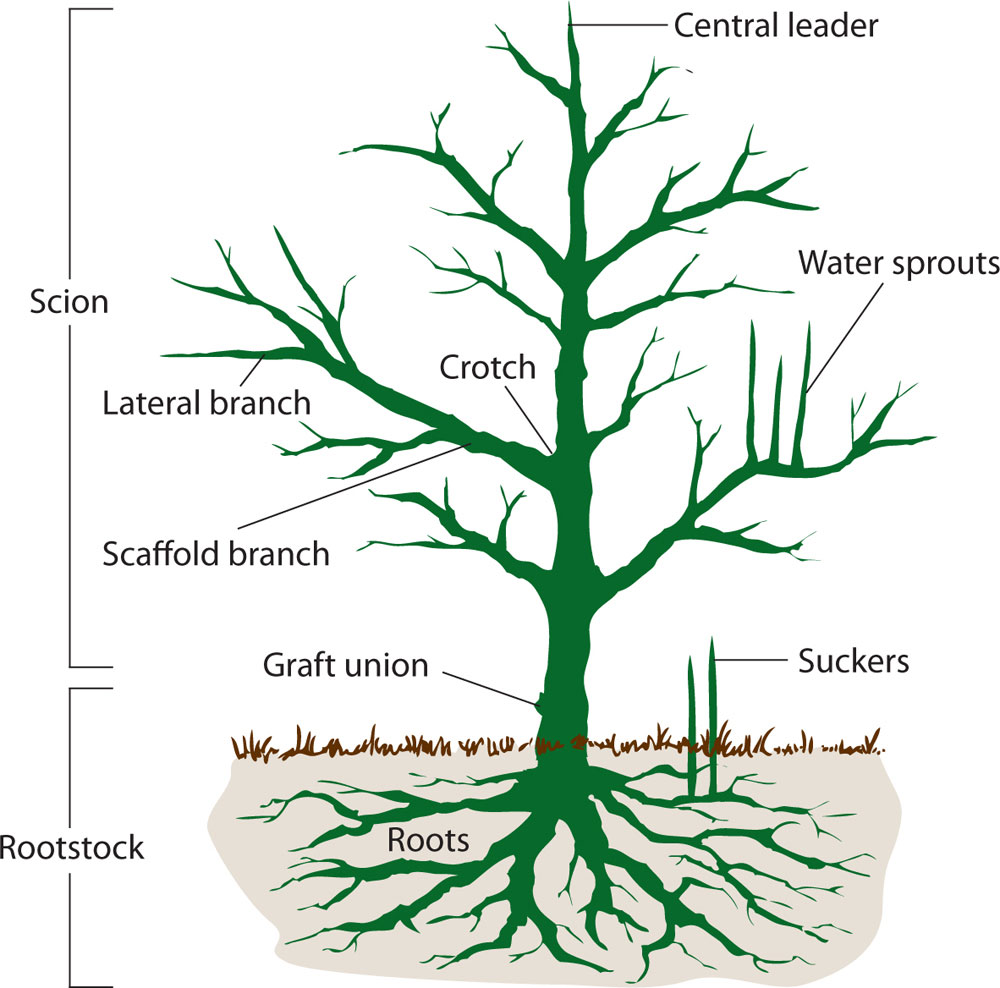
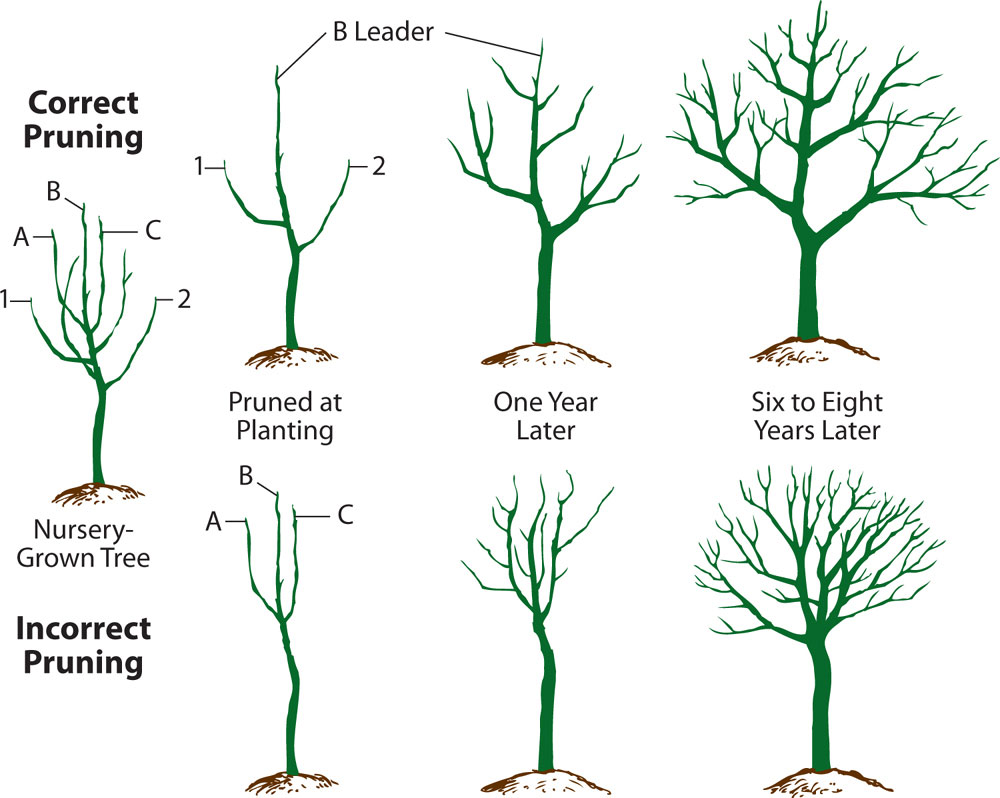
To understand the directions in the plant profiles, you need to be able to identify the parts of a fruit tree.
Rootstock: The bottom of the tree; the roots.
Scion: The top of the tree; the portion that produces fruit.
Graft union: The place on the tree where the rootstock meets the scion.
Central leader: The main trunk of the tree. (Apples and pears are pruned with a central leader. Peaches and plums are not.)
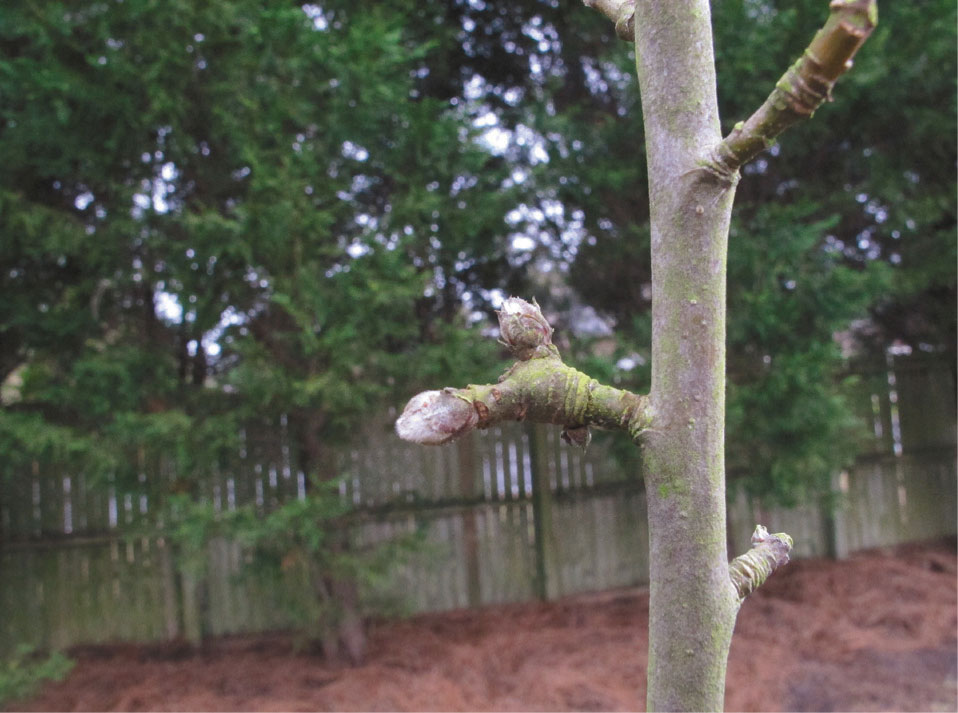
Water sprout: A branch that grows straight up from a scaffold branch on the fruit tree. Water sprouts do not produce fruit and should be removed.
Scaffold branch: A main horizontal branch from which fruiting spurs or branches grow.
Lateral branch: A smaller branch growing off of a scaffold branch. Lateral branches grow out, not up, and produce fruiting stems called spurs.
Crotch: The angle of a scaffold branch to the tree. Wider crotch angles are stronger and produce less breakage than narrow angles.
Suckers: Sprouts coming up from the rootstock. Sometimes suckers come from the stem below the graft union, and sometimes they appear to sprout right out of the soil. They should always be pruned off. Never put systemic weedkiller on a sucker. You can kill the whole tree.
Pruning isn’t just for fruit trees. Grapes, brambles, and blueberries also require pruning. You’ll prune to control the size of the plants, to get rid of old growth and encourage new growth, to increase sunlight penetration into the tree canopy, and to allow for airflow. Pruning helps establish the architecture of fruit trees and the renewal of blackberry patches.
Most pruning is done during winter when plants are dormant. A few plants benefit from summer pruning as noted in the individual plant descriptions.
Here are the tools that you need in order to prune:
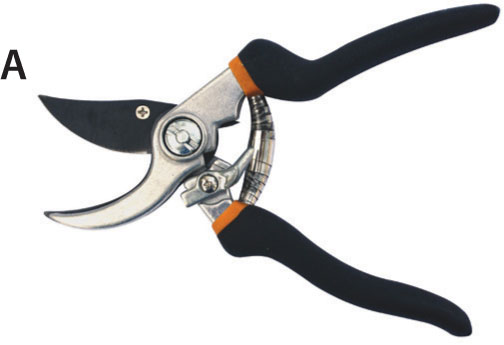
A Hand pruners have a cutting blade and an anchor blade. They’re good for pruning, deadheading, and cutting bamboo stakes.
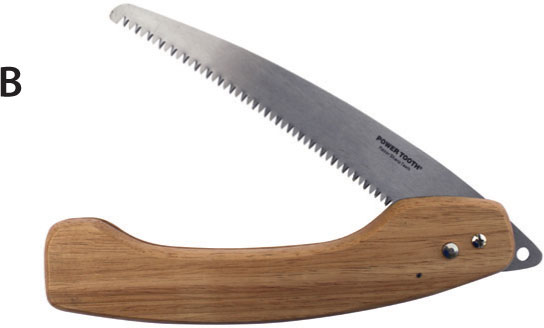
B Pruning saws fold up for easy toting in the garden basket. They are handy for cutting branches over 2 inches in diameter.

C Loppers are like big hand pruners. They have the same type of cutting blade, but usually it is larger. Loppers also have longer handles. They’re good for trimming shrubs and tree branches that are out of arm’s reach.
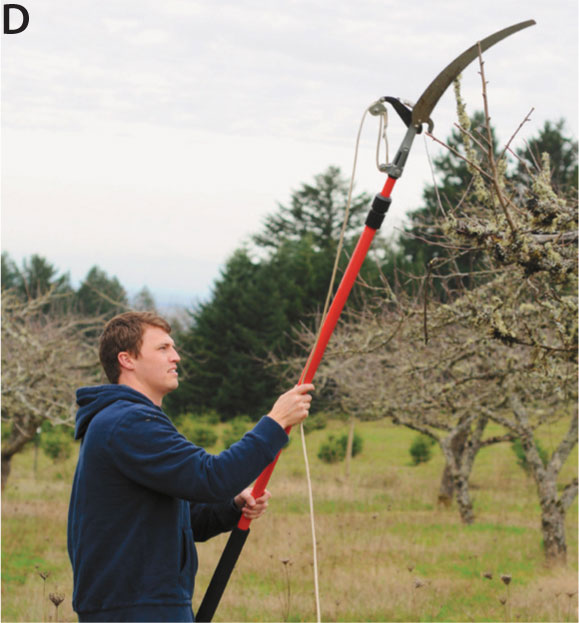
D If you grow semidwarf or standard-sized fruit trees, a pole pruner with both a lopping and a saw attachment is a handy tool. You’ll use the saw just like you’d use a pruning saw, only with a longer handle. The lopping attachment will have a string to pull to engage the cutting blade. With a pole pruner, you can reach higher up into the tree without having to climb a ladder.
Once the plants are in the ground, the most crucial aspect of fruit tree care is pruning. Individual instructions for fruit tree pruning are listed in the plant profiles. Here are the basics.
Why Prune?
 To encourage new growth
To let light and air into the tree
To establish good structure (which makes it easier to harvest fruits)
To control size
Fruit trees are usually pruned to have a central leader with scaffolds (apples, pears) or in an open-vase shape (peaches, plums). The scaffold method establishes a central leader with branches that decrease in length as you move up the tree. The open-vase shape establishes several main lateral branches that bear fruit. You can use heading cuts, thinning cuts, and renewal pruning to establish these shapes.
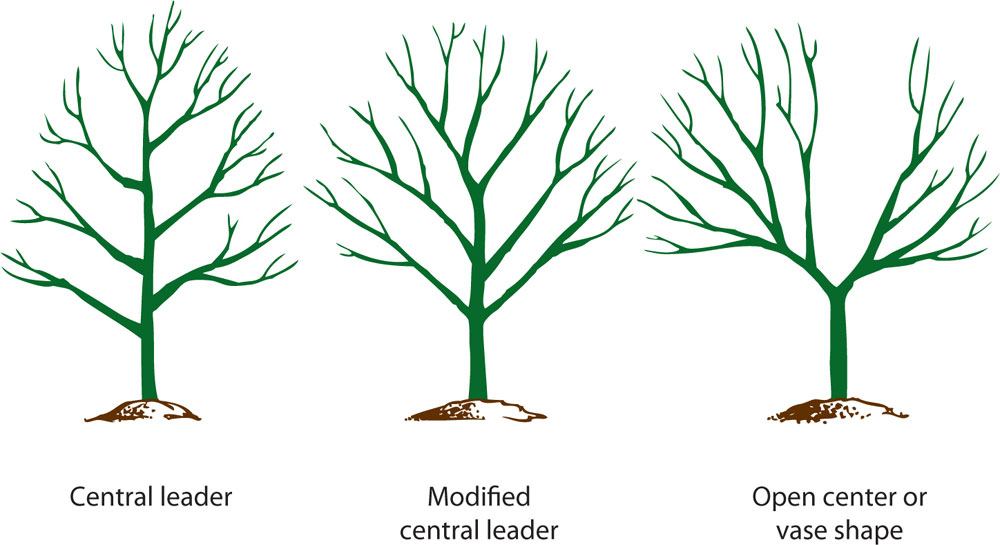
Fruit trees are shaped by pruning. Apples should be pruned in a pyramid-like shape, while peaches and plums are pruned in an open, vase shape.
Heading cuts: When you cut off the end of a branch, that’s called a heading cut. The response of the plant will be to produce more side-shoots below where you made the heading cut.
Thinning cuts: When you remove some of the “bulk” or interior branches by cutting them all the way back to the main stem, you’re making thinning cuts.
Renewal pruning: This is a process most often used with shrubs, but which can also be applied to fruit trees, whereby you remove at least one-third of the old growth on the plant each year, stimulating new growth.
Pruning stimulates fresh new growth that will produce fruit. Old orchards are brought back to life by careful pruning of the old trees. Remember: When you prune fruit trees, it’s like cutting hair—the plants will grow back.
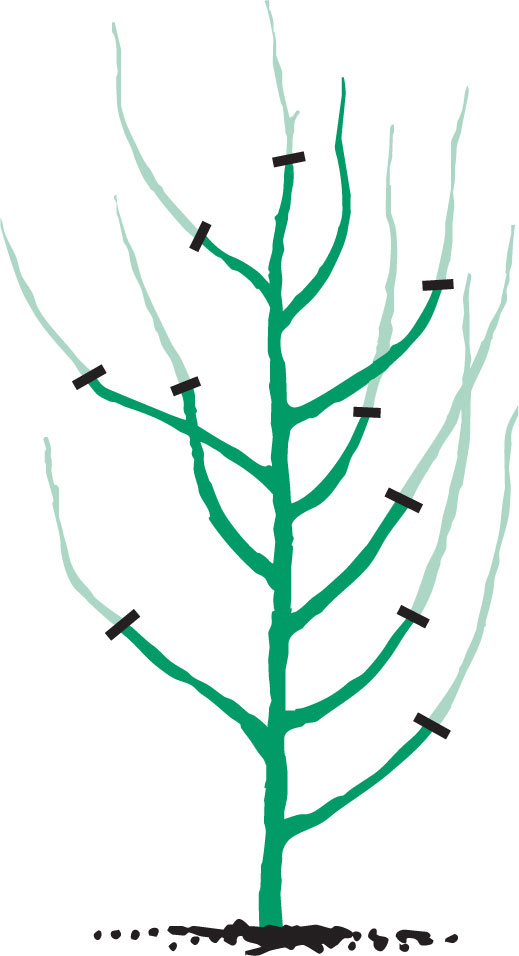
Heading cuts involve cutting off the ends of plant branches.
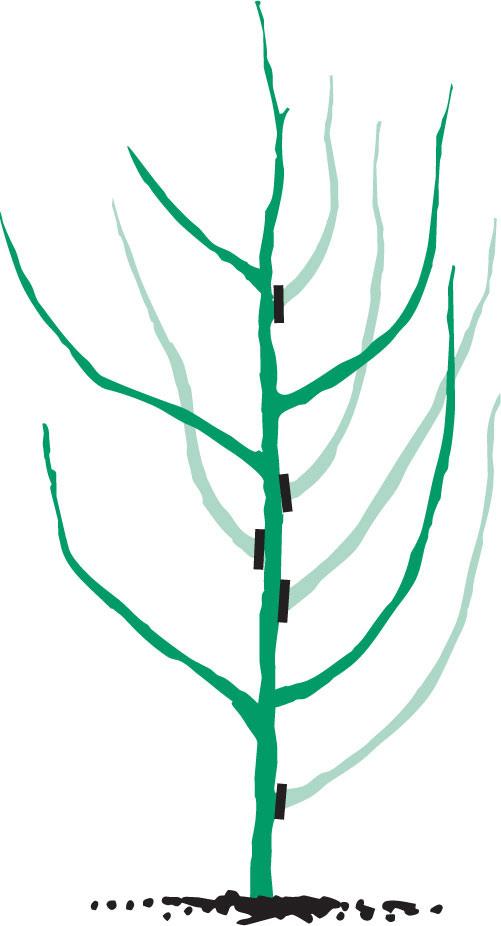
Thinning cuts involve removing some of the interior growth of the plant.
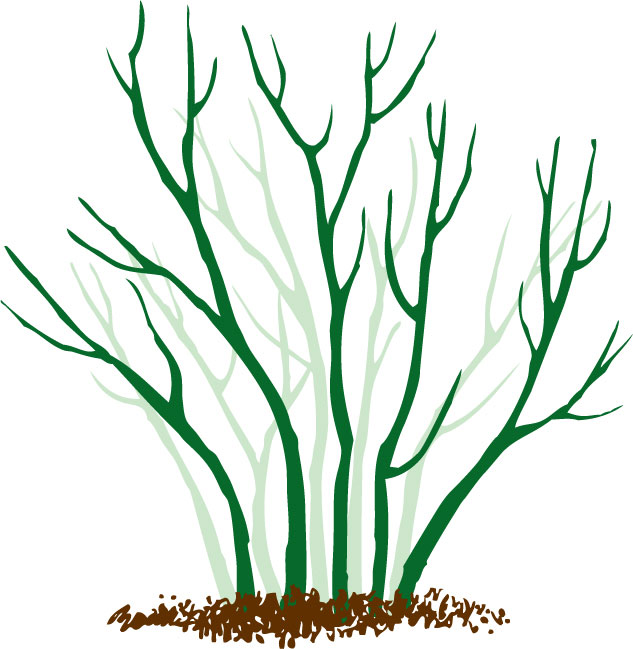
When renewal pruning, remove one-third of the plant’s growth by cutting it back to the ground.
Thinning: Fruit trees require thinning in order to produce larger fruits. The trees will self-thin about halfway through summer. You’ll know this has happened, because suddenly a bunch of little fruits will be lying all over the ground. You can go through after this and continue to selectively thin. Pick fruits so that there is only one fruit every 4 to 6 inches along a branch.
When you need to remove a large branch (anything that requires a pruning saw), use the following three-cut pruning technique.

1 Make the first cut on the underside of the branch, about 6 inches from the tree trunk. You’ll only cut one-fourth to one-third of the way through the branch.
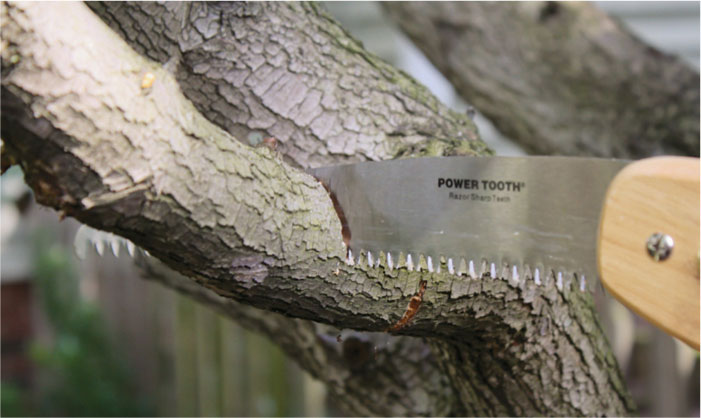
2 Make the second cut farther out on the branch from the first cut. Cut the branch all the way off. The branch will probably break off while you’re cutting it. That is why you made the first cut on the underside of the tree—to help the branch break in the direction you want without stripping the bark off the branch.
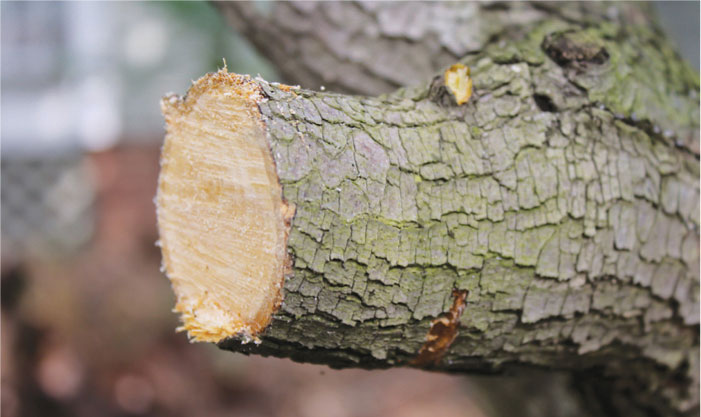
3 You can see the finished second cut, here. At the very bottom of the cut edge, you can see where part of the branch ripped. Do not make a cut that strips the bark off of a tree branch.
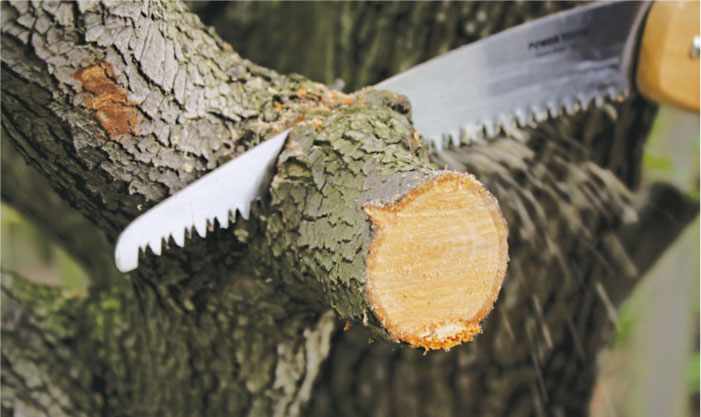
4 Cut off the branch stub remaining on the tree. Place the pruning saw just outside of the branch collar, which is the bark swelling between the branch and the main trunk. Saw through to remove the stub. Do not cut the branch flush with the tree trunk, or you’ll hurt the tree’s chances of healing itself.
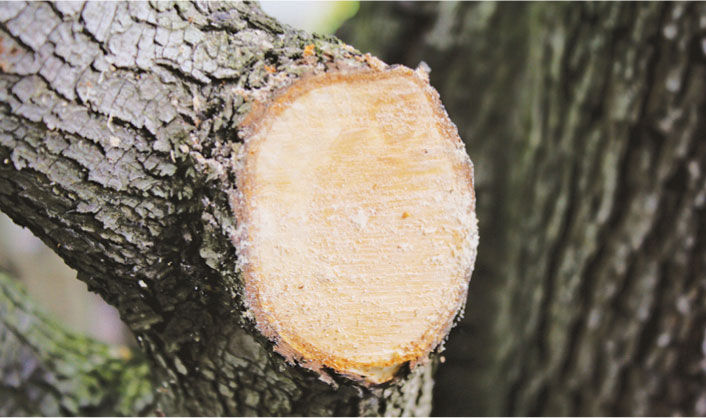
5 In this picture, you can see that there’s still about ¼ to ½ inch of branch left to allow the branch collar to heal. Never cover pruning cuts with tar, concrete, or sealant. The tree will heal itself if left alone. Sealant or tar creates a dark, moist environment that is perfect for bacteria to grow in. Sealing a cut can actually hurt the tree. If you follow this pruning technique, it will heal itself.
Most landscape trees do not need to be staked when first planted, but many fruit trees do. Blackberries and raspberries require some sort of trellis to climb up for support. Fruits can be shallow rooted, which makes them easily dislodged by wind. Plan to stake newly planted trees and to construct sturdy trellising systems for newly planted vining fruits.
Other care considerations unique to different types of fruit plants are discussed in more detail in the individual plant profiles.
Fruit pest control depends upon the pest and the host plant. Some pests are controlled with a spray of horticultural oil when the plants are not leafed out. Other pests have to be controlled while fruit is developing on the trees.
Pest control on fruits never stops, because observation of the trees and plants never stops. Different pests are active at different times of the year. Make it a habit to look at your fruit tree orchard. If something seems amiss, take a cutting or take some pictures and identify the problem. If you’re having trouble, consult your local cooperative extension office.
If birds are a problem, use netting to keep them from carrying away your harvest before you can.
Growing fruit trees is as rewarding as it can be frustrating. To get good fruit tree growth and robust harvests requires patience (it can take a while for plants to bear fruit) and vigilance (there are always insects and diseases waiting in the wings to destroy your harvest).
Choosing the right variety is an important part of success in fruit tree growing. Another factor in selecting a tree is deciding upon the size that you want.
You can purchase standard trees grown on seedling rootstocks. These fruit trees can grow from 20 to 30 feet tall. Most home gardeners look for semidwarf and dwarf fruit trees. Semidwarf trees (10 to 20 feet at maturity) are best, if you have the space. They are usually longer lived, establish deeper roots, and have more disease resistance than dwarf trees (5 to 10 feet at maturity).
Aside from the natural height of the tree (apples are naturally taller than peaches), the rootstock usually determines the size of the tree.

Dwarf pear trees are easily managed from ground-level, as they grow no taller than 10 feet or so.
You can check the index at the back of the book, but you can also use the alphabetical list below to find your favorite edibles.
Apple, 86
Blackberry, 112
Blueberry, 108
Cherry, 92
Chestnut, 94
Fig, 110
Grape, 118
Hazelnut, 96
Melon, 120
Nectarine, 98
Peach, 98
Pear, 100
Persimmon, 102
Plum, 104
Raspberry, 112
Rhubarb, 122
Strawberry, 124
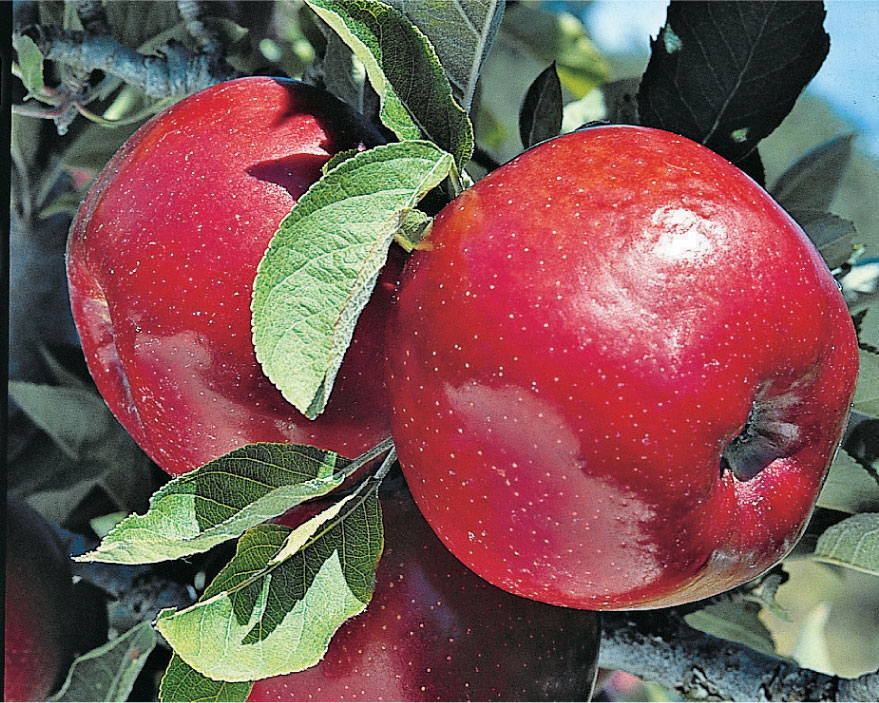
You’ll never want to eat a store-bought apple again after you taste one that you harvested from your own tree. They’re sweeter, crunchier, juicier, and have so much more flavor! Your own apples also won’t have the waxy coating that commercial growers put on their fruits to keep them “fresh” during transit.
All apples that we grow today are actually two-part plants. The top of the plant, which produces the fruit we eat, is called the scion. Rather than growing from seed, scions are cuttings from other plants of the same variety. The bottom of the plant is called the rootstock. Rootstocks can cause a scion to grow more slowly, increase cold hardiness, shorten the time between planting and fruit production, and add resistance to pests.
When you purchase an apple tree, you select not only the scion (or top), but often a particular rootstock as well. Nursery catalogs sometimes offer different choices—allowing you to purchase, say, a Gala apple with a dwarfing or semidwarfing rootstock. A “standard” tree is one that grows to full size without the benefit of a dwarfing rootstock. The size that you select depends on how much space you have to grow the tree, the type of soil in which you will be planting it, and the average low temperature for your area.
With the right selection of variety, apples can be grown in the Northwest.
 Recommended Varieties
When selecting apple trees, you need to think about two things:
The preferred size (and thus the preferred rootstock)
Bloom time for pollination
Semidwarf rootstocks will produce trees that are about two-thirds the size of a standard tree. Common semidwarf rootstocks for the Northwest include MM.106, MM.111, and M.7. These rootstocks cut the time from planting to fruit production from ten years down to four to six years.
Dwarf rootstocks produce trees that are half to one-third the size of a standard tree and reduce time from planting to fruiting from ten years to two to four years. Common dwarf rootstocks for the Northwest include M.9 and M.26.
In order to get apples, you need to plant at least two trees that bloom at the same time so that they can cross-pollinate each other. Some trees are sterile and do not produce fertile pollen. If you plant one of those trees, you need to plant at least two others in order to get apples on all of the trees.
It is best to pick two trees that bloom at the same time to plant in your home “orchard” in order to ensure good cross-pollination.
Plant at least two apples (selecting from the bloom time groups) in order to get good pollination. Varieties marked with an * are sterile and cannot cross-pollinate another apple tree. If you plant one of those, you need at least two others that bloom at the same time for fruit set.
Early-Mid Season: WSU AxP, Gravenstein*, Zestar, Brown Russett, Egremont Russett, Alkemene, William’s Pride, Louisa, Pink Cloud, Chehalis, Mott Pink, Pristine, Pink Pearl, Scarlet Sentinel, Dolgo, Silken, Centennial, Sansa, Akane, Lodi, Summerred
Mid Season: Enterprise, Jonagold*, Almata, Golden Sentinel, Belmac, North Pole, Rebella, Arkcharm, Liberty, Sweet Sixteen, Resi, Snowsweet, Red Boskoop*, Shizuka*, Greensleeves, Fameuse, Beni Shogun, Corail, Dayton, Ashmead’s, Hudson’s Golden Gem, Releika, Michelin, Freyburg, , Rubinette, Karmijn*, Prima, Royal Gala, Elstar
Mid-Late Season: Hatsuaki, Pink Lady, Foxwhelp, Red Flesh, Red Cort, Michelin, Shay, Honeycrisp, Foxwhelp, Tsugaru, Melrose, Roxbury Russet, Queen Cox*, Goldstar, Kingston Black, Wolf River, Fiesta, Ellison’s, Dabinette, King Edward VII, Arkansas Black, King*, Bramley*, Northern Spy, Cortland, Jonafree, Jonamac, Spartan, Mutsu
Special Considerations: Gardeners living in the warmest winter areas of the maritime region have to be careful about chilling hours and disease issues. These apple varieties work best for those areas: Akane, Liberty, Shay, Pristine, Chehalis, Williams Pride, Dayton, Fiesta, Queen Cox, Resi, and Rajka.
PlantingApples are tree fruits and are planted the same way you would plant any tree. Refer to the instructions on page 45. You can plant apple trees at any point during the year, although it is best to avoid planting them during the worst heat of summer (mid-June through August).
Also important in terms of planting is spacing. Apples need to be planted close enough to each other for pollination. Plant standard trees no more than 75 feet apart, semidwarf trees no more than 45 feet apart, and dwarf trees no more than 25 feet apart. Plant trees so that they have room to grow without touching at their mature spread. (That varies from tree to tree. Read the label for expected dimensions.)
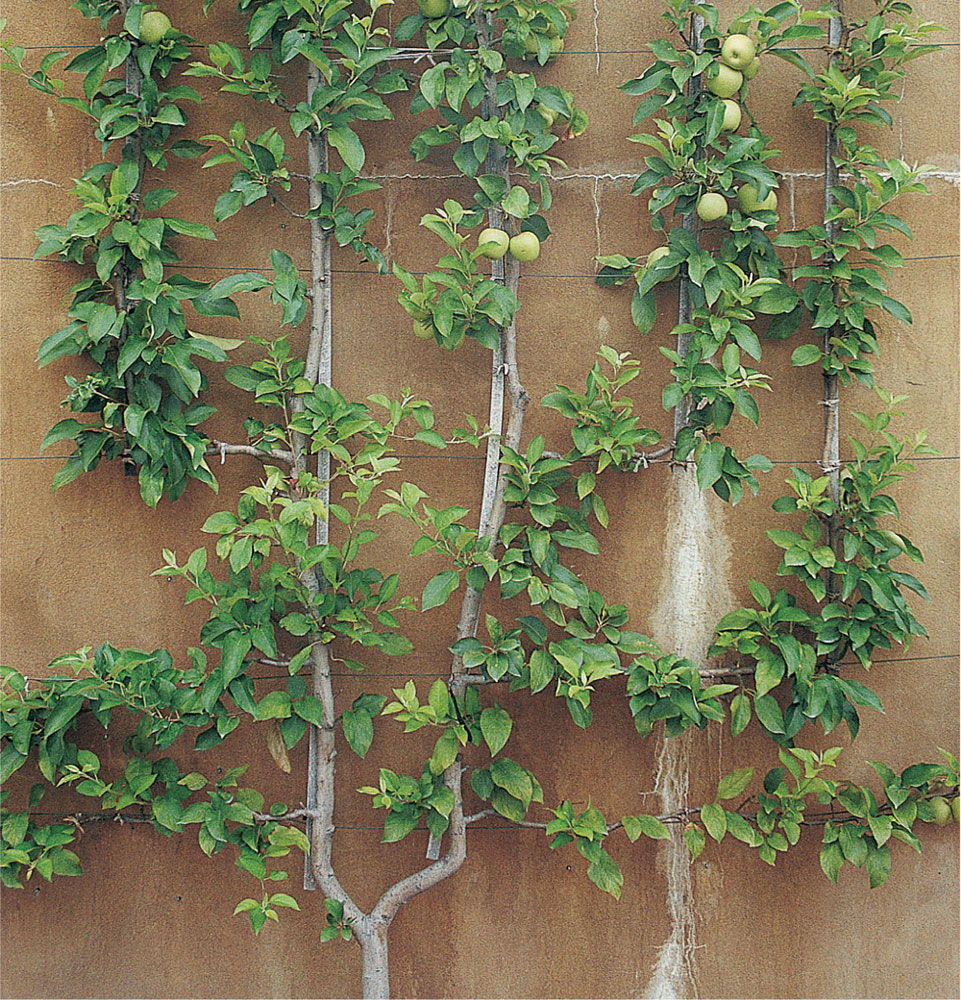
Columnar apple trees are a great choice for small yards.
When planting apple trees, make sure that the graft union (where the scion meets the rootstock) is at least 5 inches above the soil. Stake grafted trees for the first two to three years to ensure that they take root and, literally, stay together while getting established in the garden.
MaintenanceOnce planted and staked, the primary maintenance concern is pruning. You need to water the trees as they are becoming established and fertilize yearly in spring by spreading a balanced slow-release fertilizer according to package instructions around the root zone of the tree.
To allow trees to establish themselves well, remove all fruit that forms during the first three years. (Difficult, I know, but your trees will be healthier in the long run.)
Pruning is the critical type of maintenance for apple trees, though. From the moment you plant a tree, the way you prune it and train it will determine whether it is healthy and has good structure for bearing fruits or whether it is susceptible to breakage in high winds, breakage from heavy fruit loads, or low fruit production from lack of light.
When pruning fruit trees, the goal is to establish good architecture. This allows air circulation in the canopy (top of the tree), permits light penetration (sunlight must reach the inner branches for fruit production), and creates a branch structure that can withstand wind and the weight of fruit on a branch.
Pruning to Maintain Established TreesOnce the tree has become established (four or more years), you’ll need to prune to maintain good architecture and encourage fruiting. Always remove water sprouts, which are branches that grow straight up from side branches. These aren’t growing in the right direction to produce good long-term shape.
Apple tree spur
In addition to structural maintenance, you’ll prune to encourage fruiting. Some apple trees produce fruits from spurs, which are small, compressed, nubby stems along the branches. It’s a rule of thumb that the fewer fruits there are on the tree, the bigger the fruits will be. If there are too many spurs on the tree, you can use hand pruners to simply snip off the spurs at even intervals. If the tree doesn’t have enough spurs, you can cut off the end of the branch, which will cause the plants to sprout more spurs along the branches. Some apples bear fruit from the tips of branches. Prune these trees by cutting back the ends of branches by 8 to 10 inches, leaving five or six buds on the branches.
The overall guiding principle of pruning all fruit trees is to maintain a somewhat triangular shape. This allows light to reach every part of the tree. (Remember that no light equals no fruit.)
Pest ProblemsApples are members of the rose family (along with many other edible fruit plants), and are susceptible to a wide variety of pests and diseases. Anthracnose, apple scab, powdery mildew, and fire blight are some of the worst diseases of apples. Try to plant cultivars that are resistant to these diseases. Spraying dormant oil during winter can control many diseases. Apple maggots are the worst insect pests. To control apple maggots, hang traps in the trees—these are available in garden centers and home-improvement stores. You can also protect individual fruits by placing a plastic bag around each fruit and attaching it with a clothespin.
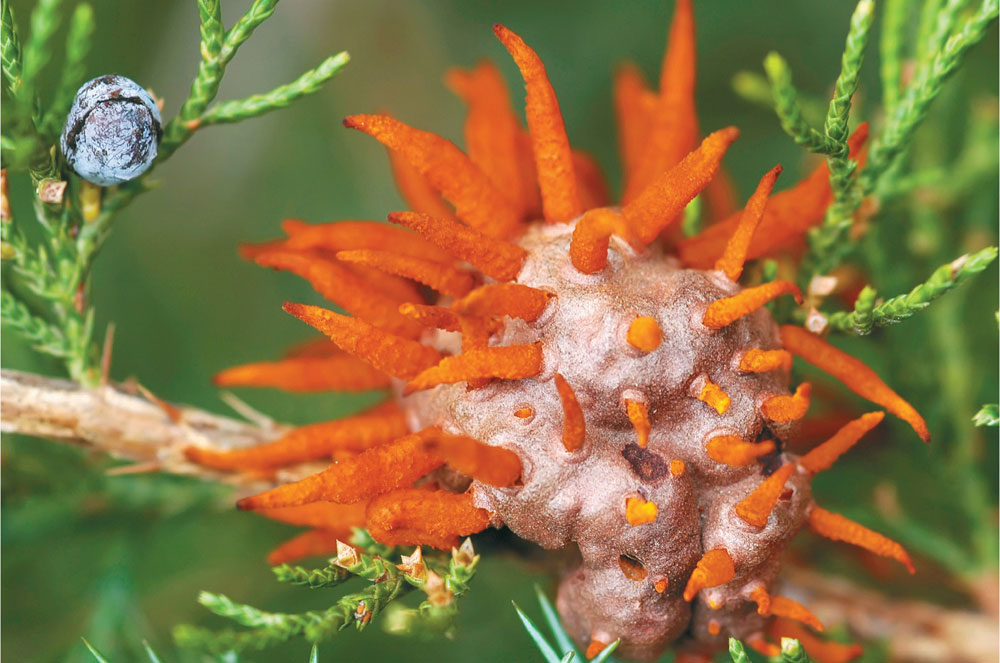
Cedar apple rust
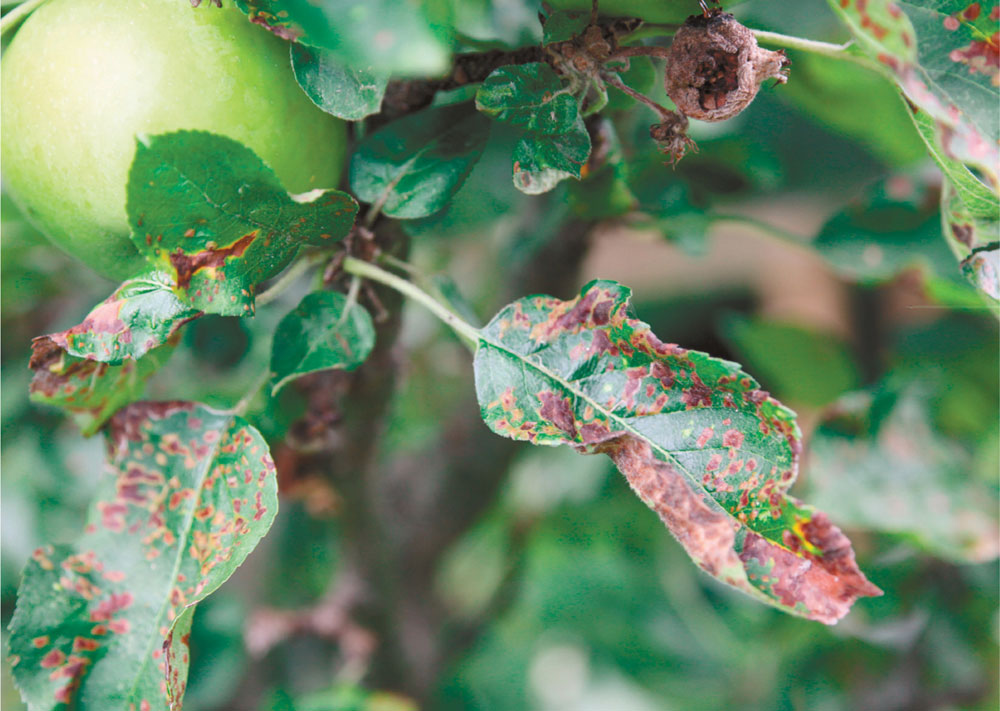
Apple scab
If you have trouble identifying what pest, disease, or cultural problem (caused by maintenance or lack thereof rather than an insect or disease) is plaguing your apple tree, take pictures, including close-ups, and cut a branch and take it to your county extension service.
HarvestingApples are ready for harvest when they easily come off the tree in your hand. Don’t rip apples from the tree, as you can damage the spurs or buds that will produce fruit next year.
Who doesn’t love cherry pie? And don’t you love summer, when you can finally add a Tupperware full of sweet cherries to your lunch box? Not all gardeners in the Northwest can grow cherries, but the ones who can are lucky and should definitely plant a few trees. Cherries grow best in the maritime area of the Northwest.
Recommended VarietiesThere are tart cherries and sweet cherries. Some sweet cherries are self-fertile and do not require a pollinator tree, others do require cross-pollination, so make sure to pick out compatible varieties (bloom at the same time) when shopping. Most tart cherries are self-pollinating.
Sweet cherry varieties: Angela, Hartland Stella, Compact Stella, Regina, Royal Ann, Bada, Lambert, Sweetheart, Lapins, Bing.
Tart cherry varieties: Montmorency, Surefire.
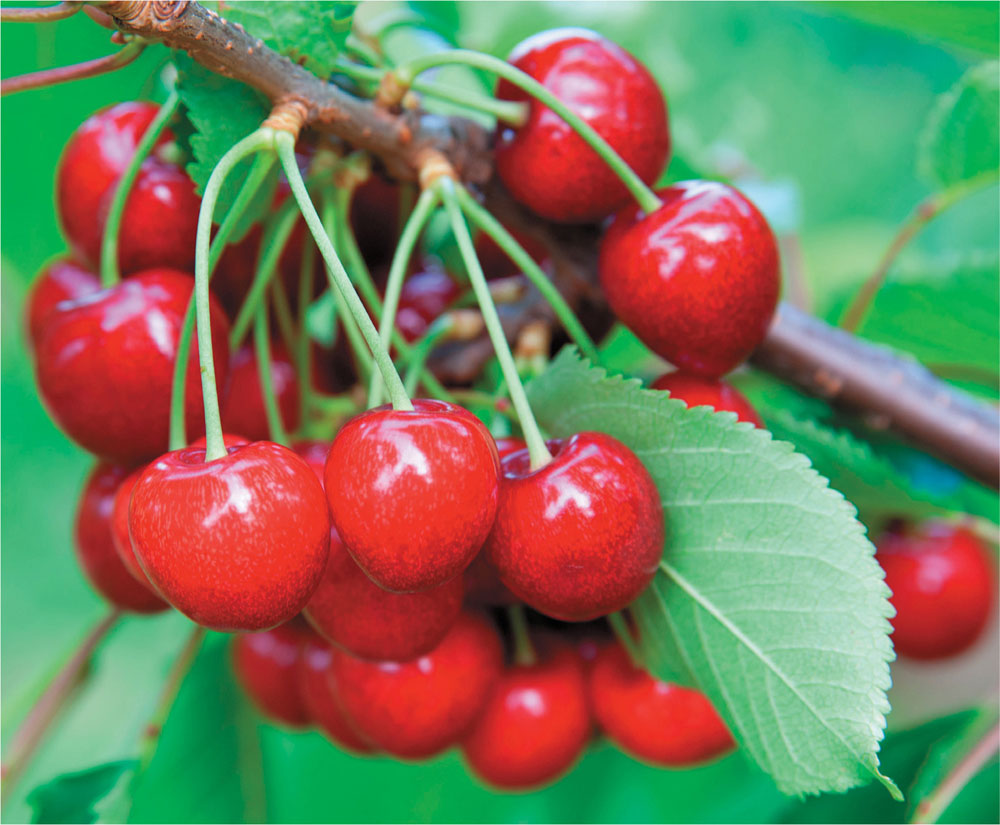
Sweet cherries grow well in many parts of the Northwest.
PlantingCherries grow best in full sun and well-drained soil. Plant the trees, taking care to ensure that the graft union between the rootstock and scion (top and bottom) is at least 3 inches above the soil.
Follow instructions for planting trees on page 47. Stake the trees for the first two years after planting.
MaintenanceCherry trees are highly susceptible to drought. Water the trees daily after planting and do not let them dry out. Mulch around newly planted trees to keep moisture in around the root zone.
Tart cherry pruning is similar to peach tree pruning, in terms of shape. You’ll prune tart cherries to an open vase shape or semi-open vase shape. Prune sweet cherries as you’d prune an apple. Cherries fruit on spurs, like apples, so treat individual branches as you would apple trees, being careful not to knock off or break off the spurs.
Prune cherry trees in mid-summer. Do not prune during cool, wet spring weather.
Pest ProblemsThere are some diseases that affect cherry trees, but they usually do not cause problems for the home gardener. Just take care to rake away all leaf and fruit debris at the end of the season so that disease spores can’t overwinter right under the tree.
Birds are one of the most annoying pests of cherry trees. You can cover smaller trees with bird netting, but if you have a larger tree, hang a “scary eye” balloon in the tree (a yellow beach ball with red circles with black centers) to scare the birds away.
HarvestingCherries are ready to harvest when they easily fall off the tree. Sweet cherries will be firm, while tart cherries will be starting to soften.
The American Chestnut (Castanea dentate) used to comprise 25 percent of trees in hardwood forests in the United States. Chestnut blight took out most of these trees in the Eastern U.S., but you can still find wild chestnuts growing in isolated areas of the Northwest. To grow chestnuts today, you need to look for a Chinese-American hybrid tree. You can also grow a straight Chinese chestnut (C. mollissima). Once established, these nut trees are easy to grow.
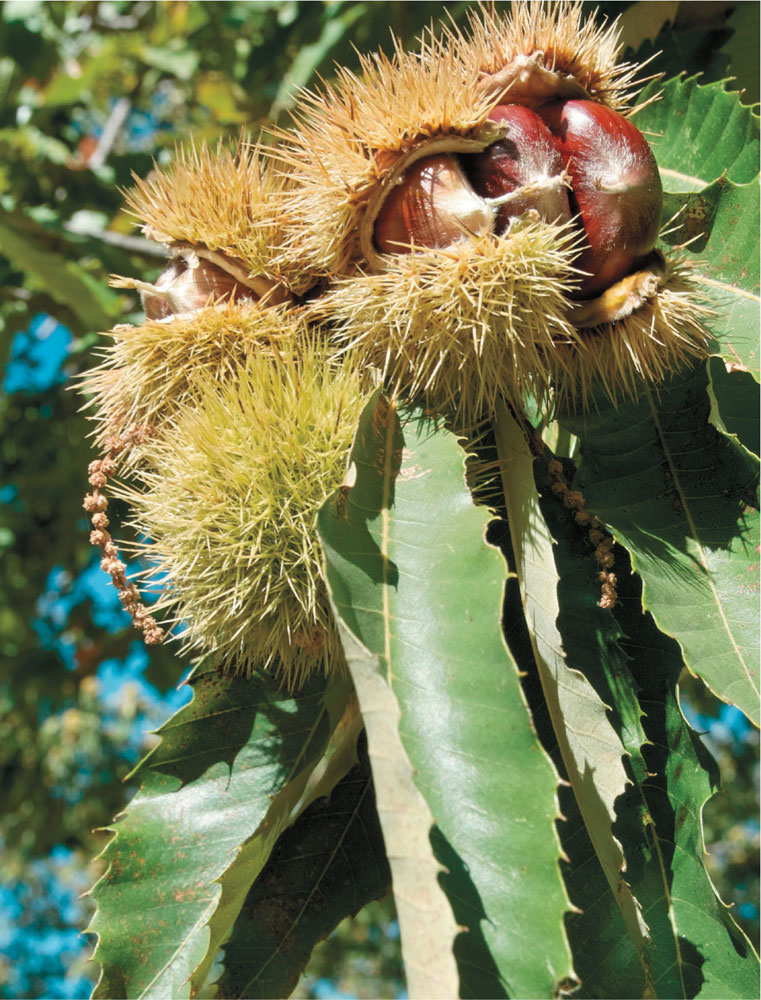
Be sure to plant your chestnut tree where the spiny husks that fall to the ground won’t be a problem.
Recommended VarietiesPlant what you can find. Chestnuts can be difficult to track down. You might have to order online. Chestnuts do require cross-pollination, so make sure to plant a pollinator tree. Some nurseries sell “chestnut seedling pollinators” just for this purpose. Try ‘Colossal’, ‘Dunstan’, ‘Nevada’, or ‘Sleeping Giant’.
PlantingChestnut trees are large, so plant them where they have room to grow to heights of 40 to 50 feet. Be careful to avoid planting under power lines. Plant chestnut trees 30 to 40 feet apart.
MaintenanceMulch trees with compost and water frequently (at least 10 to 15 gallons per week) when trees are first establishing themselves. Test the soil where chestnut trees are growing to ensure proper levels of zinc. Zinc deficiency can cause bronzing and mottling of leaves; early defoliation; dead twigs in tops of trees; abnormally small nuts; small yellowish, chlorotic leaves; and short, thin twigs growing on older scaffold branches with rosettes of small, yellowish green leaves at the tips.
Pest ProblemsSquirrels are one of the worst pests affecting all nut trees. This is primarily because they eat your harvest before you can. To protect trees from squirrels, wrap the trunk with a metal shield, 5 feet off the ground. You can attach the shield with spikes that you withdraw slightly each year as the tree grows.
Chestnut trees can grow to be 40 to 50 feet tall and just as wide!
HarvestingStart harvesting nuts when they start to fall. Lay a clean sheet under the trees and shake the branches to loosen the nuts. Once you harvest them from the tree, lay them in a single layer in a warm, dry place to dry out. You can freeze nuts in resealable plastic bags until you’re ready to use them.
Hazelnuts or filberts are ubiquitous on dining tables in the Northwest. It’s easy to grow your own as long as you make room for at least two (and even better—three) trees in your yard. These nut trees are smaller (15–20 feet tall) than other nut trees (50–70 feet tall), so they’re easier to fit in the backyard (or front yard) garden than, say, a chestnut. You can grow hazelnuts throughout the Northwest, but trees are damaged when temperatures drop below 15°F, therefore they are not worth the risk in colder regions. However, Corylus avellana × C. cornuta, hybrid crosses known as Filazels and Trazels, are hardy to zone 4.
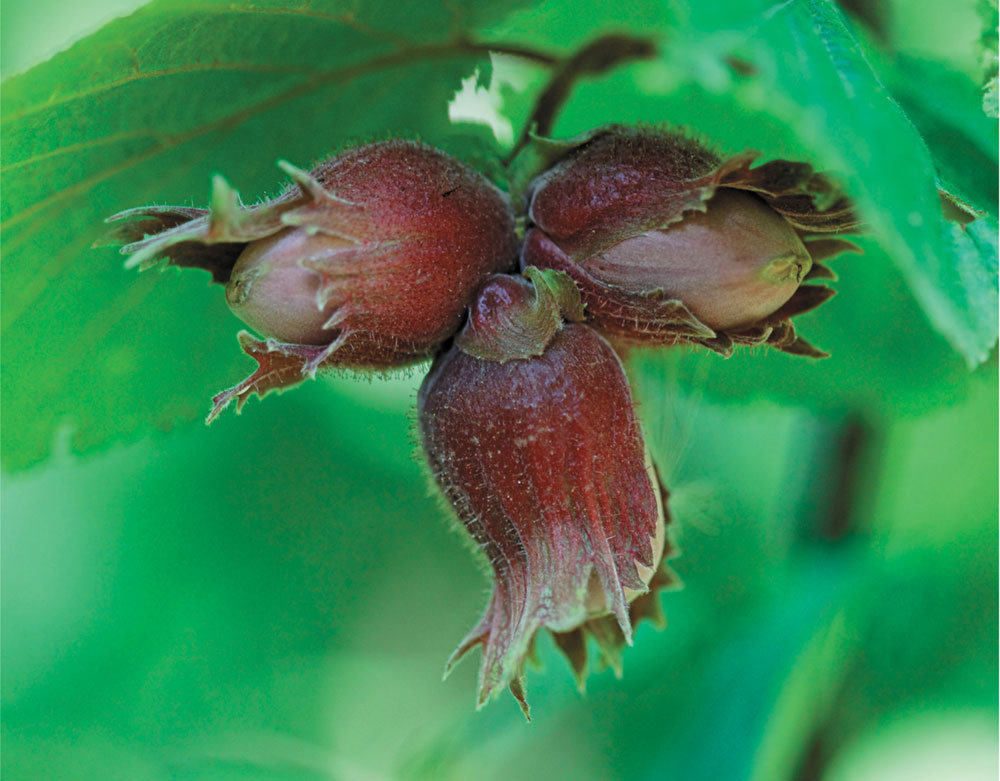
Hazelnuts are small, attractive trees that also provide a nutritious snack.
Recommended VarietiesHazelnuts require cross-pollination from another variety of tree that blooms at the same time. The number of varieties and the relationships between them is too complex for this book. It’s worth reviewing hazelnut selection information with cooperative extension before purchasing. Here are a few suggestions, though.
‘Jefferson’ and ‘Santiam’ pollinate each other and are ideal for maritime area gardens.
‘Barcelona’, ‘Delta’, ‘Eta’, ‘Gamma’, ‘Tonda di Giffoni’, and ‘Hall’s Giant’ are suited for all areas.
PlantingHazelnuts have a spreading type of growth habit and can get to be as wide as they are tall. Leave 20–30 feet between trees. Plant outside in the spring so the trees can establish themselves before the winter blooming and pollination period.
MaintenanceMulch trees with compost and water frequently (at least 10 to 15 gallons per week) when trees are first establishing themselves.
Pest ProblemsHazelnuts do have some pest problems. Aphids can eat the tree leaves but respond to insecticidal soap. The ilbert worm can be controlled with an application of B.t. in early July and again three weeks later.
HarvestingHazelnuts will begin to drop from the tree when they’re ripe. You’ll want to collect the nuts every day—don’t leave them sitting on the ground. Once you pick them up, you need to dry them before storing them. A food dryer set on 95 degrees for two days will work. You can also put them in a warm, dry area for a few weeks. Stir the nuts every few days to circulate the air.
Homegrown peaches and nectarines are so delicious, sweet, and juicy because they can be left on the tree until they are ripe, instead of being picked hard and unripe to withstand shipping. However, both peaches and nectarines are more difficult to grow than most other fruit trees. They are pickier about pruning and pest control and are susceptible to a huge variety of pests, diseases, and cultural problems. Eating a peach that you harvest yourself is worth the effort, though. Just be prepared, if you plant peaches and nectarines, to put in some extra work to get the reward.
Recommended VarietiesInland: ‘Early Hale’, ‘Perfection’, ‘Nectared’, ‘Mericrest’, ‘Fantasia’, ‘Red Gold’.
Maritime: ‘August Pride’, ‘Bonita’, ‘Flordaprince’, ‘Tropiberta’, ‘Tropic Snow’, ‘Arctic Start’, ‘Juneglo’.
PlantingPlant peaches in late fall through early spring. Peaches and nectarines are self-fertile, so spacing is not as critical when planting these trees. Location is important. Peaches are susceptible to cold snaps. Plant these trees near the top of a hill or slope so that cold air can drain down and away from the trees.
Peaches and nectarines need well-drained soil to establish healthy root systems. They are not at all tolerant of heavy, poorly drained soils.
Follow instructions for planting trees on page 47, and stake peaches and nectarines for the first two years after planting.
MaintenancePeaches are fast growers that do not need extra fertilizer, except in sandy soils. The biggest aspects of peach maintenance are pruning, thinning, and pest control. Prune peach trees to maintain an upright vase shape. Peaches produce lots of side branches, about half of which need to be removed yearly in order to channel energy into production of fewer, larger fruits. Peaches will self-thin in summer, dropping as many as half of the fruits. You can further thin peaches, leaving one peach or nectarine to mature every 4 to 6 inches along the branch.
Peach
To keep peaches productive (they produce fruit on one-year-old branches), prune after the plants have finished fruiting and you have finished harvesting to remove any water sprouts.
Pest ProblemsGive yourself a leg up on pest control by planting resistant varieties. Even this won’t spare your plants from all pests. If you want to grow fresh peaches and nectarines, you will have to follow a pest-control program. Whether you use organic or synthetic pesticides is up to you, but you won’t have peaches without being vigilant about pests.
Diseases are a bigger problem than insects with peaches and nectarines. Peach leaf curl, brown rot, peach scab, bacterial spot, and other diseases are problems with peaches. The main insect pest is plum curculio. Use fungicides and dormant oil in spring before the plants bloom in order to control diseases. Use a properly labeled insecticide to treat plum curculio right after blossom drop to treat this insect.
HarvestingPeaches are ready for harvest starting in early summer and continuing through late summer, depending on the variety. The fruits should easily come off the tree without yanking, and they should be slightly soft to the touch.
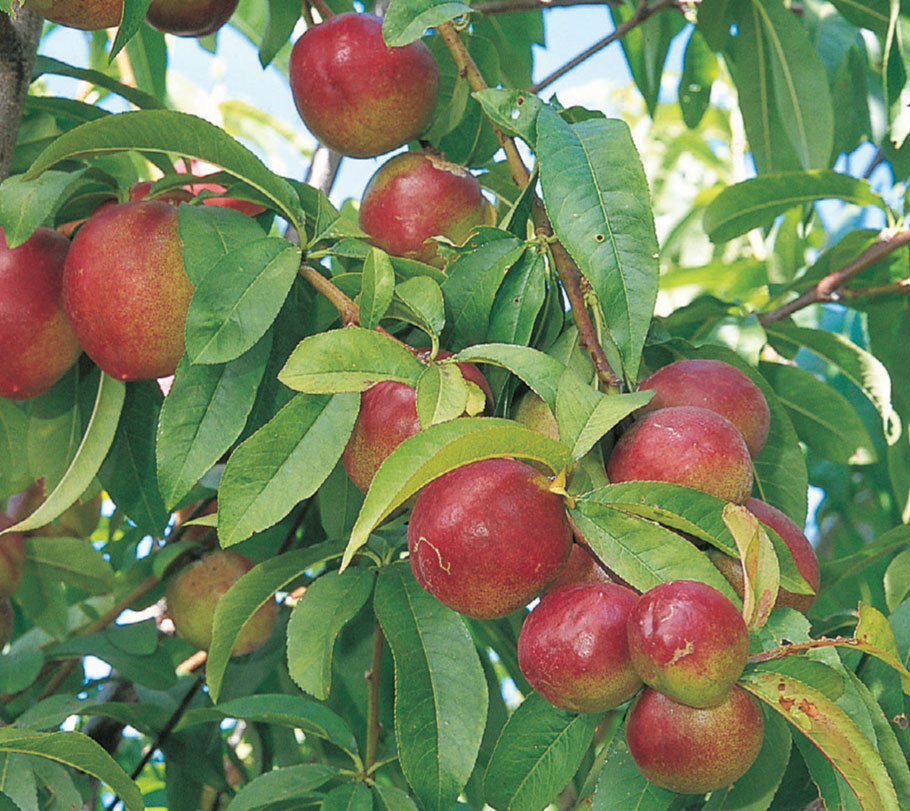
Nectarine
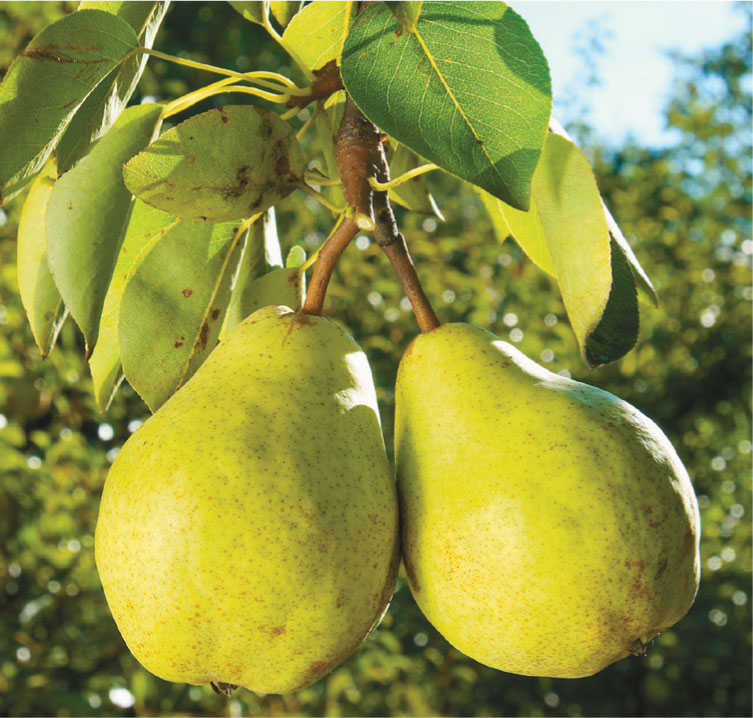
Northwest gardeners can grow both European and Asian pears. Asian pears have rounder, firmer fruits than the European varieties. Both types are prolific producers—a couple of trees is enough for the home gardener. It can take up to nine years for pear trees to bear fruit, though varieties grown on dwarf rootstocks will bear fruits earlier. Asian pears will often bear two to three years after planting—another reason to try these unusual fruits.
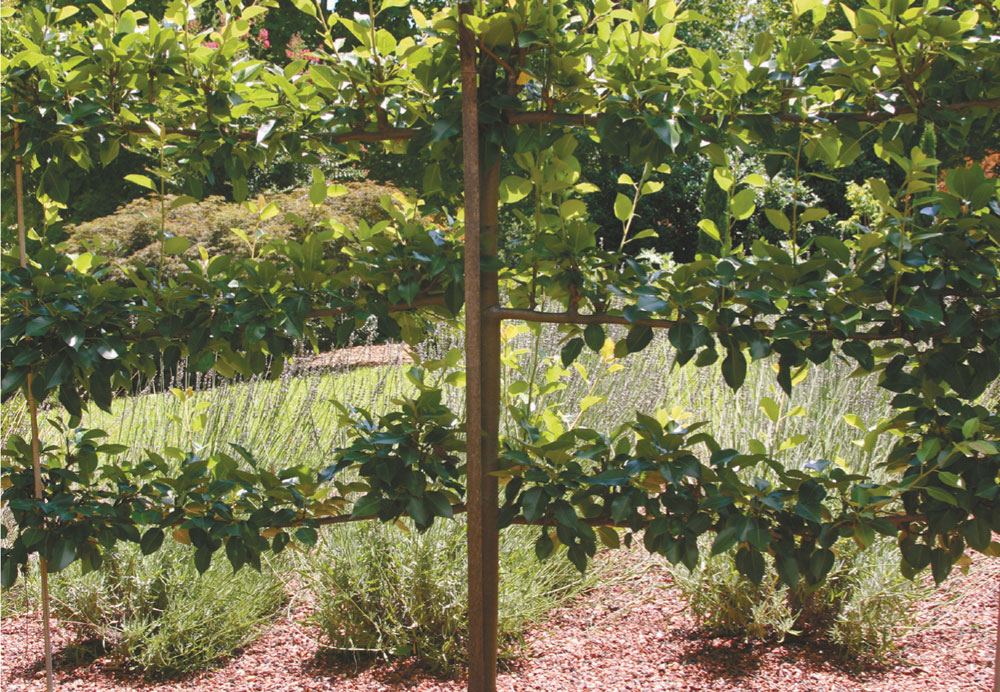
Espaliered pear tree
Recommended VarietiesEuropean: ‘Bosc’, ‘Comice’, ‘Reimer Red’, ‘Starkcrimson’, ‘Anjou’, ‘Bartlett’.
Asian: ‘Shinseiki’, ‘Hosui’, ‘Kosui’, ‘Shinseiki’.
Inland varieties: ‘Seckel’, ‘Summer Crisp’, ‘Ure’, ‘Warren’.
PlantingPlant pears in full sun in well-drained, nutrient-rich soil in late fall through early spring. Add compost to the planting hole and use compost as a mulch around the plants. Plant two or more trees, 10 to 15 feet apart, so that they can cross-pollinate each other. While most Asian pears are self-fertile, they’ll produce a bigger harvest if they have a cross-pollinating tree nearby.
MaintenancePears, once established, do not need extra water. They rarely need extra fertilizer except in extremely poor sandy soil. As with other fruit trees, pruning is the most important aspect of maintenance (beyond pest control).
Prune pears in late winter in a similar manner to apple trees—to encourage airflow and light penetration. Maintain a triangular shape with a strong central leader (single central trunk) and scaffold (layers of branches that progressively get shorter toward the top of the tree).
Pears bear fruit on three- to ten-year-old spurs. Do not prune to remove spurs, as making more pruning cuts will open more areas for diseases to attack the plants. You will want to renewal prune by removing at least 10 percent of the canopy each year to promote new growth. Also be sure to remove water spouts and root suckers.
Pears bear fruit in clusters. To encourage production of fewer, larger fruits, thin fruits when they’re 1 inch in diameter, leaving one fruit per cluster with clusters spaced every 6 inches along each branch.
Pest ProblemsFire blight is a big enough problem with pears that it is important to plant resistant varieties. You’ll know that your tree has a fire blight problem if the leaves on specific branches turn brown and dry up, seemingly overnight. Other common pear problems in the Northwest include pear scab, powdery mildew, and Coast pear rust. It’s difficult to control these diseases. Planting resistant varieties and practicing good hygiene can help the problems from spreading. You can control insect problems that affect pears, such as the aphid-like pear psylla, by spraying trees with dormant oil during winter.
HarvestingPears will be ready to harvest 100 to 140 days after flowering, depending on the variety. Allow Asian pears to ripen fully on the tree and then pick them. Asian pears will keep up to three months in the refrigerator. Harvest European pears when they are still firm to the touch and allow them to soften indoors.
It can take several years for a pear tree to bear fruit.
There are two types of persimmons: American and Asian (or Oriental). A huge, native American persimmon tree grew over the sidewalk next to the tiny house where I lived in college, across from the Horticulture Building, at Purdue University. I wish I had taken advantage of the fruits by cooking them instead of cursing the mess they made when we tracked them into the house. American persimmons have to be picked when ripe for best flavor. Asian persimmons can be picked when slightly underripe.
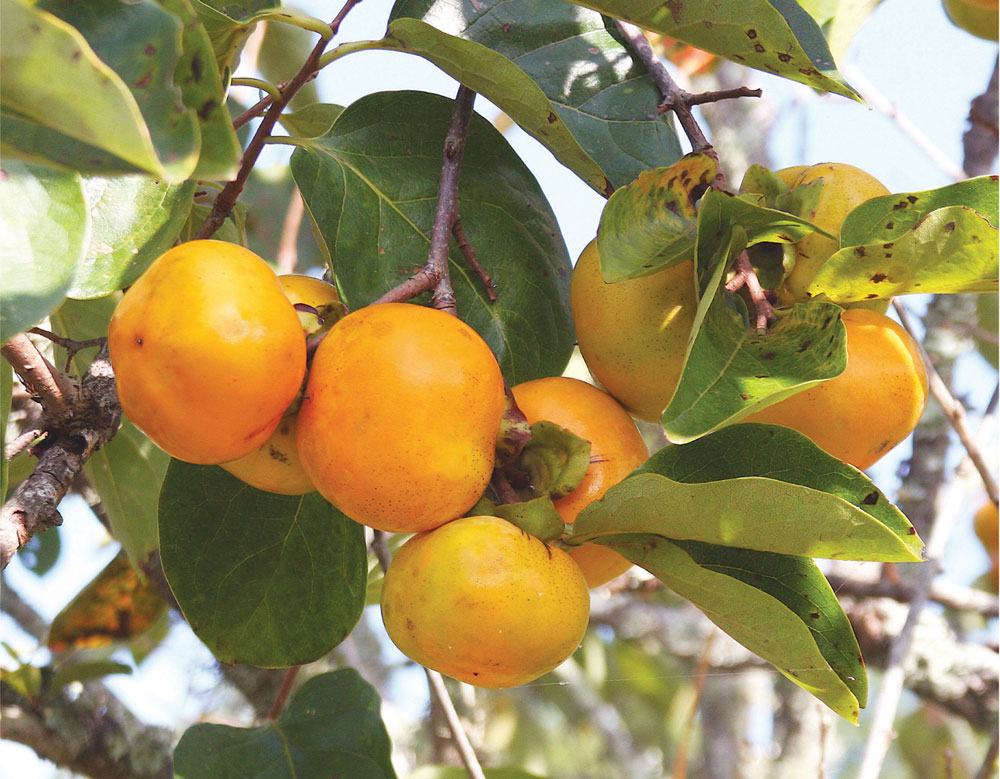
‘Great Wall’ persimmon is an Asian type.
Recommended VarietiesAmerican persimmons require a male and female tree planted near each other in order to produce fruit. Asian persimmons are self-pollinating. They will only produce fruit in zones 7 or higher, though, which means not all gardeners in the Northwest can grow them.
Persimmons can be difficult to locate, so you might just plant what you can find. For the American Persimmon, a seedling variety will work.
‘Saijo’ is a good Oriental Persimmon for the Northwest, and is hardy to zone 6. Other good varieties are ‘Fuyu’, ‘Gosho’, and ‘Nishamura Wase’.
Persimmons break dormancy based on heat units, not chilling hours. Newly planted plants might not leaf out until the fall in cooler areas of the Northwest.
PlantingPersimmons can be messy. Select a site where the tree will not grow over a driveway or walkway—unless you want to track the mess into your house. Plant cross-pollinating native varieties at least 50 feet apart so that the two trees don’t crowd each other. Plant Asian varieties 15 to 20 feet apart.
MaintenancePersimmons are drought tolerant and low maintenance once established. Asian varieties are smaller and require pruning similar to apple tree pruning.
Pest ProblemsThere are few pests that affect persimmon trees, but, by and large, it isn’t feasible to control problems on a 40-foot tree. If the trees are grown in a diverse landscape, most problems will naturally resolve themselves.
HarvestingPick fruits in fall when they’re soft. Nonastringent Asian varieties can be harvested when they are still firm.
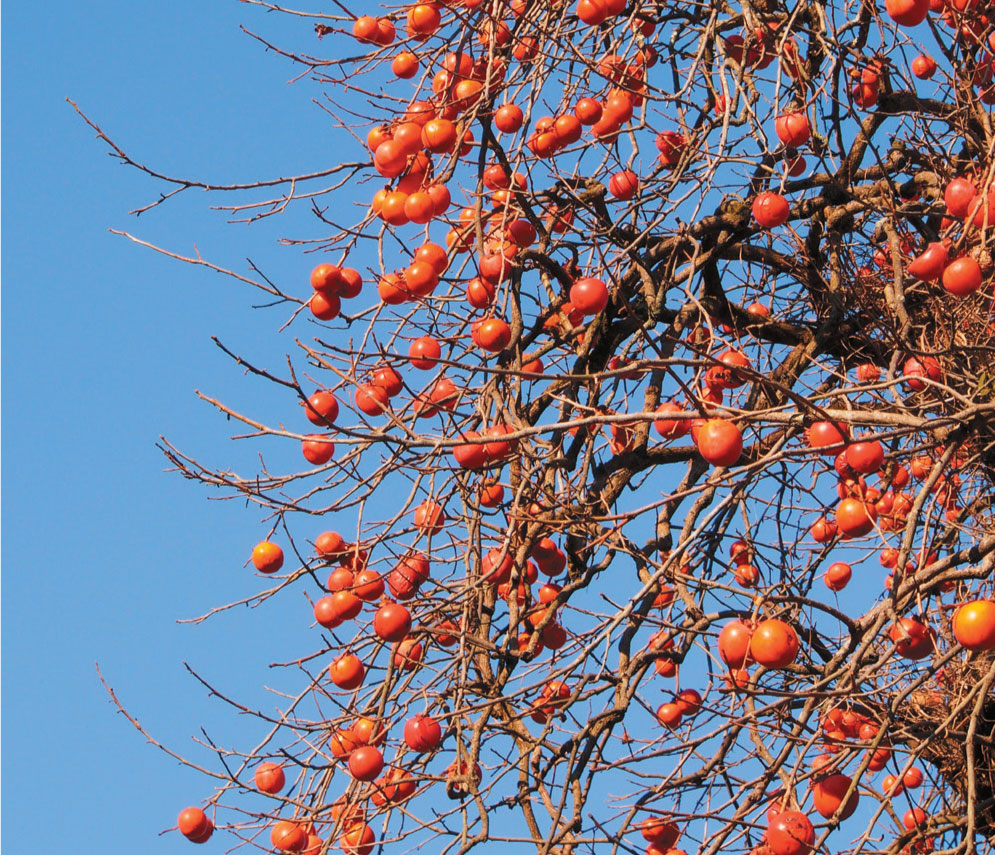
One persimmon tree will bear a lot of fruit.
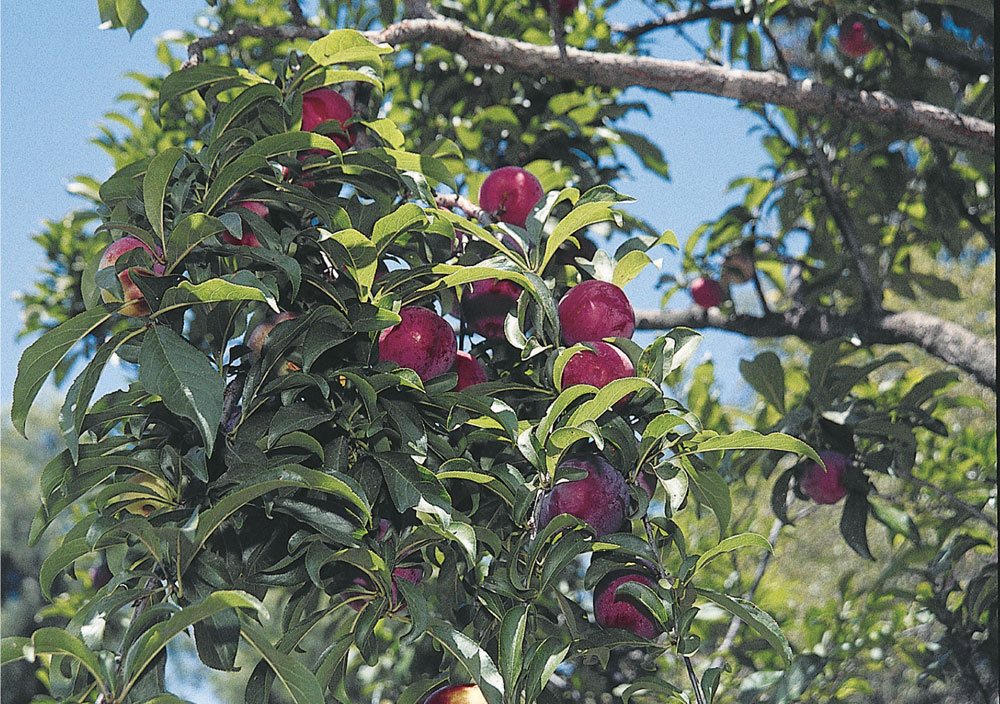
Buy a plum at the grocery store and it is likely to be hard and flavorless. Grow and harvest your own and you’ll change your tune about eating these fruits. There are two main types of plums: European and Japanese. Dried plums, or prunes, are European plums. Japanese plums are juicy with thin skins—excellent for fresh eating, these are the kinds most readily available in the grocery store.
Recommended VarietiesPlums require a cross-pollinator tree of the same type. Japanese plums cross-pollinate other Japanese plums, and European plums cross-pollinate European plums. The ‘Methley’ variety of Japanese plums is self-fruitful and doesn’t require another variety for pollination.
Japanese: ‘Early Golden’, ‘Methley’, Shiro’, ‘Burbank’, ‘Late Santa Rosa’, ‘Santa Rosa’, ‘Satsuma’.
European: ‘Brooks’, ‘Moywer’, ‘Stanley’, ‘Damson’, ‘Italian Prune’, ‘Opal’.
Inland varieties: ‘Opata’, ‘Pipestone’, ‘Underwood’.
PlantingPlant plums in full sun, 18 to 22 feet apart in soils with a pH of 6.0 to 6.5. Plums are tolerant of different soil types, growing equally well in heavier but well-drained clay soils and sandy soils.
MaintenancePlums benefit from being fertilized once a year in spring right after they finish blooming. Because they’re heavy fruiters, these trees benefit from regular water during summer while fruit are swelling.
Prune plums in much the same way that you’d prune pears—to let light into the trees, encourage air circulation, and create good branch scaffolding. Prune plums in late spring (after February 1).
When fruits are ½ inch in diameter, thin fruits to one every 4 to 5 inches along the branch.
Pest ProblemsPlums are susceptible to a variety of diseases, including root rot, bacterial canker, brown rot, crown gall, plum pockets, russeting, and virus. Aphids, leafrollers, leafhoppers, borers, scale, and other insects can prey on plums. If your tree has a problem, the best way to get an accurate diagnoses and treatment is to take a sample to your cooperative extension office. They can give you tips about how to treat the problem.
HarvestingPlums are ready to harvest when the fruits have a white, waxy coating. Allow European plums to ripen fully before harvesting. Asian plums can be picked when they are slightly underripe. Be careful not to yank the fruits off the trees, because you don’t want to break the fruiting spurs, which will bear again the following year.
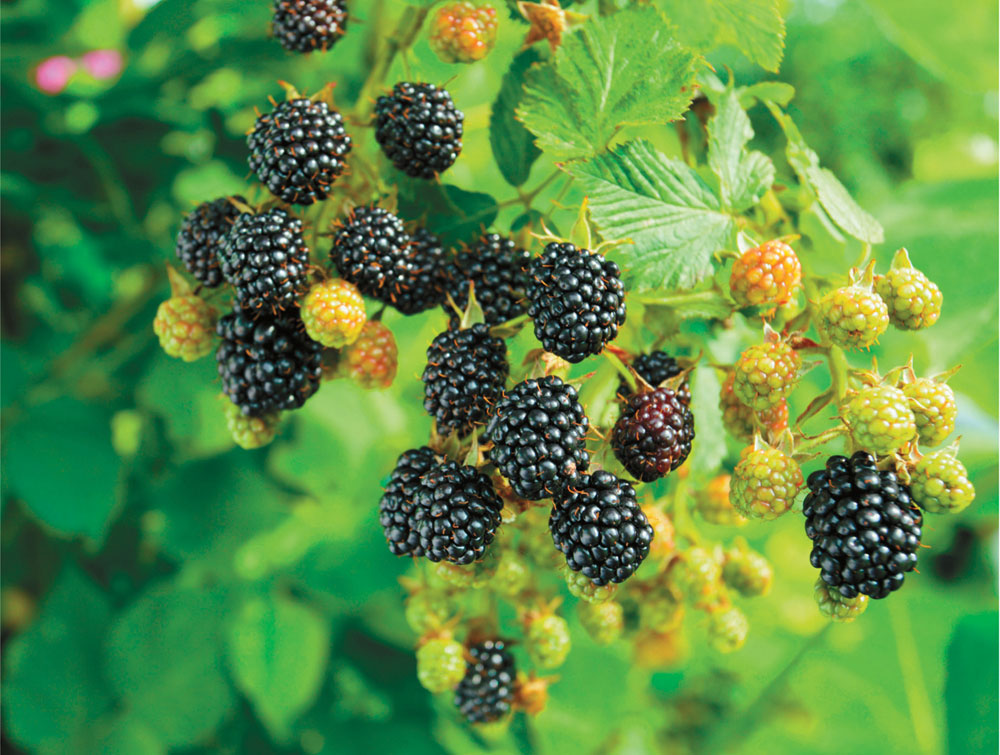
Blackberries ripening for harvest.
If you’re looking to get into fruit growing, starting with shrubs is a good plan. Fruit shrubs are forgiving and easy to care for, and are prolific producers once established. Blueberries and brambles (raspberries and blackberries) are the easiest to grow in the Northwest. You might want to also experiment with growing less common fruits such as gooseberries. They make great pies!
Landscaping with FruitEdible landscaping is a hot topic. Rosalind Creasy is arguably the pioneer of planting your yard with edibles. The first edition of her book Edible Landscaping was published in 1982 and reissued as a second edition in 2010. If you want to see what you can really do with edibles by converting your entire yard to a fruit and vegetable garden, her book is amazing.
Most people can’t do that, though. But even if you’re on the fence about turning your fence into a tomato trellis, you can at least tuck some Swiss chard or herbs into the perennial border.
It’s easy to work fruit shrubs into the landscape. Blueberries are quite ornamental. Their leaves turn bright red—a plus for any garden. In warmer winter areas, fig trees make excellent screening plants, because they have large leaves and lots of them. (They are deciduous, though, so they are less useful as a screen in winter.) A fence of blackberries is somehow friendlier than an actual fence. I have a blackberry fence between my house and my neighbor’s, and I get more berries than we can eat from just six plants. Some blackberry varieties have become invasive in the maritime areas. Be sure to plant a blackberry variety that will not become invasive.
Placing Fruit Shrubs in the GardenFruit shrubs can be planted throughout the yard (provided that you plant at least two or three near each other if they need to be cross-pollinated) or along the edges of the property. Because fruit shrubs take up less space and throw less shade than fruit trees, you can also plant them in or around your vegetable garden. Plant taller varieties on the north side of the garden so that they don’t shade other plants.
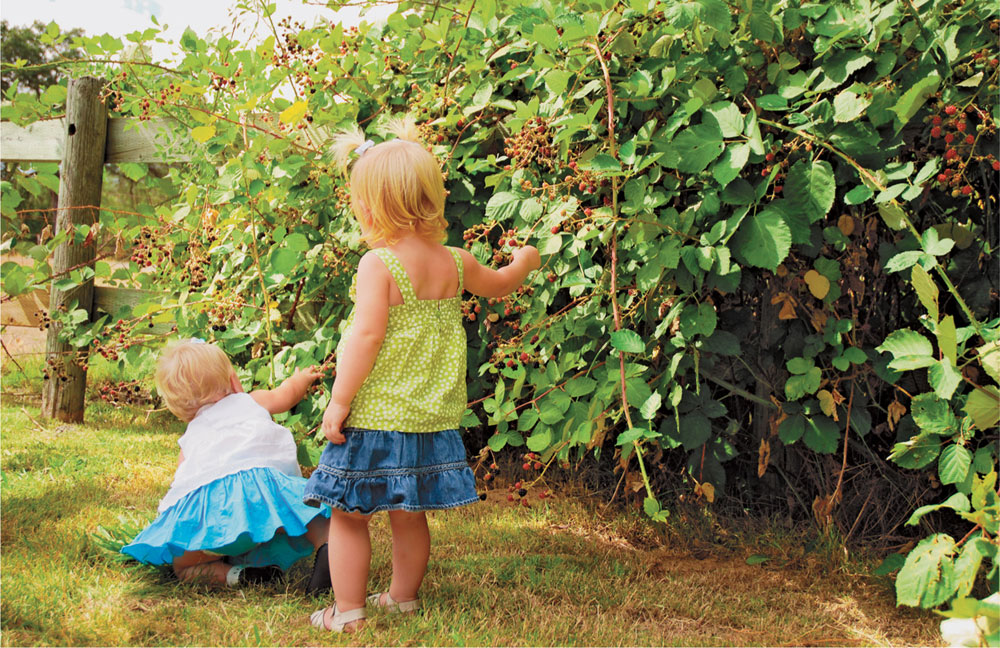
Get kids involved with gardening by letting them help harvest!
Blueberries are one of the few widely grown fruits that are native to North America. These plants are easy to grow as long as you select the right variety for your area.
Recommended VarietiesNorthern Highbush blueberries are the type most suited to the cooler winter regions of the northwest. Southern highbush blueberries are more suited to areas with less winter chill. Within the Northern Highbush group there are some variations in bloom time, which affects what you can plant to ensure the plants are pollinated and produce fruit. Some blueberry varieties require a cross-pollinator, while others do not. Always check to see whether you need to plant two different cultivars when purchasing blueberry plants.
Early: ‘Earliblue, ‘Spartan’, ‘Patriot’, ‘Jubilee’, ‘Misty’.
Mid: ‘Bluejay,’ ‘Bluecrop’, ‘Berkeley’, ‘Olympia’.
Late: ‘Legacy’, ‘Pink Lemonade’, ‘Darrow’ (self-pollinating)
Inland varieties: ‘Polaris’ (early), ‘Northblue’ (mid), ‘Chippewa’ (mid).
PlantingPlant blueberries in early spring or in the fall. They’ll establish best during periods of some rainfall.
Blueberries grow well in acidic soil. You probably won’t have to lower the pH of your soil if you live in the Coastal regions, but will need to adjust it if you live in the Interior Northwest. If your soil is alkaline, you will have to add aluminum sulfate to lower the pH to below 6.0. (If you can get the pH to 4.5 to 5.5, that’s even better.) Take this step at least three months before you plan to plant. Blueberries also need relatively high levels of organic matter in the soil. If you have sandy soil, amend the soil in the entire blueberry planting area by adding at least 4 inches of compost.
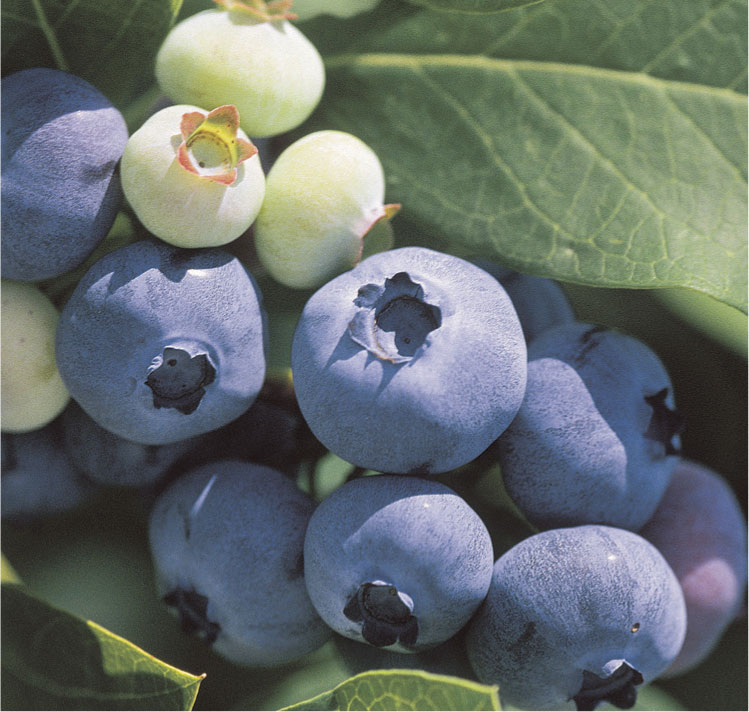
Blueberry plants provide fresh fruit in the summer and decorative foliage in cooler weather.
MaintenanceWater: Water every other day during the first six months after planting to encourage good establishment. After the first year, water twice a week during fruiting and once a week after plants have finished fruiting. Blueberries are shallow rooted, so they dry out quickly.
Mulch: Help keep the soil around blueberries moist by mulching with pine needles or shredded hardwood mulch. Blueberries are shallowly rooted plants, so it is best to mulch to conserve moisture and control weeds and to avoid cultivating around them.
Fertilizer: Do not fertilize during the first six months of growth. After the first six months, feed with a balanced fertilizer before the plants bloom and after you harvest the fruits, to encourage growth for next year. To maintain the acidity of the soil, you can also fertilize with fertilizer formulated for hollies.
Pruning: Prune blueberries in late winter or early spring. They do produce fruits on one-year-old growth, so don’t hack the plant to the ground. If you do, you won’t get any berries. You can prune a bit each year to keep the shrubs a manageable size. Renewal prune by selectively removing at least one-third of the branches each year (throughout the shrub) to encourage new growth.
Pest ProblemsBirds are the most annoying pest problem with blueberries. You can throw nets over the shrubs once the fruits are reaching harvestable size in order to protect them. Blueberry maggots and cherry and cranberry fruitworms can be problems with blueberries. You’ll see the damage caused by these insects. Cranberry fruitworm make webs around the damaged berries. Consult your local cooperative extension for help controlling these insects.
HarvestingBlueberry season runs from July through September in the Northwest. Pick berries as you plan to eat them for the freshest fruits. (They can stay on the shrubs for a while, so you don’t have to pick the shrub clean all at once.) The easiest way to determine if the berries are ripe is to taste a few. You’ll learn to recognize when they’re ready to harvest.
Figs can be a challenge to grow in the northwest, but the results are worth it. It grows best in the maritime areas, but needs excellent drainage. It took a trip to California for me to truly appreciate what you can do with figs in the kitchen. My new favorite fall sandwich is an open-faced, toasted sandwich made with goat cheese, caramelized onions, and figs and braised in the oven for a few minutes. Figs can grow to be large shrubs, so give them plenty of room.
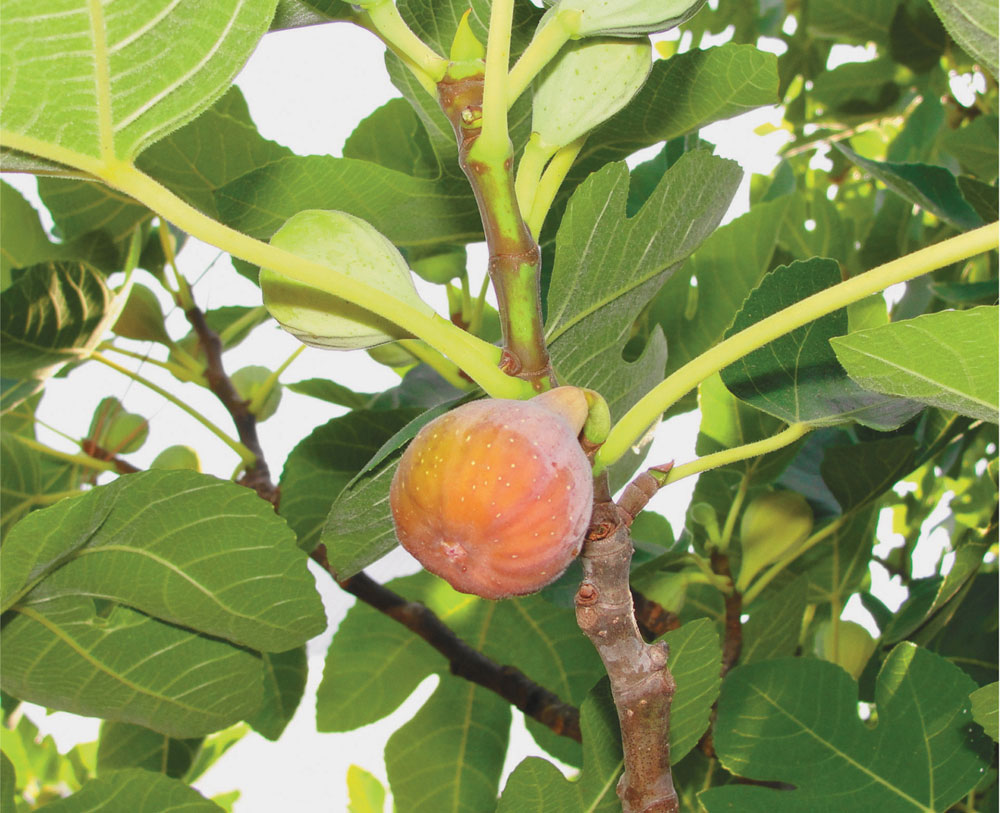
For best eating, pick figs when they are soft to the touch.
Recommended VarietiesOnly grow varieties of figs that do not require cross-pollination. Recommended varieties for cooler regions include ‘Chicago Hardy’, ‘Brown Turkey’, Desert King’, ‘Lattarule’, and ‘Osborn Prolific’.
PlantingPlant fig trees in late winter to early spring when they’re dormant. Figs are fast growers and won’t become well established if planted during summer. Plant figs in full sun to partial shade in nutrient-rich, well-drained soil. Give them room to grow, as they can reach up to 30 feet in height and spread.
MaintenanceWater: Give figs 1 inch of water per week during summer.
Fertilizer: Fertilize once a year with a balanced fertilizer just as the plants begin flowering.
Pruning: Figs need to be pruned mainly to keep them from taking over the landscape—they can get big. Prune figs in late winter while they are still dormant.
Pest ProblemsFigs are fairly pest-free plants, making them ideal for home gardens. The biggest problem affecting figs is root-knot nematodes. Inspect plants before planting them. If their roots look knobbly or knotty, do not plant them. Nematodes cannot be eliminated once established in the landscape.
HarvestingFigs taste best when harvested ripe. Pick figs when they are somewhat soft to the touch, and eat them within a few days.
Blackberries and raspberries are “bramble” fruits. Brambles are part of the rose family. In fact, their flowers look a little bit like small wild roses. Blackberries and raspberries require similar care and have similar growth habits. A half-dozen blackberry or raspberry plants will give you a large harvest. Some blackberry varieties have become invasive in the maritime areas. Be sure to plant a blackberry variety that will not become invasive.
Recommended VarietiesThere are trailing, semitrailing, and erect types of blackberries. Trailing types are thorny, semitrailing are thornless, and erect types can be either thorny or thornless. It doesn’t necessarily matter which type of blackberry you get, as long as it is suitable for your growing zone. It will come in handy to know which type you have when it comes to plant care, though. Whether a plant is trailing or semitrailing will determine the type of staking and training. Whether it bears fruit on first year or second year growth will affect when you prune the plant.
Trailing: ‘Obsidian’, ‘Cascade’, ‘Pacific’, ‘Tayberry’, ‘Ollalie’, ‘Logan’, ‘Marion’.
Erect: ‘Cherokee’, ‘Arapaho’, ‘Natchez’, ‘Navaho’, ‘Triple Crown’, ‘Dirkson’.
You can purchase both container-grown and bare-root plants. If container-grown plants are available in your area, spend the extra money for them. They’ll establish themselves better and faster and will be healthier in the long run.
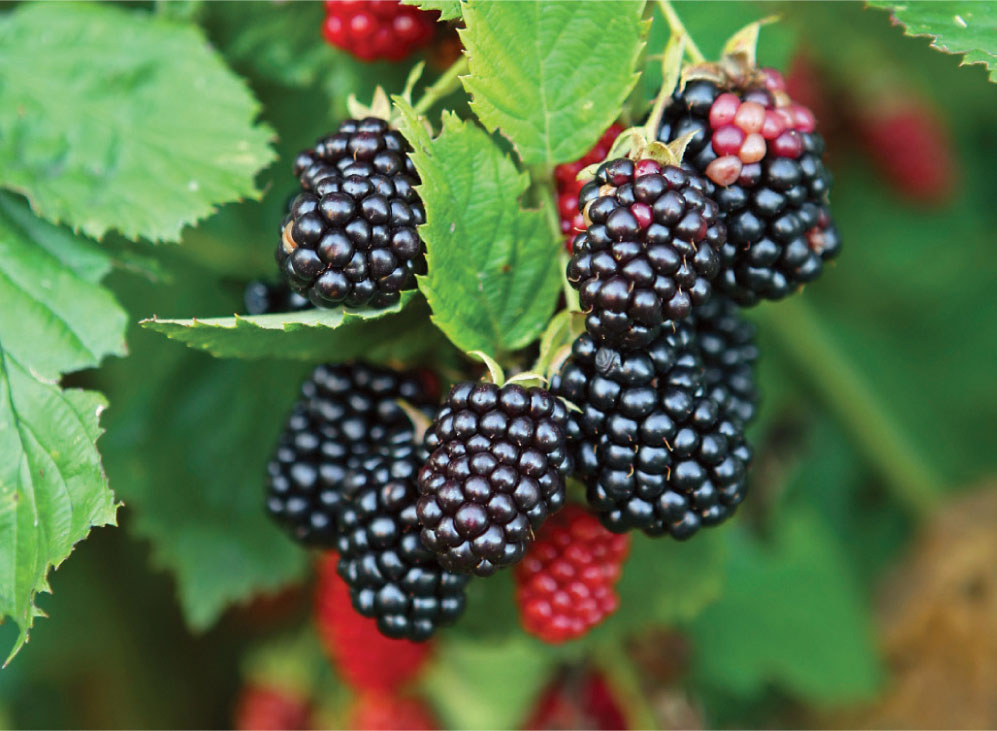
Blackberries are easy to grow throughout the Northwest.
Raspberries produce fruit in the fall on first year growth (primocanes) or in the summer on second-year growth.
Fall-bearing varieties: ‘Autumn Bliss’, ‘Fallred’, ‘Caroline’, ‘Summit’, ‘Heritage’
Summer-bearing varieties: ‘Willamette’, ‘Meeker’, ‘Nootka’, ‘Tulameen’, ‘Qualicum’, ‘Malahat’

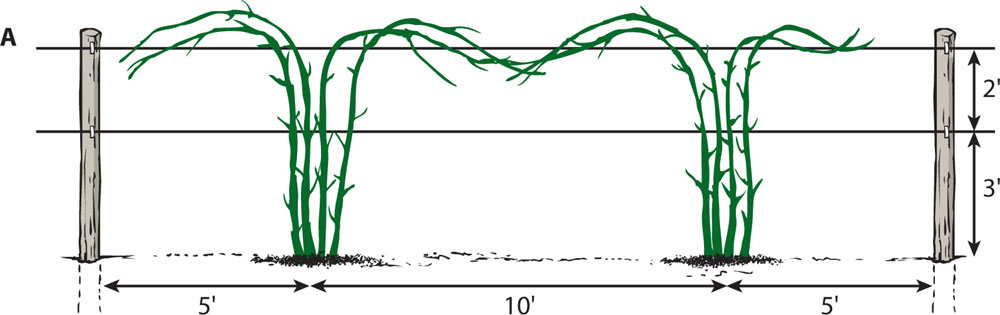
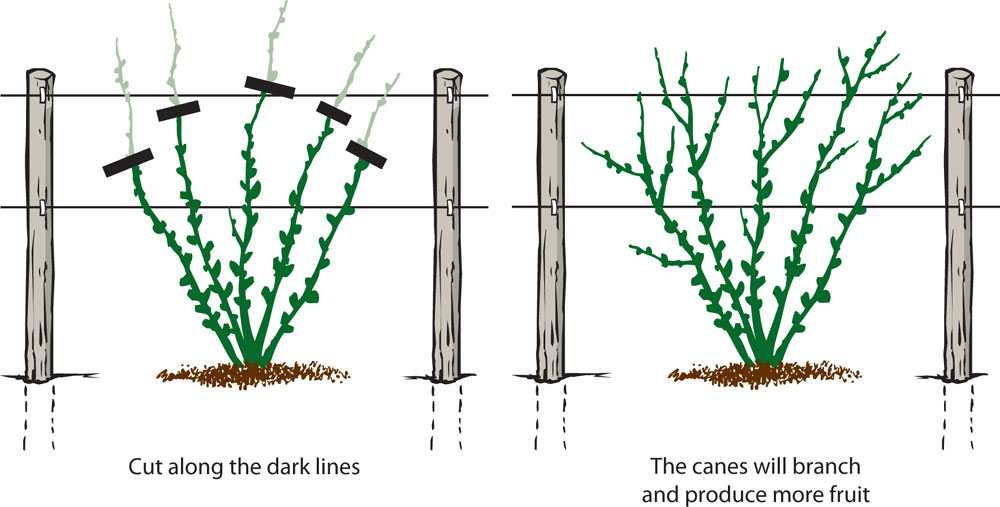
(A) Train trailing plants to a two-wire trellis. (B) Train erect blackberry plants to a one-wire trellis. Note that trailing blackberries need more space between plants than erect blackberries.
Train raspberries the way you’d train erect blackberries. You can let raspberries grow into large clumps, but those become hard to maintain. It’s much easier to grow the plants in a single line and train them to a two wire trellis. That way you can easily cut back the older canes and allow new ones to grow.
PlantingPlant blackberries and raspberries in full sun in well-draining soil with a pH of 5.5 to 6.5. Sun is important for growth and fruit production. Some fruits will produce in partial shade, but bramble berries not only won’t produce, but also won’t grow.
You can plant container-grown and bare-root plants at any point in the year, as long as snow isn’t on the ground and the ground isn’t frozen. Soak the roots of bare-root plants for twenty-four hours before planting. Follow instructions on page 47 for planting bare-root plants.
Plant container-grown plants so that the rootball of the plant is at the same level as, or just slightly higher than, the soil around the planting hole. Don’t plant too deep!
Brambles grow best with support. You could stake individual plants or grow them against a fence. The best way to grow them, though, is to set up a post and wire system with 2 inch × 4 foot posts and heavy-duty wire.
You can train the plants to grow along the wire, and you can anchor the stems using coated tomato wire or twist ties. (I leave several twist ties on the wires so that there’s one handy if I happen to decide to go outside and check the blackberries. At the end of the season, I cut the old canes and refasten the twist ties so that they’re handy again in spring.)
MaintenanceWater: Frequent watering during the first year is the best way to make sure the plants get off to a good start. Run soaker hoses along the plants (taking care to keep the hoses from touching the stems). Water every two or three days during the first growing season. In subsequent years, watering at least twice a week, giving the plants 1 inch of water per week, will help the plants produce a big crop of fruits for harvest.
Fertilizer: Fertilize in spring with a balanced fertilizer.
Pruning: Improper pruning of blackberries resulting in no fruit production has broken many a heart. Blackberry stems are called canes. A first-year cane is called a primocane. A second-year cane is called a floricane. Summer-bearing blackberries only bear fruit on second-year floricanes. Fall-bearing blackberries bear fruit on primocanes.
You won’t hurt fruit production in your plants if you follow this rule: only prune blackberries all the way to the ground in fall, and only cut down canes that bore fruit during that year. Whether you have plants that bloom on first-year canes or second-year canes, if you only prune the canes that bore fruit, and you only prune in fall, you won’t cut down fruit-bearing canes before their time.
If you cut off the top 6 to 12 inches of the canes during the first year, the plants will produce side branches that bear fruit during the second year.
The floricanes of summer-bearing blackberries usually start to die back after you pick the fruits, anyway, which makes it easy to see which ones to cut down.
Another type of pruning is pruning to produce more productive side shoots. Prune blackberries back by 6 inches in the middle of summer. This will encourage the plants to produce more side shoots off the main canes, which will result in a bigger fruit crop during the second year.
Prune raspberries by removing the fruiting branches in the summer after the second crop of fruit. You can also prune back the tips of second-year branches by 6 inches in the spring to encourage side shoots to grow.
Pest ProblemsBlackberries and raspberries have few pests that are a major problem in the home garden. There are a few diseases that affect plants, including rosette disease. Plant resistant varieties to avoid this problem.
Cane borers attack blackberries. You will be able to tell if you have these insects if the top of a first-year cane wilts and falls over suddenly. Cut below the wilted area and discard the branch with the borer. (Do not compost.)
Occasionally birds will eat your blackberries before you can. If this is a problem, purchase bird netting at a garden center or home-improvement store, and throw the nets over the plants.
HarvestingHarvest blackberries when they easily come off the plants. Plants will produce ripe berries for several weeks. Harvest only what you want to eat, and harvest fresh daily.
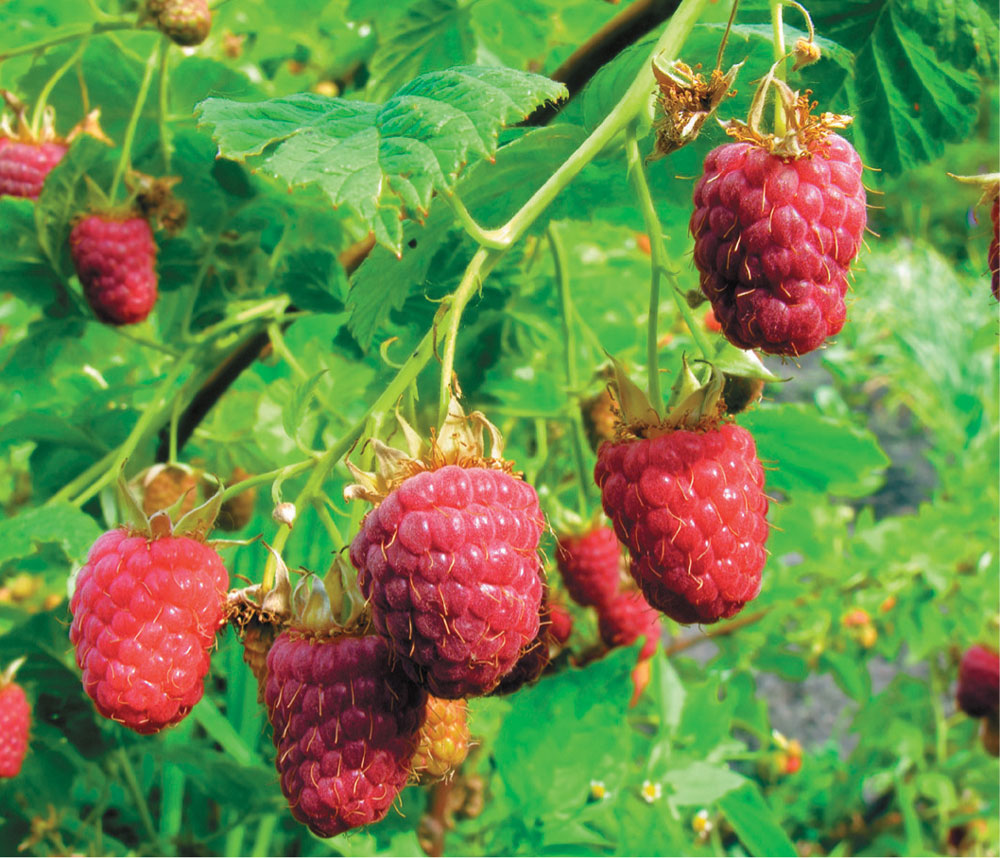
Home-grown raspberries are much sweeter than store-bought ones.
Grape vines need to have support in the garden, but they are well worth the extra effort.
After covering fruit and nut trees, and shrubby fruits, what’s left? Vining fruits and garden fruits. Vining fruits such as grapes are perennial fruits with sprawling growth habits. Melons are similarly sprawling but are annuals. Strawberries are somewhat in a category of their own—they can be grown as perennials or annuals. Melons and strawberries could be covered in the “vegetables” section, but they’re sweet, and we treat them as fruits in the kitchen.
This category of fruits includes plants that can be somewhat tricky to site in the garden. They all take up a fair amount of space, and all but melons are perennial. The question to ask yourself before deciding to grow any of these fruits is, how badly do you want your own?
To get enough strawberries to make a difference on your table, you have to plant a lot of plants, and that takes space. Melons take up a huge amount of space. I’m not trying to talk you out of growing these, but when it comes to making a real difference in the budget versus taking up a lot of valuable real estate in the garden, these fruits are hogs. Strawberries and melons are cheap to get at the farmers’ market when they’re in season. If you are low on space, consider growing a few plants for fun but leaving the heavy lifting to market growers in your area.

Fresh strawberries have the best taste, but they can take up a lot of room in the garden.
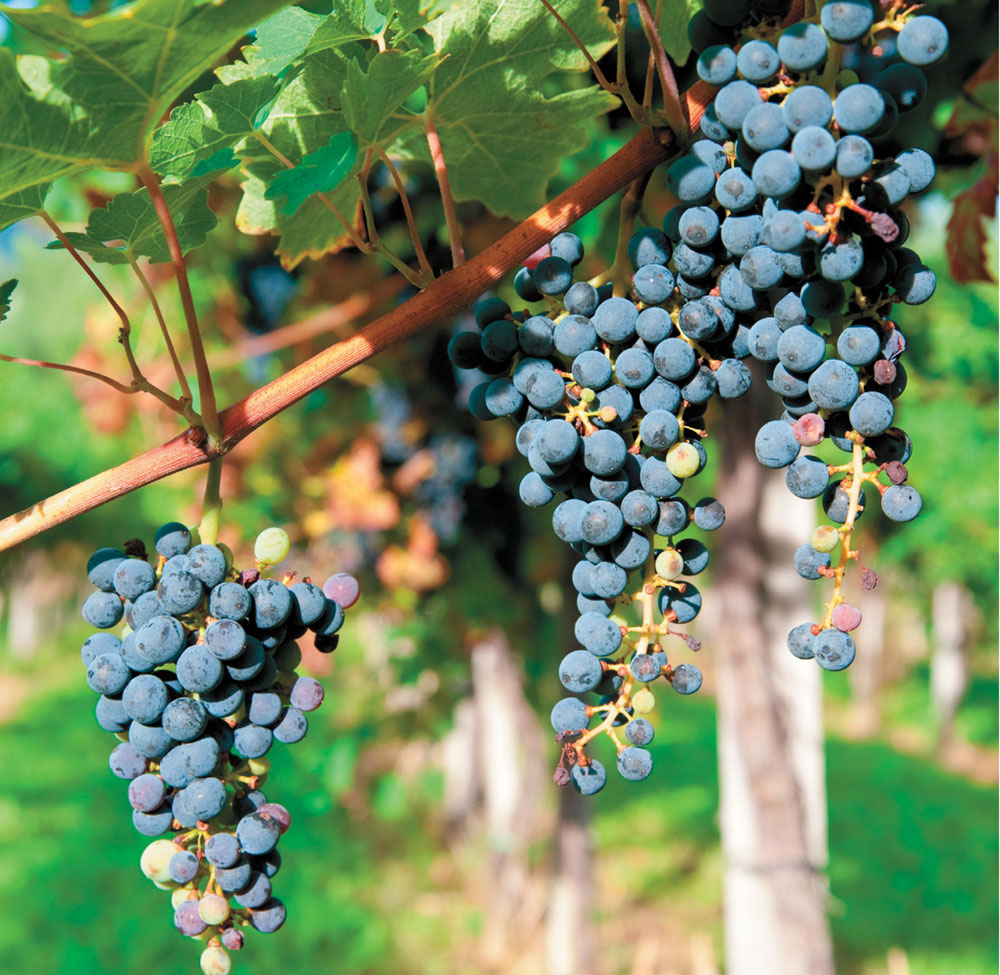
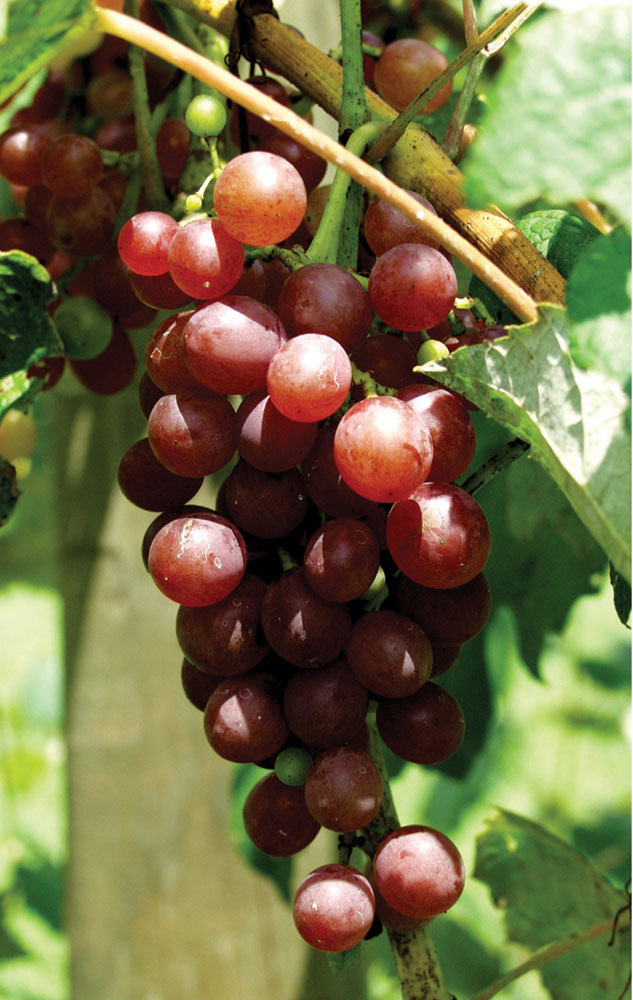
Grapes are almost absurdly easy to grow in the Northwest—hence the large number of vineyards in this area. The ever-popular Concord grape is a bunch grape that is tasty for eating and great for making juice and jelly. You can grow several different types of grapes for different colors and flavors on the table or in your lunch box. Home gardeners should check whether they are planting seedless grapes such as ‘Himrod’ or seeded grapes such as ‘Concord’.
Recommended VarietiesHere are some of the most highly recommended bunch grapes for Northwest gardeners.
‘Himrod’: Golden yellow grape
‘Delaware’: Red grape, great for winemaking
‘Concord’: Blue/black grape, better for cooler climates
Pinot Gris: White grape suitable for wine.
Vanessa: Red table grape
Grow grapes for both eating and juice or jelly.
PlantingYou can buy bare-root grapes and container-grown grapes. Plant bare-root grapes in late February to late March. Plant container-grown grapes at any point during the year.
Plant grapes in full sun in well-drained soil high in organic matter. Grapes do not grow well in heavy clay soils or soils where water sits for more than a few hours at a time.
Grapes require support. If you don’t want to start over every couple of years, it is best to go big or go home. A post and wire system like you’d use for blackberries will work well for grapes. Situate the wire at a height that’s comfortable for you to reach—between waist and chest high works well. Plant grapes with 10 to 20 feet of space between each vine.
MaintenanceWater: Water grapes several times a week as they are becoming established. In subsequent years, give vines 1 inch of water per week during the fruiting season.
Fertilizer: Grapes benefit from the application of 2 ounces of ammonium nitrate per vine, spread on the ground in a 2-to-3-foot-diameter area around the trunk. Fertilize in March, May, and July. You can also fertilize with composted chicken manure.
Grapes are sensitive to magnesium levels in the soil. If you see yellowing in the spaces between veins of older leaves, there’s probably a magnesium shortage. Spread Epsom salts in the same diameter area you’d spread fertilizer at a rate of 2 to 4 ounces per plant to correct this problem.
Pruning: The biggest mystery of grape production is pruning. Grape vines have a central stem, called the trunk, and two side shoots called cordons. The plants will bear fruit from the cordons on compressed side shoots called spurs. Each cordon will have many spurs. From the spurs grow shoots with buds that will sprout and produce grapes.
Train new grape vines by allowing them to grow up toward the wire of the trellis. Cut off side shoots while the vine is growing up. Once the vine has reached the wire, cut off the growing tip to force side shoots to grow. Two of these will become the right and left arms of the cordon.
Prune grapes in winter. At each spur, prune back all growths except for one piece of fruiting spur from the previous year’s growth. Each fruiting spur should be about 4 inches long and have three to five buds on it.
To keep new fruiting spurs forming, each year remove every other spur down to the cordon. New spurs will sprout.
It’s important to know that grapes bear fruit on one-year-old spur growth, so you don’t want to cut off that growth when pruning.
Pest ProblemsThere are some fungal diseases that affect grapes. Check with your cooperative extension for information about treating fungal diseases.
HarvestingRipe grapes will easily come off in your hand. You can cut individual clusters as they ripen. Do a taste test to see if the grapes are ready to eat!
Melons are annual vines related to cucumbers and squash. If you’re limited on space in the vegetable garden, skip the melons and buy them at the farmers’ market. If you have space, give them a shot. It’s fun to go out into the garden and find tiny watermelons growing larger each day. Now there are also compact varieties such as ‘Lil’ Loupe’.
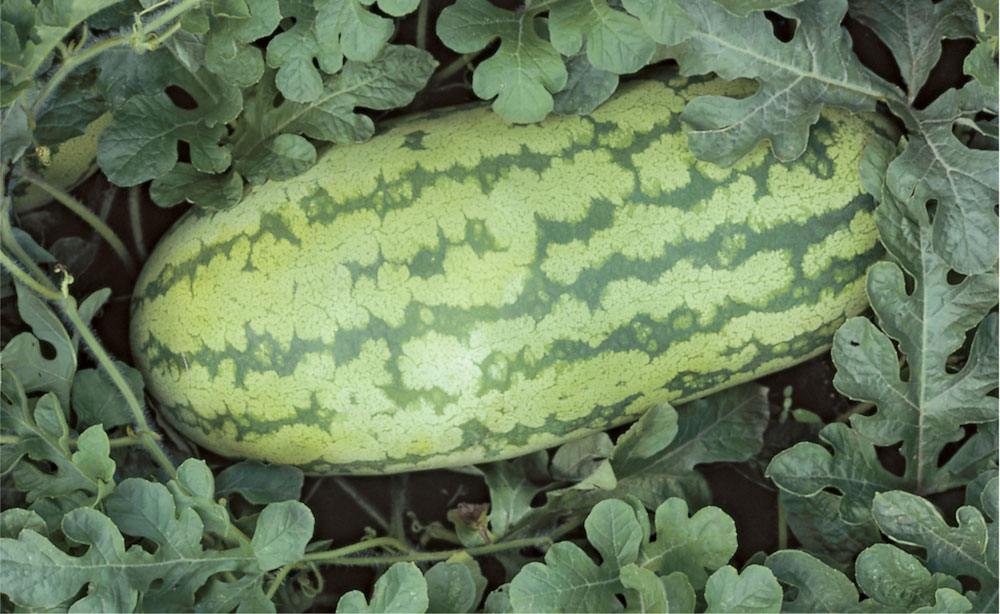
Melons can take up a lot of space in the garden, but they’re fun to grow.
Recommended VarietiesMelons grow best in hot summer climates. Short-season varieties are essential for success. Look for melons that require no more than 85 days to maturity. (The days to maturity will be listed on the seed packet.)
Cantaloupe: ‘Ambrosia’, ‘Harper Hybrid’, ‘Gold Star’, ‘Classic’, ‘Pulsar’, ‘Superstar’, ‘Earlisweet’, ‘Early Dawn’, ‘Magnum .45’, ‘Eclipse’, ‘Primo’, ‘Earliqueen’, and ‘Saticoy’
Honeydew: ‘Earlidew’, ‘Honey Brew’, ‘Morning Ice’, ‘Yellow Canary’, and ‘Honey Orange’
Look for heirloom and specialty melon varieties, as well.
PlantingStart melon seeds indoors up to three weeks before you plan to plant outside. Plant them in peat pots that can be directly transplanted into the garden. Harden off and then transplant outside in mid-June.
Melons need full sun and rich soil full of compost in order to produce well. The soil pH should be 6.5 to 7.0. If it’s any lower, the plants can suffer from calcium deficiencies. Plant seeds in hills at least 4 feet apart, and plant three seeds per hill. Thin plants to one plant every 4 feet after they grow three sets of leaves.
MaintenanceWater: Melons are heavy drinkers. Lay soaker hoses after the plants have sprouted, and water every other day during the growing season in sandy soils. Avoiding overhead watering can prevent some disease problems.
Fertilizer: Sidedress with calcium nitrate when the vines are 3 feet long, or apply a slow-release fertilizer at planting time.
Pollination: Melon plants have separate male and female flowers on the same plant. The flowers have to be pollinated in order to produce fruits. If you want to be absolutely sure that plants have been pollinated, you can hand-pollinate them. Move pollen from a male flower to a female flower using a paintbrush or cotton swab. (Female flowers have a small swelling behind the flower, which is what will grow into the melon.)
Pest ProblemsMelons suffer from the same types of pests that all squash-family plants encounter. Cucumber beetles, flea beetles, squash bugs, and squash vine borers are some of the worst. Use row covers to prevent flying insects from landing on the plants. Lift the row covers for two hours in the morning twice a week to encourage pollination, or hand-pollinate. If you have bad problems with squash bugs and squash vine borers, you might consider growing melons under cover for their entire growing season and hand-pollinating to ensure fruit set.
HarvestingWhen are melons ripe? That is the hardest thing to learn, and something you’ll figure out over time. Cantaloupe varieties will be ready to harvest around 30 to 35 days after flowering. Honeydews take about 40 to 45 days after flowering before they’re ready to harvest. Honeydew melons turn pale green when they’re ready to harvest. Cantaloupe melons should smell sweet.
If you ever read the Little House on the Prairie book The First Four Years, which details the first years of Laura Ingalls’s marriage to Almanzo Wilder, you’ll recall a scene when the newly married Laura makes a pie for the farmhands using “pie plant.” She forgets to add sugar, and the pie is so sour that it is inedible. “Pie plant” is rhubarb. You eat the petioles (leaf stems) of this plant, and nothing else. Though it is really a vegetable, it is used in the kitchen as a fruit. Be careful with rhubarb. ONLY the stems are edible after cooking. The rest of the plant is poisonous.
Recommended VarietiesPlant whatever you can find. It is easier to grow rhubarb from crowns (the roots of one year old plants) than it is to grow from seed. Some good choices include: ‘Cherry’, ‘Crimson Cherry’, and ‘MacDonald’.

Rhubarb stalks can be green or red, depending on the variety you plant.
When and Where to PlantTemperature: Not all regions can grow rhubarb. It requires temperatures below 40 degrees in the winter to break dormancy and temperatures below 75 degrees to grow well during the summer and replenish its stores for winter growth. Plant in the spring or the fall while the crowns are still dormant.
Soil: Rhubarb grows best in loose, well-drained soil with a neutral pH.
Sun: Full sun.
How to PlantStarting seeds indoors: Not recommended.
Planting outside: Cultivate the soil to a depth of 8-10 inches. Plant rhubarb crowns 24 inches apart, covering them with just 1 to 2 inches of soil. Water well.
How to GrowWater: Water rhubarb with the same frequency you’d water sugar snap peas, which is to say regularly, but don’t let the soil stay soggy.
Fertilizer: Fertilize after harvest with liquid fish emulsion.
Pest control: Rhubarb has few pest problems.
How to HarvestHarvest during the third season of growth. Use a knife to cut off the stalks at the base of the plant. Never remove more than one-third of the plant at any given time. Stop cutting stalks when they are less than ½ inch wide. Let the plant keep growing to produce reserves to allow it sprout next year. Do not eat the leaves!
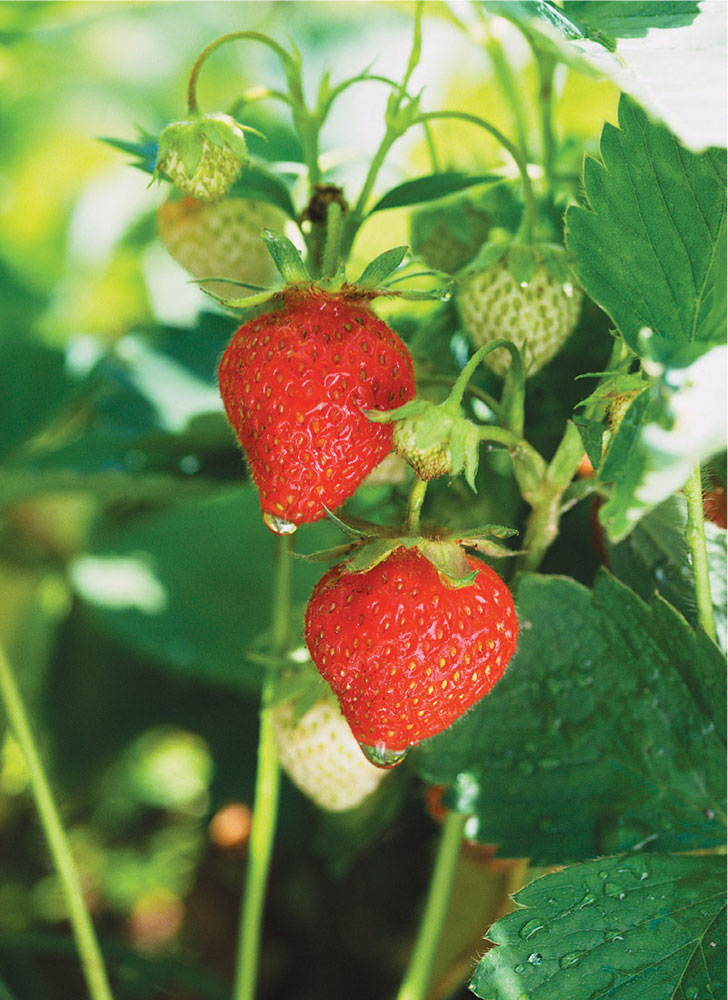
Warm, fully ripe, fresh-picked strawberries are one of the most delicious things you can eat. Strawberries can be grown as annuals—replanted each fall for fruiting in spring. This is the way commercial farms grow strawberries. Most gardeners prefer to grow strawberries as perennials via the mat and row system. If your plants grow well when left in the ground for several years, it is absolutely easier to treat them as perennials this way. If anthracnose is a problem and plants decline or don’t fruit, switch to the annual system of fall planting and spring harvesting.
Recommended VarietiesThere are June-bearing, everbearing, and day-neutral strawberries. As with many fruit crops, it is best to purchase plants from local growers. If you have u-pick farms in your area, check them out. They will often have plants for sale.
Because of the number of diseases that affect strawberries, buy resistant varieties when possible.
June-bearing: ‘All-Star’, ‘Guardian’, ‘Lateglow’, ‘Tioga’, ‘Totem’, ‘Puget Reliance’, ‘Ranier’.
Everbearing: ‘Fort Laramie’, ‘Ozark Beauty’, ‘Quinalt’.
Day neutral: ‘Tribute’, ‘Tristar’.
Use nets to ensure you’ll get to eat your strawberries before the birds do.
PlantingPlant bare-root strawberry plants each spring in March or April. Plant container-grown plants in May. The plants will flower and fruit in mid- to late-summer.
Strawberries grow best in full sun in well-drained, sandy soils with a pH of 5.5 to 6.5. They do not tolerate heavy clay soils or swampy, poorly drained soils very well.
To grow plants as perennials, plant strawberries 2 feet apart with 4 feet between rows. Allow runners to fill in the row to create a 2-foot mat with a final spacing of 2 feet between rows.
You can plant new strawberries in spring and allow them to send out runners throughout summer that will bloom and fruit the following year. You can also transplant larger plants in fall and allow them to produce fruits in spring.
If anthracnose is a problem, dig up plants after harvesting, and plant new plants each fall in a new area.
MaintenanceWater: Strawberries require extra water at very specific times during their growth cycle:
Right after planting
During peak harvest
After peak harvest when you’re encouraging new runners
In fall when fruit buds for the following year are forming
During these times, water the plants so that the soil is wet to a depth of 6 to 8 inches.
Mulch: All strawberries do best when mulched to conserve moisture, keep weeds under control, and keep the berries from touching the soil.
Fertilizer: Apply slow-release fertilizer at planting time or in spring and again in early summer. Apply a granular fertilizer in September.
Pest ProblemsThere are numerous pests and diseases that affect strawberries. Birds are the worst animal pests. Use nets to keep the birds from eating the fruits as they ripen. Multiple fungal and bacterial problems attack strawberry plants. If you think your plants could be afflicted, the best thing to do is to dig up a plant and take it to your local cooperative extension office for help with diagnosis and treatment solutions.
HarvestingHarvest when the fruits are colorful and can be easily pulled off the plant.