Canning is fun, economical, and a good way to preserve your precious produce. As more and more farmers’ markets make their way into urban centers, city dwellers are also discovering how rewarding it is to make seasonal treats last all year round. Besides the value of your labor, canning homegrown or locally grown food may save you half the cost of buying commercially canned food. Freezing food may be simpler, but most people have limited freezer space, whereas cans of food can be stored almost anywhere. And what makes a nicer, more thoughtful gift than a jar of homemade jam, tailored to match the recipient’s favorite fruits and flavors?
The nutritional value of home canning is an added benefit. Many vegetables begin to lose their vitamins as soon as they are harvested. Nearly half the vitamins may be lost within a few days unless the fresh produce is kept cool or preserved. Within 1 to 2 weeks, even refrigerated produce loses half or more of certain vitamins. The heating process during canning destroys from one-third to one-half of vitamins A and C, thiamin, and riboflavin. Once canned, foods may lose from 5 to 20 percent of these sensitive vitamins each year. The amounts of other vitamins, however, are only slightly lower in canned compared to fresh food. If vegetables are handled properly and canned promptly after harvest, they can be more nutritious than fresh produce sold in local stores.
The advantages of home canning are lost when you start with poor-quality foods, when jars fail to seal properly, when food spoils, and when flavors, texture, color, and nutrients deteriorate during prolonged storage. The tips that follow explain many of these problems and recommend ways to minimize them.
The high percentage of water in most fresh foods makes them very perishable. They spoil or lose their quality for several reasons:
• Growth of undesirable microorganisms—bacteria, molds, and yeasts
• Activity of food enzymes
• Reactions with oxygen
• Moisture loss
Microorganisms live and multiply quickly on the surfaces of fresh food and on the inside of bruised, insect-damaged, and diseased food. Oxygen and enzymes are present throughout fresh food tissues. Proper canning practices include:
• Carefully selecting and washing fresh foods
• Peeling some fresh foods
• Hot packing many foods
• Adding acids (lemon juice, citric acid, or vinegar) to some foods
• Using acceptable jars and self-sealing lids
• Processing jars in a boiling-water or pressure canner for the correct amount of time
Collectively, these practices remove oxygen; destroy enzymes; prevent the growth of undesirable bacteria, yeasts, and molds; and help form a high vacuum in jars. High vacuums form tight seals, which keep liquid in and air and microorganisms out.
TIP
A large stockpot with a lid can be used in place of a boiling-water canner for high-acid foods like tomatoes, pickles, apples, peaches, and jams. Simply place a rack inside the pot so that the jars do not rest directly on the bottom of the pot.
Food Acidity and Processing Methods
Whether food should be processed in a pressure canner or boiling-water canner to control botulism bacteria depends on the acidity in the food. Acidity may be natural, as in most fruits, or added, as in pickled food. Low-acid canned foods contain too little acidity to prevent the growth of these bacteria. Other foods may contain enough acidity to block their growth or to destroy them rapidly when heated. The term “pH” is a measure of acidity: the lower its value, the more acidic the food. The acidity level in foods can be increased by adding lemon juice, citric acid, or vinegar.
Low-acid foods have pH values higher than 4.6. They include red meats, seafood, poultry, milk, and all fresh vegetables except for most tomatoes. Most products that are mixtures of low-acid and acid foods also have pH values above 4.6 unless their ingredients include enough lemon juice, citric acid, or vinegar to make them acid foods. Acid foods have a pH of 4.6 or lower. They include fruits, pickles, sauerkraut, jams, jellies, marmalade, and fruit butters.
Although tomatoes usually are considered an acid food, some are now known to have pH values slightly above 4.6. Figs also have pH values slightly above 4.6. Therefore, if they are to be canned as acid foods, these products must be acidified to a pH of 4.6 or lower with lemon juice or citric acid. Properly acidified tomatoes and figs are acid foods and can be safely processed in a boiling-water canner.
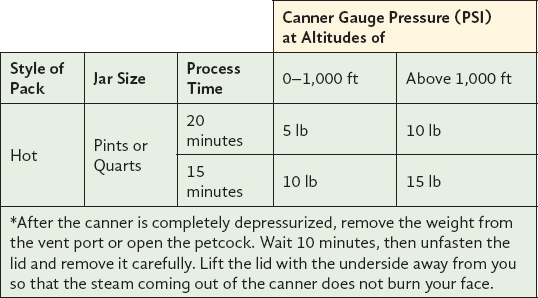
Botulinum spores are very hard to destroy at boiling-water temperatures; the higher the canner temperature, the more easily they are destroyed. Therefore, all low-acid foods should be sterilized at temperatures of 240 to 250°F, attainable with pressure canners operated at 10 to 15 PSIG. (PSIG means pounds per square inch of pressure as measured by a gauge.) At these temperatures, the time needed to destroy bacteria in low-acid canned foods ranges from 20 to 100 minutes. The exact time depends on the kind of food being canned, the way it is packed into jars, and the size of jars. The time needed to safely process low-acid foods in boiling water ranges from 7 to 11 hours; the time needed to process acid foods in boiling water varies from 5 to 85 minutes.
It is important to know your approximate elevation or altitude above sea level in order to determine a safe processing time for canned foods. Since the boiling temperature of liquid is lower at higher elevations, it is critical that additional time be given for the safe processing of foods at altitudes above sea level.

What Not to Do
Open-kettle canning and the processing of freshly filled jars in conventional ovens, microwave ovens, and dishwashers are not recommended because these practices do not prevent all risks of spoilage. Steam canners are not recommended because processing times for use with current models have not been adequately researched. Because steam canners may not heat foods in the same manner as boiling-water canners, their use with boiling-water processing times may result in spoilage. So-called canning powders are useless as preservatives and do not replace the need for proper heat processing.
It is not recommended that pressures in excess of 15 PSIG be applied when using new pressure-canning equipment.
Ensuring High-Quality Canned Foods
Examine food carefully for freshness and wholesomeness. Discard diseased and moldy food. Trim small diseased lesions or spots from food.
Can fruits and vegetables picked from your garden or purchased from nearby producers when the products are at their peak of quality—within 6 to 12 hours after harvest for most vegetables. However, apricots, nectarines, peaches, pears, and plums should be ripened 1 or more days between harvest and canning. If you must delay the canning of other fresh produce, keep it in a shady, cool place.
Fresh, home-slaughtered red meats and poultry should be chilled and canned without delay. Do not can meat from sickly or diseased animals. Put fish and seafood on ice after harvest, eviscerate immediately, and can them within 2 days.
Maintaining Color and Flavor in Canned Food
To maintain good natural color and flavor in stored canned food, you must:
• Remove oxygen from food tissues and jars
• Quickly destroy the food enzymes
• Obtain high jar vacuums and airtight jar seals.
Follow these guidelines to ensure that your canned foods retain optimal colors and flavors during processing and storage:
• Use only high-quality foods that are at the proper maturity and are free of diseases and bruises
• Use the hot-pack method, especially with acid foods to be processed in boiling water
• Don’t unnecessarily expose prepared foods to air; can them as soon as possible
• While preparing a canner-load of jars, keep peeled, halved, quartered, sliced, or diced apples, apricots, nectarines, peaches, and pears in a solution of 3 grams (3,000 milligrams) ascorbic acid to 1 gallon of cold water. This procedure is also useful in maintaining the natural color of mushrooms and potatoes and for preventing stem-end discoloration in cherries and grapes.
You can get ascorbic acid in several forms:
Pure powdered form—Seasonally available among canning supplies in supermarkets. One level teaspoon of pure powder weighs about 3 grams. Use 1 teaspoon per gallon of water as a treatment solution.
Vitamin C tablets—Economical and available year-round in many stores. Buy 500-milligram tablets; crush and dissolve 6 tablets per gallon of water as a treatment solution.
Commercially prepared mixes of ascorbic and citric acid—Seasonally available among canning supplies in supermarkets. Sometimes citric acid powder is sold in supermarkets, but it is less effective at controlling discoloration. If you choose to use these products, follow the manufacturer’s directions.
• Fill hot foods into jars and adjust headspace as specified in recipes
• Tighten screw bands securely, but if you are especially strong, not as tightly as possible
• Store the jars in a relatively cool, dark place, preferably between 50 and 70°F
• Can no more food than you will use within a year
Advantages of Hot Packing
Many fresh foods contain from 10 percent to more than 30 percent air. The length of time that food will last at premium quality depends on how much air is removed from the food before jars are sealed. The more air that is removed, the higher the quality of the canned product.
Raw packing is the practice of filling jars tightly with freshly prepared but unheated food. Such foods, especially fruit, will float in the jars. The entrapped air in and around the food may cause discoloration within 2 to 3 months of storage. Raw packing is more suitable for vegetables processed in a pressure canner.
Hot packing is the practice of heating freshly prepared food to boiling, simmering it 3 to 5 minutes, and promptly filling jars loosely with the boiled food. Hot packing is the best way to remove air and is the preferred pack style for foods processed in a boiling-water canner. At first, the color of hot-packed foods may appear no better than that of raw-packed foods, but within a short storage period both the color and flavor of hot-packed foods will be superior.
Whether food has been hot packed or raw packed, the juice, syrup, or water to be added to the foods should be heated to boiling before it is added to the jars. This practice helps to remove air from food tissues, shrinks food, helps keep the food from floating in the jars, increases vacuum in sealed jars, and improves shelf life. Preshrinking food allows you to add more food to each jar.
Controlling Headspace
The unfilled space above the food in a jar and below its lid is termed headspace. It is best to leave a ¼-inch headspace for jams and jellies, ½ inch for fruits and tomatoes to be processed in boiling water, and from 1 to 1¼ inches for low-acid foods to be processed in a pressure canner.
This space is needed for expansion of food as jars are processed and for forming vacuums in cooled jars. The extent of expansion is determined by the air content in the food and by the processing temperature. Air expands greatly when heated to high temperatures—the higher the temperature, the greater the expansion. Foods expand less than air when heated.
Jars and Lids
Food may be canned in glass jars or metal containers. Metal containers can be used only once. They require special sealing equipment and are much more costly than jars.
Mason-type jars designed for home canning are ideal for preserving food by pressure or boiling-water canning. Regular- and wide-mouthed threaded mason jars with self-sealing lids are the best choices. They are available in half-pint, pint, 1½-pint, and quart sizes. The standard jar mouth opening is about 2⅜ inches. Wide-mouthed jars have openings of about 3 inches, making them more easily filled and emptied. Regular-mouthed decorative jelly jars are available in 8-ounce and 12-ounce sizes.
With careful use and handling, mason jars may be reused many times, requiring only new lids each time. When lids are used properly, jar seals and vacuums are excellent.
Jar Cleaning
Before reuse, wash empty jars in hot water with detergent and rinse well by hand, or wash in a dishwasher. Rinse thoroughly, as detergent residue may cause unnatural flavors and colors. Scale or hard-water films on jars are easily removed by soaking jars several hours in a solution containing 1 cup of vinegar (5 percent acid) per gallon of water.
Sterilization of Empty Jars
Use sterile jars for all jams, jellies, and pickled products processed less than 10 minutes. To sterilize empty jars, put them right side up on the rack in a boiling-water canner. Fill the canner and jars with hot (not boiling) water to 1 inch above the tops of the jars. Boil 10 minutes. Remove and drain hot sterilized jars one at a time. Save the hot water for processing filled jars. Fill jars with food, add lids, and tighten screw bands.
Empty jars used for vegetables, meats, and fruits to be processed in a pressure canner need not be sterilized beforehand. It is also unnecessary to sterilize jars for fruits, tomatoes, and pickled or fermented foods that will be processed 10 minutes or longer in a boiling-water canner.
Lid Selection, Preparation, and Use
The common self-sealing lid consists of a flat metal lid held in place by a metal screw band during processing. The flat lid is crimped around its bottom edge to form a trough, which is filled with a colored gasket material. When jars are processed, the lid gasket softens and flows slightly to cover the jar-sealing surface, yet allows air to escape from the jar. The gasket then forms an airtight seal as the jar cools. Gaskets in unused lids work well for at least 5 years from the date of manufacture. The gasket material in older unused lids may fail to seal on jars.
It is best to buy only the quantity of lids you will use in a year. To ensure a good seal, carefully follow the manufacturer’s directions in preparing lids for use. Examine all metal lids carefully. Do not use old, dented, or deformed lids or lids with gaps or other defects in the sealing gasket.
After filling jars with food, release air bubbles by inserting a flat plastic (not metal) spatula between the food and the jar. Slowly turn the jar and move the spatula up and down to allow air bubbles to escape. Adjust the headspace and then clean the jar rim (sealing surface) with a dampened paper towel. Place the lid, gasket down, onto the cleaned jar-sealing surface. Uncleaned jar-sealing surfaces may cause seal failures.
Then fit the metal screw band over the flat lid. Follow the manufacturer’s guidelines on or enclosed with the box for tightening the jar lids properly.
• If screw bands are too tight, air cannot vent during processing, and food will discolor during storage. Overtightening also may cause lids to buckle and jars to break, especially with raw-packed, pressure-processed food.
• If screw bands are too loose, liquid may escape from jars during processing, seals may fail, and the food will need to be reprocessed.
Do not retighten lids after processing jars. As jars cool, the contents in the jar contract, pulling the self-sealing lid firmly against the jar to form a high vacuum. Screw bands are not needed on stored jars. They can be removed easily after jars are cooled. When removed, washed, dried, and stored in a dry area, screw bands may be used many times. If left on stored jars, they become difficult to remove, often rust, and may not work properly again.
Selecting the Correct Processing Time
When food is canned in boiling water, more processing time is needed for most raw-packed foods and for quart jars than is needed for hot-packed foods and pint jars.
To destroy microorganisms in acid foods processed in a boiling-water canner, you must:
• Process jars for the correct number of minutes in boiling water
• Cool the jars at room temperature
To destroy microorganisms in low-acid foods processed with a pressure canner, you must:
• Process the jars for the correct number of minutes at 240°F (10 PSIG) or 250°F (15 PSIG)
• Allow canner to cool at room temperature until it is completely depressurized
The food may spoil if you fail to use the proper processing times, fail to vent steam from canners properly, process at lower pressure than specified, process for fewer minutes than specified, or cool the canner with water.
Processing times for half-pint and pint jars are the same, as are times for 1½-pint and quart jars. For some products, you have a choice of processing at 5, 10, or 15 PSIG. In these cases, choose the canner pressure (PSIG) you wish to use and match it with your pack style (raw or hot) and jar size to find the correct processing time.
Recommended Canners
There are two main types of canners for heat processing home-canned food: boiling-water canners and pressure canners. Most are designed to hold seven 1-quart jars or eight to nine 1-pint jars. Small pressure canners hold four 1-quart jars; some large pressure canners hold eighteen 1-pint jars in two layers but hold only seven 1-quart jars. Pressure saucepans with smaller volume capacities are not recommended for use in canning. Treat small pressure canners the same as standard larger canners; they should be vented using the typical venting procedures.
Low-acid foods must be processed in a pressure canner to be free of botulism risks. Although pressure canners also may be used for processing acid foods, boiling-water canners are recommended because they are faster. A pressure canner would require from 55 to 100 minutes to can a load of jars; the total time for canning most acid foods in boiling water varies from 25 to 60 minutes.
A boiling-water canner loaded with filled jars requires about 20 to 30 minutes of heating before its water begins to boil. A loaded pressure canner requires about 12 to 15 minutes of heating before it begins to vent, another 10 minutes to vent the canner, another 5 minutes to pressurize the canner, another 8 to 10 minutes to process the acid food, and, finally, another 20 to 60 minutes to cool the canner before removing jars.
Boiling-Water Canners
These canners are made of aluminum or porcelain-covered steel. They have removable perforated racks and fitted lids. The canner must be deep enough so that at least 1 inch of briskly boiling water will cover the tops of jars during processing. Some boiling-water canners do not have flat bottoms. A flat bottom must be used on an electric range. Either a flat or ridged bottom can be used on a gas burner. To ensure uniform processing of all jars with an electric range, the canner should be no more than 4 inches wider in diameter than the element on which it is heated.
Using a Boiling-Water Canner
Follow these steps for successful boiling-water canning:
1. Fill the canner halfway with water.
2. Preheat water to 140°F for raw-packed foods and to 180°F for hot-packed foods.
3. Load filled jars, fitted with lids, into the canner rack and use the handles to lower the rack into the water; or fill the canner, one jar at a time, with a jar lifter.
4. Add more boiling water, if needed, so the water level is at least 1 inch above jar tops.
5. Turn heat to its highest position until water boils vigorously.
6. Set a timer for the minutes required for processing the food.
7. Cover with the canner lid and lower the heat setting to maintain a gentle boil throughout the processing time.
8. Add more boiling water, if needed, to keep the water level above the jars.
9. When jars have been boiled for the recommended time, turn off the heat and remove the canner lid.
10. Using a jar lifter, remove the jars and place them on a towel, leaving at least 1 inch of space between the jars during cooling.
Pressure Canners
Pressure canners for use in the home have been extensively redesigned in recent years. Models made before the 1970s were heavy-walled kettles with clamp-on lids. They were fitted with a dial gauge, a vent port in the form of a petcock or counterweight, and a safety fuse. Modern pressure canners are lightweight, thin-walled kettles; most have turn-on lids. They have a jar rack, a gasket, a dial or weighted gauge, an automatic vent or cover lock, a vent port (steam vent) that is closed with a counterweight or weighted gauge, and a safety fuse.
Pressure does not destroy microorganisms, but high temperatures applied for a certain period of time do. The success of destroying all microorganisms capable of growing in canned food is based on the temperature obtained in pure steam, free of air, at sea level. At sea level, a canner operated at a gauge pressure of 10 pounds provides an internal temperature of 240°F.
Air trapped in a canner lowers the inside temperature and results in under-processing. The highest volume of air trapped in a canner occurs when processing raw-packed foods in dial-gauge canners. These canners do not vent air during processing. To be safe, all types of pressure canners must be vented 10 minutes before they are pressurized.
To vent a canner, leave the vent port uncovered on newer models or manually open petcocks on some older models. Heating the filled canner with its lid locked into place boils water and generates steam that escapes through the petcock or vent port. When steam first escapes, set a timer for 10 minutes. After venting 10 minutes, close the petcock or place the counterweight or weighted gauge over the vent port to pressurize the canner.
Weighted-gauge models exhaust tiny amounts of air and steam each time their gauge rocks or jiggles during processing. The sound of the weight rocking or jiggling indicates that the canner is maintaining the recommended pressure and needs no further attention until the load has been processed for the set time. Weighted-gauge canners cannot correct precisely for higher altitudes, and at altitudes above 1,000 feet must be operated at a pressure of 15.
Check dial gauges for accuracy before use each year and replace if they read high by more than 1 pound at 5, 10, or 15 pounds of pressure. Low readings cause over-processing and may indicate that the accuracy of the gauge is unpredictable. If a gauge is consistently low, you may adjust the processing pressure. For example, if the directions call for 12 pounds of pressure and your dial gauge has tested 1 pound low, you can safely process at 11 pounds of pressure. If the gauge is more than 2 pounds low, it is unpredictable, and it is best to replace it. Gauges may be checked at most USDA county extension offices, which are located in every state across the country.
Handle gaskets of canner lids carefully and clean them according to the manufacturer’s directions. Nicked or dried gaskets will allow steam leaks during pressurization of canners. Gaskets of older canners may need to be lightly coated with vegetable oil once per year, but newer models are pre-lubricated. Check your canner’s instructions.
Lid safety fuses are thin metal inserts or rubber plugs designed to relieve excessive pressure from the canner. Do not pick at or scratch fuses while cleaning lids. Use only canners that have Underwriter’s Laboratory (UL) approval to ensure their safety.
Replacement gauges and other parts for canners are often available at stores offering canner equipment or from canner manufacturers. To order parts, list the canner model number and describe the parts needed.
Using a Pressure Canner
Follow these steps for successful pressure canning:
1. Put 2 to 3 inches of hot water in the canner. Place filled jars on the rack, using a jar lifter. Fasten canner lid securely.
2. Open petcock or leave weight off vent port. Heat at the highest setting until steam flows from the petcock or vent port.
3. Maintain high heat setting, exhaust steam 10 minutes, and then place weight on vent port or close petcock. The canner will pressurize during the next 3 to 5 minutes.
4. Start timing the process when the pressure reading on the dial gauge indicates that the recommended pressure has been reached or when the weighted gauge begins to jiggle or rock.
5. Regulate heat under the canner to maintain a steady pressure at or slightly above the correct gauge pressure. Quick and large pressure variations during processing may cause unnecessary liquid losses from jars. Weighted gauges on Mirro canners should jiggle about two or three times per minute. On Presto canners, they should rock slowly throughout the process.
When processing time is completed, turn off the heat, remove the canner from heat if possible, and let the canner depressurize. Do not force-cool the canner. If you cool it with cold running water in a sink or open the vent port before the canner depressurizes by itself, liquid will spurt from jars, causing low liquid levels and jar seal failures. Force-cooling also may warp the canner lid of older model canners, causing steam leaks.
Depressurization of older models should be timed. Standard-size heavy-walled canners require about 30 minutes when loaded with pints and 45 minutes with quarts. Newer thin-walled canners cool more rapidly and are equipped with vent locks. These canners are depressurized when their vent lock piston drops to a normal position.
1. After the vent port or petcock has been open for 2 minutes, unfasten the lid and carefully remove it. Lift the lid away from you so that the steam does not burn your face.
2. Remove jars with a lifter, and place on towel or cooling rack, if desired.
Cooling Jars
Cool the jars at room temperature for 12 to 24 hours. Jars may be cooled on racks or towels to minimize heat damage to counters. The food level and liquid volume of raw-packed jars will be noticeably lower after cooling because air is exhausted during processing and food shrinks. If a jar loses excessive liquid during processing, do not open it to add more liquid. As long as the seal is good, the product is still usable.
Testing Jar Seals
After cooling jars for 12 to 24 hours, remove the screw bands and test seals with one of the following methods:
Method 1: Press the middle of the lid with a finger or thumb. If the lid springs up when you release your finger, the lid is unsealed and reprocessing will be necessary.
Method 2: Tap the lid with the bottom of a teaspoon. If it makes a dull sound, the lid is not sealed. If food is in contact with the underside of the lid, it will also cause a dull sound. If the jar lid is sealed correctly, it will make a ringing, high-pitched sound.
Method 3: Hold the jar at eye level and look across the lid. The lid should be concave (curved down slightly at the center). If the center of the lid is either flat or bulging, it may not be sealed.
Reprocessing Unsealed Jars
If a jar fails to seal, remove the lid and check the jar-sealing surface for tiny nicks. If necessary, change the jar, add a new, properly prepared lid, and reprocess within 24 hours using the same processing time.
Another option is to adjust headspace in unsealed jars to 1½ inches and freeze jars and contents instead of reprocessing. However, make sure jars have straight sides. Freezing may crack jars with “shoulders.”
Foods in single unsealed jars could be stored in the refrigerator and consumed within several days.
Storing Canned Foods
If lids are tightly vacuum-sealed on cooled jars, remove screw bands, wash the lid and jar to remove food residue, then rinse and dry jars. Label and date the jars and store them in a clean, cool, dark, dry place. Do not store jars at temperatures above 95°F or near hot pipes, a range, a furnace; in an un-insulated attic; or in direct sunlight. Under these conditions, food will lose quality in a few weeks or months and may spoil. Dampness may corrode metal lids, break seals, and allow recontamination and spoilage.
Accidental freezing of canned foods will not cause spoilage unless jars become unsealed and recontaminated. However, freezing and thawing may soften food. If jars must be stored where they may freeze, wrap them in newspapers, place them in heavy cartons, and cover them with more newspapers and blankets.
Identifying and Handling Spoiled Canned Food
Growth of spoilage bacteria and yeast produces gas, which pressurizes the food, swells lids, and breaks jar seals. As each stored jar is selected for use, examine its lid for tightness and vacuum. Lids with concave centers have good seals.
Next, while holding the jar upright at eye level, rotate the jar and examine its outside surface for streaks of dried food originating at the top of the jar. Look at the contents for rising air bubbles and unnatural color.
While opening the jar, smell for unnatural odors and look for spurting liquid and cotton-like mold growth (white, blue, black, or green) on the top food surface and underside of lid. Do not taste food from a stored jar you discover to have an unsealed lid or that otherwise shows signs of spoilage.
All suspect containers of spoiled low-acid foods should be treated as having produced botulinum toxin and should be handled carefully as follows:
• If the suspect glass jars are unsealed, open, or leaking, they should be detoxified before disposal.
• If the suspect glass jars are sealed, remove lids and detoxify the entire jar, contents, and lids.
Detoxification Process
Carefully place the suspect containers and lids on their sides in an 8-quart-volume or larger stockpot, pan, or boiling-water canner. Wash your hands thoroughly. Carefully add water to the pot. The water should completely cover the containers with a minimum of 1 inch of water above the containers. Avoid splashing the water. Place a lid on the pot and heat the water to boiling. Boil 30 minutes to ensure detoxifying the food and all container components. Cool and discard lids and food in the trash or bury in the soil.
Thoroughly clean all counters, containers, and equipment including can opener, clothing, and hands that may have come in contact with the food or the containers. Discard any sponges or washcloths that were used in the cleanup. Place them in a plastic bag and discard in the trash.
 |
Country Tidbit Pectin is a substance that helps foods gel and it occurs naturally in many fruits. Some fruits have enough pectin that you don’t need to add much (if any) to make jelly out of them. How do you know which fruits contain pectin? Do the bounce test! Fruits that tend to bounce when you drop them a short distance (like blueberries, blackberries, and lemons) have more pectin than those that just squish when dropped (like strawberries or peaches). |
 |
The best apple varieties to use for apple butter include Jonathan, Winesap, Stayman, Golden Delicious, and Macintosh apples, but any of your favorite varieties will work. Don’t bother to peel the apples, as you will strain the fruit before cooking it anyway. This recipe will yield 8 to 9 pints.
Ingredients
• 8 lb apples
• 2 cups cider
• 2 cups vinegar
• 2¼ cups white sugar
• 2¼ cups packed brown sugar
• 2 Tbsp ground cinnamon
• 1 Tbsp ground cloves
Directions
1. Wash, stem, quarter, and core apples.
2. Cook slowly in cider and vinegar until soft. Press fruit through a colander, food mill, or strainer.
3. Cook fruit pulp with sugar and spices, stirring frequently. To test for doneness, remove a spoonful and hold it away from steam for 2 minutes. If the butter remains mounded on the spoon, it is done. If you’re still not sure, spoon a small quantity onto a plate. When a rim of liquid does not separate around the edge of the butter, it is ready for canning.
4. Fill hot into sterile half-pint or pint jars, leaving ¼-inch headspace. Quart jars need not be pre-sterilized.
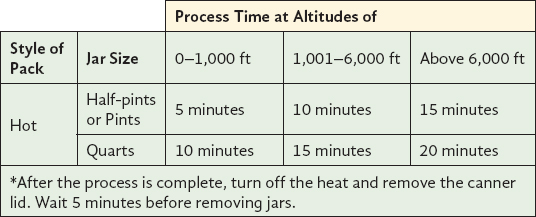
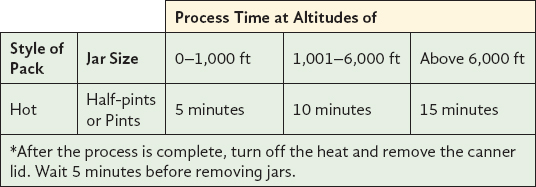
PROCESS TIMES FOR APPLE BUTTER IN A BOILING-WATER CANNER*
Strawberry-rhubarb jelly will turn any ordinary piece of bread into a delightful treat. You can also spread it on shortcake or pound cake for a simple and unique dessert. This recipe yields about seven half-pints.
Ingredients
• 1½ lb red stalks of rhubarb
• 1½ qt ripe strawberries
• ½ tsp butter or margarine to reduce foaming (optional)
• 6 cups sugar
• 6 oz liquid pectin
Directions
1. Wash and cut rhubarb into 1-inch pieces and blend or grind. Wash, stem, and crush strawberries, one layer at a time, in a saucepan. Place both fruits in a jelly bag or double layer of cheesecloth and gently squeeze juice into a large measuring cup or bowl.
2. Measure 3½ cups of juice into a large saucepan. Add butter and sugar, thoroughly mixing into juice. Bring to a boil over high heat, stirring constantly.
3. As soon as mixture begins to boil, stir in pectin. Bring to a full rolling boil and boil hard 1 minute, stirring constantly. Remove from heat, quickly skim off foam, and fill sterile jars, leaving ¼-inch headspace. Adjust lids and process.
PROCESS TIMES FOR STRAWBERRY-RHUBARB JELLY IN A BOILING-WATER CANNER*
Crushed tomatoes are great for use in soups, stews, thick sauces, and casseroles. Simmer crushed tomatoes with kidney beans, chili powder, sautéed onions, and garlic to make an easy pot of chili.
Directions
1. Wash tomatoes and dip in boiling water for 30 to 60 seconds or until skins split. Then dip in cold water, slip off skins, and remove cores. Trim off any bruised or discolored portions and quarter.
2. Heat 1/6 of the quarters quickly in a large pot, crushing them with a wooden mallet or spoon as they are added to the pot. This will exude juice. Continue heating the tomatoes, stirring to prevent burning.
3. Once the tomatoes are boiling, gradually add remaining quartered tomatoes, stirring constantly. These remaining tomatoes do not need to be crushed; they will soften with heating and stirring. Continue until all tomatoes are added. Then boil gently 5 minutes.
4. Add bottled lemon juice or citric acid to jars (see page 93). Add 1 teaspoon of salt per quart to the jars, if desired. Fill jars immediately with hot tomatoes, leaving ½-inch headspace. Adjust lids and process.
PROCESS TIMES FOR CRUSHED TOMATOES IN A DIAL-GAUGE PRESSURE CANNER*
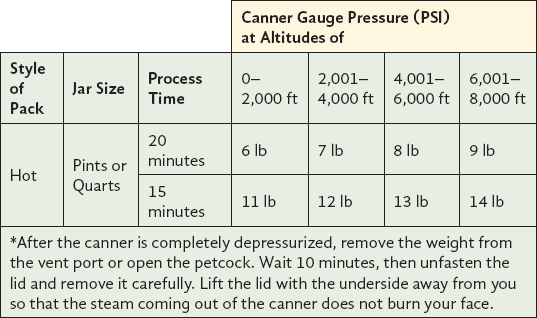
PROCESS TIMES FOR CRUSHED TOMATOES IN A WEIGHTED-GAUGE PRESSURE CANNER*
