If you have one of the latest aluminum body Macintosh laptops, you'll have a unique trackpad that doubles as a giant button. (If you have an older plastic Macintosh laptop, you'll have a standard trackpad with a single button.)
The trackpad accepts four different finger gestures:
One Finger Pressing one finger on the trackpad acts like clicking the left button of an ordinary mouse.
Two Fingers Sliding two fingers horizontally or vertically scrolls in that direction, much like clicking the horizontal or vertical scrollbars of a window.
Three Fingers Sliding three fingers horizontally across the trackpad (left or right) displays the next item in certain programs, such as iPhoto.
Four Fingers Sliding four fingers up displays the desktop (similar to pressing F11), while sliding four fingers down displays all windows (similar to pressing F9). Sliding four fingers left or right displays the Application Switcher.
To customize the trackpad, do this:
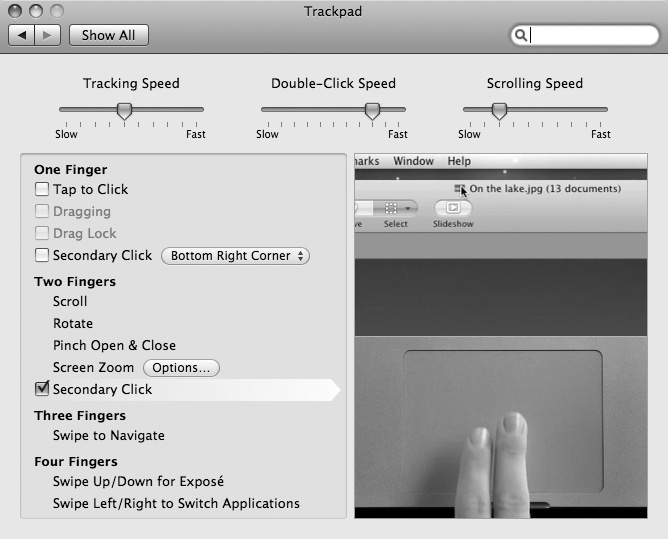
Click the Apple menu and choose System Preferences. The System Preferences window appears.
Click the Trackpad icon under the Hardware category. The Trackpad dialog appears, as shown in Figure 2-7. A video plays in the right pane to show you how different finger gestures work.
Select (or clear) the checkboxes under the One Finger category. (If you select the Secondary Click checkbox under the One Finger category, you can select a corner of the trackpad that you can press to mimic pressing the right mouse button of a typical mouse.)
Select (or clear) the Secondary Click checkbox under the Two Fingers category. (If you click the Screen Zoom Options button, you can define how to zoom in and out using two fingers.)
Click the close button of the Trackpad dialog when you're done customizing the Trackpad.